Jump to content


Photo

Mecom Lola GT


  • Please log in to reply
10 replies to this topic

#1 Thom

Thom

    Mid-Pack Racer

  • Full Member
  • PipPipPip
  • 125 posts
  • Joined: 06-March 10
  • Gender:Male
  • Location:Omaha

Posted 09 July 2025 - 09:47 PM

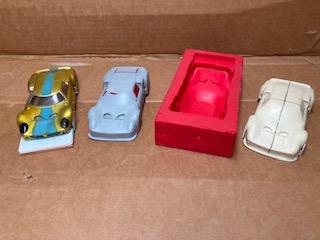
Seeing Ernie’s widebody Cheetah has prompted me to show my widebody Lola GT. Back in 1964 I had a Lola powered by a sidewinder Cox chassis and motor, it was my favorite car. Quite a few years later I began looking to build another one. Those bodies were darn near impossible to find and expensive when you did. I finally found a rough body and began the process of cleaning it up so that I could mould it and re-pop some. After doing that and building three 2-1/2” wide chassis to fit them, I got a wild hair to do a widebody that would fit a 3-1/4” flexi chassis. This is the outcome.


IMG_0095.jpeg


  • n.elmholt, Tex, Alchemist and 3 others like this
Thom Asay


#2 Martin

Martin

    Posting Leader

  • Full Member
  • PipPipPipPipPipPipPip
  • 4,420 posts
  • Joined: 22-February 09
  • Gender:Male
  • Location:US

Posted 12 July 2025 - 08:36 AM

Looks great.

Would love to see more of the making of the body process Thom.   


Martin Windmill

#3 Bill from NH

Bill from NH

    Age scrubs away speed!

  • Full Member
  • PipPipPipPipPipPipPipPip
  • 14,991 posts
  • Joined: 02-August 07
  • Gender:Male
  • Location:New Boston, NH

Posted 12 July 2025 - 08:49 AM

If memory serves me right, Champion of Chamblee used a Mecom Lola body on some of the 36D RTR cars in late 60s & early 70s. I don't have any photos, but I think that body was used during the 50 or so hour endurance run for those cars that covered in Car Model magazine during that period.


Bill Fernald
 
I intend to live forever!  So far, so good.  :laugh2:  :laugh2: 

#4 Thom

Thom

    Mid-Pack Racer

  • Full Member
  • PipPipPip
  • 125 posts
  • Joined: 06-March 10
  • Gender:Male
  • Location:Omaha

Posted 13 July 2025 - 10:20 PM

Gene/ZR1 has a great thread titled. “Thingie vacuum-forming and molding made easy”. It told me everything I needed to know. When I get home from the sports car races at Ozarks International Raceway i will try to post some pictures of the mold I used to form the wide bodied Lola.


  • Bill from NH likes this
Thom Asay

#5 Thom

Thom

    Mid-Pack Racer

  • Full Member
  • PipPipPip
  • 125 posts
  • Joined: 06-March 10
  • Gender:Male
  • Location:Omaha

Posted 16 July 2025 - 11:31 PM

The process in pictures was to start out with the old body on the left, make the red silicon mold, cast the resin on the right which gets divided 4 ways.


After adding about 1/4” you get a buck that looks like this to pull your clear body from.

I also added side rails between the flairs to fit the chassis and a nose piece to cover the guide flag.

Attached Images

  • IMG_0368.jpeg
  • IMG_0097.jpeg
  • IMG_0096.jpeg

  • Bill from NH, Alchemist and grooverunner like this
Thom Asay

#6 Thom

Thom

    Mid-Pack Racer

  • Full Member
  • PipPipPip
  • 125 posts
  • Joined: 06-March 10
  • Gender:Male
  • Location:Omaha

Posted 16 July 2025 - 11:39 PM

These are the repops of the original size body and the chassis I built to fit them, 2 3/4” wide.

Attached Images

  • IMG_0376.jpeg
  • IMG_0375.jpeg
  • IMG_0377.jpeg

  • vfr750, MSwiss, Bill from NH and 1 other like this
Thom Asay

#7 Alchemist

Alchemist

    Posting Leader

  • Full Member
  • PipPipPipPipPipPipPip
  • 2,748 posts
  • Joined: 11-November 09
  • Gender:Male
  • Location:Far, far away

Posted 03 August 2025 - 06:48 PM

Hi Thom,


I just wanted to let you know that besides, Gene aka ZR1, YOU also inspired me to finally start doing my own bodies.


If I may ask please, would you kindly explain what you mean when you stated:

cast the resin on the right which gets divided 4 ways.


and the other question is what did you do to the bottom of your mold - did you carve it out?


Thanks for sharing Thom!


Ernie


Ernie Layacan

#8 Thom

Thom

    Mid-Pack Racer

  • Full Member
  • PipPipPip
  • 125 posts
  • Joined: 06-March 10
  • Gender:Male
  • Location:Omaha

Posted 04 August 2025 - 08:24 AM

I slowly pour the resin into the red silicon mould to prevent bubbles of air, that happen when you stir the resin and hardener together, from forming in the surface of your shell. Then I drew square lines down the center and across the shell just behind the windscreen as seen in the pic on the right. I then sawed the shell into 4 pieces. 

I poured a thin slush shell , because it would be easier to cut and glue in between the 4 pieces to widen and lengthen shell to fit a flexi chassis. You can see that thin sections in the bottom view center front, back, and sides.

I cut pieces of green floral foam to push into the still liquid resin before it hardens to create the void. Gene/ZR1 shows this on the 3rd page of his thread listed above. After drilling the vent holes in strategic spots on the body shell to help the vacuum suck down in deep areas, I did take a Dremel tool to the under side in order to open up those areas giving the drilled holes better access to the vacuum. 

Hope that helps.


  • Alchemist likes this
Thom Asay

#9 Alchemist

Alchemist

    Posting Leader

  • Full Member
  • PipPipPipPipPipPipPip
  • 2,748 posts
  • Joined: 11-November 09
  • Gender:Male
  • Location:Far, far away

Posted 04 August 2025 - 01:17 PM

Hi Thom,


Thank you so much for taking the time to explain that procedure - it is appreciated!


If I may inquire please, what is your next body project?


Thanks again Thom - be well!


Ernie


Ernie Layacan

#10 Thom

Thom

    Mid-Pack Racer

  • Full Member
  • PipPipPip
  • 125 posts
  • Joined: 06-March 10
  • Gender:Male
  • Location:Omaha

Posted 04 August 2025 - 10:23 PM

Nothing in the works at this time scale wise. Spending all of my time restoring my XKE 1:1 body and running gear.


  • Alchemist likes this
Thom Asay

#11 Mark Onofri

Mark Onofri

    Posting Leader

  • Subscriber
  • PipPipPipPipPipPipPip
  • 2,629 posts
  • Joined: 18-November 20
  • Gender:Male
  • Location:Syracuse, NY

Posted 06 August 2025 - 02:48 PM

You can use a vacuum pump to remove ALL the air bubbles. Pain in the a$# but it's guaranteed to remove them.


Electric Dreams Online Shop