The Last Chassis I Built
#1
Posted 08 November 2008 - 09:41 AM
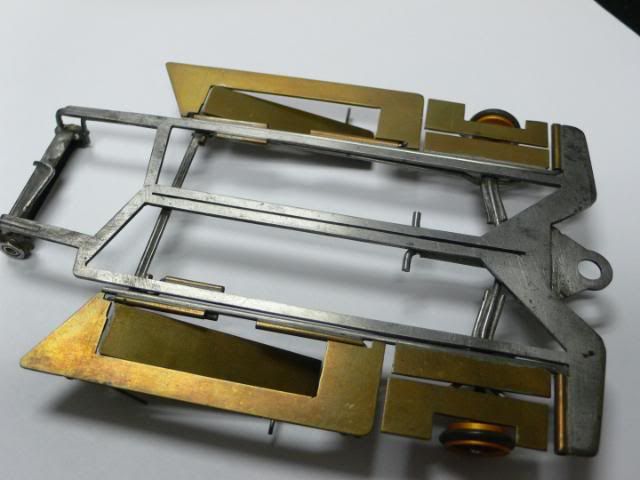
The amazing thing to me is how good a condition it is in. All the hinges work. When I built this I was already seriously in the RC end of the business and probably had not built anything for a year or more. Ernie who had not run for quite awhile wanted to run at Elmsford and begged me to make him something to run. Since I was out of it for awhile I used a lot of Paul Pfieffers ideas in this chassis. I was only going to build one, so it had to be good, so why not steal from the best.
The center is hand cut wit a dremel which was still the SOP at the time.
There are removeable pan weights which are held in place with little pieces of .032 wire that is removable and which is simply held in place with tape. The tape marks are still on the top of the pans. Another interesting feature is that the cross piece floats. The .032 wire simply goes into the .063 tubing on top of the plumber rails.
Honestly I do not remember much about building it. I though you guys might like to see it though. Now I have to locate a trinity black box motor to throw in it...
Thanks Bob!
Anthony 'Tonyp' Przybylowicz
5/28/50-12/20/21
Requiescat in Pace
#2
Posted 08 November 2008 - 09:46 AM
That is one helluva beautiful chassis!, and I know a teensey bit about cutting steel with a Dremel...even more impressive! As for interesting bits...it looks like the front wheels (which are themselves beautifully executed) carry their own sub pans when they articulate. What's that all about? Anyway, just great craftsmanship!
-john
#3
Posted 08 November 2008 - 09:51 AM
Philippe de Lespinay
#4
Posted 08 November 2008 - 09:51 AM
Anthony 'Tonyp' Przybylowicz
5/28/50-12/20/21
Requiescat in Pace
#5
Posted 08 November 2008 - 09:52 AM
Anthony 'Tonyp' Przybylowicz
5/28/50-12/20/21
Requiescat in Pace
#6
Posted 08 November 2008 - 09:59 AM
Philippe de Lespinay
#7
Posted 08 November 2008 - 11:31 AM
Yoda, give it a tumble and post the picture!!PDL, what do you want to trade for it?
John Chas Molnar
"Certified Newark Wise Guy since 1984" (retired)
"Certified Tony P Chassis God 2007.2023
Retro Chassis Designer-Builder
#8
Posted 08 November 2008 - 11:43 AM
-john
#9
Posted 08 November 2008 - 12:26 PM
thanks for that chassis pic. Memories!
John, you can do that in a single cut by lubing the cut continuously with zero weight sythetic oil! Or spit will do. the discs fail because of heat.
Those were the most fun part of the chassis, the steel cutting.
Fate
3/6/48-1/1/12
Requiescat in Pace
#10
Posted 08 November 2008 - 03:05 PM
-john
#11
Posted 08 November 2008 - 04:27 PM
Did you use 60/40 solder, soft silver (Sta-brite) solder or a combination of both on the frame?
8/19/54-8/?/21
Requiescat in Pace
#12
Posted 09 November 2008 - 11:40 AM
John, I always just used a sharpie to draw the line. I am glad, though, that you are getting into this. some fun.
As discussed earlier, It has been the most difficult part of racing from 74 through 04, that bulding just wasn't allowed in programs.
Frustrating.
Fate
3/6/48-1/1/12
Requiescat in Pace
#13
Posted 09 November 2008 - 02:11 PM
...it's cutting a lazer-striaght slot like Tony that's the problem
I've found that if I mark the cut line with a Sharpie and then hold a piece of .032 or .040 brass (or steel) on the line as a guide with the disc right up against the edge of the brass I can make pretty straight cuts.
Don Weaver
Don Weaver
A slot car racer who never grew up!
The supply of government exceeds demand.
L.H. Lapham
If the brain-eating amoeba invades Washington
it will starve to death...
#14
Posted 09 November 2008 - 03:19 PM
Dremel in a drill press stand and running the steel on it's edge back & forth along the bed.
Along with straight cuts, by flipping the steel back and forth on the opposite edges, the rails were always symetrical and the same width
on either side.
Mike Swiss
Inventor of the Low CG guide flag 4/20/18
IRRA® Components Committee Chairman
Five-time USRA National Champion (two G7, one G27, two G7 Senior)
Two-time G7 World Champion (1988, 1990), eight G7 main appearances
Eight-time G7 King track single lap world record holder
17B West Ogden Ave., Westmont, IL 60559, (708) 203-8003, mikeswiss86@hotmail.com (also my PayPal address)
Note: Send all USPS packages and mail to: 692 Citadel Drive, Westmont, Illinois 60559
#15
Posted 09 November 2008 - 05:59 PM
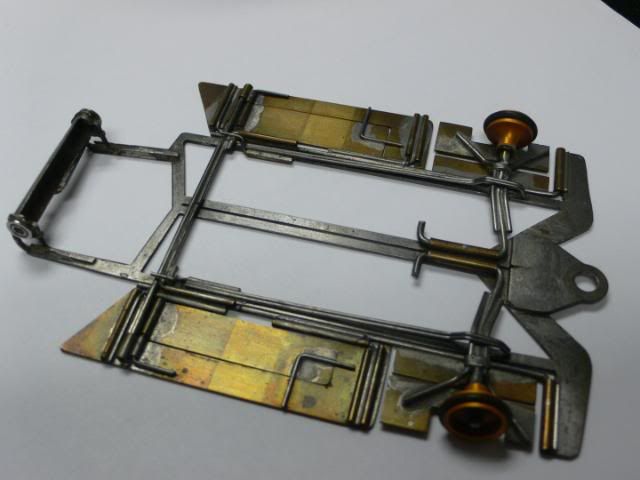
I am sorry to hijack your thread, but I have a very similar chassis and I wondered if someone here could identify it for me.
It was given to me by a neighbour here in England about 15 years ago, I have asked around, but no one seems to know who made it.
Regards
Joel
#16
Posted 09 November 2008 - 06:14 PM
Tony the Herman pans (name may vari according to location) that were attched to the front wheel section were a exact copy of Paul Phifers 83 winning Nats chassis. The "Herman pans" were attached for weight distribution as mentioned but mostly to alter the weight to the center section. The springs were an important part of dampening and also limiters so the "L" axle would not fold back upon thierselves. also the forced the wheels down below the chassis when tilting in the corners. It also took the weight off the pans, plumber rails and placed it on the nose (hindge) of the center section. The springs also worked as a poor mans iso with bite bar interaction (if the bite bar was further forward). This was also the age of what was called the take apart chassis. The rear cross bar usually pulled out of a retaining tube) and the parts, such as each plummer bar plus pans could be dissaembled and altered at will. Some just soldered the bite bar tubes to the plumber rail without the take aart peature but gave it slop. The period correct motor is hard to pegg as there were so many motor changes in those years as cobalts redefined what cans were used. Ernie may have been using his narrowed C can polymer peanut motor or a Trinity square can cobalt motor. Pretty sure it then it was the Trinity Square can. Possibly even a PK/Camen RM640. It was'nt to far after 84 the one piece tripod shuttle or perimiter chassis came about
Mike is correct about cutting Jigs for spring steel. In the NW we used a Jig originating from an idea by a local racer Bob Maclehose. The unit involved using a large Drawer slide to attach the dremel tool to. It was allowed to rock a bit up and down. The bed that held the steel sheet was floated by using a minimum of 4 springs attached to base with adjustable wing bolts and "T" bolts. To that adjustable bed another two bolts clamped a bar that held down the steel sheet. Others had direct threaded beds that could be adjusted but I found the free floating sping adjusted dampend the vibration better while cutting.
The object was to cut in very light paths which were absolutly straight. I was able with practice to cut a center section with about one to two disks. I could rubber cement a pattern on a steel spring steel plate. The object to go almost to the end of your pattern but not to each edge of you pattern. You would only break one disk if you forced it down too hard in swipes. Mostly the disks got too small. Save those disks for later . Those worked for finishing up or for finnishing a cut edge.
I still use this to this day so that is thirty years of building since making this in 1980-81. I have cut out upward of 50-60 center section or perimiter or steel scale one piece chassis and only screwed up about 5 by this method (cut too thin a rails) . Pehaps Rick or someone can improve on the idea with a machined unit.
Definately cut dry with very light cuts. Yes heat is your disk disinegrator. Cut at a high speed as that can assist th cut cleanlyness the ball bearing Dremel is a must. Absolutly do not wet or lube your cut wet. That weakends the disk and it will either explode or diintergrate quickly.
Raymond Batchelor
#17
Posted 10 November 2008 - 07:58 AM
Hi Tony,
Did you use 60/40 solder, soft silver (Sta-brite) solder or a combination of both on the frame?
I always just used and still use just 60/40 solder. I never use silver solder. I think the 60/40 flexes better.
Anthony 'Tonyp' Przybylowicz
5/28/50-12/20/21
Requiescat in Pace
#18
Posted 10 November 2008 - 08:03 AM
Anthony 'Tonyp' Przybylowicz
5/28/50-12/20/21
Requiescat in Pace
#19
Posted 12 November 2008 - 11:30 PM
Hi Tony, When you say it flexes better: is this from a performance or durability perspective? Thanks, SandyI always just used and still use just 60/40 solder. I never use silver solder. I think the 60/40 flexes better.
#20
Posted 13 November 2008 - 08:02 AM
Anthony 'Tonyp' Przybylowicz
5/28/50-12/20/21
Requiescat in Pace
#21
Posted 14 November 2008 - 04:16 PM
I think when you solder 2 rails together with silver solder along the length and do the same with 60/40 the 60/40 flexes more. I never built a silver soldered car that handled as well as one with 60/40. Something I got from Bob Emott when I started racing... It could be in my head but it works for me.
60/40 cars were as good as they were going to get right out of the box. A silver solder car needed to be raced about 6 times before the flex would come in. In the days of "The Trick Chassis Of The Week", you needed to 60/40 them.
P, I gotta Black Box Motor in good shape if you need it. I don't remember what it has for an arm, it needs to be tracked down.
"Just once I want my life to be like an '80s movie,
preferably one with a really awesome musical number for no apparent reason."
#22
Posted 14 November 2008 - 06:07 PM
I asked something along the same lines a while ago.
10 years ago I got the 3% silver in .031 size in a 3 lb. roll and have been using it for everything but building chassis cause I havent built a chassis in YEARS..... I have now built 2 retro chassis and can see the difference in the solder look & flow along a solder joint. The silver is much stronger in that I have not spun a pinion since using it and have noted that piano wire will bend long before the solder joint breaks. Now I know the difference! I have noted that my new double wire frame is not as flexable as the old anglewinder double wire frames. To keep the silver. I guess I'll go smaller wire and give it a try..
mmmmmm
PHIL
#23
Posted 14 November 2008 - 06:34 PM
I guess that explains why I need so much horse power in my irons to get this stuff to flow!
11/27/57-8/12/22
Requiescat in Pace
#24
Posted 14 November 2008 - 08:33 PM
[/quote]
Yeah... Now that you say something. I have noticed that I have had to turn the dial higher. I lost my UNGER after 10 years 8 months ago......Just mite be a reason why and why my new one has problems where the pins go threw to hold the tip to the heater.
OL'PHRTS RACIN TEAM
PHIL
#25
Posted 15 November 2008 - 10:55 AM
Remember, two wrongs don't make a right... but three lefts do! Only you're a block over and a block behind.