

I am in the 3rd year since my slot car rebirth. I've relearned a few of the things I used to do. I've done a thing or two for the first time. I have other things I want to learn to do. Winding/rewinding/dewinding arms is one of them. It will be late in 2009 before I get around to it, but I want to begin with removing some winds from my stock Pittman 196B, possibly applying some epoxy and/or tying off the comm wires, and then static balancing it the old-school way.... balanced on two razor blades. I'll have to come back to this thread at that time, but why not ask the questions now(?). The first thing would be to remove a few winds from the arm to hop it up a bit; I'm not looking to set lap records with it, just get around the track a little faster. HOW are the winds removed? What is the process? Is tying off the comm wires in this meager effort worth it? How does one construct the simple balancing "jig", using two razor blades?

Dewinding Armatures - 101
Started by
Tex
, Jan 02 2009 04:14 PM
22 replies to this topic
#1

Tex
-
- Full Member
-

- 9,248 posts Joined: 07-July 06
Grand Champion Poster
- Gender:Male
- Location:Denton, TX
Posted 02 January 2009 - 04:14 PM
Richard L. Hofer
Remember, two wrongs don't make a right... but three lefts do! Only you're a block over and a block behind.
Remember, two wrongs don't make a right... but three lefts do! Only you're a block over and a block behind.
#2
havlicek
-

- Subscriber
-
- 11,198 posts Joined: 20-August 07
OCD Rewinder
- Gender:Male
- Location:NY
Posted 02 January 2009 - 05:14 PM
Hi Tex,
Dewinding was the first thing I did as a kid (as did many) to get a bit more oomph out of a motor. I never did much of anything with Pittmans, but the process is the same. You look at the arm and especially where the magnet wire is soldered to the com, you can see which way the wire is wrapped. Disconnect the wire from the com at the first pole by snipping it with a pair of small scizzors or whatever implement of destruction you have handy and slowly begin to unwrap it. You have to be careful because the skinny wire they used at the factory is easy to break if you tug too hard. Winds can get stuck down in between lower wraps by sinking between them and some can be difficult to get out without breaking the wire. There's also often a lacquer coating that can make things difficult for the topmost layers of wire. When you get off the amount of wire you want to remove, leave it longer than you think you'll need and snip off the excess. Proceed to the next pole and so on. When done, just strip off some of the lacquer coating on the wire where it will pass over the comm tabs. To hold it tight over the tab, just run the excess wire down the side of the arm and wrap it around the bottom of the shaft. Solder it back on to the tabs and then wiggle it back and forth (not up and down) until it breaks right at the side of the tab where it's less flexible. Probably an excellent solder to use for this would be "Solder-it" silver-bearing paste. You can apply a perfect little dab (solder and flux combined) and then heat it afterwards. It will flow at around 450°F, but only remelt at around 600°F (certainly fine for this arm) and allows for precision...nice stuff.
As for the balancing, some people use a glob of modelling clay or even Play-Doh and just stick razor blades in the stuff. That's a crude way to go about it and making adjustments is a nightmare of trial and error. A block of wood with two parrallel slots about 1 1/2" apart is MUCH better and you can either use shim stock to level it...or install a set of screws to raise or lower one side at a time. I had a piece of 1/2" ply that I cut the slots in with a Dremel and had installed brass threaded inserts and thumb screws. Later on, I asked Rick (Rgeo) to make me one that was more substantial and he made this:
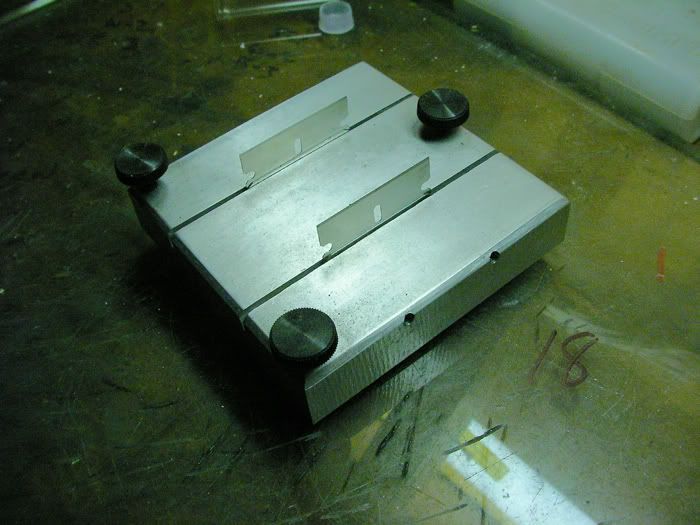
It even has set screws on the side to lock the blades in with (!) and the extra mass of the thick aluminum he used is great. What happens here is that you do an initial setup where the armature won't just roll off the blades and as you get closer and closer to "balance", you shouldn't have to adjust it further. You have to be careful when drilling the arm so as not to slip and ruin the winds by hitting them with the bit...a good drill with a chuck that has as little runout as possible will help. Even better is to set up a "jig/cradle" that will support the arm with one pole at a time perfectly at the top and centered under a drill press. I think Rick T has something like this and it's (like everything he does) by far the safest and most "pro" way to go about it. You could even set a depth stop if using a drill press to prevent you from going to deep and hitting the winds and/or weakening the arm.
Tying the arm is never a bad thing to do and yours shouldn't require any special epoxy...just don't use the 5-minute stuff as it's a little less heat-resistant than the 45 minute stuff. For a mild older arm, you could use regular cotton thread or even dental floss...it's doubtful that you'd ever approach temperatures that would cook the thread. I don't know that tying the thing would be absolutely necessary though. I hope this helps.
-john
Dewinding was the first thing I did as a kid (as did many) to get a bit more oomph out of a motor. I never did much of anything with Pittmans, but the process is the same. You look at the arm and especially where the magnet wire is soldered to the com, you can see which way the wire is wrapped. Disconnect the wire from the com at the first pole by snipping it with a pair of small scizzors or whatever implement of destruction you have handy and slowly begin to unwrap it. You have to be careful because the skinny wire they used at the factory is easy to break if you tug too hard. Winds can get stuck down in between lower wraps by sinking between them and some can be difficult to get out without breaking the wire. There's also often a lacquer coating that can make things difficult for the topmost layers of wire. When you get off the amount of wire you want to remove, leave it longer than you think you'll need and snip off the excess. Proceed to the next pole and so on. When done, just strip off some of the lacquer coating on the wire where it will pass over the comm tabs. To hold it tight over the tab, just run the excess wire down the side of the arm and wrap it around the bottom of the shaft. Solder it back on to the tabs and then wiggle it back and forth (not up and down) until it breaks right at the side of the tab where it's less flexible. Probably an excellent solder to use for this would be "Solder-it" silver-bearing paste. You can apply a perfect little dab (solder and flux combined) and then heat it afterwards. It will flow at around 450°F, but only remelt at around 600°F (certainly fine for this arm) and allows for precision...nice stuff.
As for the balancing, some people use a glob of modelling clay or even Play-Doh and just stick razor blades in the stuff. That's a crude way to go about it and making adjustments is a nightmare of trial and error. A block of wood with two parrallel slots about 1 1/2" apart is MUCH better and you can either use shim stock to level it...or install a set of screws to raise or lower one side at a time. I had a piece of 1/2" ply that I cut the slots in with a Dremel and had installed brass threaded inserts and thumb screws. Later on, I asked Rick (Rgeo) to make me one that was more substantial and he made this:
It even has set screws on the side to lock the blades in with (!) and the extra mass of the thick aluminum he used is great. What happens here is that you do an initial setup where the armature won't just roll off the blades and as you get closer and closer to "balance", you shouldn't have to adjust it further. You have to be careful when drilling the arm so as not to slip and ruin the winds by hitting them with the bit...a good drill with a chuck that has as little runout as possible will help. Even better is to set up a "jig/cradle" that will support the arm with one pole at a time perfectly at the top and centered under a drill press. I think Rick T has something like this and it's (like everything he does) by far the safest and most "pro" way to go about it. You could even set a depth stop if using a drill press to prevent you from going to deep and hitting the winds and/or weakening the arm.
Tying the arm is never a bad thing to do and yours shouldn't require any special epoxy...just don't use the 5-minute stuff as it's a little less heat-resistant than the 45 minute stuff. For a mild older arm, you could use regular cotton thread or even dental floss...it's doubtful that you'd ever approach temperatures that would cook the thread. I don't know that tying the thing would be absolutely necessary though. I hope this helps.
-john
John Havlicek
#3
Bill from NH
-

- Full Member
-
- 14,938 posts Joined: 02-August 07
Age scrubs away speed!
- Gender:Male
- Location:New Boston, NH
Posted 02 January 2009 - 07:59 PM
Utility knife blades also work for a balancing jig if you don't find the proper razor blades. And they'll be a bit longer. 
Bill Fernald
I intend to live forever! So far, so good.
I intend to live forever! So far, so good.
#4
Phil Irvin
-

- Full Member
-
- 1,764 posts Joined: 21-July 08
Checkered Flag in Hand
- Gender:Male
- Location:Wesley Chapel, FL
Posted 03 January 2009 - 02:23 AM
JOHN,
Your better than the average bear....You got a hi $$ balancer. I found a plastic box I epoxyed the razors to the inside. I knew my table wasn't flat so I used old cards to raise one side..Cut myself a time or two looking for it too...Till I found some cork....With out the bottle attached...Darn

PHIL

#5
havlicek
-
- Subscriber
-
- 11,198 posts Joined: 20-August 07
OCD Rewinder
- Gender:Male
- Location:NY
Posted 03 January 2009 - 07:03 AM
Yep Bill, they DO have a longer bearing surface which can be a help. The Stanley ones I tried don't seem to have quite the same fine edge as Stanley's single-edge razor blades out of the box which makes sense for their intended purpose. They do work though! Rick showed a balancing block he uses that works with gauge pins which is safer than razor blades and I would think that if those pins are polished nicely they would work really well also since only the tiniest surface area is in contact between two "rods" (the arm shaft and the gauge pins) at right angles to each other.
Phil, I know the balancing block Rick made is kind of a luxury item , but it sure does help get things done fast(er).
-john
Phil, I know the balancing block Rick made is kind of a luxury item
, but it sure does help get things done fast(er).-john
John Havlicek
#6
Prof. Fate
-

- Member at Peace
-
- 6,580 posts Joined: 20-February 06
a dearly-missed departed member
- Gender:Male
- Location:Salt Lake City, UT
Posted 03 January 2009 - 01:08 PM
Hi
The pittman 196b isn't a good candidate for Dewinding.
Backstory, in the early days the defination of "12volt" had a vague industrial application but not in ours. Mabuchi would traditionally use a very small guage wire and then "dewind" them.
For example, current "S"cans start with the slowest model with having some 300 turns of (I think) 38 wire. And the hotter motors, down to the Fly/scalex application, were just "dewound" to 160turns.
The Pittman 196 started as a "12volt" railroad motor inthe 195 model. The application was that the thing would run forever at the rating in a train layout at moderate current use. The "slot car" variants were actually a "dewind" in effect and the 196B was actually too hot for any train application. They actually went to bigger wire and a proper wind for the frame/magnet.
Rewing to bigger wire is the thing, the 196b wont be better "dewound". The old SP500 types really do benefit.
But the real thing is that just jumping into the rewind is no harder than doing the rewind and lets you "cut to the chase".
Fate
Rocky Russo
3/6/48-1/1/12
Requiescat in Pace
3/6/48-1/1/12
Requiescat in Pace
#7
Tex
-
- Full Member
-
- 9,248 posts Joined: 07-July 06
Grand Champion Poster
- Gender:Male
- Location:Denton, TX
Posted 03 January 2009 - 04:27 PM
Hi
The pittman 196b isn't a good candidate for Dewinding.
Rewing to bigger wire is the thing, the 196b wont be better "dewound". The old SP500 types really do benefit.
But the real thing is that just jumping into the rewind is no harder than doing the rewind and lets you "cut to the chase".
Fate
Great replies all!
Rocky,
You say dewinding the 196B wouldn't improve it any; just for my education, what WOULD be the result of dewinding the 196B?
Richard L. Hofer
Remember, two wrongs don't make a right... but three lefts do! Only you're a block over and a block behind.
Remember, two wrongs don't make a right... but three lefts do! Only you're a block over and a block behind.
#8
Pablo
-

- Administrator
-
- 18,491 posts Joined: 20-February 06
Builder
- Gender:Male
- Location:Cleveland, Tennessee
Posted 03 January 2009 - 08:37 PM
As long as you are playing with the old wires, why not go all out and rewind it, then epoxy it, Tex ?

Paul Wolcott
#9
havlicek
-
- Subscriber
-
- 11,198 posts Joined: 20-August 07
OCD Rewinder
- Gender:Male
- Location:NY
Posted 03 January 2009 - 09:35 PM
Tex,
...it would probably spin faster, might lose some torque and run a bit warmer. Depends on how much wire you take off, but it's doubtful that the motor has been totally optimized from the factory and no improvement is possible.
-john
You say dewinding the 196B wouldn't improve it any; just for my education, what WOULD be the result of dewinding the 196B?
...it would probably spin faster, might lose some torque and run a bit warmer. Depends on how much wire you take off, but it's doubtful that the motor has been totally optimized from the factory and no improvement is possible.
-john
John Havlicek
#10
Tex
-
- Full Member
-
- 9,248 posts Joined: 07-July 06
Grand Champion Poster
- Gender:Male
- Location:Denton, TX
Posted 03 January 2009 - 11:41 PM
As long as you are playing with the old wires, why not go all out and rewind it, then epoxy it, Tex ?
Baby steps, Paul.
Just wanna start with the simplest of modifications when first delving into the black art of "all things winding related".Then again, if there wouldn't be any improvement, why NOT obtain another suitable arm blank and wind one up? "Securing a suitable arm blank" might be the hard part. I guess I could keep my original 196B in service and buy another 196B(or 196A?) to work on the arm(?). Yes, that just may be the ticket!
Richard L. Hofer
Remember, two wrongs don't make a right... but three lefts do! Only you're a block over and a block behind.
Remember, two wrongs don't make a right... but three lefts do! Only you're a block over and a block behind.
#11
Tex
-
- Full Member
-
- 9,248 posts Joined: 07-July 06
Grand Champion Poster
- Gender:Male
- Location:Denton, TX
Posted 03 January 2009 - 11:42 PM
Tex,
...it would probably spin faster, might lose some torque and run a bit warmer.-john
Is that the "usual" effect? Is there always a tradeoff of one performance factor vs. another?
Richard L. Hofer
Remember, two wrongs don't make a right... but three lefts do! Only you're a block over and a block behind.
Remember, two wrongs don't make a right... but three lefts do! Only you're a block over and a block behind.
#12
havlicek
-
- Subscriber
-
- 11,198 posts Joined: 20-August 07
OCD Rewinder
- Gender:Male
- Location:NY
Posted 04 January 2009 - 08:21 AM
My physics teacher used to say that there's no such thing as a free lunch Tex. The ultimate performance of a motor at any given voltage is a balance between the magnetic field strength, the arm wind and the components ability to work efficiently...brushes/com/bearings etc. DC motors can be looked at as not really having a specific voltage...but a life expectancy at a specific voltage. You could take a 6V motor and run it at 9V for shorter periods of time with greater performance but an increased chance of it smoking. I have no idea what this Pittman runs like at 12V, but by dewinding it you're in effect making it say a 10V motor. This is a simplification of what's really going on because I'm not an electrical engineer, so I work with broad generalities Same thing applies for say an old Mabuchi can. They may have been quite reliable (or not  ) as they came from the factory, but they were wound to be really "safe" at 12VDC. As the winds got hotter, the limits or faults of the rest of the can...starting with the endbell and then on to the magnets, com, brushes, springs and bearings became a problem.
Anyway, it's a pretty safe bet that your old Pittman could see some sort of increase in performance by a conservative dewind, balance and epoxy after putting it back together carefully and assuming the magnet is hokey-dokey. I would have no idea at all what a "safe" dewind would be, but I think that we used to start somewhere around removing 10% of what was on a stock arm and work from there. For running afterwards, you'd have to do a few laps and see how the thing was holding up to gauge how much you can push the thing...as well as to see how whatever gearing you have works with the wind so the motor isn't working too hard. Generally, you can get more RPMs at a given voltage with the same setup but at the cost of torque and some additional heat. Sometimes those tradeoffs aren't a problem and are worth the effort...sometimes not, in that way this is all a LOT like hot-rodding.
-john
Same thing applies for say an old Mabuchi can. They may have been quite reliable (or not ) as they came from the factory, but they were wound to be really "safe" at 12VDC. As the winds got hotter, the limits or faults of the rest of the can...starting with the endbell and then on to the magnets, com, brushes, springs and bearings became a problem.Anyway, it's a pretty safe bet that your old Pittman could see some sort of increase in performance by a conservative dewind, balance and epoxy after putting it back together carefully and assuming the magnet is hokey-dokey. I would have no idea at all what a "safe" dewind would be, but I think that we used to start somewhere around removing 10% of what was on a stock arm and work from there. For running afterwards, you'd have to do a few laps and see how the thing was holding up to gauge how much you can push the thing...as well as to see how whatever gearing you have works with the wind so the motor isn't working too hard. Generally, you can get more RPMs at a given voltage with the same setup but at the cost of torque and some additional heat. Sometimes those tradeoffs aren't a problem and are worth the effort...sometimes not, in that way this is all a LOT like hot-rodding.
-john
John Havlicek
#13
Bill from NH
-
- Full Member
-
- 14,938 posts Joined: 02-August 07
Age scrubs away speed!
- Gender:Male
- Location:New Boston, NH
Posted 04 January 2009 - 08:52 AM
Tex, if you just want to dewind something to see how it improves performance, or how it doesn't, why not use a Chinese 16D can motor. They are plentiful, parts are cheap, & they're readily available. Who knows, they might even unwrap easier than a vintage Pittman. I don't own any open frame motors, such as your 196, but if I did, I probably would find something else to screw around with.
Bill Fernald
I intend to live forever! So far, so good.
I intend to live forever! So far, so good.
#14
havlicek
-
- Subscriber
-
- 11,198 posts Joined: 20-August 07
OCD Rewinder
- Gender:Male
- Location:NY
Posted 04 January 2009 - 09:40 AM
Good point Bill!
-john
-john
John Havlicek
#15
TSR
-

- Full Member
-
- 42,304 posts Joined: 02-February 06
The Dokktor is IN
- Gender:Male
- Location:Marxifornia
Posted 04 January 2009 - 10:37 AM
10 turns per pole off a standard Mabuchi FT26 ("26D") will transform that rocket into a missile.
Use high-temp varnish lover the windings after re-soldering the comm tabs with high-temp solder.
That was our speed secret in 1967...
Use high-temp varnish lover the windings after re-soldering the comm tabs with high-temp solder.
That was our speed secret in 1967...
Philippe de Lespinay
#16
havlicek
-
- Subscriber
-
- 11,198 posts Joined: 20-August 07
OCD Rewinder
- Gender:Male
- Location:NY
Posted 04 January 2009 - 10:57 AM
10 turns per pole off a standard Mabuchi FT26 ("26D") will transform that rocket into a missile.
Use high-temp varnish lover the windings after re-soldering the comm tabs with high-temp solder.
That was our speed secret in 1967...
...bingo!
-john
John Havlicek
#17
Prof. Fate
-
- Member at Peace
-
- 6,580 posts Joined: 20-February 06
a dearly-missed departed member
- Gender:Male
- Location:Salt Lake City, UT
Posted 04 January 2009 - 01:26 PM
Hi
The 196b isn't optimum. But the wind is already a sort of dewind in that with that wire, there was more available. In the day, we actually preferred to drop in the DC65x/6 arm!
Or rewind the 196 with a bigger wire overall.
My experience with that motor is that you lose more from the 10 turns than you gain. Actually, half awake, why 10 winds? In the day, I always wound to the ohmage, not turns. Just counting turns, or arbitrarily picking turns produces to many variables.
A while ago when John and I were talking, I kept saying "It's Easy". Just do it! Remember it was being done in the day by pimply faced kids too shy to ask a girl out.
Just wind.
Fate
Rocky Russo
3/6/48-1/1/12
Requiescat in Pace
3/6/48-1/1/12
Requiescat in Pace
#18
havlicek
-
- Subscriber
-
- 11,198 posts Joined: 20-August 07
OCD Rewinder
- Gender:Male
- Location:NY
Posted 05 January 2009 - 07:07 AM
There's a few things in play here. First off, I don't know whether this Pittman is a collectible or has extra value. If that is the case, then maybe it shouldn't be messed with since anything other than stock would reduce the value. Of course, one man's gold is another man's garbage and if Tex doesn't care about the value then that's not an issue.
Then there's the whole mechanics of playing with armatures. It may be that I take for granted what's involved since I had done this when I was a kid and was sort of familiar with what's involved. Dewinding is a good way to get into playing with armatures since the stack is done, the com is and set as is the overall length of the arm and the winding is already done. You get to tear apart the motor, see how the factory has wound it (direction and sequence), solder the com tabs, balance and play with epoxy (or lacquer in this case as Philippe has suggested) and then reassemble the motor while possibly getting things a bit straighter and tighter than the factory did. Even if only a small gain could be had by a slight dewind (taking Rocky's advice that the motor already has a light wind), all this could lead up to a performance gain. Even more important in this case is that Tex can get more comfortable playing around on the inside of the motor.
Finally there's the appeal in all of this for the "fiddlers" or "tweakers" like me who just get enjoyment from the excercize. The real payoff here is simply in just doing it...not that the motor will be in a race winning car. It's plain fun putting it all back together again and seeing it spin up. I think it's great that anyone wants to dewind or rewind or wind regardless of the potential for producing a race-winning motor and would personally encourage anyone who wants to get in there to do so. This is (to me) as important and relevant an aspect of scratchbuilding and the whole retro mindset as building a chassis or painting a body. It may be entirely missing the point to concentrate too much on whether or not this particular motor can be improved. Tex didn't ask about that originally, he wanted to know what's involved.
-john
John Havlicek
#19
Tex
-
- Full Member
-
- 9,248 posts Joined: 07-July 06
Grand Champion Poster
- Gender:Male
- Location:Denton, TX
Posted 05 January 2009 - 07:54 AM
John,
Much of what you said hit the nail on the head. I've built motors from the component level, but always with the arm already "done". I've never wound/rewound/dewound an armature and want to add that to my slot racing experience as a whole. I can see this as being a "tip of the iceberg" kind of thing and am looking forward to it immensely! Since I've never done it before, I want to proceed with "baby steps". From what I've read, the 196B isn't a particularly rare item. But, being the cautious guy I am(sometimes), I think I'll wait to dewind an armature until I find ANOTHER 196B, leaving the original arm intact so I can drive the car. I've taken the motor apart a number of times, during the construction phase of the car. I even had to build a simple tool for getting the brush springs back in position. This is a low-priority project though, racing projects are ahead of it right now. Later this year. I'll be in touch again. Thanks for ALL the info from ALL of you, including all the cautionary comments and whether or not any performance gain will be realized. Having more info from the get-go is better than less.
Much of what you said hit the nail on the head. I've built motors from the component level, but always with the arm already "done". I've never wound/rewound/dewound an armature and want to add that to my slot racing experience as a whole. I can see this as being a "tip of the iceberg" kind of thing and am looking forward to it immensely! Since I've never done it before, I want to proceed with "baby steps". From what I've read, the 196B isn't a particularly rare item. But, being the cautious guy I am(sometimes), I think I'll wait to dewind an armature until I find ANOTHER 196B, leaving the original arm intact so I can drive the car. I've taken the motor apart a number of times, during the construction phase of the car. I even had to build a simple tool for getting the brush springs back in position. This is a low-priority project though, racing projects are ahead of it right now. Later this year. I'll be in touch again. Thanks for ALL the info from ALL of you, including all the cautionary comments and whether or not any performance gain will be realized. Having more info from the get-go is better than less.
Richard L. Hofer
Remember, two wrongs don't make a right... but three lefts do! Only you're a block over and a block behind.
Remember, two wrongs don't make a right... but three lefts do! Only you're a block over and a block behind.
#20
Pablo
-
- Administrator
-
- 18,491 posts Joined: 20-February 06
Builder
- Gender:Male
- Location:Cleveland, Tennessee
Posted 05 January 2009 - 08:47 AM
That's cool, Tex. Whatever you want to do, I'll always help if I can. I have a Simco instruction sheet which illustrates procedures for both 3 and FIVE pole winding (I'm sure you've seen them on ebay) if you need to borrow it ( ), also Simco wire and a magnetic balancer.
Rocky says "go for it".
Don't let Havlicek scare you with his surgically perfect winds, just do it
), also Simco wire and a magnetic balancer.Rocky says "go for it".
Don't let Havlicek scare you with his surgically perfect winds, just do it
Paul Wolcott
#21
Tex
-
- Full Member
-
- 9,248 posts Joined: 07-July 06
Grand Champion Poster
- Gender:Male
- Location:Denton, TX
Posted 05 January 2009 - 12:22 PM
When the time comes, I'll have to learn how to recognize which pole to start with; from what I gather, you don't just pick one and go for it(?).
Question: When an arm is wound new, are all 3 poles(stacks) done with just one long piece of wire, or is each pole wound seperately with seperate pieces of wire? I "think" I know the answer but, not having done it, I can't speak with conviction. Conversely, when dewinding an arm, it would seem that each pole would have to be dewound seperately(?). This would, in effect, negate the "all poles with one piece of wire", would it not? I don't know why I'm asking these things now since it's going to be MONTHS before I do this.
Question: When an arm is wound new, are all 3 poles(stacks) done with just one long piece of wire, or is each pole wound seperately with seperate pieces of wire? I "think" I know the answer but, not having done it, I can't speak with conviction. Conversely, when dewinding an arm, it would seem that each pole would have to be dewound seperately(?). This would, in effect, negate the "all poles with one piece of wire", would it not? I don't know why I'm asking these things now since it's going to be MONTHS before I do this.
Richard L. Hofer
Remember, two wrongs don't make a right... but three lefts do! Only you're a block over and a block behind.
Remember, two wrongs don't make a right... but three lefts do! Only you're a block over and a block behind.
#22
Prof. Fate
-
- Member at Peace
-
- 6,580 posts Joined: 20-February 06
a dearly-missed departed member
- Gender:Male
- Location:Salt Lake City, UT
Posted 05 January 2009 - 12:37 PM
Hi
Tex...the answer to your two questions above is "yes". You can do it either way...at least I have.
These really are simple. And the greatest danger is "overthinking" the process. If you are doing a ten turn dewind.... you probably wont need to figure out which is first! On some rewinds when we were cramming LOTS on, overlap might inhibit this, but I doubt that the pittman has much overlap.
And I haven't seen any movement in "collectibility" with any pittman. And the 196B least of all given it came out when it was obsolete for serious racing.
Just do it, its easy.
Fate
Rocky Russo
3/6/48-1/1/12
Requiescat in Pace
3/6/48-1/1/12
Requiescat in Pace
#23
havlicek
-
- Subscriber
-
- 11,198 posts Joined: 20-August 07
OCD Rewinder
- Gender:Male
- Location:NY
Posted 05 January 2009 - 04:54 PM
When the time comes, I'll have to learn how to recognize which pole to start with; from what I gather, you don't just pick one and go for it(?).
Hi Tex,
You should see that all the poles except one have the wire simply "looping" from one pole over the top of one com tab and then runs down onto the next pole. Then you should see one com tab where the wires seems to attach to the tab coming from the same side. That's the first/last pole. For dewinding, you need to carefully snip the wire from the tab that runs backwards to the preceeding pole to dewind that pole. That will leave the wire that runs to the next pole still soldered to the tab. After dewinding, just resolder the end of the wire you just took off to that same tab (stripping some laquer off where the wire will attach to the pole beforehand). Lather/rinse/repeat
-john
John Havlicek


