R-Geo Wire Bender tutorial
#1
Posted 06 February 2011 - 12:13 PM
There are questions as to how far the wire pulls when you bend it, and how to set the wire for multiple bends etc which are both something you will have to learn on your own through using the little machine. As one of the greatest chassis builders, TonyP, always advised me, one wire, one bend, this way they are always the same and match. You trim each end and make them match. If you chekc out Tony's builds you will notice, in 98% of his builds, he stays with the one wire, one bend format.
A drop of oil on the wire at the pivot point helps reduce frictional drag and pulling.
In this picture just to show the starting position of any wire. Adjust the solid fence to hold the wire diameter against the lower pins. Thisadjustable fence will go from .047" to .078" and even smaller if you tilt the adjustable fence and use the corner to capture .032" and .025" wires. Most wire bending will begin this way.
Slide your beding arm over the pivot post and it should look like this picture. The wire will be between the pivit pin and the bedning pin. Using pins to make the bends helps in reducing micro cracks in the wire.
We have made out first 90 degree bent wire. This is a piece of .062". You will always have to go a little past the scribed line because music wire has a memory. WHen you see how far, you can make a mark on your machine with a sharpie and duplicate this bend over and over. If you would like to make bends over 90 degrees this is also possible, if you want to duplicate a previous wire, just draw a line against the wire on the plate and bend as many as you want.
In this picture I am showing you a loop bend with a piece of .078 wire, just for illustration of the power the little machine gives you. Try to bend this with 2 pair of pliers and you will see what I mean. The wire was captured against the pins and the adjustable fence was moved enough to allow for the full bend.
I have taken the .078" and postioned it to the pivot pin and make a second bend. This is what Marty Stanley used for his pan stops on the Retro Bits Chassis build. This is using .078", just to illustrate. Way overkill for this application and I will show another much simpler version later on.
The etxra heavy duty pan stop.
THis picture is the beginning of a "Z" bend wire, in the event you find you need one. I have bent the wire into the 90 degree position as above. I now have it positioned on the left side of the pivot pin and the adjustable fence holding the wire firmly in place against the pins.
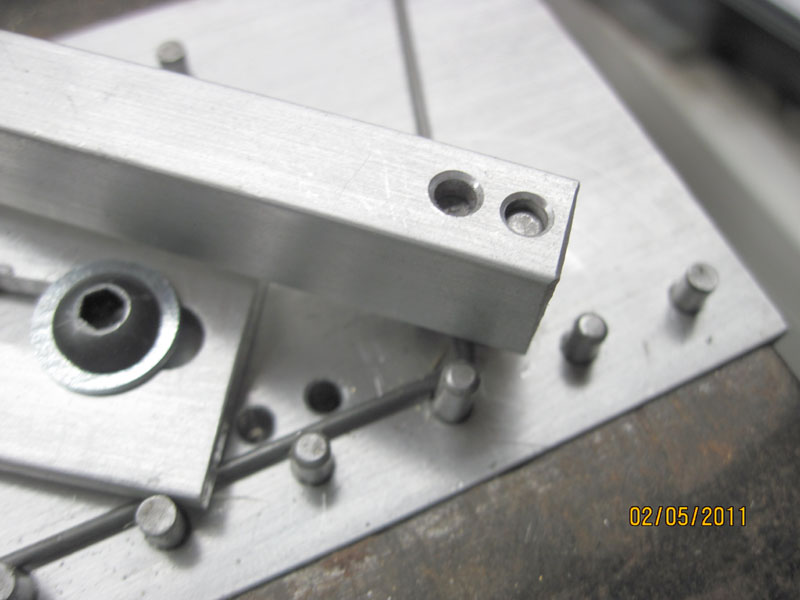
Now place the bending arm and pin on the left side of the wire and bend to the right, opposite of how we have done it to make the 90. Bend the wire until parallel.
This is the result. This is also a piece of 1/16" wire.
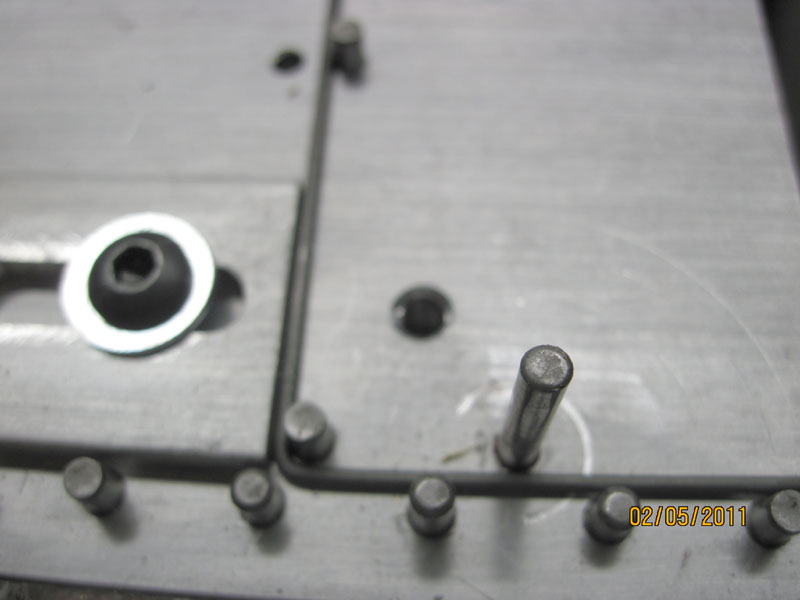
Time to make a 3/4" "U" band main rail. as in the above picture, we will bend one "L" bend at 90 degrees. Make certain you leave enough wire for the other side. Once the first 90 is made, we flip the wire over and put the extra pins in the first set of holes(as pictured) and use the adjustable fence to hold this wire tight against these pins. Second bend will be just another 90 and you are done.
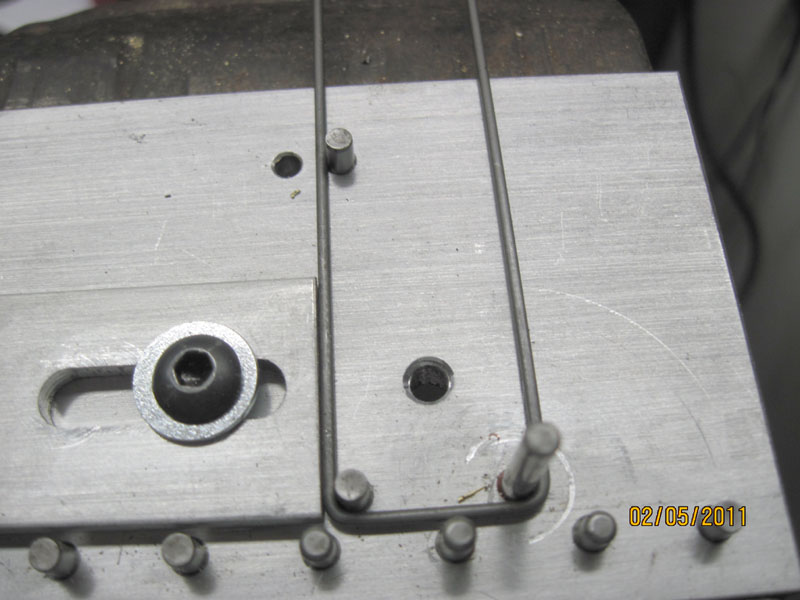
Our "U" bend main rails. You can make these .055", .062", or .078" diameter, whatever you want for your build. The next set of holes on the bender will do the same thing but make the "U" bend 1" inside.
This photo is just to show you using the adjustable fence now as a clamp to hold a wire in position for a second bend.
Here is the simple way to make the Marty pan stop. This piece of wire is .047" but you could use .055". I feel .047" is probably enough to do the job. You simply lay the wire up as you would if you wanted to make a simple 90 degree bend, but continue on past the 90 and keep going until you wrap the wire partially around the post and hit the adjustable fence and crank it a little farther and you have a perfect pan stop in one cycle. Cut off excess and solder on the pan in the position to need.
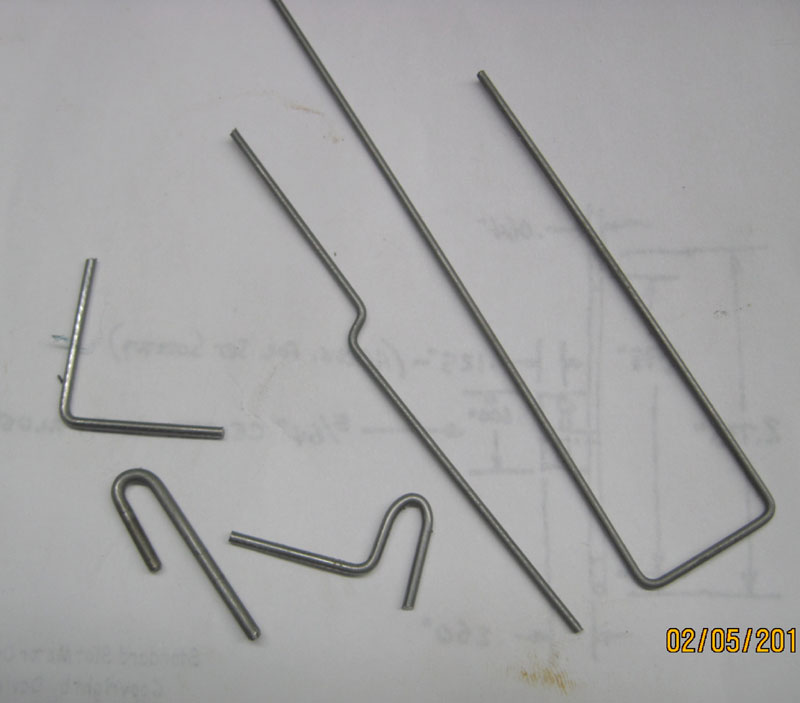
Shapes we have made. I am sure as you use the bender you will come up with more ways/ideas on how you use it and more ways to bend the wire shapes you want. It makes bending the wire rather easy and that is its main function.
If you have any special ways you use the bender, please share them with us. This is the revised bender with the HD bending pivot made from a hardened tool steel pin. The original had a 3/32" pins and a stationary fence. With the pin fence you have more latitude to lower the wire down and in between pins for more creative bending.
I hope this answers some of the questions and helps some out...
- Robert Lowder and James Fetherolf like this
Rick Bennardo
"Professional Tinkerer"
scrgeo@comcast.net
R-Geo Products
LIKE my Facebook page for updates, new releases, and sales: Rgeo Slots...
Lead! The easy equalizer...
#2
Posted 06 February 2011 - 01:42 PM
Thanks Rick for taking the time to do this!!!!
#3
Posted 06 February 2011 - 01:59 PM
Ernie
- James Fetherolf likes this
#4
Posted 06 February 2011 - 02:04 PM
1950-2016
Requiescat in Pace
And I am awaiting
perpetually and forever
a renaissance of wonder
#5
Posted 06 February 2011 - 02:24 PM
Rick,
Great tutorial I printed it out and it will have it's own binder= R-Geo reference book !! Thanks for helping us out
i-ray
#6
Posted 04 April 2011 - 08:40 PM
Great stuff as usual; the oil really does the trick
old 36d
Requiescat in Pace
#7
Posted 11 April 2011 - 12:03 AM
With all the interest in building chassis rails like Warmack and TonyP are using, I took your HD Wire Bender out, grabbed a piece of .078 and made a couple of them for an upcoming project. It's almost too easy to make one, then another to match right up using your bender.
So the first step was to make a couple of main rails with ‘loops’ in them. I figured I would have to make 2 90 degree bends and 1 180 degree bend. That doesn't sound too hard when you look at it like that. Fortunately for me, I own one of the Heavy Duty versions of the Wire Bender made by R-Geo Products.
Out came the Wire Bender and I sat and took a look and decided what I wanted to do before starting the first bend. After a few minutes, I just grabbed a piece of .078 wire and got to bending.
Why .078 wire? Well it’s pretty tough stuff and you only need a single main rail to build a chassis that works well on most King tracks. Bending .078 wire is not for folks with weak hands, or that don’t own heavy duty wire benders. The reason I own one of the R-Geo wire benders is that it is kind of like a hammer. It works well and lasts a long time. It is not complicated, but it does what you ask it to do. On the Heavy Duty model, the bending posts are made out of 1/8 inch drill blank material. I have broken one of the posts one day while bending a piece of .078 wire. Like I said, it’s pretty tough stuff. I started to put a droplet of oil on the bending arm post each time I bend a piece of .078 wire and it has never broken since.
Now, let’s make some bends:
The first thing is to gather some tools:
Here I have the R-Geo Products HD Wire Bender, fence, calipers, Champion Tech Tool and 2 lengths of .078 wire.
Since I’m not sure where the rails will end up in the chassis, I’m going to leave about 2 inches from the back of the “U” bend to the end of the motor bracket. It just so happens that with the fence set on the end of the wire bender, it’s right at 2 inches from the center of the bend to the outside edge of the wire.
The 1/8 inch pin with all the scuff marks around it is where the bending arm goes and that is where we will make all of our bends.
After I make a standard 90 degree bend with the wire bender, I like to use my Champion Tech Tool as a square. It does a very good job in that role as well as checking so many other parameters on a slot car.
Once the 90 degree bend is verified, now it’s time to move one of the pins. I use the spacing for a 1 inch “U” bend. Put the 90 degree bend #1 so the wire is oriented as you see it in the photo above.
Now put the bending arm on so the pin touches the side of the wire that is resting on the bending pin on the outside of the wire and you will move it towards you until you put a 180 degree bend in the wire. If you don’t get it all the way to 180 degrees, don’t worry, just use a pair of pliers to finish the bend. I used the calipers to measure at the top and bottom of the ‘U” shape to make sure it was 180 degrees – or at least very close to that.
Now move the top of the “U” to the 1 inch pin and make a 90 degree bend towards you to finish up the main rail.
After you make one, the 2nd one is so much simpler and it comes out exactly the same size. That’s why if you using a wire bender to make complex bends is so nice. You can easily duplicate your work the same size every time.
So, what are you waiting for?
- James Fetherolf likes this
1/24/48-2/18/16
Requiescat in Pace
#8
Posted 22 June 2011 - 04:35 AM
–Von Dutch
Rickard Johnston
All images © Rickard5
#9
Posted 05 March 2014 - 09:10 AM
Anyone have a suggestion for making bends on this jig that are 90- degrees from the first bend? I'm looking to make another tuning fork chassis and use the wire bender to ensure a 45-degree bend in both wires to bring them together in the center of the chassis. However, once I've made that bend, is there a way to turn the wire 90-degrees to make the wire reach up to brace the axle tubes?
Inquiring minds want to know...
Thanks for any suggestions.
jb
South Carolina, USA
"Assuming either the Left Wing or the Right Wing gained control of the country, it would probably fly around in circles."
- Pat Paulsen, 1968
"I drive way too fast to worry about cholesterol."
- Steven Wright ca. 1983
#10
Posted 05 March 2014 - 10:08 AM
Bend the 90 first.
"If you have integrity, nothing else matters, and if you do not have integrity, nothing else matters."
Robert Mueller, special counsel (2013)
"... because people have got to know whether or not their president is a crook."
Richard M .Nixon, Nov 17, 1973
"Fool me once, same on... shame on you. Fool me... you can't get fooled again."
George W. Bush
#11
Posted 05 March 2014 - 10:52 AM
I'll give that a try, but I'm wondering how you ensure it remains at 90 degrees while bending the fork. I've tried bracing different ways, but haven't found one yet that's ideal.
Thanks for the input. Maybe Rick has a suggestion, too?
South Carolina, USA
"Assuming either the Left Wing or the Right Wing gained control of the country, it would probably fly around in circles."
- Pat Paulsen, 1968
"I drive way too fast to worry about cholesterol."
- Steven Wright ca. 1983
#12
Posted 05 March 2014 - 12:00 PM
Clamp the wire down with the movable fence, then make the next bend. Use some oil when bending too, will help to not pull the wire.....
Rick Bennardo
"Professional Tinkerer"
scrgeo@comcast.net
R-Geo Products
LIKE my Facebook page for updates, new releases, and sales: Rgeo Slots...
Lead! The easy equalizer...
#13
Posted 05 March 2014 - 02:17 PM
I had tried using the fence, but maybe the oil trick will help. Thanks, Rick.
jb
South Carolina, USA
"Assuming either the Left Wing or the Right Wing gained control of the country, it would probably fly around in circles."
- Pat Paulsen, 1968
"I drive way too fast to worry about cholesterol."
- Steven Wright ca. 1983