Jump to content


Photo

Recreating a World Champion


  • Please log in to reply
53 replies to this topic

#1 dc-65x

dc-65x

    Grand Champion Poster

  • Subscriber
  • PipPipPipPipPipPipPipPip
  • 6,825 posts
  • Joined: 14-February 06
  • Gender:Male
  • Location:Captain Rick: The only vintage slot car nut in SW Oregon?

Posted 06 March 2011 - 05:23 PM

I owe our friend Ron Hershman big time for some absolutely killer S24 arms. When I received the PM below...

Hi Rick,

Wondering if you would be interested in doing a project for me? Back in '91 or '92 Gugu and I won the Eurosport 1/24 team enduro race at the World Championships in Chicago.

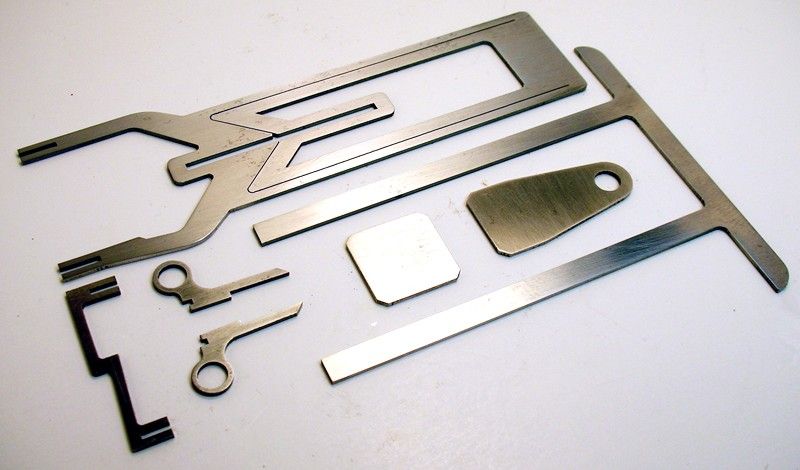
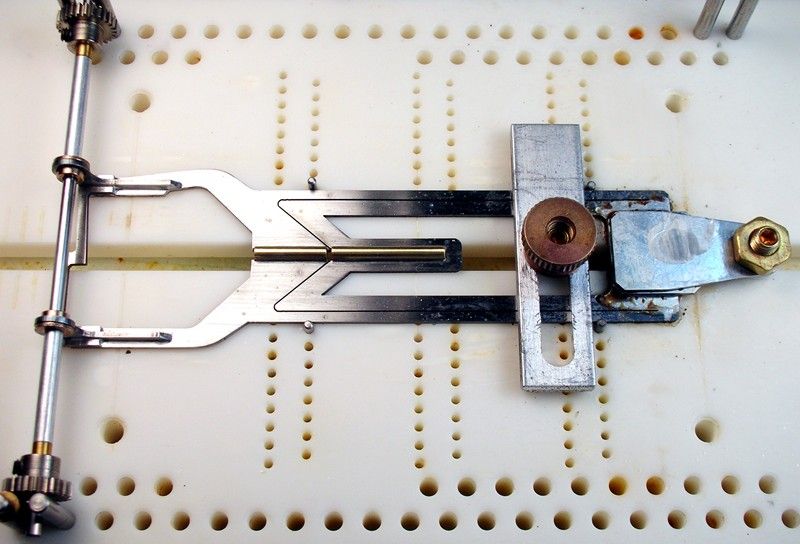
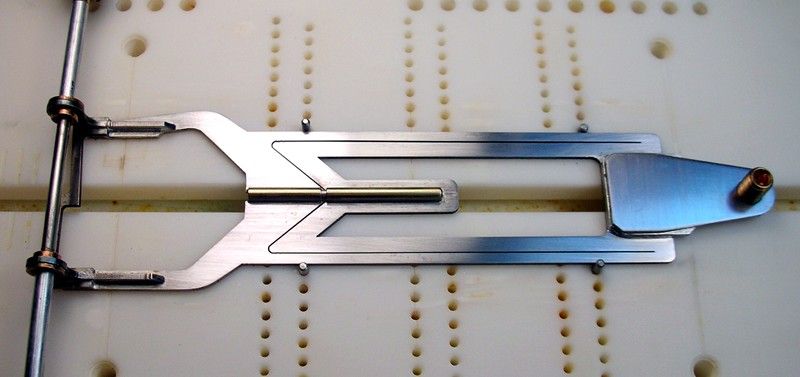
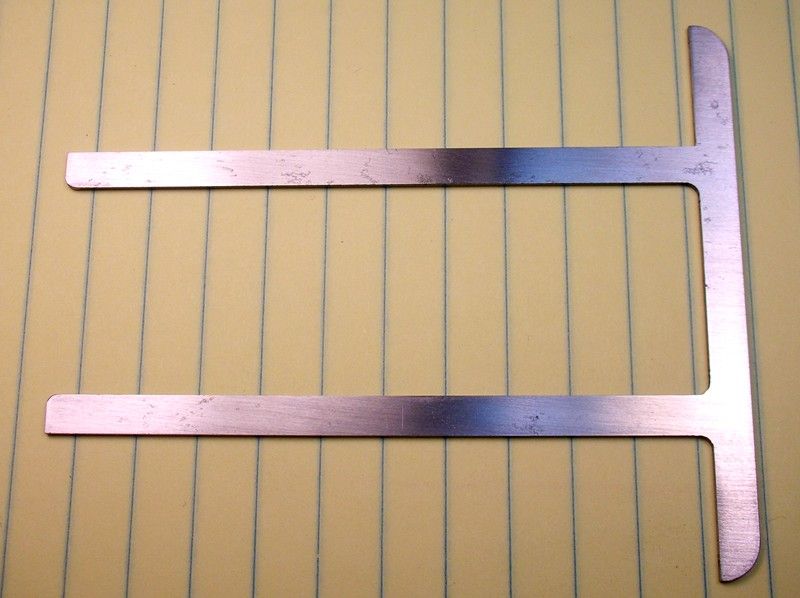
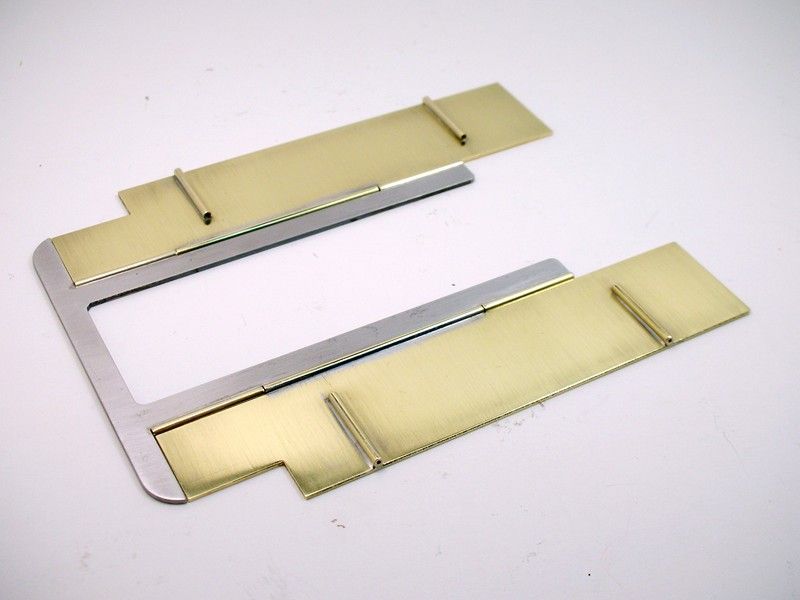
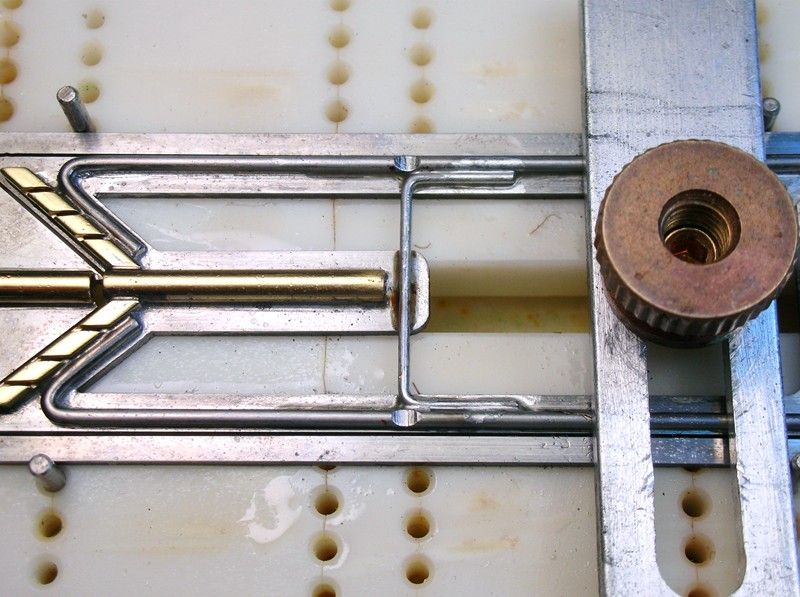
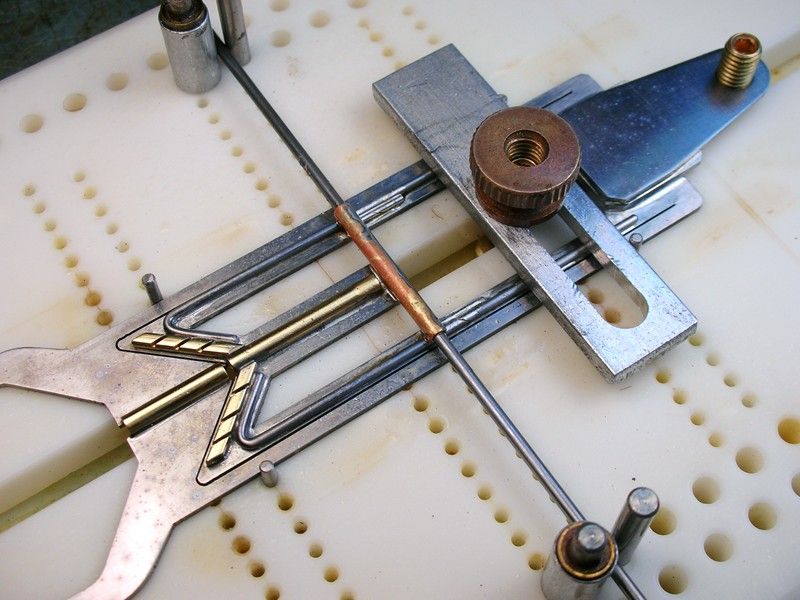
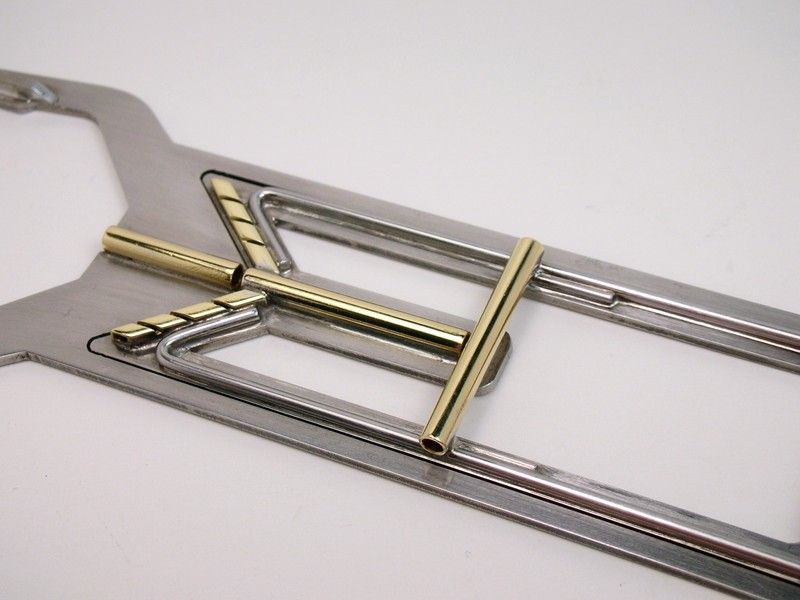
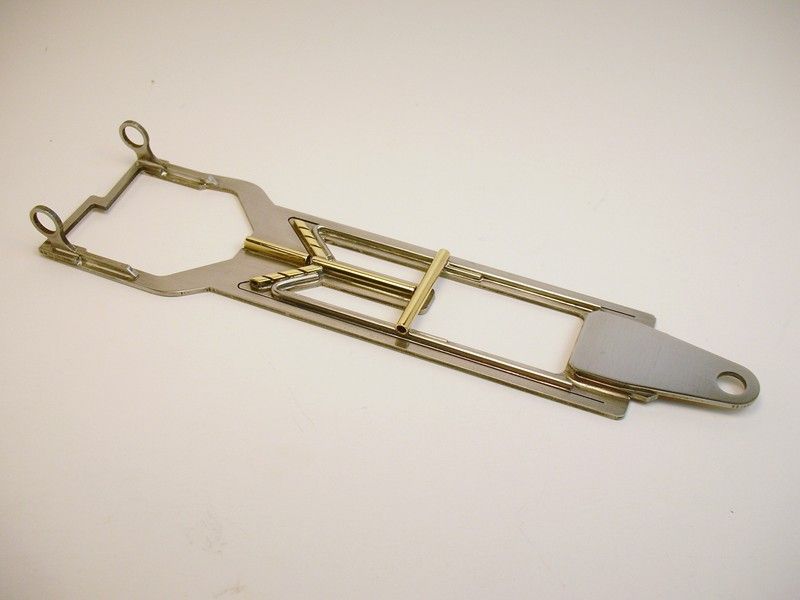
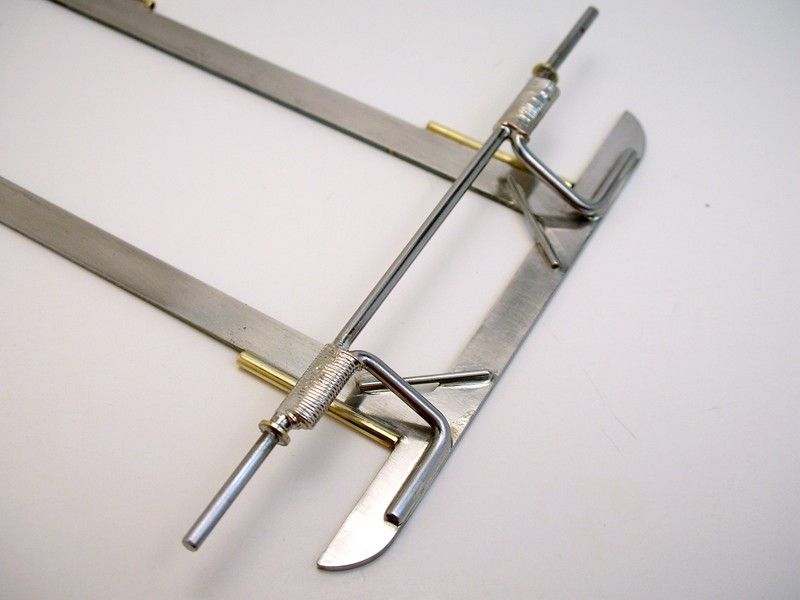
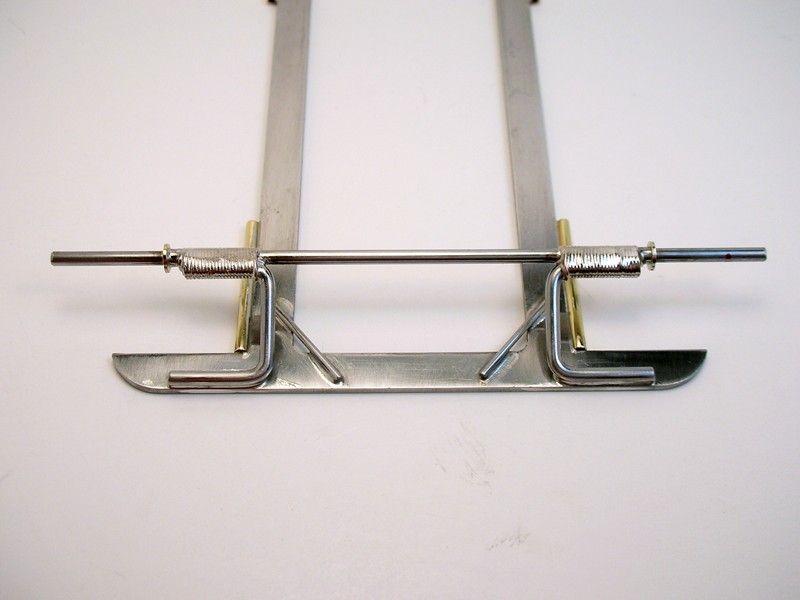
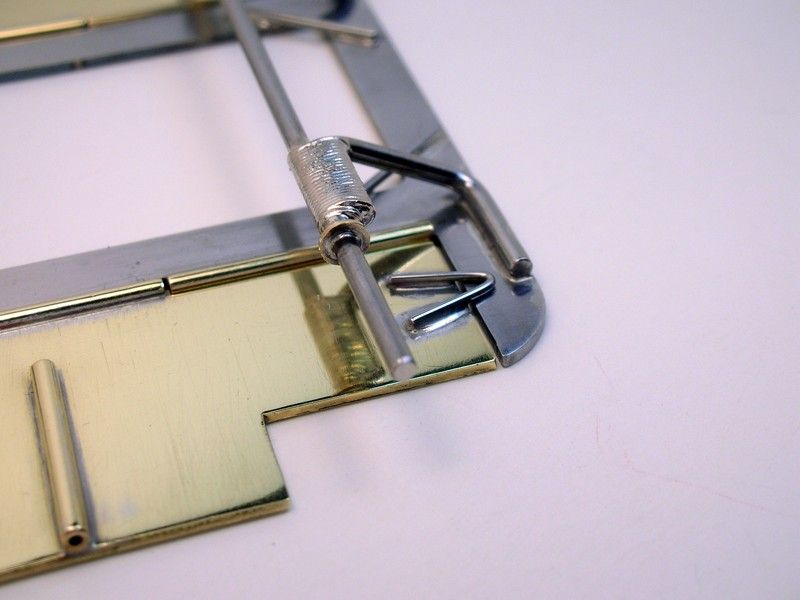
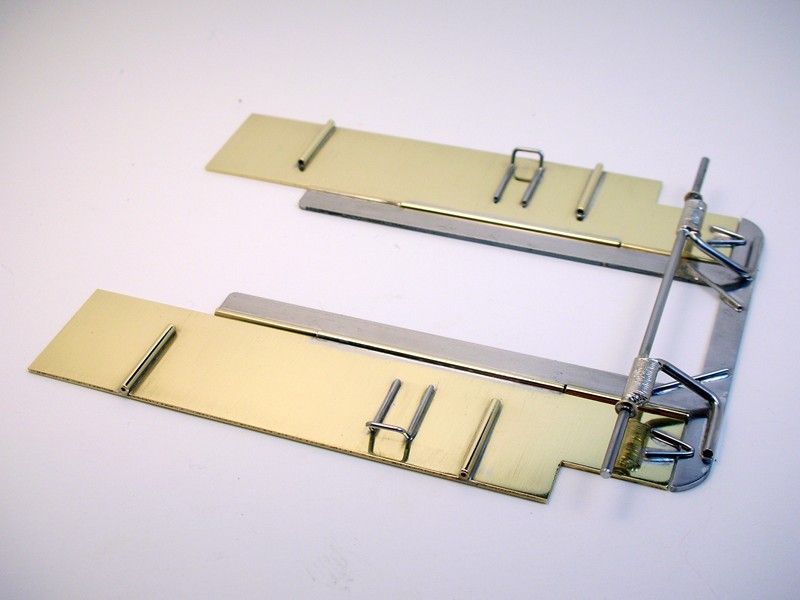
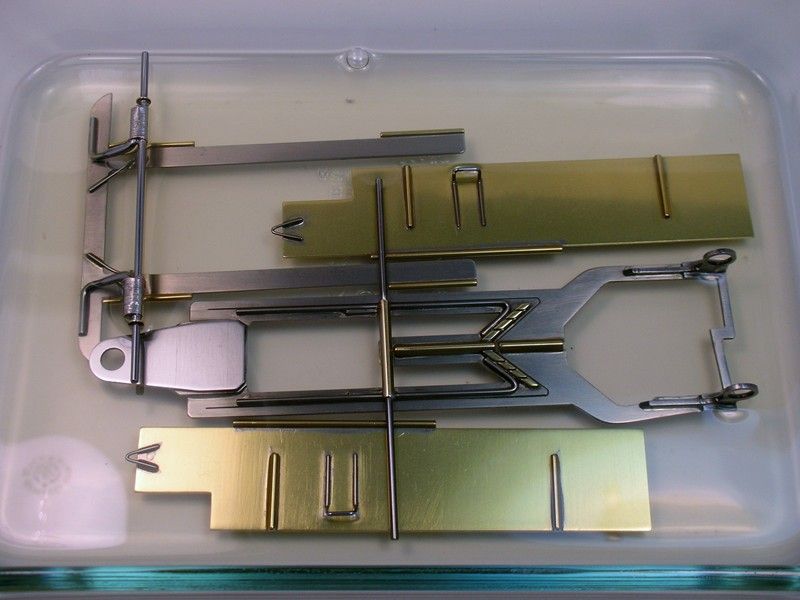
I worked at Parma at the time and Gugu built a chassis using the spring steel Parma Euro24 kit. He cut and used brass pans instead of the steel pans that came with the kit.

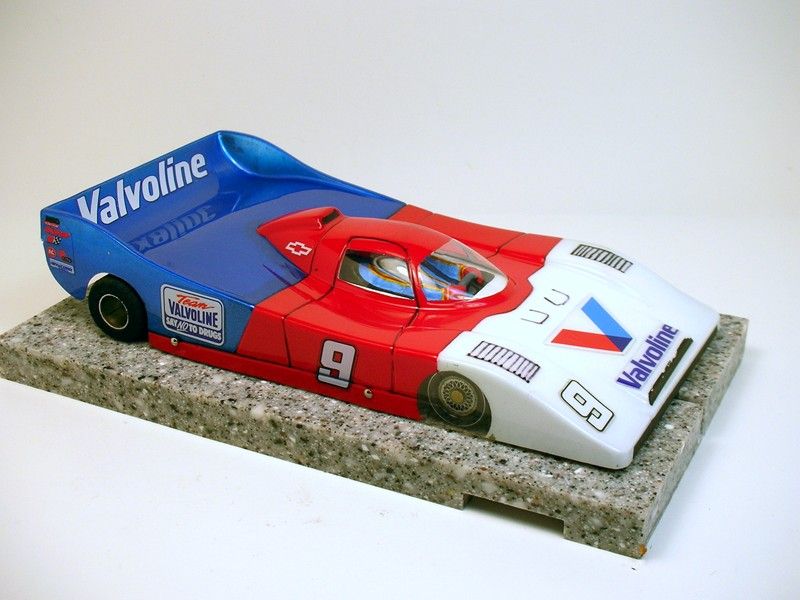
Of course it was his chassis and he kept it and I have pics of the car and always wanted a copy for my museum.

I have a kit or two and was wondering if you would be interested possibly building a replica for me??

... the answer was an instant “Okie Dokie”. Sorry, it’s taken me so long to get to the project Ron but here we go.

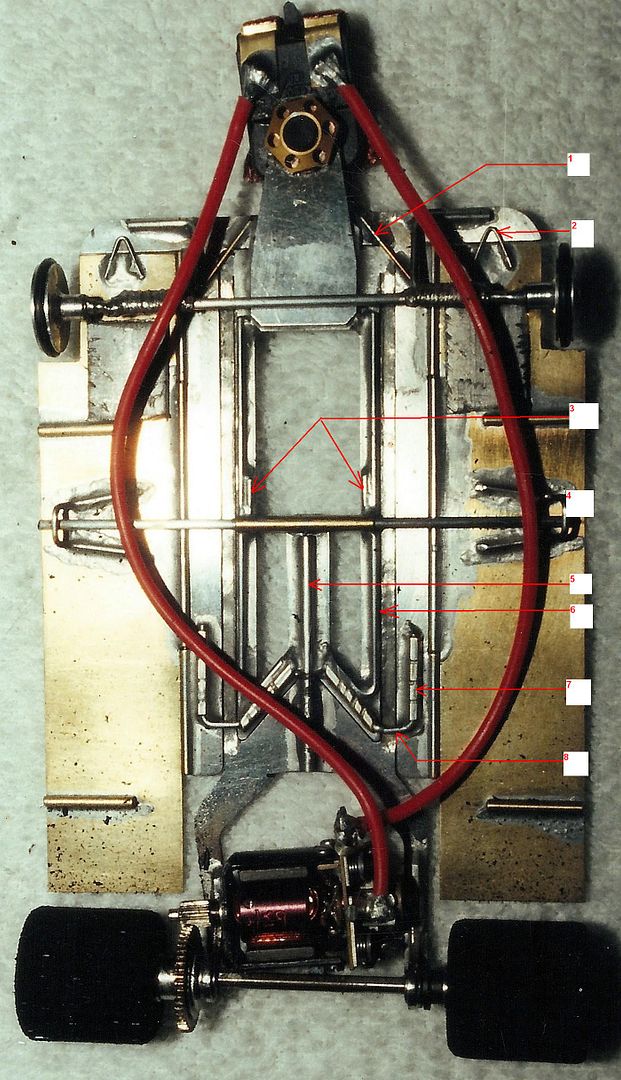
Ron sent me some original pictures he took of the car after the win:

Posted Image

Posted Image

Posted Image

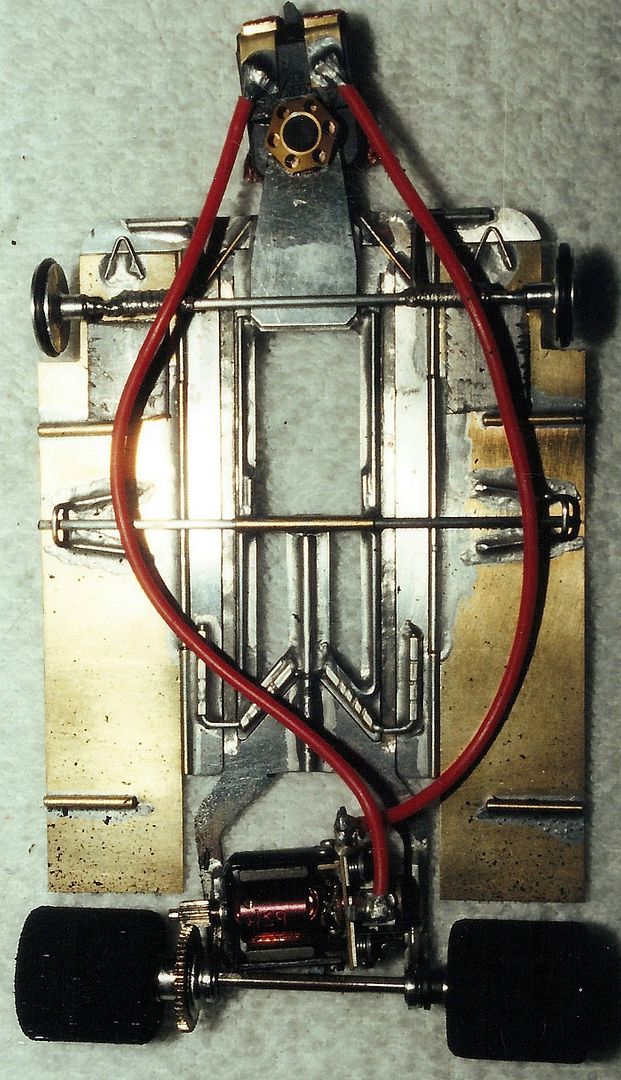
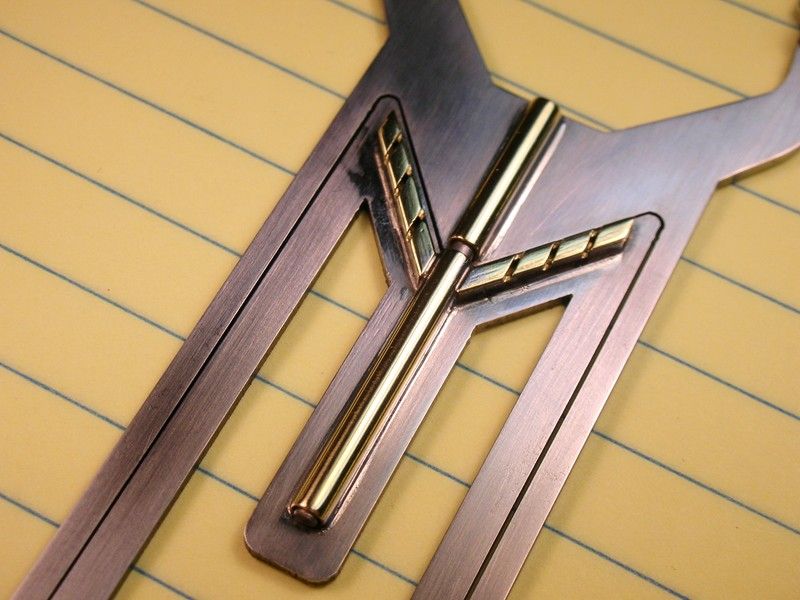
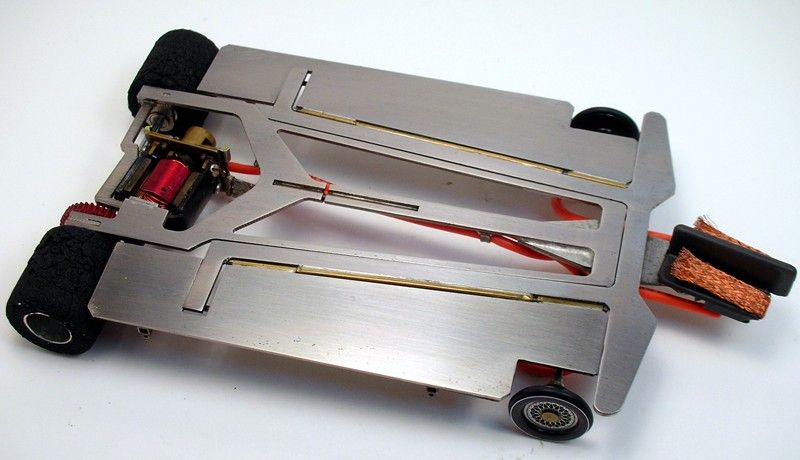
I’m going to leave it to Ron to tell the tale of the car and his World Championship win. In fact, the only knowledge I have about these cars is a Eurosport I built from a JK chassis kit almost 20 years ago:

Posted Image

Posted Image

Posted Image

I had no idea of the ”trick” way to build it so I just followed the kit instructions. With this project all I have to go by are the pictures above.

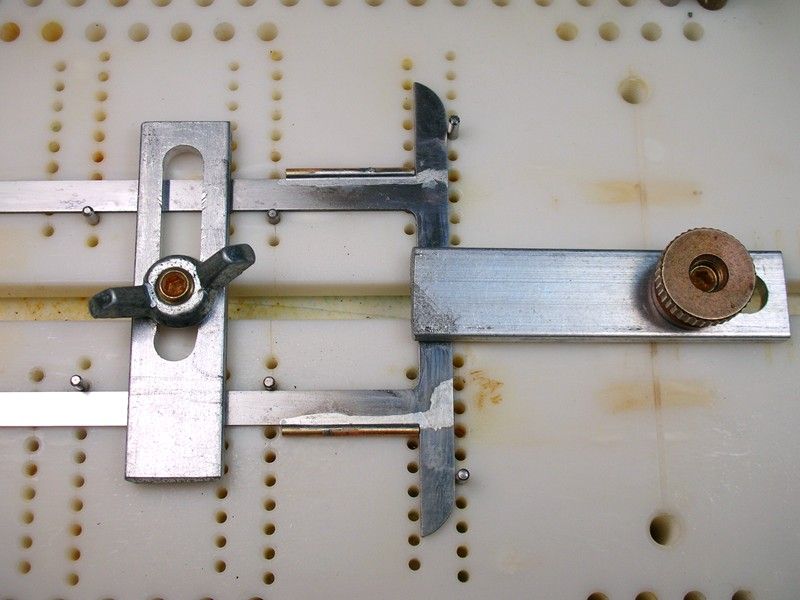
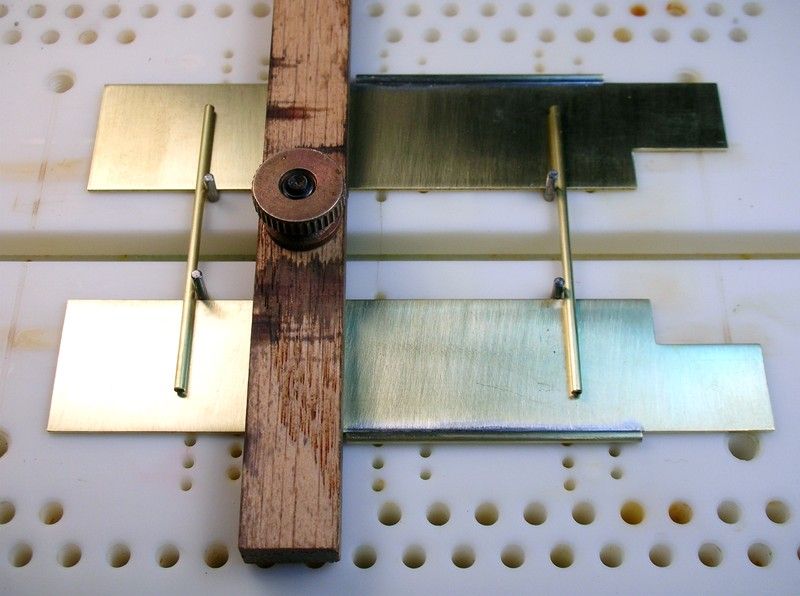
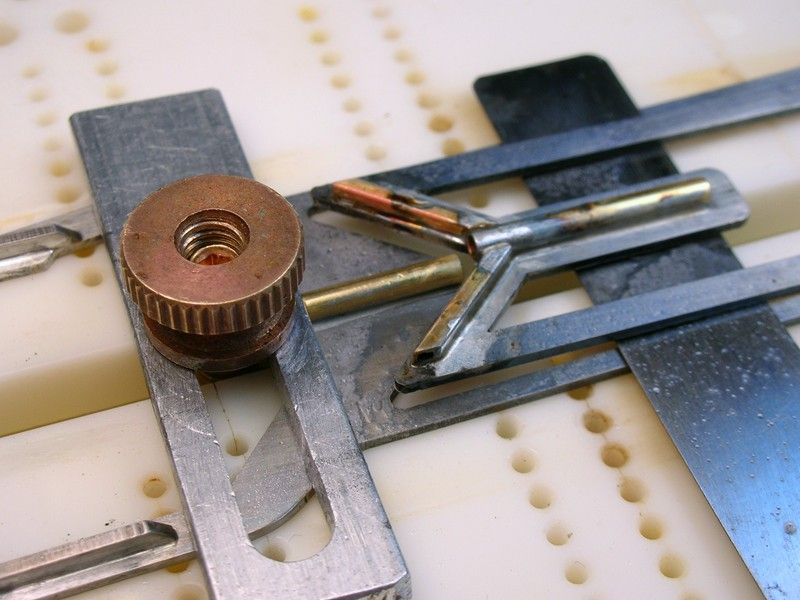
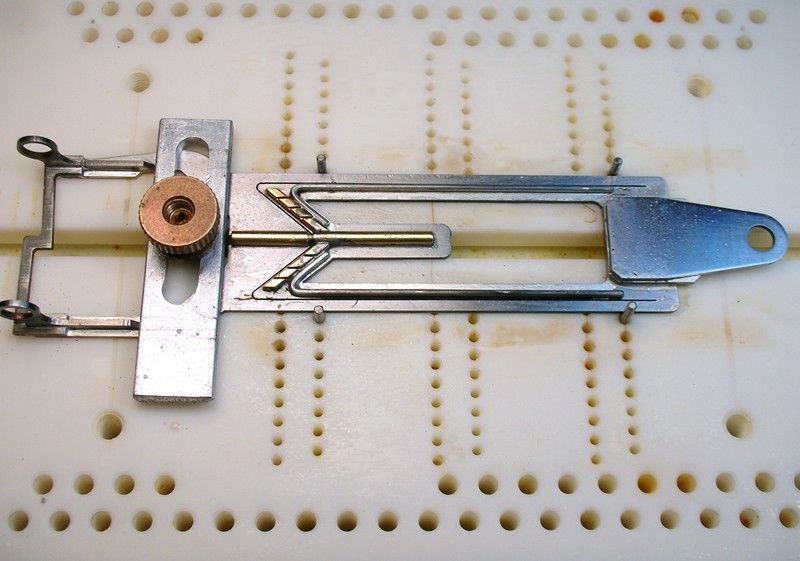
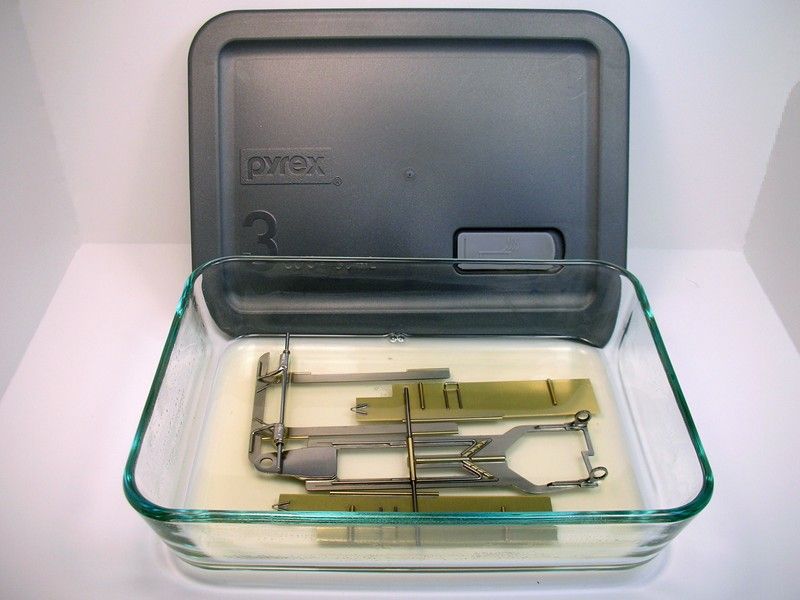
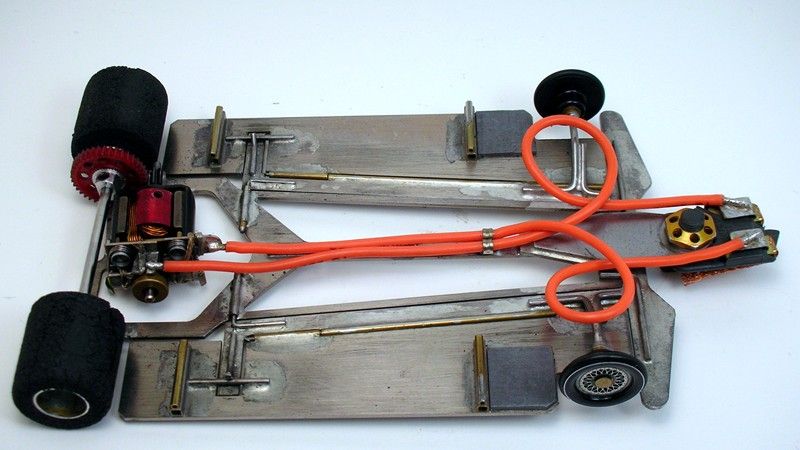
So, I got together with the SHPBAPSCR Historian (Society for the Historical Preservation of Bay Area Pro Slot Car Racing) Eric and we made some notes about possible chassis construction:

Posted Image

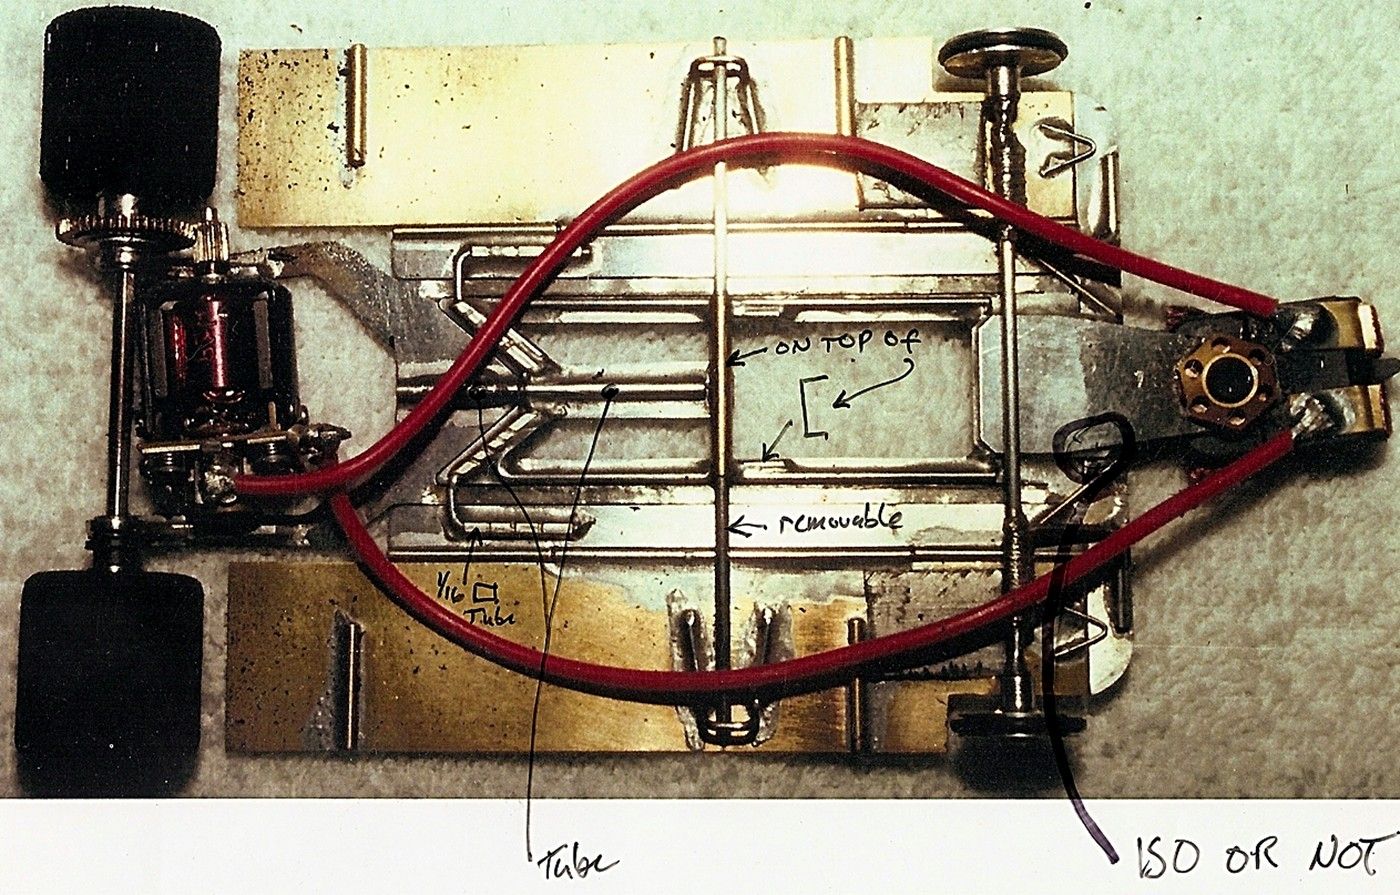
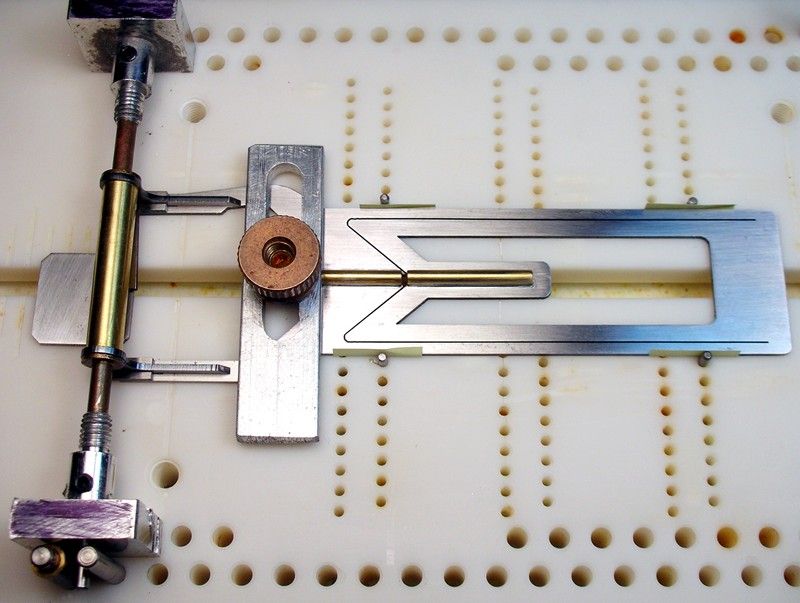
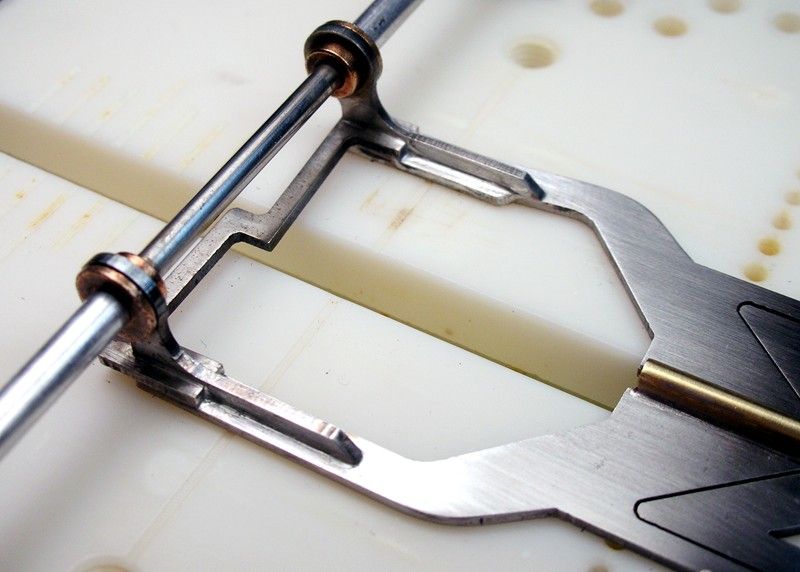
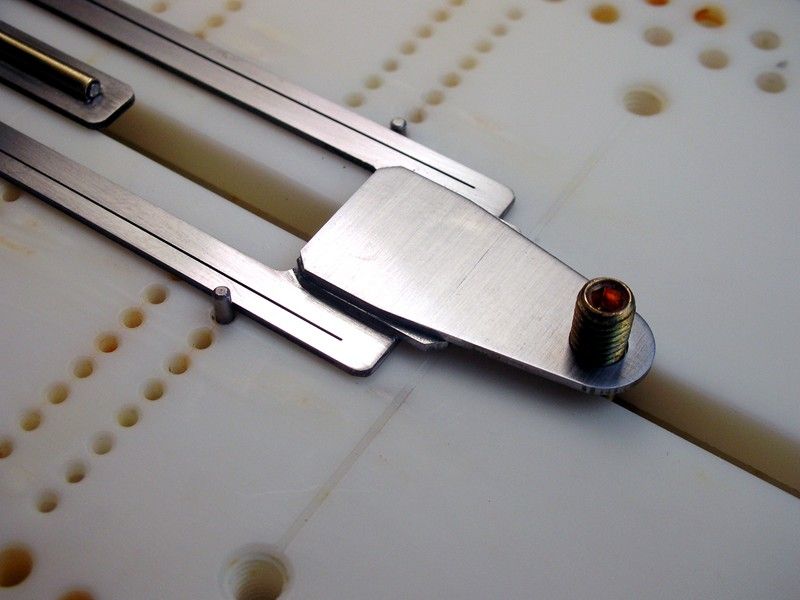
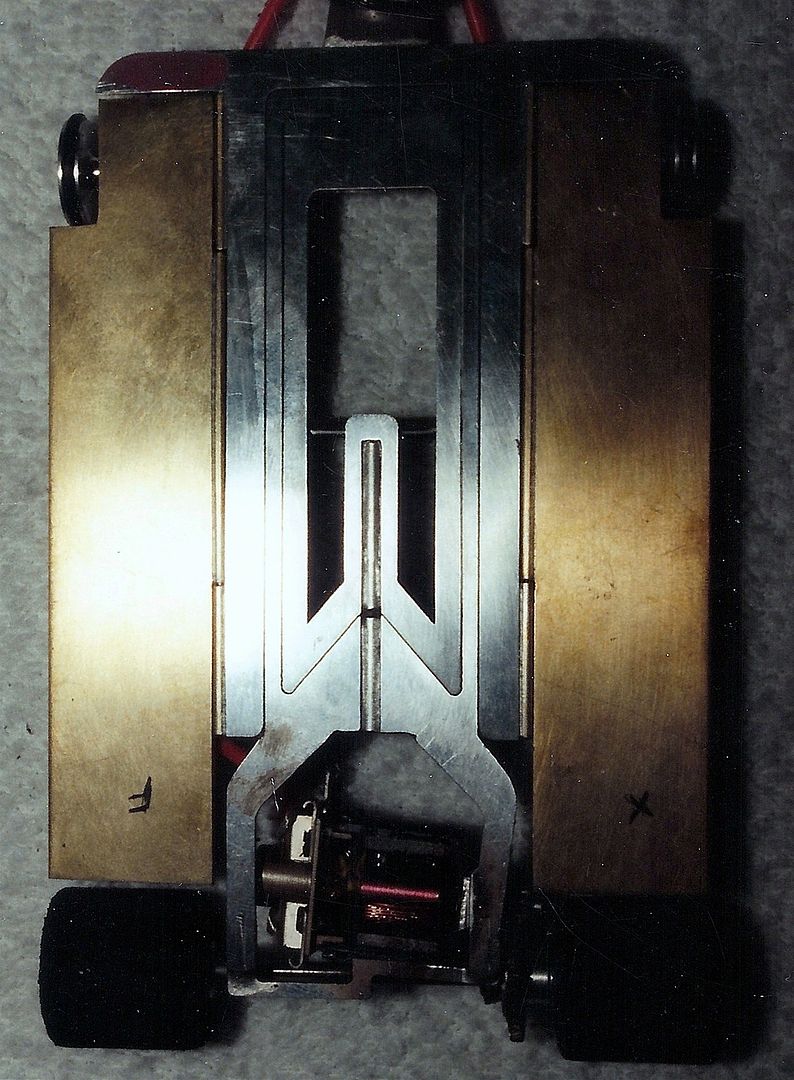
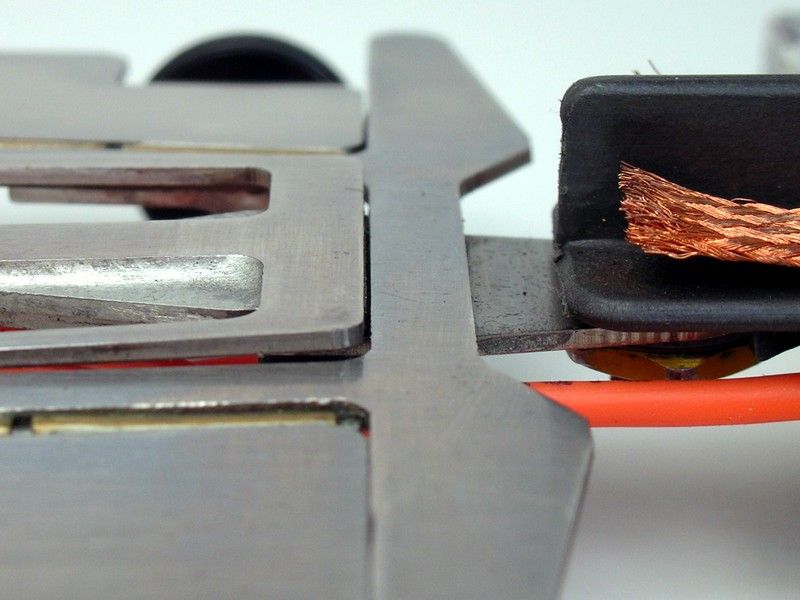
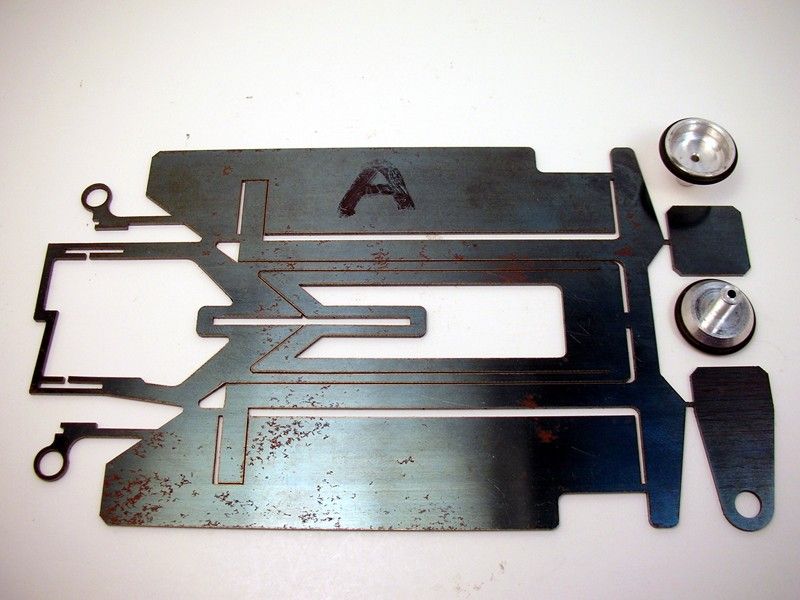
I think I know the answer to the "Iso or not" question in the picture. I believe what I have circled is the corner of the guide tongue spacer that is positioned to stop the center section from dropping down Iso style like I the way I built my chassis shown here:

Posted Image

Here's the kit and front wheels Ron sent:

Posted Image

I know I'll have lots of questions I hope you guys can help me with...

Rick Thigpen
Check out Steve Okeefe's great web site at its new home here at Slotblog:
The Independent Scratchbuilder
There's much more to come...


#2 endbelldrive

endbelldrive

    Checkered Flag in Hand

  • Member at Peace
  • PipPipPipPipPipPip
  • 1,740 posts
  • Joined: 16-February 06
  • Gender:Male
  • Location:Witless Protection Program

Posted 06 March 2011 - 08:01 PM

Yowza, that race was almost 20 years ago! :swoon: :swoon: :pardon:
Bob Suzuki
8/19/54-8/?/21
Requiescat in Pace

#3 dc-65x

dc-65x

    Grand Champion Poster

  • Subscriber
  • PipPipPipPipPipPipPipPip
  • 6,825 posts
  • Joined: 14-February 06
  • Gender:Male
  • Location:Captain Rick: The only vintage slot car nut in SW Oregon?

Posted 06 March 2011 - 08:18 PM

Hey Bob, for me this is modern stuff. :laugh2:

Rick Thigpen
Check out Steve Okeefe's great web site at its new home here at Slotblog:
The Independent Scratchbuilder
There's much more to come...


#4 Dominator

Dominator

    Posting Leader

  • IRRA National Director
  • PipPipPipPipPipPipPip
  • 2,830 posts
  • Joined: 19-September 07
  • Gender:Male

Posted 06 March 2011 - 08:20 PM

I can help with the bodies pictured. The red one is a Spice and the Valvoline body is an Intrepid.

A motor is only as fast as the chassis it's in.
 
Dominic Luongo
Like Dominator Custom Chassis on Facebook
 
NERR photos from 2012-April 2016
NERR photos from 2016 to now


#5 TSR

TSR

    The Dokktor is IN

  • Full Member
  • PipPipPipPipPipPipPipPip
  • 42,284 posts
  • Joined: 02-February 06
  • Gender:Male
  • Location:Marxifornia

Posted 06 March 2011 - 08:25 PM

Ron built me a similar car for my return to this crazy hobby in 1994, I still have it and will take pics of it if it can help. But I think it was stock and did not have brass pans.

Philippe de Lespinay


#6 dc-65x

dc-65x

    Grand Champion Poster

  • Subscriber
  • PipPipPipPipPipPipPipPip
  • 6,825 posts
  • Joined: 14-February 06
  • Gender:Male
  • Location:Captain Rick: The only vintage slot car nut in SW Oregon?

Posted 06 March 2011 - 08:56 PM

I can help with the bodies pictured. The red one is a Spice and the Valvoline body is an Intrepid.

Thanks, Dominic. Parma Intrepid, that's what my car has. It was THE body in my area. Hopefully Ron has the Spice for his recreation.

Thanks, Philippe. I have some questions about exactly how Gugu built certain parts of the chassis. I'm pretty sure I've answered my question if the center section pivoted downward like and Iso... it didn't. But I'll have more questions I'll need help with as the build progresses.

For now, here's where I'm at:

Posted Image

Gugu did a lot of cutting on the stock chassis. I still have more to do in the motor box area. I decided to get the pillow blocks and motor mount installed first before I weaken it with the final cutting.

The outside corners of the motor box are rounded.
The gizmo with the front bumper had the pan down stops cut off
Front bumper was narrowed flush with the pans, shortened to only 3/16" long and the outside corners rounded.

Time to think about how to solder this thing together...

Rick Thigpen
Check out Steve Okeefe's great web site at its new home here at Slotblog:
The Independent Scratchbuilder
There's much more to come...


#7 Ron Hershman

Ron Hershman

    Grand Champion Poster

  • Full Member
  • PipPipPipPipPipPipPipPip
  • 22,051 posts
  • Joined: 16-February 06
  • Gender:Male
  • Location:Indyanna

Posted 07 March 2011 - 09:57 AM

I can help with the bodies pictured. The red one is a Spice and the Valvoline body is an Intrepid.


Actually, the body we used is the Parma Toyota body....not a Spice.


Ron built me a similar car for my return to this crazy hobby in 1994, I still have it and will take pics of it if it can help. But I think it was stock and did not have brass pans.


Yes Philippe, your car was made from the same kit, but built totally different from how Gugu built this chassis.

I will add some more info to this thread in the next day or so.

#8 Prof. Fate

Prof. Fate

    a dearly-missed departed member

  • Member at Peace
  • PipPipPipPipPipPipPipPip
  • 6,580 posts
  • Joined: 20-February 06
  • Gender:Male
  • Location:Salt Lake City, UT

Posted 07 March 2011 - 12:44 PM

Hi

Rick, when the chassis kit was "new state of the art". locals bought several, got confused and paid me to build them for them.

I found it useful to leave the bits in place on the cuts, solder things like the bite and stops and THEN do the final cut away.

One of my few projects where I didn't keep one for me. Grin.

Fun stuff.

Fate
Rocky Russo
3/6/48-1/1/12
Requiescat in Pace

#9 dc-65x

dc-65x

    Grand Champion Poster

  • Subscriber
  • PipPipPipPipPipPipPipPip
  • 6,825 posts
  • Joined: 14-February 06
  • Gender:Male
  • Location:Captain Rick: The only vintage slot car nut in SW Oregon?

Posted 07 March 2011 - 05:05 PM

PLEASE HELP!


I've been looking at this picture and trying to figure out the wire sizes used. Here are my guesses, please give me your opinions too:

#1: If we ASSume #8 is .030" wire going through #7 1/16" square tube then is #1 smaller stuff? Say .020" or .025"?

#2: Same as #1, .020" or .025"?

#3: What the heck is this? Is this a U-shaped wire the same size as the one next to it (#6)? Does the "U" fit under that 3/32" brass tube to take up the gap between the tube and the frame?

#4: .030" pan down stops

#5: 3/32" tube with a 1/16" wire inside?

#6: Does this look larger than #8 or is it .030" too?

#7: 1/16" square tube

#8: .030" wire

Posted Image


:unsure: :unsure: :unsure: :unsure:

Rick Thigpen
Check out Steve Okeefe's great web site at its new home here at Slotblog:
The Independent Scratchbuilder
There's much more to come...


#10 Gary Bluestone

Gary Bluestone

    Race Leader

  • Full Member
  • PipPipPipPipPip
  • 761 posts
  • Joined: 24-October 08
  • Gender:Male
  • Location:Canada

Posted 07 March 2011 - 06:15 PM

You may try using a known size as a starting point and deduce the unknown sizes. Take the print out of the chassis and measure the rear axle diameter in the photo. With my caliper on the screen , I got 3/8" for the axle , which is likely actually 1/8" so that means all the other dimentions can be divided by 3 to get the actual dimentions. Gb

#11 Ron Hershman

Ron Hershman

    Grand Champion Poster

  • Full Member
  • PipPipPipPipPipPipPipPip
  • 22,051 posts
  • Joined: 16-February 06
  • Gender:Male
  • Location:Indyanna

Posted 07 March 2011 - 07:04 PM

The axle in this car was 3/32"

#12 Gary Bluestone

Gary Bluestone

    Race Leader

  • Full Member
  • PipPipPipPipPip
  • 761 posts
  • Joined: 24-October 08
  • Gender:Male
  • Location:Canada

Posted 07 March 2011 - 09:22 PM

If the known dimention is 3/32" = .0937" and the measurement in the photo is 3/8"= .375, then divide .375 by .0937 = 4.0021344. Use this # to divide the photograpic dimentions(converted to decimals, thousands of an inch) to get actual dimentions. Gb

#13 Guardrail

Guardrail

    Mid-Pack Racer

  • Full Member
  • PipPipPip
  • 128 posts
  • Joined: 23-October 08
  • Gender:Male
  • Location:Evansville, IN

Posted 07 March 2011 - 09:58 PM

Ohhhhhhhhhhhh!!! All them numbers make my head spin. :blink:
Keith Brown

#14 dc-65x

dc-65x

    Grand Champion Poster

  • Subscriber
  • PipPipPipPipPipPipPipPip
  • 6,825 posts
  • Joined: 14-February 06
  • Gender:Male
  • Location:Captain Rick: The only vintage slot car nut in SW Oregon?

Posted 07 March 2011 - 10:49 PM

Thanks Gary.

I did establish a ratio or a "magic number" by measuring a known distance in the picture. I used the center section which is 1" wide. The problem is the picture wasn't taken exactly dead on from the top. If you measure the center section the measurement varies top to bottom. The other problem is the filet of solder that can obscure the edges of the wire or tube I'm trying to measure.

With this method I pretty sure I'm "Korrect" with #5, #7 and #8. They pretty much have to be either 1/16" tube with .030" wire or 3/32" tube with 1/16" wire. But for the others I can't tell .025" wire from .030" or .047" from .055".

For the little pan and center section stops #1, #2 and #4 I've decided not to worry about and just use some fine wire.

BUT, what the heck is going on with #3 and #6 the center section reinforcement wires and whatever goes beside and/or under that 3/32" tube cross piece :unsure: .

I did get something done. I added the 3/32" hinge tubes to the center section and cut out the frames hinge tubes mounting tang that extended into the motor box:

Posted Image

Pillow blocks and guide tongue are next..........

Rick Thigpen
Check out Steve Okeefe's great web site at its new home here at Slotblog:
The Independent Scratchbuilder
There's much more to come...


#15 dc-65x

dc-65x

    Grand Champion Poster

  • Subscriber
  • PipPipPipPipPipPipPipPip
  • 6,825 posts
  • Joined: 14-February 06
  • Gender:Male
  • Location:Captain Rick: The only vintage slot car nut in SW Oregon?

Posted 12 March 2011 - 06:26 PM

I found some old Boothe jig wheels the Korrect size. I believe you are supposed to insert them into the pillow block's bearing hole and lock them in place with a nut. I felt that blocked Mr. Ungar's access for soldering so I set it up like so:

Posted Image

That worked out:

Posted Image

The guide tongue and spacer were next:

Posted Image

All spiffed up:

Posted Image

My Rick's jig is working perfectly on yet another type of chassis :) :

Posted Image

I'm going to make the pans next. I thought I was done modifying the "pan mount-bumper thingie" (has this thing got a name :unsure: ) but.....

Posted Image

.....Gugu rounded the inside corners so it could be slid back as close as possible to the center section. This is one reason I couldn't follow Rocky's sage advice:

I found it useful to leave the bits in place on the cuts, solder things like the bite and stops and THEN do the final cut away.


There is another reason I cut all the pieces apart first. If my plan comes together Korrectly :unsure: .

Posted Image

Gugu also took off the radius (bottom of the picture) so the pan hinge tube could butt up against the bumper:

Posted Image

Time to cut some brass pans and start on a concurrent project:

THE PITTMAN 703 THRU 706 TOP SPEED CHALLANGE! :shok: :shok: :shok:


Rick Thigpen
Check out Steve Okeefe's great web site at its new home here at Slotblog:
The Independent Scratchbuilder
There's much more to come...


#16 Pablo

Pablo

    Builder

  • Administrator
  • PipPipPipPipPipPipPipPip
  • 18,364 posts
  • Joined: 20-February 06
  • Gender:Male
  • Location:Cleveland, Tennessee

Posted 12 March 2011 - 07:40 PM

What kind of H2O are you going to use to tumble that ?

I can send some Mississippi water, but it's real heavy :D

Paul Wolcott


#17 dc-65x

dc-65x

    Grand Champion Poster

  • Subscriber
  • PipPipPipPipPipPipPipPip
  • 6,825 posts
  • Joined: 14-February 06
  • Gender:Male
  • Location:Captain Rick: The only vintage slot car nut in SW Oregon?

Posted 13 March 2011 - 12:42 AM

Hi Pablo,

There's no way I'll risk this chassis with anything other than a time consuming hand polish. I've got new ceramic media and the polishing solution you sent me (THANK YOU! :) )
but I don't want to experiment with this one!

Rick Thigpen
Check out Steve Okeefe's great web site at its new home here at Slotblog:
The Independent Scratchbuilder
There's much more to come...


#18 dc-65x

dc-65x

    Grand Champion Poster

  • Subscriber
  • PipPipPipPipPipPipPipPip
  • 6,825 posts
  • Joined: 14-February 06
  • Gender:Male
  • Location:Captain Rick: The only vintage slot car nut in SW Oregon?

Posted 13 March 2011 - 07:09 PM

Soldering the pan hinge tubes in my "Rick's Jig":

Posted Image

Using the jig to keep the body mounting pin tubes perfectly aligned with each other:

Posted Image

Todays progress:

Posted Image

Rick Thigpen
Check out Steve Okeefe's great web site at its new home here at Slotblog:
The Independent Scratchbuilder
There's much more to come...


#19 dc-65x

dc-65x

    Grand Champion Poster

  • Subscriber
  • PipPipPipPipPipPipPipPip
  • 6,825 posts
  • Joined: 14-February 06
  • Gender:Male
  • Location:Captain Rick: The only vintage slot car nut in SW Oregon?

Posted 14 March 2011 - 09:56 PM

I'm trying to do something every night on this project. Not only because I've kept Ron waiting over 6 months but I need to build a car for the THE PITTMAN 703 THRU 706 TOP SPEED CHALLANGE event.

This seemed like a good idea at the time. I tack soldered the two square tube in place in my Rick's jig. Then I slipped a .007" shim under the inner piece to raise it up out of harms way. It worked as I didn't solder the whole mess up solid :D .

Posted Image

A razor saw cut the nifty cuts into the square tube:

Posted Image

Next up are the .047" wire stiffeners.....

Rick Thigpen
Check out Steve Okeefe's great web site at its new home here at Slotblog:
The Independent Scratchbuilder
There's much more to come...


#20 Ron Hershman

Ron Hershman

    Grand Champion Poster

  • Full Member
  • PipPipPipPipPipPipPipPip
  • 22,051 posts
  • Joined: 16-February 06
  • Gender:Male
  • Location:Indyanna

Posted 14 March 2011 - 09:59 PM

Hi Pablo,

There's no way I'll risk this chassis with anything other than a time consuming hand polish. I've got new ceramic media and the polishing solution you sent me (THANK YOU! :) )
but I don't want to experiment with this one!


Hey Rick,

You could experiment with the steel pans you cut off the kit and won't use ;)...... might learn if the media works on not on steel.

Looking good!!!!

#21 dc-65x

dc-65x

    Grand Champion Poster

  • Subscriber
  • PipPipPipPipPipPipPipPip
  • 6,825 posts
  • Joined: 14-February 06
  • Gender:Male
  • Location:Captain Rick: The only vintage slot car nut in SW Oregon?

Posted 19 March 2011 - 04:54 PM

Here the .047" piano wire reinforcement rails are soldered in place:

Posted Image

Now we're at the part where I just had to take a guess at how this chassis was built. Eric felt the pictures showed a U-brace was used under the brass tube that holds the pan up stop. I ended up using a .030" wire U-brace and notching the .047" wire next to it for the tube to nest into...

Posted Image

.....and then soldered the 3/32" tube to the whole mess:

Posted Image

All cleaned up it looks like so:

Posted Image

The center section is complete....except for anything I've forgotten!

Posted Image

Rick Thigpen
Check out Steve Okeefe's great web site at its new home here at Slotblog:
The Independent Scratchbuilder
There's much more to come...


#22 dc-65x

dc-65x

    Grand Champion Poster

  • Subscriber
  • PipPipPipPipPipPipPipPip
  • 6,825 posts
  • Joined: 14-February 06
  • Gender:Male
  • Location:Captain Rick: The only vintage slot car nut in SW Oregon?

Posted 22 March 2011 - 09:00 AM

Here is what I think the front axle arrangement was built like:

Posted Image

The two little angled pieces of wire are stops for the center sections upward travel. I spaced the center section with a .005” shim to allow a little “wiggle room” before soldering the stops:

Posted Image

The V-shaped front pan stops are in place:

Posted Image

Here the pans are in temporarily in place with their rear down stops:

Posted Image

I still need to attach the front wheels and permanently join the center section to the “pan hanger goodie”. But first:

PABLO…..I scrubbed out my tumblers drum and added fresh media and distilled water until it’s half full (I don’t have any Mississippi water to use!). How much of the Buffalo Arms polish do you add???? A cap full?????
:unsure: :unsure: :unsure:

Rick Thigpen
Check out Steve Okeefe's great web site at its new home here at Slotblog:
The Independent Scratchbuilder
There's much more to come...


#23 Mopar Rob

Mopar Rob

    Retro Snob as of 1/12/2011

  • Full Member
  • PipPipPipPipPipPipPip
  • 3,445 posts
  • Joined: 13-December 07
  • Gender:Male
  • Location:By a Great Lake

Posted 22 March 2011 - 09:26 AM

:popcorm1: COOL :good:


Rob Hanson

Shops at Mid-America Raceway and uses R-Geo Products


Rob was right!


#24 dc-65x

dc-65x

    Grand Champion Poster

  • Subscriber
  • PipPipPipPipPipPipPipPip
  • 6,825 posts
  • Joined: 14-February 06
  • Gender:Male
  • Location:Captain Rick: The only vintage slot car nut in SW Oregon?

Posted 22 March 2011 - 09:35 PM

Hey thanks Rob.

I put "the buff" to this chassis by hand..."Rub-A-Dub-Dub" style for hours. It look pretty good but I know what tumbling a chassis can do. I'm still amazed at the first chassis I did in my thread "Holy Smokes A Tumbling We Will Go!"

So when Pablo said.....

What kind of H2O are you going to use to tumble that ?

I can send some Mississippi water, but it's real heavy :D


.....then I said.....

Hi Pablo,

There's no way I'll risk this chassis with anything other than a time consuming hand polish. I've got new ceramic media and the polishing solution you sent me (THANK YOU! :) )
but I don't want to experiment with this one!


......then Ron said.....

Hey Rick,

You could experiment with the steel pans you cut off the kit and won't use ;)...... might learn if the media works on not on steel.

Looking good!!!!


.....well, I just gotsa ta know if I can lick my tumbling steel jinx.

I've had steel rust in seconds after being removed from tumbling in plain tap water :shok: . So for this chassis I went with distilled water and a cap full of Pablo's favorite, Buffalo Arms polishing liquid (thanks Pablo :) ). After 4 hours I removed the parts and they absolutely SPARKLED :D .

I quickly washed them off in Dawn and blew them dry with my Metro Data Duster that blows hot air at about a million miles an hour.

Then into a WD-40 soak....

Posted Image

.....in my neato liquid tight glass container:

Posted Image

Posted Image

So far so good........

Rick Thigpen
Check out Steve Okeefe's great web site at its new home here at Slotblog:
The Independent Scratchbuilder
There's much more to come...


#25 Pablo

Pablo

    Builder

  • Administrator
  • PipPipPipPipPipPipPipPip
  • 18,364 posts
  • Joined: 20-February 06
  • Gender:Male
  • Location:Cleveland, Tennessee

Posted 22 March 2011 - 10:20 PM

What did the foam look like ?
Was it right up to the top ?

Paul Wolcott


Electric Dreams Online Shop