Jump to content


Photo

R-Geo chassis jig tutorial


  • Please log in to reply
25 replies to this topic

#1 Rick

Rick

    Grand Champion Poster

  • Full Member
  • PipPipPipPipPipPipPipPip
  • 8,844 posts
  • Joined: 17-February 06
  • Gender:Male
  • Location:PA

Posted 08 August 2011 - 08:14 PM

I get asked often if there are operating instructions for my chassis jig, I thought it time to do it one time with pictures and explanations and then I can link to this for most questions and also point out the many options you have available for you. This will be added to over the next few days to try and make it as complete as I can.

Forward:

The first picture I think everyone is familiar with this usage. For 3/32 axle construction about everyone slides a piece of brass over the stainless pins to bush for correct axle size. Without the bushings, the span is for 1/8" axles.
Jig tips and tricks 004.jpg

As you can see these holes run the full length of the jig, making an almost infinite wheelbase possible. If you jump from the outside row to the next pair of holes on the inside row, you will have moved your wheelbase 1/16". If you jump to the next holes in the present row, you move wheelbase 1/8". But did you know you can jump in 1/32" increments?

In this next picture, you will notice, I removed one of the bushings but added a second bushing to the other pin. This make your wheelbase jump just 1/32" , either way to boot! This is one trick many are not aware of.
Jig tips and tricks 005.jpg

If any of you have watched the Steube building video, you will find some outstanding building tips. This is one of those taught to me from the video. The center T-slot makes this possible, easily. This is a spring clamp made from a piece of banding iron. More on this later.
Banding iron clamp 001.jpg

This nest shot is a motor bracket positioner I made froma piece of aluminum, but you could make this from wood or lexan. Since the jig has the center T-slot in the middle and is machined to have equal side to side measurement, the motor bracket holder is one way to make repeats with no fuss at all. You just check edge to fixture with your calipers and then snug the screw down when its perfectly centered on your jig. This just one I had laying around on my bench, the one I use is full length of the motor bracket, but this half one was made for a special purpose.
Jig tips and tricks 002.jpg

Next picture shows motor box snugly fit to the aluminum piece and it does not move around. Very solid, if you make it fir the inside measurement tight.

Jig tips and tricks 003.jpg

Here is a sample of using the Steube clamp. The nice thing is this stuff is free to be found easily and you can get different widths and lengths. Be careful drilling thin material, such as this, because it grabs and can open you up like a can opener, in a flash. Then round off the corners and deburr the hole.

Jig tips and tricks 006.jpg

More to follow..........
  • MarcusPHagen likes this

Rick Bennardo
"Professional Tinkerer"
scrgeo@comcast.net
R-Geo Products
LIKE my Facebook page for updates, new releases, and sales: Rgeo Slots...
 
Lead! The easy equalizer...


#2 Duffy

Duffy

    a dearly-missed departed member

  • Member at Peace
  • PipPipPipPipPipPipPip
  • 3,791 posts
  • Joined: 25-January 09
  • Gender:Male
  • Location:Geographically Brooklyn, Politically Berkeley

Posted 08 August 2011 - 08:45 PM

This man clearly has far too much time on his hands. We need to step up and demand more custom work from Rick. It's the humane thing to do, after all.
Michael J. Heinrich
1950-2016
Requiescat in Pace
 
And I am awaiting
perpetually and forever
a renaissance of wonder

#3 Duffy

Duffy

    a dearly-missed departed member

  • Member at Peace
  • PipPipPipPipPipPipPip
  • 3,791 posts
  • Joined: 25-January 09
  • Gender:Male
  • Location:Geographically Brooklyn, Politically Berkeley

Posted 08 August 2011 - 08:46 PM

Be careful drilling thin material, such as this, because it grabs and can open you up like a can opener, in a flash. Then round off the corners and deburr the hole.


On what? The spring steel, or your mutilated finger?
Michael J. Heinrich
1950-2016
Requiescat in Pace
 
And I am awaiting
perpetually and forever
a renaissance of wonder

#4 Rick

Rick

    Grand Champion Poster

  • Full Member
  • PipPipPipPipPipPipPipPip
  • 8,844 posts
  • Joined: 17-February 06
  • Gender:Male
  • Location:PA

Posted 08 August 2011 - 08:51 PM

I have the scars to prove out dumb a$$ stunts... :laugh2: :laugh2: :laugh2:

Rick Bennardo
"Professional Tinkerer"
scrgeo@comcast.net
R-Geo Products
LIKE my Facebook page for updates, new releases, and sales: Rgeo Slots...
 
Lead! The easy equalizer...


#5 Jairus

Jairus

    Body Painter Extraordinaire

  • Subscriber
  • PipPipPipPipPipPipPipPip
  • 10,174 posts
  • Joined: 16-February 06
  • Gender:Male
  • Location:Salem, OR

Posted 09 August 2011 - 12:36 AM

Where is the like button when you really need it? :D

Jairus H Watson - Artist
Need something painted, soldered, carved, or killed? - jairuswtsn@aol.com

www.slotcarsmag.com

www.jairuswatson.net
http://www.ratholecustoms.com
Check out some of the cool stuff on my Fotki!


#6 justDave

justDave

    Rookie Keyboard Racer

  • Full Member
  • Pip
  • 42 posts
  • Joined: 10-November 08
  • Gender:Male
  • Location:Corby, Northamptonshire, UK

Posted 09 August 2011 - 02:39 AM

Great, Rick. For a newbie/cretin like me, this is really invaluable. Why don't you spend all your waking hours adding to these posts? I, for one, will be reading and re-reading them. Posted ImagePosted Image

David

#7 Rick

Rick

    Grand Champion Poster

  • Full Member
  • PipPipPipPipPipPipPipPip
  • 8,844 posts
  • Joined: 17-February 06
  • Gender:Male
  • Location:PA

Posted 09 August 2011 - 05:09 PM

Today is a couple of photos to make your builds easier and some more pluses for the jig:

Just for demonstartion purposes, the first photo is to show you how to take advantage the jig gives you, with the wheelbase adjustment holes running the entire length of the jig, they are not only there for building 32nd scale and 43rd scale chassis but you have 1/16" changes for any and all of the needs you have to putting in cross wire and hinge tubes and keep them perfectly perpendicular to your main rails. The adjustment on this feature is once again, almost infinite on positioning. And if you want to rebuild or check some prebuilt chassis in need of repairs. You have the latitude to find positive stops.

Tips 8-9-11 004.jpg

This next gadget is something that is very easy to fabricate and makes pin tube, any size easy to install and perfect on the main rails. You will need to make a left hand and right hand version, as you will see when building some chassis.

You have all seen the gurus of chassis building make their hinge wires and put that little offset in the wire so it lies flat on the pan. This new way of mounting the hinge tubes is quicker and exact every time. Now if about a gram of weight being up .032 from the block bothers your Center of Gravity thinkg, then by all mean, do the tiny offset and just skip this tip.

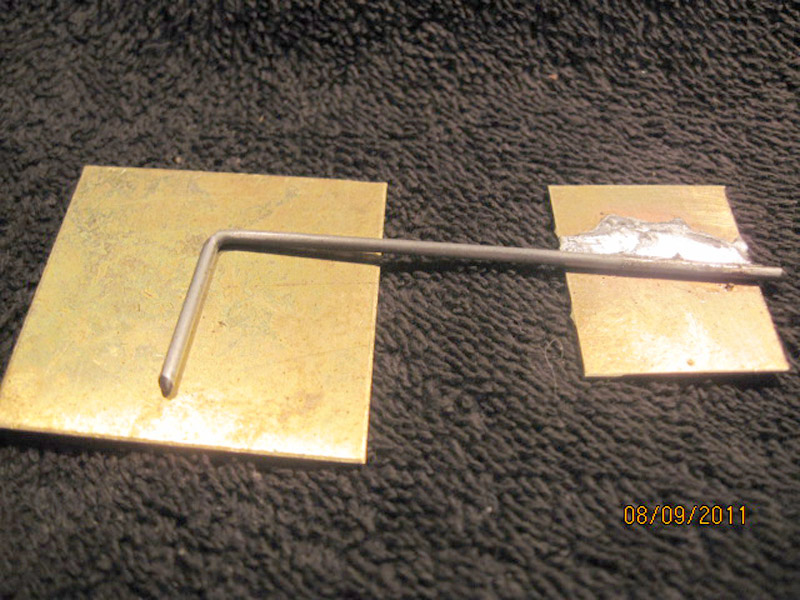
Take two piece of brass scraps, the thickness of your chassis plate or pan you are going to use. Then take a piece of music wire the correct size to slip inside of the hinge tube, bend an "L" bend in the wire. It doesn't have to be a perfect 90 degrees, just close. I am using .032 scraps and a piece of .062 that fits inside a piece of .093 brass tube.
Tips 8-9-11 001.jpg

This is what you should have now, just make sure the bent piano wire lays flat on both pieces of scrap. This is what you should end up with. Solder the brass "L" on to the one piece of brass scarp.

You now have a hinge jig, to attach the tube to the main rail of your chassis. I have the piece of .093 tube on the wire, in the picture. This will allow you to place the hinge tube at the exact height of the pan and other than a 90 degree bend, no other bdens are required for a perfect flat hinge. This trick can be used with any jig or building method, it's not exclusive to my jig.
Tips 8-9-11 002.jpg

Here is the part that is exclusing to the R-Geo jig, we once again have all those 1/8" pins along the jig edges, you can now position a wire across these pins, alligator clip it to the pin and then slide your hinge tube gainst the cross wire. Making the pins tubes right and left perfectly aligned wiht on another. No eyecrometer( lol Brain) is required here, it is all positive stop.

This has two pictures, the first to show the hinge tube against the main rail and the second is a reference pic to demonstrate the cross wire for a tube stop.
Tips 8-9-11 003.jpg
Tips 8-9-11 004.jpg

When soldering the hinge tube to the main rail, I prefer the "Jairus" method. What that is, coat the piano wire well with magic marker and the solder will not wick in and stick the wire to the hinge tube. When you solder the hinge on, heat in the center with your iron and you can view the solder wetting out along the pin, when it is very close to the end of the tube, remove the iron and it stops immediately. You can touch and go if you want it further out on the tube.

Next item is the "Duffy Pinner" brought to us from the lovable Duffy, of course. ;) Duffy and went a few rounds on this one, I said you only need one side,he insisted that they were needed a pair. He won.

These little gadgets are an optional item that slide over two of the pins along the edge. They can also be moved around anywhere you prefer. ( rememebr the pins change in 1/16" moves) They make it possible to have the same exact pin tube location on any build you create. You are also not limited on pin tube height, in any way. Just drop 1/8" axle shims on the pins and then install the pinners and make them the perfect height you want. Some like to use the Parma or JK wire clips on their builds and with having a dozen choices on each pinner, about any mount spread can be met and repeated.

Many will use a full width piece of 1/16" tube side to side, but if you are using precut hinge tubes, you can just use the pin tubes and a piece of .031 wire to span left and right and keep them straight and aligned.

These could also be used to locate your hinge wires perfectly side to side.
Tips 8-9-11 005.jpg
Tips 8-9-11 006.jpg

More to follow........stay tuned
  • Tim Neja likes this

Rick Bennardo
"Professional Tinkerer"
scrgeo@comcast.net
R-Geo Products
LIKE my Facebook page for updates, new releases, and sales: Rgeo Slots...
 
Lead! The easy equalizer...


#8 Duffy

Duffy

    a dearly-missed departed member

  • Member at Peace
  • PipPipPipPipPipPipPip
  • 3,791 posts
  • Joined: 25-January 09
  • Gender:Male
  • Location:Geographically Brooklyn, Politically Berkeley

Posted 09 August 2011 - 06:28 PM

... I know what you're doing here... and I LIKE it!...

It's true, you can't take everything there is to be done with a well-designed tool and engrave it on the base. That's why we have whole blogs for Shopsmith owners and the like.

This thread isn't so much a tutorial as an illumination, and I thank you for putting it up.

Duffy
Michael J. Heinrich
1950-2016
Requiescat in Pace
 
And I am awaiting
perpetually and forever
a renaissance of wonder

#9 Rickard Five

Rickard Five

    Dumb Drag Racer

  • Full Member
  • PipPipPip
  • 191 posts
  • Joined: 10-June 11
  • Gender:Male
  • Location:Dallas TX

Posted 15 August 2011 - 08:03 PM

That is a Kool Tool, when will we see a Full sized Jig. that will build a 13" Dragster ? One of those would make No Wheelie bar Dragsters Easy to build :)
“I make a point of staying right at the edge of poverty. I don’t have a pair of pants without a hole in them, and the only pair of boots I have are on my feet. I don’t mess around with unnecessary stuff, so I don’t need much money. I believe it’s meant to be that way. There’s a ‘struggle’ you have to go through, and if you make a lot of money it doesn’t make the ‘struggle’ go away. It just makes it more complicated. If you keep poor, the struggle is simple.“
–Von Dutch

Rickard Johnston
All images © Rickard5

#10 Marty Stanley

Marty Stanley

    Posting Leader

  • Member at Peace
  • PipPipPipPipPipPipPip
  • 2,582 posts
  • Joined: 21-July 08
  • Gender:Male
  • Location:Umatilla, FL

Posted 15 August 2011 - 08:54 PM

Rick,

Very nice!

Hey this is kind of like what Duffy said, a user's guide to all that you can do with one of these. Kind of like a hammer - they never come with an instruction sheet either. But there is a lot you learn how to do with that hammer while using it.

Posted Image


There is another simpler, but less adjustabe way to do use one of those pieces of 1/8 inch tubing on the axle on each side. That will put the axle right in the middle of the desired wheelbase.

Now if you add a set of those axle collars of yours on each axle, outside the spacers, then you won't have to pick the spacer up each time you move the jig.
Marty Stanley
1/24/48-2/18/16
Requiescat in Pace

#11 Duffy

Duffy

    a dearly-missed departed member

  • Member at Peace
  • PipPipPipPipPipPipPip
  • 3,791 posts
  • Joined: 25-January 09
  • Gender:Male
  • Location:Geographically Brooklyn, Politically Berkeley

Posted 16 August 2011 - 04:48 AM

Even better than a hammer, the jig hurts less when you hit your thumb with it.

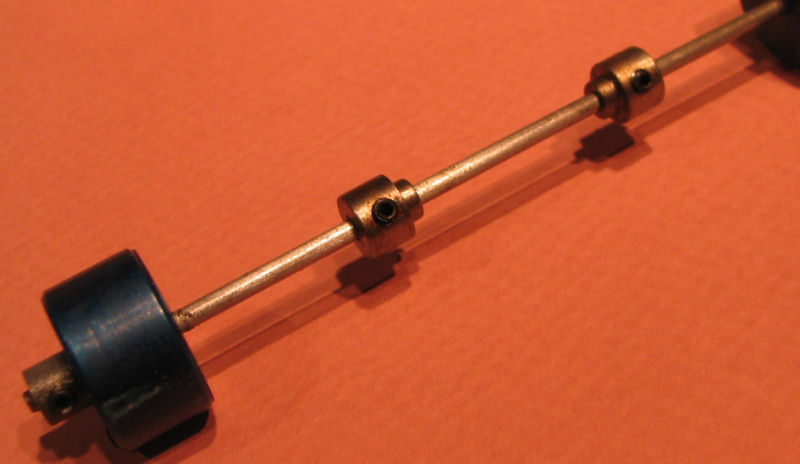
I ended up going out & buying some 3/32" stainless rod and making extra-long pieces, to span the whole jig & put collars on the outside.
That way the jig wheel's retained when I move things around. Another way would be to just setscrew the jig wheel...anyway I like
keeping things out on the outside, it gives me room to work.

Duffy47 OXCART GRAVY 03.jpg

And, also: I made me some flanged collars, with a .1875" boss to mimic a bearing. Better than stacking up with the real thing and
exposing it to all that acid.

Duffy 48 OXCART 09.jpg


Duffy
  • MarcusPHagen, Tim Neja and Rich Goucher like this
Michael J. Heinrich
1950-2016
Requiescat in Pace
 
And I am awaiting
perpetually and forever
a renaissance of wonder

#12 Joe Mig

Joe Mig

    Posting Leader

  • Full Member
  • PipPipPipPipPipPipPip
  • 3,077 posts
  • Joined: 25-February 07
  • Gender:Male
  • Location:Queens, NY, USA

Posted 16 August 2011 - 05:53 AM

That is a Kool Tool, when will we see a Full sized Jig. that will build a 13" Dragster ? One of those would make No Wheelie bar Dragsters Easy to build :)

He made one for me and I love it. :blum:
Take a look ,you might want somthing just a little diffrent.
http://slotblog.net/...__1#entry208821
Joseph Migliaccio. Karma it's a wonderful thing.

"Drive it like you're in it!!!"

"If everything feels under control... you are not going fast enough!"

Some people are like Slinkies... they're really good for nothing... but they still bring a smile to your face when you push them down a flight of stairs.

#13 Duffy

Duffy

    a dearly-missed departed member

  • Member at Peace
  • PipPipPipPipPipPipPip
  • 3,791 posts
  • Joined: 25-January 09
  • Gender:Male
  • Location:Geographically Brooklyn, Politically Berkeley

Posted 18 August 2011 - 06:03 PM

Here's a convenient little frammistan I made up when I was doing a lot of JDs; doing another
one tonight--& what with all my collars being 3/32" bore--I pulled it out.


This is 3/16" aluminum with a .078" slot cut down the middle with a Dremel cutoff disc
(actually, many, because aluminum gums 'em up pretty 'orrible). It shoves into the center
slot and takes the motor shaft--

RGOctr1.jpg


--and keeps everything centered.

RGOctr2.jpg


The funny egg shape was an attempt to make a rocking-cam clamping kind of thing.
Turned out to be totally unnecessary, the tight fit in the slot and around the shaft is fine.

Duffy
  • MarcusPHagen, macman and Joe Mig like this
Michael J. Heinrich
1950-2016
Requiescat in Pace
 
And I am awaiting
perpetually and forever
a renaissance of wonder

#14 Jocke P

Jocke P

    Backtracker

  • Full Member
  • PipPipPipPip
  • 258 posts
  • Joined: 31-October 13
  • Gender:Male
  • Location:Sweden

Posted 21 December 2013 - 09:52 AM

Rick, I am very pleased with my Jig so far, the first real build is coming up soon, your chassis will be first on the block.

When holding down multiple items at the same time across the Jig, I use snips of silicone tube under the aluminium bracket.

I had some pieces of fuel line tube from RC cars in different diameters and thicknesses that are now cut in 1/2" segments in a box. very handy and they can take the heat when soldering.
Joakim Pegers

#15 Dennis David

Dennis David

    Posting Leader

  • Subscriber
  • PipPipPipPipPipPipPip
  • 3,424 posts
  • Joined: 05-April 06
  • Gender:Male
  • Location:SF Bay Area

Posted 21 December 2013 - 11:36 AM

Ok who's going to make me a Duffy Pinner and one of those motor shaft holders?


Dennis David


#16 Jocke P

Jocke P

    Backtracker

  • Full Member
  • PipPipPipPip
  • 258 posts
  • Joined: 31-October 13
  • Gender:Male
  • Location:Sweden

Posted 21 December 2013 - 12:13 PM

The Duffy pinner combined with a template for body holes would end up on my must have list.
Joakim Pegers

#17 Pablo

Pablo

    Builder

  • Administrator
  • PipPipPipPipPipPipPipPip
  • 18,436 posts
  • Joined: 20-February 06
  • Gender:Male
  • Location:Cleveland, Tennessee

Posted 26 December 2013 - 06:22 PM

Rick, I got one of those white plate thingies with my Rick's jig but have never used it.

I forgot what it's for and how to use it.  Can you post something here about it ?


Thanks !!


Paul Wolcott


#18 Rick

Rick

    Grand Champion Poster

  • Full Member
  • PipPipPipPipPipPipPipPip
  • 8,844 posts
  • Joined: 17-February 06
  • Gender:Male
  • Location:PA

Posted 26 December 2013 - 11:14 PM

That was to lay a chassis on with tires etc and still be able to check straightness and or make repairs.......


Rick Bennardo
"Professional Tinkerer"
scrgeo@comcast.net
R-Geo Products
LIKE my Facebook page for updates, new releases, and sales: Rgeo Slots...
 
Lead! The easy equalizer...


#19 Pablo

Pablo

    Builder

  • Administrator
  • PipPipPipPipPipPipPipPip
  • 18,436 posts
  • Joined: 20-February 06
  • Gender:Male
  • Location:Cleveland, Tennessee

Posted 27 December 2013 - 08:24 AM

OK Thanks I'll fiddle with it.


Paul Wolcott


#20 Tim Neja

Tim Neja

    Grand Champion Poster

  • Subscriber
  • PipPipPipPipPipPipPipPip
  • 6,838 posts
  • Joined: 11-June 07
  • Gender:Male
  • Location:Paso Robles

Posted 27 December 2013 - 07:07 PM

Hey Duffy---do you make any of your "pinners"?  I'd like those!! Very nice! :)


She's real fine, my 409!!!

#21 Duffy

Duffy

    a dearly-missed departed member

  • Member at Peace
  • PipPipPipPipPipPipPip
  • 3,791 posts
  • Joined: 25-January 09
  • Gender:Male
  • Location:Geographically Brooklyn, Politically Berkeley

Posted 27 December 2013 - 07:22 PM

I gave the idea to Rick to sell after I made my own set up (he also came up with the name, which kinda creeped me out - I get this picture of being mounted between a moth and a rhinoceros beetle or some such), and in the wake of some PMs from you lot he is talking about rummaging around for stock to make up a run of them. Stay tuned.


Duf


Michael J. Heinrich
1950-2016
Requiescat in Pace
 
And I am awaiting
perpetually and forever
a renaissance of wonder

#22 Rick

Rick

    Grand Champion Poster

  • Full Member
  • PipPipPipPipPipPipPipPip
  • 8,844 posts
  • Joined: 17-February 06
  • Gender:Male
  • Location:PA

Posted 03 January 2014 - 06:00 PM

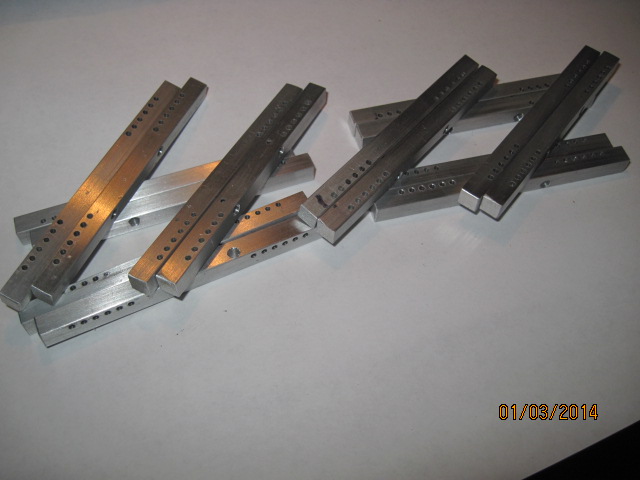
I made some "Duffy Pinners" and they are here for anyone that wants a pair...........

IMG_1114.JPG


  • Jimmy La Barba likes this

Rick Bennardo
"Professional Tinkerer"
scrgeo@comcast.net
R-Geo Products
LIKE my Facebook page for updates, new releases, and sales: Rgeo Slots...
 
Lead! The easy equalizer...


#23 Samiam

Samiam

    Posting Leader

  • Subscriber
  • PipPipPipPipPipPipPip
  • 4,762 posts
  • Joined: 18-January 12
  • Gender:Male
  • Location:Long Island, NY

Posted 03 January 2014 - 06:10 PM

ME....ME.....I want a pair of Duffy Pinners.


Just add it to the pile of other stuff.


Thanks.


Sam Levitch
 
"If you have integrity, nothing else matters, and if you do not have integrity, nothing else matters."
    Robert Mueller, special counsel (2013)
 
"... because people have got to know whether or not their president is a crook."
    Richard M .Nixon, Nov 17, 1973
 
"Fool me once, same on... shame on you. Fool me... you can't get fooled again."
    George W. Bush

#24 Dennis David

Dennis David

    Posting Leader

  • Subscriber
  • PipPipPipPipPipPipPip
  • 3,424 posts
  • Joined: 05-April 06
  • Gender:Male
  • Location:SF Bay Area

Posted 03 January 2014 - 07:56 PM

I'll take a pair. I also need for of the post that they go into.


Dennis David


#25 Bill Breck

Bill Breck

    Mid-Pack Racer

  • Full Member
  • PipPipPip
  • 112 posts
  • Joined: 21-October 10
  • Gender:Male
  • Location:Central NY

Posted 04 January 2014 - 01:28 PM

I'll take a pair. PM sent.


Electric Dreams Online Shop