Jump to content


Photo

Dragon Slayer building tech


  • Please log in to reply
15 replies to this topic

#1 Rick

Rick

    Grand Champion Poster

  • Full Member
  • PipPipPipPipPipPipPipPip
  • 8,844 posts
  • Joined: 17-February 06
  • Gender:Male
  • Location:PA

Posted 27 October 2011 - 06:49 PM

The first installment for building the Dragon Slayer will be some basics and then some pics to explain why what is done and where. A step by step picture tutorial will be coming soon.

Also some pictures and feedback from other builders.

This one recievd today on R-Geo Slots Facebook page:

Steve Kempson from the UK posted a pic of his build:

Steve Kempson Dragon.jpg

He used the same system as Rob Hanson, with stops soldered to the bend-ups on the center section and some kool pan reinforcement wires on the front of the pans. If you look closely you can see he laminated a small wire along the front edge of the ears on the nosepiece.

This was his post:

Final assembly: 6pm.
First lap of North London track: 8pm.
Race winner: 10:30pm.
Thanks, Rick. Not too bad at all!

Rick Bennardo
"Professional Tinkerer"
scrgeo@comcast.net
R-Geo Products
LIKE my Facebook page for updates, new releases, and sales: Rgeo Slots...
 
Lead! The easy equalizer...


#2 SliderGreg

SliderGreg

    On The Lead Lap

  • Full Member
  • PipPipPipPip
  • 267 posts
  • Joined: 16-August 06
  • Gender:Male
  • Location:Robertsdale, AL

Posted 27 October 2011 - 08:23 PM

Oh,,,,,,,, I gotta get my hands on one of these!
Maybe two or three.
Puxly the Pillsbury Doughboy!!!

(AKA Greg Gilbert)

#3 Mopar Rob

Mopar Rob

    Retro Snob as of 1/12/2011

  • Full Member
  • PipPipPipPipPipPipPip
  • 3,445 posts
  • Joined: 13-December 07
  • Gender:Male
  • Location:By a Great Lake

Posted 30 October 2011 - 09:31 PM

Rick asked me to do a build tutorial so I'm posting it here since it can always be moved later.


Unfortunately, this isn't going to be a stock build so it will have some extra steps. I figured it woudn't hurt to add them in case someone wanted to do the same?


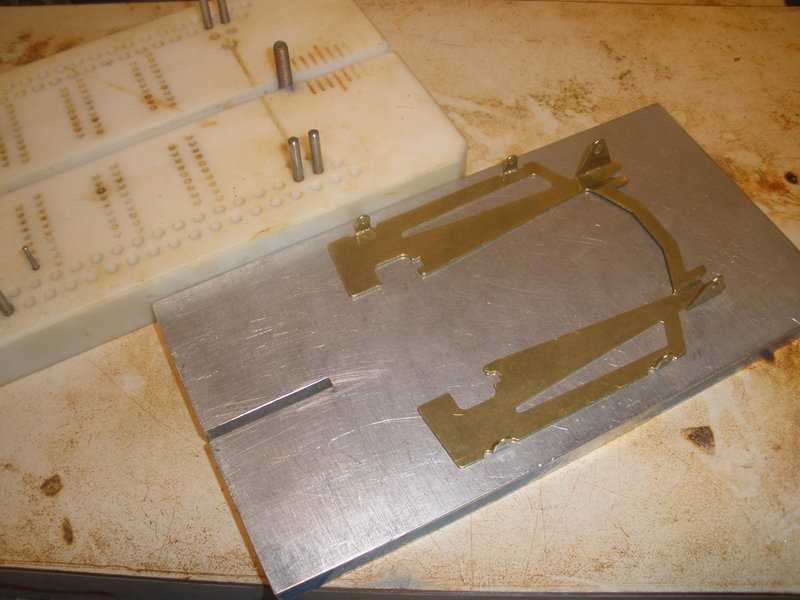
The first thing I do is straighten the main pan. Rick told me that his laser guy has a new tumbler process and my pan came to me pretty straight. I spent about 15 minutes to get it where I thought it was flat enough. Note make sure you check it on a flat plate.

TUTORIAL 00.jpg

Instead of the stock .078" rail, this will have a double rail. The easy way would be to run the second rail on the inside of the rail spaced 1" and just make a "L" bend and solder it to the face of the bracket. I decided I wanted the rail spacing wider so I need to trim the Backatcha. Normally I would just give the pieces to my buddy Bill and have him trim it off in his mill. Instead, I'm doing this Old School. Basically I scribed a line in the Backatcha ( red arrow ) with my calipers at the distance I need to remove material to.

TUTORIAL 01.1.jpg

Then I put it in my vice sandwiched between two pieces of spring steel. That help keeps it flat and the one piece is at the line that I scribed. All one has to do at this point is file it to the spring steel. Since the spring steel doesn't file very well, I don't have to worry about taking too much material off.

TUTORIAL 02.1.jpg

Rick's new bracket seems to be a nice piece? As a compromise between his pro bracket and this one I decided to remove some material ( red line ) Before modification the .050" bracket weight is a respectable 6.4 grams

TUTORIAL 02.2.jpg

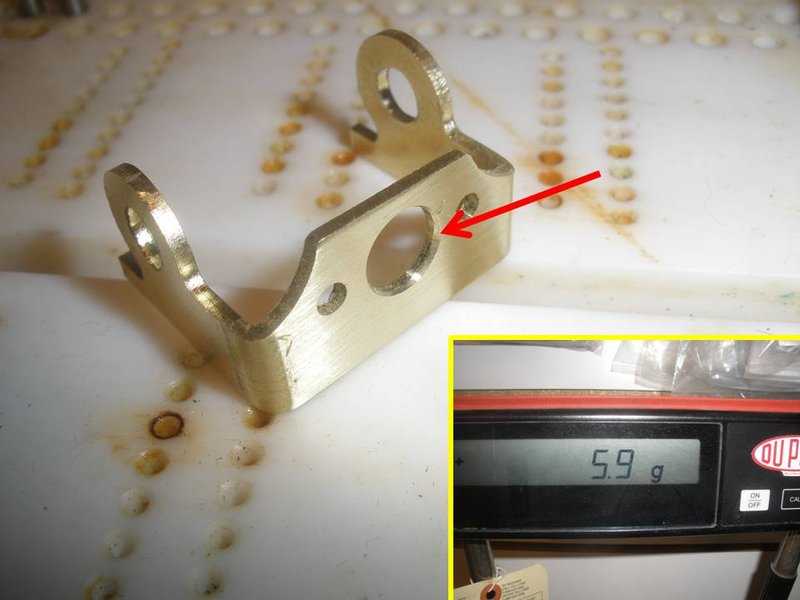
After modification I removed another .5 grams for a new weight of 5.9 grams. Even though Rick chamfered the bracket, I decided to make a bigger chamfer ( red arrow ) with a simple Vermont American counter sink bit that I purchased at my local hardware store for something like $5?

TUTORIAL 03.1.jpg


Rob Hanson

Shops at Mid-America Raceway and uses R-Geo Products


Rob was right!


#4 Mopar Rob

Mopar Rob

    Retro Snob as of 1/12/2011

  • Full Member
  • PipPipPipPipPipPipPip
  • 3,445 posts
  • Joined: 13-December 07
  • Gender:Male
  • Location:By a Great Lake

Posted 30 October 2011 - 09:43 PM

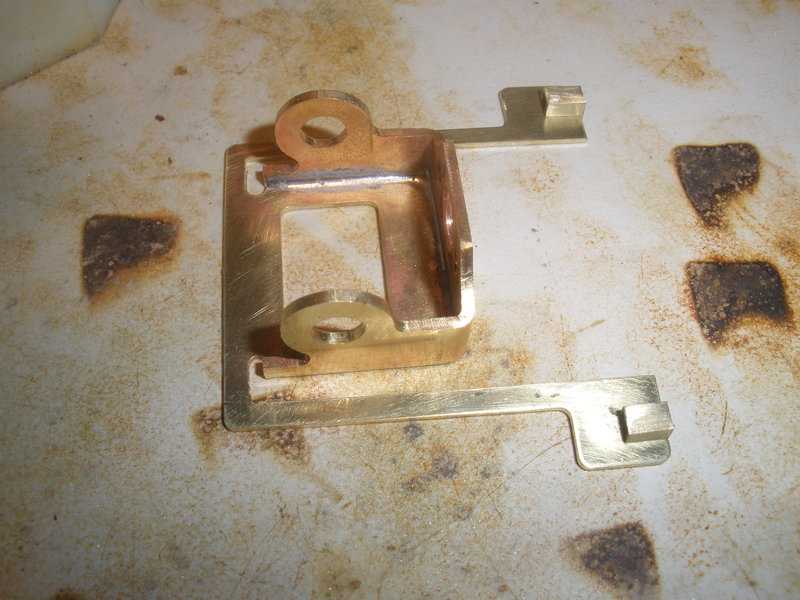
Now that the bracket and Backatcha have been modified I'm ready to solder the two together. Normally, this would have been the next step after straightening the main pan. I usually just slide the two pieces together, use some acid, put a small piece of soder in the corner and then apply some heat with my micro torch.

TUTORIAL 04.jpg

IMHO it leaves a clean looking solder joint?

TUTORIAL 05.jpg

I like to complete the whole Backatha assembly before moving on to the rest of the chassis. I cut two pieces of 1/8" square tubing 3/16" long.

TUTORIAL 06.jpg

After soldering I like to turn the piece over to make sure it wicked completely around the tubing for maximum strength. Any additional solder can be removed later with sandpaper, Scothbrite pad or better yet with one of those wire brushes that Rick sells.

TUTORIAL 07.jpg

Rob Hanson

Shops at Mid-America Raceway and uses R-Geo Products


Rob was right!


#5 Mopar Rob

Mopar Rob

    Retro Snob as of 1/12/2011

  • Full Member
  • PipPipPipPipPipPipPip
  • 3,445 posts
  • Joined: 13-December 07
  • Gender:Male
  • Location:By a Great Lake

Posted 30 October 2011 - 10:27 PM

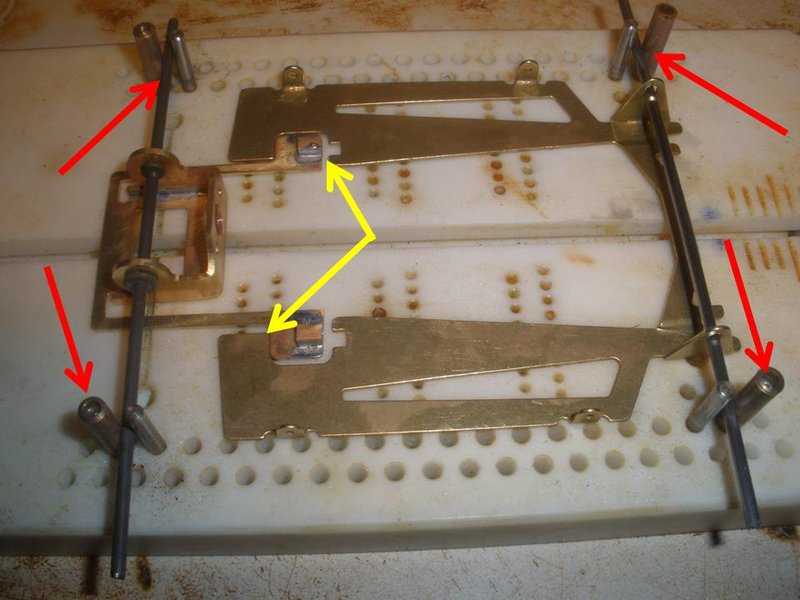
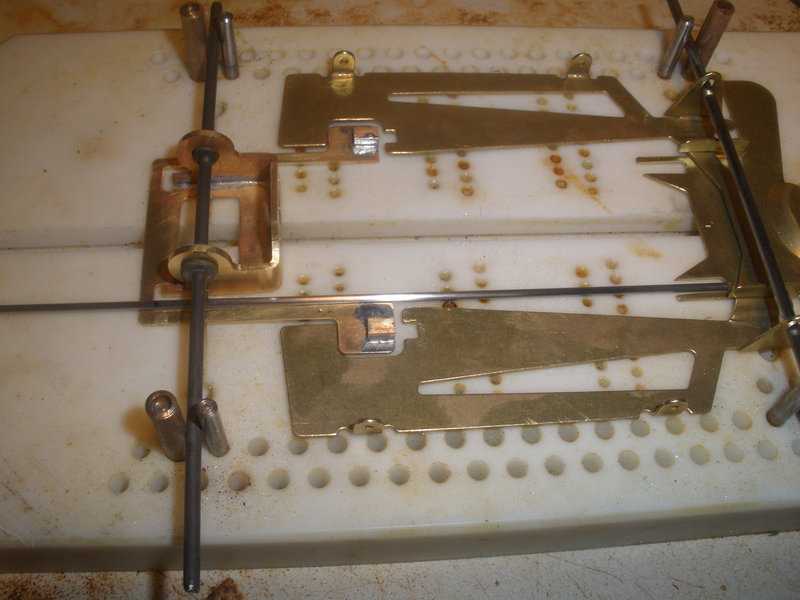
My next step is to put the pan and Backatcha on a jig. This chassis can probably be built without a jig, but since I have a couple, I figured I might as well use it? One of the nice things about Rick's jig is it can be adjusted in .032" increments with tubing (red arrows) I used the tubing to adjust the pieces where the main pan was fully foward touching the back of the Backatcha ( yellow arrows )

rsz_tutorial_08.jpg

Next I slide the nose piece toward the main pan ( red arrow ) until there is positive engagement of the nose piece to main pan ( yellow arrows ). Once the rails are soldered in the pan should hit all the foward stops on the nose piece and Backatcha at the same time?

rsz_tutorial_09.jpg

I guess at this point one could measure the distance between the front piece and Backatcha to determine the lenght of the main rails? I get lazy and just dop a longer than needed piece of piano wire into the chassis.

TUTORIAL 10.jpg

I then mark it with a marker ( red arrow ) and cut with my Dremel tool

rsz_tutorial_11.jpg

After the rails are cut and put into the chassis they're ready to be soldered in.

TUTORIAL 12.1.jpg

Rob Hanson

Shops at Mid-America Raceway and uses R-Geo Products


Rob was right!


#6 Mopar Rob

Mopar Rob

    Retro Snob as of 1/12/2011

  • Full Member
  • PipPipPipPipPipPipPip
  • 3,445 posts
  • Joined: 13-December 07
  • Gender:Male
  • Location:By a Great Lake

Posted 31 October 2011 - 09:19 PM

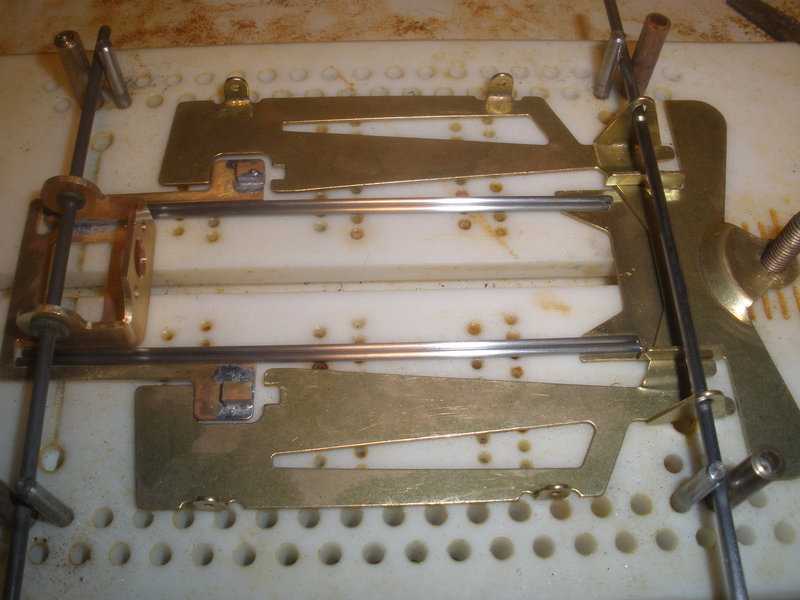
The next step in my process is to solder the rails together, into the nose piece, to the motor bracket and Backatcha.

TUTORIAL 13.1.jpg

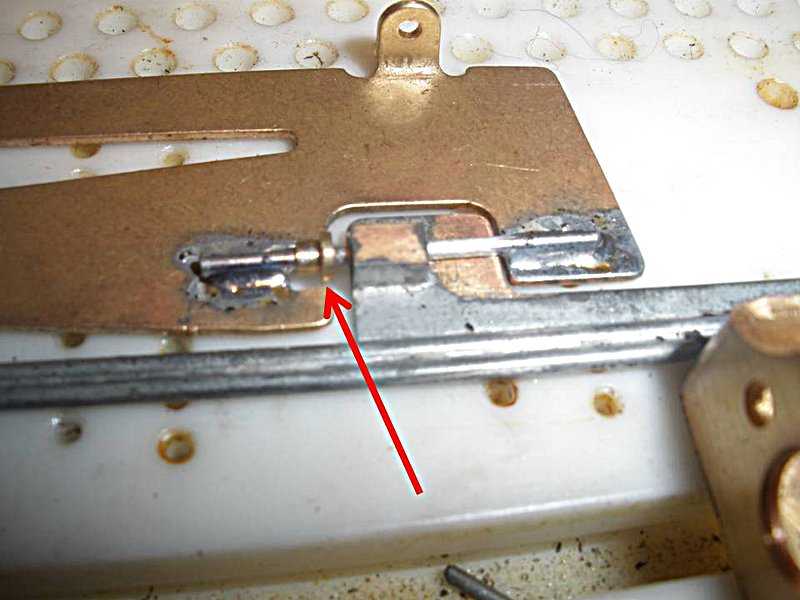
One change I did from my prototype build was to solder a piece of .047" wire ( red arrow ) to the crossover piece that connects the pans together. This is a dual purpose addition. It helps further stiffen the pan from a side impact and makes it harder to spread the pan appart.

TUTORIAL 14.1.jpg

After seeing Steve Kempson's build I lengthened the pan stop similar to his ( red arrow ) to help reinforce the pan.

TUTORIAL 15.1.jpg

Once the front pan stops are soldered in place I soldered the rear pan stops in place ( red arrow) I use .047" piano wire and a Sonic retainer. The 1/8" tubing that was soldered into the Backatcha has an internal dimension of .093". When you add the thickness of the chassis plate, the piano wire and subtract it from the ID there's .014" up and down movement. .032" + .047" = .069" .093" - .069" = .014" Side movement should be aproximately .023" if the wire is centered in the tubing. .093" - .047" = .046" Divide .046" / 2 = .023" for an aproximate side to side movement.

TUTORIAL 16.1.jpg


The distance between the Backatcha and the pan is .032" so that would be the maximum movement if one were to offset the wire in the tubing unless material was removed from the pan or Backatcha?


Rob Hanson

Shops at Mid-America Raceway and uses R-Geo Products


Rob was right!


#7 Mopar Rob

Mopar Rob

    Retro Snob as of 1/12/2011

  • Full Member
  • PipPipPipPipPipPipPip
  • 3,445 posts
  • Joined: 13-December 07
  • Gender:Male
  • Location:By a Great Lake

Posted 31 October 2011 - 09:46 PM

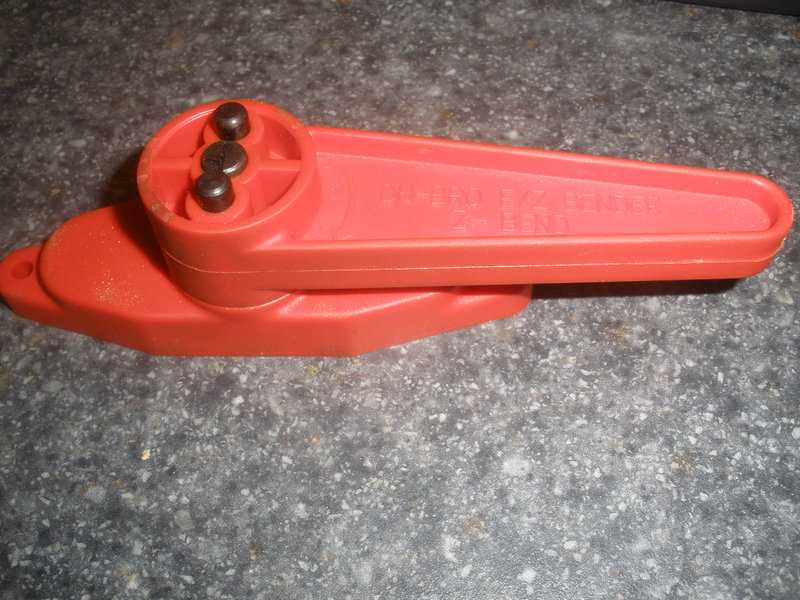
For the next step I used my Du-Bro Z-Bender

TUTORIAL 17.1.jpg

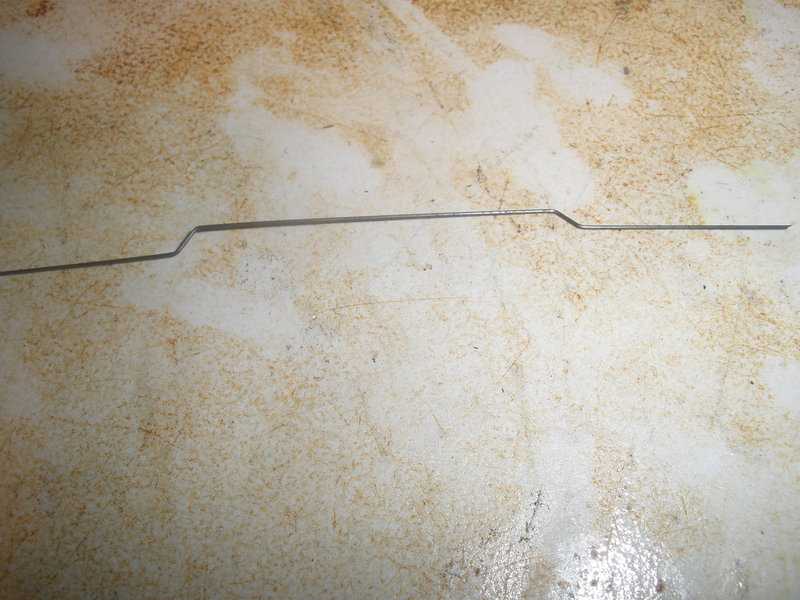
I made a wire per a tech inspectors suggestion to keep the pans from spreading during tech.

TUTORIAL 18.1.jpg

I soldered the wire in front of where the motor will sit. Personally, I don't think it's necessary but the .015" wire I used didn't add much weight and the pans still have the independent up and down plumber movement. If I would have used thicker wire some of that movement might have been lost?

TUTORIAL 19.1.jpg

All that was left was to solder the pin tubes and front axle in place.

TUTORIAL 20.1.jpg

I didn't need to add any additional wire to limit the pan movement like I had to in my prototype build. I was able to limit the movement with how I bent the tab for aproximately .003" or the thickness of a sheet of paper clearance. This allows the pan to move side to side an not "rock"

Rob Hanson

Shops at Mid-America Raceway and uses R-Geo Products


Rob was right!


#8 Mopar Rob

Mopar Rob

    Retro Snob as of 1/12/2011

  • Full Member
  • PipPipPipPipPipPipPip
  • 3,445 posts
  • Joined: 13-December 07
  • Gender:Male
  • Location:By a Great Lake

Posted 31 October 2011 - 09:58 PM

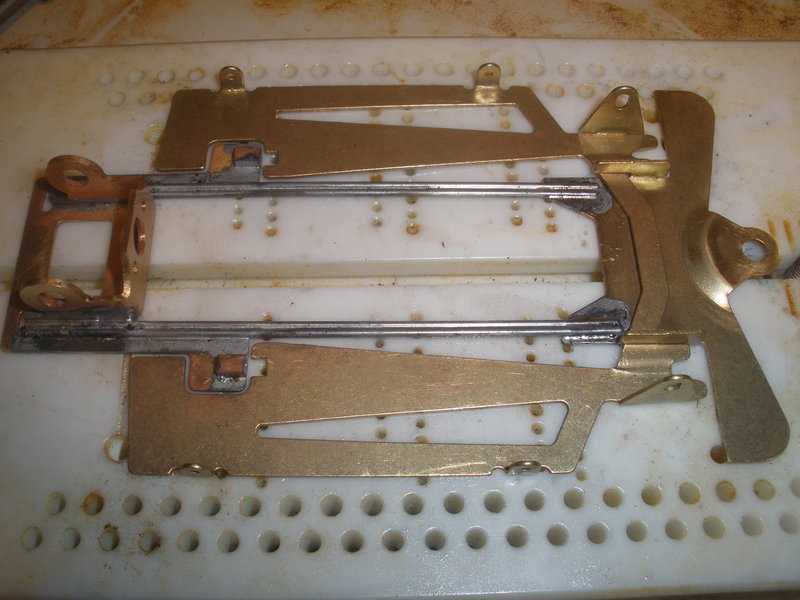
All finished.

TUTORIAL 21.jpg

TUTORIAL 22.jpg

Rob Hanson

Shops at Mid-America Raceway and uses R-Geo Products


Rob was right!


#9 Rick

Rick

    Grand Champion Poster

  • Full Member
  • PipPipPipPipPipPipPipPip
  • 8,844 posts
  • Joined: 17-February 06
  • Gender:Male
  • Location:PA

Posted 31 October 2011 - 11:38 PM

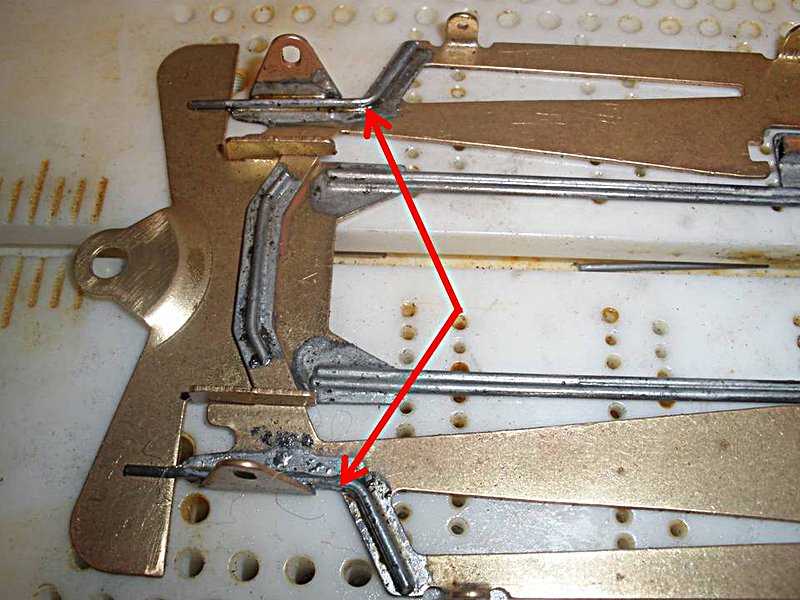
WTG Rob, great tutorial. Should help everyone building a Dragon Slayer. I would like to add one thing to the pictures.
DRagon Slayer 004 B.jpg

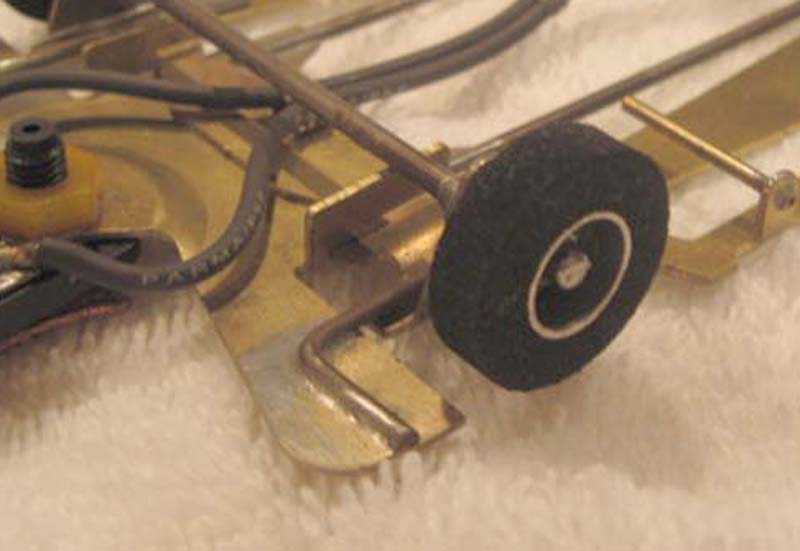
I like to add a stiffening wire to the front ears of most chassis, and if you solder this wire to the ears and then bring it back over the center section, you have zero .000, drop and the plane is not broken in any way. The rear pods on he backatcha has he wire running from the pan across the pod and that cannot break the plane in any way.

I raced mine last Saturday and it was very fast in the donut and handled great thruout the entire track. The King at Marks is very flat with no banking. I do not have any movement limited on my particular chassis.

Since there are no hinges, the pan spreading is a moot point. The cross wire is not required or needed. If someone were to pull the pans hard enough to spread them past 3.125, they are actually springing the pan and a hammer would be in order for their chassis. LOL

I like the wire laminate on Steves chassis( on the ear edge) and Mike Muir did a similar wire on his. I will get some pictures of his(Mikes) build and post in this thread ASAP.

Rick Bennardo
"Professional Tinkerer"
scrgeo@comcast.net
R-Geo Products
LIKE my Facebook page for updates, new releases, and sales: Rgeo Slots...
 
Lead! The easy equalizer...


#10 Rick

Rick

    Grand Champion Poster

  • Full Member
  • PipPipPipPipPipPipPipPip
  • 8,844 posts
  • Joined: 17-February 06
  • Gender:Male
  • Location:PA

Posted 08 November 2011 - 11:30 AM

I got an email this morning that I would like to share with you all:

Hi Rick,
I built my first DragonSlayer last week and tested on Saturday.
I followed your advice and did a standard build as per Mopar Rob’s on SlotBlog.
I’m very impressed, The new car was quicker than my previous best CanAm car.
I’ve built 6 different design chassis up to now and none of them equal the DragonSlayer!
We race on a 220 Kingleman Our rules are pretty much IRRA except we run a Plafit Cheetah 2 motor only.
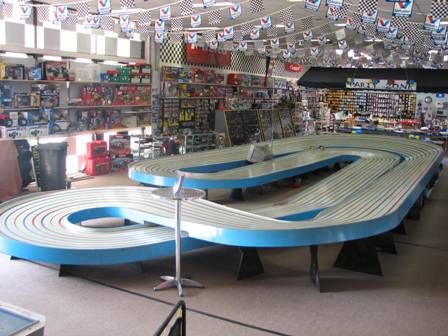
220 Kingelman.jpg


A competitive lap time here is 5.8, there are three of us that race in the 5.6/5.7 region with a best I have seen of high 5.4’s.
My cars have been doing 5.5’s at best and only once have I ever done a high 5.4.
Within 10 laps of running the DragonSlayer I was reeling off mid 5.4’s with track conditions not as good as on a race night.
My good Buddy (name removed) is currently building the second car, I’m sure he’ll be very happy as well.
I will let you know how the next race goes on the 19th.
As I have done a standard build and am happy to leave that car alone, I’d like to order some more products from you to do some experimenting.


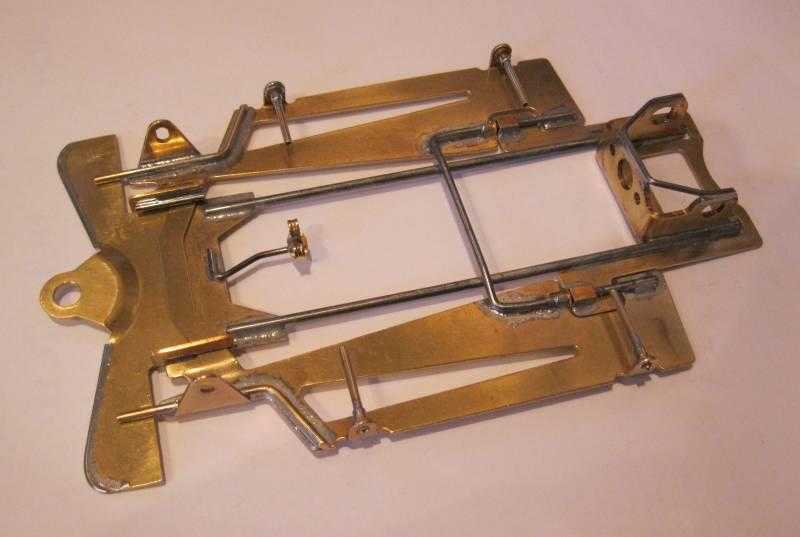
IMO this porject has been a complete success. The Dragon Slayer is easy to build and will make a competitive car. That was the agenda, for average skilled builders to create something that could compete well with the pro builders, at a reasonable price.

The project will continue with updates as I find out areas that need changed or supported as they become raced more and more reports come in.
Rick Bennardo
"Professional Tinkerer"
scrgeo@comcast.net
R-Geo Products
LIKE my Facebook page for updates, new releases, and sales: Rgeo Slots...
 
Lead! The easy equalizer...


#11 Charley

Charley

    Backmarker

  • Full Member
  • PipPip
  • 78 posts
  • Joined: 11-January 08
  • Gender:Male
  • Location:Marietta, GA

Posted 09 November 2011 - 12:42 PM

Where can one get this chassis, and how much are they? I would like to try my hand at one.

Charles Cornell


#12 Mopar Rob

Mopar Rob

    Retro Snob as of 1/12/2011

  • Full Member
  • PipPipPipPipPipPipPip
  • 3,445 posts
  • Joined: 13-December 07
  • Gender:Male
  • Location:By a Great Lake

Posted 09 November 2011 - 01:14 PM

Where can one get this chassis, and how much are they? I would like to try my hand at one.


Either PM "Rick" since he is R-Geo, the manufacturer of the product or I know Roger @ Mid-America (630) 484-8574 had some on his wall. Not sure if they are available through distributors, Rick would have to answer that?

Rob Hanson

Shops at Mid-America Raceway and uses R-Geo Products


Rob was right!


#13 Rick

Rick

    Grand Champion Poster

  • Full Member
  • PipPipPipPipPipPipPipPip
  • 8,844 posts
  • Joined: 17-February 06
  • Gender:Male
  • Location:PA

Posted 09 November 2011 - 01:47 PM

The Dragon Slayer is sold out here. Eagle had some as did Mid America.

Another run will be in the near future.

Follow along with Robs demonstration build and it should be fine. Rob has shored up the areas that has been found to possibly cause an issue. I will have more pictures of other builders builds to see their way of doing theirs.

Thanks for your interest.........

Rick Bennardo
"Professional Tinkerer"
scrgeo@comcast.net
R-Geo Products
LIKE my Facebook page for updates, new releases, and sales: Rgeo Slots...
 
Lead! The easy equalizer...


#14 Rick

Rick

    Grand Champion Poster

  • Full Member
  • PipPipPipPipPipPipPipPip
  • 8,844 posts
  • Joined: 17-February 06
  • Gender:Male
  • Location:PA

Posted 20 November 2011 - 02:26 PM

A follow up to the above story arrived this morning.

Hi Rick,
well the final round of the Retro CanAm 10 race series in Melbourne Australia has been run and won.
I’ve been trying all year to win a round of this series, trying all sorts of different design chassis, but always a placegetter, not a winner.

All that changed on November 19 when from a field of 18 entrants I finally won running a DragonSlayer (stock build) for the first time in the last race of the series.
My average lap times surpassed anything I’ve ever done before, and I set the fastest time during the race. (over a tenth faster than anyone else).
My car was definitely not the fastest in a straight line, however it was handling very well and a pleasure to drive.
My good buddy Andy running the only other DragonSlayer was almost as fast and ran a fine third place overall and could have won if it weren't for lots of crash carnage in his heat race.
I usually run a rear spoiler but on this occasion I opted to run no rear spoiler at all on a Truescale long nose Ti22 body.

I finished second in the series (if only I had a DragonSlayer sooner, who knows? There’s always next year).

Thanks again for an excellent chassis kit!
Can’t wait to get some more DragonSlayers and build one for my son.

Rick Bennardo
"Professional Tinkerer"
scrgeo@comcast.net
R-Geo Products
LIKE my Facebook page for updates, new releases, and sales: Rgeo Slots...
 
Lead! The easy equalizer...


#15 Ken Bryan

Ken Bryan

    Race Leader

  • Full Member
  • PipPipPipPipPip
  • 944 posts
  • Joined: 18-September 07
  • Gender:Male
  • Location:Spokane, WA

Posted 20 November 2011 - 08:32 PM

My situation is a little different and I built the car to fit my track. In addition to being a flat track, it has some very aggressive esses. My best car in every class (Can Am, formula, and stock car) is the one with the most chassis flex and the most chassis movement.

DSC08756.JPG

So I made 2 changes to the basic build. First I used a single .063 wire down the sides. No double wires or extra wire in the center. And while the little notch for the tubing was ingenious, I wanted more play than it would allow. So I ignored the slot and put a U-shaped piece almost under the back axle. The completed chassis looks like this:

DSC08758.JPG

When done, I realized that the floating pan could come up more than .032, allowing it to move forward over the little backatcha extension piece. So I soldered a very small forward stop on the forward piece. I'm sure it's not what Rick intended, but it works. Down stops front and back keep the pan from going too low.

DSC08760.JPG

With a long JK Ferrari body, the chassis weighs in at about 107 gram, which is among the lightest in may stable. Most are 115-120.

Handled great out of the box. Once the new motor began to break in, I pushed it to see how fast a lap I could turn. I consider my cars race ready if I can turn 5.5 in practice.. The lap record during a race is 5.29.

I turned a series of 5.3s in the car, then cranked a 5.26.

Going to mount a new body on it. Can't wait to get it on the track in a real race.

Thanks, Rick!

Ken Bryan

#16 Rick

Rick

    Grand Champion Poster

  • Full Member
  • PipPipPipPipPipPipPipPip
  • 8,844 posts
  • Joined: 17-February 06
  • Gender:Male
  • Location:PA

Posted 21 November 2011 - 03:10 PM

Tweaking a kit to suit your needs is what scratch building is all about. Glad you found some success with it Ken. It's always nice to hear positive feedback. In an early report from GRRR, Marty Stanley loaned his Dragon Slayer to a local young man that has never raced a retro car before(hes a flexi racer) and he won the CanAM A main.
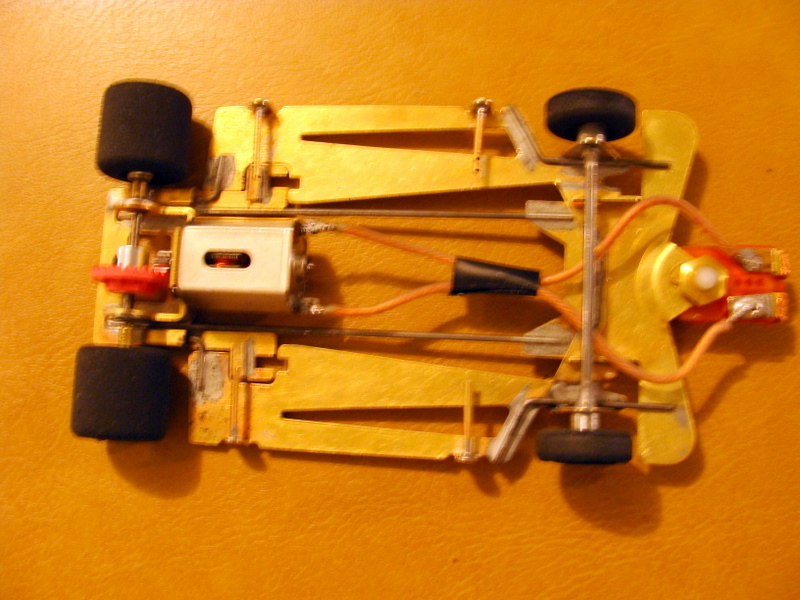
EDIT: I made an error the young man, JP Snyder, won the coupe race, not the CanAm Race............

Rick Bennardo
"Professional Tinkerer"
scrgeo@comcast.net
R-Geo Products
LIKE my Facebook page for updates, new releases, and sales: Rgeo Slots...
 
Lead! The easy equalizer...


Electric Dreams Online Shop