Jump to content


Photo

Tony P. 1969 Plumber's Nightmare Bat Pan car


  • Please log in to reply
62 replies to this topic

#26 Pablo

Pablo

    Builder

  • Administrator
  • PipPipPipPipPipPipPipPip
  • 18,370 posts
  • Joined: 20-February 06
  • Gender:Male
  • Location:Cleveland, Tennessee

Posted 05 February 2013 - 09:09 PM

Thanks for posting that, John Gorski !  Very very cool.


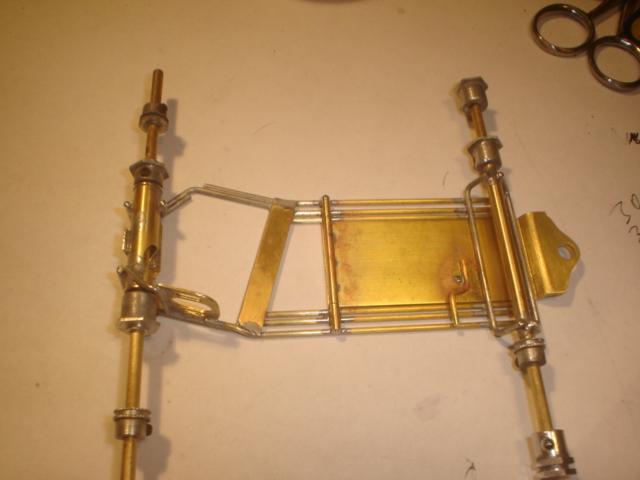
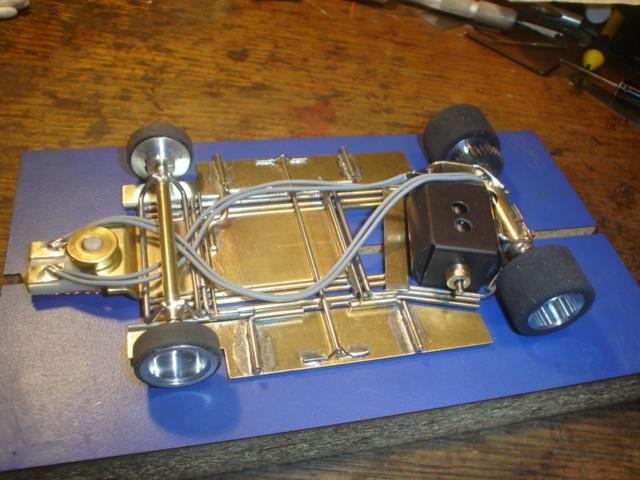
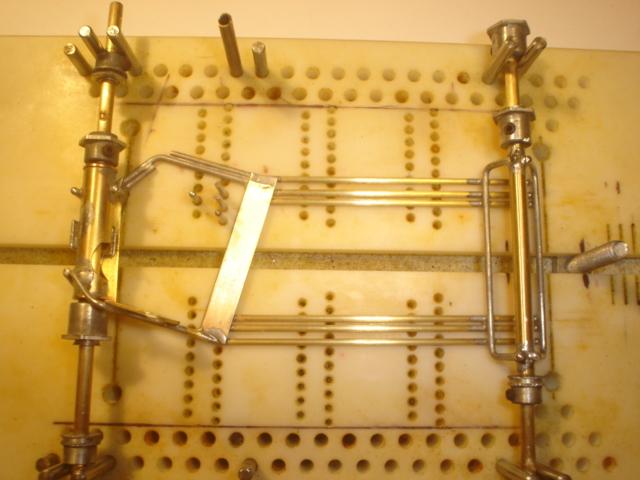
Front axle tube is secured, and drop arm is ready.  The article make it all look so easy.  The problem is, the parts are slightly different and the jig and jig wheels are different. Not to mention, my body is of different dimensions. 


DSC06286.JPG


DSC06290.JPG


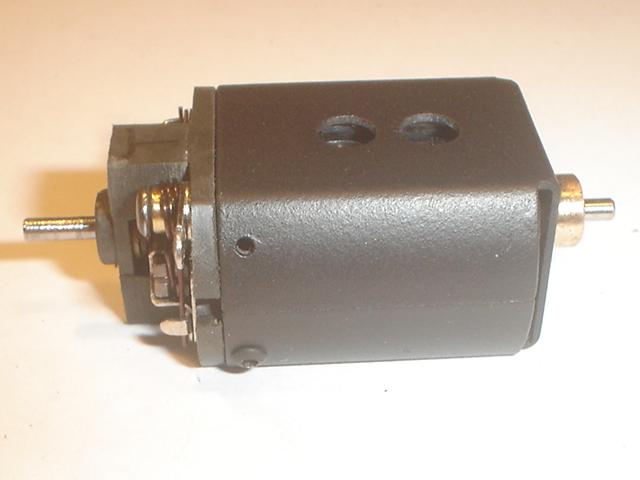
At this point, I took a break from the chassis to play with the motor.

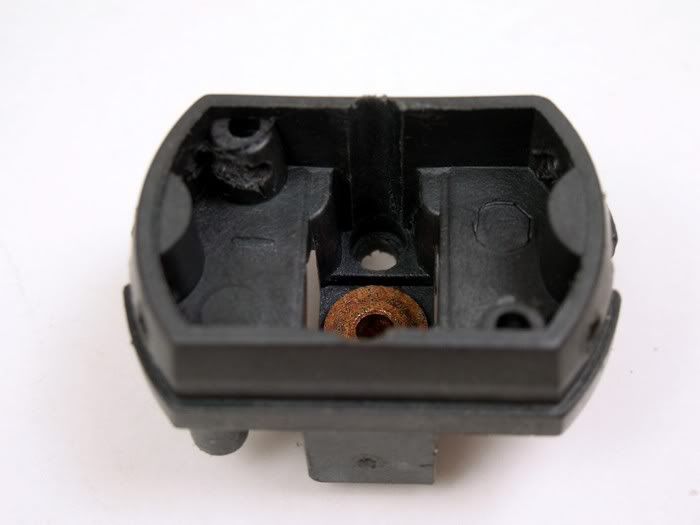
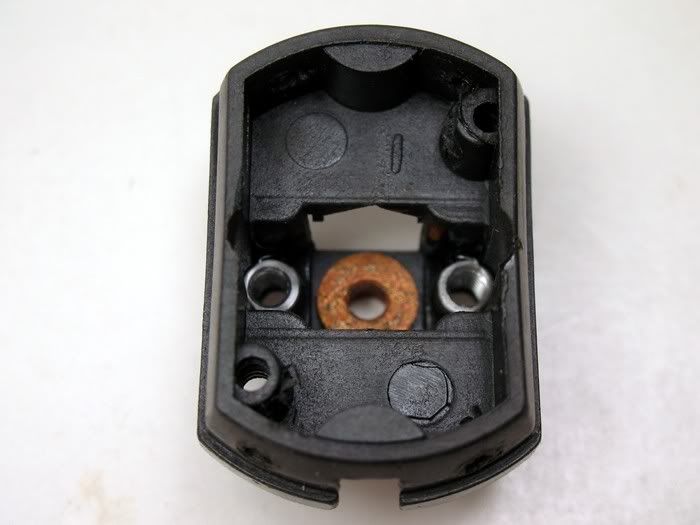
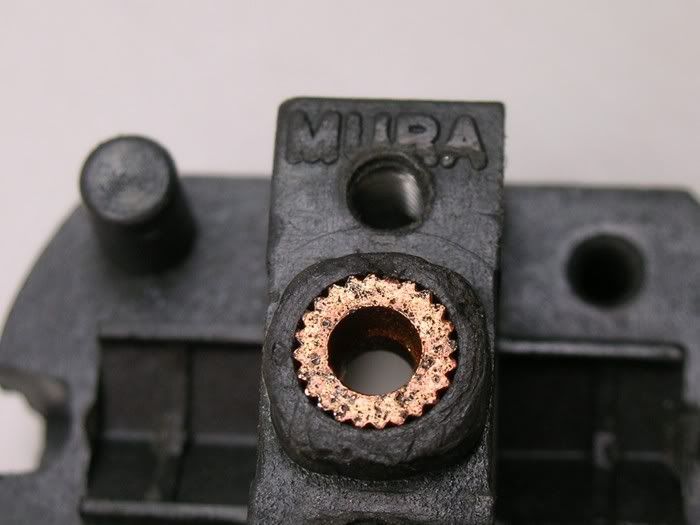
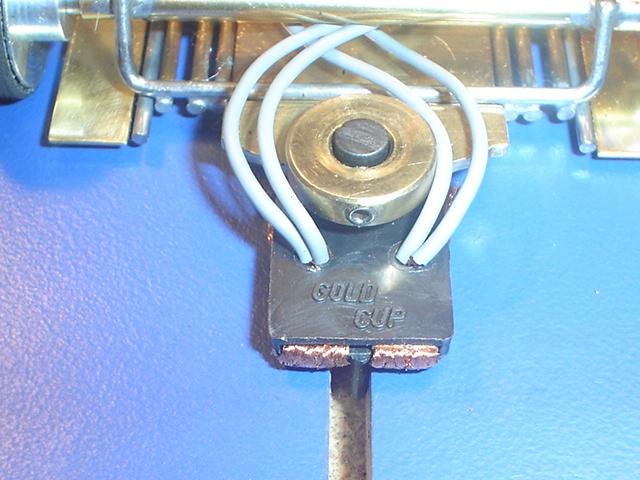
I absolutely have to have a motor that runs cool and will last.  The outdated hardware on the old Mura endbell will not provide that.

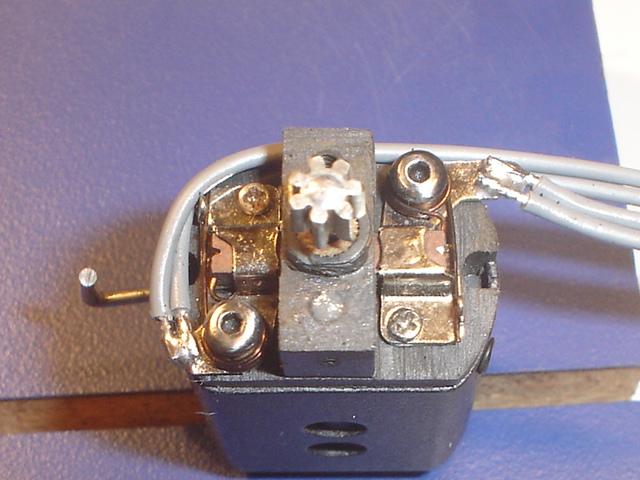
In previous builds, I have used modern Pro Slot hardware mated to vintage endbells with success.

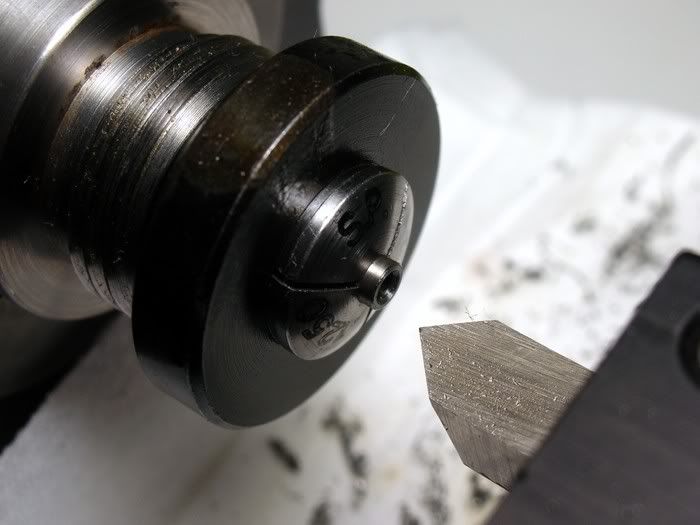
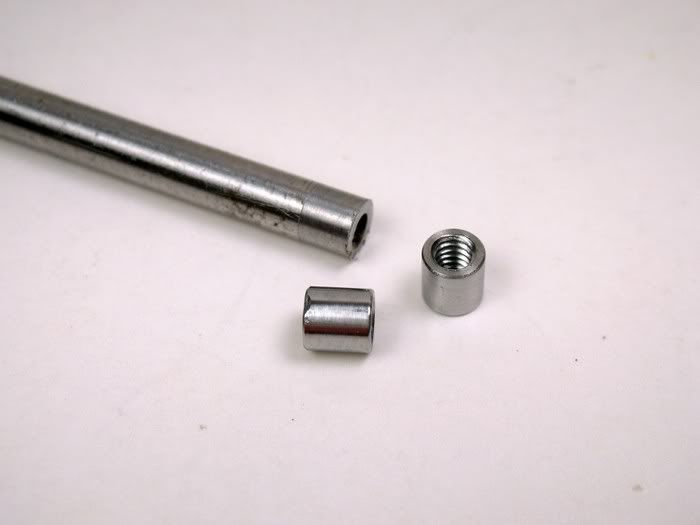
Here we go again: the posts and nubs on a vintage Mura endbell are shaved down to provide a level playing surface for new Pro Slot Speed FX hardware.


DSC06280.JPG


  • Peter Horvath likes this

Paul Wolcott


#27 Danny Zona

Danny Zona

    Checkered Flag in Hand

  • Full Member
  • PipPipPipPipPipPip
  • 1,535 posts
  • Joined: 27-July 12
  • Gender:Male
  • Location:Holly Hill (Daytona Beach), FL

Posted 05 February 2013 - 10:20 PM

I love watching how you build\rebuild cars. It's really cool and has helped me a lot. Thank you my friend.
Test, test, test and go test some more.
You're never fast enough!!! 💯

Preparation leads to separation.

Success is never owned but rented and rent is due everyday.

KELLY RACING 😎

#28 Pablo

Pablo

    Builder

  • Administrator
  • PipPipPipPipPipPipPipPip
  • 18,370 posts
  • Joined: 20-February 06
  • Gender:Male
  • Location:Cleveland, Tennessee

Posted 06 February 2013 - 01:59 PM

Hi Danny ! Welcome to my sickness :laugh2:  :crazy:


The PS hardware installed no problemo, although I had to use Mura spring cups to make it work.

Hoods are perfectly aligned.


DSC06291.JPG


Pre-radiused the Gold Dust brushes, found a pair of new Champion Light red springs, and she started right up at first click of the Wrightway. Always a good sign  Draws 1.2 Amps at 3 Volts and is cool as a cucumber :D


Paul Wolcott


#29 Pablo

Pablo

    Builder

  • Administrator
  • PipPipPipPipPipPipPipPip
  • 18,370 posts
  • Joined: 20-February 06
  • Gender:Male
  • Location:Cleveland, Tennessee

Posted 06 February 2013 - 06:43 PM

Thank Goodness for Dale Ryan's Knob Job; I hit the desired front and rear wheel OD's first try :)

DSC06300.JPG

DSC06301.JPG


Can paint turned out OK.  Where did I put that doggone Mura sticker ? :mellow:  

DSC06303.JPG


Motor runs strong, starts and revs up quick, and has good brakes.  The best feature of this pablo motor is, the brushes and springs are easy to service, readily available and easily replaced.

frankenmotor.jpg


Attached Images

  • DSC06312.JPG

Paul Wolcott


#30 Pablo

Pablo

    Builder

  • Administrator
  • PipPipPipPipPipPipPipPip
  • 18,370 posts
  • Joined: 20-February 06
  • Gender:Male
  • Location:Cleveland, Tennessee

Posted 06 February 2013 - 09:13 PM

Drop arm is done.  Don't try this without a mini-torch, kidz. :D


DSC06318.JPG


  • Peter Horvath likes this

Paul Wolcott


#31 Champion 507

Champion 507

    Checkered Flag in Hand

  • Full Member
  • PipPipPipPipPipPip
  • 1,521 posts
  • Joined: 06-March 09
  • Gender:Male
  • Location:OK

Posted 07 February 2013 - 08:41 AM

Another first class job on another cool project by Pablo. :wub:


Doug Azary
"We offer prompt service... no matter how long it takes!"
"We're not happy unless you're not happy"
"You want it when?"

#32 Jairus

Jairus

    Body Painter Extraordinaire

  • Subscriber
  • PipPipPipPipPipPipPipPip
  • 10,174 posts
  • Joined: 16-February 06
  • Gender:Male
  • Location:Salem, OR

Posted 07 February 2013 - 10:40 AM

I love the smell of burning flux in the morning.  :)


Very nice work Mr. P.  :good:


Jairus H Watson - Artist
Need something painted, soldered, carved, or killed? - jairuswtsn@aol.com

www.slotcarsmag.com

www.jairuswatson.net
http://www.ratholecustoms.com
Check out some of the cool stuff on my Fotki!


#33 Pablo

Pablo

    Builder

  • Administrator
  • PipPipPipPipPipPipPipPip
  • 18,370 posts
  • Joined: 20-February 06
  • Gender:Male
  • Location:Cleveland, Tennessee

Posted 15 February 2013 - 09:01 PM

Thanks Doug and Jairus ! :D


Plumber assembly complete.  It is harder than it looks ! :)


DSC06320.JPG


Paul Wolcott


#34 Pablo

Pablo

    Builder

  • Administrator
  • PipPipPipPipPipPipPipPip
  • 18,370 posts
  • Joined: 20-February 06
  • Gender:Male
  • Location:Cleveland, Tennessee

Posted 16 February 2013 - 12:01 AM

Lots of movement, just like Tony did it. :)


DSC06321.JPG


  • endbelldrive likes this

Paul Wolcott


#35 Bill from NH

Bill from NH

    Age scrubs away speed!

  • Full Member
  • PipPipPipPipPipPipPipPip
  • 14,326 posts
  • Joined: 02-August 07
  • Gender:Male
  • Location:New Boston, NH

Posted 16 February 2013 - 07:45 AM

That Mini Wheels car will have some competition yet! :)  Nice job Pablo. :heart:


  • Peter Horvath likes this
Bill Fernald
 
I intend to live forever!  So far, so good.  :laugh2:  :laugh2: 

#36 Pablo

Pablo

    Builder

  • Administrator
  • PipPipPipPipPipPipPipPip
  • 18,370 posts
  • Joined: 20-February 06
  • Gender:Male
  • Location:Cleveland, Tennessee

Posted 16 February 2013 - 09:49 AM

Thanks Bill !

The article calls for a LOT of movement.  Mine has a little less. I spent a LOT of time making the movements perfect. It was a challenge making it fit the dimensions of the narrower, shorter body.

One thing I learned from this build is, the further to the rear the plumber tube is, the more the front of the pans tilt downward when the rear lifts.

How do you like me now, Tony ? :icon22:  :curtsey:

Out of the tumbler:

DSC06331.JPG

DSC06332.JPG

DSC06344.JPG


  • endbelldrive, slotbaker, Peter Horvath and 1 other like this

Paul Wolcott


#37 dc-65x

dc-65x

    Grand Champion Poster

  • Subscriber
  • PipPipPipPipPipPipPipPip
  • 6,828 posts
  • Joined: 14-February 06
  • Gender:Male
  • Location:Captain Rick: The only vintage slot car nut in SW Oregon?

Posted 16 February 2013 - 11:47 AM

Looks great Pablo and that Mississippi water is still doing the trick. Shiny, shiny, shiny!!! :)


Rick Thigpen
Check out Steve Okeefe's great web site at its new home here at Slotblog:
The Independent Scratchbuilder
There's much more to come...


#38 Champion 507

Champion 507

    Checkered Flag in Hand

  • Full Member
  • PipPipPipPipPipPip
  • 1,521 posts
  • Joined: 06-March 09
  • Gender:Male
  • Location:OK

Posted 16 February 2013 - 02:39 PM

You 'da man, dude! :good:


Doug Azary
"We offer prompt service... no matter how long it takes!"
"We're not happy unless you're not happy"
"You want it when?"

#39 Pablo

Pablo

    Builder

  • Administrator
  • PipPipPipPipPipPipPipPip
  • 18,370 posts
  • Joined: 20-February 06
  • Gender:Male
  • Location:Cleveland, Tennessee

Posted 16 February 2013 - 09:22 PM

Thanks Rick and Doug :D

The lower hole on the 43 year old Mura endbell was a little sloppy, so I filled it with JB Weld and will re-tap it tomorrow.

Twin sets of Marklin Train wires. Motor brace ready.

DSC06355.JPG


Paul Wolcott


#40 Champion 507

Champion 507

    Checkered Flag in Hand

  • Full Member
  • PipPipPipPipPipPip
  • 1,521 posts
  • Joined: 06-March 09
  • Gender:Male
  • Location:OK

Posted 16 February 2013 - 09:28 PM

Pablo,

Is this your first time to fill a stripped Mura endbell hole with JB Weld or have you done it before?


I have a couple of those endbells that need help like that and that would be an easy fix.


Please let us know how it turns out.


Doug Azary
"We offer prompt service... no matter how long it takes!"
"We're not happy unless you're not happy"
"You want it when?"

#41 Pablo

Pablo

    Builder

  • Administrator
  • PipPipPipPipPipPipPipPip
  • 18,370 posts
  • Joined: 20-February 06
  • Gender:Male
  • Location:Cleveland, Tennessee

Posted 16 February 2013 - 09:37 PM

Doug, there is no doubt it will work, strong as before.

I will let it harden overnight, then tap it with my Radio Shack mini-twist drill bit set.


Paul Wolcott


#42 Bill from NH

Bill from NH

    Age scrubs away speed!

  • Full Member
  • PipPipPipPipPipPipPipPip
  • 14,326 posts
  • Joined: 02-August 07
  • Gender:Male
  • Location:New Boston, NH

Posted 16 February 2013 - 11:22 PM

You could also drill out the hole & glue in a plug of 3/32 plastic rod. When dry, drill & tap the plastic plug for a 2-56 machine screw. This procedure will also fix a stripped out endbell hardware hole.


Bill Fernald
 
I intend to live forever!  So far, so good.  :laugh2:  :laugh2: 

#43 dc-65x

dc-65x

    Grand Champion Poster

  • Subscriber
  • PipPipPipPipPipPipPipPip
  • 6,828 posts
  • Joined: 14-February 06
  • Gender:Male
  • Location:Captain Rick: The only vintage slot car nut in SW Oregon?

Posted 17 February 2013 - 12:09 AM

 Hi Pablo,


The JB Weld will should work. If it doesn't here's something that I did that worked. I hope it's OK to share it here :)


The chassis is finished and tumbling away to shiny goodness. In the mean time these words of the Good Doktor were ringing in my head........


........as I stripped out the well worn threads in my Mura end bell :shok: ohmy.gifangry.gifblush.gif .

We don't have a large stock of Mura A-can end bells in the SHPBAPSCR museum. In fact many we do have are stripped out blink.gif . Time for a fix! Here's what I came up with. I used my new Sherline lathe bought with my "Bush Bucks" (tax credit smile.gif ) and machined some 1/8" diameter by 1/8" long steel inserts. Then I tapped them for 2-56 machine screws:

Steube1stGenAW026.jpg

Steube1stGenAW033.jpg

I set the end bell up in my milling machine, indicated the bearing hole in, offset .200" and plunged an 1/8" endmill down to within 1/32" of breaking out the front of the end bell. This created a nice pocket for the insert to be press fit into:

Steube1stGenAW032.jpg

Here is the insert and machine screw installed:

Steube1stGenAW046.jpg

Here both inserts are pressed in place. The press fit was enough to allow me to tighten the pee out of the screws but I added some "2-Ton" epoxy anyway:

Steube1stGenAW041.jpg

From the outside it looks stock. You can just see the shiny steel thread inside the hole:

Steube1stGenAW043.jpg

This worked out great and it means all our stripped out end bells can be saved. It's a bit time consuming and if I could order a new Mura end bell from the 1968 1/2 Auto World Catalog I would :laugh2: .

As I turn my attention to building up a first generation all Mura made A-can motor more of the Good Doktor's words come to mind:


Yikes! More to come..............


  • Gator Bob likes this

Rick Thigpen
Check out Steve Okeefe's great web site at its new home here at Slotblog:
The Independent Scratchbuilder
There's much more to come...


#44 Champion 507

Champion 507

    Checkered Flag in Hand

  • Full Member
  • PipPipPipPipPipPip
  • 1,521 posts
  • Joined: 06-March 09
  • Gender:Male
  • Location:OK

Posted 17 February 2013 - 07:16 AM

To quote Artie Johnson on Laugh-In years ago, "ver-r-r-ry interestink". I'll remember that.


How would you fix a white Mabuchi endbell with the same problem?


Doug Azary
"We offer prompt service... no matter how long it takes!"
"We're not happy unless you're not happy"
"You want it when?"

#45 tonyp

tonyp

    Grand Champion Poster

  • Member at Peace
  • PipPipPipPipPipPipPipPip
  • 15,325 posts
  • Joined: 12-February 07
  • Gender:Male
  • Location:Sanford, FL, land of lizards and big roaches

Posted 17 February 2013 - 04:19 PM

Pablo, looking great.

Anthony 'Tonyp' Przybylowicz

5/28/50-12/20/21
Requiescat in Pace


#46 Pablo

Pablo

    Builder

  • Administrator
  • PipPipPipPipPipPipPipPip
  • 18,370 posts
  • Joined: 20-February 06
  • Gender:Male
  • Location:Cleveland, Tennessee

Posted 17 February 2013 - 09:21 PM

Thanks Tony !!!


DSC06372.JPG

DSC06382.JPG


  • endbelldrive and Peter Horvath like this

Paul Wolcott


#47 Mark H

Mark H

    Race Leader

  • Full Member
  • PipPipPipPipPip
  • 591 posts
  • Joined: 02-September 09
  • Gender:Male
  • Location:SoCal

Posted 17 February 2013 - 09:36 PM

very nice Paul!


Mark Haas

#48 Peter Horvath

Peter Horvath

    Mid-Pack Racer

  • Full Member
  • PipPipPip
  • 142 posts
  • Joined: 03-June 10
  • Gender:Male
  • Location:Highland Park, NJ - Home of Mini Wheels

Posted 17 February 2013 - 09:53 PM

Wow, Pablo. That thing is killer. Can't wait to see it all finished.


Peter Horvath
My Band
Plays guitar.
Plays with slot cars.
Cooks food.
Hangs out with family.

Sleeps occasionally.


#49 dc-65x

dc-65x

    Grand Champion Poster

  • Subscriber
  • PipPipPipPipPipPipPipPip
  • 6,828 posts
  • Joined: 14-February 06
  • Gender:Male
  • Location:Captain Rick: The only vintage slot car nut in SW Oregon?

Posted 18 February 2013 - 01:39 AM

Very clean build Pablo. Really nice!


Rick Thigpen
Check out Steve Okeefe's great web site at its new home here at Slotblog:
The Independent Scratchbuilder
There's much more to come...


#50 Pablo

Pablo

    Builder

  • Administrator
  • PipPipPipPipPipPipPipPip
  • 18,370 posts
  • Joined: 20-February 06
  • Gender:Male
  • Location:Cleveland, Tennessee

Posted 18 February 2013 - 06:20 PM

Thanks Guys ! :)


I made a mistake - the drop arm was designed for a Cox flag.  The Jet Flag required WAY too many spacers.  A new Gold Cup with modern braid ended up being a good combination.


DSC06395.JPG


Almost forgot to apply the Mura sticker.  Yes I know it's not orientated correctly.  Oh well.


DSC06396.JPG


I guess if I have my own sandbox now, I need to start keeping better records.


Summary:

Armature: unknown

Magnets: Speed FX

Endbell: Mura with Speed FX brush hoods

Brushes: Gold Dust

Pinion: JK 48P 7T

Spur: D & S 32T

Axles: 1/8 PCH

Spacers: Slick 7 steel

Flag:  Gold Cup

Front and rear wheels:  Electric Dreams Russkit reproductions, front 3/4, rear 7/8

Bushings: Slick 7

Chassis: Tony P. replica built by Pablo

Wheelbase: 3 3/4"

Width: 3.0"

Guide Lead: 3/4"

Body: Tom Andersen, paint by Pablo

Driver paint by Jairus Watson


Now, if I could just find that doggone body harpoon...... :laugh2:


  • Peter Horvath likes this

Paul Wolcott


Electric Dreams Online Shop