Recently Rick B of R-Geo sent this 4.5” stock car kit to me for approval and a test build. Following is a little abbreviated step by step concentrating on the major concepts of this frame and not dwelling on how to cut a piece of wire. I’m going to assume that some stuff is just basic.
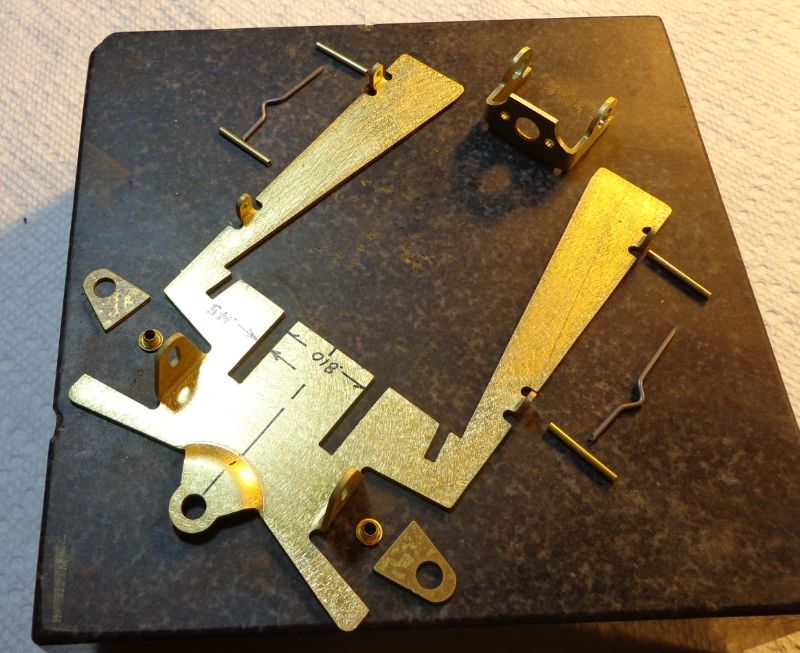
Right out of the bag it is obvious that this is a very easy kit to work with. This first pic shows all the parts. I used most all except for the extra front uprights which are for ball bearings. The main center section was very flat and the bracket was square. Brass stock is .050" thick.
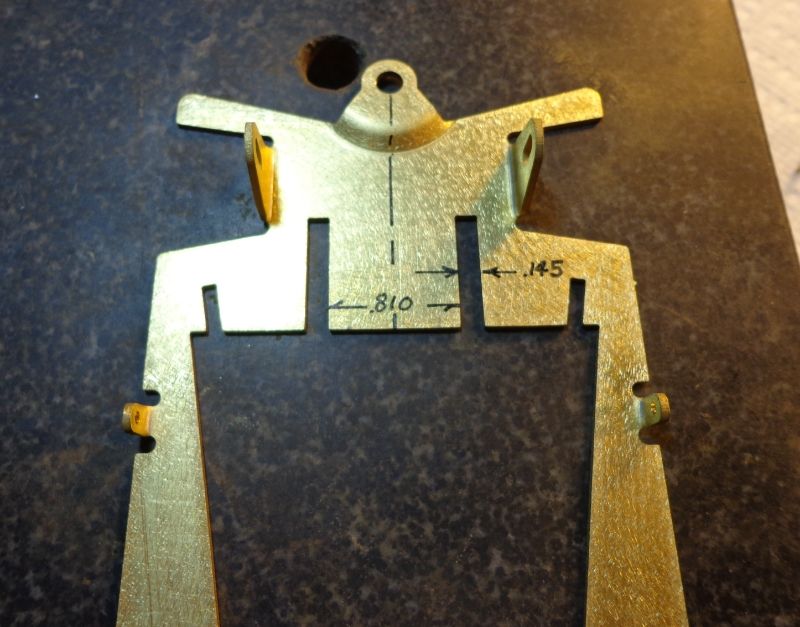
Pic 2 shows the major dimensions that we are dealing with the width of the main rail slots and the inside distance for the main rails. The slot for the main rails accommodates three rails of .047" piano wire per side in stock configuration.
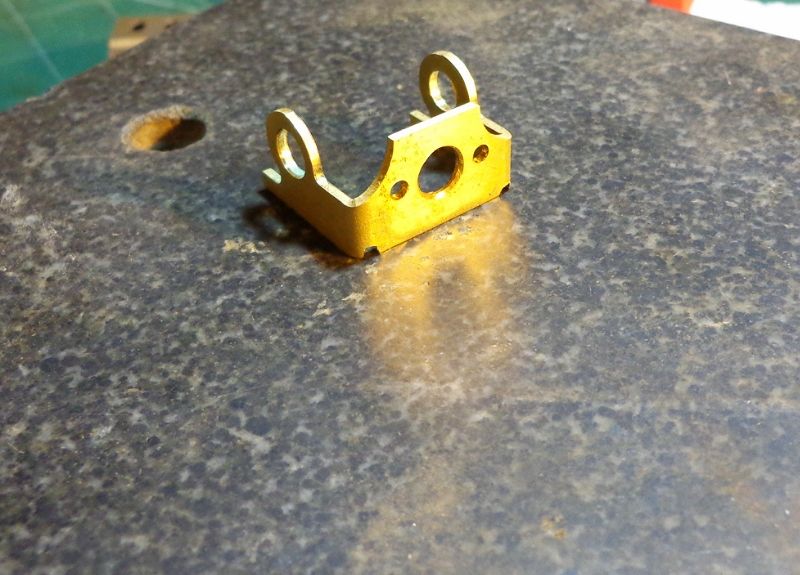
This shows the bracket with a small relief cut at each side. This is to allow the inside main rail to run all the way to the rear, while butted directly against the inside of the bracket.
Pic 4 shows the center section in the jig with a dummy motor screwed in place and a spacer block in place that is exactly the same width as the inner rail spacing. This spacer allows me to build the inner rails right up against the spacer an thus keep the frame square more easily.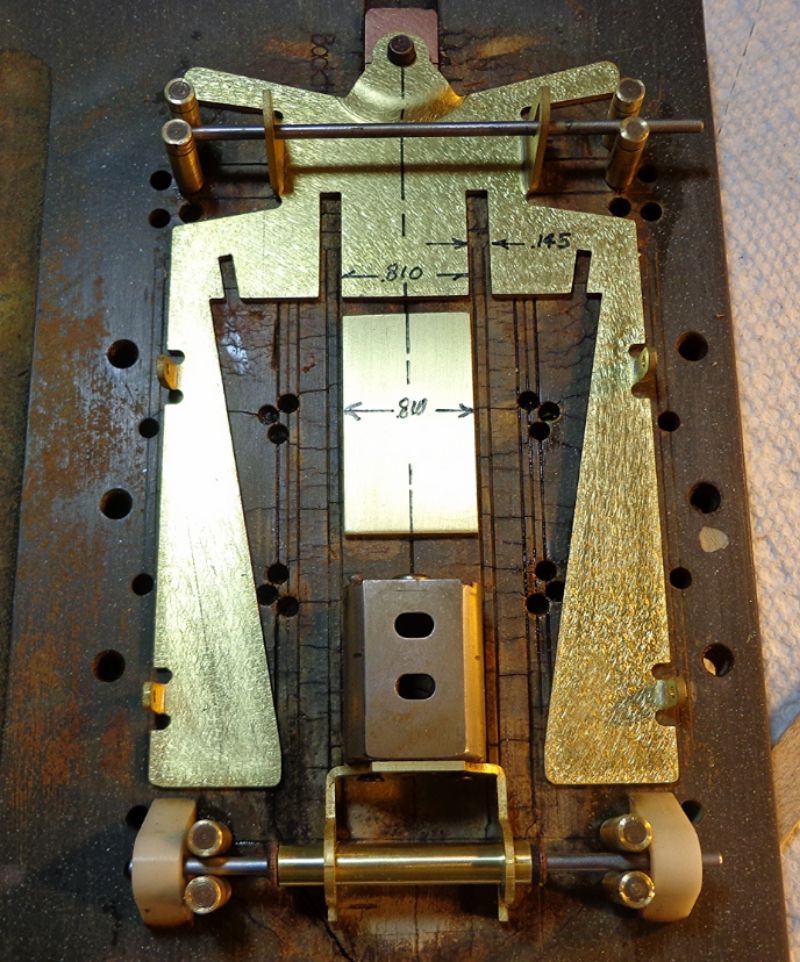
Pic 5 shows the inner and outer main rails tacked in place with a spacer rail in between. This is because the inner and outer rails run full length and run wild at the end of the bracket. They can be trimmed as needed later. However, the middle rail in this three-rail .047" configuration runs right into the bracket. I chose to set the inner and outer rails first and then come back and fill in the center rail.
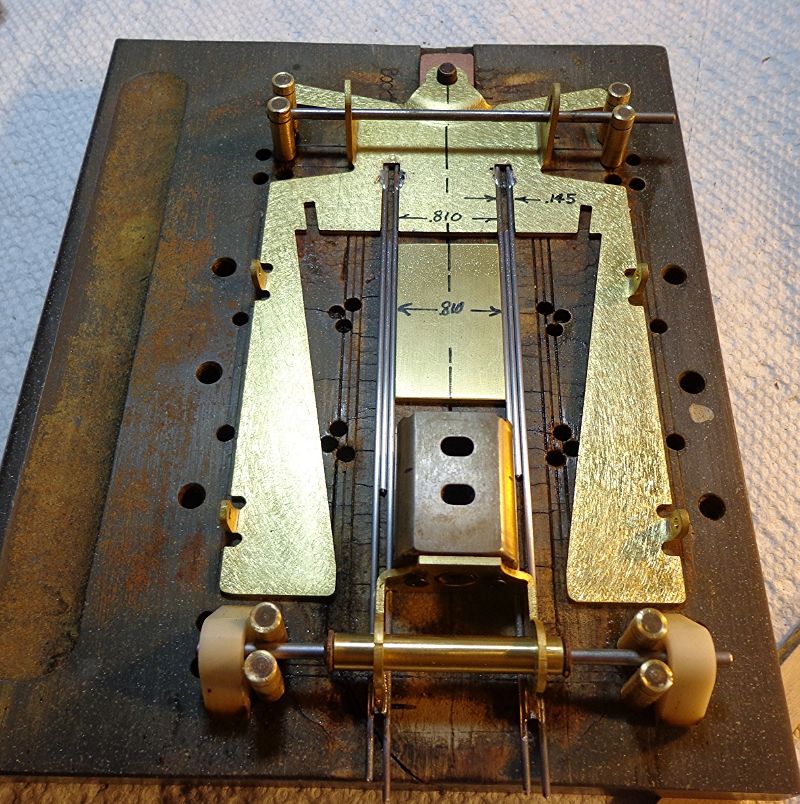
Here’s the center rail with the upright bend in place and ready to trim to length and fit between the others. Note that the inner and outer rails are barely tacked in place at this point.
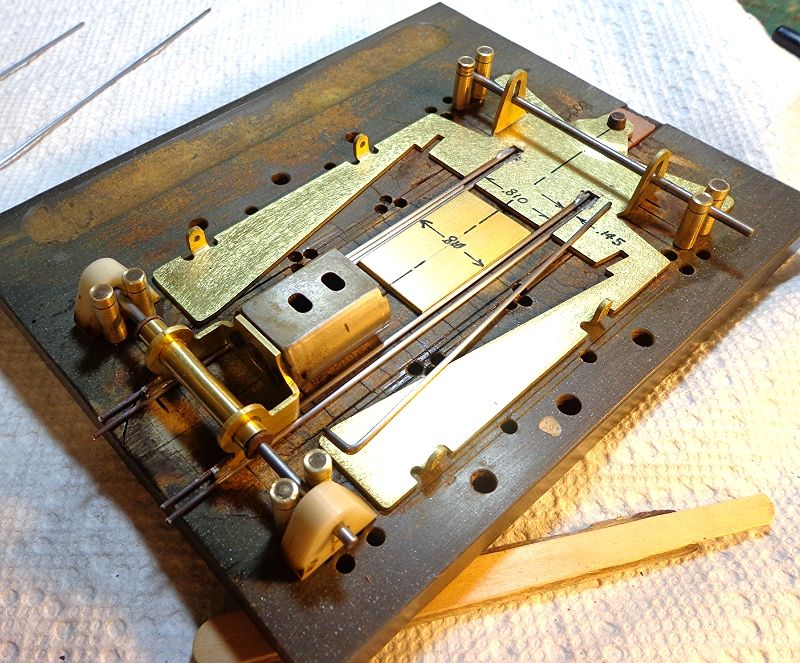
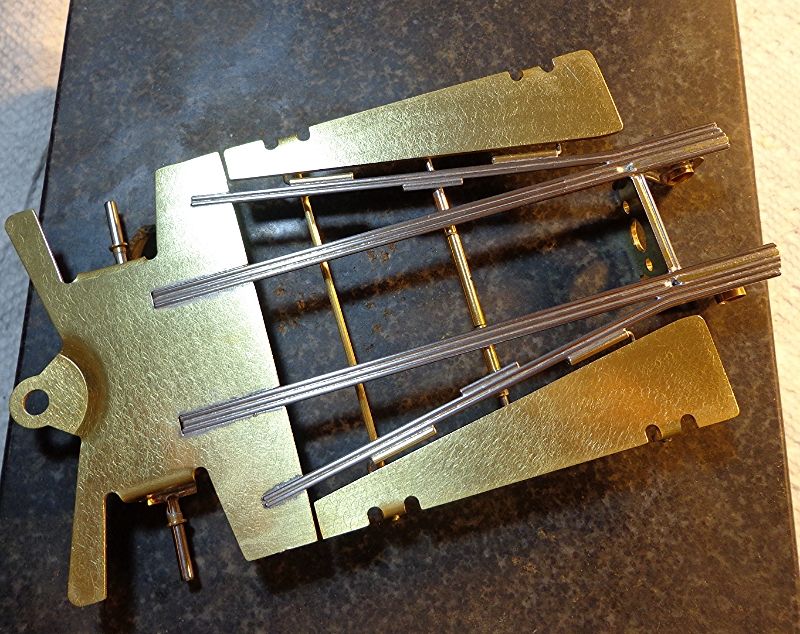
This pic shows the three .047" main rails in place, flow soldered, and finished. This also shows the two .047" tripod rails in place and soldered on the left while the two on the right are being bent to fit before soldering in place.
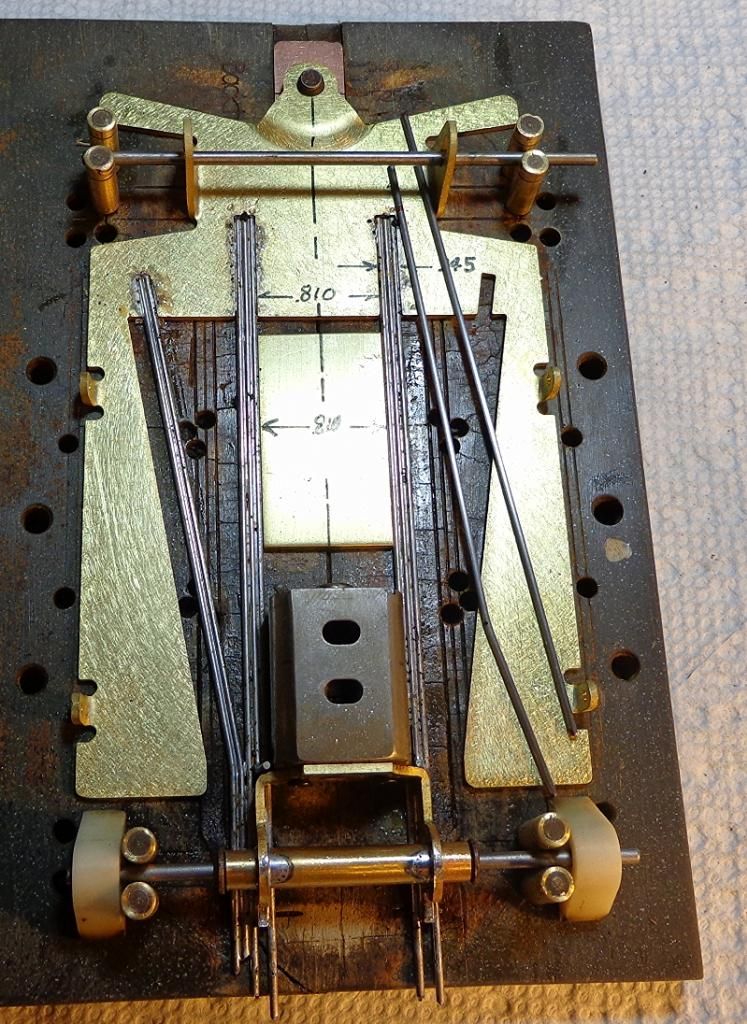
Here she is on the granite flat block with the main rails and tripod rails complete. At this point, I did a little cleanup to check all the solder joints and also do the “flatness check” This frame came out of the jug almost perfect with just a minor adjustment necessary.
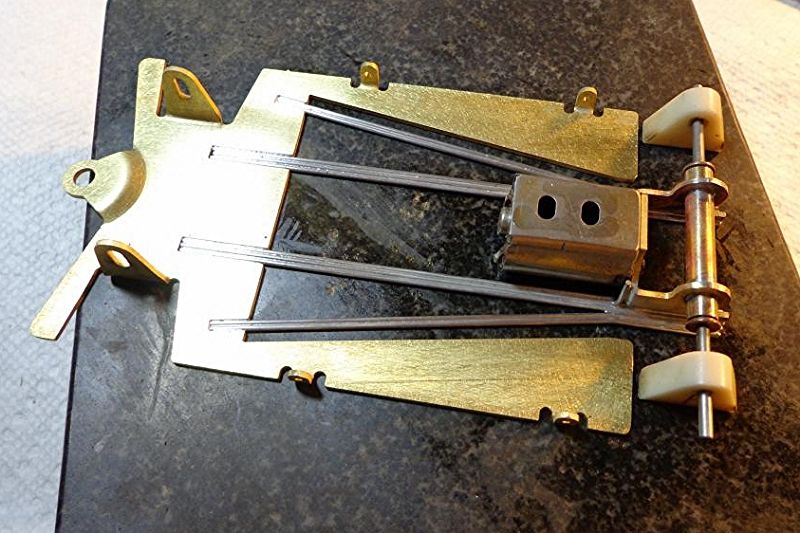
This pic shows a number of small details. You can see that the center frame rail butts against the bracket and is flow soldered. The pan hinges are very simple with each tube being 1/16” brass tubing, ½” long. The hinge rods are .032" piano wire and each need a fairly significant “dogleg” in them as seen on the left front which is not yet installed.
You can also see an extra bit of .047" wire soldered against the tripod rail about halfway toward the front. This is to give a little extra soldering room for the bite bar tubes which come into play next.
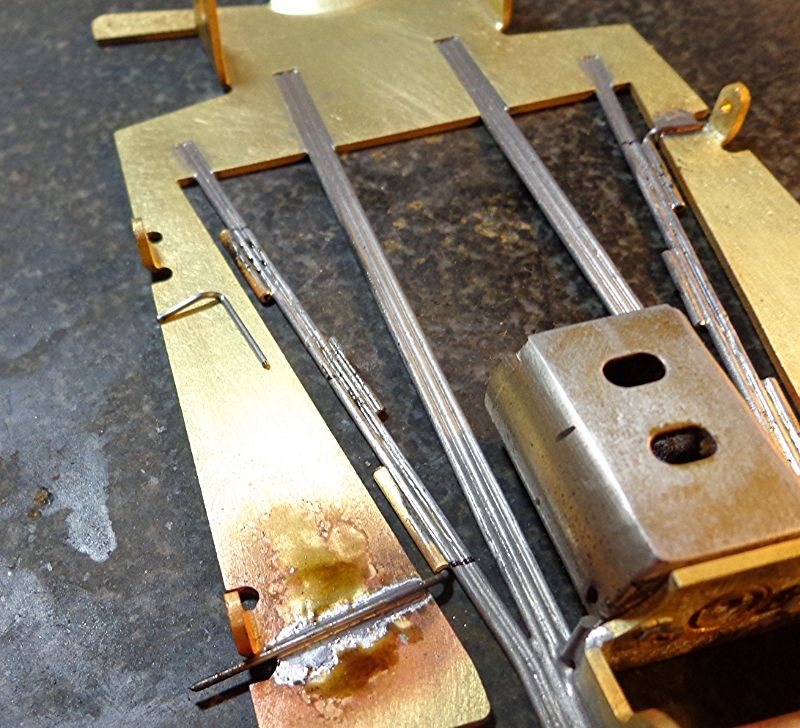
OK… more details here. We’re really getting close to a wrap so I’m covering several basics in this pic.
This shows the bite bar/stop setups ready to install. The .055" bar will go though the two 3/32” tubing bits already soldered in place. The longer bit of 3/32" tubing is cut about .010" smaller than the space between the outer tubes. There is a little cut in the center tube that allows me to solder this inner tube and bar together while leaving them free to float very slightly in the outer tubes. The pre-bent "A-frame" bars will straddle the bite bar at the outboard edges as down stops.
There is also a U-shaped brace of .062" wire soldered inside the bracket to reinforce the axle tube. This bracket is very strong and this step is possibly unnecessary.
The bite bar tubes are only soldered to the tripod rails and the bar itself floats in the tubes. This allows the maximum flex from this configuration. If the chassis is too “bitey” I can solder the tubes to the main rails first to stiffen it some. Then I can solder the bar itself solidly inside the tubes if further stiffening is required.
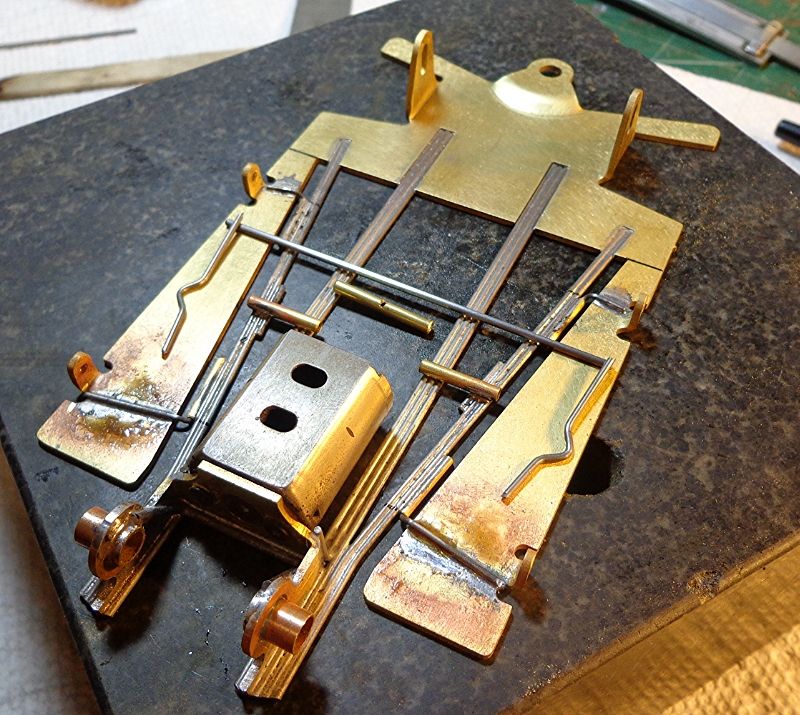
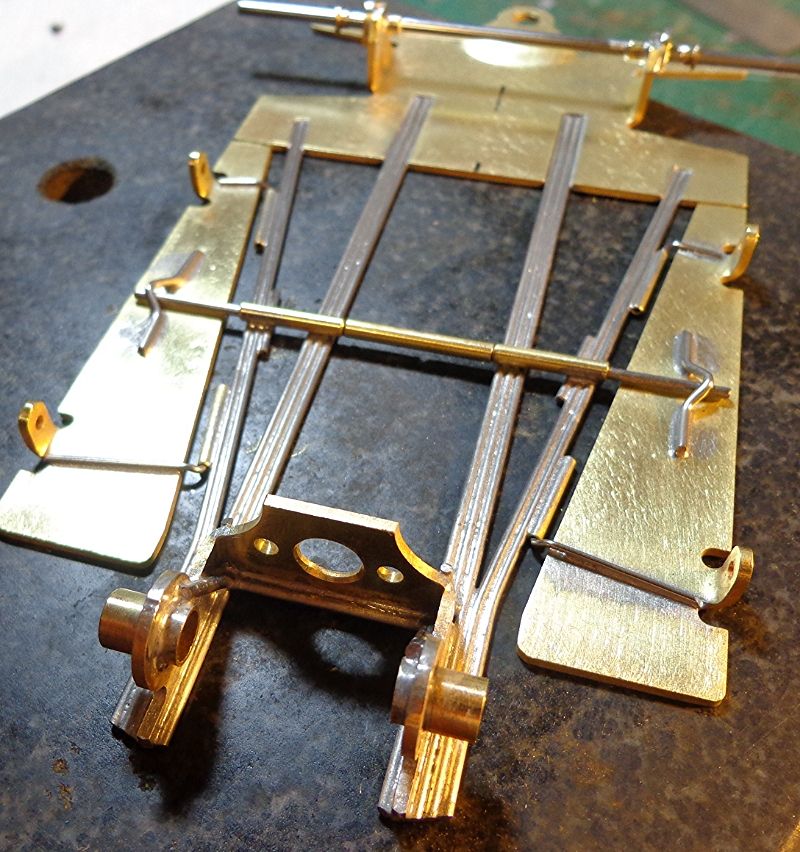
Here is the finished product ready to set up with running gear. Rear body pins are conventional while the front is a floater but with very little movement. After the axle was soldered in place there was a fair bit of excess height on the axle towers. I cut this off and draped the cutoff piece over the axle right against the outside of the tower on order to get more support for the front axle.
This car will set up at about 115 grams without body. I suspect this will be a pretty high-bite car.
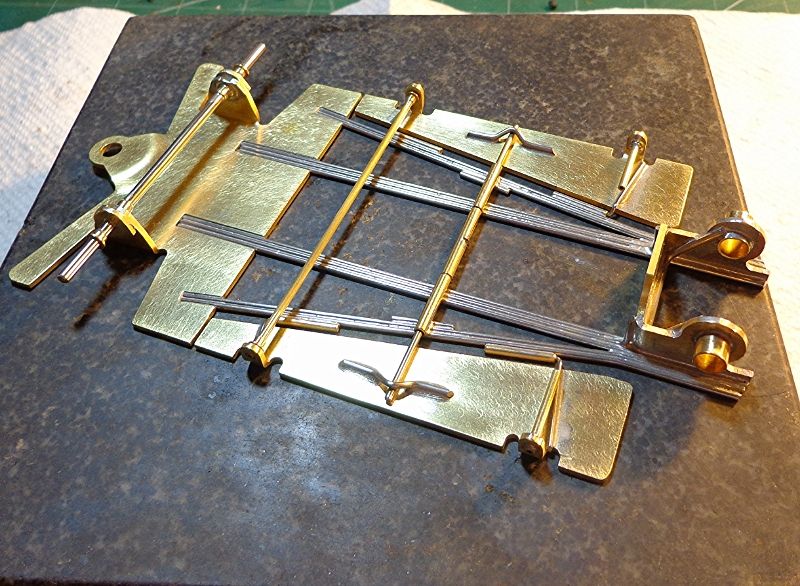
This was a very high quality kit that was very flat and easy to work with. All the cuts were the right size and the build was about fours start to finish.
Thanks to Rick from R-Geo for the sample. I'll have the completed car with me at Modesto and we'll legalize the kit for the next race.
R-Geo Stock Car kit: a step-by-step build
#1

Posted 18 February 2013 - 03:43 AM
- Cheater, Joe Mig, Tim Neja and 2 others like this
#2

Posted 18 February 2013 - 08:58 AM
Really nice job... and thanks for the educational angle.
Brian Wolfsohn
South Florida - the land without slot cars
OopsRacing.com
Insuring YOU don't come in last
Now, touring the country in a 2015 Roadtrek 190P RV
#3

Posted 18 February 2013 - 10:29 AM
Outstanding build and the step-by-step should really be helpful to noobs to see how to do it.
Thanks, Jim. Everything I expected and more.
Can't wait for your track test report...
Rick Bennardo
"Professional Tinkerer"
scrgeo@comcast.net
R-Geo Products
LIKE my Facebook page for updates, new releases, and sales: Rgeo Slots...
Lead! The easy equalizer...
#4

Posted 18 February 2013 - 11:48 AM
Rick:
I know you weren't expecting this so quick but I really got into it and had a lot of fun. Because it is so well made, this kit avoids a lot of the arrrrrrgh! moments that are part and parcel with some of them. Thanks again and congrats on the accuracy of the parts and the cuts.
This will get set up with running gear and a body and will see a track for the first time at Modesto this coming weekend.
#5

Posted 18 February 2013 - 01:53 PM
First Place Loser in the JK Products
International D3 Builders Competition
#6

Posted 18 February 2013 - 01:59 PM
Tell us about the surface finish on the brass. Is it the result of tumbling and if so, with what media was used please?
Gregory Wells
Never forget that first place goes to the racer with the MOST laps, not the racer with the FASTEST lap
#7

Posted 18 February 2013 - 02:04 PM
Another nice one, Jim...
See you Sunday!!
#8

Posted 18 February 2013 - 09:49 PM
Tell us about the surface finish on the brass. Is it the result of tumbling and if so, with what media was used please?
Rick can best answer this question but I strongly suspect a cup shaped, steel rotary brush. I don't think this is a tumbler media pattern.
#9

Posted 18 February 2013 - 10:48 PM
Rick Bennardo
"Professional Tinkerer"
scrgeo@comcast.net
R-Geo Products
LIKE my Facebook page for updates, new releases, and sales: Rgeo Slots...
Lead! The easy equalizer...
#10

Posted 02 March 2013 - 02:29 AM
Testing and development on the R-Geo Stock Car
Here are the first steps in development on this chassis: I got the chance to make some preliminary laps at TNT in Modesto on 2/24/13 but basically it was outta the box and onto the track. It was OK at that point but about 0.4 sec off the pace. I had enough to do that day that I couldn't go any further.
This week, on 2/28/13, I got the chance for some more testing, this time at FTH on the Purple Angel. I don't have a for sure target time for this track as we haven't raced the new format Stock Cars here yet. However, we have seen that in general, the Stock Cars are about 0.8 sec slower than a good Can-Am on any given track and on this day, my better Can-Ams were running 5.0. Thus, the target for the day's testing was to be 5.8 sec.
This is the target car. This 4.5" chassis that I posted on a while back was the race winner at Modesto last week. Set up was 9/28 gearing, Alpha Wonder tires, O/S '68 Charger body, weight as shown to bring it to 116.6 grams (sans body). Best time for this car on the Angel today was 5.74 on the fast orange lane so I figure this was a worthy target.
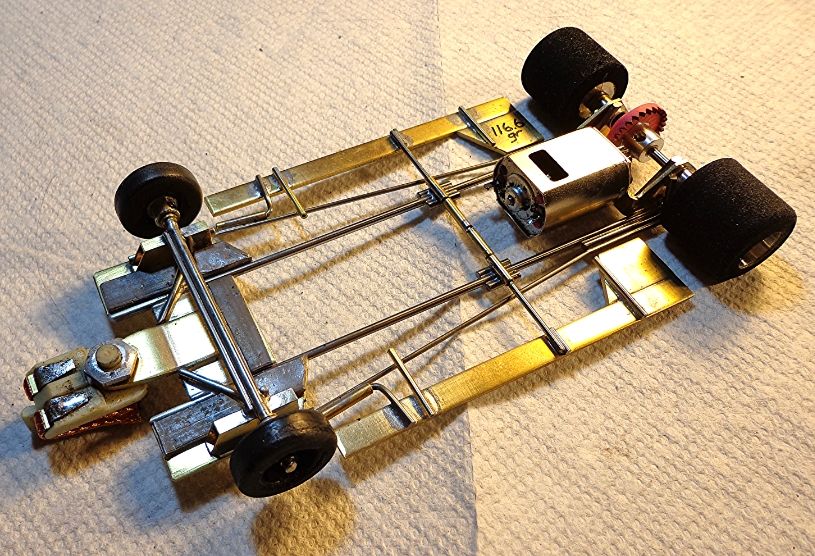
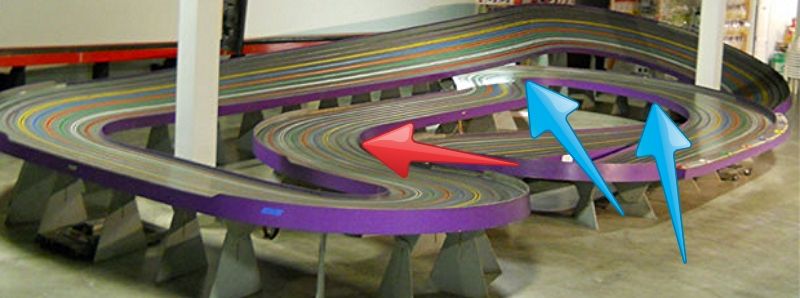
The new R-Geo was first tested as shown here. The best time was 6.07. The car felt a little snappy and the de-slots came very quickly. The biggest areas of trouble were the double radius turn before the "fishook" (red arrow) and the exit of the sweeper (blue arrows) coming toward the drivers panel. At first, I thought some chassis work was going to be in order but as always, I decided to get through the basic stuff first.
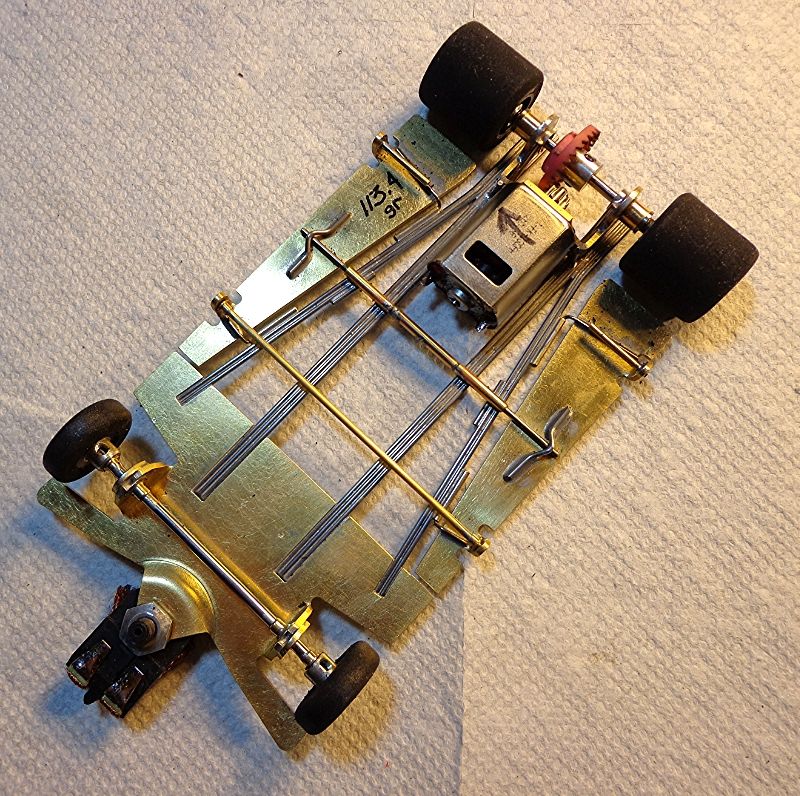
First step was to test bodies but I didn't really get anywhere with this. Here are the bodies tested today on the new car. Parma Cyclone. O/S Ford Fairlane, O/S '68 Charger. There was no great advantage to any of these but the Fairlane was a little quicker on average (on this car... this day) than the rest so that's what I ran for the remainder of this test.
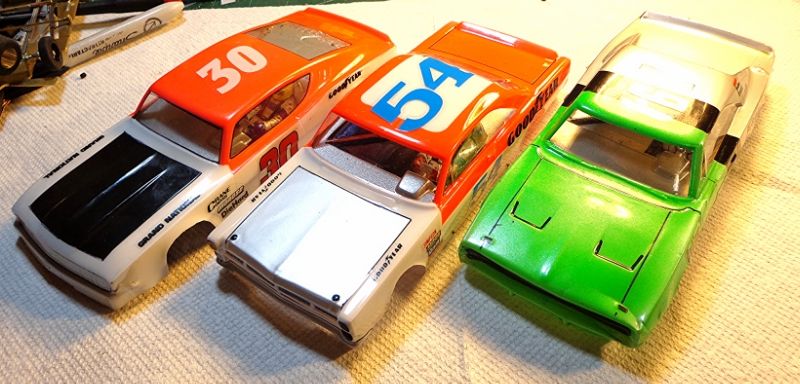
Second test was to run through the tire selection. I had started with the Alpha Wonders then cycled through Koford Wonder Soft, Koford Wonder Super Soft, JK 8713 treated, last was JK 8713 untreated. As much as the target car likes Wonders, this car didn't like 'em at all in any form. Once I got to the JK's things came around and times dropped to a 5.92 best on the 8713 treated.
Next step was the simple one of coating the front tires. Some cars respond to this and others notsomuch. In this case, I coated the fronts with two layers of super glue (dry in between) and while there was no great improvement in times, the car was a little more consistent with a best of 5.90.
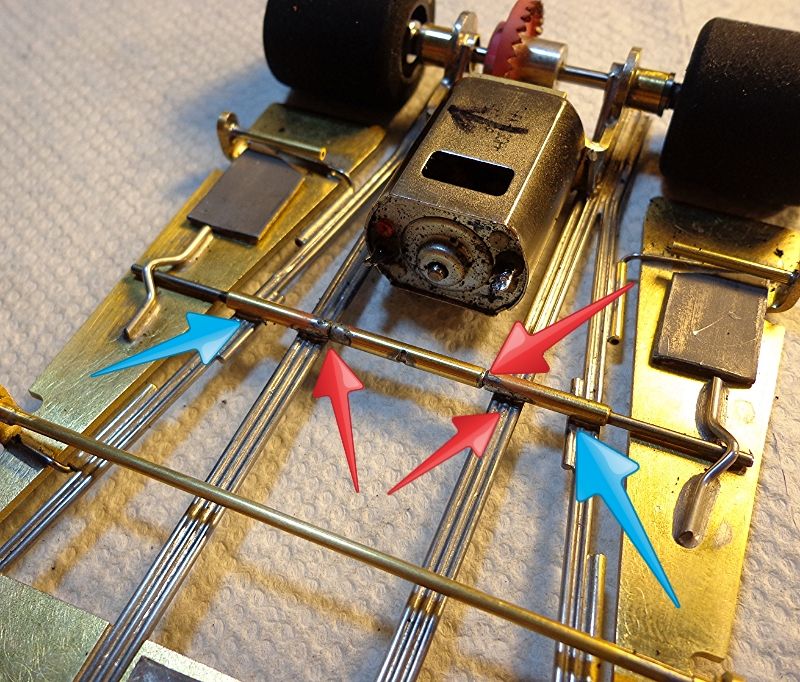
Next up came the crux move of soldering up the bite bar. As I speculated earlier, I thought that this might be the case and sure enough, as soon as I did this, the car dropped to a very competitive time of 5.79. The blue arrows indicate where the floating bar/tubes originally soldered and the red arrows indicate the solder joints that made the bar/tubes a solid piece. The car was now competitive but still just a little bit "sudden" in the deslots on turn exit. So I added the lead weight shown here. This was about 5.5 grams total and in this case it didn't help anything. For the next round of testing, this weight will come off and I'll start working with different gearing and narrowing the tires.
At this point, the R-Geo frame in stock form is very close to a race winning car. The needs of developing for the "Angel" are pretty unique and since we won't be racing these again until the race at Eddie's, I'm going to stand pat for now. I suspect that this will be very good on the more conventional turn layout at Eddie's.
Thanks again to Rick for an outstanding starting point.
#11

Posted 02 March 2013 - 07:25 AM
Gregory Wells
Never forget that first place goes to the racer with the MOST laps, not the racer with the FASTEST lap
#12

Posted 02 March 2013 - 12:21 PM
And this is why Jim was the man for the task! No one can build any nicer and run a car through the tests better than he does.
I will be looking forward to the next chapter on Eddie's King track.
Thank you, Jim!!...
Rick Bennardo
"Professional Tinkerer"
scrgeo@comcast.net
R-Geo Products
LIKE my Facebook page for updates, new releases, and sales: Rgeo Slots...
Lead! The easy equalizer...
#13

Posted 03 March 2013 - 05:27 PM
Rick, is there a number for this chassis so I can get one? I really like the multiple .047" design.
8/3/53-4/11/21
Requiescat in Pace
#14

Posted 03 March 2013 - 07:28 PM
R-Geo #321, Ben...
Rick Bennardo
"Professional Tinkerer"
scrgeo@comcast.net
R-Geo Products
LIKE my Facebook page for updates, new releases, and sales: Rgeo Slots...
Lead! The easy equalizer...
#15

Posted 08 April 2013 - 12:09 PM
I've now tested this car on all of our track types. As I surmised earlier, it is at its best on the King track at Eddies. With several test sessions in, I think I've done all the tuning that makes sense. Depending on the tire, body, motor and gear choices, plus the phase of the moon, it is clear that this car is between 2-5 hundredths faster or slower than than my last build. In order to make any more progress, it is time to do some work on the bare frame. This car is very solid and so I think it can take some weight reduction. It also runs a little tight which is partially a function of the slowish motor that we use and its inability to break the tires loose on turn exit.
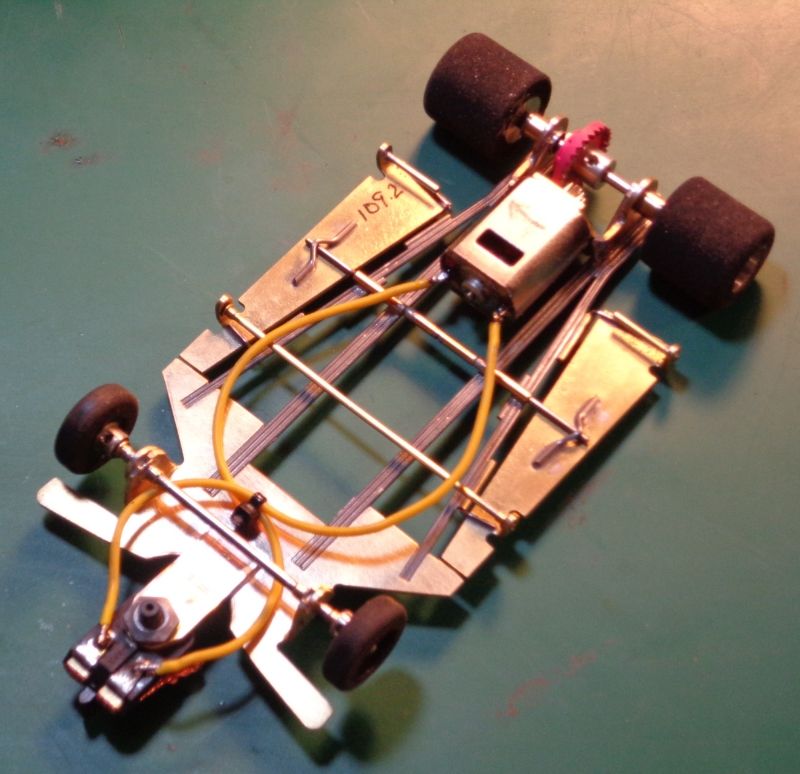
This view shows the (shaded) target areas for weight reduction. (ugh.....poor photo right there)
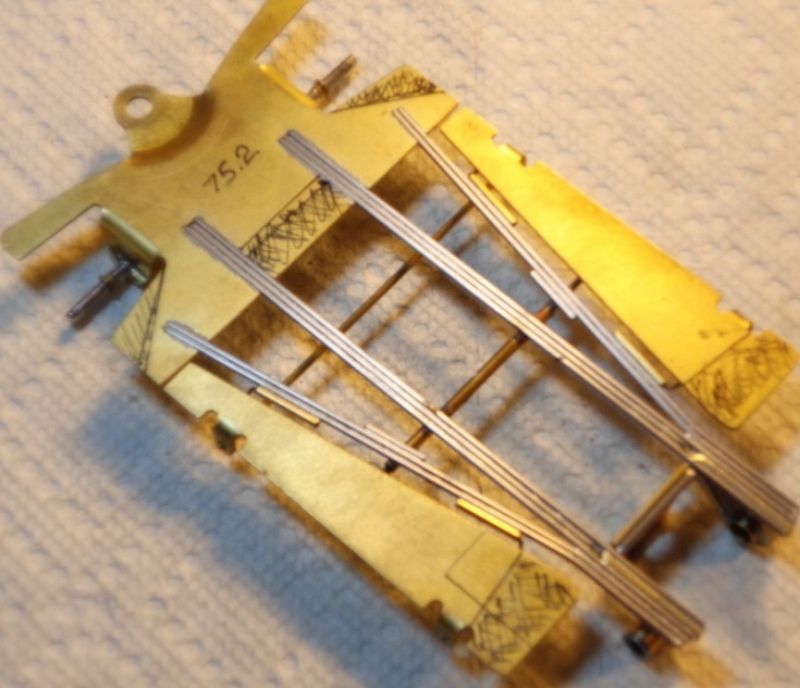
This shot shows the finished product. Weight reduction was just under 8 grams.
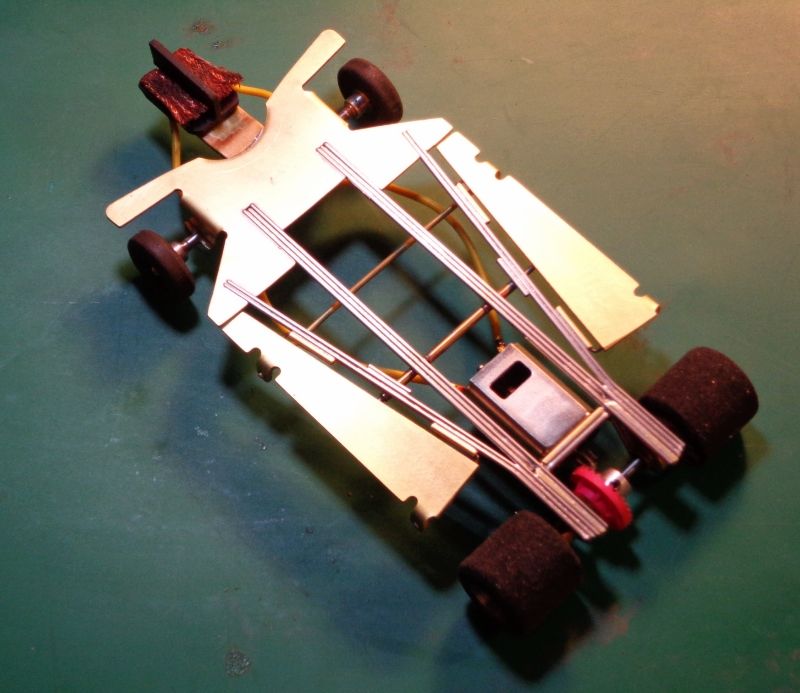
Finally, the coined guide tongue was cut out and replaced with a Warmack unit @ + 1/16" guide lead over stock. This added back a little of the saved weight. The RTR weight is now 109.2 gr as shown for a net reduction of 6 gr. The weight reduction was desirable but I'm hoping that the longer guide lead will free it up a little. Next opportunity to test will likely be in a couple of weeks.
As an aside, this chassis as shown here would make a Can Am of about 116 (+ or -) with another 4-6 gr reduction available pretty easily. I think that it could be very good for some tracks as a Can AM. That will be a longer term project.
#16

Posted 08 April 2013 - 01:07 PM
Really nice work Jim--and LOVE all your documentation!! If you'd like further testing at BPR--send it down to me!!! ![]()
![]()
#17

Posted 08 April 2013 - 02:53 PM
Rot ro, here we go. LOL I know what is coming down for the next revision but won't spoil that. But we have to admit Jim is putting it thru the wringer for tests. IRRA racers take note, the new guide tongue would not pass tech for you, their rules do not mandate 3/4" max guide lead.
Now to see what the next track tests provide us.
Thanks Jim for all the info.............................
Rick Bennardo
"Professional Tinkerer"
scrgeo@comcast.net
R-Geo Products
LIKE my Facebook page for updates, new releases, and sales: Rgeo Slots...
Lead! The easy equalizer...
#18

Posted 08 April 2013 - 09:11 PM
Really nice work Jim--and LOVE all your documentation!! If you'd like further testing at BPR--send it down to me!!!

I'm hoping I can hand deliver it this coming weekend. (I hope to be able to come down to go flat trackin' wit y'all)
#19

Posted 18 April 2013 - 11:13 AM
Here's an update on the last set of modifications pictured above......
Yesterday, I got the chance to run again on the King at Eddies slot car world. The track conditions were a little slower than last time and all my times were about .10-.15 sec slower than my last time here........except for this car. With the above modifications, this car was now faster than last time out and a good tenth faster than my previous best car. I started with Koford Xsoft Wonders and the O/S '68 Charger body. The all up weight was now 119 gr. which is at least 7 gr less than any other stock car that I have. With this set up, the car was quicker in the short straights, and felt faster overall but on the rather dirty track, it felt a little jumpy. I switched out the tires for soft Wonders and ultimately for Alpha medium Wonders and it was now clearly faster than my previous best car and despite the light weight, it was easy to drive and it could be pushed. I think that it could take even a little less bite in certain circumstances and that would probably suggest a narrowed tire. With faster motors that can spin the tire more readily......probably not an issue.
I think that the lighter weight contributed to the quickness and the longer guide lead** freed up the car so the balance of the mods was about right. As it stood yesterday, this will be my race car for the coming weekend. I'm intrigued by the potential that this frame offers both as stock car and potentially as a mid-weight Can Am.
**As Rick noted, the longer guide lead that I used here would not be legal for IRRA rules events.
#20

Posted 23 April 2013 - 05:50 PM
After some development time, the lightened R-Geo is now my fastest stock car and was a comfortable winner in it's first race outing. I think the changes and modifications are pretty much done and the car will either go into the box as the first option stock car (or) get some more dramatic changes as a Can Am. For now, the lighter weight has made the car quicker in all aspects but a little more critical as to tire selection. This car will probably run some variation of wonder rubber in most outings. Also, the light weight version seems to like a slightly lower gear ratio than the previous iteration.
In the case of Nor-Cal rules, the slower motor that we run requires that the driver work the tuning angle in order to get just the right amount of slide on turn exit. In it's first race, the car was still a little tight with Koford Soft wonders but, It was fast enough that I didn't have to drive it right at the edge. If I had to race it closer to the limit, I'd probably opt for Alpha mediums or Koford softs and narrow them a little. Normally, I'm not a huge fan of the O/S Dodge Daytona but in this case, the body is so long, that it actually helped loosen the car a little. With the track conditions this time out, the short Ford Fairlane was just too tight and while quick.....it wouldn't have raced very well.
After this process, I can say that this is a very easy kit to work with and the end result is very tunable The gyrations that I went through in tuning this car would likely not be necessary in an IRRA event as the faster motors would break the grip more easily. This kit provides the builder with a lot of options but the basic build is very good as is.
Highly recommended.
- John C Martin likes this
#21

Posted 23 April 2013 - 08:29 PM
Thank you Jim. Great build/tune documentation.

Bob Israelite
#22

Posted 10 June 2013 - 09:09 PM
Against the best chassis builders on the east coast, the R-Geo Warrior II won...
- John C Martin likes this
Rick Bennardo
"Professional Tinkerer"
scrgeo@comcast.net
R-Geo Products
LIKE my Facebook page for updates, new releases, and sales: Rgeo Slots...
Lead! The easy equalizer...
#23

Posted 12 April 2014 - 02:07 AM
Jim or Rick,
Could you please comment on the 'loose' front uprights shown in the first picture?
Who makes them and are they intended for use with ball bearings?
Thanks!

Bob Israelite
#24

Posted 12 April 2014 - 09:33 AM
Bob, I make them. They were intended to be soldered on to the regular uprights, after proper trimming, for ball bearings on the axle and being able to use any front tire locked down on the axle. They never caught on, but I still feel an economical front set up......
Rick Bennardo
"Professional Tinkerer"
scrgeo@comcast.net
R-Geo Products
LIKE my Facebook page for updates, new releases, and sales: Rgeo Slots...
Lead! The easy equalizer...


