Jump to content


Photo

Bill Steube Jr. 4 Rail Sports 6612


  • Please log in to reply
19 replies to this topic

#1 Steve Okeefe

Steve Okeefe

    The Independent Scratchbuilder

  • Administrator
  • PipPipPipPipPipPip
  • 1,139 posts
  • Joined: 16-February 06
  • Gender:Male
  • Location:State of Independence

Posted 01 March 2013 - 08:36 PM

Bill Steube Jr. 4 Rail Sports Car

A re-creation late 1966 chassis by Steve Okeefe


66BSJ4r001.jpg


This particular build was copied directly from the original, but because I used a REHCO #3000 motor bracket and tube type rear axle bushings, it is a period-correct re-creation and not a replica.


66BSJ4r002.jpg


If you look carefully you might also notice the thick-wall pickup-guide tube. This is a favorite detail of mine; aside from being quite strong, it puts a bit of extra down-force in a spot where it does a lot of good.


66BSJ4r003.jpg


Another favorite detail that is near impossible to see is the stainless steel tube drop arm hinge pin. It’s a leftover from the “Stainless Steel Racer” build. The stainless tubing happens to be slightly oversize at .065” diameter. Using it not only removes all the “slop” in the hinge, but also prevents the hinge from seizing up over time due to rust, a real possiblity with piano wire.


66BSJ4r004.jpg


66BSJ4r005.jpg


  • endbelldrive likes this

Steve Okeefe


I build what I likes, and I likes what I build


#2 gluebomb

gluebomb

    Mid-Pack Racer

  • Full Member
  • PipPipPip
  • 131 posts
  • Joined: 30-August 10
  • Gender:Male
  • Location:Canada

Posted 28 March 2014 - 12:29 PM

That's a really, really nice chassis...

I'm not getting the bracket detail though; familiar with the rehco bracket but not sure how you stepped it down from 1/4" or what you used as a bushing or oilite.

Any chance you could clarify for a noob ?


S.


Simon Wing

#3 TSR

TSR

    The Dokktor is IN

  • Full Member
  • PipPipPipPipPipPipPipPip
  • 42,299 posts
  • Joined: 02-February 06
  • Gender:Male
  • Location:Marxifornia

Posted 28 March 2014 - 12:41 PM

Steve forgot to mention that he kindly repaired the original for the LASCM, a beautiful job as it was quite a mess.

Steve, thanks!
:)


Philippe de Lespinay


#4 Bill from NH

Bill from NH

    Age scrubs away speed!

  • Full Member
  • PipPipPipPipPipPipPipPip
  • 14,710 posts
  • Joined: 02-August 07
  • Gender:Male
  • Location:New Boston, NH

Posted 28 March 2014 - 01:19 PM

Simon, I'll give you a sketchy answer. Steve can add details when he has the opportunity. Anyway, he turned brass axle pieces for the REHCO bracket on a lathe. One end of these pieces was 1/4" OD or flanged to fit the 1/4" bracket holes, the other end had an OD that was about the size of 5/32" tubing. He bored a 1/8" axle hole through the center of the whole piece. One of these pieces was soldered to each bracket side. Steve used to make these pieces for sale, but I don't think he still does.


Bill Fernald
 
I intend to live forever!  So far, so good.  :laugh2:  :laugh2: 

#5 Pablo

Pablo

    Builder

  • Administrator
  • PipPipPipPipPipPipPipPip
  • 18,438 posts
  • Joined: 20-February 06
  • Gender:Male
  • Location:Cleveland, Tennessee

Posted 28 March 2014 - 01:20 PM

Simon, I can't pretend to be Steve OKeefe,  :D  but I'll wager he took a standard 1/8" ID / 1/4" OD axle bushing, machined it down to reduce the width on the side opposite the flange, to a new overall width of approximately .070", then butted a piece of 5/32" OD tubing to it outside the bracket. The end of the 5/32 tube appears to end about a hair past midway between the third and fourth (outermost) rail. You can cane me if I'm really wrong. :laugh2:


Paul Wolcott


#6 Bill from NH

Bill from NH

    Age scrubs away speed!

  • Full Member
  • PipPipPipPipPipPipPipPip
  • 14,710 posts
  • Joined: 02-August 07
  • Gender:Male
  • Location:New Boston, NH

Posted 28 March 2014 - 04:05 PM

 You can cane me if I'm really wrong. :laugh2:


My health insurance provider asked me the other day if I used a cane. :laugh2:  :laugh2:

I recall once seeing photos of these pieces on the PRI site. :wave:


Bill Fernald
 
I intend to live forever!  So far, so good.  :laugh2:  :laugh2: 

#7 Steve Okeefe

Steve Okeefe

    The Independent Scratchbuilder

  • Administrator
  • PipPipPipPipPipPip
  • 1,139 posts
  • Joined: 16-February 06
  • Gender:Male
  • Location:State of Independence

Posted 28 March 2014 - 04:56 PM

Simon,


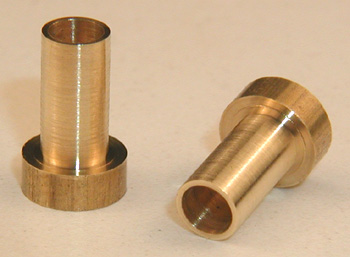
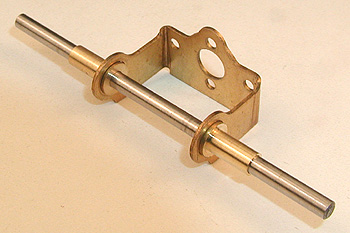
The rear axle bushings were made from 1/4" diameter brass rod.  I bored out the ID to 1/8" and turned part of the OD down to 5/32". Then I cut them to length on both ends.  Here are some photos to make things clear:


AR12010x350.jpg   Bearings in brkt x 350.jpg


I wanted to make my replica chassis built with a Rehco bracket (which was inexpensive and readily available) look more like the original built with a Russkit bracket (which was and still is quite expensive and not easy to find).  I think Electric Dreams still has a few Russkit brackets.


Bill is right; years ago I made a few dozen pairs of these bushings (one piece at a time) and sold most of them on the Profomance web site.  I remember they were rather tedious to make on a manual lathe; a machine shop with a simple screw machine could easily produce them by the thousands.


Steve Okeefe


I build what I likes, and I likes what I build


#8 gluebomb

gluebomb

    Mid-Pack Racer

  • Full Member
  • PipPipPip
  • 131 posts
  • Joined: 30-August 10
  • Gender:Male
  • Location:Canada

Posted 28 March 2014 - 06:29 PM

Thanks Bill and Pablo, both lightning fast responses much appreciated !


And thank you Steve as that's a good solution for using the Rehco bracket - I favor these also, the Russkit piece being a bit pricey for the stuff i build.


No access to a lathe but I'm thinking I'll try thinning and drilling out an oilite and fitting tube to that instead...


Btw, am i right in thinking the Rehco bracket is actually Dubro ? And do you know off hand of a similar bracket that's listed as 3001 - sure I saw this listed once but not sure where or what it's for...


And thanks again for showing all this stuff - it's beautiful work and very much inspiring.


S.


Simon Wing

#9 Bill from NH

Bill from NH

    Age scrubs away speed!

  • Full Member
  • PipPipPipPipPipPipPipPip
  • 14,710 posts
  • Joined: 02-August 07
  • Gender:Male
  • Location:New Boston, NH

Posted 28 March 2014 - 07:37 PM

Simon, your idea of drilling out a 1/4" bushing to fit a 5/32" OD tubing is a good one. If you can get them, I'd suggest using Slick 7 bronze bushings rather than an oilite.


I've been hearing the REHCO bracket called a Dubro bracket since the mid 90's, but I've never seen it used in any commercially made chassis that was called a Dubro. A couple years ago, I read somewhere it was made by Associated (Associated for Dubro?) but have never found that article a second time. REHCO has packaged these "Durbro" brackets as single items & has also packaged them with someone's 26D bracket. Perhaps the double packaged brackets carry the 3001 part number?  I'll dig out an old REHCO parts list tomorrow to check. 


Bill Fernald
 
I intend to live forever!  So far, so good.  :laugh2:  :laugh2: 

#10 Pablo

Pablo

    Builder

  • Administrator
  • PipPipPipPipPipPipPipPip
  • 18,438 posts
  • Joined: 20-February 06
  • Gender:Male
  • Location:Cleveland, Tennessee

Posted 29 March 2014 - 12:23 AM

Only $3.50 at PCH:

http://www.e-slotcar...acket-reh-3000/


Paul Wolcott


#11 Bill from NH

Bill from NH

    Age scrubs away speed!

  • Full Member
  • PipPipPipPipPipPipPipPip
  • 14,710 posts
  • Joined: 02-August 07
  • Gender:Male
  • Location:New Boston, NH

Posted 29 March 2014 - 10:05 AM

Simon, I checked my old 2000 REHCO parts sheets. I don't find a part # 3001 listed, but of course it could have been added since then. I did find a part # 3003 which is a 16D bracket with a C-clip, probably for the older can-drive Mabuchi motors, Their 26D inline brackets carry part #'s 305x. I didn't find a part # listed for the 16D/26D combo pack, but I know they existed, because I bought some at a now closed raceway. If you want more history on the 3000 bracket, contact Russ Toy in the San Francisco Bay area. Russ has been building vintage chassis with this bracket for over 20 years & first brought them to my attention. He posts on Slotblog as team burrito so you could send him a PM.


Bill Fernald
 
I intend to live forever!  So far, so good.  :laugh2:  :laugh2: 

#12 gluebomb

gluebomb

    Mid-Pack Racer

  • Full Member
  • PipPipPip
  • 131 posts
  • Joined: 30-August 10
  • Gender:Male
  • Location:Canada

Posted 29 March 2014 - 12:53 PM

Thanks Bill, thats all interesting stuff, esp the can drive 3003 - I'd imagine that's a fair bit beefier than this one at the mount but wonder if it looks similar otherwise ? If so, i've never seen it.

Thanks for pointing out the slick 7 option also - wasn't thinking about oil and soldering at all but may have found an option using brass, will post back if it works out.

Pablo - just ordered a bunch of the bay, they were listed as "drag motor brackets" there, same price though.


Simon Wing

#13 Bill from NH

Bill from NH

    Age scrubs away speed!

  • Full Member
  • PipPipPipPipPipPipPipPip
  • 14,710 posts
  • Joined: 02-August 07
  • Gender:Male
  • Location:New Boston, NH

Posted 29 March 2014 - 08:02 PM

I've never seen the 3003 brackets either, but I due have  their C-clip brackets for a 13D. Simon, here's a tip if you want to solder oilites. Put the oilite bushings on the tip of a hot soldering iron until they stop smoking. Let them cool, then brush off the burnt oil residue with a wire brush in a Dremel. They will now solder up like a normal piece of brass or bronze. I've done this numerous times so I know it works. :to_become_senile:


Bill Fernald
 
I intend to live forever!  So far, so good.  :laugh2:  :laugh2: 

#14 Pablo

Pablo

    Builder

  • Administrator
  • PipPipPipPipPipPipPipPip
  • 18,438 posts
  • Joined: 20-February 06
  • Gender:Male
  • Location:Cleveland, Tennessee

Posted 29 March 2014 - 09:48 PM

That is a classic tip, Bill :good:  Keep 'em coming :D


Paul Wolcott


#15 gluebomb

gluebomb

    Mid-Pack Racer

  • Full Member
  • PipPipPip
  • 131 posts
  • Joined: 30-August 10
  • Gender:Male
  • Location:Canada

Posted 30 March 2014 - 01:10 AM

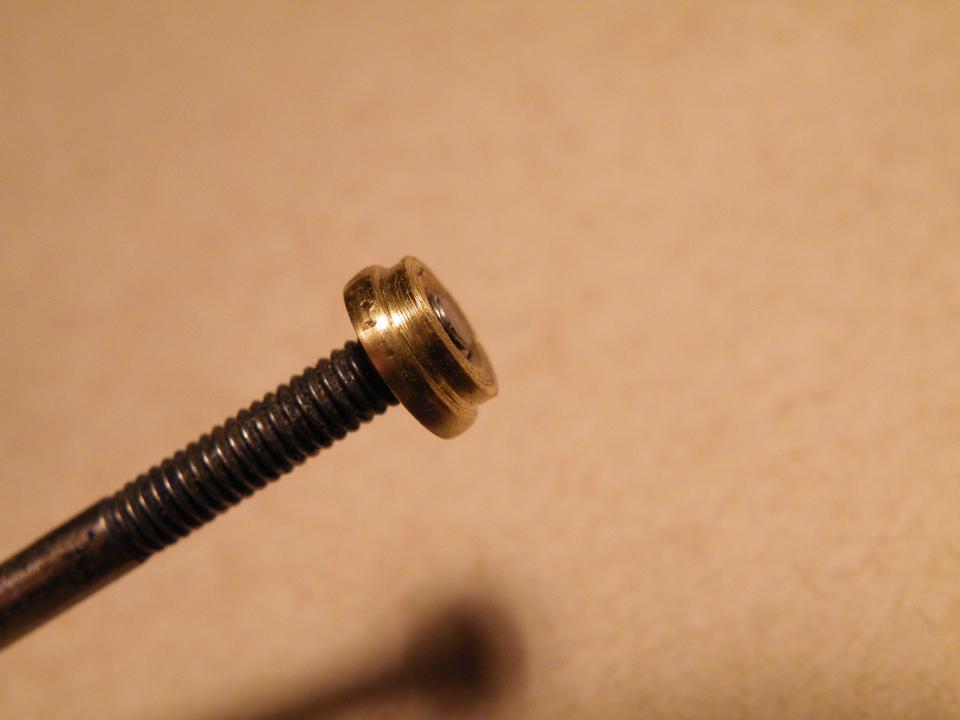
Yes, that is a good tip ! Ended up playing around and coming up with this also:


DSCF1585.JPG


DSCF1583.JPG


Basically a large 5/40 brass nut that's chucked into a dremel, shaped into a flanged bushing, soldered in once it's a light push fit, then drilled out to 5/32 - I worked up to the final hole size, used nice sharp split points as they're somewhat self centering also, a wee dab of oil.
Think it worked ? The slight gap visible is the round-over on the inside of the nut and it's very solid with the tube dry fitted, is actually a bit too tight - I'm guessing the drill bit used is slightly under...
Thanks for all the input given ! Scratching my head over this one for a while but the explanations and suggestions really helped figure out how to deal.

S.


  • endbelldrive likes this
Simon Wing

#16 Bill from NH

Bill from NH

    Age scrubs away speed!

  • Full Member
  • PipPipPipPipPipPipPipPip
  • 14,710 posts
  • Joined: 02-August 07
  • Gender:Male
  • Location:New Boston, NH

Posted 30 March 2014 - 06:55 AM

Simon, those pieces came out nice! I hadn't thought of turning down a brass nut, but it works well. Once the tube is soldered in place, those slight gaps fill with solder & won't even show. What sort of chassis do you plan to build with this bracket? :)


Bill Fernald
 
I intend to live forever!  So far, so good.  :laugh2:  :laugh2: 

#17 Pablo

Pablo

    Builder

  • Administrator
  • PipPipPipPipPipPipPipPip
  • 18,438 posts
  • Joined: 20-February 06
  • Gender:Male
  • Location:Cleveland, Tennessee

Posted 30 March 2014 - 08:44 AM

:good:


Paul Wolcott


#18 Regis4446

Regis4446

    On The Lead Lap

  • Full Member
  • PipPipPipPip
  • 435 posts
  • Joined: 24-March 10
  • Gender:Male
  • Location:France

Posted 30 March 2014 - 01:09 PM

Thank you Steve for this beautiful picture frame, and these explanations
Regis Baron

#19 JerseyJohn

JerseyJohn

    Jersey John

  • Subscriber
  • PipPipPipPipPipPipPip
  • 4,190 posts
  • Joined: 05-September 07
  • Gender:Male
  • Location:Northern NJ

Posted 30 March 2014 - 02:10 PM

is this chassis design legal for irra jail door ?
 

John Chas Molnar

"Certified Newark Wise Guy since 1984" (retired)
"Certified Tony P Chassis God 2007.2023

Retro Chassis Designer-Builder

Jerseyjohnchassis

blog.jpg


#20 gluebomb

gluebomb

    Mid-Pack Racer

  • Full Member
  • PipPipPip
  • 131 posts
  • Joined: 30-August 10
  • Gender:Male
  • Location:Canada

Posted 31 March 2014 - 04:35 PM

What sort of chassis do you plan to build with this bracket? :)

Thanks Bill; not sure but something 66 or 67 pro inspired I think ? I've some rather smallish scale bodies that would suit one of the earlier Morrisey frames so maybe one of those, ie 3 rail in rod or tube.


Simon Wing


Electric Dreams Online Shop