Jump to content


Photo

X-Minus-1


  • Please log in to reply
12 replies to this topic

#1 Steve Okeefe

Steve Okeefe

    The Independent Scratchbuilder

  • Administrator
  • PipPipPipPipPipPip
  • 1,139 posts
  • Joined: 16-February 06
  • Gender:Male
  • Location:State of Independence

Posted 03 March 2013 - 01:44 AM

X-Minus-1

An incognito original design by Steve Okeefe


Okeefe X-Minus-1 01.jpg


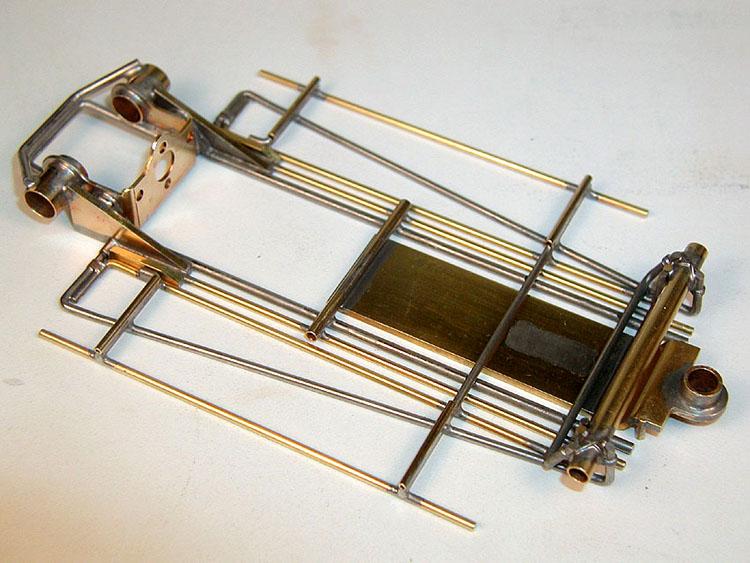
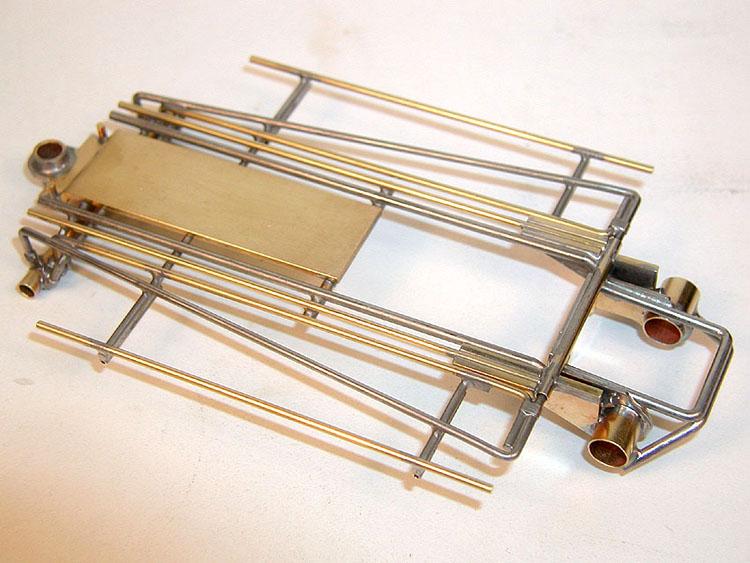
This one is a bit of a wolf in sheep's clothing. Look carefully and you will see that the drop arm is not a drop arm at all, and that this chassis is in fact a long wheelbase, short guide lead Iso-fulcrum with the hinge located at the front of the motor bracket.


Okeefe X-Minus-1 02.jpg


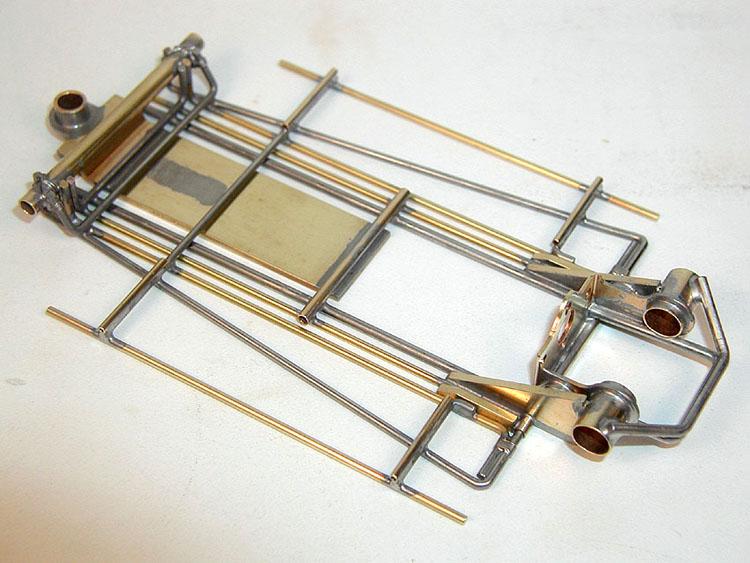
The front wheels are 3/4", the rears 7/8", but the odd shape of the X-Minus-1 body calls for a 4-3/8" wheelbase, and even with a shortened pickup guide, allows for only a rather short 4-3/4" guide lead.


Okeefe X-Minus-1 03.jpg


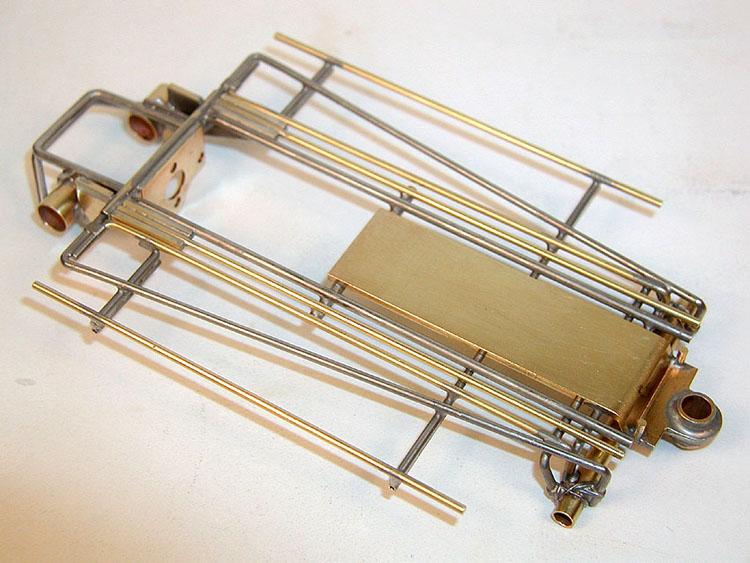
In this photo set the Iso-fulcrum down stop had not yet been installed.


Okeefe X-Minus-1 04.jpg


  • macman and miko like this

Steve Okeefe


I build what I likes, and I likes what I build


#2 olescratch

olescratch

    olescratch

  • Subscriber
  • PipPipPipPipPip
  • 977 posts
  • Joined: 19-July 13
  • Gender:Male
  • Location:Ravenna, OH

Posted 06 September 2013 - 12:03 PM

I'm  looking to build an Iso for a resin body project and this one caught my interest.  I would like to know a few more details if possible especially the weight of the basic chassis (minus wheels, motor, guide, etc.). Thank's  in advance, John. 


John Stewart

#3 Jairus

Jairus

    Body Painter Extraordinaire

  • Subscriber
  • PipPipPipPipPipPipPipPip
  • 10,174 posts
  • Joined: 16-February 06
  • Gender:Male
  • Location:Salem, OR

Posted 06 September 2013 - 12:41 PM

Sweet looking Steve!


Jairus H Watson - Artist
Need something painted, soldered, carved, or killed? - jairuswtsn@aol.com

www.slotcarsmag.com

www.jairuswatson.net
http://www.ratholecustoms.com
Check out some of the cool stuff on my Fotki!


#4 Maximo

Maximo

    Checkered Flag in Hand

  • Full Member
  • PipPipPipPipPipPip
  • 1,789 posts
  • Joined: 31-August 06
  • Gender:Male
  • Location:San Antonio, TX

Posted 06 September 2013 - 04:46 PM

Yeah Steve, continue with this build, please!


-Max


David Ray Siller

MAXImum MOtion


Retired Video Game Creator/Designer/Producer
Thingies are my thingy!


#5 SlotStox#53

SlotStox#53

    Posting Leader

  • Full Member
  • PipPipPipPipPipPipPip
  • 4,084 posts
  • Joined: 13-March 13
  • Gender:Male
  • Location:TX

Posted 06 September 2013 - 05:36 PM

Sweet looking Thingie creation Steve! :D is there a full article on this one?


#6 Steve Okeefe

Steve Okeefe

    The Independent Scratchbuilder

  • Administrator
  • PipPipPipPipPipPip
  • 1,139 posts
  • Joined: 16-February 06
  • Gender:Male
  • Location:State of Independence

Posted 07 September 2013 - 01:29 PM

Jairus,


Thanks!  :D


John, Dave & Paul,


Sorry to disappoint, but I don't have this chassis anymore and did not write up a full construction article.  The chassis was built for and sold to Tom Scott (tjsguns) four years ago; you'll have to ask him.


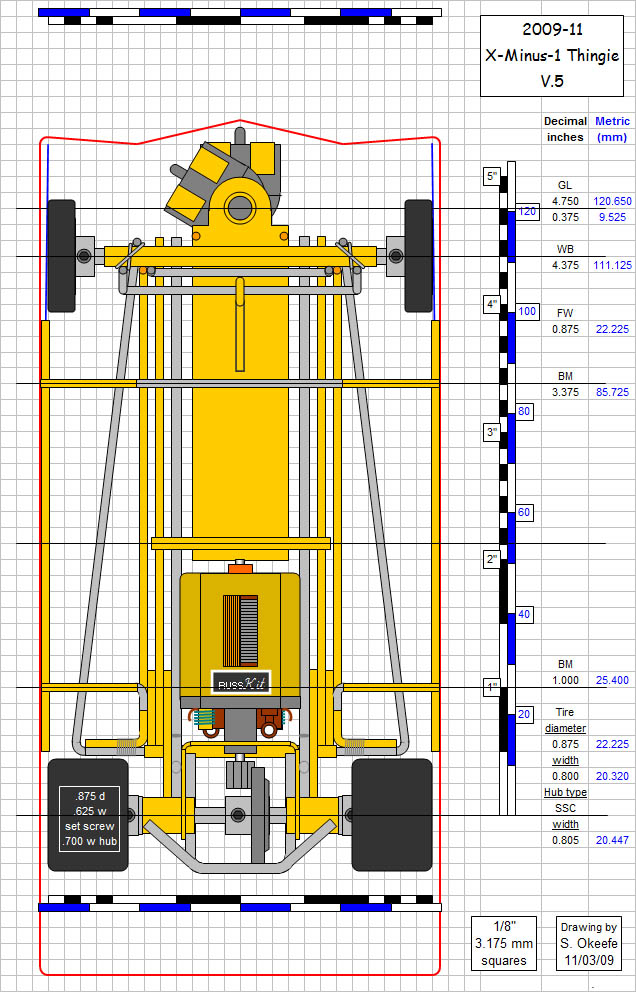
On the other hand, I can help with a drawing of the chassis as-built and some construction notes:


X-Minus-1 V.5.jpg


Note that the inner piano wire rail is .078" diameter, whereas all the other piano wire rails and brass rods are .063".  Where the cross rails (three places) and brass tube (one place) intersect the .078" rail, the .078" rails are notched to fit.


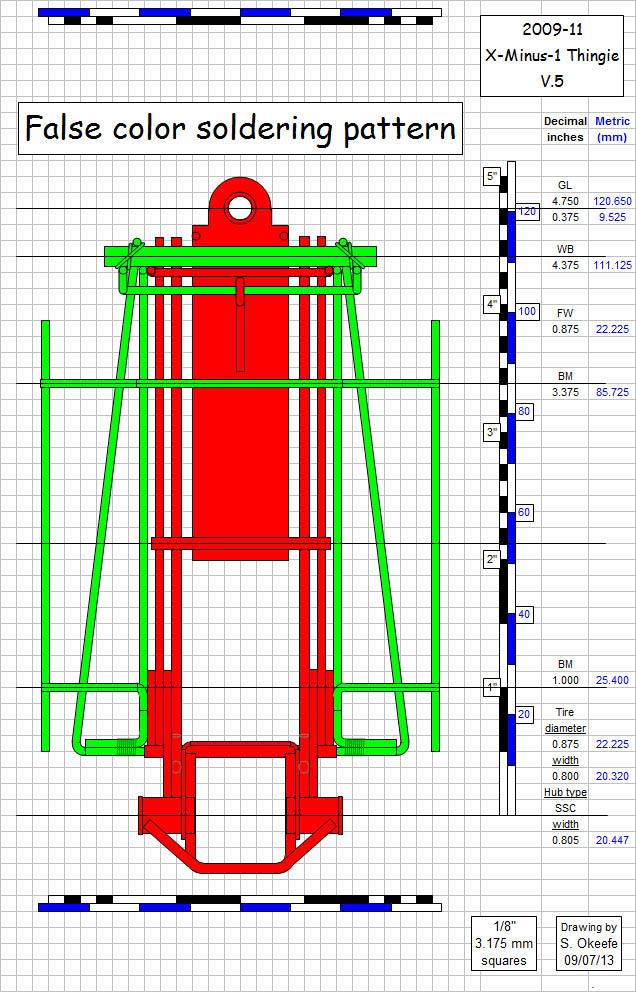
Because this is a bit of a "trick" chassis design, it is not obvious how the center section and the ISO section parts go together.  So, I've provided a false color diagram to help make it clearer.  All the parts colored red are soldered together, same thing for the parts colored green.  Nowhere are the red parts and green parts soldered to each other:


X Minus-1 Soldering Pattern.jpg


Hope this helps!


Steve Okeefe


I build what I likes, and I likes what I build


#7 Jairus

Jairus

    Body Painter Extraordinaire

  • Subscriber
  • PipPipPipPipPipPipPipPip
  • 10,174 posts
  • Joined: 16-February 06
  • Gender:Male
  • Location:Salem, OR

Posted 07 September 2013 - 01:38 PM

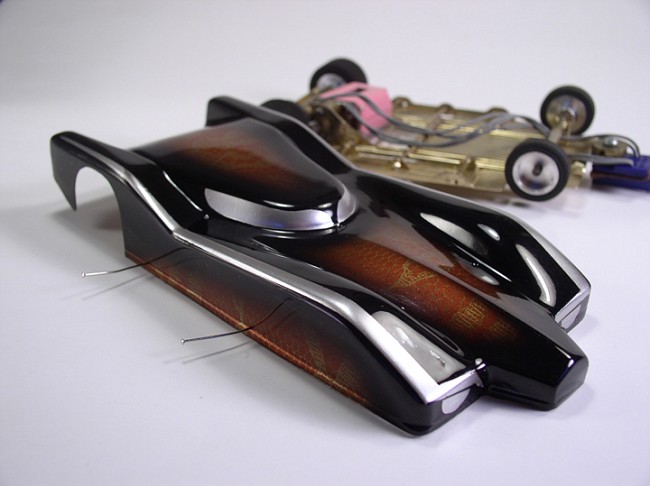
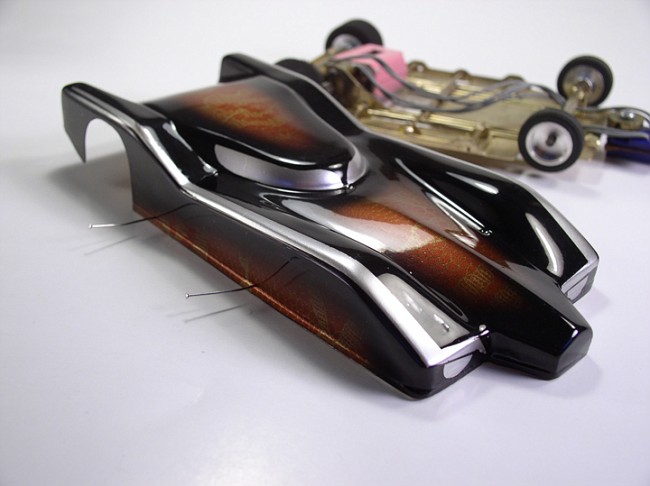
No disappointment here. I painted the body for that chassis and took some pictures of the completed project. 
:)


P1010577-vi.jpg


Motor by John Havlicek.

P1010580-vi.jpg


P1010576-vi.jpg


Guess Tom failed to show the troops...
P1010578-vi.jpg

:victory:


  • miko, Peter Horvath and Gator Bob like this

Jairus H Watson - Artist
Need something painted, soldered, carved, or killed? - jairuswtsn@aol.com

www.slotcarsmag.com

www.jairuswatson.net
http://www.ratholecustoms.com
Check out some of the cool stuff on my Fotki!


#8 Gator Bob

Gator Bob

    Grand Champion Poster

  • Banned
  • PipPipPipPipPipPipPipPip
  • 13,391 posts
  • Joined: 12-April 11
  • Gender:Not Telling
  • Location:.

Posted 07 September 2013 - 01:50 PM

Doing the math.... It might be called X-Minus-1 but I don't see anything Negative at all (if X = 0).


:good:  :good: :good:  


Posted Image
                            Bob Israelite

#9 SlotStox#53

SlotStox#53

    Posting Leader

  • Full Member
  • PipPipPipPipPipPipPip
  • 4,084 posts
  • Joined: 13-March 13
  • Gender:Male
  • Location:TX

Posted 07 September 2013 - 04:57 PM

Definitely NO disappointment here either :D The drawings showing the where & the how and pictures from Jairus (Thanks btw :good:  ) Gives perfect info on the car. Awesome chassis design & fab body Jairus , is it any specific Thingie or a one off? Certainly looks the $$$   :sun_bespectacled:   color scheme really finishes this one off.


Thanks! :dance3:


#10 olescratch

olescratch

    olescratch

  • Subscriber
  • PipPipPipPipPip
  • 977 posts
  • Joined: 19-July 13
  • Gender:Male
  • Location:Ravenna, OH

Posted 08 September 2013 - 08:37 AM

The pictures and color diagrams helped to answer many of the questions that I had about the design, but also created another. How is the Iso section kept in place? It can't be soldered at the pivot to allow for movement, so what keeps it from coming apart? John. BTW Jarius, amazing paint as usual.
John Stewart

#11 Gator Bob

Gator Bob

    Grand Champion Poster

  • Banned
  • PipPipPipPipPipPipPipPip
  • 13,391 posts
  • Joined: 12-April 11
  • Gender:Not Telling
  • Location:.

Posted 08 September 2013 - 08:49 AM

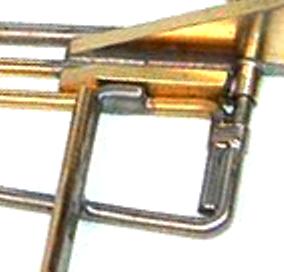
 How is the Iso section kept in place? It can't be soldered at the pivot to allow for movement, so what keeps it from coming apart?

John,

I'm sure Steve will clarify.

Thinking it is this connection that holds it together. 

X minus 1s.jpg


Posted Image
                            Bob Israelite

#12 Steve Okeefe

Steve Okeefe

    The Independent Scratchbuilder

  • Administrator
  • PipPipPipPipPipPip
  • 1,139 posts
  • Joined: 16-February 06
  • Gender:Male
  • Location:State of Independence

Posted 09 September 2013 - 11:22 AM

John,


Simple, but not obvious.  :D


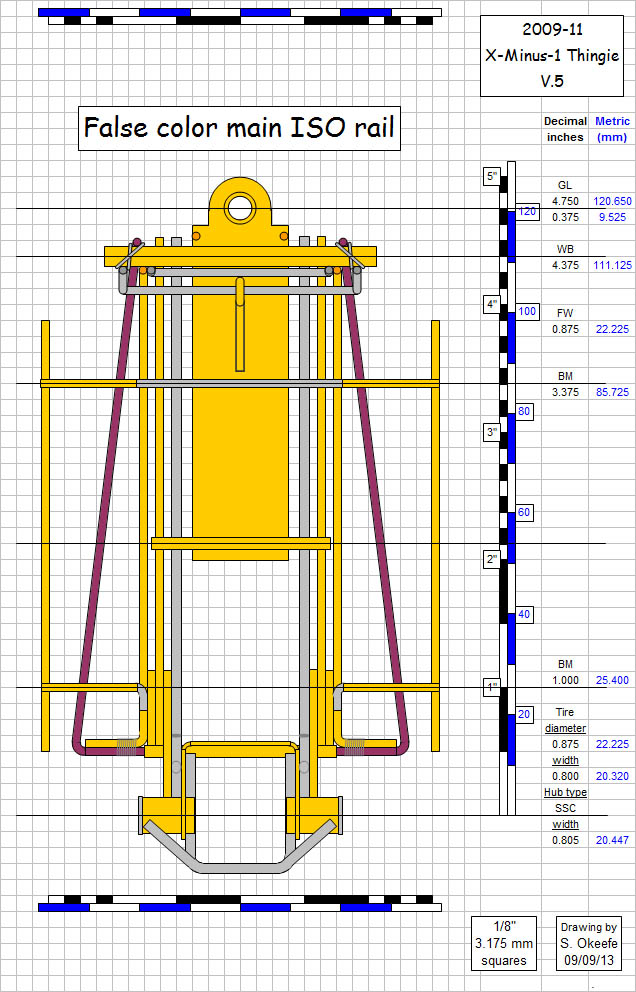
Here's another false color drawing (illustrations work great, don't they?) that shows how it works.


The entire main ISO rail (shown in purple)  is one piece of piano wire:


X Minus-1 Main ISO Rail.jpg


Check the photos of the bottom of the chassis and you can see how the main ISO rail passes through the hinge tube that is soldered to the motor bracket.


The brass secondary ISO rails (tied and soldered to the main ISO rail near the hinge) slide up and down against the .063" brass "rub strip" soldered to the center section, keeping the whole ISO section centered.


Piece-o-cake!  :good:


Steve Okeefe


I build what I likes, and I likes what I build


#13 olescratch

olescratch

    olescratch

  • Subscriber
  • PipPipPipPipPip
  • 977 posts
  • Joined: 19-July 13
  • Gender:Male
  • Location:Ravenna, OH

Posted 09 September 2013 - 01:06 PM

Thank's Steve.  I couldn't see it working if each side was a separate piece.  I do believe that seeing is believing, but I couldn't see it.  Thank's for the pictures and the explanations of them, John


John Stewart


Electric Dreams Online Shop