
February 1967
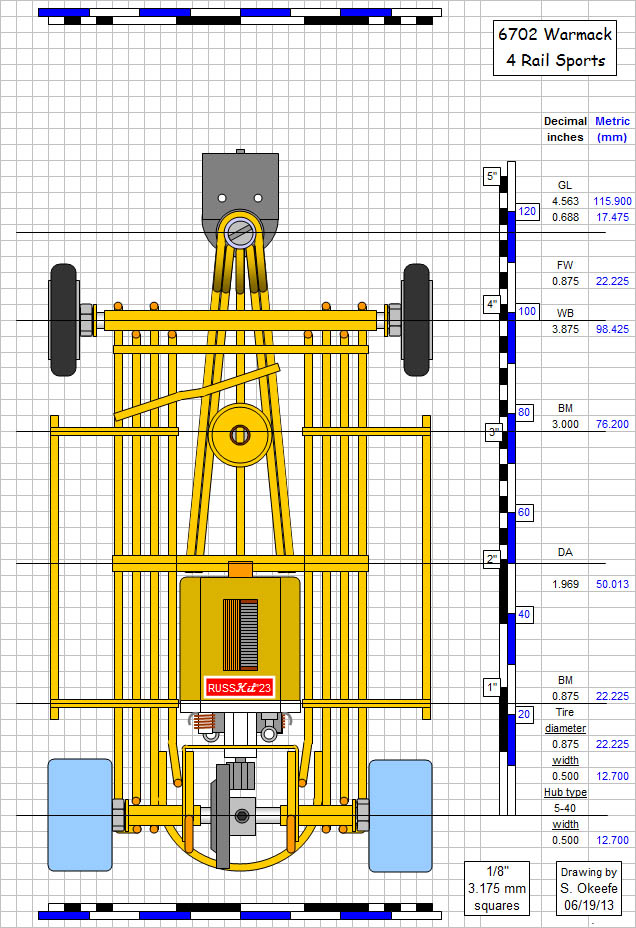
Warmack 4 Rail Sports Car
Drawing by Steve Okeefe

|

The Independent Scratchbuilder

Posted 19 June 2013 - 11:48 AM
February 1967
Warmack 4 Rail Sports Car
Drawing by Steve Okeefe
Steve Okeefe
I build what I likes, and I likes what I build
Checkered Flag in Hand

Posted 19 June 2013 - 07:08 PM
This is the design that epitomizes the classic jaildoor chassis IMHO. 
Checkered Flag in Hand

Posted 28 June 2013 - 02:01 AM
Bob, I agree with you 100% 
Backmarker

Posted 21 February 2018 - 02:59 PM
Is there an article or text info to go with this chassis drawing?
I see the Bryan Warmack car pictured in the race report, http://slotblog.net/...d-race-1967-02/
and a similar Warmack chassis again in the next report: http://slotblog.net/...d-race-1967-04/
Thanks!
The Independent Scratchbuilder
Posted 22 February 2018 - 12:41 PM
).Steve Okeefe
I build what I likes, and I likes what I build
Backmarker
Posted 22 February 2018 - 04:19 PM

Mid-Pack Racer

Posted 22 February 2018 - 06:05 PM
Hi Jim,
I recently CNC machined out a few copies if the Russkit bracket for some builds I'm going to do myself and noticed it was set up for 1/8'' clearance with 7/8'' dia tires myself, and I have meant to ask Steve the same question. I was scratching my head also..
Ken
Backmarker
Posted 22 February 2018 - 06:17 PM
Posting Leader

Posted 22 February 2018 - 06:38 PM
The Independent Scratchbuilder
Posted 22 February 2018 - 08:33 PM
Jim,
No, you are not confused. Here is the logical progression:
Full size car tires range in size from about 24 to about 27 inches in diameter. There are larger and smaller sizes to be sure, but that is a typical range. In 1/24 that would be 1" to 1-1/8". In the early '60s that is what scale model slot cars had... big tires.
Towards the mid-'60s, builders and drivers were beginning to understand that slot cars require the lowest center of gravity you can give them in order to handle well, and 1" to 1-1/8" tires are just too tall. Large tires like that (and the gears that go with them) also tend to behave as flywheels, slowing down acceleration and braking.
So the rules makers conceded by allowing 15/16" diameter rear tires in 1966, and 7/8" diameter rear tires in 1967. By 1971 they further conceded 13/16", and eventually 3/4" rears. But we are talking about the Warmack car, which is from early 1967, so it would have had 7/8" (.875") diameter rear tires.
Keeping that in mind, Mabuchi FT-16 and FT-16D motors happen to be about .645" tall; that's the way Mabuchi made them without any concern whatever for what slot racers might want.
The scratchbuilders job is to marry these two things together (.875" diameter tires and .645" tall motors) so they work properly. Doing the math we find that if you center the motor shaft on the axle, and keep the motor parallel to the track, you get .115" under the motor. .115" is very close to 1/8", so your calculations are quite right.
Prefab motor brackets, regardless of who makes them, are supposed to keep the motor shaft and the rear axle aligned - that is their job. In 1967 it was assumed the correct and best alignment (in an inline set-up) was to have the center lines of the shafts intersect (and at 90 degrees!) That is not strictly necessary in slot cars, as builders and racers eventually discovered, but we're talking about 1967.
The next step is how do you deal with this significant problem of the motor being too high up? The topical answer, it turns out, is dead simple. Bolt everything together (wheels, axle, bushings, gears, bracket and motor) and simply let the front end of the motor angle downwards so it is at 1/16" clearance, same as the chassis, and build around that. It's a concession, admittedly, but it's all you get.
The math BTW, goes like this: (tire diameter - motor height) / 2 = track clearance. Rearranging for stipulated track clearance you get: (track clearance * 2) + motor height = tire diameter. For a track clearance of 1/16", that would yield a .770" tire diameter.
Hope that helps!
Steve Okeefe
I build what I likes, and I likes what I build
Mid-Pack Racer
Posted 22 February 2018 - 08:57 PM
See I knew Steve would gave a us the answer and the reasoning behind it.
I had deduced in my think that it must of started out with the 1'' to 1-1/8'' dia tires, but didn't know they tipped the front of the motor down to 1/16'' clearance.
Thank you, Steve.
Age scrubs away speed!

Posted 22 February 2018 - 08:58 PM
I knew there was a reason for me not using Russkit brackets.  Not to confuse things, I let the front of motors angle down as Steve says above, JK made 3/4" and 1" wide hypoid motor brackets where the center line of the axle was above that of the motor's armature. These would decrease the angle of motors hanging down at the front and lower the bracket. The downside is these brackets aren't true vintage, but JK brackets are nice. Angled pinions provide a good gear mesh with hypoid brackets.
Backmarker
Posted 22 February 2018 - 09:37 PM
Thanks, Steve, lots for me to think about, as usual!
In a quick look, I have 10+ vintage chassis or partial chassis with the Russkit bracket, or similar. I will have to look very closely to see if they are angled.
I see that is the natural answer from the builder's perspective - let it dangle from the axle, prop up the end at 1/16, and solder it as it sits. Some of my examples should angle downward. Many of mine are all bent up, and my eyes aren't what they were, so I've got the magnifying glass out!
Jimmy
Grand Champion Poster

Posted 23 February 2018 - 05:58 AM
Good discussion... I discovered this when I was making my first scratchbuilt chassis in '66-67, and referred to Mike Morrissey's article in the April '66 issue of Car Model: he very clearly explains how to angle the Russkit 23 motor down at the front... I think those were still 1" tires (Graupners/German spongies of course), and not yet the 15/16" in the first R&C road race series.
Of course, the Midwest guys with their 1/32 pan chassis, and all other scratchbuilders with inline cars were already doing this, and had been for many years... check out the Bob Emott chassis raced by Howie Ursaner.
The trend to smaller tires also indirectly explains the anglewinder - the only way to get a sidewinder motor to fit with these smaller tires was to set it an an angle!
MDC and other companies made hypoid brackets, which shouldn't be too hard to find... a number of years, ago, Italian ace, the late Bruno Novarese, won one of the Bordo vintage races with an MDC hypoid chassis (maybe under a Cobra, can't remember). It handled beautifully, even tho slower than other cars, but he told me it was a bear to set up correctly!
Don
The Independent Scratchbuilder
Posted 23 February 2018 - 01:19 PM
Don,
To help illustrate your description, here's a photo of an MDC hypoid bracket:
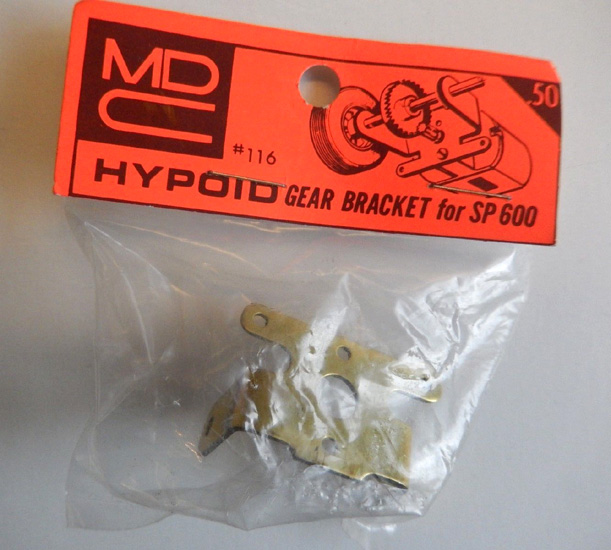
This one (as indicated on the header card) is for an SP600, which is Revell's version of an early Mabuchi 36D, technically known as an FT-36.
MDC did also have a hypoid bracket for the 16D size Mabuchi; it was part number 115:
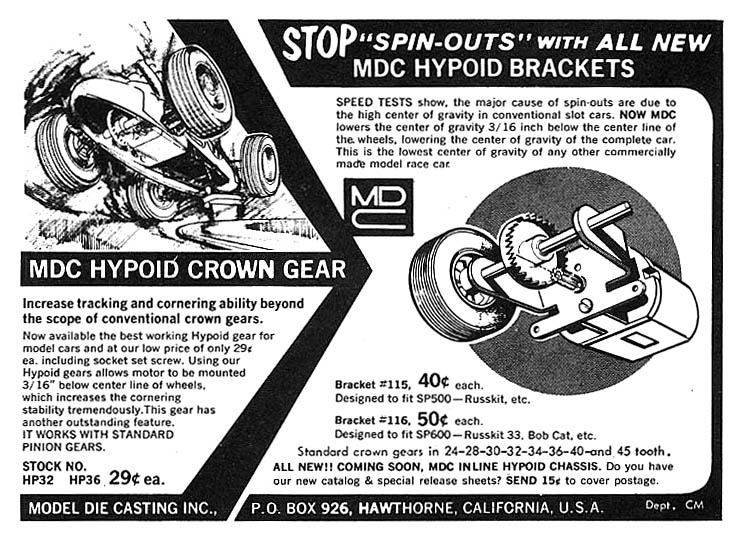
Some modern brackets intended for use in Retro cars also have a hypoid offset, although not as much as the MDC brackets had. Retro racers have discovered (as Bill has already mentioned) that they can still get a fairly smooth mesh with standard modern plastic crown gears in a hypoid setup by using an angled pinion gear.
Steve Okeefe
I build what I likes, and I likes what I build
Posting Leader

Posted 24 February 2018 - 12:04 AM
The angled pinion helps, but run the motor slowly with the gears meshing and 'carefully heat' the crown with a lighter to reform the crown teeth to the silent running mode - really - take the heat away when they stop making noise and keep the motor running until the assembly cools down. No noise, no friction, good mesh... but not as good as an aligned pinion.
Larry D. Kelley, MA
retired raceway owner... Raceworld/Ramcat Raceways
racing around Chicago-land
Diode/Omni repair specialist
USRA 2023 member # 2322
IRRA,/Sano/R4 veteran, Flat track racer/MFTS
Host 2006 Formula 2000 & ISRA/USA Nats
Great Lakes Slot Car Club (1/32) member
65+ year pin Racing rail/slot cars in America
Backmarker
Posted 07 March 2018 - 01:04 PM
Headmaster of the asylum

Posted 07 March 2018 - 01:10 PM
Gregory Wells
Never forget that first place goes to the racer with the MOST laps, not the racer with the FASTEST lap
Backmarker
Posted 07 March 2018 - 01:27 PM
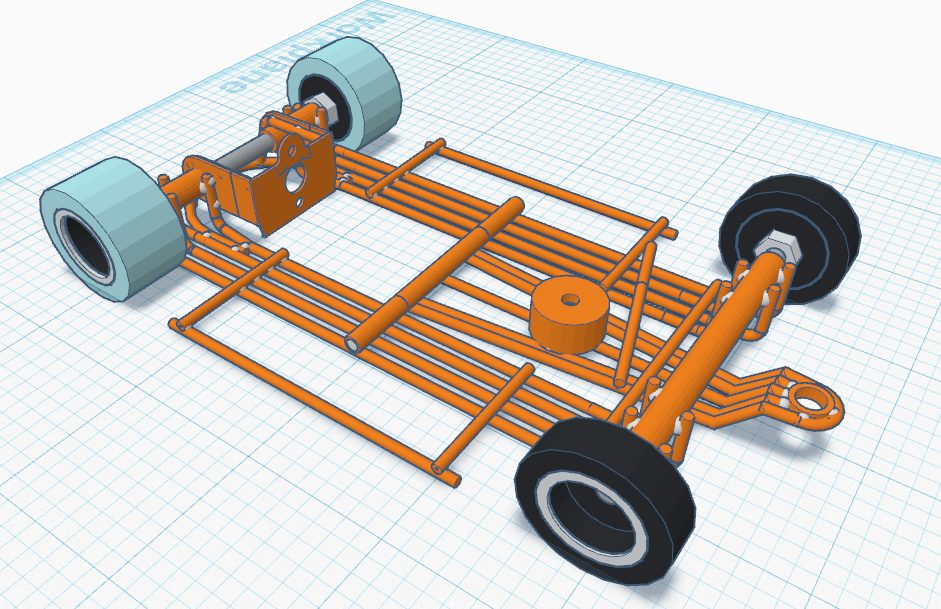
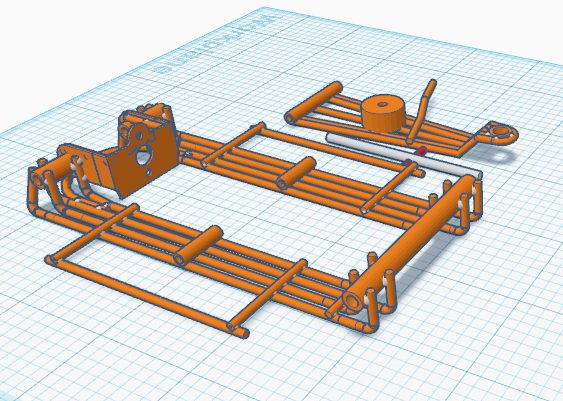
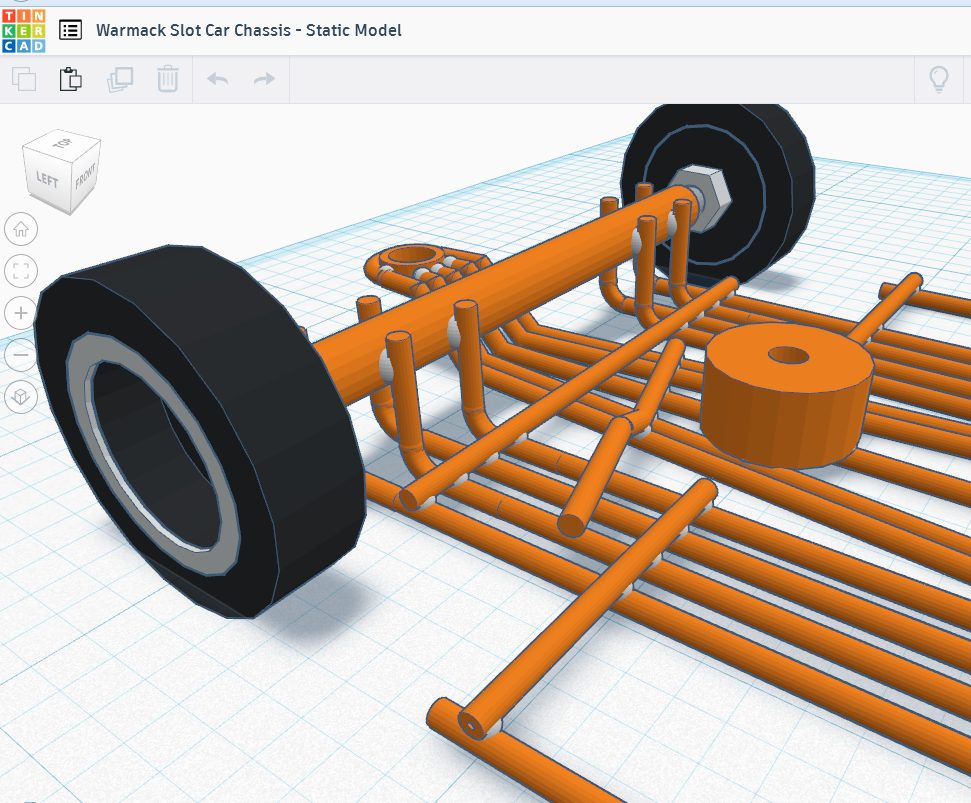
I'm working at TinkerCAD. This was fun exercise, first time I used any CAD program. I've sent it to Shapeways, and have ordered my first sample [in plastic] today. I'll show y'all when it arrives.
Backmarker
Posted 07 March 2018 - 01:34 PM
Age scrubs away speed!
Posted 07 March 2018 - 01:59 PM
Jim, I know very little about 3D printing. Why is the chassis too large for Shapeways to print in brass, yet would be okay to print in stainless steel or nylon? is it some mechanical limitation or does printing brass just take more memory to do?
Your CAD drawings would be a relatively easy chassis to build with conventional brass rod & solder on a chassis jig.
Backmarker
Posted 07 March 2018 - 02:24 PM
Different materials are outsourced to different vendors on Shapeways. The brass vendors are limited to 89mm x 89mm (about 3.5 inches square.) I'm not sure why the limit. I think brass and some other metals are actually cast from a 3D printed wax model, by the ancient lost-wax process.
I tried to copy Steve's drawing as exactly as possible, plus looked very closely at the picture in the magazine. I'm sure lots of people have built this very chassis on their workbench. I'm working on a few others, too, to be revealed as I complete them.
Backmarker
Posted 22 March 2018 - 10:51 AM
My 3D printed replica of the Warmack Chassis is back from Shapeways. This plastic model is built in homage to Bryan Warmack's classic jaildoor chassis.
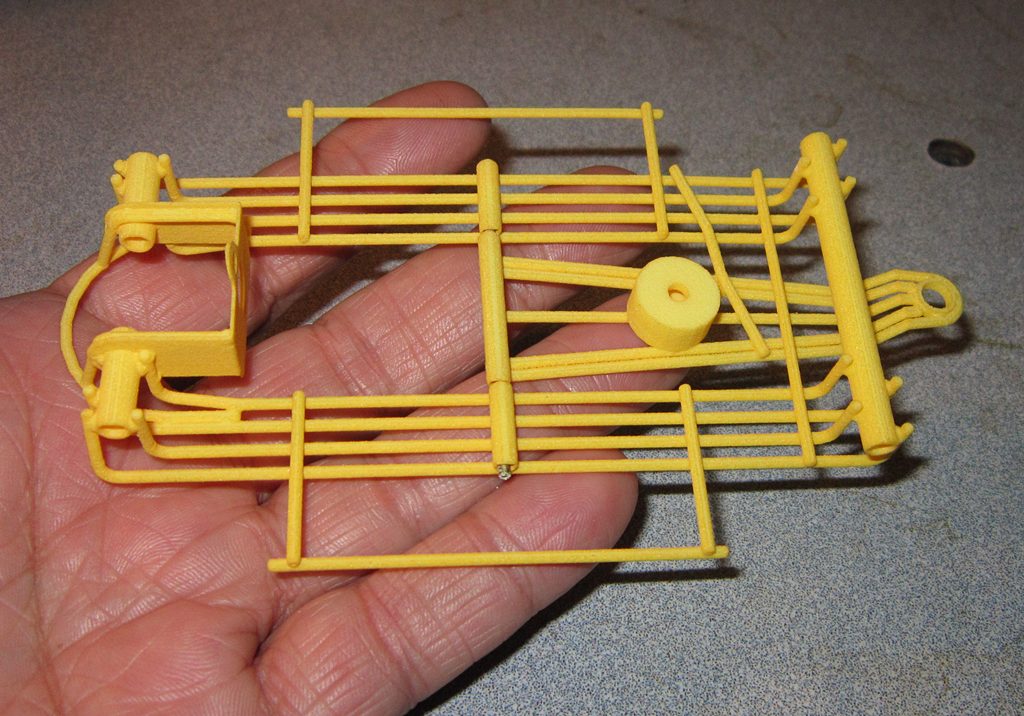
I plan to post other views in slotblog's Computer assisted design forum.
Checkered Flag in Hand
Posted 22 March 2018 - 06:48 PM
Jim, that's just plain COOL!


