Jump to content


Photo

1968 anglewinder


  • Please log in to reply
72 replies to this topic

#26 Jairus

Jairus

    Body Painter Extraordinaire

  • Subscriber
  • PipPipPipPipPipPipPipPip
  • 10,174 posts
  • Joined: 16-February 06
  • Gender:Male
  • Location:Salem, OR

Posted 09 September 2013 - 08:43 AM

Here are three examples of cars ran during the 1968 Arco 33 Nationals held at Tom Thumb raceways May 18th.
These give us a peek at the variation that was going on during those transition months.


The first built by Bob Emott.
Note that Steve is right, that Bob started out right of the gate building full rail angle-winder cars.

Emottexample-vi.jpg


The next two were built by two more very well known guys in the biz... Steube and Cukras!
SteubeCukrasexample-vi.jpg


With this in mind I went ahead and made my drop arm and motor bracket.
IMG_1399-vi.jpg

:)


Jairus H Watson - Artist
Need something painted, soldered, carved, or killed? - jairuswtsn@aol.com

www.slotcarsmag.com

www.jairuswatson.net
http://www.ratholecustoms.com
Check out some of the cool stuff on my Fotki!


#27 SlotStox#53

SlotStox#53

    Posting Leader

  • Full Member
  • PipPipPipPipPipPipPip
  • 4,084 posts
  • Joined: 13-March 13
  • Gender:Male
  • Location:TX

Posted 09 September 2013 - 09:03 AM

Certainly were a lot of chassis differences in the early stages ,great to see all the different designs & ways round the anglewinder that builders took.

Bob certainly did go all out right away, really like the full rail chassis :D

Looking good so far Jairus :)

#28 Hworth08

Hworth08

    Posting Leader

  • Member at Peace
  • PipPipPipPipPipPipPip
  • 3,563 posts
  • Joined: 16-February 06
  • Gender:Male
  • Location:Springfield, TN

Posted 09 September 2013 - 10:59 AM

Certainly were a lot of chassis differences in the early stages ,


Everyone was having a lot of trouble with bouncing and wheel hopping. My first anglewinder had the bearing tube welded to the can like Gene Husting. A smooth running car. Next used a motor box and the problems began.

Finally we figured out to use the simple little L-brace between the axle tube and motor that completely solved the problem. Course we did worry if we would go directly to hay-dees for soldering on the can!
Don Hollingsworth
11/6/54-2/13/18
Requiescat in Pace

#29 S.O. Watt

S.O. Watt

    Graduate Bench Racer

  • Full Member
  • PipPipPipPipPipPip
  • 1,175 posts
  • Joined: 24-June 06
  • Gender:Male
  • Location:Glen Cove, Key Penisula, Wa.

Posted 09 September 2013 - 11:35 AM

Here are three examples of cars ran during the 1968 Arco 33 Nationals held at Tom Thumb raceways May 18th
 
 
The next two were built by two more very well known guys in the biz... Steube and Cukras!
SteubeCukrasexample-vi.jpg
 
 img=http://images41.fotk...IMG_1399-vi.jpg]
:)


I believe that these two frames probably pre date the Emott. These look like some of the frames that John and Mike made into anglewinders from donor inlines in April just prior to the debut race at Classic. The construction details I believe support this. With Bruce now listed as the owner of the Mike S frame, that leads me to believe Mike sold him this car after the April race. Pretty common for Bruce to purchase the winners/used cars back then, especially from Mike.

The Cox spur gears were finally supplanted by the Faas gears as the preferred by the end of '70. The quality had gotten so bad that one could check ten 34t Cox gears and find maybe two that didn't have extreme wobble and were raceable.

Tom Hansen
Our Gang Racing Team
Cukras Enterprises

Team Camen

Chassis By Hansen

I race and shop at Pacific Slot Car Raceway


#30 Steve Okeefe

Steve Okeefe

    The Independent Scratchbuilder

  • Administrator
  • PipPipPipPipPipPip
  • 1,136 posts
  • Joined: 16-February 06
  • Gender:Male
  • Location:State of Independence

Posted 09 September 2013 - 12:45 PM

Jairus,


Yikes!  You don't waste any time fooling around!   :shok:


I worked up a partial chassis drawing showing an example of how the motor-box and main rails could go together:


Motorbox Example.jpg


Queing from your photo I made the drop arm in the drawing 3/4" wide and the motor-box wide enough to accommodate a Mura "A" can motor.  The center section in the drawing is unusually wide for May 1968 (except for Steube, most builders were still crowding the main rails in towards the drop arm).  I did this so you can clearly see two things:


1. How important it is to keep at least the gear-side front corner of the motor-box at or near the one-quarter chassis width point.  The opposite side one-quarter chassis width point can fall at its associated front corner or somewhere along the edge of the motor-box.  Doing this enhances the symmetry of the chassis, helping all the other parts fit better, and also adds to the aesthetic appeal.


2. How narrowing the center section will force the rails that wrap around the wide motor-box into a taper in order to match up with the narrower main rails.  This causes the rear side-pan hinge tubes to be pushed way forward.  You can clearly see this in the Emott chassis photo you posted.  Pushing the side pan hinges forward leaves a lot of the back end of the side pans (and the body that is mounted to them) hanging out in the breeze.


Narrow center sections with parallel rails were still a typical feature in May 1968, but the photo of the Steube chassis shows that some builders were already spreading out the rails, making the center sections wider, and enjoying the benefits.  A near-ideal center section width is between 1-1/2" and 1-5/8".  In the drawing I posted the center section is 1-5/8" wide.  Bob Emott wanted to keep the chassis narrow at the point where the front axle attaches, so he built his center sections with non-parallel rails, tapering smoothly from back to front.


Steve Okeefe


I build what I likes, and I likes what I build


#31 SlotStox#53

SlotStox#53

    Posting Leader

  • Full Member
  • PipPipPipPipPipPipPip
  • 4,084 posts
  • Joined: 13-March 13
  • Gender:Male
  • Location:TX

Posted 09 September 2013 - 06:32 PM

You don't hang around either Steve! That detail drawing is coming along nicely :D great information on all the differences with the rails & center sections.

The drawing will go with all the others for reference when looking at what cars to build.

#32 Pablo

Pablo

    Builder

  • Administrator
  • PipPipPipPipPipPipPipPip
  • 18,370 posts
  • Joined: 20-February 06
  • Gender:Male
  • Location:Cleveland, Tennessee

Posted 09 September 2013 - 09:26 PM

The fog paint on the motor just looks SO naturally beautiful with the brass.  Once again, the bar is raised...... gives me goose bumps..... :clapping:


Paul Wolcott


#33 Steve Okeefe

Steve Okeefe

    The Independent Scratchbuilder

  • Administrator
  • PipPipPipPipPipPip
  • 1,136 posts
  • Joined: 16-February 06
  • Gender:Male
  • Location:State of Independence

Posted 10 September 2013 - 12:12 PM

Jairus,


After I posted that quick drawing yesterday I realized I had ended up describing something that I wasn't showing.  So, given 24 hours I've re-done my drawings so they are more comprehensive.


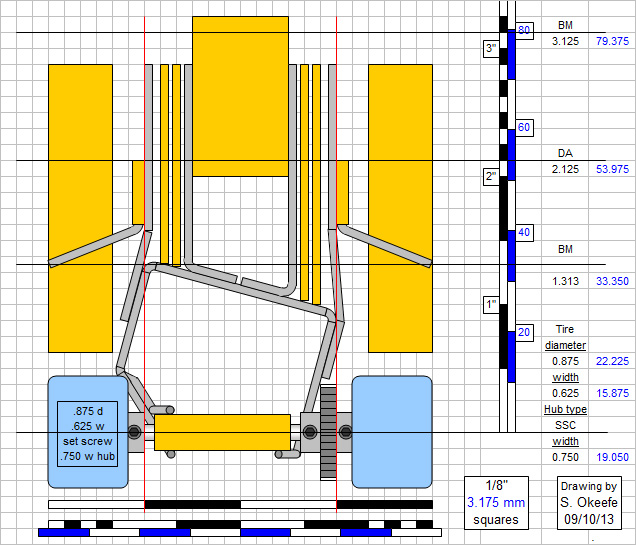
For the wide set main rails (1-5/8" wide center section), here's how far back the rear side pan hinge tubes can be located (this could be considered the "gold standard"):


Main Rails Wide.jpg


If you crowd the main rails together towards the drop arm (giving you a 1-1/4" wide center section), the rear side pan hinge tubes must be pushed far forward, in this case all the way to the drop arm hinge.  This is an extreme example to illustrate my point; I doubt any pro builder would actually construct a chassis this way:


Main Rails Narrow.jpg


Most builders would (and many did) add extra bends in the outside main rails, jogging them to get that rear side pan hinge mount farther back.  Introducing extra bends complicates the build, and the closer together those bends are the harder it is to get them right:


Main Rails Jogged.jpg


There are of course several other ways to deal with this dilemma.  In the wide set example, the rails are spaced at 1/16"; it would be just as easy to space them at 1/32" (or some combination of 1/16" and 1/32").  That way they appear to be close in but the outside rail would be far enough out that the jog required would be much smaller and simpler (simpler is always better)  Note in this example, the center section is 1-1/2" wide:


Main Rails Mid Set.jpg


Another way to locate the rails farther out would be to add a space between the drop arm and the inner rail.  You couild also use a wider (7/8") drop arm.


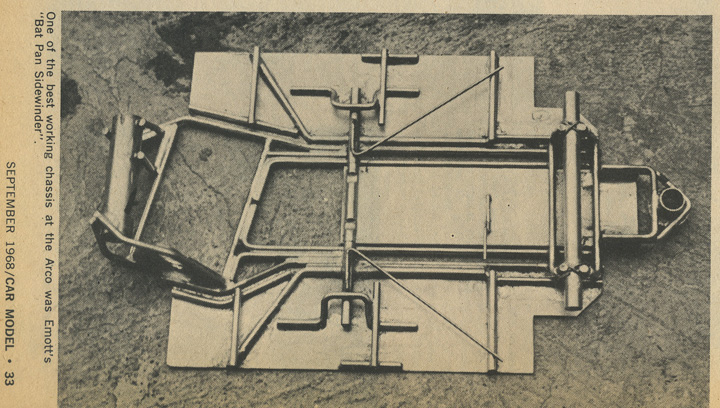
Lastly, you could taper the whole center section back-to-front so that the outside rails remain completely straight from the motor-box to the front axle on both sides (same as the wide set main rail example above), allowing you to locate the side pan hinge tubes anywhere you like (that's what Bob Emott did).


Anyway, all of this is just babble from an old chassis geek.  :hi:   Hope you find it useful.  :D


  • Jaak likes this

Steve Okeefe


I build what I likes, and I likes what I build


#34 Jairus

Jairus

    Body Painter Extraordinaire

  • Subscriber
  • PipPipPipPipPipPipPipPip
  • 10,174 posts
  • Joined: 16-February 06
  • Gender:Male
  • Location:Salem, OR

Posted 10 September 2013 - 01:17 PM

Wow! You put a lot of thought into this and the first illustration is what I was going with originally.... albeit with 1/4" outside pans and brass* inside rails. But that is very close to the plan Steve, very nice!

Working on some box-art illustration at the moment... but this afternoon I believe I can get jiggy on the chassis again!  :) 


* When I say brass... I mean hard bronze welding rod instead of that soft K&S stuff.


Jairus H Watson - Artist
Need something painted, soldered, carved, or killed? - jairuswtsn@aol.com

www.slotcarsmag.com

www.jairuswatson.net
http://www.ratholecustoms.com
Check out some of the cool stuff on my Fotki!


#35 Hworth08

Hworth08

    Posting Leader

  • Member at Peace
  • PipPipPipPipPipPipPip
  • 3,563 posts
  • Joined: 16-February 06
  • Gender:Male
  • Location:Springfield, TN

Posted 10 September 2013 - 06:17 PM


* When I say brass... I mean hard bronze welding rod instead of that soft K&S stuff.


The K&S brass is soft, to make it easy for hobbyist to bend. Bare brass (non-coated) brazing rod is between bronze and K&S. The brazing rod is LOT cheaper, 32 or 33 three foot lengths cost $12 to 15.


Don Hollingsworth
11/6/54-2/13/18
Requiescat in Pace

#36 Pablo

Pablo

    Builder

  • Administrator
  • PipPipPipPipPipPipPipPip
  • 18,370 posts
  • Joined: 20-February 06
  • Gender:Male
  • Location:Cleveland, Tennessee

Posted 10 September 2013 - 08:14 PM

I tried some once.  Must have been the wrong stuff, because it was very brittle. Bend it a second time and it snaps.


Paul Wolcott


#37 Jairus

Jairus

    Body Painter Extraordinaire

  • Subscriber
  • PipPipPipPipPipPipPipPip
  • 10,174 posts
  • Joined: 16-February 06
  • Gender:Male
  • Location:Salem, OR

Posted 10 September 2013 - 08:40 PM

Yeah, that's the stuff! 
More flexable than soft brass, holds up to a crash and ... well, that's all I got.

All jigged up on the threshing room floor.
Now gotta figure out how to attach to the front axle? Hmmmmmm?  :unknw:


The standard was to bend the front wires up towards the axle tube pretty much like they did since '67.

Strong and simply.

However Emott suggests with his chassis build using two "U" wires, and there-by promoting a bad and weak mounting idea used for a year or more until the "L" bracket idea.  Tony P also backs up this design in his chassis building article. But then, that article didn't come out till October so....
 

Guess I'll go the old school route since most of the cars shown built during April, May and June seemed to use that idea.

IMG_1400-vi.jpg


Jairus H Watson - Artist
Need something painted, soldered, carved, or killed? - jairuswtsn@aol.com

www.slotcarsmag.com

www.jairuswatson.net
http://www.ratholecustoms.com
Check out some of the cool stuff on my Fotki!


#38 dc-65x

dc-65x

    Grand Champion Poster

  • Subscriber
  • PipPipPipPipPipPipPipPip
  • 6,829 posts
  • Joined: 14-February 06
  • Gender:Male
  • Location:Captain Rick: The only vintage slot car nut in SW Oregon?

Posted 10 September 2013 - 09:17 PM

HOLY SMOKES!


Now that's a "loved" Rick's Jig for sure! The stories I bet it could tell :crazy:


Rick Thigpen
Check out Steve Okeefe's great web site at its new home here at Slotblog:
The Independent Scratchbuilder
There's much more to come...


#39 Jairus

Jairus

    Body Painter Extraordinaire

  • Subscriber
  • PipPipPipPipPipPipPipPip
  • 10,174 posts
  • Joined: 16-February 06
  • Gender:Male
  • Location:Salem, OR

Posted 10 September 2013 - 09:47 PM

I know... so embarrassed to show it.  :blush:


  • Jaak likes this

Jairus H Watson - Artist
Need something painted, soldered, carved, or killed? - jairuswtsn@aol.com

www.slotcarsmag.com

www.jairuswatson.net
http://www.ratholecustoms.com
Check out some of the cool stuff on my Fotki!


#40 Pablo

Pablo

    Builder

  • Administrator
  • PipPipPipPipPipPipPipPip
  • 18,370 posts
  • Joined: 20-February 06
  • Gender:Male
  • Location:Cleveland, Tennessee

Posted 10 September 2013 - 09:57 PM

That is what is so nice about all those holes....you can avoid burn spots like re-routing a highway trip. :)


Paul Wolcott


#41 gascarnut

gascarnut

    Posting Leader

  • Full Member
  • PipPipPipPipPipPipPip
  • 3,938 posts
  • Joined: 16-February 06
  • Gender:Male
  • Location:Irvine, CA

Posted 10 September 2013 - 10:14 PM

I know... so embarrassed to show it.  :blush:


And here was I thinking "that looks just like my jig"...
Dennis Samson
--------------------------
Scratchbuilding is life
Life is scratchbuilt

Samson Classics

#42 Steve Okeefe

Steve Okeefe

    The Independent Scratchbuilder

  • Administrator
  • PipPipPipPipPipPip
  • 1,136 posts
  • Joined: 16-February 06
  • Gender:Male
  • Location:State of Independence

Posted 10 September 2013 - 11:06 PM

Jairus,


You wrote: "However Emott suggests with his chassis build using two "U" wires, and there-by promoting a bad and weak mounting idea used for a year or more until the "L" bracket idea. Tony P also backs up this design in his chassis building article. But then, that article didn't come out till October so...."


Yes but...


The chassis was built in May of 1968 (says so right in the article), so you're good to go with the drop axle front end if you want to.


With four rails on each side, you're going to have 16 separate solder joints holding the front axle mount on.  Somehow I don't think it's going to come off in a crash...  :laugh2:


Steve Okeefe


I build what I likes, and I likes what I build


#43 Hworth08

Hworth08

    Posting Leader

  • Member at Peace
  • PipPipPipPipPipPipPip
  • 3,563 posts
  • Joined: 16-February 06
  • Gender:Male
  • Location:Springfield, TN

Posted 11 September 2013 - 09:10 AM

The two "U" pieces with a 5/32nds tube such as the Emott frame in post 26 gained immediate popularity when it was introduced. A lot easier to build than bending the rails and very strong.


Another feature was giving a place to butt the guide mount against. With increased speeds breaking the solder joint holding the drop arm was becoming a problem.


IIRC we started using that front end arrangement on in-line frames.


Don Hollingsworth
11/6/54-2/13/18
Requiescat in Pace

#44 Jairus

Jairus

    Body Painter Extraordinaire

  • Subscriber
  • PipPipPipPipPipPipPipPip
  • 10,174 posts
  • Joined: 16-February 06
  • Gender:Male
  • Location:Salem, OR

Posted 11 September 2013 - 09:45 AM

I beg to differ Don.
For a time between 2006 and 2010 I was buying up lots of those "Kit" chassis just for the Mura "A" motors.  And each and every one showed a broken solder joint somewhere holding the front axle tube.  Most are in storage now or I would have posted a "rogues gallery" of poor building in conjunction with this car that I'm building.  

I agree with you that it gained immediate popularity because it was indeed easier to build. But disagree with the "very strong" statement.

HEY! The iron is hot!


Jairus H Watson - Artist
Need something painted, soldered, carved, or killed? - jairuswtsn@aol.com

www.slotcarsmag.com

www.jairuswatson.net
http://www.ratholecustoms.com
Check out some of the cool stuff on my Fotki!


#45 Jairus

Jairus

    Body Painter Extraordinaire

  • Subscriber
  • PipPipPipPipPipPipPipPip
  • 10,174 posts
  • Joined: 16-February 06
  • Gender:Male
  • Location:Salem, OR

Posted 11 September 2013 - 12:06 PM

Here we are so far.
3 7/8" WB and set for a 3" track width with legal 3/4" front and 7/8" rear tire diameter.
Hanging of the "sloppy sam mounts" next, while waiting on PCH to deliver the needed period motor bracket.
IMG_1401-vi.jpg

On a completely different subject.... Victor emailed me this pic asking if I would like to use a little different body for this project.
Still a Lola... but from a different manufacturer (on the left) and has slightly different details than the normal T.S. Lola T70 we are used to.
Of course I said YES!!!!
(Anyone want to identify the original maker of this body?)
LolaBodies-vi.jpg
Everybody HAPPY HAPPY HAPPY!


  • miko likes this

Jairus H Watson - Artist
Need something painted, soldered, carved, or killed? - jairuswtsn@aol.com

www.slotcarsmag.com

www.jairuswatson.net
http://www.ratholecustoms.com
Check out some of the cool stuff on my Fotki!


#46 dc-65x

dc-65x

    Grand Champion Poster

  • Subscriber
  • PipPipPipPipPipPipPipPip
  • 6,829 posts
  • Joined: 14-February 06
  • Gender:Male
  • Location:Captain Rick: The only vintage slot car nut in SW Oregon?

Posted 11 September 2013 - 12:56 PM

Looks like the earlier generation of Dynamic Lola T70 with the exhaust pipes showing behind the Weber carbs. We call it the "short nose Lola" in our little word. :)


It sure would be nice to have these available as they are the Korrect version for Pro inlines.


Rick Thigpen
Check out Steve Okeefe's great web site at its new home here at Slotblog:
The Independent Scratchbuilder
There's much more to come...


#47 SlotStox#53

SlotStox#53

    Posting Leader

  • Full Member
  • PipPipPipPipPipPipPip
  • 4,084 posts
  • Joined: 13-March 13
  • Gender:Male
  • Location:TX

Posted 11 September 2013 - 03:19 PM

Ooo love the look of that Lola , always nice to have more bodies to choose from :D

#48 dc-65x

dc-65x

    Grand Champion Poster

  • Subscriber
  • PipPipPipPipPipPipPipPip
  • 6,829 posts
  • Joined: 14-February 06
  • Gender:Male
  • Location:Captain Rick: The only vintage slot car nut in SW Oregon?

Posted 11 September 2013 - 03:32 PM

Jairus, you might have some trouble with spur gear clearance with the "short nose" version. See how "long nose" version on the right has wider bulges for gear and tire clearance?


  • Jaak likes this

Rick Thigpen
Check out Steve Okeefe's great web site at its new home here at Slotblog:
The Independent Scratchbuilder
There's much more to come...


#49 endbelldrive

endbelldrive

    Checkered Flag in Hand

  • Member at Peace
  • PipPipPipPipPipPip
  • 1,740 posts
  • Joined: 16-February 06
  • Gender:Male
  • Location:Witless Protection Program

Posted 11 September 2013 - 11:12 PM

It would be nice to have extra depth on the rocker panels (drop the bottom trim line an 1/8" of an inch...or do away with it altogether  :) ) so we can raise the back end for motor, gear and tire clearance.


Bob Suzuki
8/19/54-8/?/21
Requiescat in Pace

#50 Jairus

Jairus

    Body Painter Extraordinaire

  • Subscriber
  • PipPipPipPipPipPipPipPip
  • 10,174 posts
  • Joined: 16-February 06
  • Gender:Male
  • Location:Salem, OR

Posted 11 September 2013 - 11:26 PM

Just got home after a full day of work... and a GREAT evening of slot racing.
Flexi NASCAR and Flexi GT Scale. Both with sealed 16D Parma motors.
Still remain surprised at the fact that there can be motors THAT BLOODY FASTER THAN MINE!
But I'm not sore.  Nooooooooooooo not sore at all.

The drive south to Albany was fantastic following the Willamette River on the two lane, despite the 90 degree heat and coming in last yet again.... I still had a great time!
Tomorrow Bob is going to get a surprise when we race Go-Karts tho.  I am coming out for bear!!!!


As for the difference between the Lotus bodies.  I had not noticed that at first, good eyes Rick.  This might be a deal breaker... but, let's not tell Victor till he sends me the body.  

'cause I could still use that one on a later project.  If the gear doesn't clear.... then the long nose body will suffice since that was the plan in the beginning.  Or make it work as Bob suggests.  Just need to get the chassis done first... right?
Of course right!


Jairus H Watson - Artist
Need something painted, soldered, carved, or killed? - jairuswtsn@aol.com

www.slotcarsmag.com

www.jairuswatson.net
http://www.ratholecustoms.com
Check out some of the cool stuff on my Fotki!


Electric Dreams Online Shop