Jump to content


Photo

Lexan slot car body trimming accuracy


  • Please log in to reply
31 replies to this topic

#1 Alchemist

Alchemist

    Posting Leader

  • Full Member
  • PipPipPipPipPipPipPip
  • 2,676 posts
  • Joined: 11-November 09
  • Gender:Male
  • Location:Far, far away

Posted 10 September 2013 - 03:05 PM

There are times when cutting a new body, the sides are never even and find that the body is slightly tilted after mounting.  


When trimming the lower part of the body to prepare for chassis  mounting, what is it that you do to ensure that both sides of the body are even?  Is there another way to check it  besides mounting it and looking at it on a tech block?  


I've tried using tape as an guide for cutting, following what I deem to be cut lines built into the mold of the new untrimmed body.


Would you consider sharing your techniques for body trimming and tips on how to make the cut lines straight and accurate please?


Thank you.


Ernie


Ernie Layacan


#2 MG Brown

MG Brown

    Grand Champion Poster

  • Administrator
  • PipPipPipPipPipPipPipPip
  • 7,757 posts
  • Joined: 16-February 06
  • Gender:Male
  • Location:The Cumberland Plateau

Posted 10 September 2013 - 03:10 PM

It's true that some bodies have uneven cut lines. Measuring from the top edge of the body with a steel ruler can be helpful. I use tape as a guide also.


A helpful tool for cutting bodies is a pair of Fiskars "Razor Edged" scissors. Be careful! They are very sharp.


That's thirty minutes away. I'll be there in ten.


#3 Tim Neja

Tim Neja

    Grand Champion Poster

  • Subscriber
  • PipPipPipPipPipPipPipPip
  • 6,803 posts
  • Joined: 11-June 07
  • Gender:Male
  • Location:Paso Robles

Posted 10 September 2013 - 03:32 PM

Well the critical point is the wheel wells.  I measure down from the top of the wheel wells and then draw a line across each side to get them LEVEL!! Then mount and trim now that you have EVEN sides!! :)


She's real fine, my 409!!!

#4 Bernie

Bernie

    Checkered Flag in Hand

  • Full Member
  • PipPipPipPipPipPip
  • 1,283 posts
  • Joined: 11-March 09
  • Gender:Male
  • Location:St Johns, Florida

Posted 10 September 2013 - 03:33 PM

Get one of these:


Wrightway Body Mounting Jig

WWBCJ-228x228.jpg
Brand: Wrightway
Product Code: WWBCJ
Availability: In Stock
Unit: EACH
Price: $13.95


Works Great. Wing Car guys use them. Kevin Van Pelt turned me on to them. Smart guy :victory:


  • Mike K, The Bugman and Frankie Schaffier like this
Bernie Schatz

#5 gascarnut

gascarnut

    Posting Leader

  • Full Member
  • PipPipPipPipPipPipPip
  • 3,938 posts
  • Joined: 16-February 06
  • Gender:Male
  • Location:Irvine, CA

Posted 10 September 2013 - 04:21 PM

The fanciest body jig i think I have ever seen belongs to Mike McMasters in Columbus, maybe he will post some photos some time.


It has all sorts of clamps and cutting guides and even pin tube guides, if I remember.


Dennis Samson
--------------------------
Scratchbuilding is life
Life is scratchbuilt

Samson Classics

#6 Jairus

Jairus

    Body Painter Extraordinaire

  • Subscriber
  • PipPipPipPipPipPipPipPip
  • 10,174 posts
  • Joined: 16-February 06
  • Gender:Male
  • Location:Salem, OR

Posted 10 September 2013 - 04:46 PM

Experience is best.
The more bodies you cut.... the better you get.


  • MG Brown, Bernie, PCH Parts Express and 3 others like this

Jairus H Watson - Artist
Need something painted, soldered, carved, or killed? - jairuswtsn@aol.com

www.slotcarsmag.com

www.jairuswatson.net
http://www.ratholecustoms.com
Check out some of the cool stuff on my Fotki!


#7 Tom Eatherly

Tom Eatherly

    Posting Leader

  • Full Member
  • PipPipPipPipPipPipPip
  • 2,144 posts
  • Joined: 28-October 11
  • Gender:Male
  • Location:SoCal

Posted 10 September 2013 - 10:08 PM

Experience is best.
The more bodies you cut.... the better you get.

With out a doubt!


Tom Eatherly

#8 spudboy

spudboy

    Race Leader

  • Subscriber
  • PipPipPipPipPip
  • 885 posts
  • Joined: 14-January 09
  • Gender:Male
  • Location:Amesbury, MA

Posted 10 September 2013 - 11:50 PM

Whenever possible I try to "pre-mount" the body while it is still clear.  I use some of the tips MG describes and try to set my mounting holes and wheel wells accordingly.  When the mounting holes are punched I tape over them on the outside of the body before painting.


Nate "spudboy" Bemis

#9 backintheslot

backintheslot

    On The Lead Lap

  • Full Member
  • PipPipPipPip
  • 408 posts
  • Joined: 24-March 10
  • Gender:Male
  • Location:S.F/ Seattle

Posted 11 September 2013 - 12:25 AM

Get one of these:


Wrightway Body Mounting Jig

WWBCJ-228x228.jpg
Brand: Wrightway
Product Code: WWBCJ
Availability: In Stock
Unit: EACH
Price: $13.95


Works Great. Wing Car guys use them. Kevin Van Pelt turned me on to them. Smart guy :victory:


:good:  :good:  :good:  With a small  "General Tools" pocket straight edge to measure body height, a fine Sharpie for marking and quarters, dimes, nickels or pennies (depending on desired size for opening) to mark the wheel cut outs and the Trinity curved body scissors for the curve work.   Clean up any un-wanted sharpie marks with a dab of isopropyl alcohol on a soft rag..........  Ernie, Frank will hook you up!


straight edge.jpg


The clip slides to hold proper measurement. ( I have flipped my clip to go the other way so the flat end buts up flush to the tool.)  Once the tool is clamped down, an Exacto blade goes through each side of the body like butter. You can then mark the front and rear of the body with the straight edge to match the sides.


Jairus makes a fine point as well!


John Albright


I have a chassis jig and I'm threatening to use it!


#10 Mopar Rob

Mopar Rob

    Retro Snob as of 1/12/2011

  • Full Member
  • PipPipPipPipPipPipPip
  • 3,445 posts
  • Joined: 13-December 07
  • Gender:Male
  • Location:By a Great Lake

Posted 11 September 2013 - 07:04 AM

Put a mark at the back and front of the body after measuring. I then use a piece of .019" X 1/2" stainless strip with double sided tape stuck to it as a guide. I stick it on the outside of the body and and cut with my xacto knife. I then just peel it off and trim the front with scissors.

Rob Hanson

Shops at Mid-America Raceway and uses R-Geo Products


Rob was right!


#11 kvanpelt

kvanpelt

    Checkered Flag in Hand

  • Member at Peace
  • PipPipPipPipPipPip
  • 1,282 posts
  • Joined: 29-January 08
  • Gender:Male
  • Location:IL

Posted 11 September 2013 - 09:14 AM

Shontel Howard from Dallas Slot Cars sells body templates that give you a straight edge and wheel cutouts, which make the job very easy.


They go for $10.00 if you use the same style body frequently.


Kevin VanPelt
?/?/56-6/12/23
Requiescat in Pace


#12 The Groove

The Groove

    On The Lead Lap

  • Full Member
  • PipPipPipPip
  • 328 posts
  • Joined: 14-December 08
  • Gender:Male
  • Location:MI

Posted 11 September 2013 - 09:48 AM

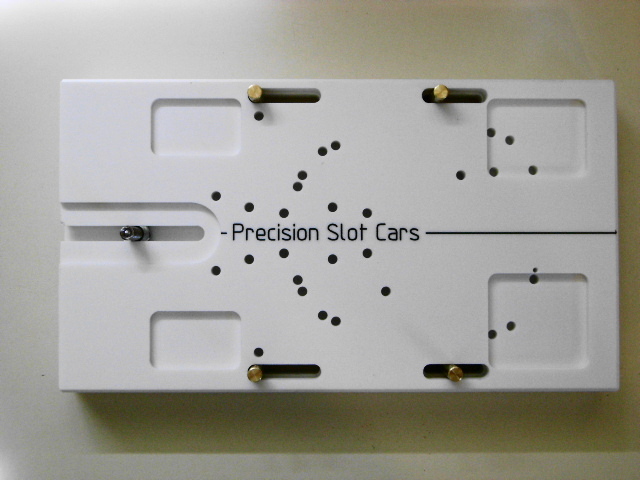
723029_preview.jpg

Not so much for triming but this body mounting pin tube fixture #1890 (Precision slot cars) sure makes it alot easier to mount the body how and where you want it.


  • Dave Person likes this
Rich Attee, THE GROOVE-PSC race team

PRECISION SLOT CARS - BUILT TO WIN
Check out my track at Precision Slot Cars

#13 SlowBeas

SlowBeas

    Troublesome De-slotter

  • Subscriber
  • PipPipPipPipPip
  • 994 posts
  • Joined: 15-January 07
  • Gender:Male
  • Location:Lost in South Carolina, USA

Posted 11 September 2013 - 12:36 PM

Put a mark at the back and front of the body after measuring. I then use a piece of .019" X 1/2" stainless strip with double sided tape stuck to it as a guide. I stick it on the outside of the body and and cut with my xacto knife. I then just peel it off and trim the front with scissors.

Similarly, I soldered a piece of 1/2" wide brass plating and a 2" long piece of piano wire perpendicular to each other. The wire is measured and soldered at just the right place to allow me to stick it inside the body at the rear, measuring the maximum allowable body height (accounting for additional height of tires), providing a straight line for me to use with my exacto blade from front to rear. Doesn't require a lot of additional measuring and taping.


I know this idea is not necessarily original, but it's a good one.


  • Duffy and John C Martin like this
Jim Beasley
South Carolina, USA

"Assuming either the Left Wing or the Right Wing gained control of the country, it would probably fly around in circles."
- Pat Paulsen, 1968
"I drive way too fast to worry about cholesterol."
- Steven Wright ca. 1983

#14 Duffy

Duffy

    a dearly-missed departed member

  • Member at Peace
  • PipPipPipPipPipPipPip
  • 3,791 posts
  • Joined: 25-January 09
  • Gender:Male
  • Location:Geographically Brooklyn, Politically Berkeley

Posted 11 September 2013 - 12:53 PM

Ohhh wow. Beas, you put the light on up in the salt mine and broke the logjam. (Sorry, too much coffee.)


How 'bout instead of soldering the wires, you bend two tight clippy things like hairpin-shape (does anybody use those anymore? Yarmulke clips, then) so that you got the bare ends of equal length, and set them anywhere along your brass strip, so they can be adjusted with a little friction. They'll clip the body to the strip and you can set them to a chosen datum inside the bod, mark one side, then move the thing to the other side and mark it the same. We can work up a more complex clamping system maybe, but that's the general idea. Wha' ya think about that?


Duf


Michael J. Heinrich
1950-2016
Requiescat in Pace
 
And I am awaiting
perpetually and forever
a renaissance of wonder

#15 backintheslot

backintheslot

    On The Lead Lap

  • Full Member
  • PipPipPipPip
  • 408 posts
  • Joined: 24-March 10
  • Gender:Male
  • Location:S.F/ Seattle

Posted 11 September 2013 - 01:26 PM

You just had to go and make it complicated now, didn't ya......... :laugh2:


John Albright


I have a chassis jig and I'm threatening to use it!


#16 Ralph Thorne

Ralph Thorne

    Posting Leader

  • Full Member
  • PipPipPipPipPipPipPip
  • 2,152 posts
  • Joined: 30-September 08
  • Gender:Male
  • Location:Snellville, GA

Posted 11 September 2013 - 03:39 PM

When I am measuring the body for a cut line, I start at the highest point on the rear of the body and measure down, I shoot for 1.3" on Can Am and GT Coupe bodies.


  • Jesse Gonzales likes this

#17 MG Brown

MG Brown

    Grand Champion Poster

  • Administrator
  • PipPipPipPipPipPipPipPip
  • 7,757 posts
  • Joined: 16-February 06
  • Gender:Male
  • Location:The Cumberland Plateau

Posted 11 September 2013 - 03:53 PM

... if you use the same style body frequently.


The retro folks only need a Ti22 template apparently.


That's thirty minutes away. I'll be there in ten.


#18 Duffy

Duffy

    a dearly-missed departed member

  • Member at Peace
  • PipPipPipPipPipPipPip
  • 3,791 posts
  • Joined: 25-January 09
  • Gender:Male
  • Location:Geographically Brooklyn, Politically Berkeley

Posted 11 September 2013 - 04:02 PM


You just had to go and make it complicated now, didn't ya......... :laugh2:


Aww Jeez! I shoulda just made one up, it took less time than typing out the description! Listen, we're tossing ideas around here -


Body Scriber.JPG


A couple things show up in this test run:

It occurs that this tool works fine on a Ti or other bod with sharp corners, but you'd prob'ly have to orient to some reference point on any curvier bods. Likely locations will suggest themselves when you come to that point.

A nice thing to have would be a wire sticking up on the end, for lateral reference. Solder it solid.

Since you can't clamp the thing together in any way that won't come lose when you switch sides - the shell would get clamped in as well (UNLESS you ruff-cut the wheel openings and put the height wires in there) - you might have to mark your positions on the wire and the straightedge with a Sharpie and re-locate on the other side.


After this test, I'm gonna stick with my method: measure and mark both sides, clamp steel rule to side at marks & cut, trim nose to resultant plane. Now, that takes longer than typing it, but - what're ya gonna do.


Duf


  • George Blaha likes this
Michael J. Heinrich
1950-2016
Requiescat in Pace
 
And I am awaiting
perpetually and forever
a renaissance of wonder

#19 James Grandi

James Grandi

    On The Lead Lap

  • Full Member
  • PipPipPipPip
  • 473 posts
  • Joined: 31-May 10
  • Gender:Male
  • Location:Cranston, RI

Posted 12 September 2013 - 01:16 PM

On any given body, I'll measure down from the spoiler/wing first. I'll mark on each side with an ultra fine point sharpie, then move to the front of the body and mark where I want to cut the nose at. If there is a cut line I'll use it as a guide, but many bodies I use don't have one.

I then take blue painters tape ( not very sticky stuff at all ) and lay it straight so it hits the edges of the marks on the front and back of the body. The tape is layed so that it covers the upper portion of the body aka the area I do not want to cut into. I trace the tape line with the same ultra fine point, then cut with the tape still on.
  • ejgehrken likes this
James Grandi
obSCEne Chassis
HVR BB Fronts
Bodies by Weaver

"There is no such thing as a race you are destined to lose. You will always have a chance."
 

#20 Dave Buchholz

Dave Buchholz

    Mid-Pack Racer

  • Full Member
  • PipPipPip
  • 191 posts
  • Joined: 13-June 19
  • Gender:Male
  • Location:Rochester, NY

Posted 03 January 2021 - 11:37 PM

Anybody try a couple of small steel rulers on the outside of the body and a few magnets on the inside?

  Seems like the magnets would do away with needed clips, and give access to the entire length of the body.for cutting without the clamps or clips getting in the way


 Just wondering.


 Dave


 Rochester NY


#21 bbr

bbr

    Posting Leader

  • Full Member
  • PipPipPipPipPipPipPip
  • 2,381 posts
  • Joined: 08-March 12
  • Gender:Male
  • Location:LA

Posted 04 January 2021 - 12:05 AM

I put the body upside down on a block and make the marks for cutting using a template for that body
Mike Low
Cry like a baby, drive like a girl, walk like a man.
Give me enough rope and I'll build a fast car... or hang myself?

#22 Dave Buchholz

Dave Buchholz

    Mid-Pack Racer

  • Full Member
  • PipPipPip
  • 191 posts
  • Joined: 13-June 19
  • Gender:Male
  • Location:Rochester, NY

Posted 04 January 2021 - 12:10 AM

...and how do you create a template?

#23 bbr

bbr

    Posting Leader

  • Full Member
  • PipPipPipPipPipPipPip
  • 2,381 posts
  • Joined: 08-March 12
  • Gender:Male
  • Location:LA

Posted 04 January 2021 - 01:21 AM

Plastic or cardboard so I can replicate the marks on both sides of the body.
After mounting the same body many times, you know how you want it mounted, the template just makes it faster and precise
Mike Low
Cry like a baby, drive like a girl, walk like a man.
Give me enough rope and I'll build a fast car... or hang myself?

#24 Tim Neja

Tim Neja

    Grand Champion Poster

  • Subscriber
  • PipPipPipPipPipPipPipPip
  • 6,803 posts
  • Joined: 11-June 07
  • Gender:Male
  • Location:Paso Robles

Posted 04 January 2021 - 02:26 PM

Plastic or cardboard so I can replicate the marks on both sides of the body.
After mounting the same body many times, you know how you want it mounted, the template just makes it faster and precise

You could also take a body you've trimmed perfectly--and SACRIFICE it for the template!! Simply cut the sides out so it fits on your next body--and you've got the perfect template every time for the cost of a body! 


She's real fine, my 409!!!

#25 team burrito

team burrito

    Posting Leader

  • Full Member
  • PipPipPipPipPipPipPip
  • 2,149 posts
  • Joined: 15-September 06
  • Gender:Male
  • Location:SF Bay area

Posted 05 January 2021 - 12:52 AM

if you can't find the cut line, take a large tire bottle, shove it in the back corner & mark it with a fine pen. cut out the back of the body as needed, tape the body down to a piece of polypropylene (available at tap plactics), find your end point at the front & cut a straight line with a heavy steel ruler. don't try to cut it with one cut; it's okay to use 2 or 3 cuts. cut off the remnant & repeat on the other side. cut off the front if the nose is straight or run a piece of tape around the perimeter if it's curved. trim off the front with curved lexan scissors as necessary, clean it up with a sanding drum & finish the edge with a sanding stick. that's how i do it & it's worked for me for over 25 years.


Russ Toy (not Troy)
First Place Loser in the JK Products
International D3 Builders Competition


Electric Dreams Online Shop