Jump to content


Photo

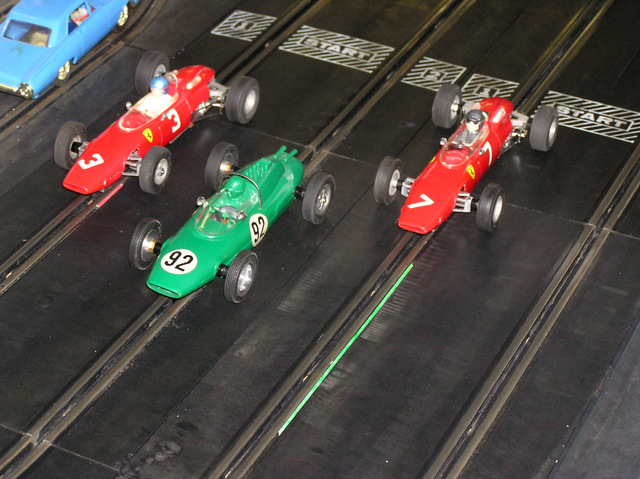
Cox 1964 Ferrari 158 F1


  • Please log in to reply
16 replies to this topic

#1 TSR

TSR

    The Dokktor is IN

  • Full Member
  • PipPipPipPipPipPipPipPip
  • 42,299 posts
  • Joined: 02-February 06
  • Gender:Male
  • Location:Marxifornia

Posted 09 December 2013 - 07:49 PM

A gentleman inquired on my PM about this model as he found one in fair condition and asked me about repair issues.
Since there was none on the LASCM website, I guess it was time I addressed the subject.
So here it is:

The Cox 1/24 scale Ferrari was their first slot car racing kit and was issued in early 1965. by 1966 it became available in RTR form, and both RTR and kit were updated to a new chassis and motor in mid-1966, that required body mold changes, meaning that the Series 1 bodies will not fit on the Series 2 chassis and vice versa.

The kit was first issued with the TTX100 motor, a standard Mabuchi FT16 with pinion on the endbell side and there were sintered bronze crown gears (two of them offering different ratios). The chassis had no separate rear-axle bearings. The magnesium chassis and wheels were coated with that pinkish varnish to slow their corrosion from exposure to oxygen in the air. The separate 3-piece driver was molded of flash color plastic. Plated parts included the exhausts, side engine and gear box details. The rubber tires were slick, a few years ahead of the full-size racing cars! Two steel wire forms mimicked the rear suspension trailing arms and fit inside cavities provided on the engine-detail moldings.

c148_1.jpg

A Series 2 kit soon replaced the original issue with Nylatron (glass-filled nylon) crown gears replacing the bronze gears, but there were no other changes.

The Series 3 had the new TTX150 motor, a Mabuchi FT16D with the pinion on the can side, a new chassis and modified body, but retained the one-piece Nylatron gears.

c112_1.jpg

The box wore a sticker announcing the new motor:

c112_2.jpg

These stickers will no long appear in the final version, the series 4, that will have the "standard" Cox setscrew crown gear with aluminum hub. The kit will be discontinued at the end of 1966.

The contents of the Series 3 kit show the new chassis and motor, and the one-piece Nylatron gears, that quickly lost their grip on the axles. Best was to notch the axle and apply a bit of thread locker on the setscrew and all was fine...

c112_3.jpg

You can see more pictures of these kits here.

The RTR version is very commonly found as it was produced in huge quantities in two versions, the Series 2 being much more difficult to find. Both came with a standard Cox crown gear with aluminum bub and a setscrew, a proof that they were issued well after the Series 4 kits were marketed.
The car has a magnesium chassis and wheels, an injected plastic body with separate, factory painted driver glued on a cross bar molded in the body. The first issues of Cox's RTR cars had "chrome" plated wheels and front suspension and are the hardest to find. Later versions have plain mag wheels and a gray plastic front suspension. The car was powered by a Mabuchi FT16 motor dubbed Cox TTX100, with the pinion on the endbell side. All were fitted with the steel rear-suspension trailing arms.

c130.jpg

c130_3.jpg

Please note the plated wheels and front suspension.

The Series 2 had a new Mabuchi FT16D motor called TTX150 with the pinion on the can side, requiring a new chassis, now fitted with Nylatron axle bearings. Below, you can see the two different body kits, the second missing the molded cross bar. One was supplied in the new kit but it needed to be glued in a different location for the new chassis to fit.

cox_9440.jpg

You may now see detailed pictures of this model here.

Repairs:

While most of the RTR models have escaped desecration and are generally only missing a few parts, many of the kits have been assembled by glue fanatics and often need tender loving care to get back to decent aesthetics.
To separate the plastic parts is a delicate operation and I unfortunately cannot give any good advice here other than gently cutting marks with a sharp knife to cause a clean break.
The mag chassis and wheels can be lightly blasted with walnut shells media and coated with a clear polyurethane varnish mixed with 5% of candy-apple red paint to recover the original color. Plated parts should be repaired first, then sent to model kit parts plating specialists.
Tires are likely dried up, but lots of NOS originals have survived, plus there are great repros made by Ortmann as well as great decals, and available at Electric Dreams.com
To remove the original decals, soaking in lukewarm water for 24 hours, then gently knocking the decals off with a tongue depressor of which end has been made into a scraper works great.
Everything else will require elbow grease, fine polishing compound and patience...


  • strummer likes this

Philippe de Lespinay


#2 n.elmholt

n.elmholt

    Checkered Flag in Hand

  • Moderator
  • PipPipPipPipPipPip
  • 1,111 posts
  • Joined: 06-May 06
  • Gender:Male
  • Location:Denmark

Posted 09 December 2013 - 07:58 PM

Thanks Philippe, this is an Icon slot car :-)

Niels, Dk

Niels Elmholt Christensen, DK
www.racecars.dk - my Picasa Photos


#3 Bill from NH

Bill from NH

    Age scrubs away speed!

  • Full Member
  • PipPipPipPipPipPipPipPip
  • 14,718 posts
  • Joined: 02-August 07
  • Gender:Male
  • Location:New Boston, NH

Posted 09 December 2013 - 09:28 PM

I owned one of the ugly handling Cox Ferraris, I believe it was a Series 4 bought in 1967 or 68. I painted it fluorescent pink so it could be found easier after deslotting.


Bill Fernald
 
I intend to live forever!  So far, so good.  :laugh2:  :laugh2: 

#4 Milkman

Milkman

    Mid-Pack Racer

  • Full Member
  • PipPipPip
  • 199 posts
  • Joined: 07-April 07
  • Gender:Male
  • Location:Houston, TX

Posted 09 December 2013 - 09:43 PM

I have one of these and the BRM too.  They're both in good shape and I have them both mounted in a clear display case.  Too bad kits like this aren't offered.


Ken Stevens
Speedstar - Go fast, stay on, do laps!!

#5 TSR

TSR

    The Dokktor is IN

  • Full Member
  • PipPipPipPipPipPipPipPip
  • 42,299 posts
  • Joined: 02-February 06
  • Gender:Male
  • Location:Marxifornia

Posted 09 December 2013 - 10:33 PM

We did not know then but we know now how to make these cars handle sweetly...  it does not take much.  :)


Philippe de Lespinay


#6 Bill from NH

Bill from NH

    Age scrubs away speed!

  • Full Member
  • PipPipPipPipPipPipPipPip
  • 14,718 posts
  • Joined: 02-August 07
  • Gender:Male
  • Location:New Boston, NH

Posted 09 December 2013 - 11:02 PM

My car finally disappeared about 20 yrs. ago, in spite of the pink fluorescent paint. And I never looked back! :laugh2:


Bill Fernald
 
I intend to live forever!  So far, so good.  :laugh2:  :laugh2: 

#7 bluecars

bluecars

    Checkered Flag in Hand

  • Member at Peace
  • PipPipPipPipPipPip
  • 1,273 posts
  • Joined: 26-June 13
  • Gender:Male
  • Location:Tuskegee, AL

Posted 11 December 2013 - 08:19 PM

Didn't have one of those but my first car was a Ravell Rat Fink Lotis. very ill handling. I'm sure a lot of the problem was all I had to control it was a micro switch. (on off no brake)Didn't take long. I had a Pitman 706 with Fred's frame. and a Cox control. Still have the Pitman car.
Robert 'Red' Valantine
9/18/51-8/30/24
Requiescat in Pace

#8 dc-65x

dc-65x

    Grand Champion Poster

  • Subscriber
  • PipPipPipPipPipPipPipPip
  • 6,953 posts
  • Joined: 14-February 06
  • Gender:Male
  • Location:Captain Rick: The only vintage slot car nut in SW Oregon?

Posted 11 December 2013 - 10:51 PM

Hi Philippe,


Thanks for the great writeup!


As the saying goes, "I'd rather be lucky than good!" I'm very lucky as I've been putting together parts for a Cox Ferrari GP. I've got a nice Gen II BRM with a beat up body and a sealed Ferrari body kit with the header card torn off. Thanks to your info I know I lucked into the "Korrect" body and chassis/motor combination.


Not being able to leave well enough alone, I plan on "hoping up" my Ferrari.


We did not know then but we know now how to make these cars handle sweetly...  it does not take much.  :)


Any advise would be much appreciated. :)


Rick


Rick Thigpen
Check out Steve Okeefe's great web site at its new home here at Slotblog:
The Independent Scratchbuilder
There's much more to come...


#9 BWA

BWA

    Race Leader

  • Full Member
  • PipPipPipPipPip
  • 974 posts
  • Joined: 16-February 06
  • Location:Oakville, Ontario, Canada

Posted 11 December 2013 - 11:18 PM

I also have a fairly complete Cox Ferrari Fi in fairly shabby, but infinitely restorable condition that a I scrounged off Fleabay for cheap money quite a few years ago.


Have been putting off doing it, but, this thread has got me cranked up ready to do it. I'm just in the process of "Restoring" the Bat Cave-II, making great progress on that, and, should soon be back building after a couple of years off.


Should be able to get started in a couple of weeks.


Al Penrose BWA (Batchelor Without Arts, Eh!)

#10 Jean-Michel Piot

Jean-Michel Piot

    Plastic surgeon

  • Full Member
  • PipPipPipPipPip
  • 654 posts
  • Joined: 16-March 08
  • Gender:Male
  • Location:Paris (France)

Posted 13 December 2013 - 10:52 AM

Hi Philippe,


...


Any advise would be much appreciated. :)


Rick


Indeed.


I have several to build (in addition to the kit box and the 2 types of body kit that will be left untouched in my collection) and would also welcome any advise as for enhancing the handling.


Very interesting thread by the way!


(Bud)light is right!

#11 Gary Bluestone

Gary Bluestone

    Race Leader

  • Full Member
  • PipPipPipPipPip
  • 763 posts
  • Joined: 24-October 08
  • Gender:Male
  • Location:Canada

Posted 13 December 2013 - 10:20 PM

I raced mine last month, I built an end bell drive version and a can drive version. Both using fresh original Cox Goodyear rears. Even out of the pack these need to be sanded . I mount the wheels seperately on an axle held in an electric drill and remove the oxidized outer surface with 220 grit sandpaper held on a flat paint stir stick. Round the outside edges too . Both cars are fitted with the plastic 33t cox gear. I couldn't fit the latter aluminum hub style gears because of clearance between the back of the gear and the chrome exhaust pipe assembly. Lastly, I added and adjusted the brass tongue, guide flag up stop. This is important to keep the guide as deep in the slot as possible. The drop arm spring is pretty useless at achieving this goal . Not sure if the brass was included with the early kits but it is needed. We raced both cars and there was no clear winner between the two versions . The can drive version I built , has free wheeling fronts , but despite these upgrades, both cars are pretty even. Of course standard prep such as motor and axle lube and gear lash are necessary too. I also like to polish my axles with Autosol or other metal polish, also using the drill. Every little bit helps.

#12 Gary Bluestone

Gary Bluestone

    Race Leader

  • Full Member
  • PipPipPipPipPip
  • 763 posts
  • Joined: 24-October 08
  • Gender:Male
  • Location:Canada

Posted 17 December 2013 - 01:31 PM

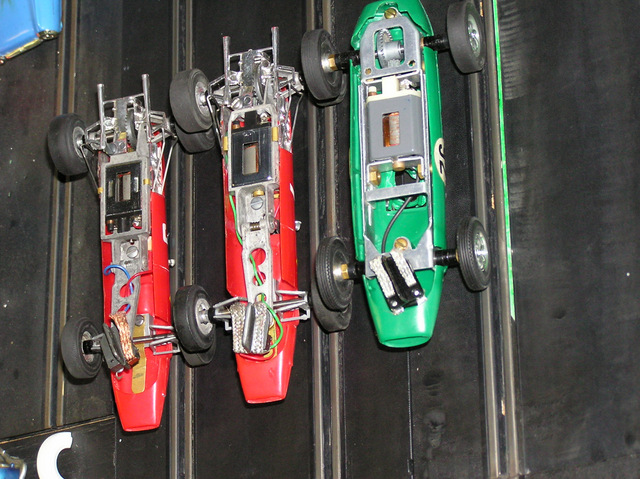
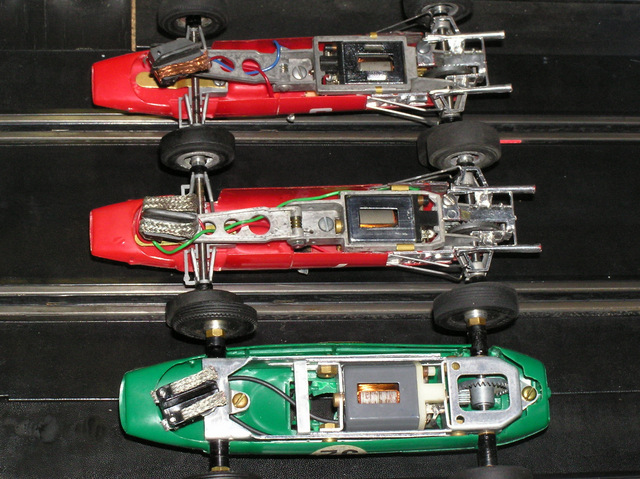
Here are some recent shots. Revell Lotus was not really up for the challenge. Exhaust assemblys look different than Lascm shots.

Attached Images

  • P1010126.JPG
  • P1010128.JPG
  • P1010129.JPG


#13 TSR

TSR

    The Dokktor is IN

  • Full Member
  • PipPipPipPipPipPipPipPip
  • 42,299 posts
  • Joined: 02-February 06
  • Gender:Male
  • Location:Marxifornia

Posted 17 December 2013 - 02:38 PM

Hi Gary,

I could not find a Revell Lotus-Ford on the LASCM website but the exhausts on yours look correct to me, just short stubs. You may have seen pictures of the beautifully assembled model by this all-time world champ of assembling kits, Rick Thigpen, a model he donated to the LASCM years ago. That one may have had plated Russkit pipes or something similar on it.


As far as enhancing the car's handling, the first thing I did was to not only remove the drop-arm spring, but to lock it in place after blocking it in a position allowing the front wheels to barely contact the track. Then, affixing a 1/16" brass pan "floating" under the chassis does the trick, as it allows the top-heavy car to slide instead of turning over. The pan is cut to clear the motor-retaining clip and is hooked in four places on the front suspension and the rear axle mount.


Philippe de Lespinay


#14 Gary Bluestone

Gary Bluestone

    Race Leader

  • Full Member
  • PipPipPipPipPip
  • 763 posts
  • Joined: 24-October 08
  • Gender:Male
  • Location:Canada

Posted 17 December 2013 - 03:36 PM

Actually I meant the Ferrari exhausts look different and I wondered if a gear with some re-enforcement ribs on the back, like the aluminum hub style, would fit.It may be an illusion but the photo of the underside in the earlier post looks like the exhaust is different. I could only fit the plastic gear with a flat back into mine because of clearance issues with the exhaust. I didn't try the brass gears because they are too heavy. As for a brass pan, we don't modify our original vintage racers with these, we try to keep everything fair and equal, but it is OK to remove the drop arm spring or add the up stop tongue.

#15 TSR

TSR

    The Dokktor is IN

  • Full Member
  • PipPipPipPipPipPipPipPip
  • 42,299 posts
  • Joined: 02-February 06
  • Gender:Male
  • Location:Marxifornia

Posted 17 December 2013 - 04:37 PM

Oh, sorry, I misunderstood!  :)


Gary,

all the "chrome" parts are the same in either version of the kits or RTRs, but I will verify if by any chance the earliest versions of the RTRs with the chromed wheels and front-end have smaller diameter exhausts (the mold could have been modified and the pipes enlarged in later examples), and no, the reinforced gear will not clear without altering the plated parts. It was introduced well after the Ferrari and BRM kits and RTRs were no longer in production. 


Philippe de Lespinay


#16 Gary Bluestone

Gary Bluestone

    Race Leader

  • Full Member
  • PipPipPipPipPip
  • 763 posts
  • Joined: 24-October 08
  • Gender:Male
  • Location:Canada

Posted 17 December 2013 - 08:59 PM

Phillippe, Earlier you wrote this:;

"The RTR version is very commonly found as it was produced in huge quantities in two versions, the Series 2 being much more difficult to find. Both came with a standard Cox crown gear with aluminum bub and a setscrew, a proof that they were issued well after the Series 4 kits were marketed."


So my question is now , did the gear have ribs, no ribs or was the exhaust assembly modified to allow a thicker gear. The photo in the first post appears to show a wider slot for the gear between the exhaust pipes. N'est pas.


#17 TSR

TSR

    The Dokktor is IN

  • Full Member
  • PipPipPipPipPipPipPipPip
  • 42,299 posts
  • Joined: 02-February 06
  • Gender:Male
  • Location:Marxifornia

Posted 17 December 2013 - 09:38 PM

They never had the gear with added ribs. If you find one, it simply means that it was modified by its owner. BUT, it is possible that the molding of the exhaust MAY have been modified, something I need to check, because the original crown gear in sintered bronze was thinner than the later plastic gears. But at this time, I do not think so.


Philippe de Lespinay


Electric Dreams Online Shop