Make A Tyre Cutter For Slot Car Donuts
Design
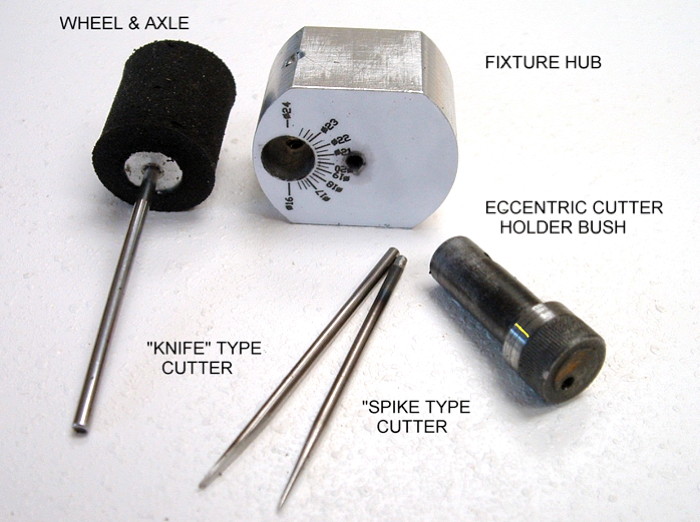
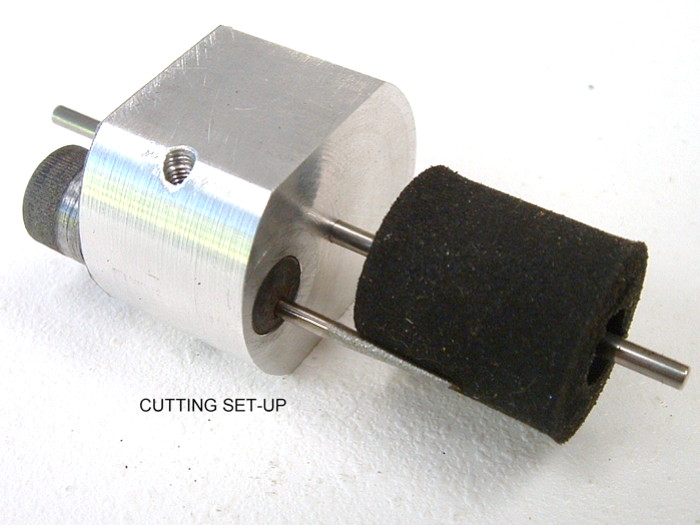
This is a dead simple design which can be hand-held or mounted in a vice, used in conjunction with an electric drill (or similar). It is all you need to cut and dress your donuts.
It is not as good as a tyre grinder but what it lacks it makes up for by being simple and inexpensive.
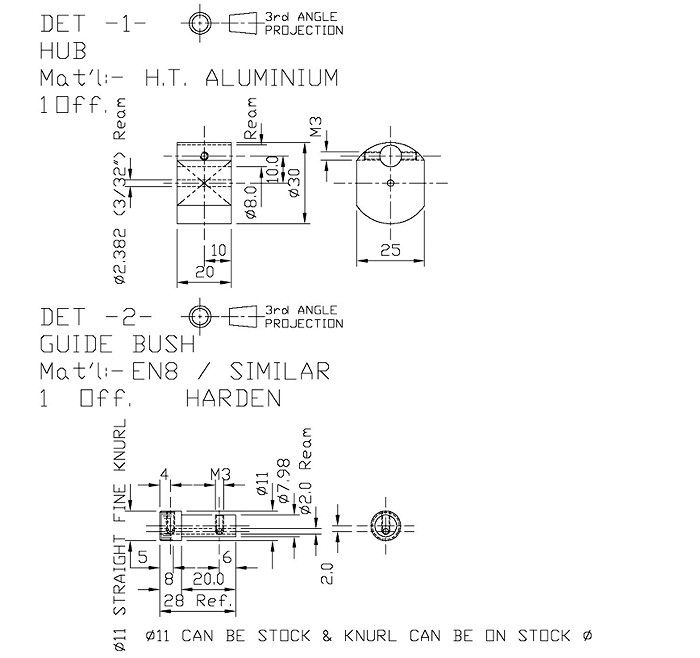
These parts are not difficult to machine (or have machined) although they need to be fairly accurately made if your scale is to be accurate.
Parts To Be Made
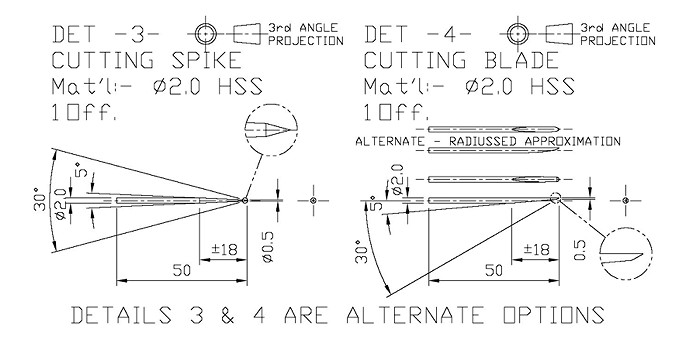
I have not outlined how to make the Hub & Eccentric (you either know how to do it or you dont) but this is how I sharpened the Cutting Spike which is something you will need to do periodically to replace or resharpen the spike.
The spike is made from a through-hardened 2mm ejector pin in high speed steel available from tooling suppliers like Toolquip.
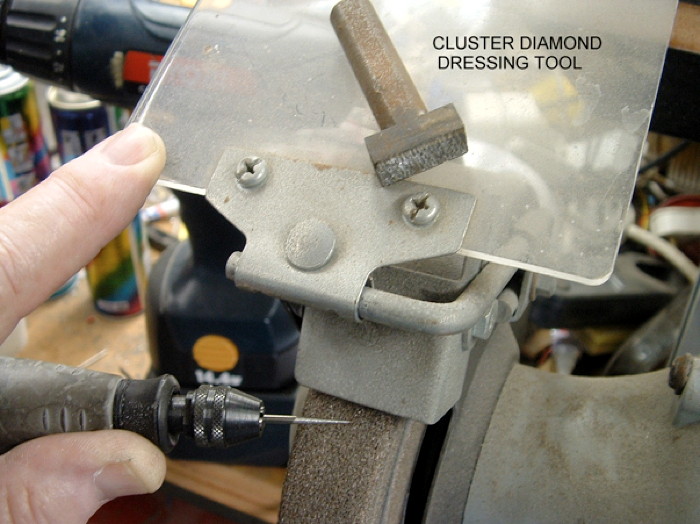
Grinding is fairly obvious but be sure that your Dremel (or whatever) runs true and that you have dressed your grinding wheel (cluster diamond dresser placed on spark guard for the photo).
If either is out of true you are never going to be able to grind a decent concentric spike. If its not concentric then your scale wont work and it will also go out of calibration every time you remove/replace/resharpen the Cutting Spike.
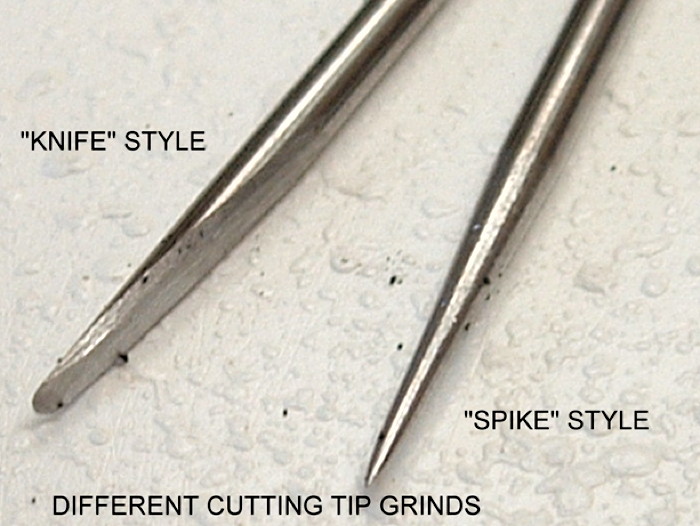
The optional knife (the better option as far as Im concerned) produces much straighter cuts but the downside is it takes a little longer to set up as the knife must be set tangential to the tyre after you have set the diameter something you dont have to do with the Spike.
Most people are clueless as to wheel dressing when you grind on a properly dressed wheel it goes shhhhhhhh... on an undressed or out of true wheel it goes dingitty dong-ping-chunk-kalang (and several other Korean names).
Crusher type wheel dressers (look like a row of spur wheels) are a poor choice compared to a cluster diamond but better than nothing. You can find diamond sticks and similar at most hardware shops (in a push use a segment tip from a concrete cutting saw blade, etc.)
I get mine from a company that uses huge grinders and throw these thing away before they are fully worn out to avoid them breaking out during automated dressing which can cause a disaster.
If youve never dressed your grinder, do so and I promise you youll never use an undressed wheel again!
Keep a cup of water to hand, take small passes, and cool frequently so as not to soften the tip by overheating.
After grinding use some fine emery paper and oil to polish the 5° surface this helps to reducing rubbing during cutting.
On the knife type remove all the sharp edges except (duhhh...) the one it cuts with.
You will note that the last 0.5mm is ground to 30° - this is for strength reasons if you grind the 5° all the way to the sharp tip, it will snap off during cutting.
The angles are not critical your best guess should do.
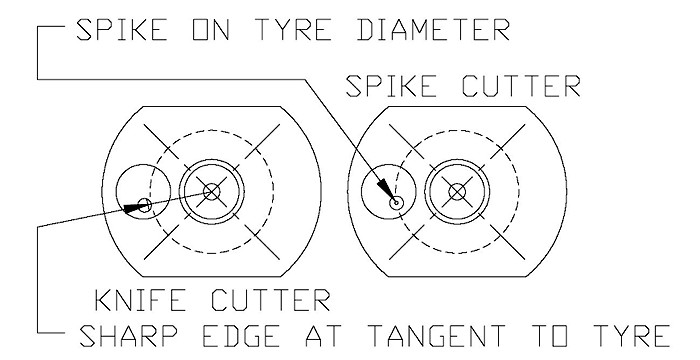
The illustration above shows why it is necessary to adjust the angular position of the knife after any change in diameter but this does not affect the spike type as the sharp point is on the centreline the knife type cutting edge is 1mm off centre.
Artwork For The Cutter
I print this on self-adhesive paper, then laminate it, cut to shape, and peel off backing paper (c/w its side laminate) this gives you a self-adhesive decal with a clear plastic cover for durability. Better still inkjet printable adhesive vinyl (oil bleeds into paper label).
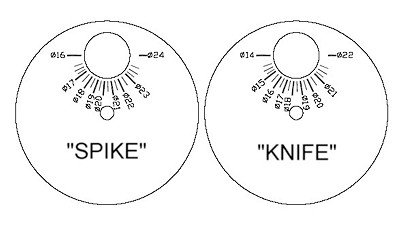
Note: The Ø16-Ø24 is for the sharp spike and Ø14-Ø22 is for the knife obviously you can use both prints one either side of the hub or just use the one type and allow for the 2mm offset if you use the alternate blade type.
This should print the correct size or you can drag the corners to change it. You might otherwise play with your print settings to scale it correctly or export it from this file to some other print utility for the same reason. (For reference the big circle is 32mm.)
Cut the holes and fit with shafts for alignment before final appliqué remove backing, clean metal surface with thinners. and apply decal - once again using the shafts for alignment.
The guide bush has an indicator slot (at ±90° to the M3 grubscrew hole) not dimensioned present on drawing as it is best added later cut one tyre and after measuring it determine where to put the indicator mark in the Guide as highlighted in yellow in photos.
Obviously if the pitch between the holes in the hub or the eccentric are significantly out then the artwork scale will be wrong make your own to suit.
I did mine after hardening using a Dremel cutting disk with its edge sharpened to a 90° V.
I then filled it with black marker (highlighted in yellow in the photos as it didnt show up well).
The eccentric must be hardened otherwise the securing screws will bruise it and cause it to jam up or at the least leave witness marks which tend to pull the adjustment towards the most used points making fine adjustment impossible.
Using The Cutter
Obviously you must first mount the donuts and trim off any excess length. I use a Stanley knife and a cordless/electric drill (a Dremel is too fast/weak) to trim the ends like this.
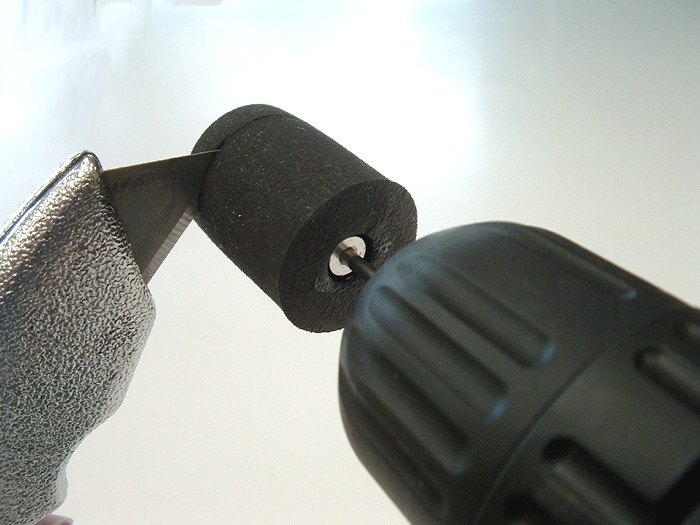
A steady hand is needed especially getting the cut started true. Best method - clamp electric drill in vice and hold knife with both hands.
Next ensure there is sufficient spike/knife sticking out of the eccentric guide to cut the width of your donuts plus a small allowance for stretch. Alternatively have the spike sticking out a little more than halfway and cut from either side see later.
You then mount set the eccentric to the desired finished diameter (16 to 24 possible).
Note: The scale has ½mm divisions other than between the first and last millimetre where it has ¼mm divisions (this because of the bad non-linearity of the markings there).
If you are using the knife type cutter you will (after setting the diameter) need to rotate the knife so that its parallel side/sharp edge is tangential to the tyre use the M3 hole in the knob end of the eccentric to secure the knife (the other one isnt accessible).
Mount the wheel on the end of a longish 3/32 axle, and put a drop of oil on the axle to lubricate the hole in the fixture hub. You can also place a spot of oil on the spike or knife it helps to reduce cutting friction and is easily removed from the tyre with solvent after cutting.
Even a 2½ long axle is a bit on the short side for this if you cant find a long enough axle use a 3/32 tungsten electrode (available from any welding supply shop). Cutting only halfway through also helps with the axle length problem.
Push axle through the fixture hub and attach drill chuck securely to opposite end.
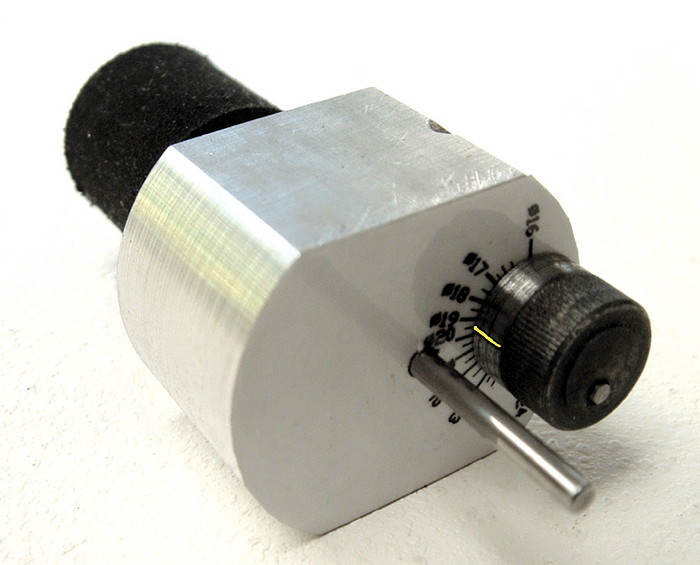
This is the end where the electric drill is attached removed above for clarity.
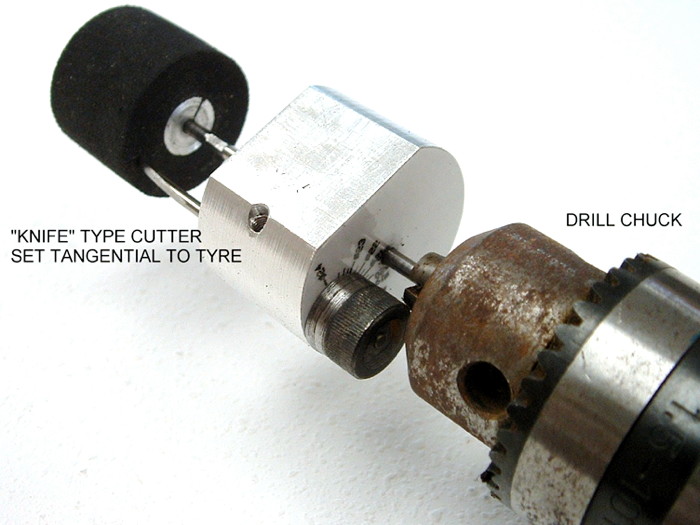
Now you can mount the hub in a vice or simply hold it firmly in your hand. A vice is recommended for safety reasons.
Start the drill with the tyre clear of the cutter, pull the drill backwards to pull the tyre onto the cutter fast enough to trim the length in about 2-3 seconds. Use a consistent feed for best results.
For this operation I found a Dremel to be too fast with far too little torque - the result is that you keep pushing the power as you go in but on breakthrough the thing overrevs, expands and gets chewed up by the spike before you can react a mess. It can be done but is fiddly to say the least. You need about 2,000-3,000 RPM, which is typical electric drill speed.
If you only have a Dremel I would recommend cutting half way from either end.
A Photobucket video of the tyre cutter being used can be found HERE.
Pretty damned simple but I forgot the blade must stick out a bit further due to stretch; that horrible corner dresses off easily enough. The diameter was exactly what I had dialled in.
A viedo of what not to do can be found HERE.
What not to do (its really a combination of factors):
Don't use a Dremel.
Don't use a Spike
Don't use plastic rims without additional support hub (see later).
Dressing
If your spike/knife is sharp and polished the outside diameter should be almost good to go but the spike tends to taper it slightly more than the knife this because of the spike taper compressing the tire as it goes in however its easily enough dressed off (you can also minimise this taper by setting the spike to only go halfway into the tyre and do it in two goes (which is my recommendation) takes a little longer but the results are better and easier to control especially if you use a Dremel as it is short on sufficient torque to easily go right through.
When cutting through, the exit corner can come out a bit ratty because it stretches away from the cutter but that is of no consequence as these have to be radiussed in any case.
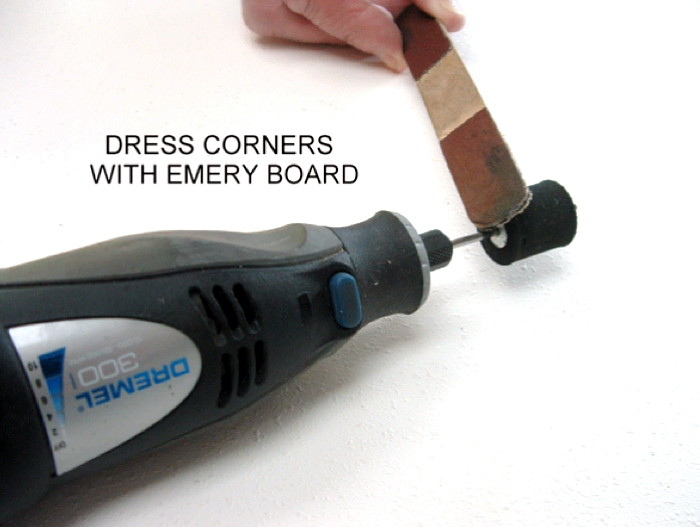
Experience will tell you to go a little oversize and finalise tyre size either in the Dremel with an emery board or on the car against an emery board (I dont like doing this as it's rather hard on the cars motor).
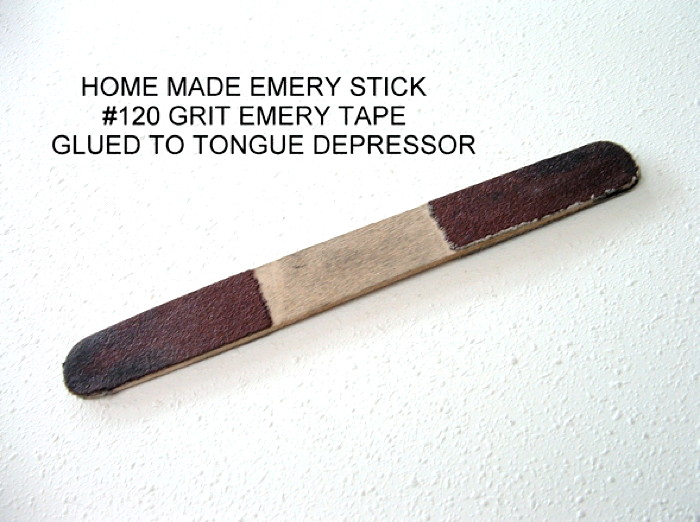
I make my own emery boards out of tongue depressors and #120 grit fabric-backed emery tape as the nail file boards are too fine and not durable.
Below examples of finish with the four different cutting methods.
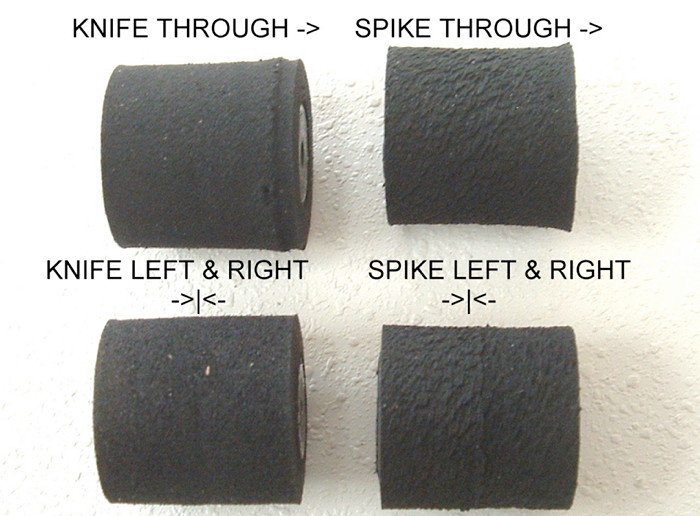
The spike cuts a lot rougher and more tapered than the knife. Penetrating only halfway+ improves either method. The spike tends to cut smaller than setting (it is rubbing material off during cutting also causes that horrible finish) whereas the knife tends to cut to set size (rubbing is confined to the inside of the tube you cut off).
The top left example of cutting through with the knife left a very irregular corner lump so I withdrew the cutter and went in again hence the additional trimming not my best idea it would have cleaned up during radiussing in any case.
Note the finish and size when knife cut, which apart from the exit corner is spot on and good enough to use on the car. The Spike tends to leave a rougher tapered finish but less noticeable if penetrated half way from either end but that tends to leave a witness mark in the middle.
Some racers prefer a slight taper on their tyres and they typically wear that way in any case so again it's up to you if you want to correct the taper.
All in all I suspect that the ease of set up of the Spike isnt offset by the extra effort of setting the Knife correctly. But by the same token you can cock it up completely if you dont set the knife correctly (parallel side tangential to wheel) i.e. if you change diameter settings and forget to adjust the knife as well.
Below knife/through cut tyre after final dress with emery board.
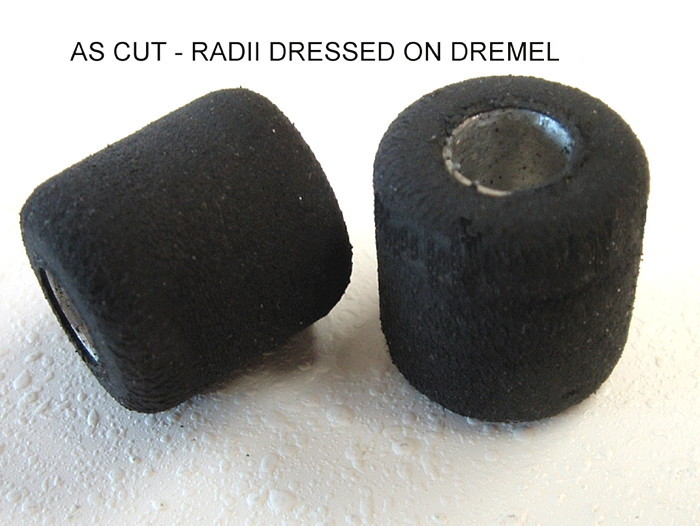
The cylinder portion is as cut and has not been touched up with the emery board.
The final decision is yours but the knife is a better tool than the spike and cutting from both ends produces (generally) better results than cutting from one end only note: this is based on limited testing and might vary considerably from one tyre compound to another.
Cautions
As pointed out above an electric drill is more appropriate for speed and available torque. A Dremel is more suited to dressing with an emery board because of its higher speed. If you only have a Dremel, work the cut from both ends and dont push the speed switch higher to overcome overtorque slow-down it will bite you in the ass when it runs free.
This method is unsuitable for thin walled plastic rims (moulded onto a metal mounting hub) these have a wall thickness of only 0.5mm and flex far too much under the pressure produced by the spike cutting method.
These rims can be done but you need to make an additional support bush to support the open end of the rim and/or only use the two cut approach if you use the Spike.
Final Tips
When using the Knife type you can verify your set diameter by measuring between the centre axle and the cutter with a Vernier (multiply by 2 and add axle diameter) Instead of relying on the scale.
You can do the same thing for the spike (multiply by 2 and add axle diameter and add 2mm) this presumes the spike point is on the centreline (concentric).
If you use a range of different size axles, i.e 1/8, 3/32, 3.0mm, 2.5mm, then it is best to build your hub to suit the largest (1/8) and then grind stepped axles to suit the other sizes, vis:
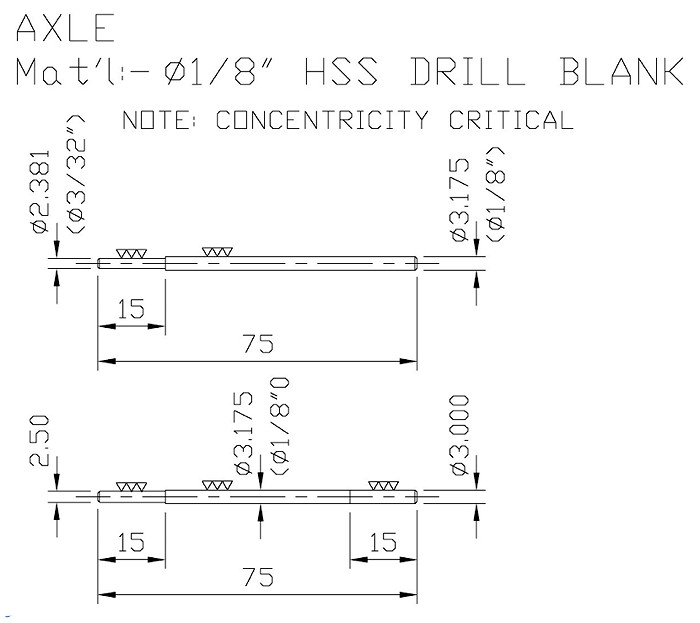
These are the axles from my proper tyre grinder at our club we use all these axle sizes. (Dont ask, its a long story.)
My Regular Tyre Grinder Is a Monster
Below my regular tyre grinder (which has the nickname Nagasaki at the club as it is powerful enough to turn donuts into great clouds of smoke).
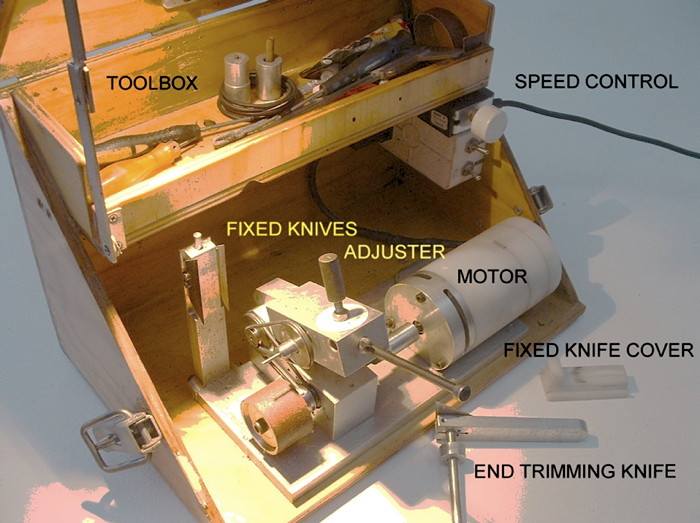
I designed and built this about fourteen years ago because of the large number of tyres I ended up doing for my extended family of slot car enthusiasts.
Its a great machine and handles all tyres very quickly and accurately. The 750W Ryobi motor from an electric drill beats anything else hands down but its probably overkill. It started out with a sewing machine motor and that just wasnt good enough.
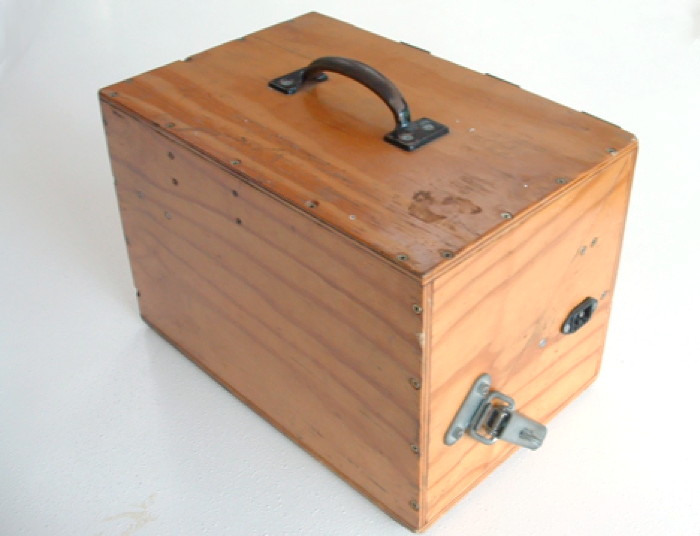
All closed up for transport.
If anyone would like the plans for the Monster, I will happily supply them if you genuinely want to build one. My email is keni@worldonline.co.za.


