Jump to content


Photo

Improving the vintage Monogram chassis


  • Please log in to reply
8 replies to this topic

#1 chrisguyw

chrisguyw

    Mid-Pack Racer

  • Full Member
  • PipPipPip
  • 123 posts
  • Joined: 17-February 06
  • Gender:Male
  • Location:Toronto, Canada

Posted 12 November 2014 - 01:47 PM

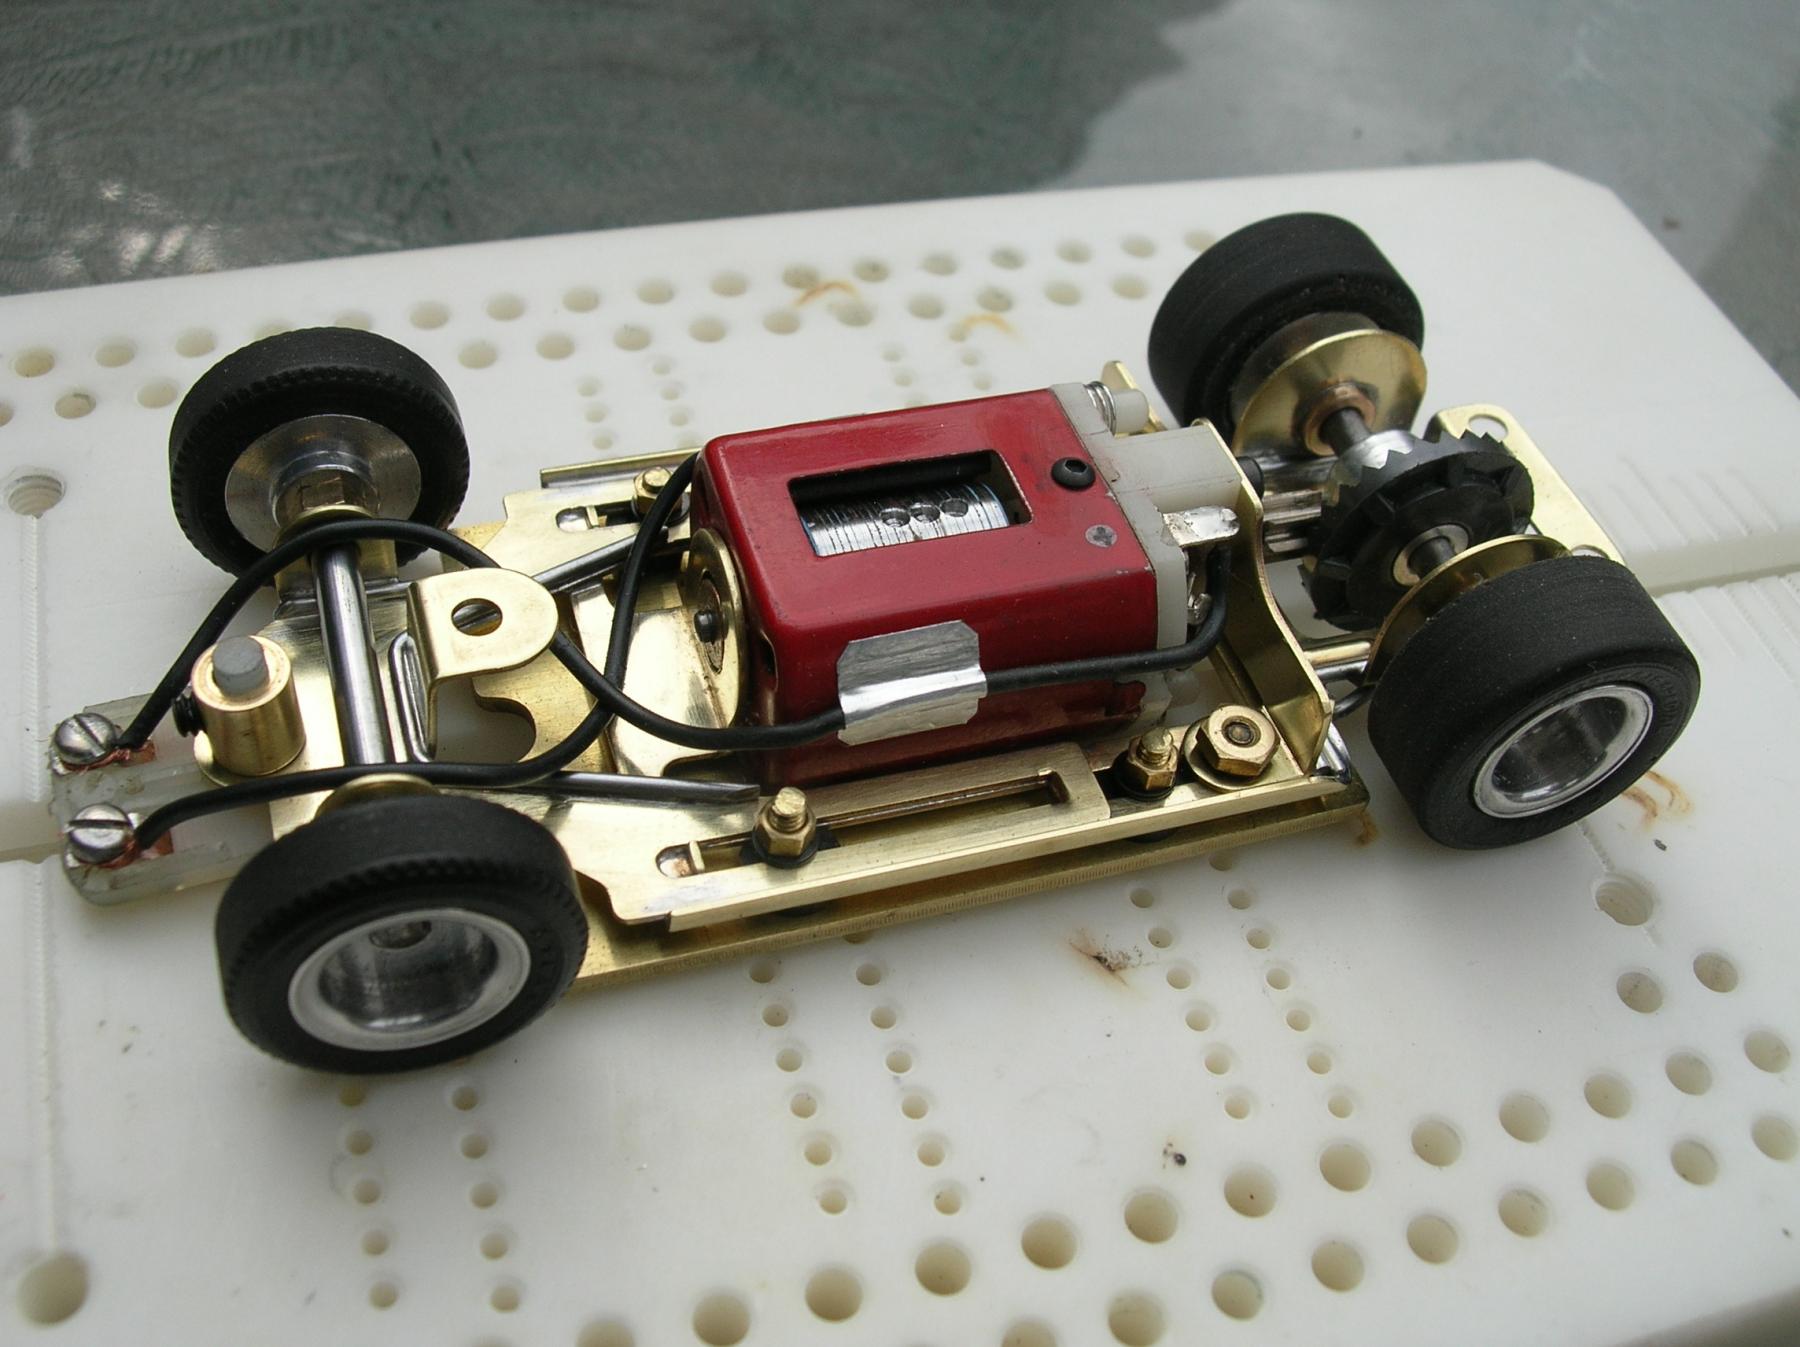
For many "experienced" slotters, the Monogram 1/32 kits were our first foray into serious slot cars......an adjustable brass chassis, aluminum screw on wheels, detailed body, tools, decals, and that new fangled "Tiger" x 100 motor....a kid could not be happier..., and once built, it ran away from the Eldons' and Strommies that many of us were thrashing around our basement plastic tracks. As newer/faster motors became available (almost weekly) they were duly installed, and at this point the inherent weakness(s) of the chassis became apparent. It was flimsy, bent far too easily, and would just not handle the power of anything more than the Tiger,.........so a frenzied program of chassis bracing/weighting began.......


This post is to show some of the things we did (and I few I wish we had thought of) to help. For those familiar with building and racing the Mono. chassis', you won't learn much, but, it is always nice to look at pictures.


The first pic. shows.....


1/ The chassis halves have been soldered together.....while this makes future wheelbase adjustment a pain, it certainly strengthens the chassis and , you won't have those little screws/nuts coming loose.


2/ The original Mono. rear bushings (even new) had a fair bit of play, and have been replaced with 1/8 x 1/4 oilites. The originals had a proprietary OD, so the rear bushings holes need to be reamed a bit.


3/ Braces have been added, .055 wire for the rear "L" shapes, and the front "C" shape, and .047 for the front uprights.


The 2nd pic. shows....


 The front upright brace "L" shapes....by leaving the legs to extend below the chassis, they act as guide stops......(I lost a of lead wires as a kid when the car spun 180 degrees). Leave these a little long until you install the guide....then trim.


The 3rd pic. shows....


An .055 wire brace added to the motor mount.......this must be attached on the side opposite the screw lugs.


The 4th pic,............is of the .055 wires acting as longitudinal chassis braces......the chassis' major issue


The 5th pic............is a .063 brass plate that will be mounted under the chassis using machine screws/nuts.


The final pics, are of the finished chassis, sporting one of Mr. Havliceks' "breathed on" Tiger x 100's......if I had had this  car as a kid,..... I would have been the champ!


Cheers

Chris Walker

Attached Images

  • 2003-12-31 23.00.00-22.jpg
  • 2003-12-31 23.00.00-147.jpg
  • 2003-12-31 23.00.00-150.jpg
  • 2003-12-31 23.00.00-155.jpg
  • 2003-12-31 23.00.00-152.jpg
  • 2003-12-31 23.00.00-160.jpg
  • 2003-12-31 23.00.00-146.jpg

  • Tim Neja likes this
Chris Walker


#2 dc-65x

dc-65x

    Grand Champion Poster

  • Subscriber
  • PipPipPipPipPipPipPipPip
  • 6,949 posts
  • Joined: 14-February 06
  • Gender:Male
  • Location:Captain Rick: The only vintage slot car nut in SW Oregon?

Posted 12 November 2014 - 05:15 PM

Nice Chris! :good:


Sorry if I missed it, but is the pan a "rattle fit" (loose, not rigidly attached) to the chassis and will the body be "rattle fit" to the chassis?


Rick Thigpen
Check out Steve Okeefe's great web site at its new home here at Slotblog:
The Independent Scratchbuilder
There's much more to come...


#3 havlicek

havlicek

    OCD Rewinder

  • Subscriber
  • PipPipPipPipPipPipPipPip
  • 11,198 posts
  • Joined: 20-August 07
  • Gender:Male
  • Location:NY

Posted 13 November 2014 - 09:39 AM

VERY nice work Chris...clean and functional, and well photographed to boot!  It's also a beautiful thing to see one of my motors in such a lovely setting. 1/32 cars were something I always had a soft spot for as a kid, so this brings back some fond memories.  The chassis-bending problems were something to deal with on about all the R2R and many kit cars.  Those aluminum chassis like the various ones from Classic would seemingly bend if you even looked at them cross-eyed!...but we all loved 'em anyway.


-john


John Havlicek

#4 Ramcatlarry

Ramcatlarry

    Posting Leader

  • Subscriber
  • PipPipPipPipPipPipPip
  • 2,942 posts
  • Joined: 08-March 06
  • Gender:Male
  • Location:St Charles, IL 60174

Posted 13 November 2014 - 02:11 PM

I raced with the Lombard, Illinois "Glenwood Club" in the late 1960's.  Monogram sports cars were the 'production car' spec class.  Standard fair was Hard silicone tires,bevel gears, and brass plates.  The rules required using ALL of the parts - including the nuts and bolts - best way was to glue them or solder them solid so that body rock and chassis stiffness worked...and the bolts did not fall off on the track.   The F-1 cars from monogram was the second production class - a slab of lead between the motor and the frame helped a lot as did the other standard modifications.


My original set-up cars can still run with the modern non-magnet cars .


Larry D. Kelley, MA
retired raceway owner... Raceworld/Ramcat Raceways
racing  around Chicago-land


Diode/Omni repair specialist
USRA 2023 member # 2322
IRRA,/Sano/R4 veteran, Flat track racer/MFTS

Host 2006 Formula 2000 & ISRA/USA Nats
Great Lakes Slot Car Club (1/32) member
65+ year pin Racing rail/slot cars in America


#5 chrisguyw

chrisguyw

    Mid-Pack Racer

  • Full Member
  • PipPipPip
  • 123 posts
  • Joined: 17-February 06
  • Gender:Male
  • Location:Toronto, Canada

Posted 13 November 2014 - 03:11 PM

Hi Rick, The pan is spaced from the chassis bottom with some urethane washers, to reduce vibrations/noise, and while this allows some flex, there is no rattle/float. As you know, in order for the pan to provide consistent "downforce" it must have constant  contact with the chassis. Any  "Free" vertical movement of the pan negates this.


I will also be using thin (20 thou.) urethane washers between the body posts, and the chassis for the same vibration/noise issue, but here the body will be set with some "free" movement.


Cheers

Chris Walker


PS The body will be the Monogram Lola MK6...still deciding between 2 vintage liveries


Chris Walker

#6 dc-65x

dc-65x

    Grand Champion Poster

  • Subscriber
  • PipPipPipPipPipPipPipPip
  • 6,949 posts
  • Joined: 14-February 06
  • Gender:Male
  • Location:Captain Rick: The only vintage slot car nut in SW Oregon?

Posted 13 November 2014 - 05:21 PM

Sounds like a winner Chris. I'll bet the slight movement in the hard body you have planned will really help the car.
 
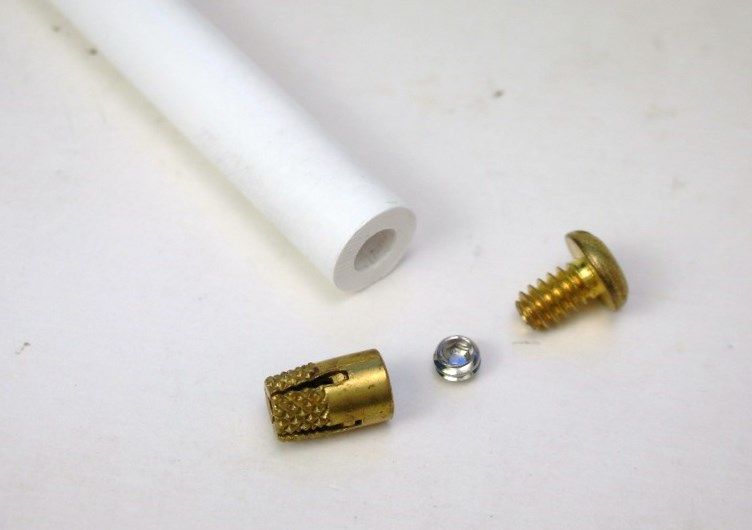
This has worked well for me to set the "slop" in the body mounting screws:
 

............ I mounted the body on 1/4" Evergreen plastic tubes with vintage 4-40 threaded inserts. The set screw is adjusted for the "Korrect" amount of play. A drop of Loctite. keeps the set screw in place once adjusted:
 
KingCobra49.jpg


Rick Thigpen
Check out Steve Okeefe's great web site at its new home here at Slotblog:
The Independent Scratchbuilder
There's much more to come...


#7 chrisguyw

chrisguyw

    Mid-Pack Racer

  • Full Member
  • PipPipPip
  • 123 posts
  • Joined: 17-February 06
  • Gender:Male
  • Location:Toronto, Canada

Posted 13 November 2014 - 05:44 PM

Thanks for the tip Rick........I have some long 4/40 screws that I normally trim with a dremel until they give the right amount of movement, and, bottom out in the inserts. Your method will eliminate the screams and blisters from trying to hold hot brass screws!!!


If you can find some thin (20/30 thou) rubber/urethane washers, try them between the chassis/insert face.......really reduces the "rattle" that a loosely mounted hardbody can make.


Cheers

Chris


Chris Walker

#8 dc-65x

dc-65x

    Grand Champion Poster

  • Subscriber
  • PipPipPipPipPipPipPipPip
  • 6,949 posts
  • Joined: 14-February 06
  • Gender:Male
  • Location:Captain Rick: The only vintage slot car nut in SW Oregon?

Posted 13 November 2014 - 09:41 PM

Hi Chris,


I found some teflon washers at McMaster Carr for the body mount screws. I'll get some on my next order. Thanks for the tip. :)


Rick Thigpen
Check out Steve Okeefe's great web site at its new home here at Slotblog:
The Independent Scratchbuilder
There's much more to come...


#9 Mark Johnson

Mark Johnson

    On The Lead Lap

  • Full Member
  • PipPipPipPip
  • 499 posts
  • Joined: 27-March 08
  • Gender:Male
  • Location:Minneapolis

Posted 02 March 2015 - 03:08 PM

I make em from old inner tube .


Electric Dreams Online Shop