

Looks great. Don't forget the rubber band. LOL.

John Clow's La Cucaracha refurb
Started by
Pablo
, Apr 03 2015 12:30 PM
107 replies to this topic
#26

bluecars
-

- Full Member
-

- 1,273 posts Joined: 26-June 13
Checkered Flag in Hand
- Gender:Male
- Location:Tuskegee, AL
Posted 13 April 2015 - 07:37 PM
Robert "Red" Valantine 
#27
Pablo
-
- Administrator
-
- 18,363 posts Joined: 20-February 06
Builder
- Gender:Male
- Location:Cleveland, Tennessee
Posted 13 April 2015 - 07:45 PM
That's a good point, Red. Where did I put those doggone rubber bands?
Pretty soon, I'll be hiding my own Easter eggs. 
Thanks for reminding me. 
Paul Wolcott
#28
Pablo
-
- Administrator
-
- 18,363 posts Joined: 20-February 06
Builder
- Gender:Male
- Location:Cleveland, Tennessee
Posted 14 April 2015 - 02:47 PM
I'm no stranger to Iso chassis design and tuning, but this Cuc has some things I don't understand.
Fully assembled, body on, in a non-recessed slot, why do the front wheels prevent the pan section from resting on the center section?
As it is, the Cox flag already has 30 thou of spacers (not to mention the raised lip molded into the flag already) and it's still not planted. I'm missing something here, please help if you know the answer.
Also, the pan section vertical track clearance in front is about .078" when the fronts touch???

It takes .905" rear wheels to give .063" rear clearance, but they will rub the wheel wells at that size. What am I doing wrong?
Anybody know if the rear axle bearings floated sloppy in the chassis holes like this? Could I align and JB Weld them in place?

Thanks for any help - I owned a 1/32 Cuc back in the day but I don't remember caring about any fine tuning - it handled pretty well stock as I recall. 
Paul Wolcott
#29
Gator Bob
-

- Banned
-
- 13,391 posts Joined: 12-April 11
Grand Champion Poster
- Gender:Not Telling
- Location:.
Posted 14 April 2015 - 04:10 PM
Missing the "foam pad".
Yes... the roller bearing floated in the uprights and the axle floated in the roller.
Sorry, IMO that set-up was crap.
If the tires rub the wheel lips you might move them inboard. Or cut the **** out of them like most did... 

Bob Israelite
#30
Pablo
-
- Administrator
-
- 18,363 posts Joined: 20-February 06
Builder
- Gender:Male
- Location:Cleveland, Tennessee
Posted 14 April 2015 - 05:23 PM
Thanks, Bob, that's exactly the info I needed and it makes perfect sense.
Please give me your opinion on JB Weld-ing the rear axle roller bearings to the uprights.
Narrowing the rear wheel assembly is not an option as far as I can tell. I placed three 10 thou spacers per side outboard of the roller bearings just to prevent the hubs from riding on the bearing flanges. That is the only way they will spin free.
Maybe this Cuc isn't quite as "stock" as I first thought... 
This is my first Cuc restoration, and I'm enjoying the lessons learned. 
Paul Wolcott
#31
Gator Bob
-
- Banned
-
- 13,391 posts Joined: 12-April 11
Grand Champion Poster
- Gender:Not Telling
- Location:.
Posted 14 April 2015 - 06:23 PM
As crazy as it sounds on these 'bearings' the spacer does ride on the outer flange... there is no true inner race.
I have NOS and I'm tellin' ya they look cool but are sloppy junk.
If not making a 100 point resto-car... use oilite bushings or real BBs... if it's a runner.
It's those hubs that are making it too wide.
I have NOS and I'm tellin' ya they look cool but are sloppy junk.
If not making a 100 point resto-car... use oilite bushings or real BBs... if it's a runner.
It's those hubs that are making it too wide.
Bob Israelite
#32
Pablo
-
- Administrator
-
- 18,363 posts Joined: 20-February 06
Builder
- Gender:Male
- Location:Cleveland, Tennessee
Posted 15 April 2015 - 06:03 AM
I gotcha, Bob. I think I know exactly what I need to do now, thanks to you.
No guarantees it will remain 100% stock.
I think I know exactly what I need to do now, thanks to you.No guarantees it will remain 100% stock.
Paul Wolcott
#33
Pablo
-
- Administrator
-
- 18,363 posts Joined: 20-February 06
Builder
- Gender:Male
- Location:Cleveland, Tennessee
Posted 15 April 2015 - 03:25 PM
Jairus driver, intake stacks, and decals done. Driver needs a steering wheel, but John can fiddle with that later.
The decals are extremely delicate, in fact the silver part scratches if you run a finger across it.
Maybe I should have clear-coated them or something. It ain't a concours car anyway.

The decals are extremely delicate, in fact the silver part scratches if you run a finger across it.
Maybe I should have clear-coated them or something. It ain't a concours car anyway.
Paul Wolcott
#34
Pablo
-
- Administrator
-
- 18,363 posts Joined: 20-February 06
Builder
- Gender:Male
- Location:Cleveland, Tennessee
Posted 15 April 2015 - 04:54 PM
It needs more chassis tuning work than I thought, but of course everything does.
A work week, starting tomorrow, will give me time to plan.
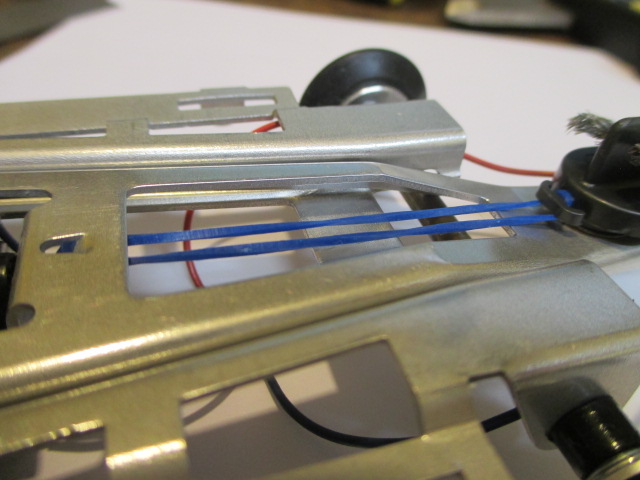
I did nail down the correct rubber band size today - and it's the right color, too!
A work week, starting tomorrow, will give me time to plan.
I did nail down the correct rubber band size today - and it's the right color, too!
Paul Wolcott
#35
Pablo
-
- Administrator
-
- 18,363 posts Joined: 20-February 06
Builder
- Gender:Male
- Location:Cleveland, Tennessee
Posted 15 April 2015 - 07:05 PM
The only windshield I could find was a very nice repro item on eBay from Brad Blohm, price: about $28. If this was a "vintage correct" car, I'd have bought one and not even blinked.
I made this one out of a plastic water bottle and a braid clip. price: free.
Amount of time it took me to make: (you don't want to know )
)

It's not quite finished yet - I still need to make extenders on the sides...
I made this one out of a plastic water bottle and a braid clip.
price: free.Amount of time it took me to make: (you don't want to know
)
It's not quite finished yet - I still need to make extenders on the sides...
- miko and Peter Horvath like this
Paul Wolcott
#36
Pablo
-
- Administrator
-
- 18,363 posts Joined: 20-February 06
Builder
- Gender:Male
- Location:Cleveland, Tennessee
Posted 16 April 2015 - 06:28 PM
Anybody know the dimensions of the foam pieces that load the center section?
I can't find a good photo of them anywhere, I guess they are all dust by now.
I can't find a good photo of them anywhere, I guess they are all dust by now.
Paul Wolcott
#37
Gator Bob
-
- Banned
-
- 13,391 posts Joined: 12-April 11
Grand Champion Poster
- Gender:Not Telling
- Location:.
Posted 16 April 2015 - 08:06 PM
.900" x .390" x .185".
.185" with the double sided tape.
Open cell, large pore, soft/little compression resistance, gray color.


.185" with the double sided tape.
Open cell, large pore, soft/little compression resistance, gray color.
- Cheater likes this
Bob Israelite
#38
Pablo
-
- Administrator
-
- 18,363 posts Joined: 20-February 06
Builder
- Gender:Male
- Location:Cleveland, Tennessee
Posted 17 April 2015 - 07:36 AM
Thanks!
Paul Wolcott
#39
Pablo
-
- Administrator
-
- 18,363 posts Joined: 20-February 06
Builder
- Gender:Male
- Location:Cleveland, Tennessee
Posted 18 April 2015 - 09:49 AM
I sure have learned a lot about Cucs, having read every single thread pertaining to them in Slotblog's Amateur 1/24 Vintage Cars sub-forum.
Gator Bob's advice has helped immensely, along with PdL's old posts and a PM.
The main thing I learned is, there were a million variables of different parts and configurations. The car I'm working on is not nearly as "stock" as I thought.
Which, to me, is a good thing because now I'm not so reluctant to change a rare collector's item. The car still needs some tuning work.
- Gator Bob likes this
Paul Wolcott
#40
Gator Bob
-
- Banned
-
- 13,391 posts Joined: 12-April 11
Grand Champion Poster
- Gender:Not Telling
- Location:.
Posted 18 April 2015 - 11:08 AM
Pablo,
Thought I remembered the pad to be one piece vs two... but that would work out fine.
That is the open cell foam as I was trying to describe.

Photo courtesy of - vsrnonline.com
I liked Cucs until I got one.
Back story: As a 11-year old  I was 'tricked' by a 16-year old into trading my brand new (that day) store built Champion 285 chassis, 607 motor, hard fronts, foam rears, Cox QC guide and gear... no body RTR. It was a birthday gift from my dad's brother... big bucks, like not in the paper route budget coinage.
  When I saw the kid and the car after the motor broke in and a Can-Am body was installed it was so fast on the King that I was
  .
.
Learn in Jersey... LOL.
I have everything on hand to re-create the Champion ... and the Cuc.
Bob Israelite
#41
Pablo
-
- Administrator
-
- 18,363 posts Joined: 20-February 06
Builder
- Gender:Male
- Location:Cleveland, Tennessee
Posted 18 April 2015 - 11:24 AM
Bob,
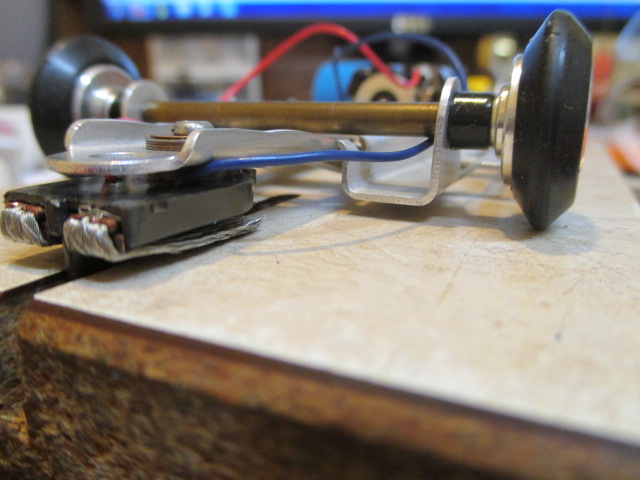
Can those Cox needle bearings (bottom photo of post 28) be soldered without ruining them?
I was considering JB Welding the sides of a Du-Bro motor bracket to the aluminum uprights, then soldering in the bearings...? As is, they are very sloppy in the holes.
Paul Wolcott
#42
Gator Bob
-
- Banned
-
- 13,391 posts Joined: 12-April 11
Grand Champion Poster
- Gender:Not Telling
- Location:.
Posted 18 April 2015 - 11:37 AM
Negative, sir.
No heat! 
The roller 'cage' is made of plastic.
Another trick is to put four small equally- centerpunches around the edge of the bearing hole in the upright. The slight 'distortion' of the hole at four points snugs up the bearing and keeps it centered.
Bob Israelite
#43
Pablo
-
- Administrator
-
- 18,363 posts Joined: 20-February 06
Builder
- Gender:Male
- Location:Cleveland, Tennessee
Posted 18 April 2015 - 11:43 AM
OK, what do you say to "plan B":
Du-Bro pieces with tubes soldered in place then JB Welded to uprights, and bearings then Loctited into the tubes .
Paul Wolcott
#44
Gator Bob
-
- Banned
-
- 13,391 posts Joined: 12-April 11
Grand Champion Poster
- Gender:Not Telling
- Location:.
Posted 18 April 2015 - 11:50 AM
Personally... I don't go for using epoxy for an application like that.
The cut-off brass uprights with a soldered axle tube idea is real good.
But... 0-80 screws and nuts mounting them would be a strong solution. Jig the bracket with tube... then cut it up.
Bob Israelite
#45
Pablo
-
- Administrator
-
- 18,363 posts Joined: 20-February 06
Builder
- Gender:Male
- Location:Cleveland, Tennessee
Posted 18 April 2015 - 11:55 AM
Du-Bro sides bolted and nutted, I was thinking of that also...
Paul Wolcott
#46
Pablo
-
- Administrator
-
- 18,363 posts Joined: 20-February 06
Builder
- Gender:Male
- Location:Cleveland, Tennessee
Posted 20 April 2015 - 05:39 PM
Next question: I know most glues won't work well on this polypropylene body. Does Krazy Glue work?
I bought some 1/8" styrene rod for a roll bar - what would be a good glue to allow some flex when the car crashes?
Paul Wolcott
#47
Don Weaver
-

- Subscriber
-
- 1,820 posts Joined: 26-October 07
Checkered Flag in Hand
- Gender:Male
- Location:Lexington. SC
Posted 20 April 2015 - 07:04 PM
ShooGoo?
Don Weaver
A slot car racer who never grew up!
The supply of government exceeds demand.
L.H. Lapham
If the brain-eating amoeba invades Washington
it will starve to death...
#48
Bill from NH
-

- Full Member
-
- 14,315 posts Joined: 02-August 07
Age scrubs away speed!
- Gender:Male
- Location:New Boston, NH
Posted 20 April 2015 - 07:06 PM
Use something such as Shoe Goo or GE silicone caulk. IC2000 super glue might work too. Ordinary Krazy Glue will just drive you crazy.
Bill Fernald
I intend to live forever! So far, so good.
I intend to live forever! So far, so good.
#49
Mbloes
-

- Subscriber
-
- 626 posts Joined: 19-April 12
Race Leader
- Gender:Male
- Location:Los Angeles, CA
Posted 21 April 2015 - 03:36 PM
I've always had good luck with red Loctite.
Mike Bloes
#50
Pablo
-
- Administrator
-
- 18,363 posts Joined: 20-February 06
Builder
- Gender:Male
- Location:Cleveland, Tennessee
Posted 22 April 2015 - 08:32 AM
Bob, I found a pair of genuine tapered hole Cox hubs in my vintage box of horrors.
Tonight: donuts on proper 1/2" wide hubs, (body) glue experiments, and foam piece fitting.
Paul Wolcott


