Jump to content


Photo

Building the R-Geo Arrow chassis - first race update


  • Please log in to reply
14 replies to this topic

#1 JimF

JimF

    Posting Leader

  • Full Member
  • PipPipPipPipPipPipPip
  • 2,220 posts
  • Joined: 20-June 07
  • Gender:Male

Posted 08 October 2015 - 01:35 AM

I've been building a ton lately but haven't done any kit builds so when this chassis kit showed up, it was a total surprise and actually kind of a nice break. This will take me a couple of installments because my summer vacation is over and I'm back working some. This will be a pretty conventional 10-rail (five per side) with three straight and two angled rails per side.
 
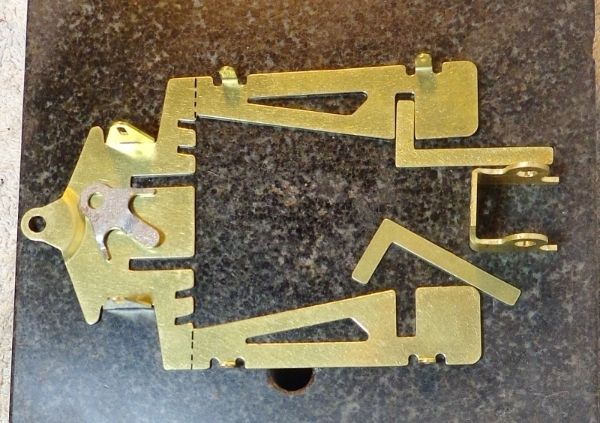
Here are the parts laid out on my granite flat block. Bracket is 3/4" X .050". All the rest of the brass is .032".

  • I have already drawn in the lines where the pans will be cut off the nose.
  • I cut the pans off right away so it's easier to make the nosepiece flat without them.
  • Get the nosepiece sitting dead flat.
  • Square up the bracket face and sides so the face is flat and square to the side legs.
07812fc5-4db5-4588-8351-061ac06a931d_zps

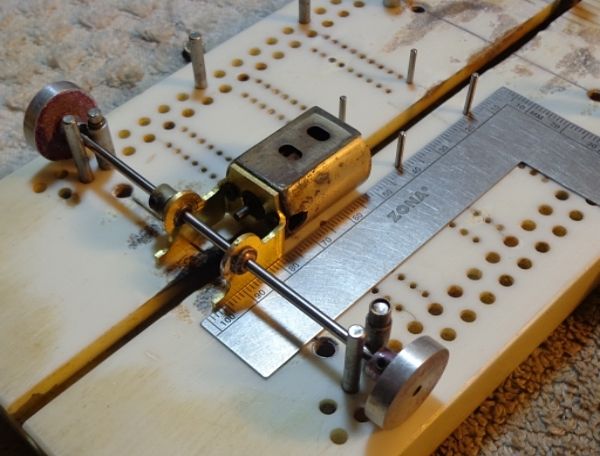
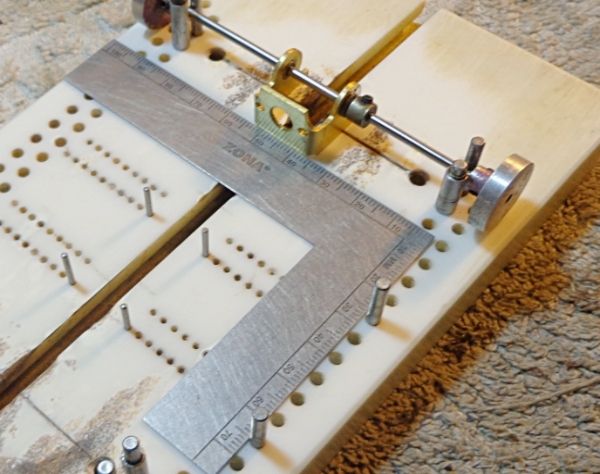
  • Get your building motor screwed in and building oilites ready.
  • Lay a straight edge against a pair of locating pins set at 3/4".
  • Line up the side leg of your bracket against the square.
  • Get your jig wheels on and then slip the oilites along the axle and into the bearing hole.
  • The oilite must slip right into the hole with no drag. If the hole is not qutre right, enlarge it just enough.
  • Lightly tack solder the oilites.

1a563ada-f9c8-4214-a7f6-570f03827108_zps

  • Now the big test. Take your motor out for a sec and check that your bracket face is square.
  • If so, on we go. If not, fix it now because it'll be harder later.
43e1955b-306d-4f8b-82c7-d7a810a86dc4_zps

  • Check your guide tongue for your desired upward tilt. I like about .012-.015".
  • Check the fit of the steel guide tongue reinforcer. The GTR must be flat on the brass guide tongue.
  • Make sure that the support legs of the GTR don't hold it up or at the wrong angle.
  • Solder well. I usually use a torch for this job.
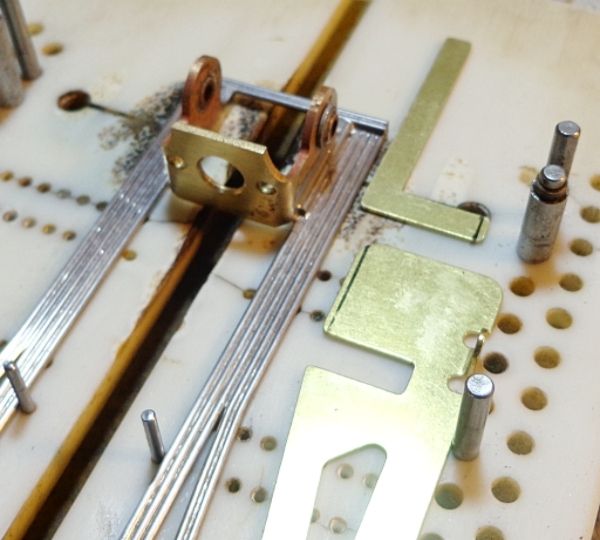
  • There's a gang of 5" pieces of .047" wire waiting to become frame rails.
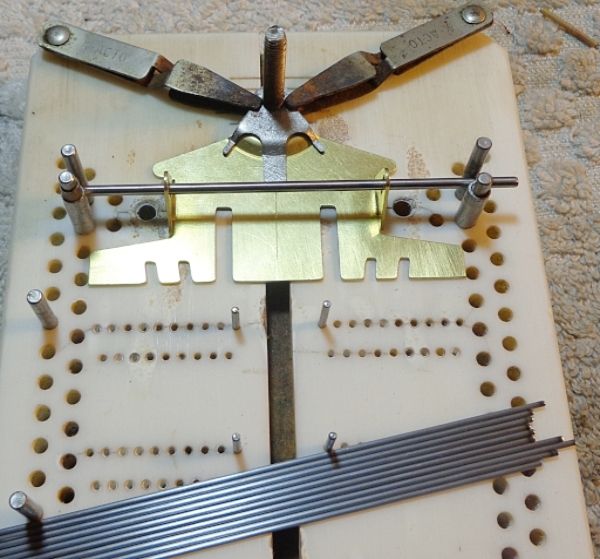
7425d1de-1a95-4807-a500-609ad4b990a6_zps

  • Take three of your bits of wire and hold them flat and solder together full length.
  • These bundles become your main rail sub assemblies.
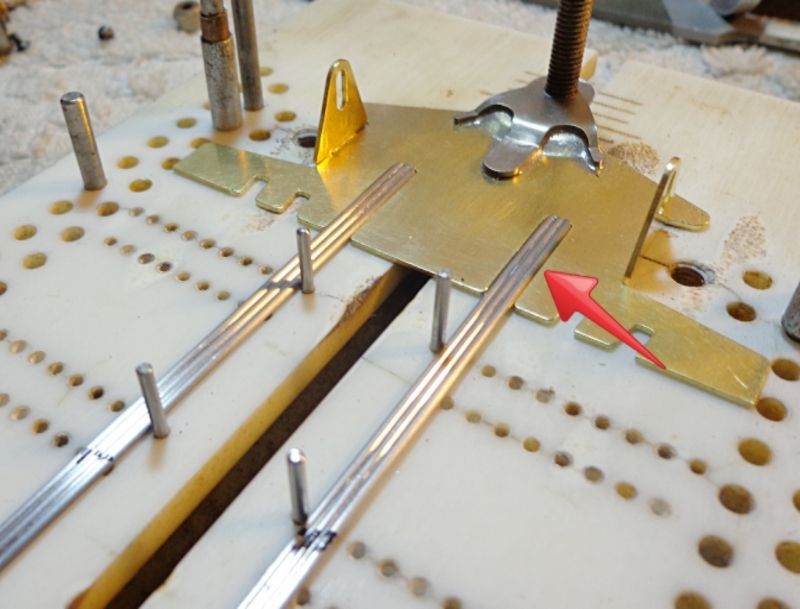
  • After the bundles are done clean them up then trial fit into the pre-cut slots on the nosepiece.
  • You want the bundles to drop right into the slots while being held square by your location pins.
  • On this one, the right rail bundle didn't go in quite flat so a little file work was done at the red arrow.
  • Once the bundles slip in easily, solder them up.
50557cc8-2ce9-4093-8637-7c2c0a475744_zps

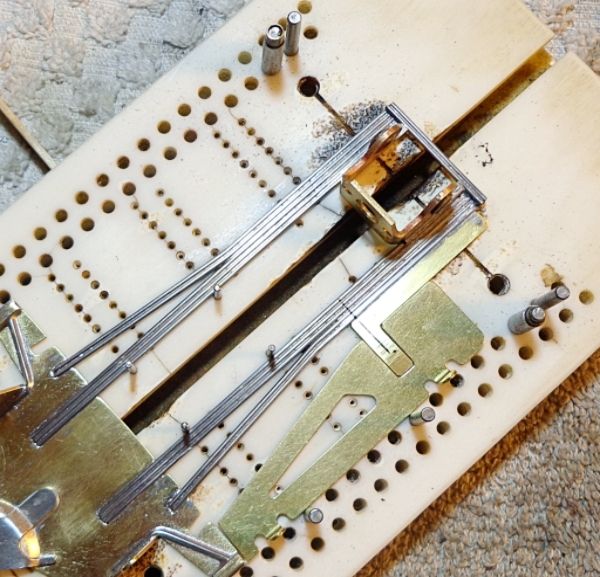
  • This is a good time to check the fit of your pans and rear pan support blocks. These will need some trimming.
  • The main rail bundles and also the angled rails will run wild at the back. They'll be trimmed later.
  • There is a little bit of wire (arrow) that I'm using to figure out where the angled rails intersect the mains.
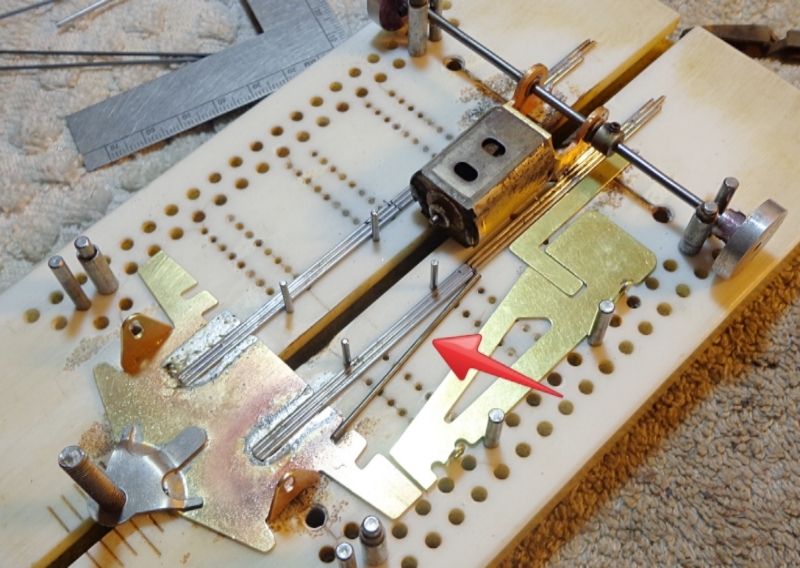
655d65e1-d4fa-43de-a315-5b4d0af1295b_zps

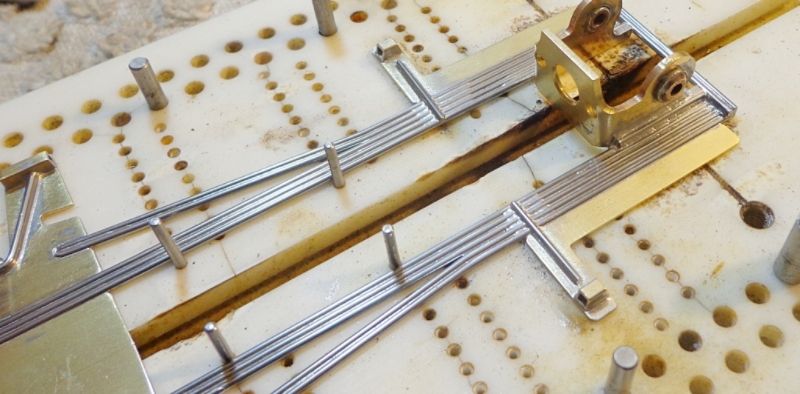
  • Bend your first angled rail and fiddle with the angle until it's right.
  • The rear part lays flush against the mains and the front part goes to the inside edge of the cutout.
  • The second angled rail is the bent to match the first. It isn't right until it matches without pushing it into place.
  • This build is using the inner slots for the angled rails but of course, the outer ones could be used instead.
  • Once the rails are perfect, solder them up then do the other side.
  • There will be two bits of .047" wire laid across the tails of all the main rails at the rear of the bracket.
  • Those are soldered up then the excess of the rails is cut off.
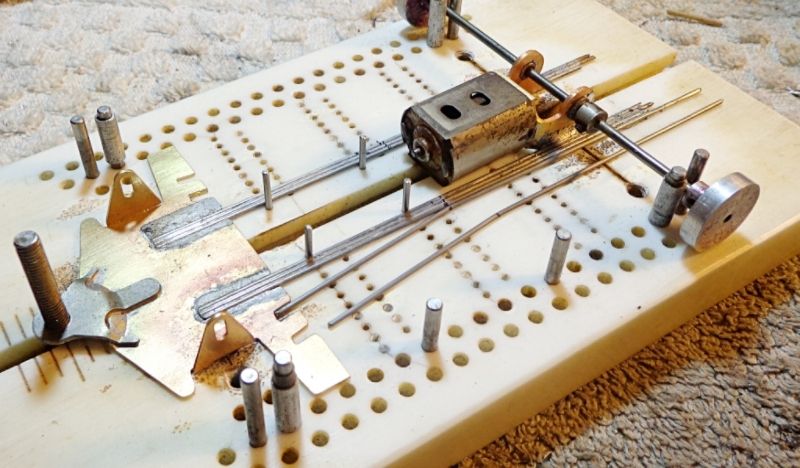
31b5e9ee-70ee-4393-a6b2-0f33c88b160a_zps

  • OK, clean your solder joints of flux gunk and examine each joint to make sure there are no gaps.
  • Put it on the flat block and check all four corners for dead nuts flat.
  • It's pretty easy to make sure that it is flat now but becomes harder when the pans are on.
  • The cross braces are in place at the rear of the bracket and the rails are trimmed.
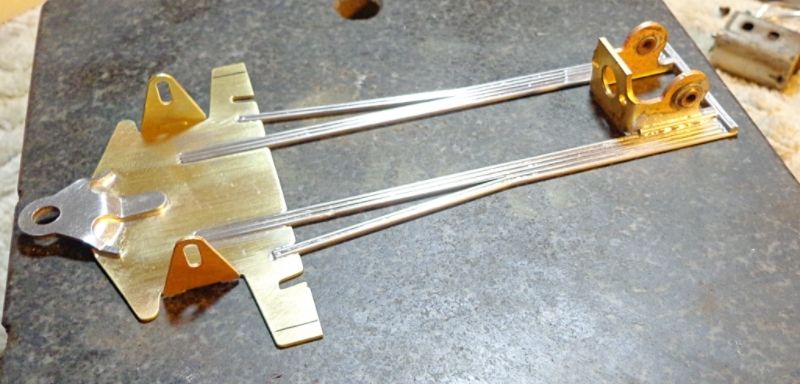
e3f63e55-9a3d-44a3-a083-7dd6e0aa0d5e_zps

  • Some .047" wire is soldered in place to reinforce the nosepiece ears.
  • A small bit of 3/32" OD box tubing is soldered in place outboard on each ear to capture the pan stops.
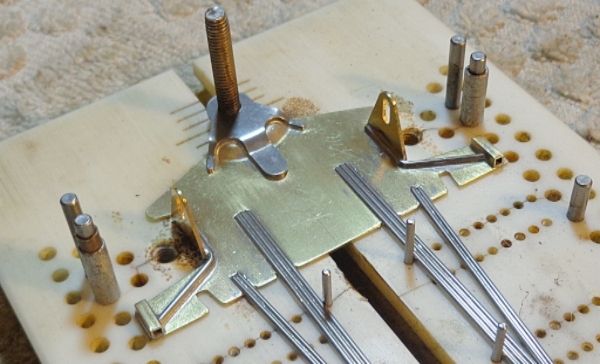
bc1e3777-fc28-450a-a7e8-df7cf8f19bda_zps

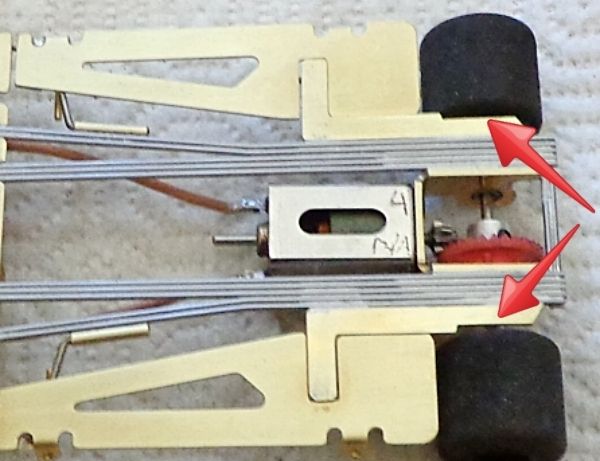
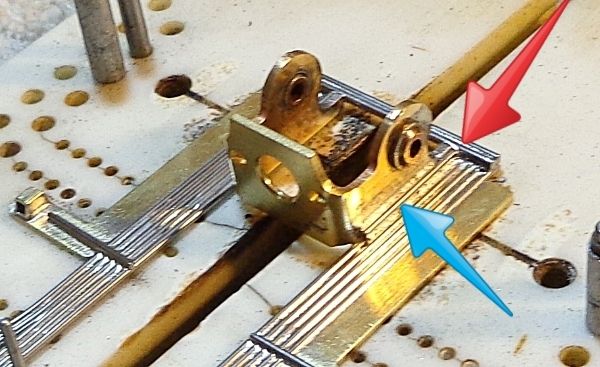
  • Bracket reinforcement (took this pic after the pan supports went on - will cover that tomorrow).
  • Red arrow = two bits of .047" soldered across the main rails.
  • Blue Arrow = One bit of .047" forming a fillet that reinforces the junction of the bracket and main rails.
9c7a28a9-0ba1-41be-a14a-082d21a1e535_zps
 
That's all I can do tonight. Will finish up tomorrow and hopefully test this weekend.


  • Cheater, Jencar17, Tim Neja and 7 others like this
Jim Fowler


#2 JimF

JimF

    Posting Leader

  • Full Member
  • PipPipPipPipPipPipPip
  • 2,220 posts
  • Joined: 20-June 07
  • Gender:Male

Posted 09 October 2015 - 12:36 AM

OK... part two here... wrapping up the build. It's all done and in the tumbler for some cleanup. By the time I hack my way through this, it'll be ready for a completed picture. Got a little ahead of myself with the last last pic from yesterday. That showed the rear pan supports done and in place. Here's how they were done.

  • All the main rails are in place and finished along with the bracket reinforcements.
  • Now, with your chassis centered and side stops in place, lay the pan and support arm in place in the jig and in the proper location.
  • They won't fit! so you'll have to trim both a little bit. The pan and arm are shown here with markings for the trim.
  • These would fit perfectly in an eight-rail build but the 10-rail is too wide and thus those parts need a little trim.

0064e2d0-a050-4928-af25-1ec582ec6e77_zps

  • OK... trimmed up. Now they fit as intended.
  • Note inked line along the pan support and across the rails. A brace of .039" wire will lay along this line.
  • The rails will have a small cut or "trench" cut straight across and about .015" deep with your Dremel.
  • This is really easy to do and when done, the brace lays in the trench across the rails and flat across the support and the rails.

8779defa-829f-4503-baf4-e030502ce53a_zps

  • Pans out of the way for clarity.
  • Rear pan support arms soldered in place.
  • Bracing wire running along the arm and across the rails soldered in place.
  • Small bit of 3/32" box tube soldered in place at the end of each arm. This is the stop tube.

2ccef612-0cc7-4fad-abeb-7f8c5c7731cc_zps


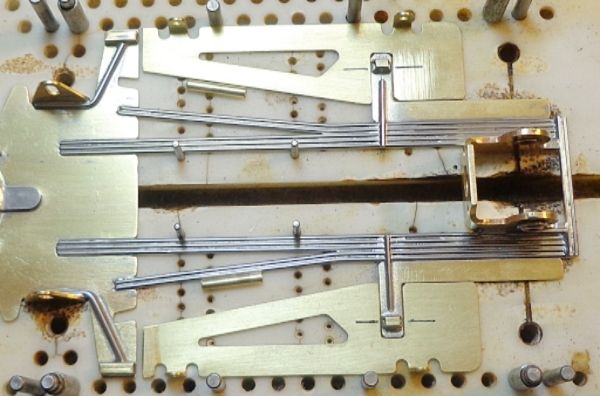
Everything in place to check fit. A couple of 1/2" bits of 3/32" round tube in place for front pan hinges.


6d8d917f-aaae-411a-a76f-6c0f91bbb920_zps

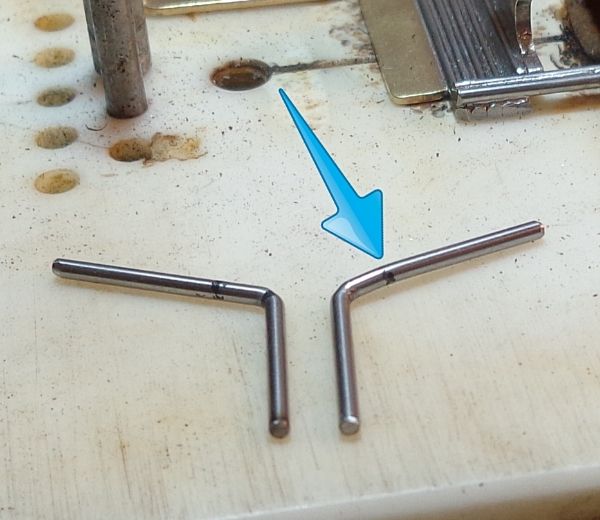
  • Front pan hinge rods of .055" wire.
  • Rod on the right has a slight "dogleg" bent into it (arrow)
  • Rod on the left is marked but not yet bent.
  • The dogleg allows the pan hinge rod to lie flat on the pan and improve soldering contact.
  • I tend to use .055" wire in 3/32" tube for my hinges because it allows a slight 3D movement but isn't really sloppy.

fe1a97f4-eb07-4f93-9dfe-ef31f6e66504_zps

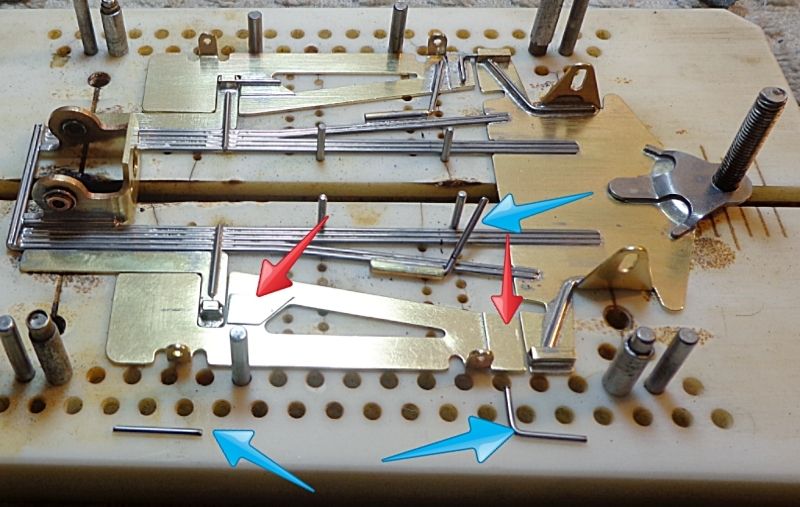
  • Far side pan assembly is done. Near side spread out for clarity.
  • There is a small bit of .016" brass strip (red arrows) that lifts each of the stop rods slightly.
  • This allows the stop rods to be at exactly the same level as the tubes they will slide into.
  • Hinge rod (.055" wire) in tube (blue arrow) and tilted up for clarity.
  • Front and rear stop rods (.047" wire) in foreground, cut and ready to go in place (blue arrows).

5846856f-1df4-4885-885f-dfee6ea60a20_zps

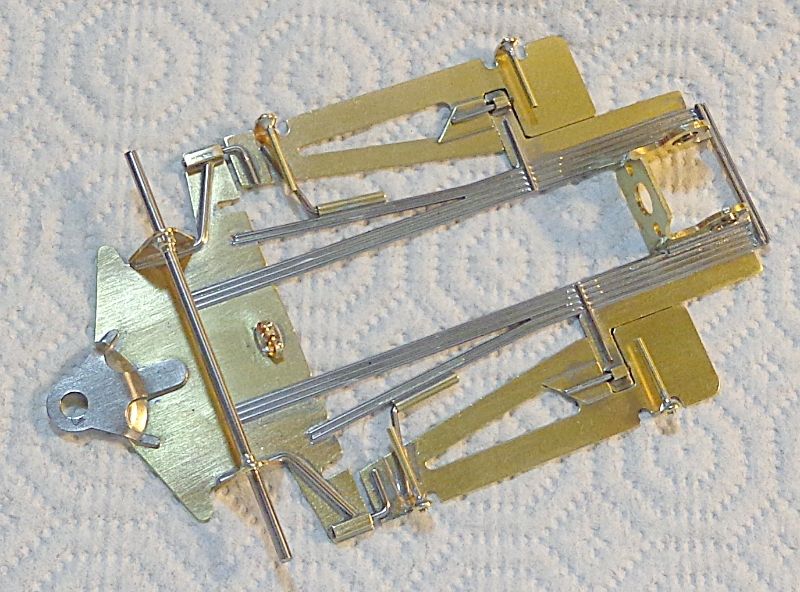
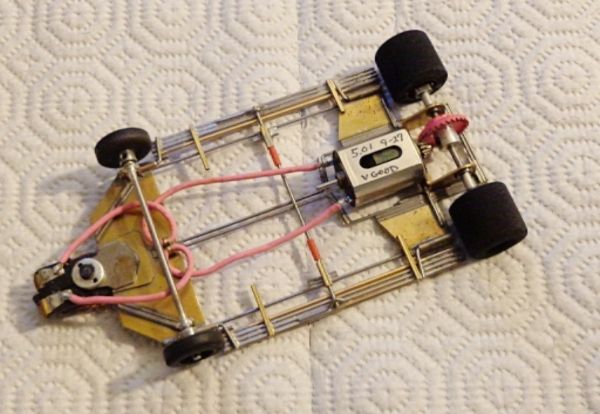
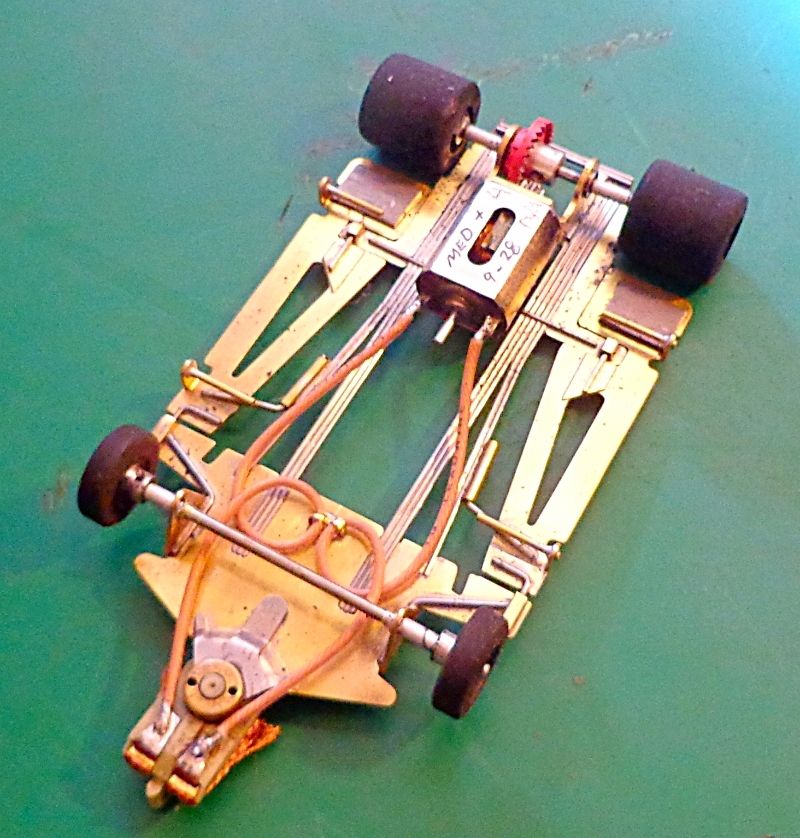
  • OK... finished pending final clean and set-up.
  • Weight is 57.4 grams as shown. Will setup at about 100.5 without body.
  • Wheelbase is 4.032", Guide lead is 1.0".
  • Earring back under the front axle will allow me to experiment with leadwire tuning.
  • Depending upon the body used, the front axle uprights may need to be trimmed down.
  • Hope to get in the first test this weekend.
22de29db-dd8a-4ce7-995d-6f75561cd2b9_zps


  • Cheater, Jencar17, Tim Neja and 4 others like this
Jim Fowler

#3 JimF

JimF

    Posting Leader

  • Full Member
  • PipPipPipPipPipPipPip
  • 2,220 posts
  • Joined: 20-June 07
  • Gender:Male

Posted 09 October 2015 - 03:43 PM

Here's one little update that I should have included in the build but didn't catch until I stared to set the car up. The rear support arm was made expecting to use four rails per side. Because we elected to do five per side on this build, the support arms were spaced out wider and thus... wouldn't clear the full width tires that I'm starting out with.
 
Rear support arms with about a .050" relief cut in to clear the tires.
 
9056d3da-6a7e-4434-b486-ffd2a3523224_zps


  • Jencar17, Tim Neja, miko and 2 others like this
Jim Fowler

#4 Tim Neja

Tim Neja

    Grand Champion Poster

  • Subscriber
  • PipPipPipPipPipPipPipPip
  • 6,839 posts
  • Joined: 11-June 07
  • Gender:Male
  • Location:Paso Robles

Posted 09 October 2015 - 08:05 PM

Those darn Dremels come in awfully handy!!! Nice build, Jim!! :)
She's real fine, my 409!!!

#5 Cheater

Cheater

    Headmaster of the asylum

  • Root Admin
  • PipPipPipPipPipPipPipPip
  • 25,656 posts
  • Joined: 14-February 06
  • Gender:Male
  • Location:Norcross, GA

Posted 10 October 2015 - 12:20 AM

Lovely work, Jim.

And a great thread; thank you.

Gregory Wells

Never forget that first place goes to the racer with the MOST laps, not the racer with the FASTEST lap


#6 JimF

JimF

    Posting Leader

  • Full Member
  • PipPipPipPipPipPipPip
  • 2,220 posts
  • Joined: 20-June 07
  • Gender:Male

Posted 10 October 2015 - 03:46 AM

Those darn Dremels come in awfully handy!!! Nice build, Jim!! :)


True-dat!


This little bit would have been easier before assembly, but I didn't catch it until I slipped the rear tires on the axle and... oops! Today, I got another dose of Dremel re-dos. I'm working on a truly weird chassis that I didn't even know how the concept would go. Turned out, I re-cut, re-soldered, cut in place, ground edges and corners, and generally thrashed all afternoon. It's really makes you grateful for a Dremel and a hot iron with a fresh tip.


Jim Fowler

#7 John Gorski

John Gorski

    Posting Leader

  • Full Member
  • PipPipPipPipPipPipPip
  • 2,346 posts
  • Joined: 16-June 06
  • Gender:Male
  • Location:NJ

Posted 10 October 2015 - 05:24 PM

Sano build, Jim.   :good: 


John Gorski, Jr.

Home of the Gorski Double-Micro Controller

#8 olescratch

olescratch

    olescratch

  • Subscriber
  • PipPipPipPipPip
  • 977 posts
  • Joined: 19-July 13
  • Gender:Male
  • Location:Ravenna, OH

Posted 11 October 2015 - 08:46 PM

Nice "how to" for those of us that like to see how it's done correctly! Awesome, clean build.


John Stewart

#9 Michael Rigsby

Michael Rigsby

    SRT Motorsports

  • Full Member
  • PipPipPipPipPipPip
  • 1,914 posts
  • Joined: 27-July 08
  • Gender:Male
  • Location:a Southern state

Posted 12 October 2015 - 05:08 AM

I really like Jim's builds, and R-Geo kits built like this with .047" multi-rail set-ups do very, very well down here on our Florida Hillclimb tracks. Though a touch heavier than some other cars, eight and ten rail R-Geo chassis (Arrow and DS6), just seem to work with the right combination of everything with very little tuning weight, and generally give a car in the range of 108 to 110 grams or so depending on body.
 
Nice clean build, Mr. Fowler. :victory:


"... a good and wholesome thing is a little harmless fun in this world; it tones a body up and keeps him human and prevents him from souring." - Mark Twain


#10 JimF

JimF

    Posting Leader

  • Full Member
  • PipPipPipPipPipPipPip
  • 2,220 posts
  • Joined: 20-June 07
  • Gender:Male

Posted 12 October 2015 - 02:35 PM

Thanks for the kudos, guys... here's the first track test.


Had some Subaru issues this week so I didn't get to Motown (Modesto) to test this car like I wanted to. I did however, manage a quick trip to Fast Track Hobbies in Rocklin to get in some laps. The test track was the Purple Angel which is a rather obscure design that makes for exceptional racing. FWIW... I much prefer this track over the typical King or Hillclimb for a speedway design.


To put it all in context, here's a pic of the track. Direction of travel is right to left down the main straight as shown here. From the deadman at the end of the main straight all the way to the drivers panel in the right foreground, the turns are flat and sort of continuous. There is very little time for the car to "settle" in these interconnected turn sequences. Despite the rather complex turn sequences, this track is exceptionally fast (faster than both of the King tracks in our region).


229d0141-8e1e-45b8-a140-5490d429b4a3_zps


On this day, the track was not exactly fast. It had not been cleaned in a while (maybe a while and a half) and an old friend and and local ace Greg Ruzich who was hanging around told me something to the effect of... "that track is just nasty today"


This was the target car for this test. This the most recent version (V-03) of the X-1 car that I chronicled some time ago. This has been the most successful design that I have done and is my fastest car on this track. Normal times will run about 4.75 sec. This car was run today with its normal set-up for this track. Best time for this car today was 5.01 sec.

  • Parma Lola 163
  • Weight - 106 gr.
  • Very good motor. Geared 9/27
  • JK 8713 narrowed.

a78b809b-3b10-4fef-bae6-560ae6adc7e3_zps


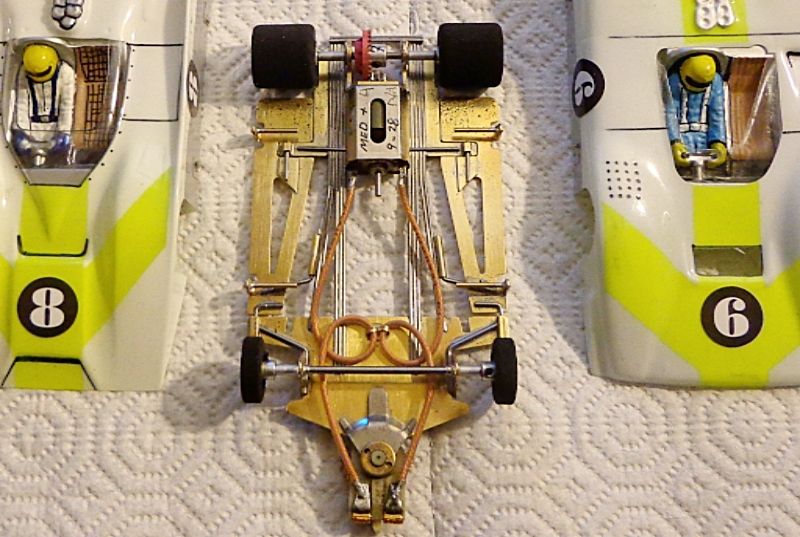
So... here is the Arrow in final race trim and with the bodies tested today. Conditions being what they were and rental traffic on the track kept me from testing as much I migh have otherwise. Weight was, as Michael suggested, about 107 grams. After running the above car, I figured that I knew what tire was going to be the choice so I set it up with JK 8703. I started with the Parma Lola. The motor in this case is at the top of my second tier. (probably my third-fourth fastest), so... good motor.

  • My initial run was my best with the car running a best of 5.08 sec.
  • From the start, the Arrow was very easy to drive and more forgiving than the target car.
  • The Arrow shone in the left foreground turn sequence. It had very fast cornering speeds here.
  • The Arrow was not quite as fast in the "hook-sweeper" sequence coming from the right background toward the driver's panel.
  • I moved through my normal litany of tires (8703-8713-8763) but the original choice was the best.
  • On this day, there was no reason to be testing treated or Wonders.
  • The Parma Lola turned out to be a little better than the TrueScale Ti22 on this day.
  • The two were the same in speeds but the Lola could just turn more laps at the max than the Ti.
  • For the sake of the test, I tried two weights of 1.5 grams ea. at the rear corners of the pans.
  • This was neither positive or negative so no reason to leave them on.

76feb638-6c47-469e-88ae-bdb82ce2f904_zps


There is more testing to do on different tracks with different turns and bite situations. Here is what I think so far...

  • This may well be the best of the DS/Arrow series that I have built and tested so far.
  • This may be because the dimensions and pan movement parameters were just right.
  • I really like the pan movement parameters with the hinge/stop configurations shown.
  • While not "quite" as fast as my very best specialty car... I honestly don't expect it to be.
  • More to come after testing in different situations.

  • Jencar17, Tim Neja, Michael Rigsby and 1 other like this
Jim Fowler

#11 Rick

Rick

    Grand Champion Poster

  • Full Member
  • PipPipPipPipPipPipPipPip
  • 8,844 posts
  • Joined: 17-February 06
  • Gender:Male
  • Location:PA

Posted 12 October 2015 - 06:17 PM

Thanks Jim again for an awesome build tutorial and as always craftsmanship second to none. The track test is a  very positive report and looking forward to further results on your other test site(s)....


  • James Fetherolf likes this

Rick Bennardo
"Professional Tinkerer"
scrgeo@comcast.net
R-Geo Products
LIKE my Facebook page for updates, new releases, and sales: Rgeo Slots...
 
Lead! The easy equalizer...


#12 JimF

JimF

    Posting Leader

  • Full Member
  • PipPipPipPipPipPipPip
  • 2,220 posts
  • Joined: 20-June 07
  • Gender:Male

Posted 20 October 2015 - 07:04 PM

I got the Arrow onto the hillclimb at Motown raceway in Modesto Ca. this past weekend. This track actually has the layout and shape of an Engleman but is tucked and tightened in a more hillclimb configuration. There are two long straights with banks at the end of each but the rest of the turns are mostly flat. Despite a lot of straightaway time, this is a challenging track to run because sight lines in the gutters are very tough and during a race, the necessary turn marshals create a lot of blind spots.


Along with the turn-straight-turn configuration, the surface here is usually pretty bitey so I figured this would be a good contrast to the first test. After selecting the car I would race myself, I started working on the Arrow. I also elicited the opinions of several of the best local racers as I went along with the work. Each driver that tried it was very impressed and three of them tried to buy it.


The car was pretty darned good the way it was from the first test but I made a few minimal but key changes.


  • Added a small 1.8 gr. weight to the rear of each pan.
  • Went from a small hub JK 8703 untreated to a large hub untreated (8713)
  • Narrowed the 8713 very slightly (about .050")


I loaned the car to a very good local racer for the race and for the first 2/3 of the race, he was in a flat footed tie with myself and the track owner for the race lead. It was a very rough race and eventually he (and I) got taken out enough times that we both dropped back from the lead. At the end of the race, he said I wasn't getting the car back and I agreed but that I needed to keep it for another week or so while I get in one more test on a flat track.


I think this is the best of the D/S variants that I have tried personally. I particularly like the combination of very free (but very limited) pan movements in combination with positive downstops. If I were to build another one to keep for myself, I don't think I'd change anything except possibly a longer wheelbase. (and maybe not even that)


ed747838-f250-4a5f-91f9-809bfca3461e_zps


  • Pablo, Jencar17, Tim Neja and 3 others like this
Jim Fowler

#13 Rick

Rick

    Grand Champion Poster

  • Full Member
  • PipPipPipPipPipPipPipPip
  • 8,844 posts
  • Joined: 17-February 06
  • Gender:Male
  • Location:PA

Posted 21 October 2015 - 11:32 AM

Awesome report Jim. with yourself and 3 top racers all liking the car, you hit a home run...Looking forward to the last installment from the flat track....Thanks for your time and excellent building......


Rick Bennardo
"Professional Tinkerer"
scrgeo@comcast.net
R-Geo Products
LIKE my Facebook page for updates, new releases, and sales: Rgeo Slots...
 
Lead! The easy equalizer...


#14 JimF

JimF

    Posting Leader

  • Full Member
  • PipPipPipPipPipPipPip
  • 2,220 posts
  • Joined: 20-June 07
  • Gender:Male

Posted 13 December 2015 - 05:29 PM

Hi James:


Thanks for the quotes but OOC, were you trying to ask a question or offer a comment?


Jim Fowler

#15 James Fetherolf

James Fetherolf

    Rookie Keyboard Racer

  • Full Member
  • Pip
  • 15 posts
  • Joined: 09-September 14
  • Gender:Male
  • Location:Columbus, OH

Posted 13 December 2015 - 07:01 PM

Just an error, sorry I was just following some of Jim Fowlers chassis updates on certain builds.


Electric Dreams Online Shop