Jump to content


Photo

Ferrari 330 P4 Jail Door car


  • Please log in to reply
51 replies to this topic

#26 Pablo

Pablo

    Builder

  • Administrator
  • PipPipPipPipPipPipPipPip
  • 18,364 posts
  • Joined: 20-February 06
  • Gender:Male
  • Location:Cleveland, Tennessee

Posted 14 May 2016 - 01:18 AM

A minute crack always indicates a bigger split down stream; this was a classic case.

I'm glad I caught this before a major failure.


IMG_1482.JPG


Motor is happy; perfect brush curvature is always a good indicator.


IMG_1485.JPG


Brush faces are perfectly shiny, comm looks fine, and everything else looks good.

So it's a simple matter of swapping the endbell :)


Paul Wolcott


#27 Bill from NH

Bill from NH

    Age scrubs away speed!

  • Full Member
  • PipPipPipPipPipPipPipPip
  • 14,315 posts
  • Joined: 02-August 07
  • Gender:Male
  • Location:New Boston, NH

Posted 14 May 2016 - 06:48 AM

Before you run the 2-56 tap in, first run a #50 tap drill in.


Bill Fernald
 
I intend to live forever!  So far, so good.  :laugh2:  :laugh2: 

#28 Pablo

Pablo

    Builder

  • Administrator
  • PipPipPipPipPipPipPipPip
  • 18,364 posts
  • Joined: 20-February 06
  • Gender:Male
  • Location:Cleveland, Tennessee

Posted 14 May 2016 - 08:41 AM

Is that a special tool, or just a regular .0700 drill bit, Sir ?


Paul Wolcott


#29 dc-65x

dc-65x

    Grand Champion Poster

  • Subscriber
  • PipPipPipPipPipPipPipPip
  • 6,824 posts
  • Joined: 14-February 06
  • Gender:Male
  • Location:Captain Rick: The only vintage slot car nut in SW Oregon?

Posted 14 May 2016 - 09:39 AM

Hi Pablo,


The #50 drill bit is .070" and is the standard tap drill size for a 2-56 screw in most metals. You can get away with a slightly smaller tap drill hole in plastic.


The thing about most self tapping screws is that they swedge or form their threads as they are forced into the hole. This acts like a wedge to potentially split the brittle endbell.


The 2-56 tap will CUT the threads with little of the force that could cause the endbell to split.


Rick Thigpen
Check out Steve Okeefe's great web site at its new home here at Slotblog:
The Independent Scratchbuilder
There's much more to come...


#30 Pablo

Pablo

    Builder

  • Administrator
  • PipPipPipPipPipPipPipPip
  • 18,364 posts
  • Joined: 20-February 06
  • Gender:Male
  • Location:Cleveland, Tennessee

Posted 14 May 2016 - 09:52 AM

Thanks Rick, I'll drill with the .07 bit before tapping :good:


Decals on the inside as usual.


IMG_1513.JPG


Driver painted by Jairus Watson.


IMG_1515.JPG


  • hiline2 and Robert BG like this

Paul Wolcott


#31 dc-65x

dc-65x

    Grand Champion Poster

  • Subscriber
  • PipPipPipPipPipPipPipPip
  • 6,824 posts
  • Joined: 14-February 06
  • Gender:Male
  • Location:Captain Rick: The only vintage slot car nut in SW Oregon?

Posted 14 May 2016 - 10:09 AM

Pablo, it can be a bit tricky to tap the hole "straight" or in alignment with the hole. If you don't have a neato tapping fixture.........


toys- 004.JPG


..........you can get good results without the neato gizmo by going slowly and checking that the tap is straight as you go:


Turn the tap in a 1/2 turn or so while looking at the front view for straightness.


Then look at the side view for straightness. You'll probably see that the tap is not quite straight from that view.


Carefully straighten the tap as you crank in another 1/2 turn or so.


Then look at it from the front view again and repeat the process.


Hopefully after couple of turns the tap is going in straight because beyond that, "you've bought what you've got!" :crazy:


Rick Thigpen
Check out Steve Okeefe's great web site at its new home here at Slotblog:
The Independent Scratchbuilder
There's much more to come...


#32 Pablo

Pablo

    Builder

  • Administrator
  • PipPipPipPipPipPipPipPip
  • 18,364 posts
  • Joined: 20-February 06
  • Gender:Male
  • Location:Cleveland, Tennessee

Posted 14 May 2016 - 11:01 PM

Improvements - new endbell and the motor is 100% ready to rock again - Marklin wires - arm dyed  :good:


IMG_1522.JPG


Special thanks to my vintage mentors, Bill from NH, and dc-65x - they always keep me straight :victory: :D


  • Samiam likes this

Paul Wolcott


#33 Regis4446

Regis4446

    On The Lead Lap

  • Full Member
  • PipPipPipPip
  • 428 posts
  • Joined: 24-March 10
  • Gender:Male
  • Location:France

Posted 15 May 2016 - 03:53 AM

Hi Pablo, very nice work.

Originally, the glue is behind the decal.
How do you stick decals inside the body.
Régis Baron

#34 Pablo

Pablo

    Builder

  • Administrator
  • PipPipPipPipPipPipPipPip
  • 18,364 posts
  • Joined: 20-February 06
  • Gender:Male
  • Location:Cleveland, Tennessee

Posted 15 May 2016 - 10:12 AM

Thanks. I use the Tom Andersen inside decal method. It is only for acrylic paints.

A bottle of Faux Glaze only costs a few bucks on Amazon. Some guys use Mod Podge.


When the decal is ready to apply, brush on a film of the glaze a little bigger than the decal.

Apply the decal and position it. Let dry for a few hours. If you are in a rush, blow drying works but don't overheat it.

Once dry, re-coat them, dry,etc. I usually do 3 coats. As Tom said, "You DON'T want paint seeping under them" :)

If you apply too much it simply runs off - wick it off with a paper towel.

The excess on the outer edges leaves a film when it dries - don't worry about it - it disappears once the paint is applied.


When you spray your first coat of paint, make it as fine and light as possible.


  • Robert BG likes this

Paul Wolcott


#35 Regis4446

Regis4446

    On The Lead Lap

  • Full Member
  • PipPipPipPip
  • 428 posts
  • Joined: 24-March 10
  • Gender:Male
  • Location:France

Posted 15 May 2016 - 01:37 PM

Pablo, thank you
Régis Baron

#36 Bill from NH

Bill from NH

    Age scrubs away speed!

  • Full Member
  • PipPipPipPipPipPipPipPip
  • 14,315 posts
  • Joined: 02-August 07
  • Gender:Male
  • Location:New Boston, NH

Posted 15 May 2016 - 07:55 PM

IIRC, Faux Glaze is an acrylic varnish, When I couldn't find any locally, I ordered it off the net.Two alternatives to the Faux Glaze that could be used are Alclad & Createx clear paints, with Alclad being solvent-based, Createx being water-based acrylic. Either will provide a surface on the lexan for the decal to "bite-into." I forget when Tom Andersen first set up his website, but I have Yahoo notes from Doug Azary in 2004 detailing decals placed on the inside of bodies using the Alclad.


Bill Fernald
 
I intend to live forever!  So far, so good.  :laugh2:  :laugh2: 

#37 Pablo

Pablo

    Builder

  • Administrator
  • PipPipPipPipPipPipPipPip
  • 18,364 posts
  • Joined: 20-February 06
  • Gender:Male
  • Location:Cleveland, Tennessee

Posted 15 May 2016 - 08:14 PM

Régis, you are welcome.


Car is ready to go, and body paint turned out nice, I think.

Somebody with a steadier hand than me will need to do the Sharpie lines :)

IMG_1541.JPG


  • slotbaker likes this

Paul Wolcott


#38 Bud Greene

Bud Greene

    On The Lead Lap

  • Full Member
  • PipPipPipPip
  • 469 posts
  • Joined: 12-February 11
  • Gender:Male
  • Location:Saraland, AL

Posted 15 May 2016 - 08:37 PM

Damn that looks good keep up the good work

#39 Bill from NH

Bill from NH

    Age scrubs away speed!

  • Full Member
  • PipPipPipPipPipPipPipPip
  • 14,315 posts
  • Joined: 02-August 07
  • Gender:Male
  • Location:New Boston, NH

Posted 15 May 2016 - 08:49 PM

Errant Sharpie lines can be easily removed using lighter fluid on a Q-tip. :laugh2: I love bodies with deep panel lines. :heart:


Bill Fernald
 
I intend to live forever!  So far, so good.  :laugh2:  :laugh2: 

#40 Pablo

Pablo

    Builder

  • Administrator
  • PipPipPipPipPipPipPipPip
  • 18,364 posts
  • Joined: 20-February 06
  • Gender:Male
  • Location:Cleveland, Tennessee

Posted 16 May 2016 - 01:51 PM

Thanks Bud :D :dance3:


Bill, I've been working on this body for days and I'm not coming anywhere near it with a Sharpie in my hand.

It would be like handing a Crayon to a child in an art museum :laugh2:


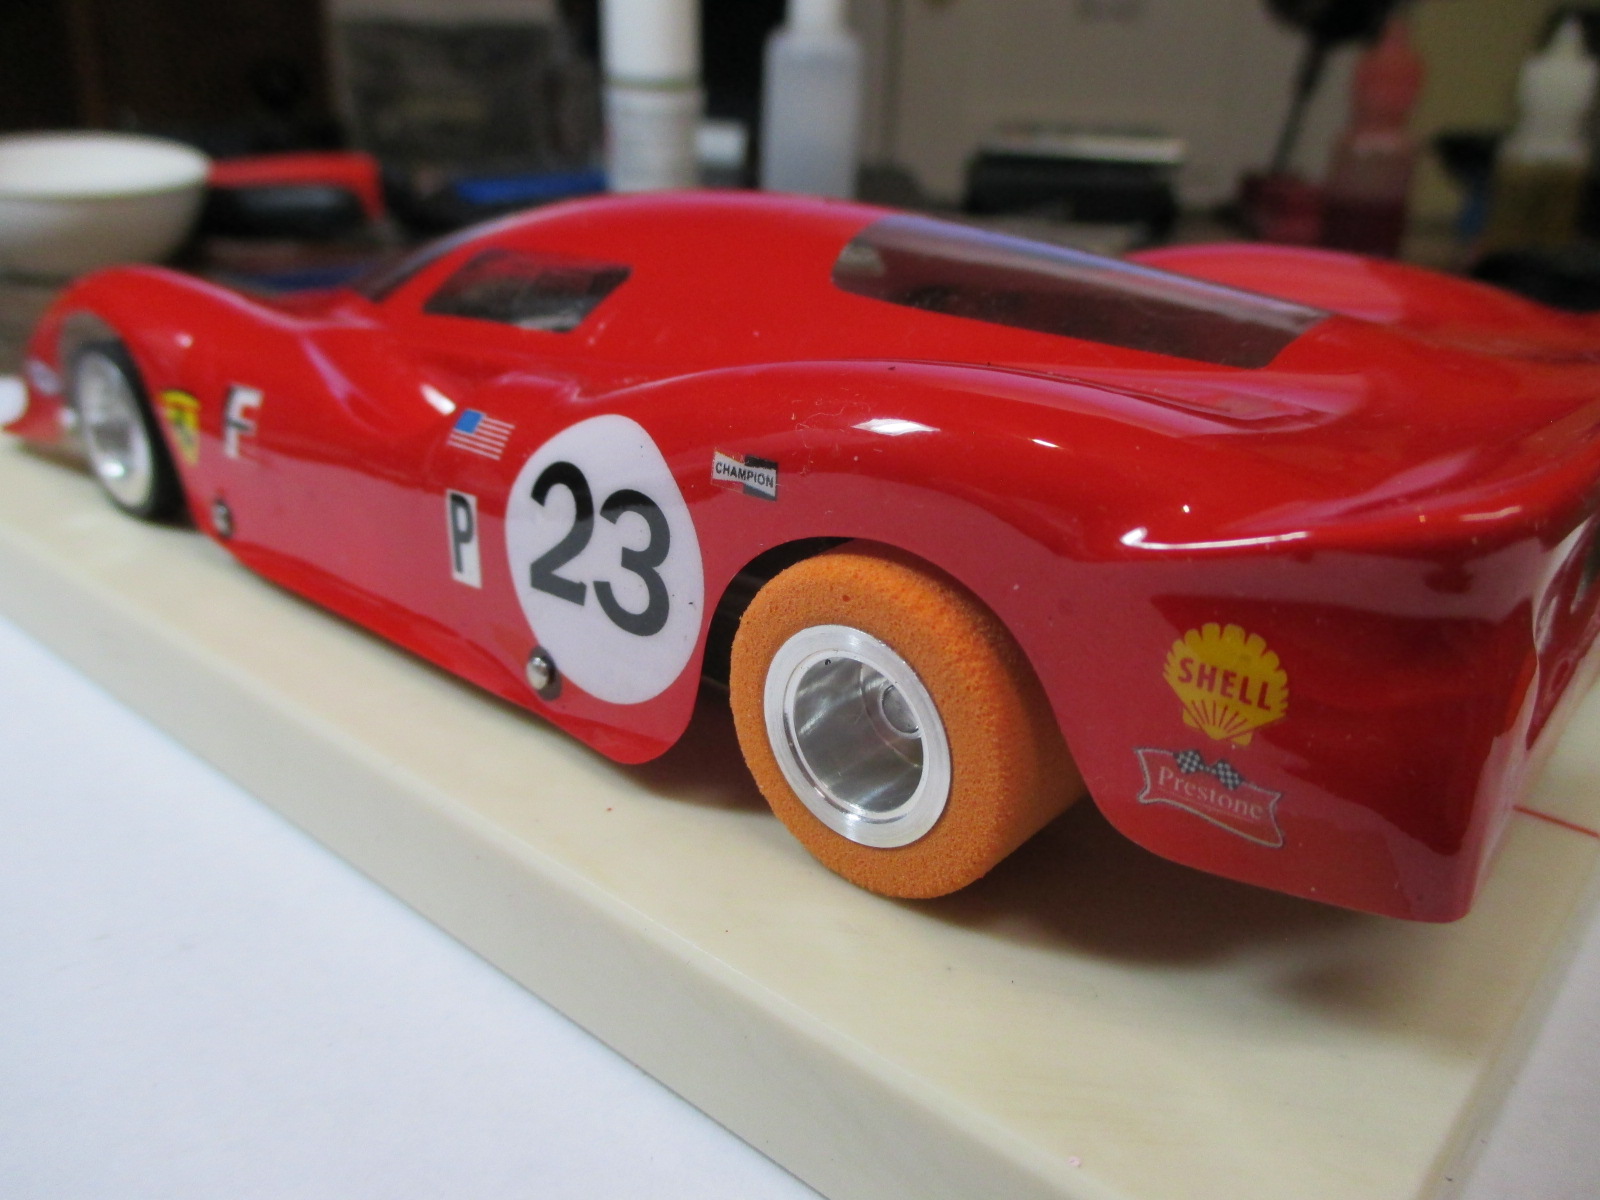
This may be the last time I get an easy opportunity to take some topside close ups of this beastie, so I took advantage of it :)


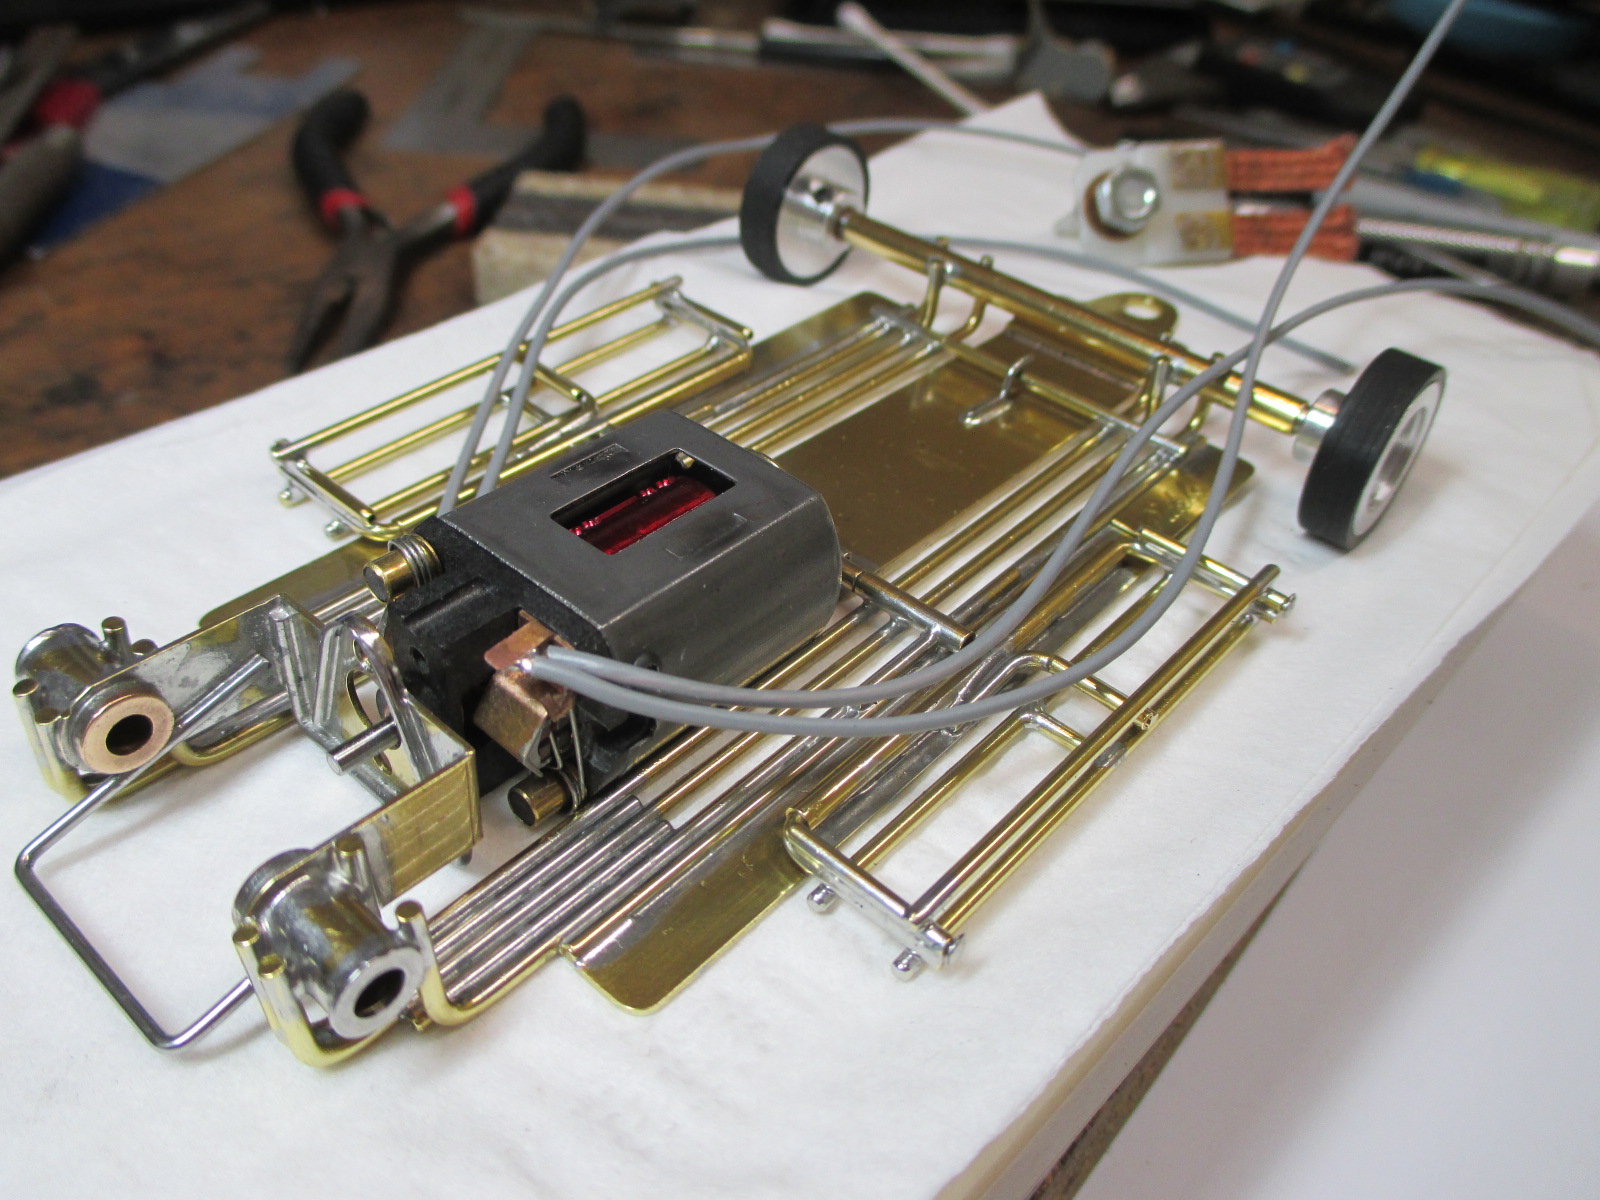
All 4 rotating surfaces on the flag assembly were faced using a Magnehone.

Flag was blueprinted using an R-Geo sanding block, Cahoza and Magnehone threaders.

It rotates as nice, with minimal wobble, as any retro or modern race car I own.

Prime Braids come soldered to the ends, stock - they will not fail.

Brass clips are Champion 820's.

There are two Koford phosphorous-bronze 10 thou spacers under the flag, and one above it.

The one up top is a spare in case you need to add one below.

Front axle is an absolutely straight and polished length of PCH bulk. Thin Koford spacers act as buffers between wheels and tube ends.


IMG_1546.JPG


Best lead wire routing method for me it isn't just style.

This was the best way I found on this particular car to achieve gentle self-centering influence on the Jet Flag.


IMG_1549.JPG


Track test has already been completed to my satisfaction, so it may seem a moot point but -

Drivetrain test on this beast is absolutely scary powerful, smooth, and sounds very sexy.


IMG_1568.JPG


Usually Cox Crowns suck. This new 30T is as true as any I've ever seen.

I had the option to use a Weldun, but the Cox works fine so it stayed.


IMG_1569.JPG


I hate seeing genuine original Riggen AA wheels depart The Ranch, but nobody lives forever.

If I kept the car for myself and wanted to run it, I'd make up a set of 4 beater wheels and keep these Riggens locked up in a fire proof safe.


IMG_1572.JPG


IMG_1576.JPG


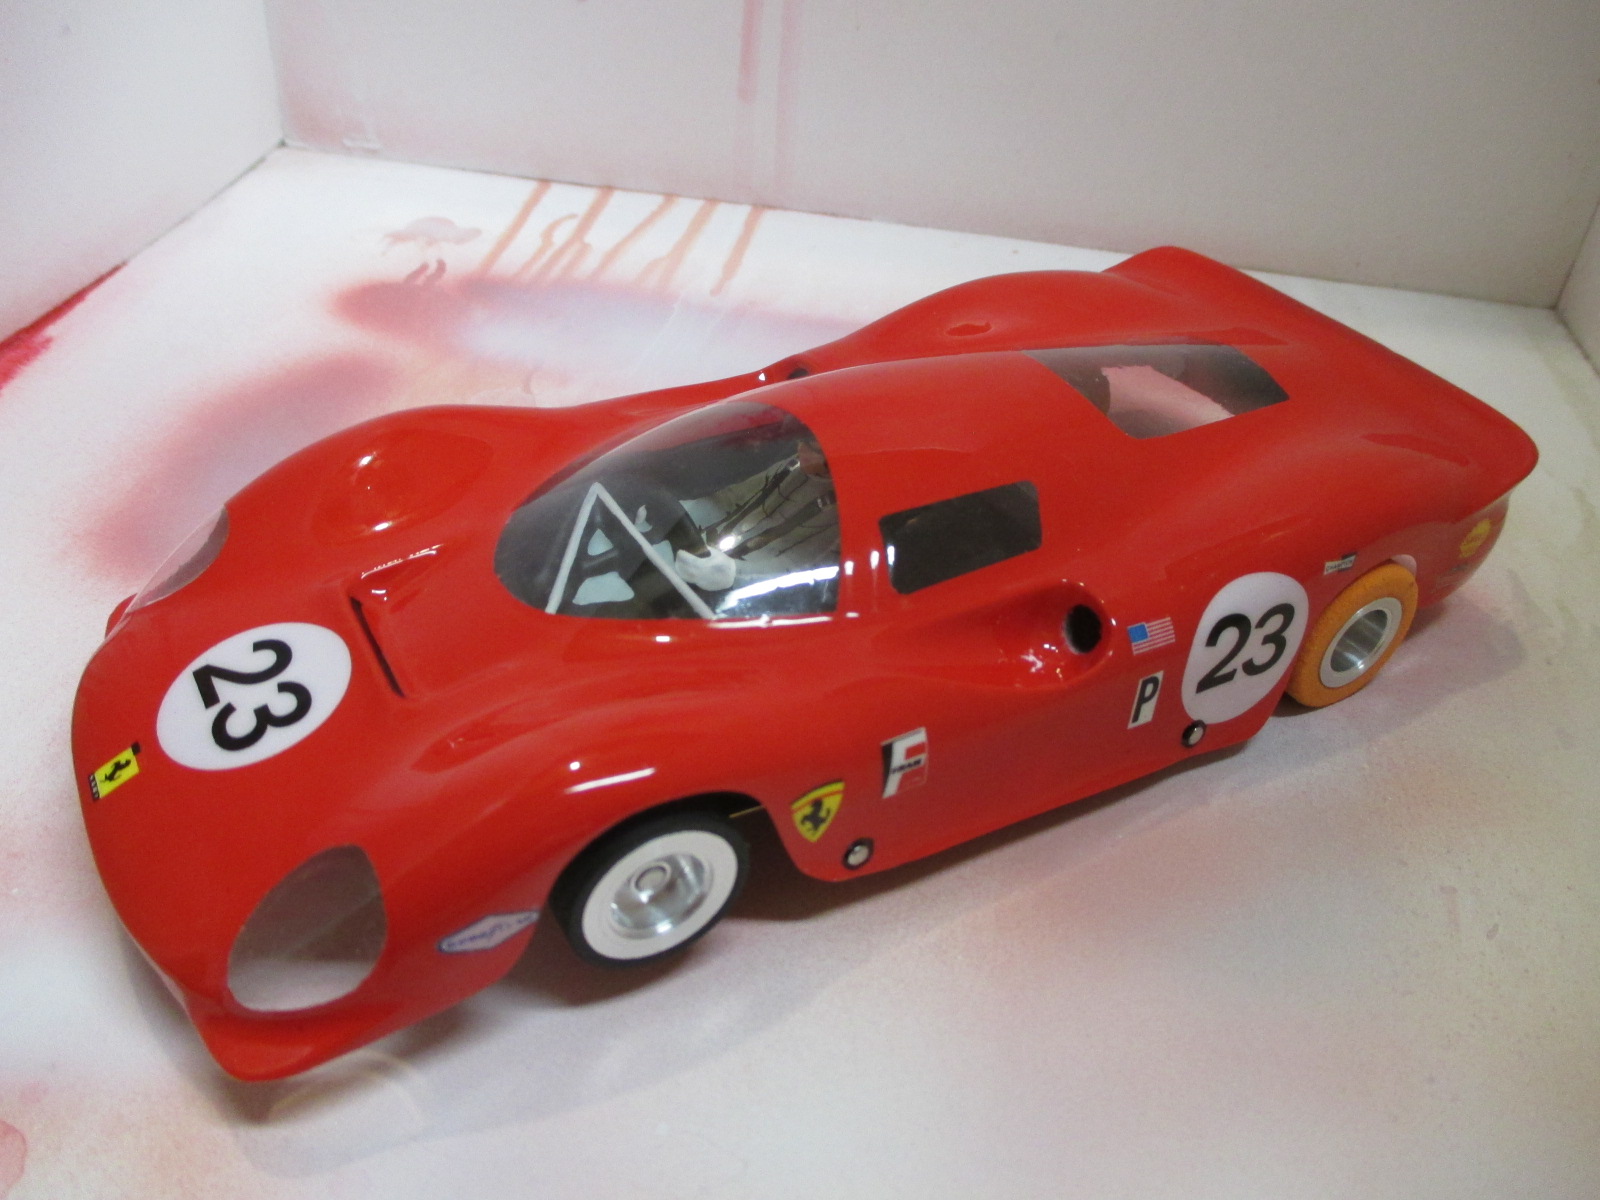
I've made my share of interior mounting mistakes - but not this time. 

Clear packing tape works fine and won't lift paint like stronger tapes sometimes do.

Here, 3 very small pieces do the trick. I'd prefer my interior to be loose on the body and not destroy any decals or paint if removed.

As opposed to being attached rigidly and lift things when removed.


IMG_1591.JPG


Paul Wolcott


#41 Pablo

Pablo

    Builder

  • Administrator
  • PipPipPipPipPipPipPipPip
  • 18,364 posts
  • Joined: 20-February 06
  • Gender:Male
  • Location:Cleveland, Tennessee

Posted 17 May 2016 - 09:57 PM

Done. On a 1 to 10 scale, I'll critique my own work:

Mechanically: 9.8

Paint, decals, mounting and trimming: 7.5

Jairus Watson interior: 10


The $6 O/S body wasn't designed for vintage cars - it's a thin race body.

One side is always thinner than the other - nature of the beast :D


IMG_1592.JPG


IMG_1603.JPG


IMG_1617.JPG


IMG_1631.JPG


  • slotbaker, Tex and Samiam like this

Paul Wolcott


#42 Samiam

Samiam

    Posting Leader

  • Subscriber
  • PipPipPipPipPipPipPip
  • 4,747 posts
  • Joined: 18-January 12
  • Gender:Male
  • Location:Long Island, NY

Posted 17 May 2016 - 10:51 PM

Pablo,


Another great build.  :good: 


The only thing I can find wrong with it is that it's not in my box. :D


Sam Levitch
 
"If you have integrity, nothing else matters, and if you do not have integrity, nothing else matters."
    Robert Mueller, special counsel (2013)
 
"... because people have got to know whether or not their president is a crook."
    Richard M .Nixon, Nov 17, 1973
 
"Fool me once, same on... shame on you. Fool me... you can't get fooled again."
    George W. Bush

#43 Bill from NH

Bill from NH

    Age scrubs away speed!

  • Full Member
  • PipPipPipPipPipPipPipPip
  • 14,315 posts
  • Joined: 02-August 07
  • Gender:Male
  • Location:New Boston, NH

Posted 17 May 2016 - 11:10 PM

What Sam, no Pablo chassis? I got one to build up. :clapping:


Bill Fernald
 
I intend to live forever!  So far, so good.  :laugh2:  :laugh2: 

#44 gc4895

gc4895

    On The Lead Lap

  • Full Member
  • PipPipPipPip
  • 493 posts
  • Joined: 04-March 16
  • Gender:Male
  • Location:Walnut Creek, CA

Posted 17 May 2016 - 11:16 PM

What a beauty! I clearly remember the Saturday I was able to go from my La Cucaracha to a jail door chassis with Ferrari body. It was when I started asking chassis questions. Next thing I knew, I was asking my dad for a soldering iron.
  • Samiam likes this
Mark Bauer

#45 Bill from NH

Bill from NH

    Age scrubs away speed!

  • Full Member
  • PipPipPipPipPipPipPipPip
  • 14,315 posts
  • Joined: 02-August 07
  • Gender:Male
  • Location:New Boston, NH

Posted 18 May 2016 - 06:05 AM

The $6 O/S body wasn't designed for vintage cars - it's a thin retro race body.

One side is always thinner than the other - nature of the beast :D


How thick was that body supposed to be? Was it a .007 body or a .010 body? I'm sure you know why some manufacturer's bodies are always thinner on one side than the other.  :)


Bill Fernald
 
I intend to live forever!  So far, so good.  :laugh2:  :laugh2: 

#46 Pablo

Pablo

    Builder

  • Administrator
  • PipPipPipPipPipPipPipPip
  • 18,364 posts
  • Joined: 20-February 06
  • Gender:Male
  • Location:Cleveland, Tennessee

Posted 18 May 2016 - 07:05 AM

It isn't legal for IRRA® or RETRO, so I assume it's 7 thou.

Good catch, Bill, I corrected my text.


Paul Wolcott


#47 Pete L.

Pete L.

    Posting Leader

  • Member at Peace
  • PipPipPipPipPipPipPip
  • 2,950 posts
  • Joined: 02-September 06
  • Gender:Male
  • Location:NJ

Posted 18 May 2016 - 08:08 AM

Pablo,


 Great work, thanks for sharing !!! 


Peter J. Linszky
6/30/54-6/27/22
Requiescat in Pace

#48 Pablo

Pablo

    Builder

  • Administrator
  • PipPipPipPipPipPipPipPip
  • 18,364 posts
  • Joined: 20-February 06
  • Gender:Male
  • Location:Cleveland, Tennessee

Posted 18 May 2016 - 08:27 AM

Thank you, gentlemen :D Weight is 143 grams.

It's a stable car and the big ProSlot arm pushes it effortlessly.

2 final photos:


IMG_1639.JPG


IMG_1640.JPG


  • Tim Wilkins likes this

Paul Wolcott


#49 Jairus

Jairus

    Body Painter Extraordinaire

  • Subscriber
  • PipPipPipPipPipPipPipPip
  • 10,174 posts
  • Joined: 16-February 06
  • Gender:Male
  • Location:Salem, OR

Posted 18 May 2016 - 09:47 AM

Looks GREAT! :victory: :heat:


Jairus H Watson - Artist
Need something painted, soldered, carved, or killed? - jairuswtsn@aol.com

www.slotcarsmag.com

www.jairuswatson.net
http://www.ratholecustoms.com
Check out some of the cool stuff on my Fotki!


#50 Gary Adams

Gary Adams

    Old 'N Slow

  • Member at Peace
  • PipPipPipPip
  • 416 posts
  • Joined: 20-September 08
  • Gender:Male
  • Location:The Twilight Zone

Posted 18 May 2016 - 11:10 AM

Absolutely stunning Pablo! Having intense Riggen wheel envy at this moment . . . :shok:


Gary Adams
11/17/49-1/30/24
Requiescat in Pace


Electric Dreams Online Shop