Jump to content


Photo

Shortened Mabuchi & the evolution of slot car motors


  • Please log in to reply
14 replies to this topic

#1 havlicek

havlicek

    OCD Rewinder

  • Subscriber
  • PipPipPipPipPipPipPipPip
  • 11,198 posts
  • Joined: 20-August 07
  • Gender:Male
  • Location:NY

Posted 06 May 2016 - 01:51 PM

Not long after the can motors began to dominate slot cars in favor of the open frame or "padlock" motors, people started messing around with them. The whole rewinding thing, magnets, endbells, armatures, balancing, welding etc., are well-documented aspects of the "arms race" that started... and continues to this day.  


One aspect of this stuff was the repackaging of the motors themselves. Even though they were popular with enthusiasts for a short while and were available in plenty of RTRs as well, the big cans got smaller and smaller with people also chopping up even the "lowly" 13UO motors and stuffing hot magnets and arms in them. I'm guessing that at the beginning, simply shortening existing motors was an easy way to get more motor into a smaller package, and that even the Mura "Short Magnum" was part of this??? I get a fair number of motors from people that send me "stuff" that look like this Russkit as well:

IMG_1506_zpsbtpe87dz.jpg


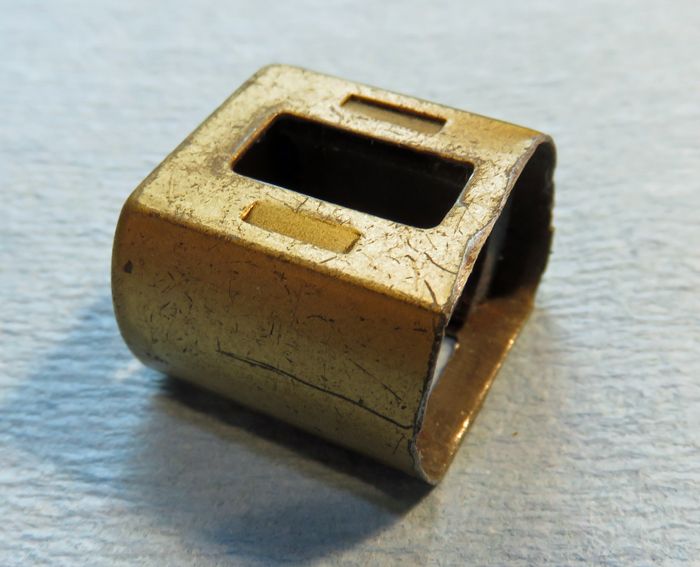
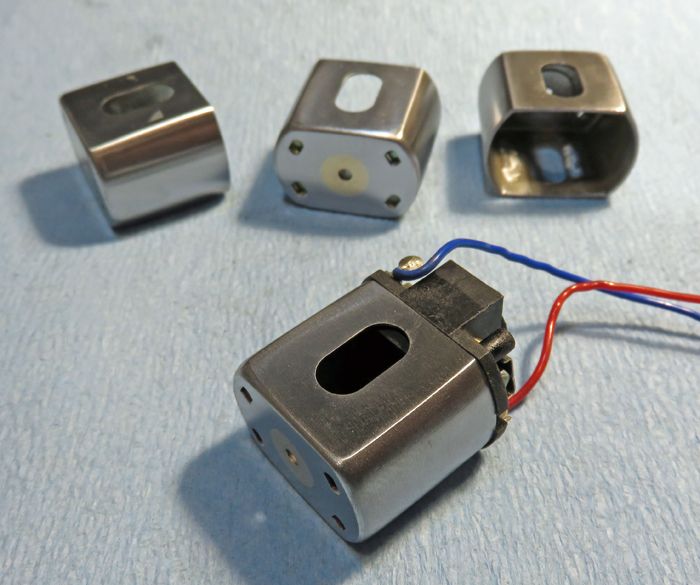
All of this got me motivated (uh-oh!) to step into my virtual "way-back machine" and have at it using not-so-correct parts and do a build. The subject of this build was a perfectly innocent and unassuming Hong Kong-era Mabuchi FT16D. For one, I don't mind screwing with these so much as with clean examples of the earlier Japanese motors, especially the Russkit-type 16D cans. Secondly, I have a fair number of these sitting here, so using one as an analog for the Japanese FT16D just makes more sense, although it presents some "problems" as well:

IMG_1507_zpspeigcbzz.jpg


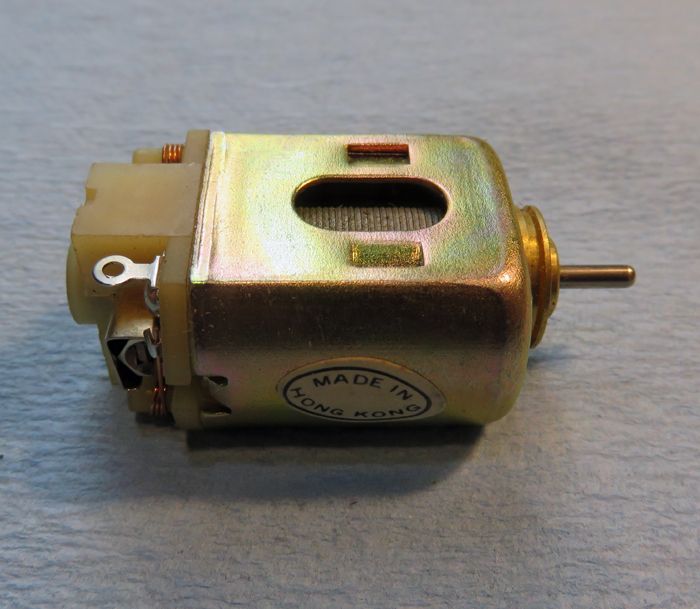
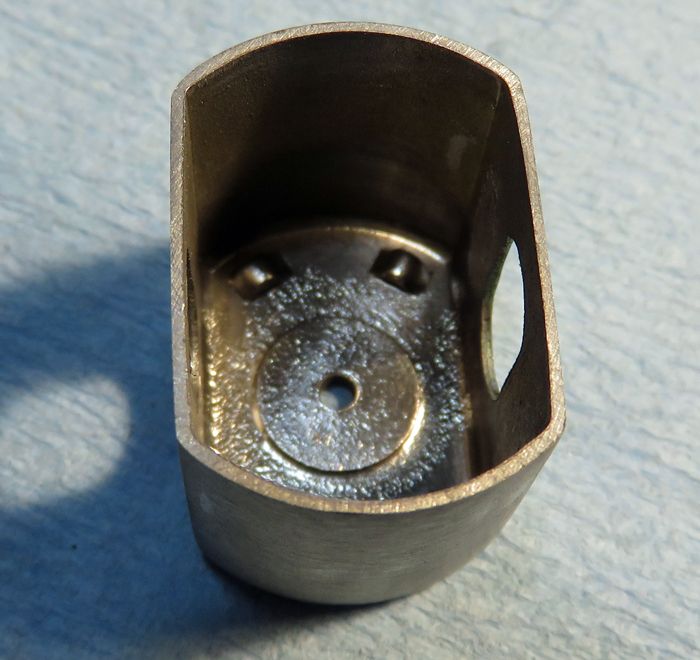
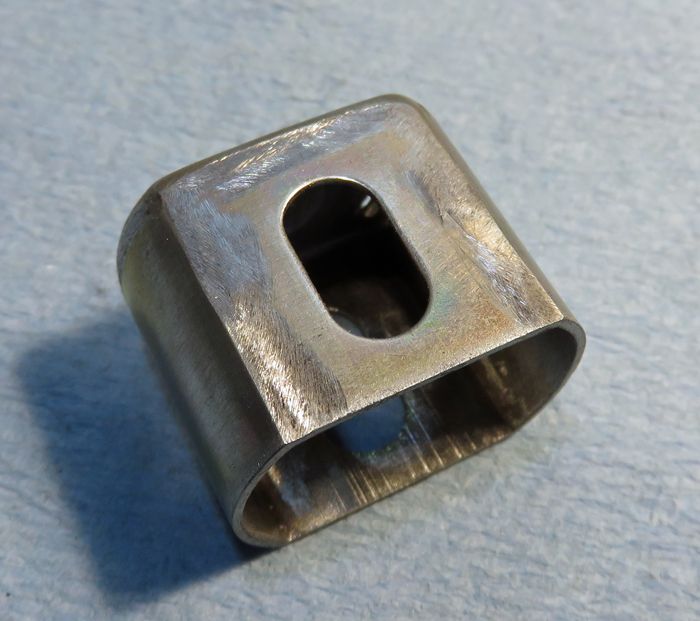
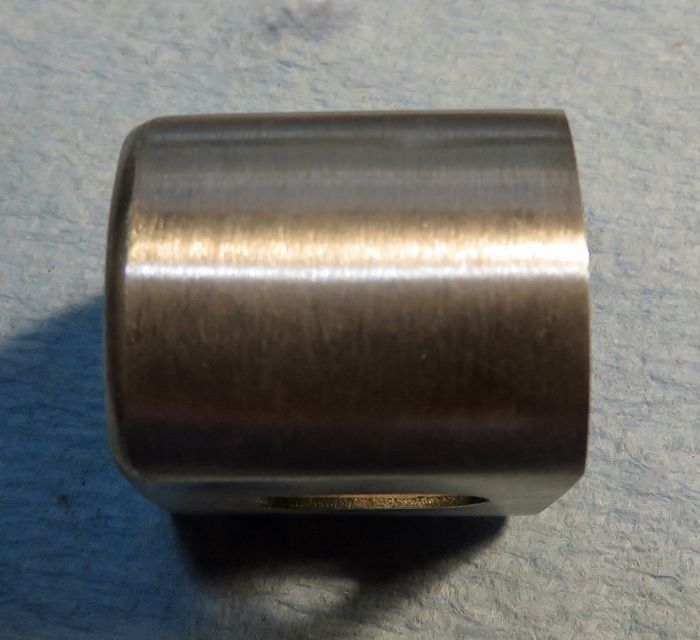
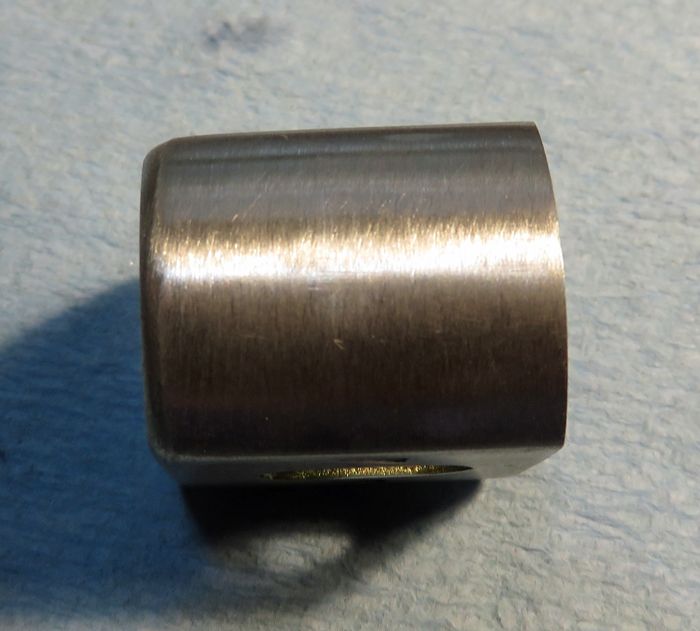
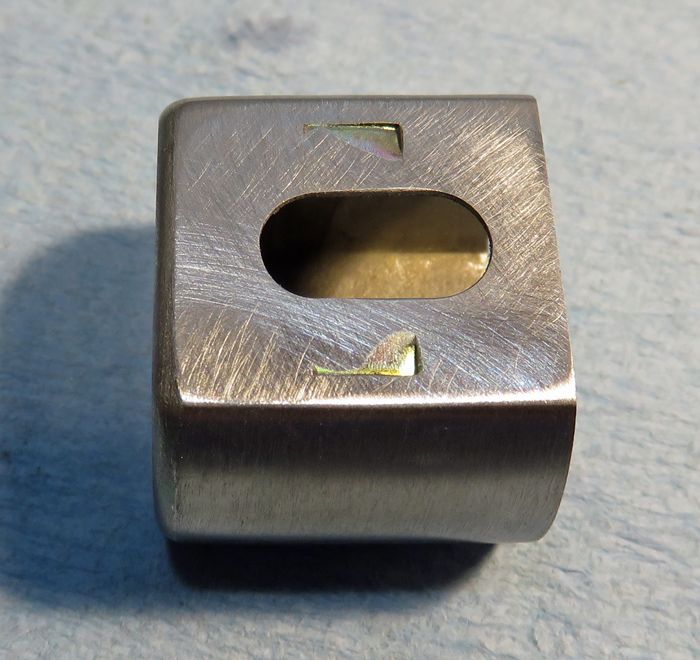
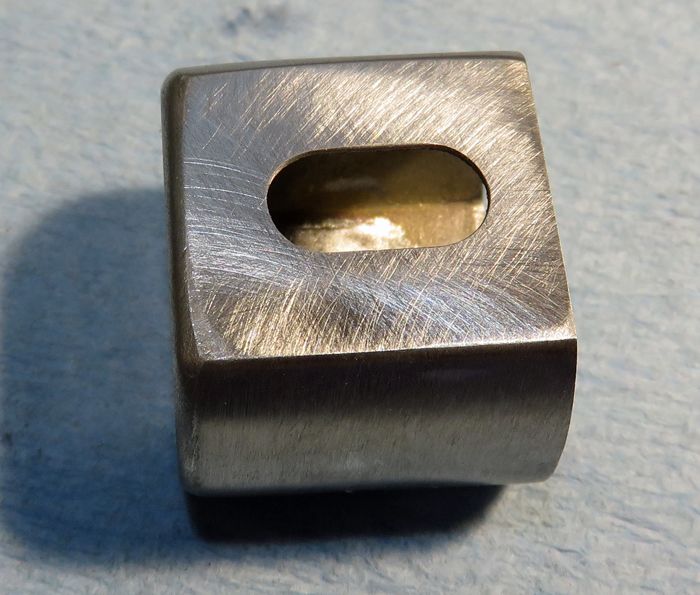
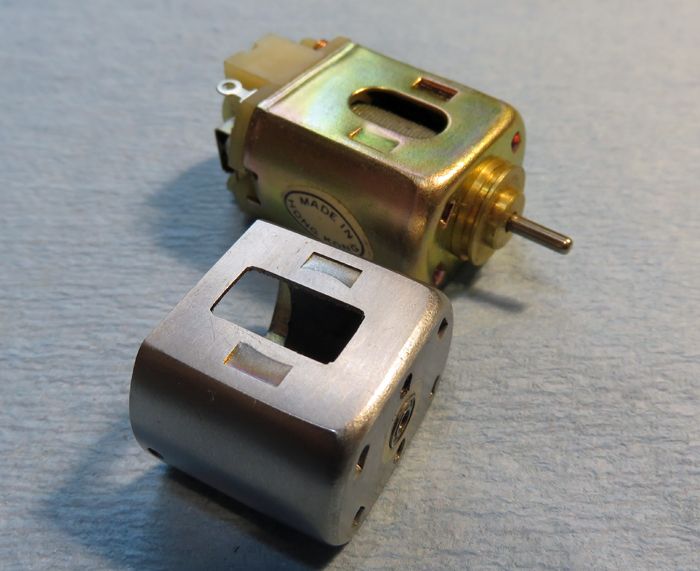
Like the Japanese models, this one has the huge honkin' can bushing carrier and that just has to go. Also, the can is made from thicker metal which makes cutting it up a "thin cutting disc killer." The bushing end of the can is much rounder and has lumps from forming the metal that (to me anyway) are kind of ugly. I also don't like the oval holes. I don't like squaring them off either, but not as much as I don't like the way the oval holes "look."

So I rolled up my sleeves and got busy (and dusty).  

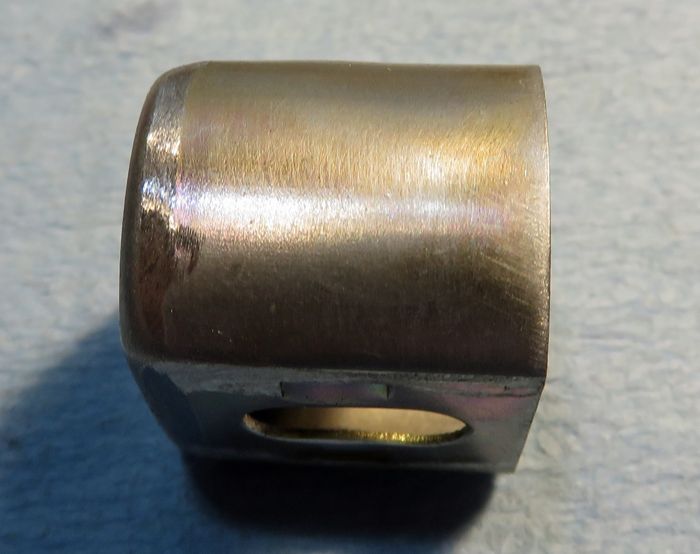
First I had to decide how much to shorten the can. Based on a "go big or go home" attitude (*or maybe... go short or go home?), I chose to shorten the can a lot... like the same length as I do the "walnuts," give or take a few thoudsandths.

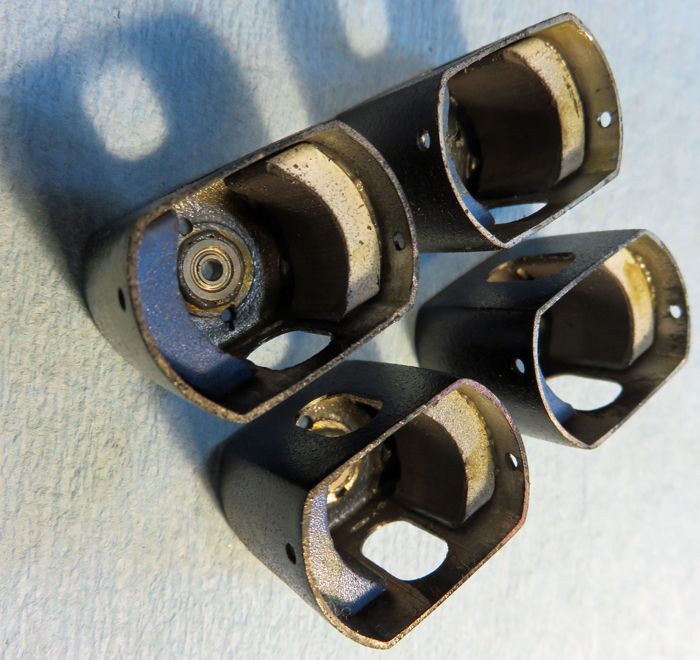
Then I flattened and squared things off best as I could, taking down the "lumps" until they were just about flush with the rest of the can, and then working with pieces (many) of sandpaper stuck to my glass work table, I began evening everything out on the flat top, bottom and end of the can. The curved sides I did by hand for obvious reasons. As is always the case over here at "Casa Destructo," if I can't do it with a rotary tool, a hand drill, and various blunt and sharp objects... I can't do it :)

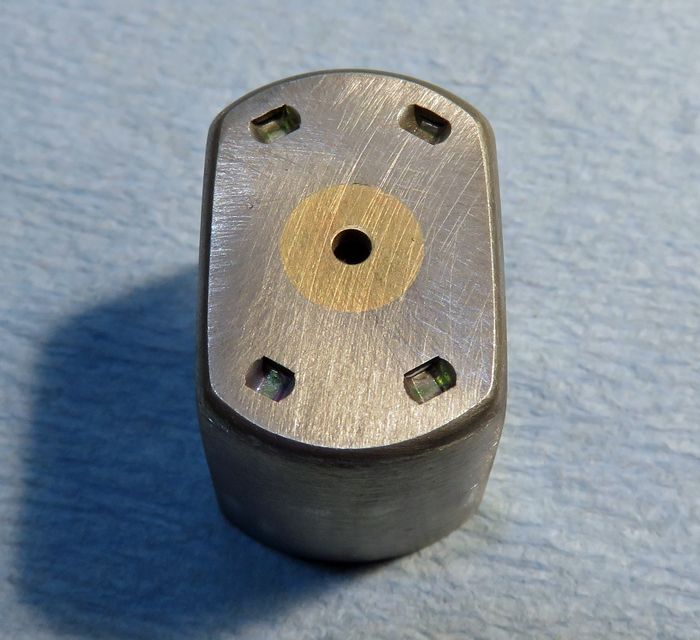
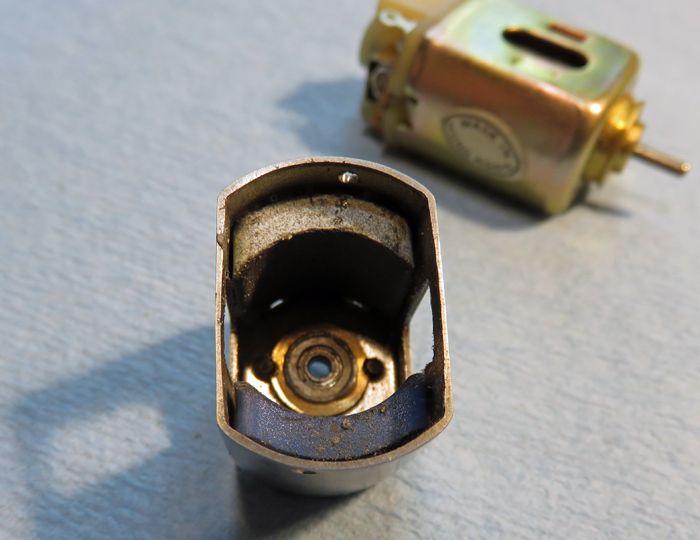
Finally, I removed the brass bushing carrier and soldered-in a Champion bushing as a way to fill the giant hole, making sure to boil out the oil... thinning down the inside and sanding the outside flush with the can. Then that was reamed out to accept a 2mmx5mm bearing for can-drive. Of course, I drilled the can sides for endbell retaining screws, and high enough not to interfere with chassis mounting. Oh yeah, I drilled a couple of holes sized for the old Mura endbell screws and spaced "pretty much" the way a modern D motor has them. Are they perfectly straight?... probably not, but they should be good enough for getting this thing mounted.   ;)

... all that was a "stoopid" amount of work, but it got me to this:


IMG_1510_zpsjtin1jkp.jpg


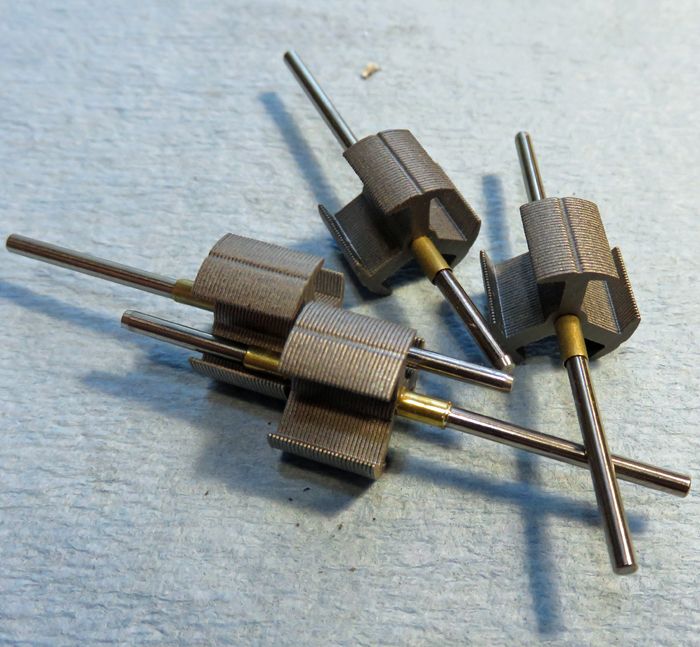
Realizing I had a long way to go, I pressed on. Sooo... now I needed a set of magnets, and there's no way either good vintage ones or (gasp) the standard Mabuchis were going in here. My plan was for a large diameter (.560") arm to be sure I could keep the wind to a four-layer coil. I knew there wouldn't be much extra room at the tail spacer (duh!), so a large diameter arm in a D-can means the Parma magnets were an easy choice.  Of course... in this can, those magnets would have to be cut down, a dusty bloody mess (... sigh)! Sometime (well, a LOT of time) later, I had them cut and epoxied into the can. Measurements before and after cutting show that the magnets lost nothing at all from cutting in terms of absolute numbers reading around 1,125 or so, although all that "oomph" is now concentrated in a significantly smaller internal area. There's more than a little "faith" involved here because I'm not sure that a reasonable length stack will center in the magnets' field until after all this is done, but the length here is something like I've done before in other motors and I *hoped* things would work out... and they did... whew!


IMG_1511_zpsnz8kqsnm.jpg


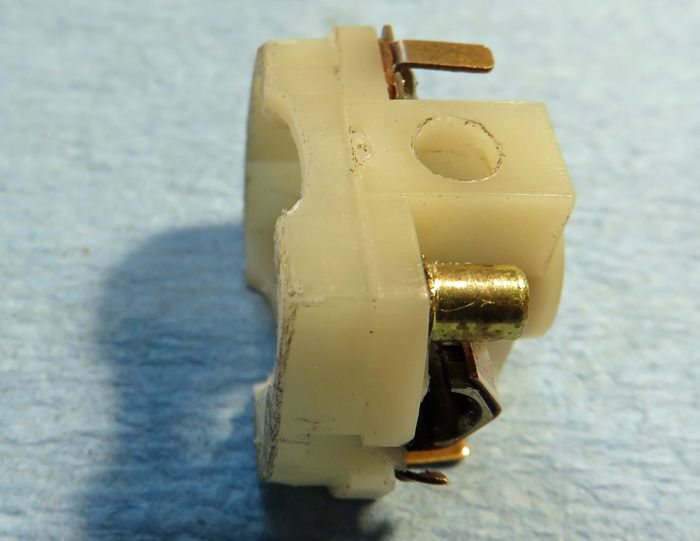
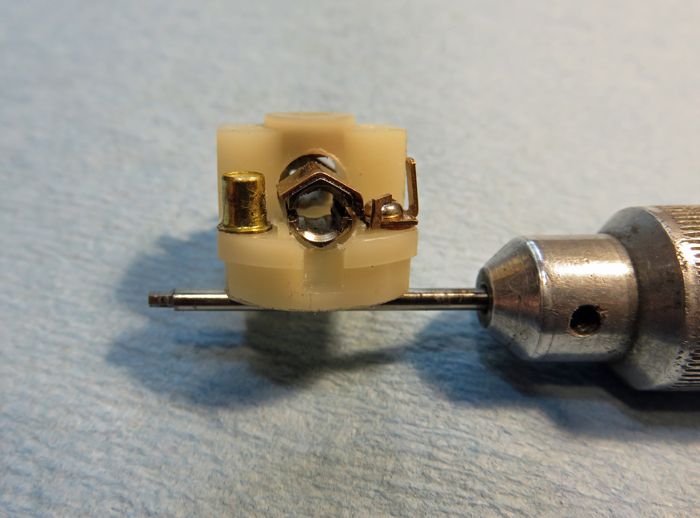
So now I had some endbell "stuff" to take care of. Here I'm using a Champion because... well it's better than both the Mabuchi and the often used Tradeship for several reasons. Right off the bat, the part of the endbell that is recessed to fit inside the can had to be shortened so as to clear the magnets. Also, the top and bottom flat sections of the endbell had to be notched to clear the stack... even after shortening! Finally, I removed some material from under/around the brush tubes so they're pretty much "floating" slightly above the endbell plastic, and soldered the brush tubes ("heat sinks") to the 'pentroof' hoods. Oh yeah, I changed over to "36D" sized tubes so modern standard-sized brushes could be used... easier to get, and they should work better with a larger diameter commutator:


IMG_1515_zps8bh0g6eo.jpg


IMG_1516_zpszoez0d09.jpg


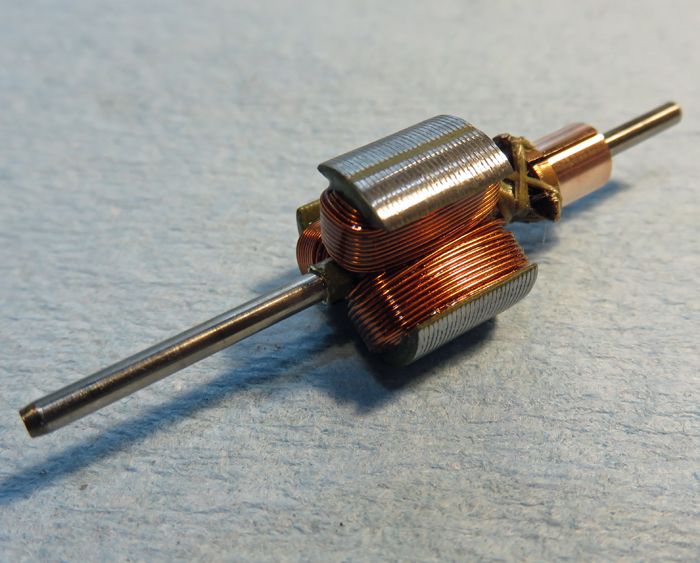
Finally (!), I could build and wind an arm for this thing. As I mentioned earlier, a .560" stack was already a "given," along with a Bugenis comm. The stack length here worked out to just under .400", not too bad by modern standards, and I chose to go with a pretty spicy 42t/28 wind. On this fairly short stack, that comes in at well under .2 ohm... or .185 ohms to be exact. This should be plenty fast and torquey, and still not tax the Champion endbell too much:


IMG_1514_zpsff5abr2z.jpg


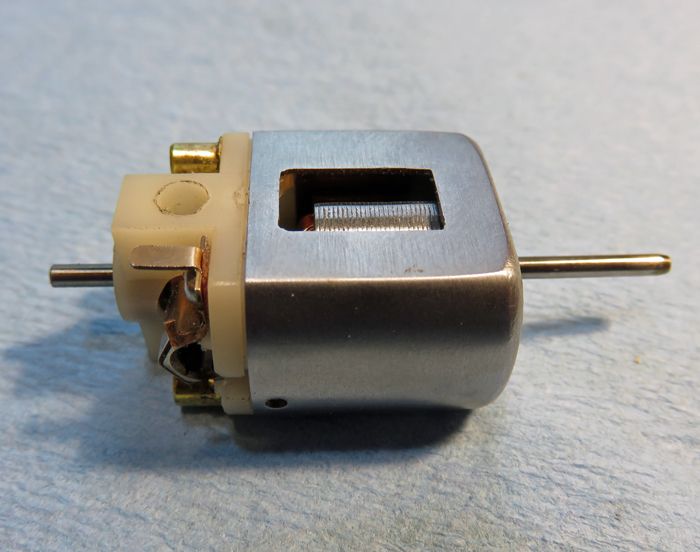
Of course, this arm will go out for a light grind and balance, but here's the motor "mocked-up." When the arm comes back, it will just need a bit of assembly type stuff:


IMG_1517_zpspp1bbwt9.jpg


So, how short is this motor? Well, it's way shorter than a C motor, let alone a D motor. Here's a little perspective on this bad boy's length:


IMG_1512_zpsmhflv2fh.jpg

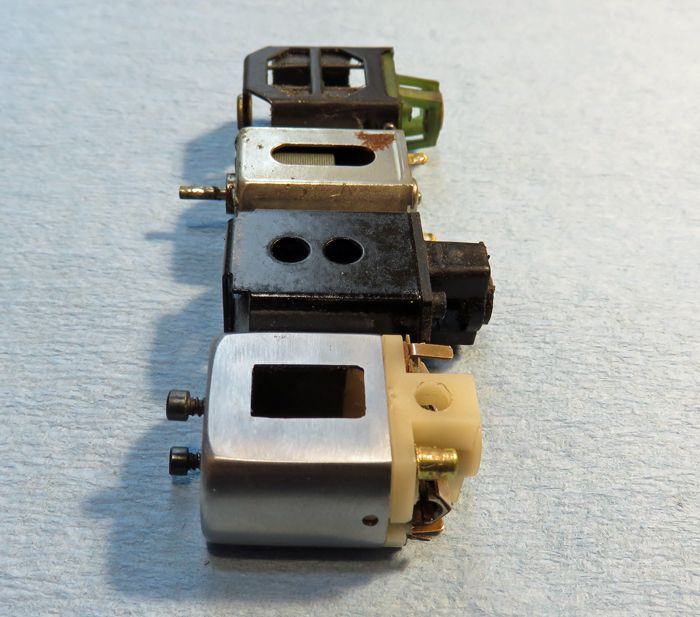
Even full sidewinder (much less anglewinder) and with fat rubber, this should go into a car with no problems keeping a "regular" track width. 


-john


  • slotbaker, boxerdog, Samiam and 4 others like this
John Havlicek


#2 Samiam

Samiam

    Posting Leader

  • Subscriber
  • PipPipPipPipPipPipPip
  • 4,772 posts
  • Joined: 18-January 12
  • Gender:Male
  • Location:Long Island, NY

Posted 06 May 2016 - 06:54 PM

That is the coolest little powerplant, John.


You have my address. Just let me know how much. :D


  • olescratch likes this
Sam Levitch
 
"If you have integrity, nothing else matters, and if you do not have integrity, nothing else matters."
    Robert Mueller, special counsel (2013)
 
"... because people have got to know whether or not their president is a crook."
    Richard M .Nixon, Nov 17, 1973
 
"Fool me once, same on... shame on you. Fool me... you can't get fooled again."
    George W. Bush

#3 havlicek

havlicek

    OCD Rewinder

  • Subscriber
  • PipPipPipPipPipPipPipPip
  • 11,198 posts
  • Joined: 20-August 07
  • Gender:Male
  • Location:NY

Posted 06 May 2016 - 08:12 PM

Hi Sam...


Thanks (whether you're serious or not)! :)  From the messages I've got, it seems to have tickled at least a few people's fancy. I hate to think about it, but I may have to make a couple more, heaven help me.


-john


  • olescratch likes this
John Havlicek

#4 Samiam

Samiam

    Posting Leader

  • Subscriber
  • PipPipPipPipPipPipPip
  • 4,772 posts
  • Joined: 18-January 12
  • Gender:Male
  • Location:Long Island, NY

Posted 06 May 2016 - 08:17 PM

Oh! I'm serious. I'll even send a core.


Sam Levitch
 
"If you have integrity, nothing else matters, and if you do not have integrity, nothing else matters."
    Robert Mueller, special counsel (2013)
 
"... because people have got to know whether or not their president is a crook."
    Richard M .Nixon, Nov 17, 1973
 
"Fool me once, same on... shame on you. Fool me... you can't get fooled again."
    George W. Bush

#5 havlicek

havlicek

    OCD Rewinder

  • Subscriber
  • PipPipPipPipPipPipPipPip
  • 11,198 posts
  • Joined: 20-August 07
  • Gender:Male
  • Location:NY

Posted 07 May 2016 - 06:01 AM

Yikes... OK, well, anyone who really wants one of these can message me.

Does anyone else have some pictures or experience with of shortened Mabuchis or Muras? I'm interested in how short they were and what they were used in. The one I did would easily fit in about any configuration and, even though the can is a little"tall," it would fit nicely in about any 1/32 car as well.


-john


John Havlicek

#6 don.siegel

don.siegel

    Grand Champion Poster

  • Subscriber
  • PipPipPipPipPipPipPipPip
  • 5,851 posts
  • Joined: 17-February 06
  • Gender:Male
  • Location:Paris, France

Posted 07 May 2016 - 09:04 AM

Hi John, 


A little later in time, about 1967, the Midwest guys like Pete Hagenbuch were shortening their 16D cans to fit them in 1/32 sidewinders - that also involved some surgery to the rear magnet and can if I remember correctly. It didn't last too long as a trend, since the anglewinder soon made its appearance. Not so necessary in 1/24, but there were probably some experiments. 


The 36D cans were often shortened for the Ram-Boochi type conversions, since these arms were shorter, and it also helped them fit better in some 1/24 scale sidewinders... 


Haven't actually found all that many shortened cans in the hundreds I've accumulated over the years... A fairly demanding procedure to keep them straight with just eyeball measurements... I think the only one I ever tried was my abortive attempt to make a twin-can long john type motor. 


Don 


  • havlicek likes this

#7 havlicek

havlicek

    OCD Rewinder

  • Subscriber
  • PipPipPipPipPipPipPipPip
  • 11,198 posts
  • Joined: 20-August 07
  • Gender:Male
  • Location:NY

Posted 07 May 2016 - 01:00 PM

I at least got started and... my fingers hurt. This really isn't the sort of thing that lends itself to "mass production."
 
-john
John Havlicek

#8 slotbaker

slotbaker

    Dan Gurney Fan

  • Subscriber
  • PipPipPipPipPipPipPip
  • 2,694 posts
  • Joined: 16-February 06
  • Gender:Male
  • Location:Sydney, Australia.

Posted 07 May 2016 - 04:56 PM

Nice little motor.

How close are the windings to the inside of the bottom of the can?

Might have to be careful mounting it to the chassis if using screws.

:huh:


  • havlicek likes this

Steve King


#9 Geary Carrier

Geary Carrier

    Race Leader

  • Full Member
  • PipPipPipPipPip
  • 614 posts
  • Joined: 23-April 16
  • Gender:Not Telling
  • Location:CT

Posted 07 May 2016 - 10:20 PM

Hi John,


Keep em' coming, this is far out...


How many possible iterations, who knows, but this is how we find out...


Thanks,


Geary


  • havlicek likes this

Yes, to be sure, this is it...


#10 havlicek

havlicek

    OCD Rewinder

  • Subscriber
  • PipPipPipPipPipPipPipPip
  • 11,198 posts
  • Joined: 20-August 07
  • Gender:Male
  • Location:NY

Posted 08 May 2016 - 06:11 AM

A little later in time, about 1967, the Midwest guys like Pete Hagenbuch were shortening their 16D cans to fit them in 1/32 sidewinders - that also involved some surgery to the rear magnet and can if I remember correctly. It didn't last too long as a trend, since the anglewinder soon made its appearance. Not so necessary in 1/24, but there were probably some experiments. 


The 36D cans were often shortened for the Ram-Boochi type conversions, since these arms were shorter, and it also helped them fit better in some 1/24 scale sidewinders... 


Haven't actually found all that many shortened cans in the hundreds I've accumulated over the years... A fairly demanding procedure to keep them straight with just eyeball measurements... I think the only one I ever tried was my abortive attempt to make a twin-can long john type motor. 


Hi Don... and thanks for the information as always! I think I've come across maybe a half dozen or so "homebrew" shortened 16D and a couple of 36D motors. The 36D is real headscratcher to me because it's never going to be a compact motor no matter what, but every time I get a smile out of the things people did out of sheer creativity. Hacking-up motors (and magnets) is dear to my heart.  :)  

Cutting the can shorter is something I was worried about when I first did it, but it really isn't nearly so bad once you've done a few. What I do is:

* Scribe a line on the two flats. For this motor, I use a piece of 3/4" flat steel and rest the bushing end of the motor on the edge of my glass table to avoid the bushing carrier. For this motor, I removed the bushing carrier first so it's not in the way and can rest the whole can on the glass.

* Cut both flat sides with a thing cut-off disc, staying just to the "safe side of the line" and letting the cut just go into the curves.  

* "Connect the dots" to make a line on the curved sides, and then cut through those... again staying to the "safe side" of the line. These cuts are where you have to be careful, because the waste side of the cut can will start to move around and bind, breaking the discs. I cut up another four cans here and wound up using only two discs, usually I would expect to ruin one disc per can... or more!

* Nibble away at the two flats with the edge of the disc to get the flats right to the scribe and still leave the two curved sides proud.


* Start using the side of a large disc and playing the entire open end of the can against the whole disc. You'll see when the open end of the can has all the same smooth surface, meaning all four sides of the can are ground and touching the spinning disc.

* Now, even though I had originally used the bushing end of the can as a reference to scribe the two flats, I put the open end of the can on my glass and place a square against the sides (all four) looking for "daylight" at either the top of the bottom. The open end is what really counts anyway, because the endbell will stop against that, meaning the endbell bushing being in line with the can bushing depends on the cut end and references against that.


* These cans have a "hump" at the bushing end because of how they're formed, so you may either see an equal gap or not, but I keep working with the square and nibbling around the sides, and alternately playing the can against the side of the disc so until all four sides have the same shiny edge (meaning they're all contacting the disc) and the can reads "true" with the square.


The above took a while when I first did all this, but got faster as I got more comfortable with the procedure. Staying to the safe side of the lines at first is important... or you wind up having to cut the can too short... been there! Of course, all of this would be much easier and precise with some machining tools. Really though, getting the sides of these cans flatter/crisper because of the lumpy rounded corners is much more difficult than cutting them down. That would be a dead cinch with a mill, and the only way I know of to do a decent job of that is by using a file and some sandpaper placed on the glass and playing the can against those after grinding the high spots. I've got two pretty nice blisters from starting all that yesterday.  


I also hate squaring of the can holes which again would be much easier and precise with milling equipment. Some of this batch of motors will (thankfully) retain the oval holes. The holes look very much like the later Cox motors (also Hong Kong), so I can see why they don't bother others, and I'm grateful for that! :)

-john


John Havlicek

#11 havlicek

havlicek

    OCD Rewinder

  • Subscriber
  • PipPipPipPipPipPipPipPip
  • 11,198 posts
  • Joined: 20-August 07
  • Gender:Male
  • Location:NY

Posted 08 May 2016 - 06:22 AM

How close are the windings to the inside of the bottom of the can?

Might have to be careful mounting it to the chassis if using screws.


Hi Steve.  


They're fairly close, but mounting shouldn't be a problem. I went through trial-and-error testing to keep the stack as long as possible here, so space is on the tight side, but not that tight! The first motor was drilled for the Mura screws and it looks like they would clear the back end of the armature coils, although there is some significant difference in the thickness of motor bracket material. A couple of washers would help prevent any problems, but I wouldn't let the screws go any further into the can than an extra thread or two.  


Best of all would be to solder the motor in and only use the screws as temporary place-holders, but some people aren't comfortable with soldering motors. I'm going to see if it's at all possible to get a teensy bit more room at the back end of the motor on this batch, but I really don't want to shorten the stack any more if I can avoid it.


-john


  • slotbaker likes this
John Havlicek

#12 havlicek

havlicek

    OCD Rewinder

  • Subscriber
  • PipPipPipPipPipPipPipPip
  • 11,198 posts
  • Joined: 20-August 07
  • Gender:Male
  • Location:NY

Posted 08 May 2016 - 06:30 AM

How many possible iterations, who knows, but this is how we find out...


Hi Geary,


Yep, people did all kinds of things to cans back then. Cans were also cut along their sides (where the welded seams are today) and even available in pieces like that, but that would require a heavily-modified end bell to make work. Both Rick T and I have built some of those motors, and from what I know, they were pretty much used by the pro racers sometimes around (before? during?) the early B or C can era.  


I'm not sure of what motivated Mura with their "Short Magnum." It could have been simply a way to get rid of D motor parts they already had (like their excellent D-sized endbells), or an actual attempt to make a better compact motor. I kinda think they were just getting rid of stuff because they stuck awful magnets in those things.   :D


-john


  • Geary Carrier likes this
John Havlicek

#13 havlicek

havlicek

    OCD Rewinder

  • Subscriber
  • PipPipPipPipPipPipPipPip
  • 11,198 posts
  • Joined: 20-August 07
  • Gender:Male
  • Location:NY

Posted 08 May 2016 - 08:51 AM

So, here's a "quickie" on what I do to these things, when I'm in the mood for self-abuse and feeling particularly masochistic.  :)

First (after cutting-down and truing/squaring the can), the bushing gets thinned out on both sides. Inside, I leave only a very thin lip and outside, I remove the outer "ridge." Then the bushing gets soldered-in with acid, and I boil out all the oil so I can later epoxy in the bearing and not worry about a good bond. Last, I grind down the magnet tabs (sort of visible on the right in the picture) after flattening them best as possible so the non-stock magnets can go in:
 

IMG_1518_zps5kxi8d1n.jpg

Next, the bushing end of the can gets flattened by filing and  then sanding to remove the filing marks until the bushing is flush with the outside of the can. The bushing in this case is only there as a way to both fill the hole left by the old bushing carrier and provide a new center that can be reamed out for a new bushing or bearing (bearing in this case):

IMG_1519_zpskwljjjvj.jpg


Next, the sides are where the big lumpy edges are, so I first carefully grind those things playing the flat of a large disc against them to hog-off the major portions until I see the disc marks contacting the flatter areas as well as the humps:

IMG_1525_zpsjyeqc8c6.jpg


IMG_1524_zps6tanfx5s.jpg


After that, I start by filing all four sides until I see even file markings across the whole side. I work with the can carefully in a vise, not overtightening to prevent distorting the can and using the file normally, as well as placing the file on my desk and playing the can against the file. Then I remove the tool marks left by the file with sandpaper. The curved sides get sanded holding the can and sanding it along the curve, the flat sides get sanded by putting the sandpaper on my glass and rotating the can on the paper. I do this until most or all the tool marks are gone:
 

IMG_1523_zpsg8q1wcwm.jpg


IMG_1521_zpsiod2ko9f.jpg


IMG_1522_zpsvm8wv3z7.jpg


IMG_1520_zpsg4jp1bwr.jpg


Now, most of this is really about aesthetics and not function, but I figure if you're going to do a custom motor, you should make it look nice too... or if you're going to do a job... do a good job. I did chassis that way and of course do carpentry that way, too. The guys here who do lovely chassis and body paint certainly go a lot further than "good enough" and that's what "craft" is all about.


In my case, I don't have machining capabilities here, so I still try and do a nice job by hand. These motors could easily be brought up to a nice polish finish at this stage, some buffing and then wet-sanding and a final polish with compound would be easy compared to all this, but paint will also look better over a nice crisp can than it would over the stock one.  


This much metal removal wouldn't be a good idea on a Japanese Mabuchi can, having been formed from thinner metal, but this much work wouldn't be necessary, as they're more nicely formed.

-john


  • slotbaker, C. J. Bupgoo and Geary Carrier like this
John Havlicek

#14 havlicek

havlicek

    OCD Rewinder

  • Subscriber
  • PipPipPipPipPipPipPipPip
  • 11,198 posts
  • Joined: 20-August 07
  • Gender:Male
  • Location:NY

Posted 08 May 2016 - 07:41 PM

The metal-smoothing is done... whew! Now I have to ream out the back ends for bearings, epoxy the bearings into the cans, and drill the back and sides. I'm going to use the Mabuchi endbells here (pictured), because they are made out of a much better material than the other D motor endbells (except for the Muras, and those are more rare than a signed Mickey Mantle card!).  

IMG_1526_zpscberrp3c.jpg
 
Then, the endbells will have to be modified, four sets of magnets cut down and epoxied into the cans, cans painted, four armatures built, wound, tied, epoxied, comms cut and sent out for grinding and balancing, then assembly... GAK!
 
-john
  • slotbaker, olescratch, C. J. Bupgoo and 1 other like this
John Havlicek

#15 havlicek

havlicek

    OCD Rewinder

  • Subscriber
  • PipPipPipPipPipPipPipPip
  • 11,198 posts
  • Joined: 20-August 07
  • Gender:Male
  • Location:NY

Posted 14 May 2016 - 12:44 PM

OK...with "life" having the irritating habit of getting in the way, I was able to get back to these motors (I have four in the works plus the original prototype...I did a coupla xtra :)  )

I got the cans all drilled, doing my best to keep things straight and spaced and all.  They ain't machine-shop perfect, but pretty good.  I also got the cans reamed out for the bearings and installed those, topping them off with a coat of Rustoleum textured finish.  Works every time  ;)

IMG_1527_zpselzzj57u.jpg

On the inside, I got all four sets of magnets cut down and epoxied those bad boys in.  So as not to have to mask the bearings which would be tough with these, I painted first and then did the bearings and magnets...being careful NOT to get epoxy on the outside of the cans.  It has a way of winding up on the outside.

IMG_1528_zps6ykjfng5.jpg


...all the above took quite a while.  Doing this stuff "four at a time" is something of a chore!  Last, I got the stacks built.

IMG_1529_zpsnwolnx6x.jpg


-john


  • slotbaker, C. J. Bupgoo and Geary Carrier like this
John Havlicek


Electric Dreams Online Shop