Jump to content


Photo

'64 GTO L-o-w a-n-d s-l-o-w


  • Please log in to reply
7 replies to this topic

#1 Lone Wolf

Lone Wolf

    Posting Leader

  • Full Member
  • PipPipPipPipPipPipPip
  • 2,736 posts
  • Joined: 03-March 08
  • Gender:Male
  • Location:New York

Posted 26 November 2017 - 12:00 PM

Sunday morning fiddling.


I have a decent selection of GTO hardbodies but no '64 yet.


Bought this kit built up for the princely sum of $3


Would like a 1/25 but not ready to shell out the big bucks for a vintage AMT kit.


These are not Jairus, O'keefe or Thigpen builds. Can't do those. Just stuff I do for fun.


Every car I build I use mostly used parts and different techniques on each. 


Maybe you can use some of these ideas, that's why I post these things.


I cannot stand screws through the body so here is how I did this one.


I originally was going to use a nice Dynamic chassis with a 36D I mocked up but it hit the interior so I had to go with Pittman power for clearance. May be a slug but who cares. 


Wheels are Mila Miglia 5 holes.


The rear mount fits into drilled holes and pivots on a tube for easy removal. Front post is Plastruct with a vintage insert. 


She's really in the weeds which looks cool.


I cut off some of the original interior and added a false styrene floor. Can't stand those vac form interiors. Seats and steering wheel modified. Will probably do the interior different shades of black.


Since the glass was heavily glued in I will just polish the body. Monogram polishes their body molds and the bodies are nice right out of the box.


Everything is in the mock up stage. 


Again, these are not concours builds, just stuff for fun using up available junk.


DSC09421.JPG


DSC09423.JPG


DSC09424.JPG


Happy to answer any questions. Thanks for looking. 


  • MarcusPHagen, slotbaker, hiline2 and 6 others like this

Joe Lupo


#2 SlotStox#53

SlotStox#53

    Posting Leader

  • Full Member
  • PipPipPipPipPipPipPip
  • 4,084 posts
  • Joined: 13-March 13
  • Gender:Male
  • Location:TX

Posted 26 November 2017 - 01:02 PM

Sweet build! Some inspiration in how you've used the original interior but cut it down etc.

Certainly dumped in the weeds! Looks great Joe :D
  • MarcusPHagen likes this

#3 Pablo

Pablo

    Builder

  • Administrator
  • PipPipPipPipPipPipPipPip
  • 18,446 posts
  • Joined: 20-February 06
  • Gender:Male
  • Location:Cleveland, Tennessee

Posted 26 November 2017 - 01:42 PM

Sweeeeet :heart:


Paul Wolcott


#4 Dave Crevie

Dave Crevie

    Posting Leader

  • Full Member
  • PipPipPipPipPipPipPip
  • 4,484 posts
  • Joined: 16-February 09

Posted 26 November 2017 - 02:01 PM

Interesting use of an old Dynamics frame. Nice period motor as well.


#5 olescratch

olescratch

    olescratch

  • Subscriber
  • PipPipPipPipPip
  • 977 posts
  • Joined: 19-July 13
  • Gender:Male
  • Location:Ravenna, OH

Posted 26 November 2017 - 03:04 PM

Nicely done!  I really like the natural looking stance!


John Stewart

#6 mike1972chev

mike1972chev

    On The Lead Lap

  • Full Member
  • PipPipPipPip
  • 298 posts
  • Joined: 02-April 17
  • Gender:Male
  • Location:Indy

Posted 26 November 2017 - 04:20 PM

Kewl ........love that "Goat"  :dirol:


I do just about the same thing on mounting hard bodies as well. I found a Nylon tubing you can buy at just about every LARGER local hardware stations and it can be threaded on the I.D. of the tube to take a machine screw. Then just use Devcon epoxy to set them.Works awesome ! Would have to cut them back out with a Dremel to remove them,or bust the body .


Michael J. Boruff


#7 Lone Wolf

Lone Wolf

    Posting Leader

  • Full Member
  • PipPipPipPipPipPipPip
  • 2,736 posts
  • Joined: 03-March 08
  • Gender:Male
  • Location:New York

Posted 30 November 2017 - 05:08 PM

Thanks for the compliments. As I said, I will share the build as I go along and maybe some info or techniques can be gained. 


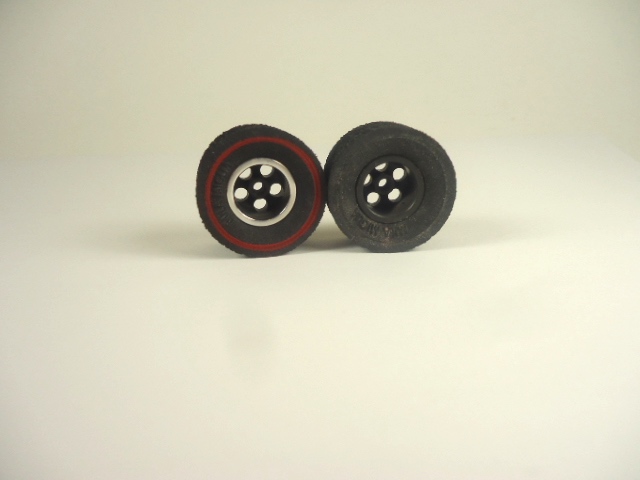
Here are the rear wheels. They are vintage Mila Miglia's. As is, out of the package on the right. Modded left.


I use a cut down junk axle chucked in a Dremel.


The outer bead is lightly sanded with 400 grit and then polished with Mothers metal polish and a soft rag. Just a little is needed.


You can re-polish these MM wheels as they were factory polished but have darkened over time.


They come out great but you will have to use a Q-tip to get into the dish. It's a bit of a pain.


Here I elected to just polish the outer edge as the black wheels would look nice with the red body.


I wash the tires with some hot water and dish soap.


Since no Goat would be correct without redlines I gave the treatment here.


The wheel with stub axle was chucked into a cordless drill.


At very low RPM I held a fine brush with red acrylic paint to make the redline.


Takes a little practice.


Never use enamel on rubber tires as it will take hundreds of years to dry. Do not ask how I know this  :dash2:  


DSC09448.JPG


  • MarcusPHagen, hiline2, olescratch and 1 other like this

Joe Lupo


#8 hiline2

hiline2

    On The Lead Lap

  • Full Member
  • PipPipPipPip
  • 468 posts
  • Joined: 22-February 06
  • Gender:Male
  • Location:Piney Woods around Tyler, TX

Posted 03 December 2017 - 09:26 PM

Looks like a candidate for DC Punk drag racing !


Paul Bass


Electric Dreams Online Shop