
With C cans being so cut up, I figured I may as well go the final distance and got busy.
A lump-o-steel:

A nicer lump-o-steel:

Now we're getting somewhere:


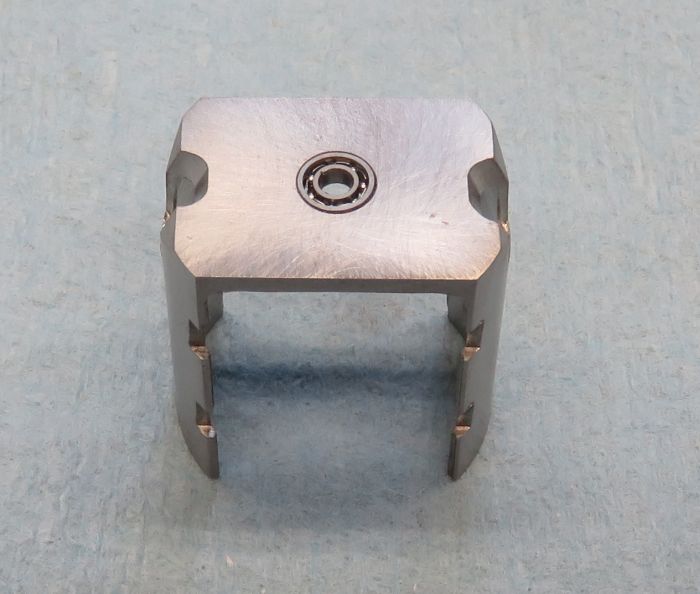
Almost a finished can:


|

OCD Rewinder

Posted 18 July 2018 - 04:18 PM
With C cans being so cut up, I figured I may as well go the final distance and got busy.
A lump-o-steel:
A nicer lump-o-steel:
Now we're getting somewhere:
Almost a finished can:
Age scrubs away speed!

Posted 18 July 2018 - 09:04 PM
John, what type of lathe tools are you using to turn your cans? HSS or diamond tipped?

Posting Leader

Posted 19 July 2018 - 02:34 AM
wow, that is a thing of beauty! excellent work.
OCD Rewinder
Posted 19 July 2018 - 04:57 AM
John, what type of lathe tools are you using to turn your cans? HSS or diamond tipped?
All el-cheapo Chinese (C2) carbide Bill, except for the parting tool which is high speed steel. The only diamond cutter I have is in my com lathe.
OCD Rewinder
Posted 19 July 2018 - 05:02 AM
wow, that is a thing of beauty! excellent work.
Thanks Russ. Things have changed a bunch since I got the Sherline lathe to go with the Sherline mill. This all is still a lot of work and all, but is way more predictable and accurate.
Since this can is a "C", I'm still going to include end holes for bracket mounting (*even though it would almost certainly only be soldered-in to whatever chassis it winds up in), and of course holes to mount the end bell. Afterwards, a little deburring will be all it needs to be a functional can.
OCD Rewinder
Posted 20 July 2018 - 03:37 PM
Can mounting holes are drilled (*they need to be opened-up and then tapped for 2-56 machine screws), end bell holes are in and the bearing is installed. Magnets are just stuck in there, and I'll wait to permanently install them until after tapping the can holes.

Checkered Flag in Hand

Posted 21 July 2018 - 12:55 PM
Age scrubs away speed!
Posted 21 July 2018 - 03:03 PM
Skeeter Lengel, the Schenectady machinist, made good motor parts. I have a couple of his endbells & a can. At one time, he made aluminum endbells for 5 or 6 different C-cans, anodized a different color for each manufacturer. I first saw his motor parts in the CASRA Series.
OCD Rewinder
Posted 22 July 2018 - 04:58 AM
John, this is an excellent scratch build. There was a time when I lived the MA and raced out of NH where we had a GT12 class with strap cans. Rather than cut our own, Lou Pirro had Skeeter produce straps that used C can magnets. Skeeter also produced an aluminum end bell for the can. It was a fantastic setup and raced exceptionally well. Too bad they are no longer available...
Thanks  Looking at many of the modern C cans (*discounting the so-called "drag cans"), it seemed to me that there's barely enough metal there to hold everything together, and certainly not enough in the right places to help the field strength of the permanent magnets. Also, the bearing strap, where strength is a good thing, has been reduced to the absolute minimum. I'm sure these cans work really well and figure they must be "strong enough", or people wouldn't be using them. Then again, if you took off all the remaining top and bottom metal and moved it to the sides and bearing end, you'd have a can that was as strong or stronger (*with the end bell installed) without adding weight. I'm sure that the weight on this can could be reduced easily, but it's already pretty danged light and seems quite strong too.
As with a LOT of the things I do, I have no clue if this sort of can is even allowed in any particular class or classes of racing, then again...that stuff doesn't really matter to me anyway! Down the road, I have some vague ideas about an aluminum can and how to secure the magnets and bearing. Why???...why not!
Posting Leader

Posted 22 July 2018 - 12:33 PM
Down the road, I have some vague ideas about an aluminum can and how to secure the magnets and bearing. Why???...why not!
John, that's exactly what I've been thinking about. I was going to start a thread about it after I finished reading this thread. I think I'll still start one so I don't derail this thread.
All the current race cans and endbells are the result of 60 years of thousands of racers using whatever makes their car the fastest within the confines of the rules. And really smart manufacturer's constantly making incremental improvements to try to get/keep their products on top. Part of that is making the can as light as possible for handling reasons. So it's not only about motor performance. That's why C cans are so skeletal. That's what wins races.
OCD Rewinder
Posted 22 July 2018 - 03:47 PM
John, that's exactly what I've been thinking about. I was going to start a thread about it after I finished reading this thread. I think I'll still start one so I don't derail this thread.
All the current race cans and endbells are the result of 60 years of thousands of racers using whatever makes their car the fastest within the confines of the rules. And really smart manufacturer's constantly making incremental improvements to try to get/keep their products on top. Part of that is making the can as light as possible for handling reasons. So it's not only about motor performance. That's why C cans are so skeletal. That's what wins races.
The main things I see that need to be considered are how to attach the magnets to the can (*seems eminently do-able to me), and then how to fasten the can to the chassis. Installing the can in the chassis is usually done with solder and maybe also a bracket of some kind. The bracket can be done with threaded mounting holes...soldering is a lot more dicey with aluminum. Even epoxy doesn't bond well to aluminum because of aluminum's tendency to form an instant oxidation layer that's resistant to bonding (*that layer can come off with the epoxy). Because of that, I think some kind of mechanical fastening along the back side of the can (*nearest the axle) is probably called for...but I'm going to look into all this further.
Age scrubs away speed!
Posted 22 July 2018 - 04:13 PM
I don't know whether some type of anodizing would allow gluing to an aluminum can or not, but it might be something to look into. If you're going to consider motor mounting via a bracket & screws, you wouldn't need to thread the bracket itself. Use clearance holes or slots for the screws in the bracket with threaded holes in the can itself. I'd like to see you also make an aluminum endbell. We know they work, but one might require more machine work. You could even have threaded mounting holes in it for endbell inline mounting in chassis, something not available with the existing aluminum endbells. Just something else to think about.
OCD Rewinder
Posted 22 July 2018 - 06:32 PM
I don't know whether some type of anodizing would allow gluing to an aluminum can or not, but it might be something to look into
Maybe, but I'm not really concerned about gluing to the can.
If you're going to consider motor mounting via a bracket & screws, you wouldn't need to thread the bracket itself. Use clearance holes or slots for the screws in the bracket with threaded holes in the can itself.
Just like any other can, I wouldn't consider threading the bracket...or even making one, that's never been necessary.
As for the aluminum end bell, sure they work, but plastic ones do as well and one would be fine for this purpose.
Posting Leader

Posted 22 July 2018 - 07:01 PM
A motor is only as fast as the chassis it's in.
Dominic Luongo
Like Dominator Custom Chassis on Facebook
NERR photos from 2012-April 2016
NERR photos from 2016 to now
OCD Rewinder
Posted 23 July 2018 - 05:09 AM
Thanks Dom!
Posting Leader

Posted 23 July 2018 - 10:03 AM
Hey John:
If you're interested in increasing the "bondability" of aluminum a chemical conversion coating like Alodine or Iridite will greatly improve the bond strength as well as provide a fairly good resistance to oxidation. It also imparts a cool looking gold color to the aluminum. It's something you might want to check out if you start making aluminum cans. Note that it is NOT an insulator but of course that shouldn't be a problem for a motor can.
Jay Guard
IRRA Board of Directors (2022-Present),
Gator Region Retro Racing Co-Director (2021-Present)
SERRA Co-Director (2009-2013)
IRRA BoD advisor (2007-2010)
Team Slick 7 member (1998-2001)
Way too serious Retro racer
Posting Leader
Posted 23 July 2018 - 02:13 PM
John, I was thinking of screw mounting instead of soldering the motor in.
I wasn't aware that it's difficult to glue to aluminum. I'll check out anodizing and Alodine and Iridite.
OCD Rewinder
Posted 23 July 2018 - 03:17 PM
Hey John:
If you're interested in increasing the "bondability" of aluminum a chemical conversion coating like Alodine or Iridite will greatly improve the bond strength as well as provide a fairly good resistance to oxidation. It also imparts a cool looking gold color to the aluminum. It's something you might want to check out if you start making aluminum cans. Note that it is NOT an insulator but of course that shouldn't be a problem for a motor can.
Hi Jay,
THANKS for the info. I had never heard of the stuff, but I looked it up because of your post. Pretty cool indeed...pricey...but cool! I'll file that in the old mental-Rolodex if that comes up!
John, I was thinking of screw mounting instead of soldering the motor in.
I wasn't aware that it's difficult to glue to aluminum. I'll check out anodizing and Alodine and Iridite.
Hi Phil,
Yes...any kind of "bonding" (*adhesives and solders) is very difficult with aluminum. As soon as you clean the stuff, it forms an invisible layer of oxide on the surface. When you go to bond to the aluminum, you're actually bonding to that micro-thin layer of oxide...so the adhesive or solder comes off with the oxide. Screw mounting is a natural, but those need to be solid and the "back end" of the can that gets tapped should be thick enough so several threads are engaged. ***Another way to have at it would be to drill clearance holes in the bracket and have a steel bolt and nut doing the work, then you could torque the thing to a greater degree without as much worry about stripping. If the can is threaded, then a pair of screws can be used as studs with nuts on the other side of whatever bracket is being used.
For maximum rigidity, I think that locking the driven end as well as the end bell end is best when possible. With most end bells no longer having a means of screw attachment, things can get dicey with aluminum. I have an idea of how to accomplish this if I ever decide to give all this a whirl.
Anyway, for soldering, it seems that using a stainless steel brush to clean the aluminum and then immediately applying heat/flux/solder (*without overheating) is the way to go with aluminum. I have seen some adhesives that claim to work well with aluminum, but have never tried any.
Keeper Of Odd Knowledge

Posted 23 July 2018 - 07:07 PM
Nice!
How much lathe time did it take to go from: 1) The lump to the solid cylinder and 2) from the solid cylinder to the hollow cylinder?
Cheers
Bill Botjer
Faster then, wiser now.
The most dangerous form of ignorance is not knowing that you don't know anything!
Never attribute to malice that which is adequately explained by stupidity
OCD Rewinder
Posted 23 July 2018 - 08:33 PM
Nice!
How much lathe time did it take to go from: 1) The lump to the solid cylinder and 2) from the solid cylinder to the hollow cylinder?
Cheers
Hi Bill, and thanks. How much time? Hours, probably like 4 hours I think.
Speaking of which, after some more time, I got the can holes threaded 2-56 and the magnets installed and zapped. Then I built and wound me up a 38/27. I'm thinking of doing a "split personality" thing here and winding a second arm to go with it, a G12.

Race Leader

Posted 24 July 2018 - 02:00 PM
So John, did you drill out the center of the can to "rough" it out then turn the ID to size?
Beautiful work, BTW.
Bobby Robinson RN, BMTCN
"Nobody rides for free." - Jackson Browne, 1980
"Positivity and optimism can overcome a lot of things." - Tom Brady, 2019
"Trying is the first step towards failure." - Homer Simpson
Posting Leader
Posted 24 July 2018 - 02:55 PM
John,
You need to include some "tell" in you're "show and tell". I personally enjoy reading about the journey even more than the arrival.
Like what machine and tool did you use to bore out the can, and especially, how did you face the bottom of the bore? I get horrible chatter (like break some something bad) when I hit the bottom of a bore or try to face it.
OCD Rewinder
Posted 24 July 2018 - 04:47 PM
So John, did you drill out the center of the can to "rough" it out then turn the ID to size?
Beautiful work, BTW.
Hi Bobby...yes, that's pretty much what I did.
Like what machine and tool did you use to bore out the can, and especially, how did you face the bottom of the bore? I get horrible chatter (like break some something bad) when I hit the bottom of a bore or try to face it.
The boring was done on the Sherline lathe, and the tool is just a carbide boring tool that I ground to work better for what I intended to do. I had to do the boring in two stages...around half way in for the first part, and then all the way in to finish things up. This is necessary with my boring bar for it to clear the ID of the can. I have experienced the same chatter at the bottom of the hole as you have, and sharpening the carbide, plus including enough bottom clearance makes a big difference. the finish in there still isn't "all that", but I see no reason to take it any further.
OCD Rewinder
Posted 25 July 2018 - 06:01 AM
Some more on this Phil. There's some "geometry" involved from what I see here. When you're turning the outside of a part spinning in a lathe, and the tool is at the precise center of the part's diameter, it's center of rotation, you're also at it's widest point. Because of that, there will always be clearance above and below the point where the tool's tip contacts the part.
When you're turning the inside of a spinning part, the tool's tip is contacting the part at a point that's furthest from the tool...*and there will be less clearance both above and below the point where the tool contacts the part. This situation gets worse/more difficult the smaller the inside diameter is, so the tools tip needs to be ground with an "undercut", to prevent the lower portion from contacting the inside of the piece. The "shaft" of the tool also needs to be ground for clearance as well, because it can contact the I.D. even before any part of the tip.
When you get to the bottom of the hole, things seem to get even worse, because it's at 90 degrees to the I.D. and suddenly the front of the tool is making contact instead of the tip. It seems to me that just having the tool be sharp ought to take care of this, but it just doesn't work as well as again having the tip do the work, so the tool's geometry...er..."shape" is even more important in there. For me, doing the boring in "stages", and adjusting the boring bar's angle as you get further-in helps a lot. ***Doing part of the boring further out first, creates clearance for going in deeper because the hole has gotten bigger, giving you more room to work.
Sooo...when the machine tells me: "DON'T DO THAT!", I try and figure out what the problem is and how in the name of all that's holy I can do it with less grief. That "chatter" at the bottom of the hole is not just bad for the part, it's bad for the machine, and can even make the part move in the lathe chuck. How do I know this? Well, if you lived within a four block radius of my house, you'd have heard the cursing.  Oh and...if the part actually DOES move in the lathe chuck, it will be difficult-to-impossible to ever re-chuck it exactly the same as it was in the first place. At least, that's the way it works over here. So, I try my best to make sure the part never leaves the chuck until it gets parted-off.
DISCLAIMER: I'm an idiot carpenter, just sharing what I've gathered so far. Actual machinists will be a far better and more reliable source of info on all this. Just like carpentry though, a sharp tool not only works far better...it is safer too!
Posting Leader

Posted 25 July 2018 - 11:10 AM
John, when are you going to start making your own magnets?
You won't need that disclaimer much longer. You learn fast. And you are detail oriented. two things a good machinist needs.


