Since these things tend to get buried as time passes, I figured to do another "step-by-step". If I put all the micro details in, this thing would turn into a mini-novel, so I'll just try and hit the high-points. If you never tried as a kid, if you (like me) tried, but failed more often than you succeeded...or even if you only want to give any of this a shot now and never cared much about it because motors are cheap and you never saw a reason to try this, maybe this will help. The basic stuff hasn't changed. We're still dealing with three pole brushed DC motors. Modern motors may look different, but they are essentially exactly the same. In fact, new motors are in many ways easier to deal with because, aside from making them go faster, people in the 1960's were also dealing with really poor designs and materials.
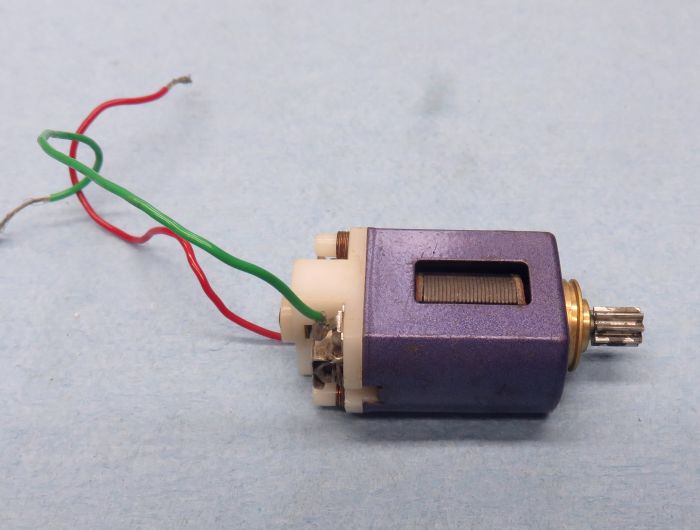
Here's the "patient" that will be undergoing the surgery...my one and only NOS (later) Mabuchi FT16D, specifically a can drive version.
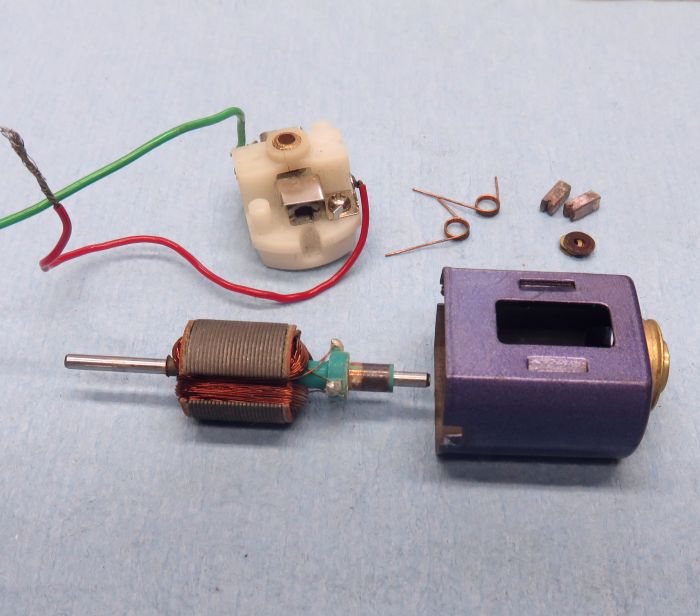
After tearing it down, you have a pretty normal three pole armature wound with what looks like maybe #32 or even maybe #33 wire. A pair of brushes and springs, along with the "patina" (ie: corrosion) imparted to them from decades of sitting in someone's basement. There's an end bell made of a very soft and highly "meltable" plastic and assorted spacers. Fortunately, this arm's shaft was not splined, so removing it from the can without also removing the can's rotating and "caged" bushing was pretty straightforward...ALWAYS check these old motors before just yanking the armature. ![]() Also clearly visible in the picture is the "Mabuchi Crack" in the end bell. That really needs to be addressed, and I'll take care of that as I go.
Also clearly visible in the picture is the "Mabuchi Crack" in the end bell. That really needs to be addressed, and I'll take care of that as I go.
The magnets are awfully weak, and the air gap is huge. The armature OD is only around .507 in stock form and the magnet "hole" is like .5595". That all sounds kind of funny by today's standards, even by late 1960's standards! ![]()

Another vintage rewind 'How To'
#1

Posted 03 October 2018 - 11:31 AM
- slotbaker, Jencar17, Steve Deiters and 2 others like this
#2

Posted 03 October 2018 - 11:46 AM
Stock motor on some Dynamic RTR slot cars.
- havlicek likes this
"If everything seems under control, you're not going fast enough" - Mario Andretti
#3

Posted 03 October 2018 - 11:59 AM
Thanks for the info Tim!
#4

Posted 03 October 2018 - 12:07 PM
So now, I set aside the can and end bell and can move on to the "heart" of the matter. I removed all 110 turns of "hair" from the three poles, as well as the commutator and the fiber stack end insulators and can-spacer. The fiber end insulators will be tossed, because I will powder coat the arm to insulate the magnet wire from shorts. ***If you want, you just leave them on there, but just put a tiny dot of CA glue on their edges so they don't rotate as you wind the arm. The tail spacer is also getting tossed, being bare steel, it can easily cause shorts. ***If you want to use it, giving it a thin coat of a heavy bodied epoxy like JB Weld is a good way to insulate it. The Mabuchi com will get tossed in favor of an old Tradeship com, which is stronger and longer lasting. ***If you want to use it, no problem. Just clean off the old solder and you're ready to go. Note that the bottom of the com has a molded-in tab that locates the com in relation to the stack for "neutral" timing...pretty much. Dialing-in some com advance is good for more speed, so you can just play the bottom end of the com carefully on some sandpaper or grind it to remove the tab. Then you can time the arm any way you want while still using the fiber end insulators.

- Jencar17 and Geary Carrier like this
#5

Posted 03 October 2018 - 12:37 PM
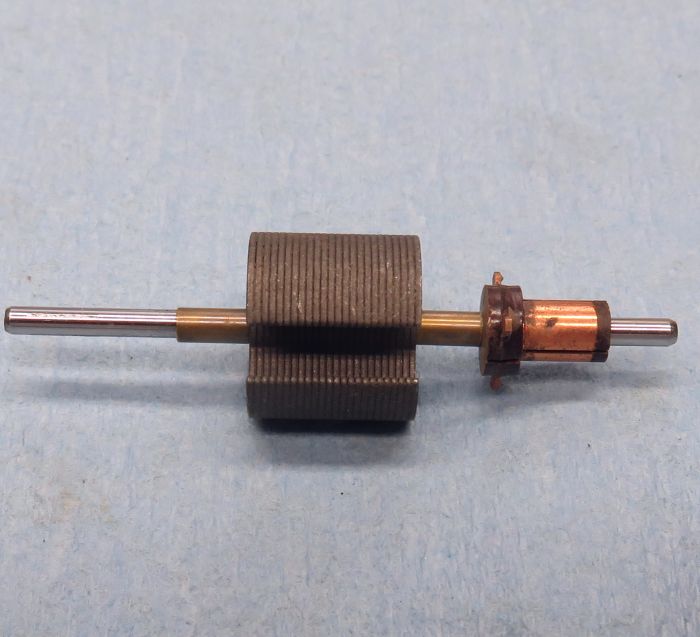
I took some #600 grit to both ends of the shaft quickly just to make sure it's clean, and then added pieces of 2mm ID tubing to space the arm so it floats correctly in the field, leaving enough room to space the arm and remove any slop when reassembling the motor. The Tradeship com has both a phenolic com spacer on it's bottom and a phenolic cap molded at it's top. I get rid of some of the cap, and removed the bottom spacer to make room for a thinner spacer of the same ID/OD as the new tail-spacer. This will give me some more room to wind, and *more importantly will make for com and tail-spacers of the same OD, so the winding can be more uniform at both the top and back of the stack.
The arm is ready for powder coating to insulate the stack and the spacers. ***Note, this Tradeship com has some advance already dialed-in, in this case CW, which is the opposite of what most all modern motors have. They do this by offsetting the com slot vis-a-vis the com tabs. I'll be adding CCW advance, which will put the com tabs in a really awkward place for winding...so if you use vintage Tradeship coms, always check the com timing by using the slots and not by eyeballing the tabs.
- slotbaker, Pablo, Jencar17 and 2 others like this
#6

Posted 03 October 2018 - 05:27 PM
So, after powder coating (*only necessary if you have the means). I wound the arm with the new Tradeship com installed. This was to be a true "rewind" using the Mabuchi stack, and I won't be doing the kind of heavy mods I often do on these motors...instead doing rewind that will be a substantial improvement over stock performance, and yet would be right at home in a typical period car. Keeping that all in mind, I did 60 turns of #30 wire and advanced the timing 18 degrees CCW. While the sharp-eyed among you might look at the tabs and think the com looks more advanced than 18 degrees, remember that these coms have 10 degrees or so of CW advance built-in.
So the arm is wound and tied, ready for epoxy. This wind (*especially with 18 degrees advance) won't be all that far off from a 55/29, but should be easier on the Mabuchi setup...no small thing!

- slotbaker, Jencar17, boxerdog and 2 others like this
#7

Posted 04 October 2018 - 06:11 AM
So, just a few tips.
1)It doesn't matter if you wind in a clockwise or counterclockwise direction, but do all three poles in the same direction. What determines the direction of best rotation is the com timing. THAT is where the CW and CCW thing comes into play.
2)"Turns" means one complete wrap around a pole. You start at the top (com), so every subsequent "turn" ends there too. I'm pretty sure that doing these things, it's better to always go by the turn count than by measuring-out three equal-length pieces of wire.
3)ALWAYS make sure that the com tabs are clean and shiny, and the magnet wire is fully stripped where it will pass over the com tabs. Any corrosion, insulation, dirt, whatever left in place will be impossible to clean later on and will probably degrade performance. NEVER try to just solder the wire hoping the heat will get rid of the insulation. There were some wires sold back in the day that supposedly could just be soldered without stripping the insulation first...bad idea.
4)You don't need kevlar thread to tie coms on mild rewinds. Unwaxed dental floss will work really well, but you can get small spools of kevlar thread on eBay for cheap, and it's the best stuff for this.
5)Pre-warm the armature before epoxying. You can use regular hardware store type epoxy for a lot of milder winds, but don't use the quick-set stuff. It will set way too fast to do a good job, and is less heat-resistant than the regular slow-cure stuff. ***Keep in mind that heat will speed-up the cure of all epoxies, and even the slow cure stuff will gel quickly on a warm armature...be ready to clean things up if the stuff gets all over the place. Be especially careful with epoxy getting on the com...clean it off and get it out of the com slits before it's too late. Cutting the com will not get epoxy our of the slits.
6)Light gauge winds like this one will absorb a lot of epoxy. Look at the outside and inside stack ends and edges to see when it starts to pile-up as a sign that the arm is fully saturated...then stop applying more. Warmth will make the epoxy more "runny"/less viscous, even if you don't use the lo-vis stuff. Too much epoxy will run all over the place before you know it. Pay attention to the arm so any problems can be corrected BEFORE the epoxy sets.
- slotbaker and Geary Carrier like this
#8

Posted 04 October 2018 - 07:02 AM
John, can we ask you questions in this thread, or had you rather we didn't & let it become just a "how-to"?
I intend to live forever! So far, so good.
#9

Posted 04 October 2018 - 10:21 AM
John, can we ask you questions in this thread, or had you rather we didn't & let it become just a "how-to"?
I can't remember telling people NOT to ask questions Bill. Why, you thinking of doing some winding??? ![]()
- Geary Carrier likes this
#10

Posted 04 October 2018 - 12:33 PM
May even try one of the RAM 7 pole padlock arms I have stripped down. The welded comm/no tabs is intriguing and a worthy challenge.
Have wrapped some wire round a kemtron 5 pole arm just put soldering,epoxying etc on the back burner.
- havlicek likes this
#11

Posted 04 October 2018 - 03:31 PM
Hi Paul,
I would definitely start with 3 pole motors before trying anything with 5 and 7 pole motors.
#12

Posted 04 October 2018 - 08:21 PM
Back on this motor. The arm has been epoxied, and the com has been cut. Resistance comes in at .492 ohms...a big step up in performance is coming, but before that can happen, both the can and the end bell are going to need some help. With clean/NOS Mabuchi FT16D motors getting so scarce...rare even, every one I do needs my full attention.

Mocked-up in the can:

While the arm goes out for balancing, I can get busy on finishing-off the can and end bell.
- slotbaker, Jencar17, Tim Wilkins and 1 other like this
#13

Posted 05 October 2018 - 03:46 PM
The first and most important detail to take care of now is the (in)famous "Mabuchi Crack". My way of handling this involves forming a "collar" that will fit the OD of the Mabuchi end bell's bushing carrier...as well as drilling teensy holes around the end bell's bushing collar. I find a piece of tubing that's almost large enough to fit over the end bell. Then chuck that in a drill and play a tapered ream against the open end to enlarge the ID until it either fits or "almost fits". The drill a series of holes (*either two or four...whatever) around the outside of the end bell. After that, a bit of epoxy around the bushing, some more inside the end bell and inside the brass "collar", and you can then install the piece. In this case, it was a "press fit", so I did the deed on an arbor press. After curing, you have some cleaning-up to do, and that can be done with a Dremel, some sandpaper or a mill.
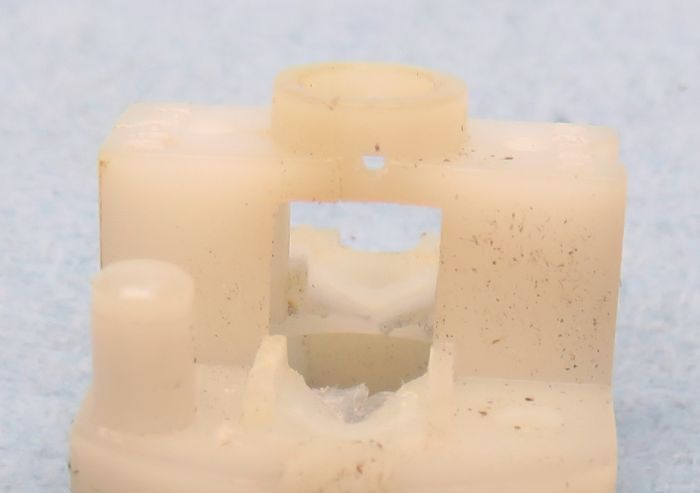


***You're not trying to bond the bushing to the end bell. You want to bond the bushing *through* the end bell to the brass collatr on the outside. When done, even the crack in the bushing's flange (*something I didn't even notice at first!) shouldn't matter at all.
Of course, while the epoxy was curing, I had time to clean all the corrosion off the hardware and even the brushes themselves.
- slotbaker, Pablo, Jencar17 and 1 other like this
#14

Posted 05 October 2018 - 07:49 PM
I still have some buttoning-up to do on the can here...but..."if it came in a box, then everyone would do it". ![]() Of course the can got drilled for end bell mounting screws. The tabs are still there, but we all know they're useless after opening them up once. The inside of the can, the magnets and the magnet clip all got a thorough cleaning as well. Before reinstalling the magnets, I cut four .004" steel shims to close up the hole...probably around .017" or so. Every thousandth helps with these magnets. After checking that the arm will center, I locked them in with some liberally-applied CA glue.
Of course the can got drilled for end bell mounting screws. The tabs are still there, but we all know they're useless after opening them up once. The inside of the can, the magnets and the magnet clip all got a thorough cleaning as well. Before reinstalling the magnets, I cut four .004" steel shims to close up the hole...probably around .017" or so. Every thousandth helps with these magnets. After checking that the arm will center, I locked them in with some liberally-applied CA glue.

Last bits on the end bell were all about reassembling, checking clearances and doing some opening-up on the inside under the hardware. While the brush hoods don't need to be soldered on this motor, I did set the "heat sinks" (*brush tubes) in a tiny puddle of gel CA glue. While it doesn't stick to the end bell plastic, it will stick to the heat sinks and kind of forms a nicer "pocket" for them to sit solidly in when dry. I also installed a set of brass spring post sleeves. The original springs get tossed, and I'll wind a set of .015" stainless steel ones for final assembly.
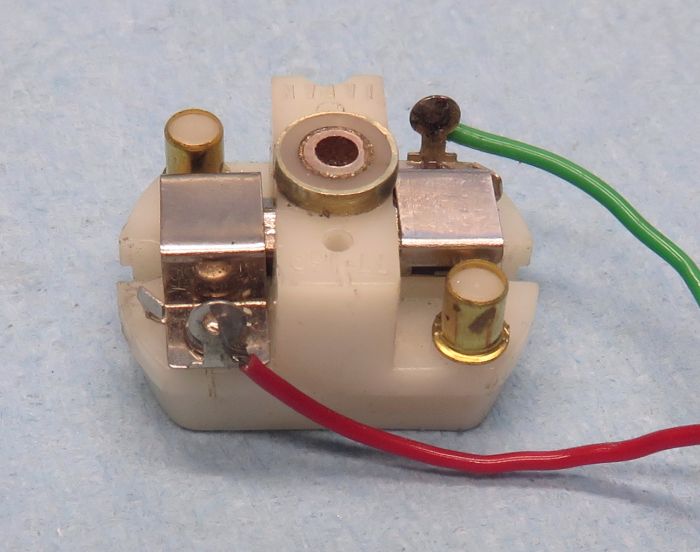
The arm just has to go get balanced.
- olescratch and Geary Carrier like this


