Ive got a bunch of mabuchi 16D motors im going to rebuild that are in bits and most have worn bushes on the can and endbell.
For the motors that have a larger brass bushing it looks fairly straightforward to ream it out for a 5mm bearing like this:
https://www.ebay.com...R2TW1:rk:5:pf:0
You can fit either a 5mm OD or a 6mm bearing in the can end. It's not a bad idea to (after removing the rotating bushing and brass-retainer) to first solder-in the remaining brass carrier on the inside only...you can alternately epoxy it in...but first make sure the mating surfaces are clean and dry).
***It's a little more tedious, but rather than drill-out the hole, a tapered hand-ream will do a really good job of keeping the hole centered on the original axis.
https://www.ebay.com...77463818&chn=ps
Are small bushings available or do you have to machine them yourself?
I dont expect replacements are readily available since these were never designed to be replaced.
I've not seen replacement bushings for these. You can actually "tighten-up" worn bushings enough to improve the fit to the armature shaft, but it's hit or miss and you'd need to experiment some to figure out a way to do this. You can also purchase oilite or sintered metal oil-impregnated rod for machining your own, but it's really expensive...I think around $20 for six inches of 1/2". Any bushing produced this way would not have the ribbed OD, and making it slightly oversized would probably open-up any cracks in the end bell plastic. Either way, you'd have to figure out a way to solidly locate the replacement bushing. This in itself means several steps. I've figured out a way to do this, look for any of my posts that talk about "keying" the bushing in place. This becomes necessary because not only are almost all of these end bells cracked at this critical area, but the material can not be reliably bonded to...even with the best epoxy and/or CA glue. The general thought had been that this crack, while not visually appealing, really didn't cause any issues. That is NOT the case, and with any significant track time, the problem gets worse to the point of causing everything from bad gear mesh to motor failure. Of course, that problem is multiplied with any rewind (*even a mild one) faster than the anemic stock wind.
Are the 5mm bearings ive posted in the link the smallest OD available?
I cant seem to see anything smaller than 5mm, so im guessing that I will just have to put bushings back in these worn endbells.
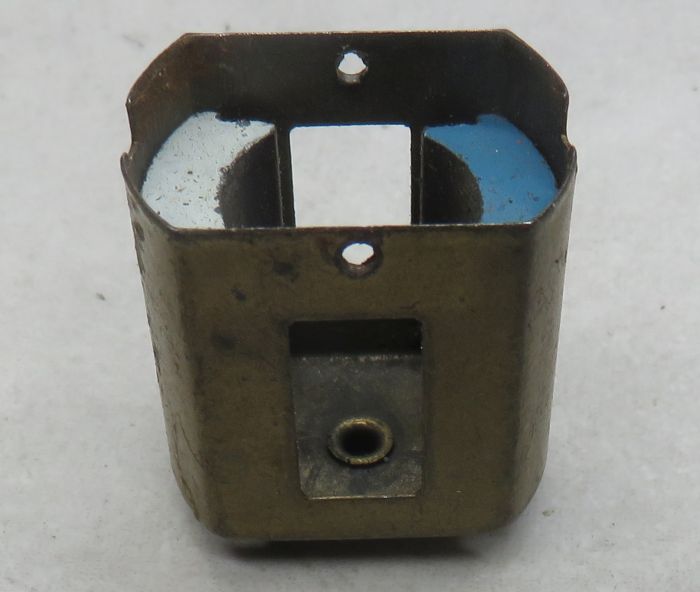
5mm OD is the smallest 2mm ID bearing from any regular supplier. Also, there is so little material on those end bells, *and many/most/all have a crack in the area that holds the bushing as it is, reaming out the plastic would be a very bad idea. There are brass bushing straps available for screwing into the two existing end bell mounting holes, and a 5mm bearing could be soldered in to the strap, which would then be mounted to the end bell. This makes cutting off the entire area where the bushing is mounted necessary...as well as makes actually mounting the motor a mess (*although slightly less-so with can-drive).
Other option is use an aftermarket endbell such as this tradeship one, but they are very pricey.
https://www.electric...are-p-5212.html
They ARE expensive now, and not really any better in any meaningful way than the Mabuchi.
Dont know if there are other ones available at a much better price, but it looks like i could upgrade it to a BB
The only other older option would be the Champion 16D end bell (*shown in your last link), but lately I've only seen them sold "bare" with no hardware. They also have a wider bushing strap that makes them difficult to mount to some chassis. The Tradeship is dimensionally the same as the Mabuchi, and can NOT accept a 5mm bearing. The Champion, with it's beefier bushing strap and recess CAN accept a bearing...either the approximately .250" Mabuchi Champion one (*garbage), or a 5mm or 6mm OD modern bearing with a sleeve to adapt it to the larger hole.
The slightly later Hong Kong-produced FT160 end bell will also work and is close to the Champion one, and is made of a MUCH better material.