

I have made plenty of tools in my career. That being said. I was thinking of making a hand punch. Whether its worth the time ????

A tale of two Bandits
Started by
Larry Horner
, Oct 22 2018 03:54 PM
101 replies to this topic
#51

Martin
-

- Full Member
-

- 3,960 posts Joined: 22-February 09
Posting Leader
- Gender:Male
- Location:US
Posted 19 September 2019 - 07:03 PM
Martin Windmill
#52
Pablo
-

- Administrator
-
- 18,364 posts Joined: 20-February 06
Builder
- Gender:Male
- Location:Cleveland, Tennessee
Posted 19 September 2019 - 07:10 PM
The knife edge Ortmann's fronts from Electric Dreams fit perfectly
Stock, they mike at .880 OD. Larry's Dynamic requires about .815 OD to meet the clearance goal so I trimmed and trued them on my Hudy. They lost a little bit of the "knife edge" look at the expense of perfect roundness and precise sizing. Absolutely nothing ruins handling better than bad front wheels, ya know 

- Lou E likes this
Paul Wolcott
#53
MattD
-

- Full Member
-
- 3,561 posts Joined: 13-August 11
Posting Leader
- Gender:Male
- Location:IN
Posted 19 September 2019 - 07:38 PM
I have a round hole punch made for card makers/scrapbookers. A punch to make straight cuts would be great. I've never thought to look online. It's possible that scrapbookers have a similar type of punch.
Matt Bishop
#54
MattD
-
- Full Member
-
- 3,561 posts Joined: 13-August 11
Posting Leader
- Gender:Male
- Location:IN
Posted 19 September 2019 - 08:48 PM
There is a common size slot punch available, but it cuts a 1/8 X 9/16 slot.
Matt Bishop
#55
Pablo
-
- Administrator
-
- 18,364 posts Joined: 20-February 06
Builder
- Gender:Male
- Location:Cleveland, Tennessee
Posted 20 September 2019 - 08:23 AM
It finally came to me at sunrise this morning - I'll make a simple gizmo out of sheet brass soldered together - something like this, only smaller and more SANO. Then masking tape it in place on the body and cut with a #11 along the edges. I'll call it a "Bandit Gizmo" 

Paul Wolcott
#56
Bill from NH
-

- Full Member
-
- 14,315 posts Joined: 02-August 07
Age scrubs away speed!
- Gender:Male
- Location:New Boston, NH
Posted 20 September 2019 - 11:16 AM
That cutting jig looks like one of 'Oregon Ron's' bending jigs for brass rods when he made jail door chassis.
Bill Fernald
I intend to live forever! So far, so good.
I intend to live forever! So far, so good.
#57
Pablo
-
- Administrator
-
- 18,364 posts Joined: 20-February 06
Builder
- Gender:Male
- Location:Cleveland, Tennessee
Posted 20 September 2019 - 04:32 PM
I mated twin pieces of .025 thick strips, placed a piece of .039 wire to make the correct notch height, and soldered a third piece. That was a "fail", because .039 wire won't create an .039 gap with .025. Duh

So I took another smart pill and realized, not only must I allow for the thickness of the strips in spacing, the #11 blade is about 16 thou thickness when held at an angle. This time I'll not use something round - I'll try doubled .025 strips. Yes, gizmos are complicated. But I'm not bleeding yet and the body patiently awaits ……  For the .270 length, I'll shoot for about .285

- Peter Horvath likes this
Paul Wolcott
#58
Pablo
-
- Administrator
-
- 18,364 posts Joined: 20-February 06
Builder
- Gender:Male
- Location:Cleveland, Tennessee
Posted 20 September 2019 - 07:07 PM
Completed "Bandit Gizmo" has been pre-tested successfully on a body swatch. The resulting notch is perfectly sized to give a hair of left/right and up/down slop to a 1/4 X 1/32 nub

- Peter Horvath, Rotorranch and olescratch like this
Paul Wolcott
#59
Bill from NH
-
- Full Member
-
- 14,315 posts Joined: 02-August 07
Age scrubs away speed!
- Gender:Male
- Location:New Boston, NH
Posted 20 September 2019 - 07:14 PM
Had you thought about using 2 side-by-side blades or two spaced blades if the knife collet will fit two? Some collets do easily.
Bill Fernald
I intend to live forever! So far, so good.
I intend to live forever! So far, so good.
#60
Pablo
-
- Administrator
-
- 18,364 posts Joined: 20-February 06
Builder
- Gender:Male
- Location:Cleveland, Tennessee
Posted 21 September 2019 - 05:20 PM
"Bandit Gizmo" worked fine, albeit tedious. Tape gizmo to side of body one notch at a time, gently score outline until notch pops out, fine sand with narrowed emory board, repeat. By making the notches slightly enlarged, the body is slightly free to wiggle, lift, droop, etc.
Maybe Dynamic had a special tool for this, and maybe they are all in landfills. Who knows? For now, I got the job done 


- slotbaker, MSwiss, miko and 2 others like this
Paul Wolcott
#61
Martin
-
- Full Member
-
- 3,960 posts Joined: 22-February 09
Posting Leader
- Gender:Male
- Location:US
Posted 21 September 2019 - 07:26 PM
Necessity is the mother of invention
Good solution
- Pablo likes this
Martin Windmill
#62
Pablo
-
- Administrator
-
- 18,364 posts Joined: 20-February 06
Builder
- Gender:Male
- Location:Cleveland, Tennessee
Posted 21 September 2019 - 07:45 PM
Thanks Martin 
Paul Wolcott
#63
Martin
-
- Full Member
-
- 3,960 posts Joined: 22-February 09
Posting Leader
- Gender:Male
- Location:US
Posted 21 September 2019 - 09:37 PM
I am sure you realize this now, as I do. I should of supplied this "Bandit Gizmo" tool with the repo body mounts I just made, doh 
Next time
Martin Windmill
#64
Maximo
-

- Full Member
-
- 1,788 posts Joined: 31-August 06
Checkered Flag in Hand
- Gender:Male
- Location:San Antonio, TX
Posted 21 September 2019 - 09:44 PM
I am sure you realize this now, as I do. I should of supplied this "Bandit Gizmo" tool with the repo body mounts I just made, doh
Next time
It's never too late!
maximo
- olescratch likes this
David Ray Siller
MAXImum MOtion
Retired Video Game Creator/Designer/Producer
Thingies are my thingy!
#65
Pablo
-
- Administrator
-
- 18,364 posts Joined: 20-February 06
Builder
- Gender:Male
- Location:Cleveland, Tennessee
Posted 22 September 2019 - 07:47 AM
You could call it the "Notch Muncher" or "Notch Nibbler" and probably sell at least a dozen worldwide
Paul Wolcott
#66
Larry Horner
-
- Full Member
-
- 412 posts Joined: 18-March 17
On The Lead Lap
- Gender:Male
- Location:San Francisco
Posted 22 September 2019 - 04:18 PM
Wow, you go camping for a few days and look at all the progress. Pablo, your notch cutting guide is the perfect solution for a difficult problem ... simple but effective. I can hardly wait until the paint arrives!
#67
Pablo
-
- Administrator
-
- 18,364 posts Joined: 20-February 06
Builder
- Gender:Male
- Location:Cleveland, Tennessee
Posted 22 September 2019 - 05:55 PM
Thanks Larry, you are probably the first person ever to be impressed with my build speed. Years ago my original and best online mentor, Bill, admitted to me he built real slow also. It encouraged me to keep trying despite my pre-conceived timeline notions. There are guys who can produce things really fast - I'm just not one of them
The Candy Root Beer Auto-Air paint arrived yesterday. Body is fully trimmed and cockpit masked. Time to install inside Martin Windmill decals

- Lou E and Peter Horvath like this
Paul Wolcott
#68
Bill from NH
-
- Full Member
-
- 14,315 posts Joined: 02-August 07
Age scrubs away speed!
- Gender:Male
- Location:New Boston, NH
Posted 22 September 2019 - 06:59 PM
I'm probably slower now !!
Bill Fernald
I intend to live forever! So far, so good.
I intend to live forever! So far, so good.
#69
Pablo
-
- Administrator
-
- 18,364 posts Joined: 20-February 06
Builder
- Gender:Male
- Location:Cleveland, Tennessee
Posted 23 September 2019 - 06:07 PM
Martin's numbers and stripes are nice, but they didn't test well with glazing medium for inside use. So I'm investigating other options.
Time to test the paint. I have zero experience with "Auto-Air Colors", so I need to experiment. My test swatch consists of Lexan pieces with waterslide decals secured and dried with glazing medium, and a piece of the actual body material

Paul Wolcott
#70
Pablo
-
- Administrator
-
- 18,364 posts Joined: 20-February 06
Builder
- Gender:Male
- Location:Cleveland, Tennessee
Posted 23 September 2019 - 08:07 PM
Paint thins up easy and sprays real sweet. I backed up some with white just to see

It passes the "crinkle" test 100% - in other words, adhesion is awesome. No problems with the glazed decals. This paint is going to work perfect

- Peter Horvath likes this
Paul Wolcott
#71
Martin
-
- Full Member
-
- 3,960 posts Joined: 22-February 09
Posting Leader
- Gender:Male
- Location:US
Posted 23 September 2019 - 09:19 PM
Just a thought Paul, what about backing it up with gold or even copper? Might add that warmer look.
I can see this is tricky to match. Hope this helps?
Attached Images

- Lou E likes this
Martin Windmill
#72
Pablo
-
- Administrator
-
- 18,364 posts Joined: 20-February 06
Builder
- Gender:Male
- Location:Cleveland, Tennessee
Posted 24 September 2019 - 07:43 AM
I can try brushing some gold over the parts of the swatches I didn't back with white, later today
But I have to say, in person the root beer color where I backed with white, absolutely nails it dead on to my eyes.
This is some outstanding paint, it sprays finer than anything I've seen and after repeatedly crinkling a swatch purposely trying to make it fail, it doesn't. You better believe I'll use it on my race cars soon. It does need more (blow dry) heat than Fascolors - you can see the thumb smear where I tested how quickly it dries - it just needed the blow dryer for more time.
New decal plan is, black #44 under white meatball, Fassky (baby blue) stripes painted on, and I found an auto club decal in a vintage sheet at Electric Dreams 
Paul Wolcott
#73
Pablo
-
- Administrator
-
- 18,364 posts Joined: 20-February 06
Builder
- Gender:Male
- Location:Cleveland, Tennessee
Posted 24 September 2019 - 03:59 PM
I tried backing with gold and it makes it look gold. Backed with silver makes it darker. Backed with white is perfect candy root beer as Larry wants, and that's what it's gonna be
Time to harness all that Havlicek horsepower to the track. Namely, weights. Back in the day when this car was popular, the pros were experimenting with drop arm chassis. Mike Morrissey noted they found through trial and error, the best placement for weights on a drop arm of the Grand Prix (F1) cars was slightly rearward of the front axle.
In addition to the Classic flag weight, I found a Team Associated 1/4 oz. iron weight fits perfect, nested on the Dynamic drop arm like a glove with a little filing. Before I retire tonight it will be JB Welded to the chassis. Yes, I'm totally sure it will work, no need to install it temporarily

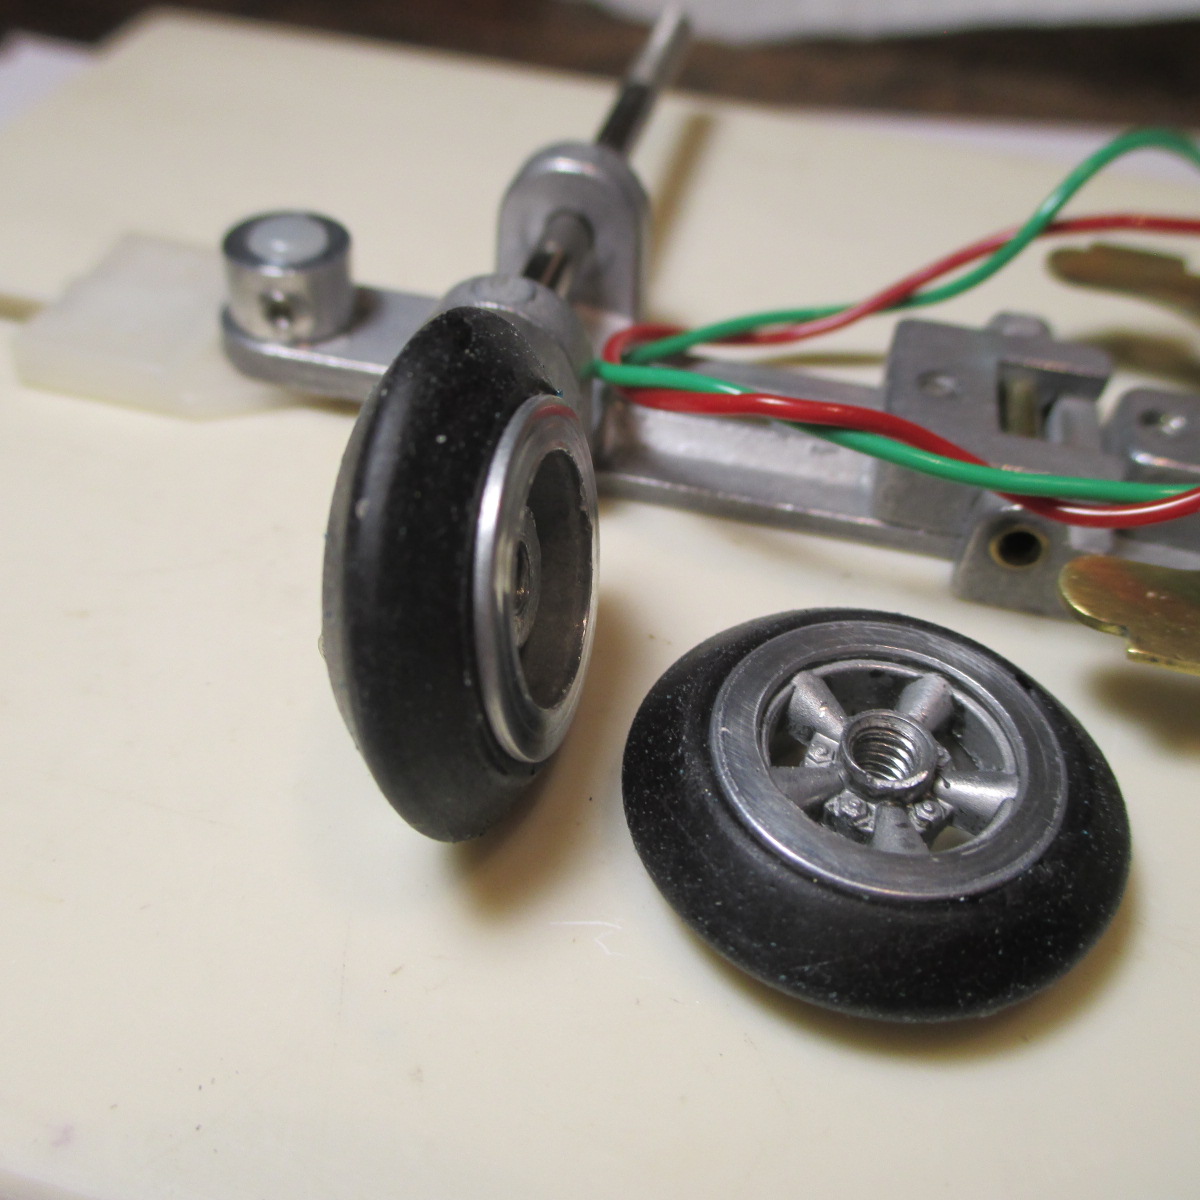
Front wheel assembly went on nicely, ending up total width slightly over 2 7/8" plus knockoffs, which were secured with microdots of Loctite 271


- Peter Horvath and olescratch like this
Paul Wolcott
#74
Bill from NH
-
- Full Member
-
- 14,315 posts Joined: 02-August 07
Age scrubs away speed!
- Gender:Male
- Location:New Boston, NH
Posted 24 September 2019 - 06:32 PM
We thought you were trying to duplicate the original Dynamic color, not that you had a customer order for root beer.
Bill Fernald
I intend to live forever! So far, so good.
I intend to live forever! So far, so good.
#75
Pablo
-
- Administrator
-
- 18,364 posts Joined: 20-February 06
Builder
- Gender:Male
- Location:Cleveland, Tennessee
Posted 24 September 2019 - 07:09 PM
Larry says the original color was "root beer" but it looks orange-ish to me. I can make the "Candy Root Beer" paint any shade he wants. Larry, HELP!
Paul Wolcott


