Jump to content


Photo

New chassis kit build: R-Geo "X-Factor"


  • Please log in to reply
13 replies to this topic

#1 JimF

JimF

    Posting Leader

  • Full Member
  • PipPipPipPipPipPipPip
  • 2,220 posts
  • Joined: 20-June 07
  • Gender:Male

Posted 31 January 2019 - 01:13 PM

I certainly have not posted many projects within the last year so this will be my first of the 2019 season. With the NorCal retro season fast approaching, this will also be the subject of some long term tuning.


 It’s not that I hadn’t been building during ’18 but customer cars had me pretty busy much of last year and most of what I did for myself was small variations on existing stuff and I just didn’t want to repeatedly post up the “same old things”


This chassis is built from a newer R-Geo kit that has been released fairly recently. This is partially a rail variation of the “Razzo” but it does use an entirely new nosepiece. I believe that Mr. GVP was closely involved in the development and he has posted on this as well. I built this in "bone stock" configuration because the feedback has been very good. Rick B calls this the “X-Factor” kit and I think it is generally available now.


I really wanted to do a full step by step article but as I got into it, time got the better of me. It turned out that after a few detail steps at the beginning, all I had time for was some explanatory closeups after finishing.


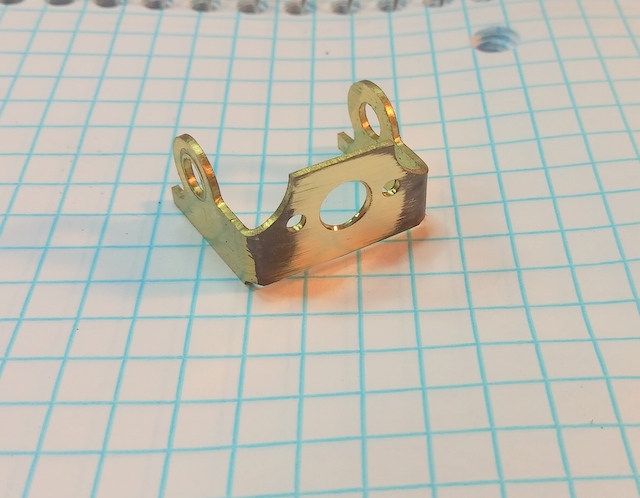
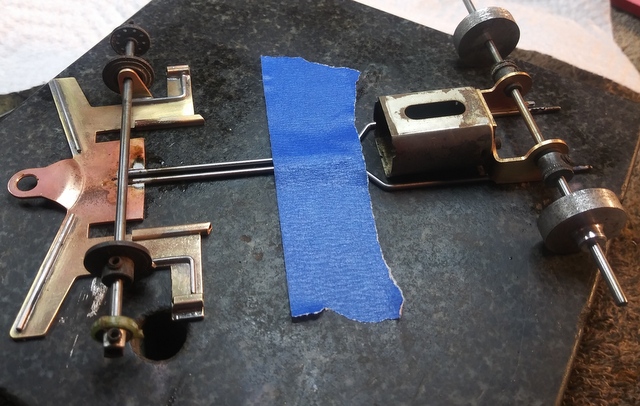
Here are the starting components.


01-20190127_204133.jpg


Step #1 is always to detail the bracket. This shows the bracket face colored with marker and then filed until the face is flat to outboard of the screw holes……..almost there!


02-20190127_204703.jpg


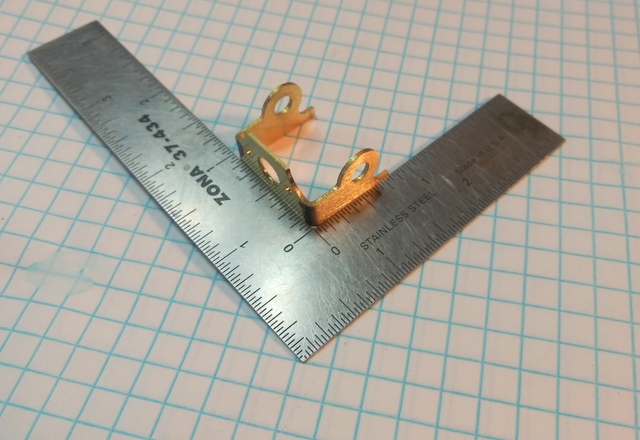
Squaring up the bracket


03-20190127_205329.jpg


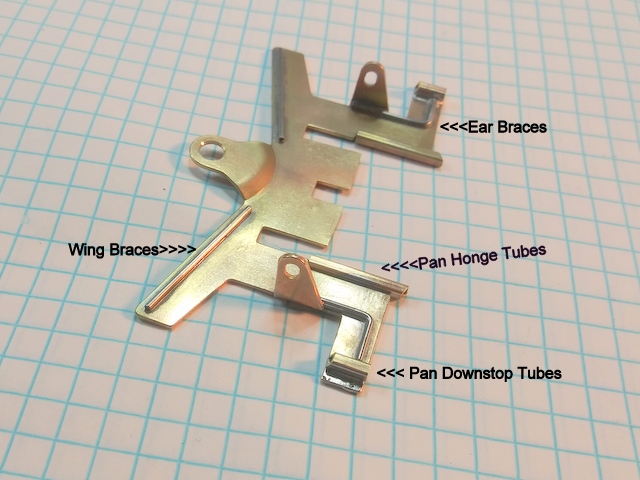
This shows the nosepiece details along with a potentially different downstop configuration. If using this setup, a stop rod would extend from the the pans into the downstop tubes.This just shows a building option. After this pic, I took this back to stock configuration using the formed in loops at the front of the pans and a piece of 3/32" sq. tube as the combo up/down stop. for this article.


05-20190127_221701.jpg


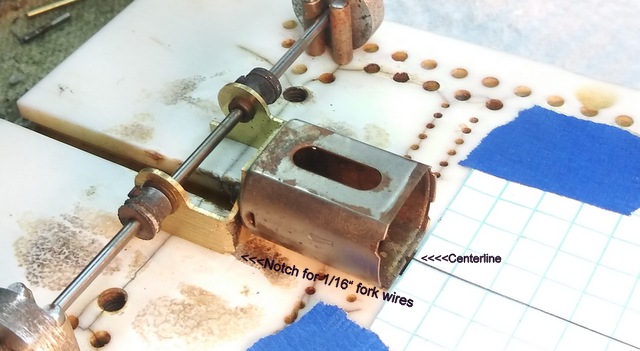
A piece of graph paper taped to the jig to aid in forming the tuning fork rails. The fork rails are .062.


09-20190127_230740_Burst01.jpg


I started to realize my time limitations now so I have skipped over the bending of the fork rails (I’ve covered that before anyway) Here it is with the rails in place and taped to my granite surface block. At this point, I’m “relaxing” the joints by torching each of rear corners and the center attachment point for the forks to see if anything moves. After this step, everything should be flat.


11-20190127_232112.jpg


From this point forward, I had to get it going so I’m going to show further details using the finished chassis.

  • This chassis could be built with many configurations including variations of the fork and rail diameters.
  • This could also easily be built as a straight rail car.
  • In this case, .062 forks, >055 angled rails, 4" W/B, .925 G/L, 65 gr with "windows" in.


1-20190131_082555.jpg


Front details:

  • 3/32 sq. tube as up/downstop. Important to solder this on the ears not the pans.
  • Front hinge rod is .055 in 3/32" tube. I tried .062 but it was just too tight.
  • Small filler to take up the gap between the 2X.055 angled rails and the pre-cut rail slot.
  • There are couple of additional axle uprights in place for bracing and a loop point for leadwires.
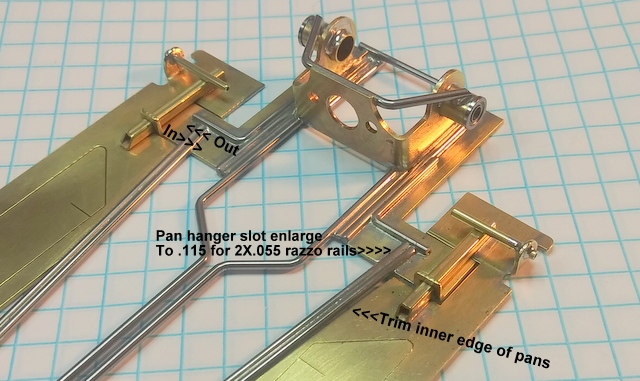
2-20190131_082622.jpg


Pan hanger details:

  • Rail slot needs to be enlarged for the 2X055 angled rails. Slot can be enlarged either inward or outward,
  • If the slot is enlarged outward, as I did here, the inner edge of the pans will need to be trimmed to clear the rails.

3-20190131_082631.jpg


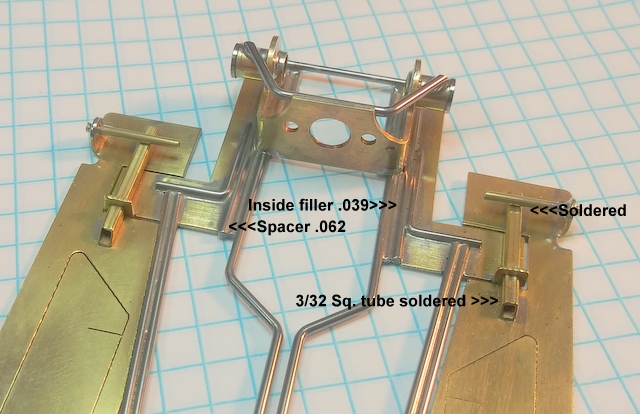
More hanger details:

  • Small filler to compensate for thickness of bracket so that the spacer rail will be flush and runs all the way to the rear
  • Spacer rail is .062 and spaces the pan hanger away from the bracket and to match the depth of the pan cuts.
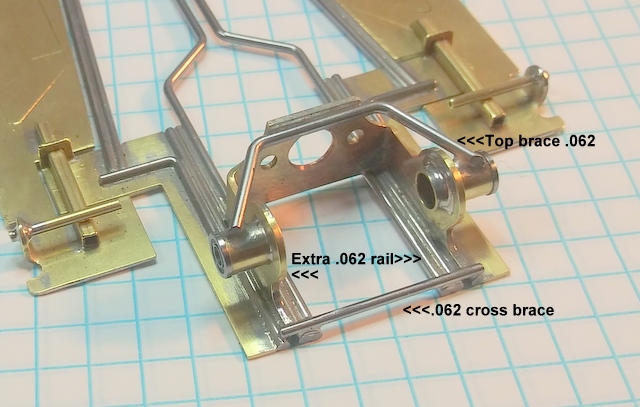
 

5-20190131_082742.jpg


Rear View:

  • Extra bit of .062 inside the bracket for additional soldering surface for cross brace.
  • Cross brace self explanatory.
  • Top brace is something I don't often do on a .050 bracket but did choose to do on this .040 one.
  • Looking at the fillers and spacers from a different angle.


4-20190131_082640.jpg


I'll set this up today and I really hope to travel to Motown this weekend to test it. I haven't touched a controller for a couple months so I'm kinda thinkin' that if I do go, it'll be a "rust chipping" expedition......... :crazy:


  • Jencar17, Tex, miko and 8 others like this
Jim Fowler


#2 MSwiss

MSwiss

    Grand Champion Poster

  • IRRA National Director
  • PipPipPipPipPipPipPipPip
  • 25,916 posts
  • Joined: 16-April 06
  • Gender:Male

Posted 31 January 2019 - 07:44 PM

Great job as always, Jim.

With the ears, did use different/smaller size jig wheels, or did you just run bigger front tires, to make front clearance?

Mike Swiss
 
Inventor of the Low CG guide flag 4/20/18
IRRA® Components Committee Chairman
Five-time USRA National Champion (two G7, one G27, two G7 Senior)
Two-time G7 World Champion (1988, 1990), eight G7 main appearances
Eight-time G7 King track single lap world record holder

17B West Ogden Ave., Westmont, IL 60559, (708) 203-8003, mikeswiss86@hotmail.com (also my PayPal address)

Note: Send all USPS packages and mail to: 692 Citadel Drive, Westmont, Illinois 60559


#3 JimF

JimF

    Posting Leader

  • Full Member
  • PipPipPipPipPipPipPip
  • 2,220 posts
  • Joined: 20-June 07
  • Gender:Male

Posted 31 January 2019 - 08:48 PM

I know exactly why you'd think that.Those are not jig wheels. Those are just retainers made out of scrapped, turned down metal spur gears. I use 'em to hold stuff together and keep center while I'm messing with it in the jig. I set the front at the very end with normal jig wheels.


Jim Fowler

#4 MSwiss

MSwiss

    Grand Champion Poster

  • IRRA National Director
  • PipPipPipPipPipPipPipPip
  • 25,916 posts
  • Joined: 16-April 06
  • Gender:Male

Posted 31 January 2019 - 08:54 PM

It has nothing to do with that pic.


Just that chassis with ears, need a shallower rake, to make .015" clearance , or whatever your org uses.


IOW, a chassis with ears will have less angle, than an earless chassis.


Mike Swiss
 
Inventor of the Low CG guide flag 4/20/18
IRRA® Components Committee Chairman
Five-time USRA National Champion (two G7, one G27, two G7 Senior)
Two-time G7 World Champion (1988, 1990), eight G7 main appearances
Eight-time G7 King track single lap world record holder

17B West Ogden Ave., Westmont, IL 60559, (708) 203-8003, mikeswiss86@hotmail.com (also my PayPal address)

Note: Send all USPS packages and mail to: 692 Citadel Drive, Westmont, Illinois 60559


#5 JimF

JimF

    Posting Leader

  • Full Member
  • PipPipPipPipPipPipPip
  • 2,220 posts
  • Joined: 20-June 07
  • Gender:Male

Posted 31 January 2019 - 11:30 PM

Ah.....misunderstood the question. I've always just used std jig wheels and trimmed the tires a little taller than normal when necessary.


Jim Fowler

#6 JerseyJohn

JerseyJohn

    Jersey John

  • Subscriber
  • PipPipPipPipPipPipPip
  • 4,203 posts
  • Joined: 05-September 07
  • Gender:Male
  • Location:Northern NJ

Posted 31 January 2019 - 11:54 PM

Hay Jim great build on RGEO Rick's chassis kit. Impeccable soldering.
  • olescratch likes this
 

John Chas Molnar

"Certified Newark Wise Guy since 1984" (retired)
"Certified Tony P Chassis God 2007.2023

Retro Chassis Designer-Builder

Jerseyjohnchassis

blog.jpg


#7 JimF

JimF

    Posting Leader

  • Full Member
  • PipPipPipPipPipPipPip
  • 2,220 posts
  • Joined: 20-June 07
  • Gender:Male

Posted 01 February 2019 - 01:43 AM

Thanks JJ


  • JerseyJohn likes this
Jim Fowler

#8 Tom Eatherly

Tom Eatherly

    Posting Leader

  • Full Member
  • PipPipPipPipPipPipPip
  • 2,165 posts
  • Joined: 28-October 11
  • Gender:Male
  • Location:SoCal

Posted 01 February 2019 - 10:12 AM

Very nice, clean build Jim. Flat track chassis there? Looks good as always.


  • JimF likes this
Tom Eatherly

#9 boxerdog

boxerdog

    Race Leader

  • Full Member
  • PipPipPipPipPip
  • 877 posts
  • Joined: 10-November 10
  • Gender:Male
  • Location:Modesto, CA

Posted 01 February 2019 - 10:16 AM

When are you showing up??


David Cummerow

#10 Greg VanPeenen

Greg VanPeenen

    Checkered Flag in Hand

  • Subscriber
  • PipPipPipPipPipPip
  • 1,200 posts
  • Joined: 26-March 10
  • Gender:Male
  • Location:MI

Posted 01 February 2019 - 12:41 PM

Great work as usual Jim.


Don;t forget to take a bit of wire to solder at the rear of the Fork for testing. Another thing you may want to try is to float the front of the Forks. That seems to work very well on that chassis.


Regards,

Greg VanPeenen  


  • JimF likes this
Greg VanPeenen
12/4/49-4/17/24
Requiescat in Pace

#11 JimF

JimF

    Posting Leader

  • Full Member
  • PipPipPipPipPipPipPip
  • 2,220 posts
  • Joined: 20-June 07
  • Gender:Male

Posted 02 February 2019 - 12:37 AM

Thanks for the input Greg, I always appreciate it. I always have a bit of wire ready to solder in at the split. But, I also always want to try it without first, then I'll add at the track in the first session to see what happens. I've also personally always had the forks free in tubes at the front but in this case, Rick asked me to follow his blueprint as closely as possible (which I thought might be your M.O. as well) so that's what I did.


I was thinking I'd get it on track this weekend but right now, it's looking like 2-4 feet of snow Sat>Sun. I'm afraid that if I leave Tahoe tomorrow, I might not get home 'til Mon or Tues. Right now, I can't afford that time away from the job.


Jim Fowler

#12 JimF

JimF

    Posting Leader

  • Full Member
  • PipPipPipPipPipPipPip
  • 2,220 posts
  • Joined: 20-June 07
  • Gender:Male

Posted 02 February 2019 - 12:46 AM

When are you showing up??


I was going to drop by FTH tomorrow to see everyone at the NCSCRA race in the AM, hand out schedules and some chassis repairs that I've done, then head to the campsite tomorrow afternoon. Now, it's looking like 2-4' of snow between Sat>Sun. If that holds up, I won't go this weekend and will stall it to the following.


I'll text you tomorrow if I do go but right now, it's doubtful.


Not the absolute worst thing as I just had a flash of brilliance that I want to try in an F-1 chassis, but can't get done until mid week.


Jim Fowler

#13 JimF

JimF

    Posting Leader

  • Full Member
  • PipPipPipPipPipPipPip
  • 2,220 posts
  • Joined: 20-June 07
  • Gender:Male

Posted 02 February 2019 - 12:50 AM

Very nice, clean build Jim. Flat track chassis there? Looks good as always.


Might just be a flat track chassis. At this point, I just don't know. It's certainly heavy for a Gerding, but actually not bad for what passes for speedways up here in the frozen North. If I knock out the windows, it'll be under 108 all up and that's pretty good for our tracks.


  • boxerdog and Tom Eatherly like this
Jim Fowler

#14 boxerdog

boxerdog

    Race Leader

  • Full Member
  • PipPipPipPipPip
  • 877 posts
  • Joined: 10-November 10
  • Gender:Male
  • Location:Modesto, CA

Posted 02 February 2019 - 09:56 AM

I dropped you a PM. BTW it is miserable down here, lots of rain and wind. I'd stay home and build!


David Cummerow


Electric Dreams Online Shop