Jump to content


Photo

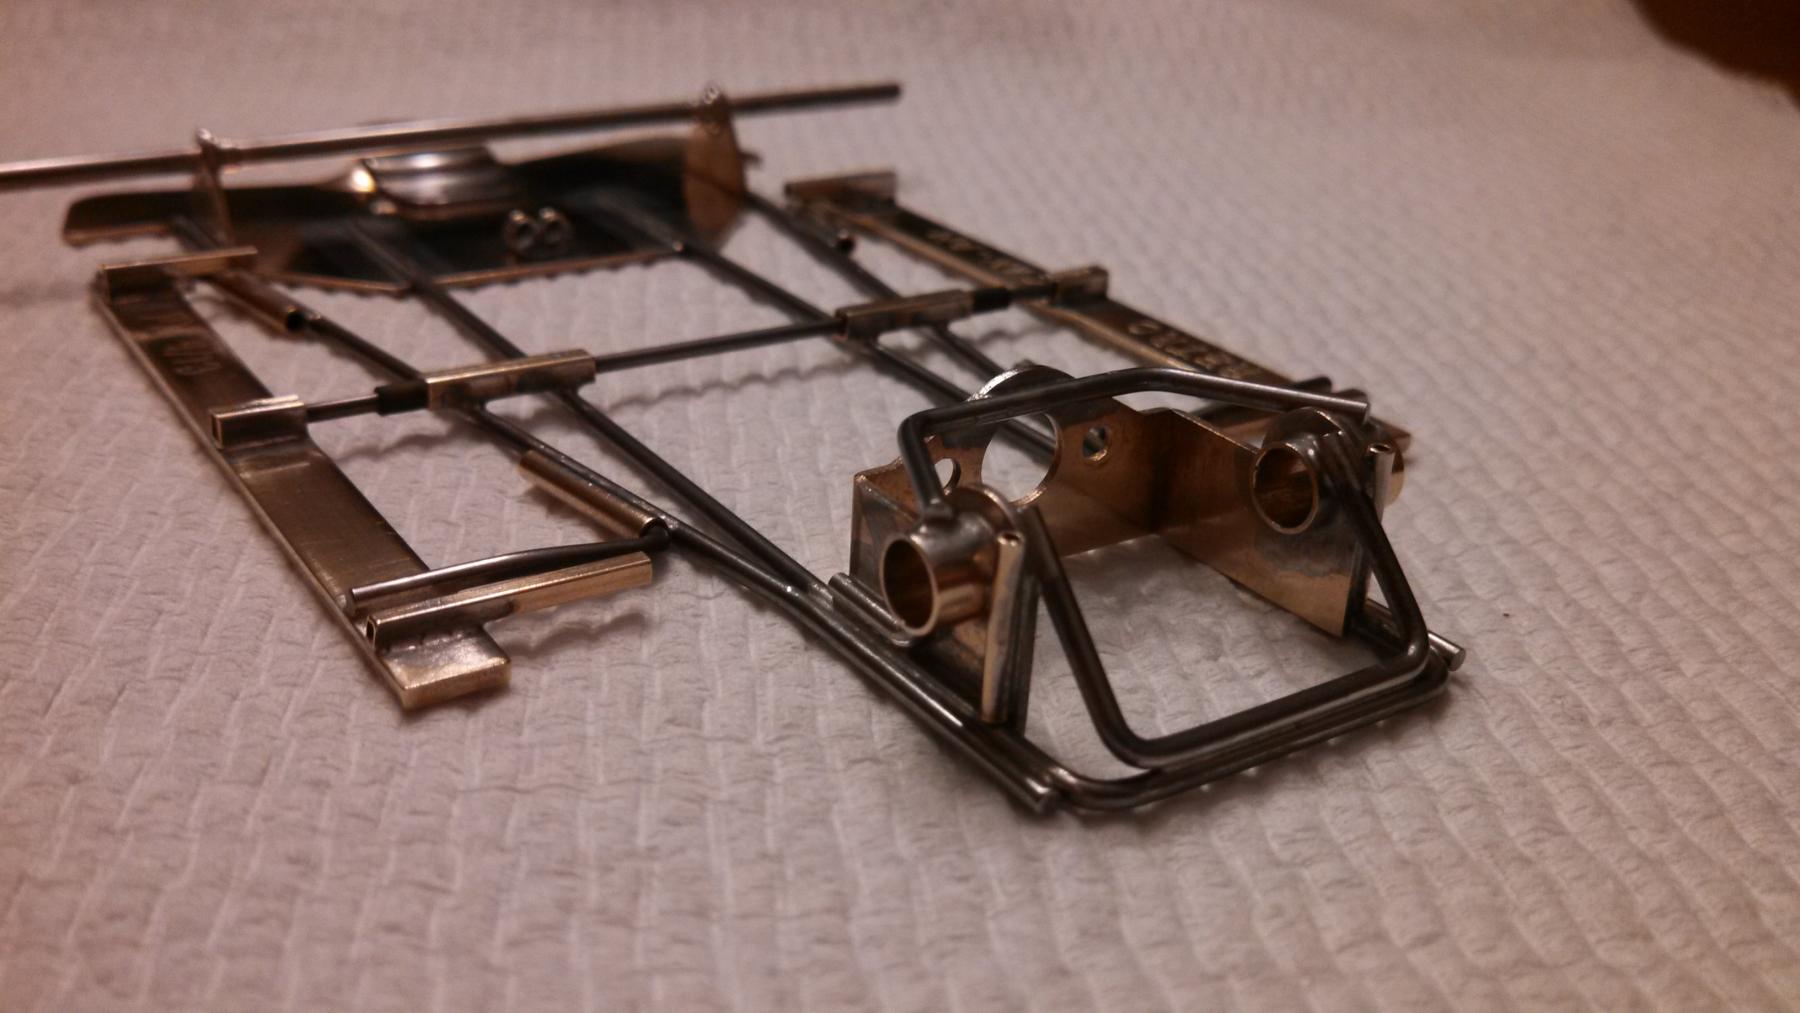
Stock Car chassis first scratchbuild attempt


  • Please log in to reply
9 replies to this topic

#1 dtosetto

dtosetto

    Rookie Keyboard Racer

  • Full Member
  • Pip
  • 22 posts
  • Joined: 14-March 21
  • Gender:Male
  • Location:CO

Posted 13 April 2021 - 10:22 AM

Hello, team,


It's is my first attempt to build an IRRA Stock Car chassis. Can you please point my mistakes, and show me I can improve my skills.

Thank you.


0FA433D1-8466-4B26-B9F3-5FBBCE323229.jpeg


C46C2999-1314-4570-BB42-1F9AF11A8F2F.jpeg


  • Pablo, MSwiss, Tex and 3 others like this


#2 slotcarone

slotcarone

    Posting Leader

  • Full Member
  • PipPipPipPipPipPipPip
  • 3,985 posts
  • Joined: 23-January 07
  • Gender:Male
  • Location:Dutchess County, NY

Posted 13 April 2021 - 11:10 AM

Looks great. My suggestion is to brace the axle tubes and bracket.
  • tonyp and crazyphysicsteacher like this

Mike Katz

Scratchbuilts forever!!


#3 Tim Neja

Tim Neja

    Grand Champion Poster

  • Subscriber
  • PipPipPipPipPipPipPipPip
  • 6,839 posts
  • Joined: 11-June 07
  • Gender:Male
  • Location:Paso Robles

Posted 13 April 2021 - 11:18 AM

A little less solder would keep it cleaner. Use lot's of acid flux-- just enough solder to spread after the heat is applied.  Then keep cleaning after soldering.  Nice job--- looks good!


She's real fine, my 409!!!

#4 Dominator

Dominator

    Posting Leader

  • IRRA National Director
  • PipPipPipPipPipPipPip
  • 2,925 posts
  • Joined: 19-September 07
  • Gender:Male

Posted 13 April 2021 - 11:44 AM

Nice job Daniel. Like Mike said, definitely brace the axle tunes. Once you have tried it if you find you need more weight add a floating center weight. I usually use .016 brass for this so I can add as little or as much weight is needed.

A motor is only as fast as the chassis it's in.
 
Dominic Luongo
Like Dominator Custom Chassis on Facebook
 
NERR photos from 2012-April 2016
NERR photos from 2016 to now


#5 Pablo

Pablo

    Builder

  • Administrator
  • PipPipPipPipPipPipPipPip
  • 18,447 posts
  • Joined: 20-February 06
  • Gender:Male
  • Location:Cleveland, Tennessee

Posted 13 April 2021 - 12:06 PM

Excellent work for the first time, great job!  :D


  • aquavelvis likes this

Paul Wolcott


#6 dtosetto

dtosetto

    Rookie Keyboard Racer

  • Full Member
  • Pip
  • 22 posts
  • Joined: 14-March 21
  • Gender:Male
  • Location:CO

Posted 13 April 2021 - 05:02 PM

A little modification, thank you everyone for the feedback.

Attached Images

  • C6F649A9-07BD-4C83-8E54-654CE25FCDC7.jpeg

  • crazyphysicsteacher likes this

#7 slotcarone

slotcarone

    Posting Leader

  • Full Member
  • PipPipPipPipPipPipPip
  • 3,985 posts
  • Joined: 23-January 07
  • Gender:Male
  • Location:Dutchess County, NY

Posted 13 April 2021 - 06:37 PM

It looks like there were not any axle tubes originally and then you added them? Did you start with a long tube going across and then cut it? You have to cut the tubes almost flush with the inside of the bracket. Here you can see some bracing..IMG_20130901_205018_085.jpg

  • tonyp and Frank-Peter van de Goor like this

Mike Katz

Scratchbuilts forever!!


#8 dtosetto

dtosetto

    Rookie Keyboard Racer

  • Full Member
  • Pip
  • 22 posts
  • Joined: 14-March 21
  • Gender:Male
  • Location:CO

Posted 13 April 2021 - 07:06 PM

Yes, I started with a long tube, soldered and cut,now I’m going to trim, thank you for your suggestion I’m going to do the same bracing as your chassis.
I really appreciated your help and time.

#9 crazyphysicsteacher

crazyphysicsteacher

    On The Lead Lap

  • Full Member
  • PipPipPipPip
  • 364 posts
  • Joined: 04-March 12
  • Gender:Male
  • Location:NJ

Posted 18 April 2021 - 03:42 PM

For the bracket, make a square u and use it to brace the inside. The center flat of the u should go against the bottom of the bracket by the motor and the two ends go over the top of the tubes on the inside. 055 is a good compromise for this. Also use some 047 to make a brace on each upright in the front to keep them from bending in a side wall hit. Put the brace behind the Axle. And if you did not already, add a color on each end of the Axle to give more surface area to solder it to the uprights in the front.
It looks good, practice and repairs will make your next ones look better.

Sent from my Nokia 7.1 using Tapatalk

Chris Wendel
Silver Side Down Racing
Silver Side Down Graphics

​The Race Place Retro Crew member

"Failure teaches way more than success. It shows what does not work and what to never do again, again..." 🙊🙈🙉  


#10 Justin

Justin

    Mid-Pack Racer

  • Full Member
  • PipPipPip
  • 160 posts
  • Joined: 29-February 08
  • Gender:Male
  • Location:Loveland, CO

Posted 12 June 2021 - 03:30 PM

Looks good Daniel, nice job
Justin Kill
(970)-581-8134 (cell)
Overkill Racecars


Electric Dreams Online Shop