Jump to content


Photo

Scratchbuilt two-lane folding test track


  • Please log in to reply
8 replies to this topic

#1 Alchemist

Alchemist

    Posting Leader

  • Full Member
  • PipPipPipPipPipPipPip
  • 2,703 posts
  • Joined: 11-November 09
  • Gender:Male
  • Location:Far, far away

Posted 01 May 2021 - 12:45 AM

I wanted a track that I could easily put away when not in use, so I decided to try my hand at building a folding track and hoping to keep it lightweight?!


I started it the later part of 2020, after I posted my initial experience with finding a router guide strip.


I was working as efficiently as I knew how, hoping to get the track at least primered before the cold weather set in.


I did get it in primer, but unfortunately the winter cold temperature set in.


I made an attempt to heat up the garage as well as getting enough airflow to draw out the solvents of the primer.


I used automotive 2K primer surfacer because I had some leftover from a project car.


I'm at a standstill at this time, because there are a few primer cracks caused by solvent being trapped and finally gassing out.


The reason I'm at a standstill is I'm undecided if I want to continue with it, or sell it as is.


I just assembled it as it sits at this time; it seems close to being done (after the primer cracks are addressed), with only final block sanding of the other half, painting the track, laying down the copper tape and wiring it up/


Here are photos, of my very first attempt at building my own home test track.


Starting out with 2 pieces of 1/2" thick birch plywood cut to 3 ft x 6-1/2 ft sizes.


Footprint is 3 ft x 13 ft  with a 12 ft long straightaway.    


Unsanded Side.jpg


Uncut weight of 55 lbs.


Uncut Weight.jpg


Placed the 2 sheets together and started to layout the guide for the router.


The router guide was screwed into place.


I used 1/2" PEX tubing to aid with the curves.


Track Guide Layout_3.jpg


Track Guide Layout_4.jpg


Track Guide Layout_5.jpg


Track Guide Layout_6.jpg


I made an rod coupler from a dowel to butt the ends together.


Track Guide Layout_7_Butt Fit.jpg


Aligned and butted together.


Track Guide Layout_8_Butt Fitted.jpg


Router guide layout completed.


Track Guide Layout_Outer Done1.jpg


Track Guide Layout_Outer Done2.jpg


Starting to route slot.


Starting to Route Slot.jpg


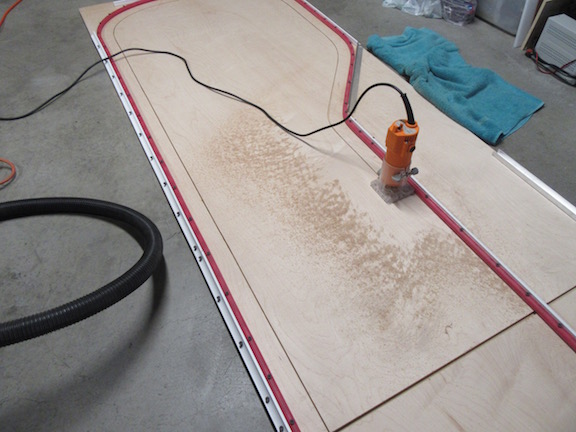
Finished first slot.


Starting to Route_Completed.jpg


I fabricated a jig for the second slot from aluminum composite with the addition of nylon glide strips.


Slot Guide Jig.jpg


Starting to route the second slot.


Second Slot with Jig.jpg


Second slot complete.


Second Slot with Jig_Completed.jpg


 I cut out areas in an attempt to lighten the weight.


Got the weight of both boards to 40 lbs.       


Cut Weight.jpg


Cutouts_1.jpg


Cutouts_2.jpg


Removed router guides and filled screw holes by gluing in wooden hole plugs I made from a dowel.


Screw Hole Plug_1.jpg


Then flush cut them and sanded flat.


Screw Hole Plug_2_Flushcut.jpg


Had a good size piece fracture that come off which was repaired.


Fracture.jpg    


Fracture_Repaired.jpg


I then guide coated the boards, filled some minor flaws and started to blocksand.


I felt a bunch of waves which is why I decided to blocksand the surface prior to applying the primer surfacer.


Guidecoated.jpg


Finished blocksanding and ready for primer surfacer.


Blocksanded.jpg


Primered and guidecoated.


Primered Guidecoated.jpg


Finished blocksanding one side and then had to wait for a few months for warmer weather.


Sanded Side.jpg


I thought all was going well, but upon recent inspection I discovered a few areas that had cracks in the primer.


Primer Crack_1.jpg


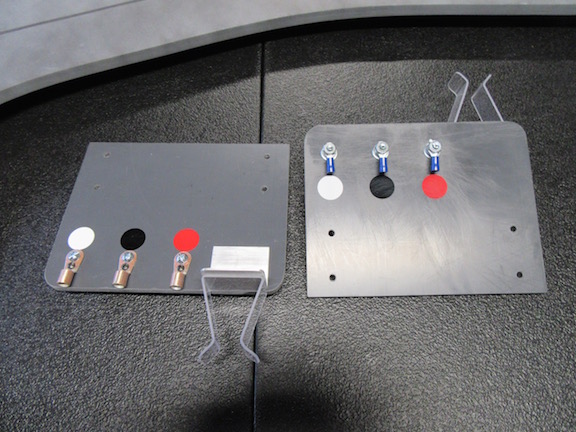
For the controller stations, I used strips of polycarbonate, which I bent to shape, as well as employing terminal ends for 10 awg wire, screwed onto 1/4" thick PVC board for the controller alligator clips.


Controller Holder_Pieces.jpg


Controller Piece_Bending.jpg


Controller Holder_Bent.jpg


Protective covering removed and then mounted onto the PVC Board.


Controller Holder_Finished.jpg


Controller Tested for fitment.


Controller Holder_Test.jpg      


Controller Holder_Test2.jpg


Controller Panel - top and bottom photo.


Controller Panel_Top:Bottom.jpg


Track assembled with Controller Stations Mounted.


Controller Panel_Closeup_1.jpg      


Controller Panel_Closeup_2.jpg


Controller Setup_1.jpg


Controller Setup_2.jpg


Thank you for looking.


Ernie


  • Tim Neja, Lou E, Mike Patterson and 8 others like this
Ernie Layacan


#2 Steve Ogilvie

Steve Ogilvie

    Race Leader

  • Subscriber
  • PipPipPipPipPip
  • 630 posts
  • Joined: 17-November 14
  • Gender:Male
  • Location:Kincardine, Ontario, Canada

Posted 01 May 2021 - 07:01 AM

Nice and tidy, you have done a great job. Can't wait to see how it will fold up. This is something a few people asked me to make over the years but I never had time to develop a prototype.


#3 MSwiss

MSwiss

    Grand Champion Poster

  • IRRA National Director
  • PipPipPipPipPipPipPipPip
  • 25,916 posts
  • Joined: 16-April 06
  • Gender:Male

Posted 01 May 2021 - 11:23 AM

Cool.

I love your alligator clip hookup setup.

If you plan to keep it and run on it seriously/often, you should consider using braid vs. copper tape.
  • NSwanberg likes this

Mike Swiss
 
Inventor of the Low CG guide flag 4/20/18
IRRA® Components Committee Chairman
Five-time USRA National Champion (two G7, one G27, two G7 Senior)
Two-time G7 World Champion (1988, 1990), eight G7 main appearances
Eight-time G7 King track single lap world record holder

17B West Ogden Ave., Westmont, IL 60559, (708) 203-8003, mikeswiss86@hotmail.com (also my PayPal address)

Note: Send all USPS packages and mail to: 692 Citadel Drive, Westmont, Illinois 60559


#4 Alchemist

Alchemist

    Posting Leader

  • Full Member
  • PipPipPipPipPipPipPip
  • 2,703 posts
  • Joined: 11-November 09
  • Gender:Male
  • Location:Far, far away

Posted 01 May 2021 - 11:54 AM

Hi Steve,


Thank you so much for the kind words - it's appreciated!


Thank you Mike,


As this is my first attempt at constructing a test track, I elected to go with the copper tape for convenience;  braid is a serious consideration should I attempt to do another track.


I came up with this idea for the alligator clip connector because of my wife!  LOL


Whenever we would visit the commercial track, at least once, one of her controller clips would pop off or I would look at the clips and see that they move around quite a bit.


With this setup, the clips have a good "bite" and the terminal neck prevents the clips from moving about.


I also wanted to ensure there wasn't a possibility of shorting.


My wife helped me fold up the track this morning.


You can see the center hinge, which has aluminum support plates underneath which are much wider.


The aluminum channels you see on both side edges are "alignment bridges".


Obviously, being wood, they are not perfectly flat and these pieces keep everything in "alignment/flat".


Track Center Hinge.jpg


Track folded in half.


Track Folded_1.jpg


Note the white towel under one of the controller panels (CP).


I located the CPs in that position because I wanted to keep the width of the track as narrow as possible, due to the limited space I have.


So, when we started to fold it over, I hadn't realized the one CP would be laying on top of the track, thus causing the controller holder to damage the surface.


Thus, the towel prevents this from happening at this time.


If I had placed the CP on the straightaway side, it would not have been an issue, but as I mentioned, I was wanting to keep the width at a minimum.


Should I decide to finish the track, I would make a protective hood for the CP to prevent damaging the track surface when folded.


Here you can see the aluminum support bracket.


The blocks you see, are support blocks to raise up the track from the table; without them, the controller panel causes a slight tilt to the track near that area.


Track Folded_2.jpg


As for putting the track away, when folded, it's approximately 3-1/2 inches in height so it fits perfectly UNDERNEATH THE CAR!  LOL


Thank you for looking.


Ernie


  • Tim Neja and Steve Ogilvie like this
Ernie Layacan

#5 Lou E

Lou E

    Backmarker

  • Full Member
  • PipPip
  • 78 posts
  • Joined: 16-July 07
  • Gender:Male
  • Location:NJ

Posted 02 May 2021 - 05:47 AM

That is a cool track and you did really nice work so far, may have to your controller hookup idea on my track.  Hopefully you decide to finish it and show us the completed track.


  • Tim Neja likes this
Lou Esteves

#6 Tim Neja

Tim Neja

    Grand Champion Poster

  • Subscriber
  • PipPipPipPipPipPipPipPip
  • 6,844 posts
  • Joined: 11-June 07
  • Gender:Male
  • Location:Paso Robles

Posted 02 May 2021 - 12:08 PM

You've already done so much of the hard work-- it would be a shame not to finish it and play with it!! A lot of nice ideas--congratulations on your innovations!! 


She's real fine, my 409!!!

#7 Paul Menkens

Paul Menkens

    On The Lead Lap

  • Full Member
  • PipPipPipPip
  • 434 posts
  • Joined: 02-February 21
  • Gender:Male
  • Location:VT

Posted 03 May 2021 - 08:55 PM

I'd stay with the copper tape, I've routed 3 tracks with excellent results, 1 with braid and 2 with tape, braid is a lot more work and doesn't work any better, on a commercial track braid is a necessity but for home use tape is easy to maintain and you can buy a lot of rolls of tape at $12 a roll!


#8 Bill from NH

Bill from NH

    Age scrubs away speed!

  • Full Member
  • PipPipPipPipPipPipPipPip
  • 14,774 posts
  • Joined: 02-August 07
  • Gender:Male
  • Location:New Boston, NH

Posted 03 May 2021 - 09:43 PM

A lot of home & club tracks use tape because the tracks don't see constant use like a commercial track would, plus it's less work to put down than braid & cheaper too. I don't have my own home track, but I've helped re-braid a couple commercial tracks in the past.


  • Paul Menkens likes this
Bill Fernald
 
I intend to live forever!  So far, so good.  :laugh2:  :laugh2: 

#9 Larry Horner

Larry Horner

    On The Lead Lap

  • Full Member
  • PipPipPipPip
  • 467 posts
  • Joined: 18-March 17
  • Gender:Male
  • Location:San Francisco

Posted 21 May 2021 - 11:48 AM

Ernie, I'm a bit late to this party but I love what you're doing here! And your router jig that allowed you to rout the second lane from the first is a very elegant solution. Any updates? Expiring minds want to know!


Electric Dreams Online Shop