

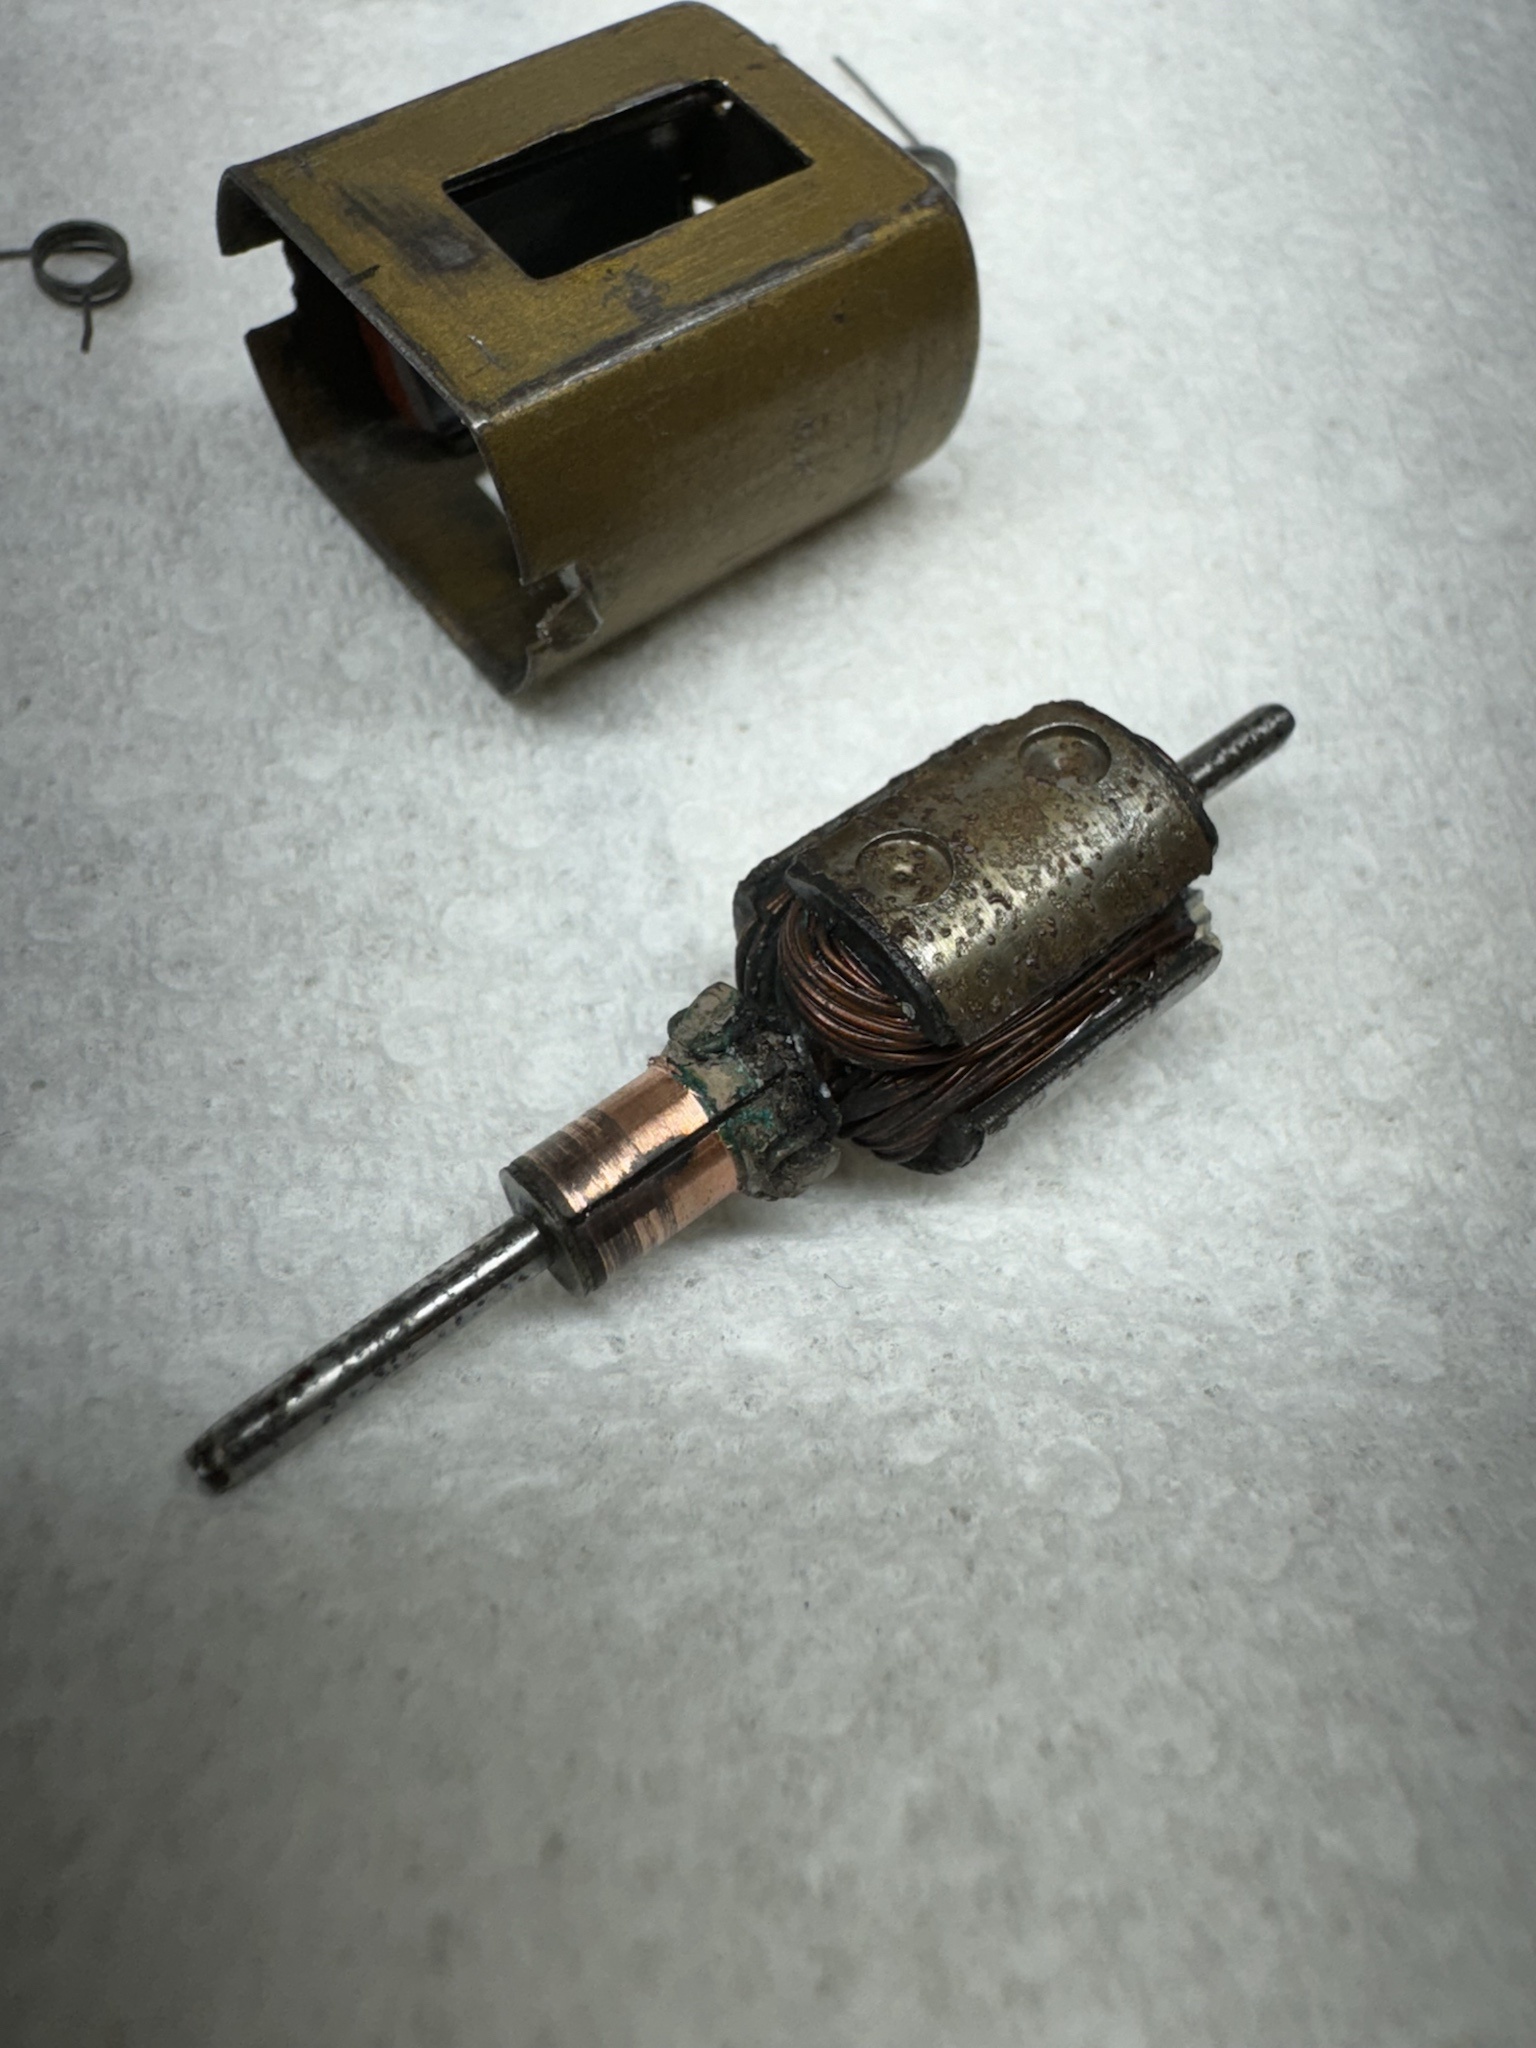
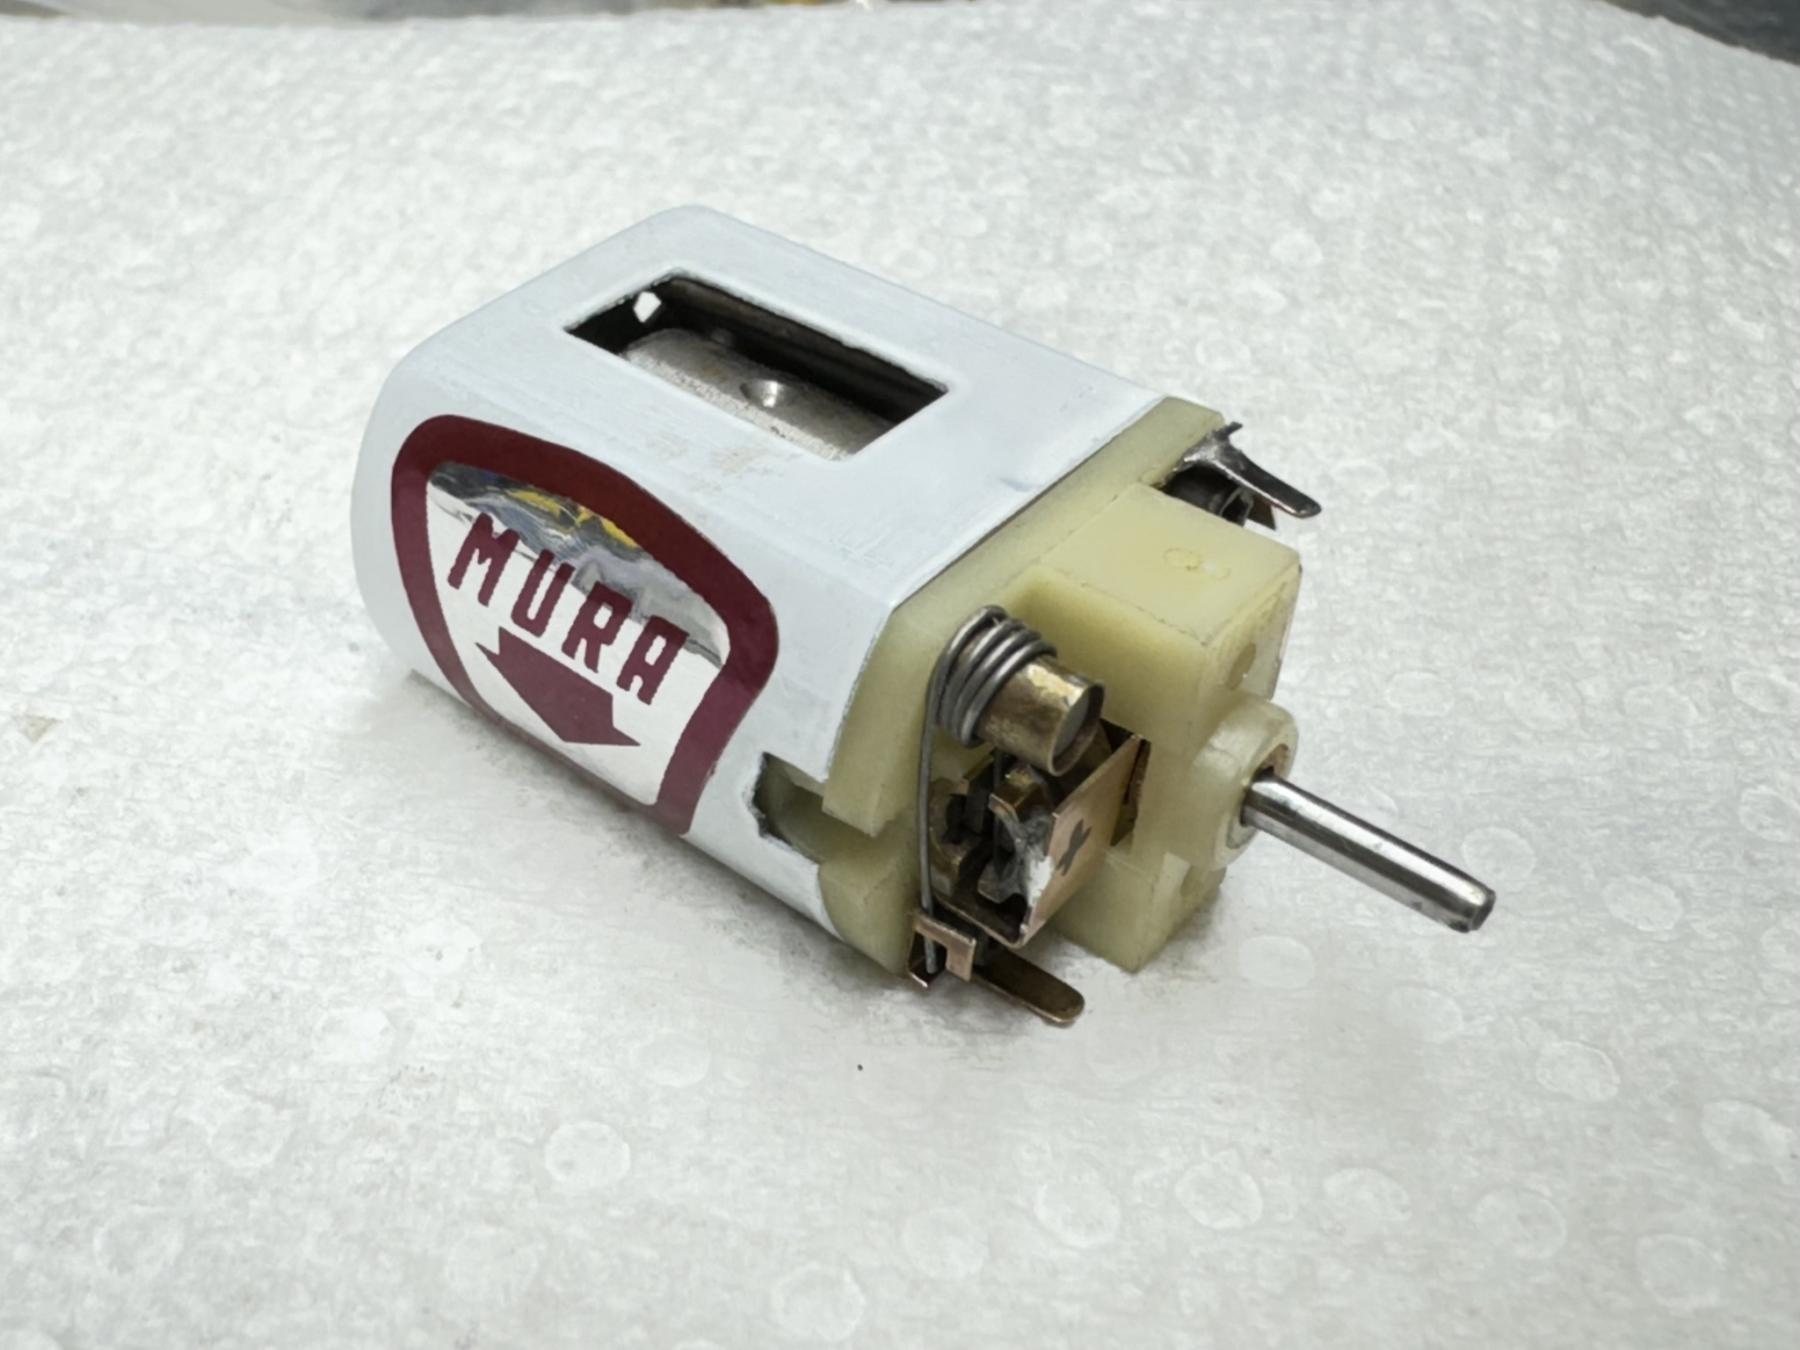
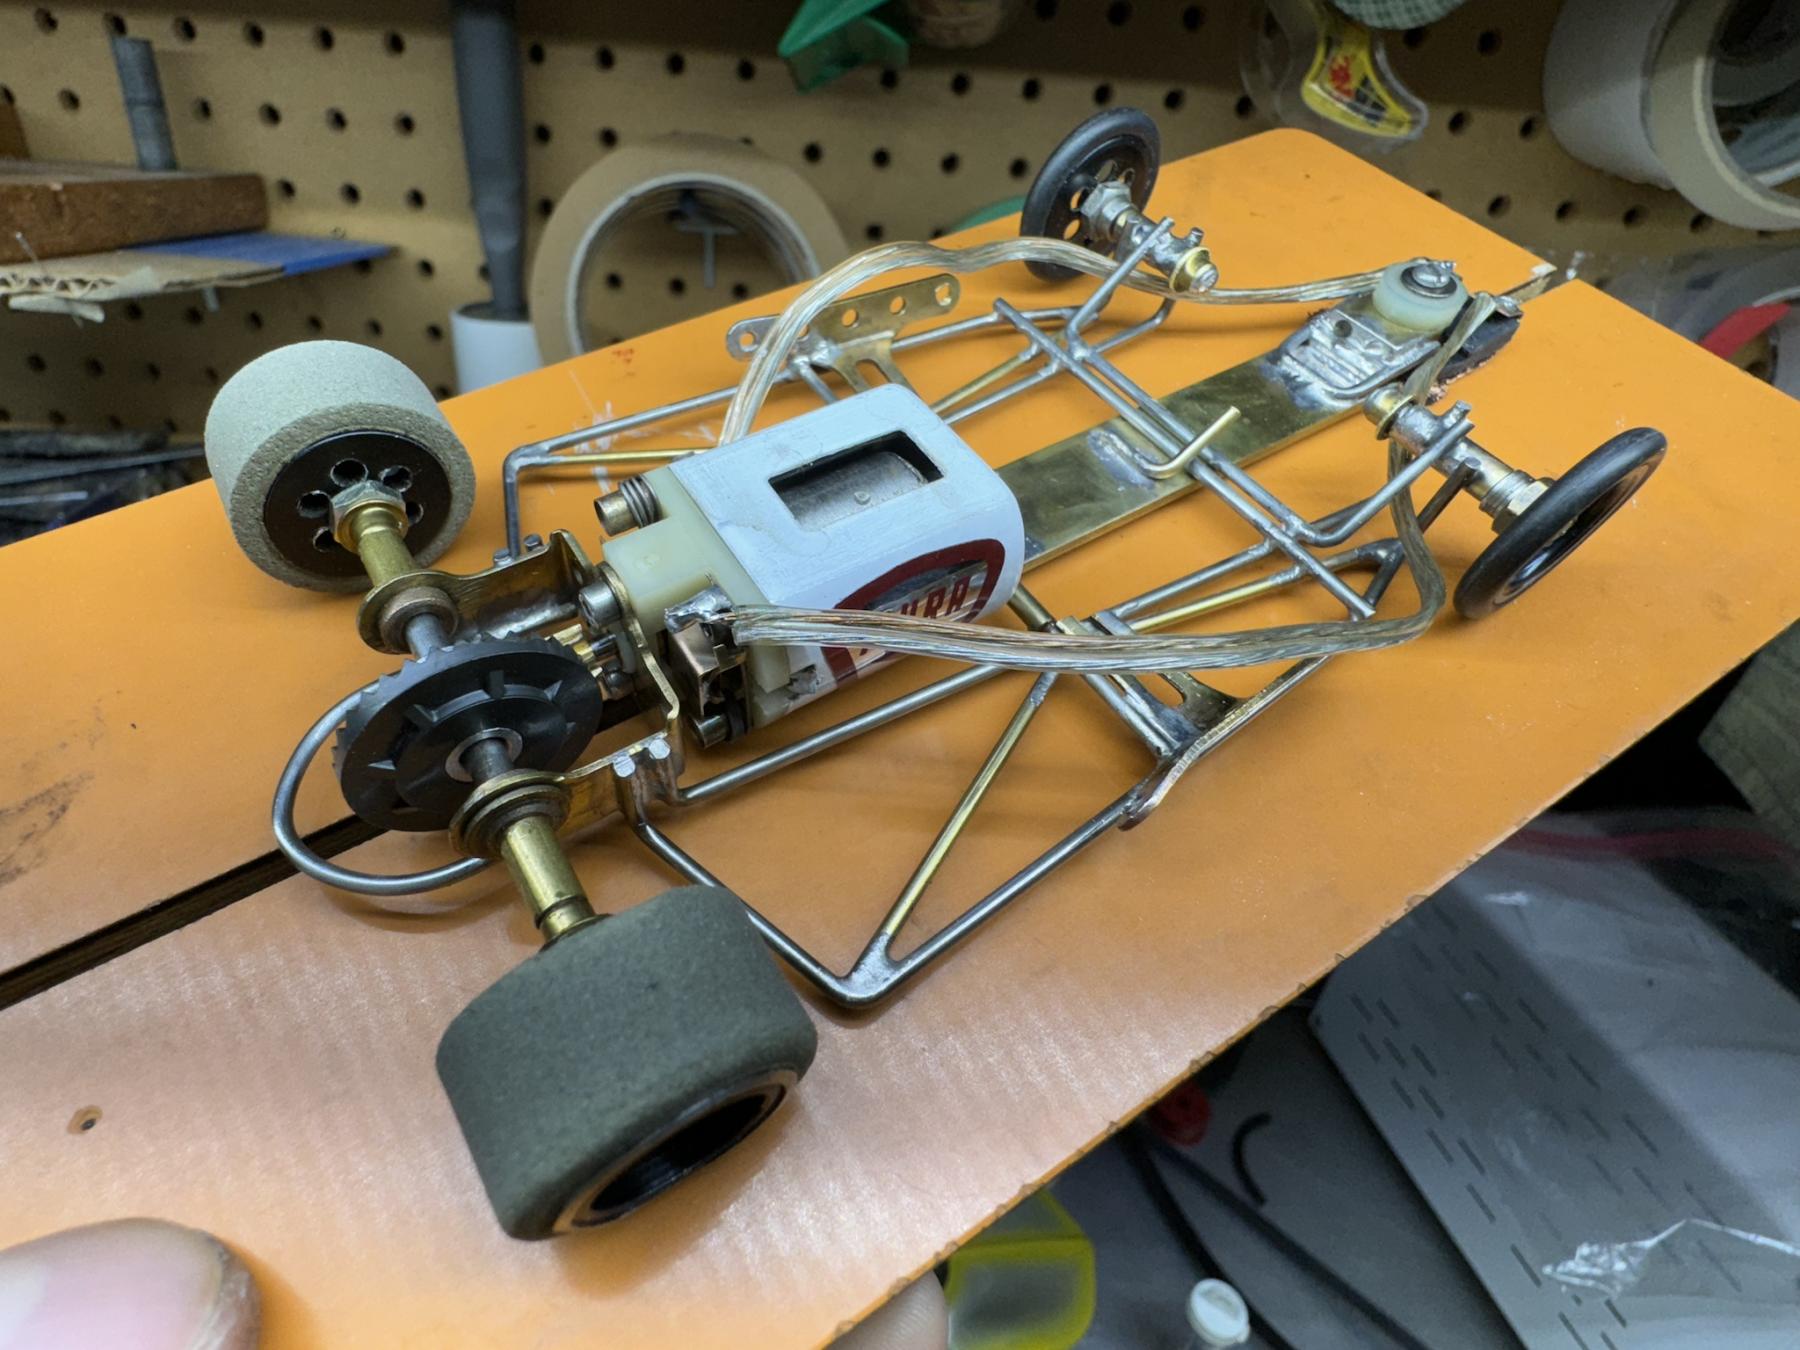
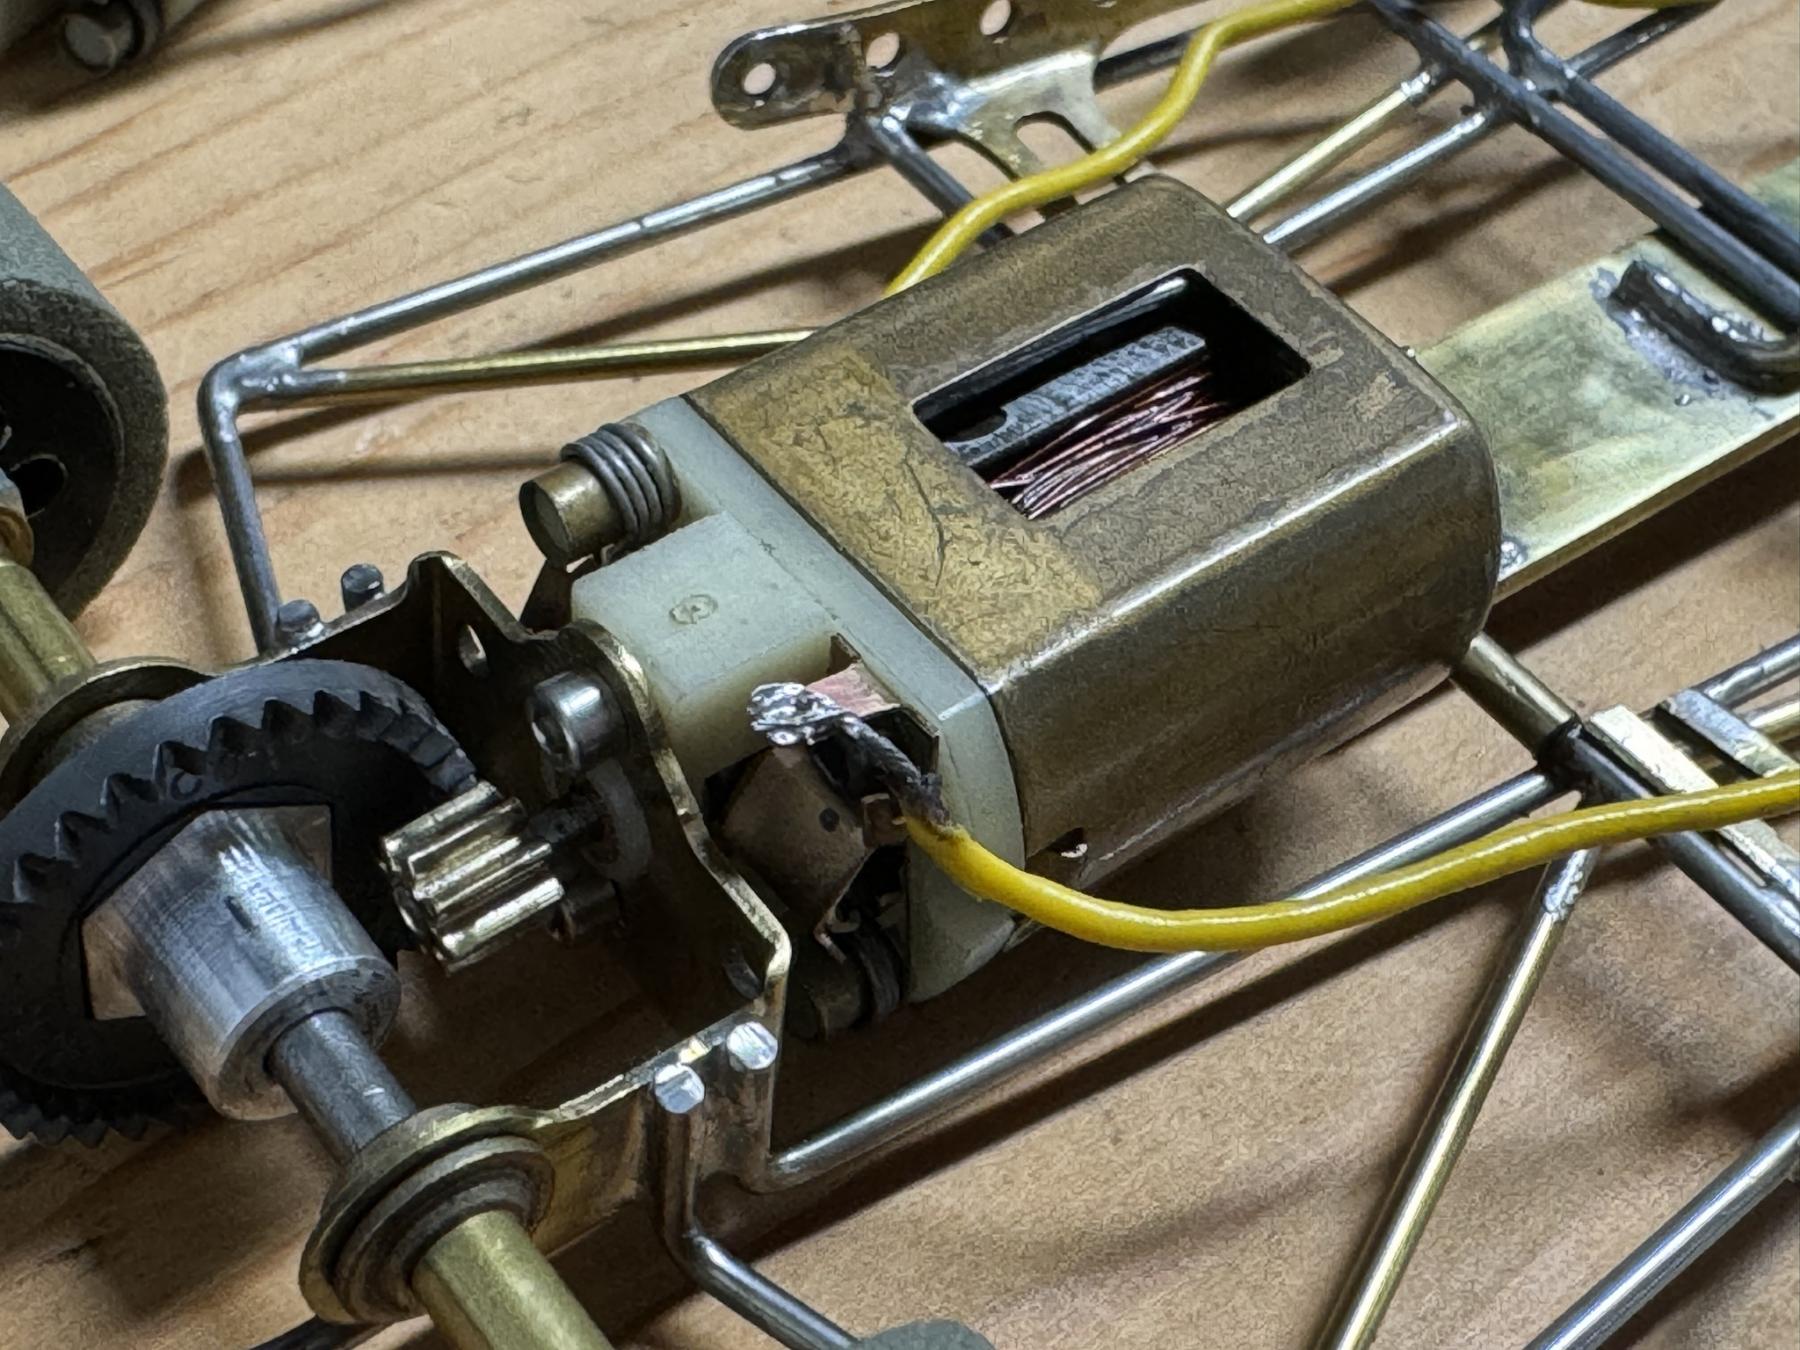
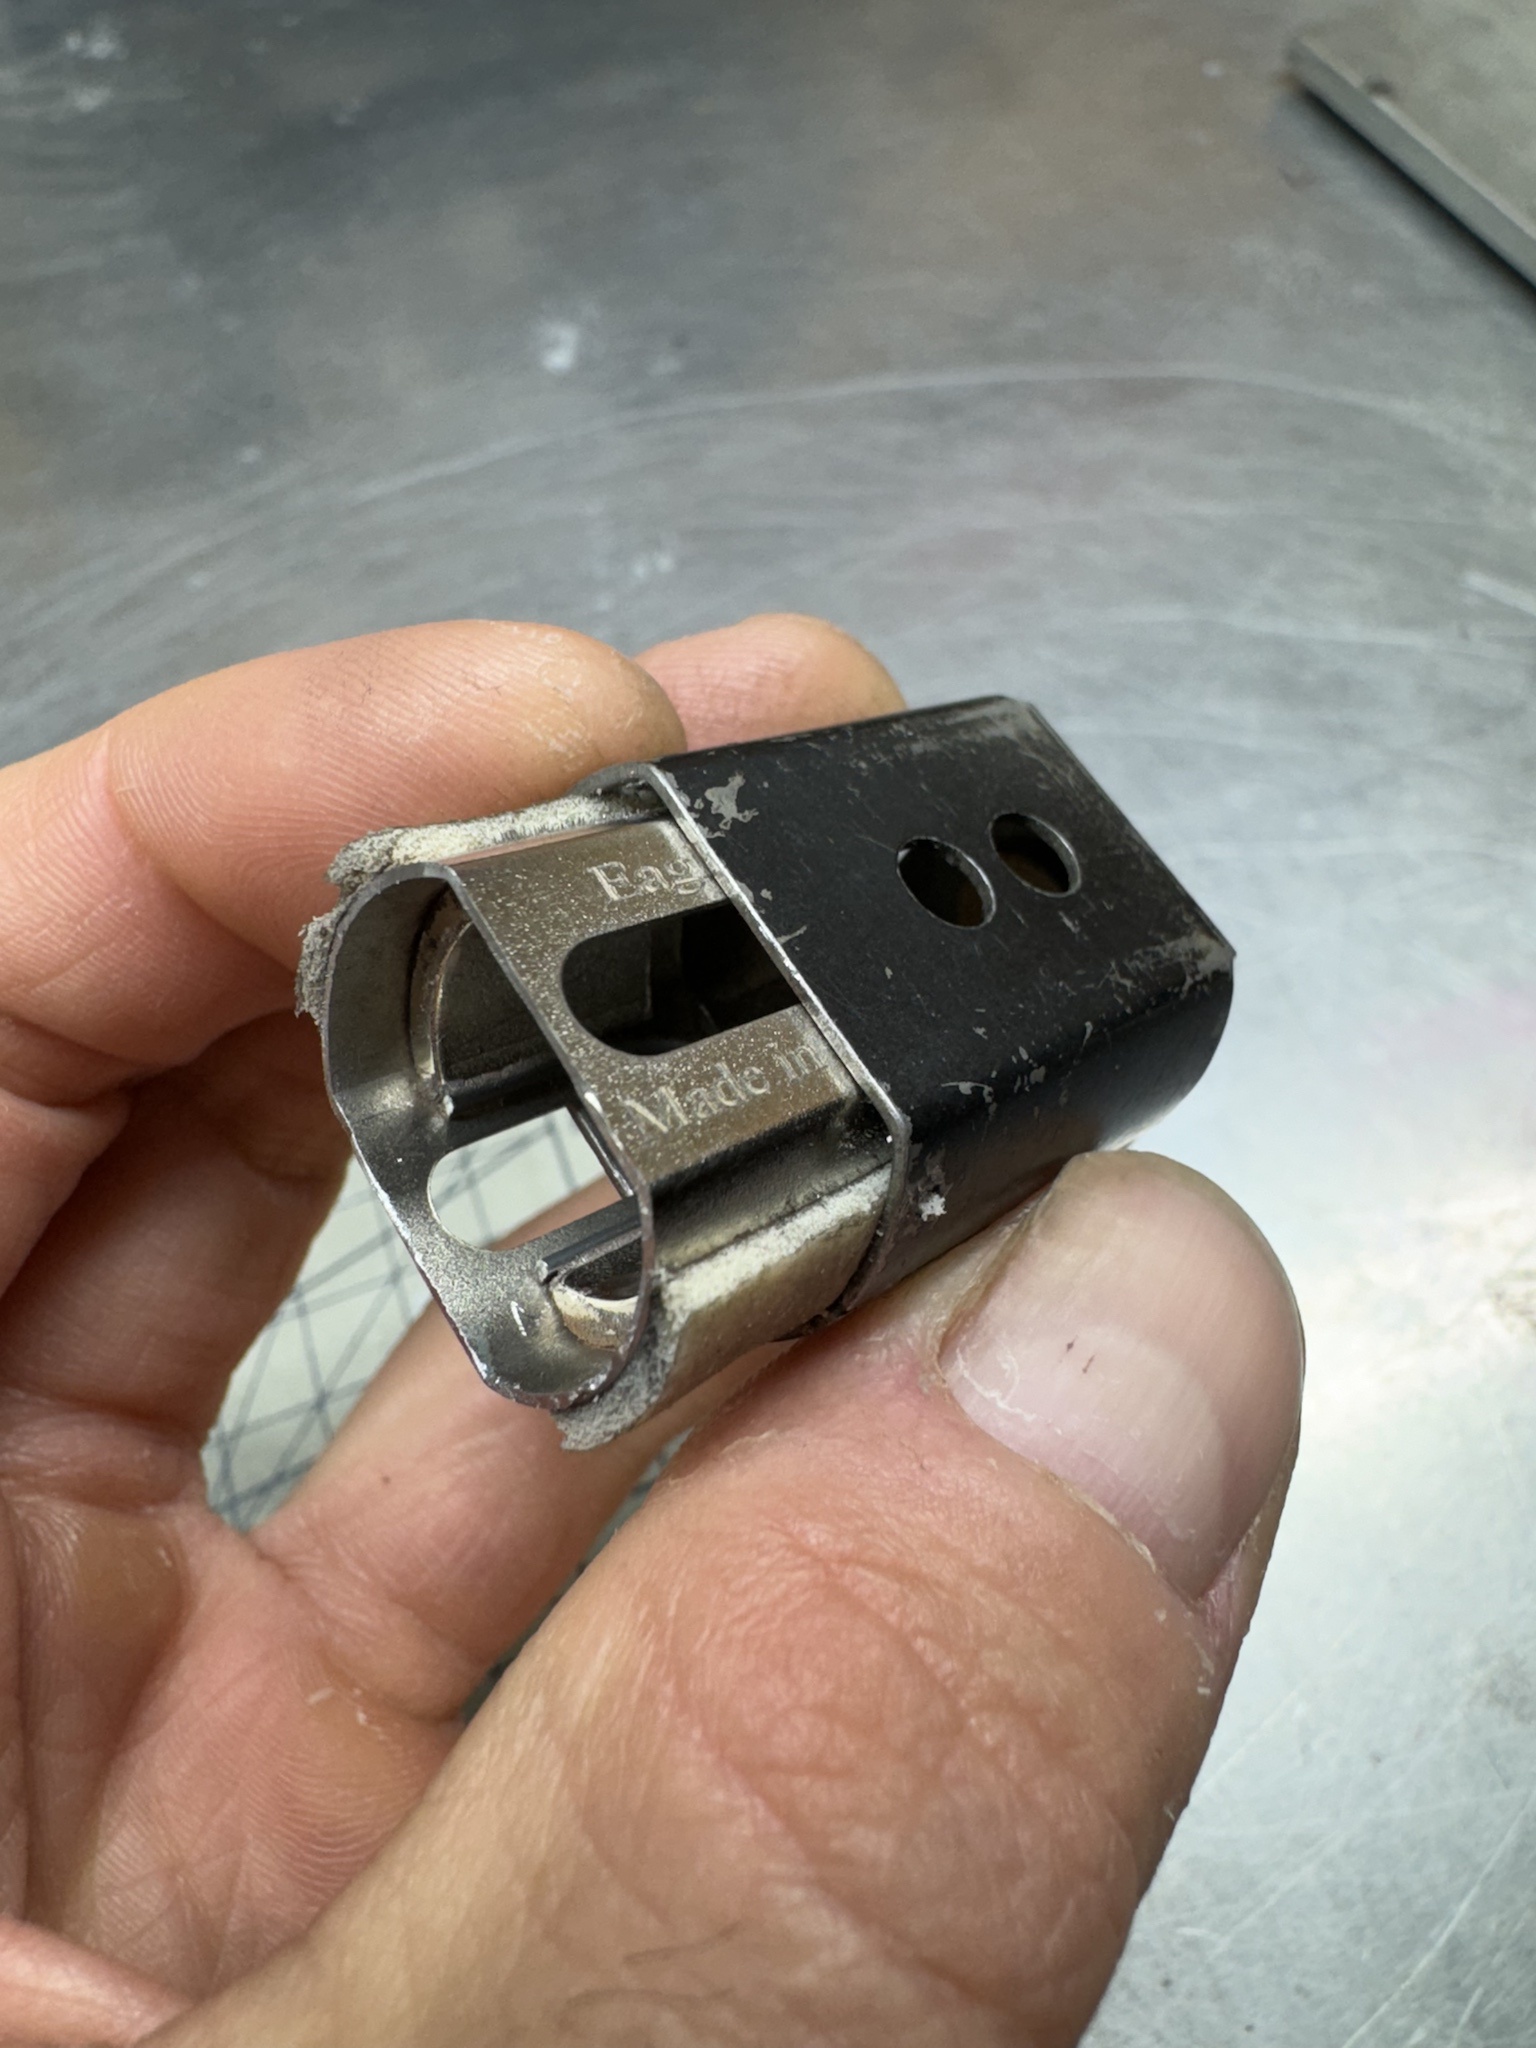
I'm lacking in the EBD ft16 motor category besides some slow stock russkit 23s so I decided to try and cobble together something from my parts. I have a bunch of blown up ft16s and all kinds of unknown motor bits and pieces Ive collected. I took a really ratty old Russkit can and drilled out the blind bearing and poorly soldered in a ball bearing. i know the magnets are always weak on these old motors so I shoe horned in some Parma 16d magnets (no idea if good or bad idea). I have a bunch of cool Mura Im guessing? rewinds from my Ron Aguirre stash so I grabbed a random crusty one (I dont know how to tell if its going to be a hot arm or not). I cleaned the melted foam off real quick and cut the comm.
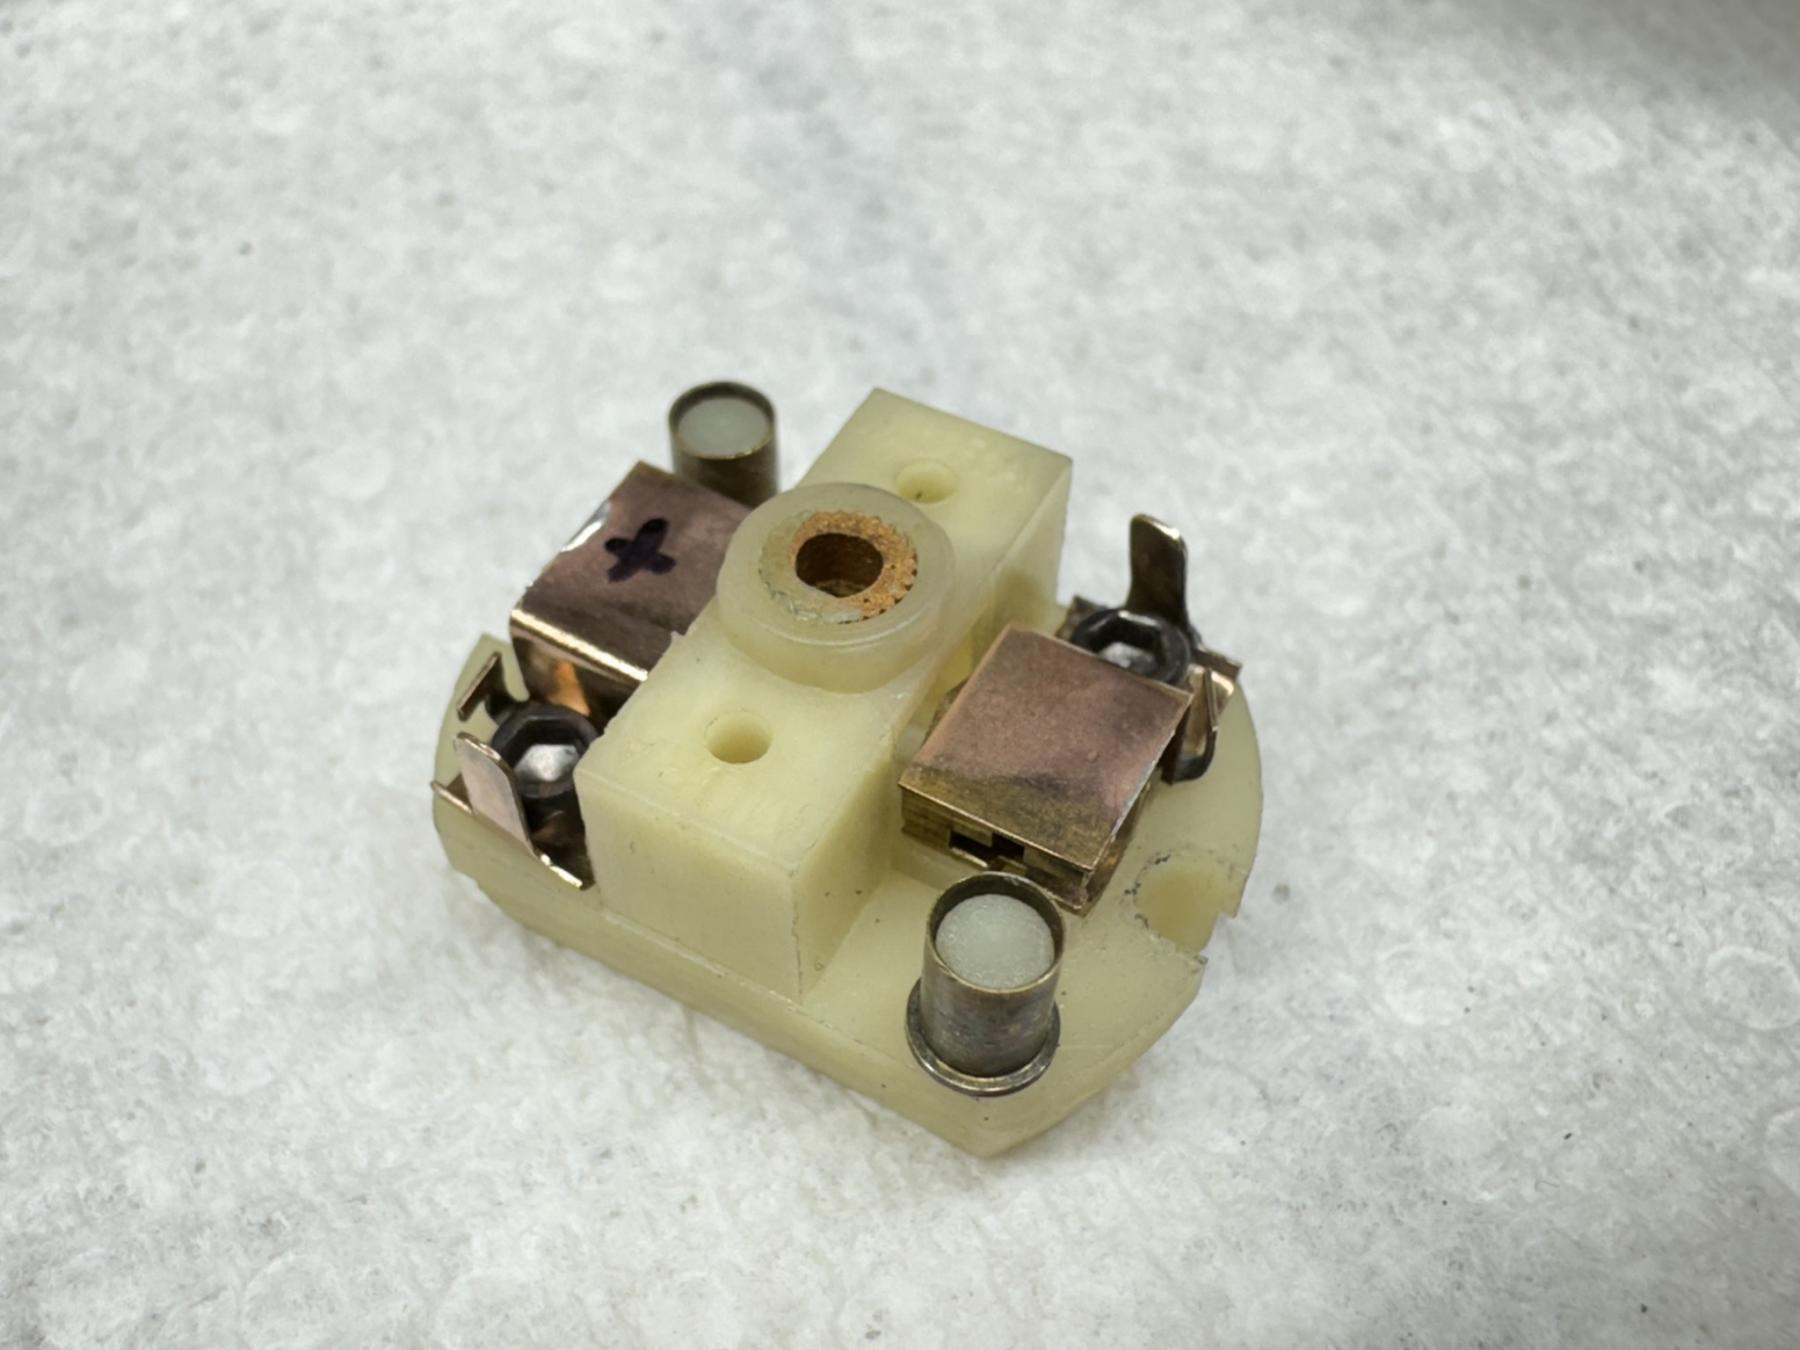
I did my best with the little bit of info I read on bulletproofing these mabuchi endbells so I soldered the brush hoods to the guides and installed some post protectors. no idea what brush springs these are but they fit over the post protectors so I used them. stock russkit 23 brushes. I have shunted brushes but didnt check if they are for a ft16 they are probably mura. testing motor on my power supply with the motor running counter clockwise looking and the endbell it would only start going at around 2.5V with a bump start with my fingers. no smoke but but the RPMs where climbing as the brushes started to seat and break in a bit. got fairly hot pretty quick. I sprayed out with motor spray and did another dry run. ran a little better and didnt get as hot. still feel like this is probably going to melt and that arm isnt even meant for this type of motor and is probably meant for a Mura B can or something?

No idea what I'm doing: FT16 build
#1

-
- Full Member
-

- 869 posts Joined: 03-February 19
Race Leader
- Gender:Male
- Location:SoCal
Posted 12 November 2024 - 11:09 PM
#2
-
- Full Member
-
- 869 posts Joined: 03-February 19
Race Leader
- Gender:Male
- Location:SoCal
Posted 12 November 2024 - 11:13 PM
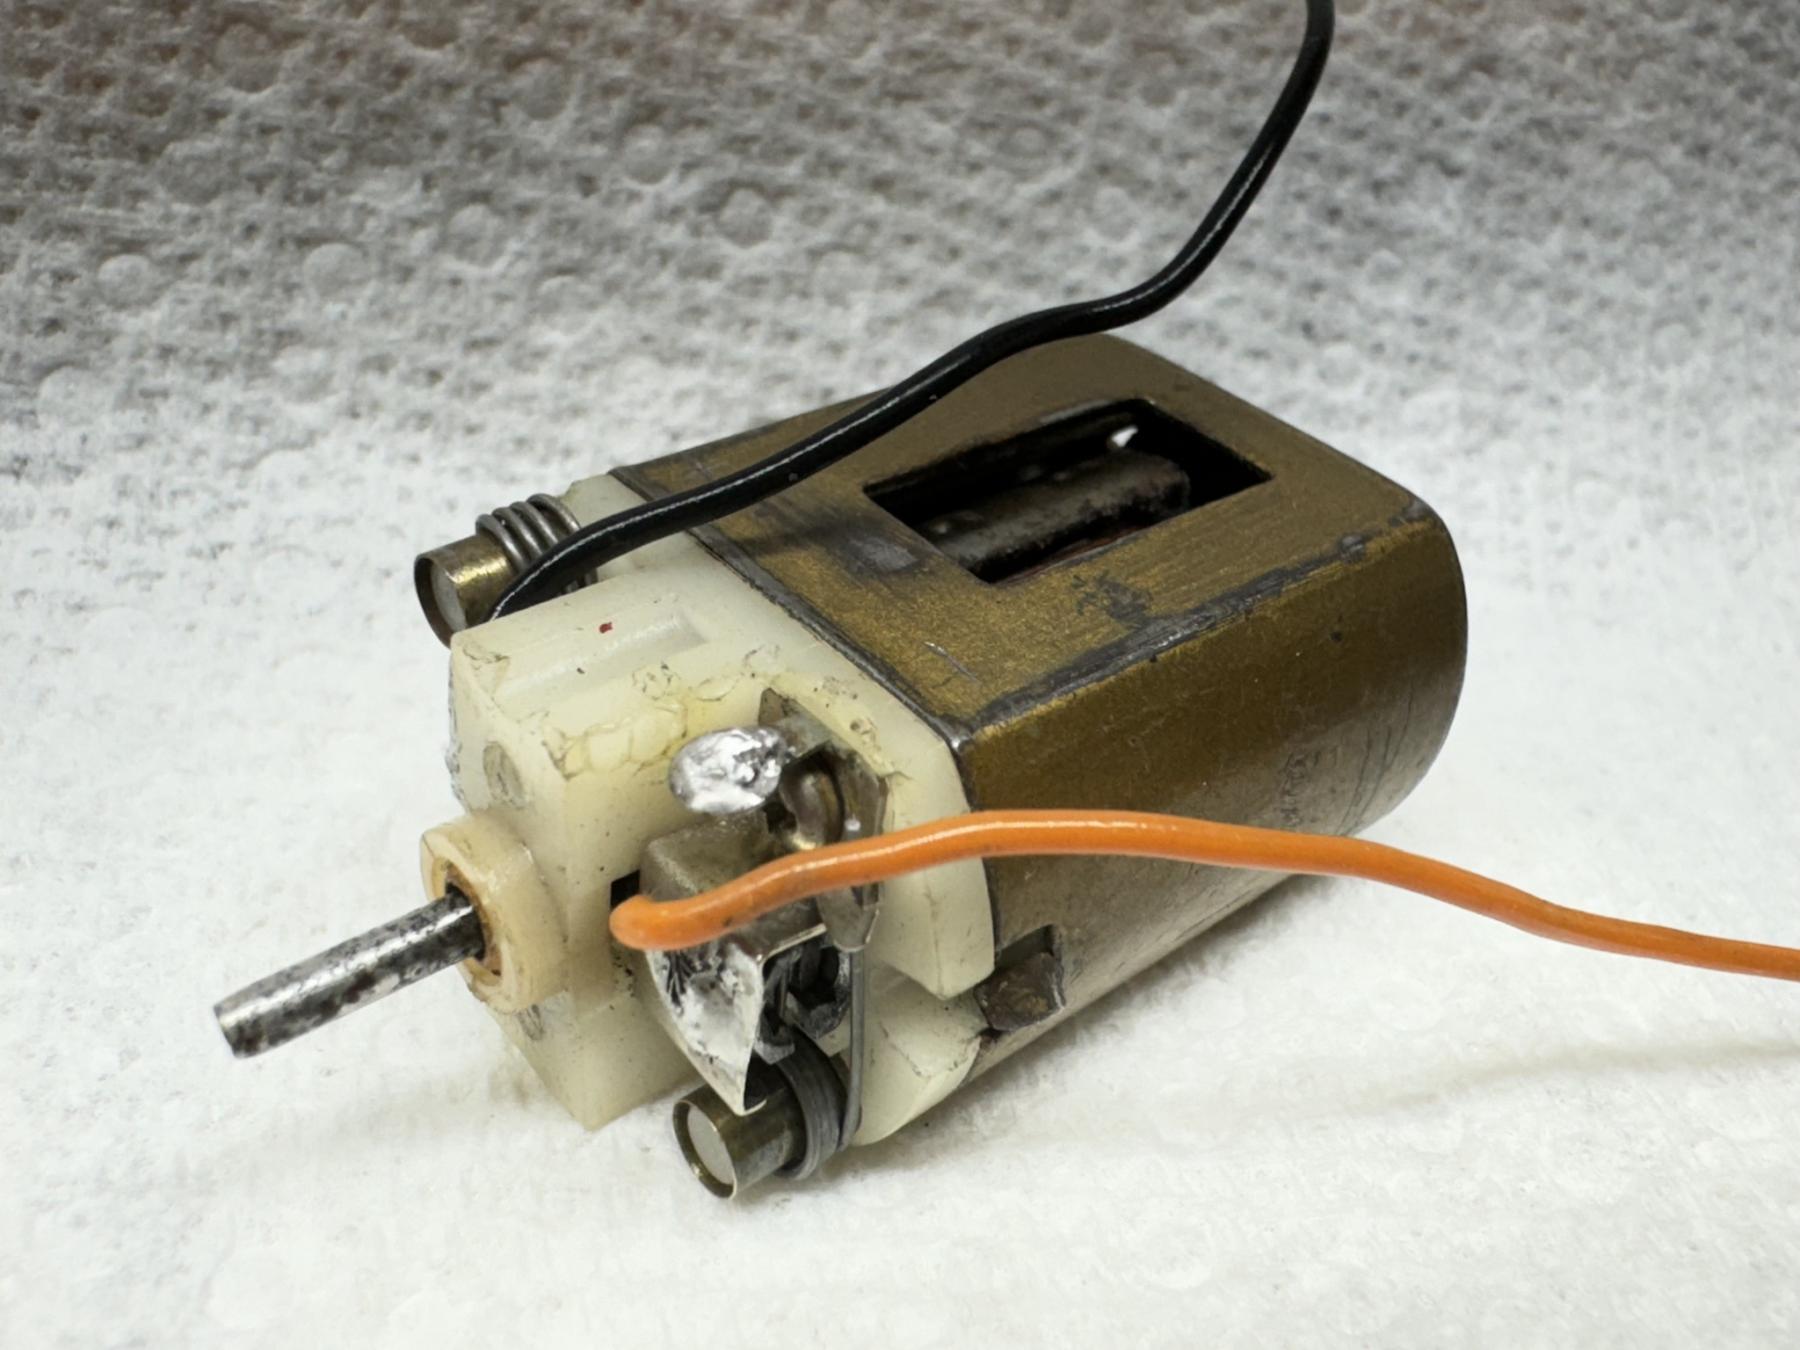
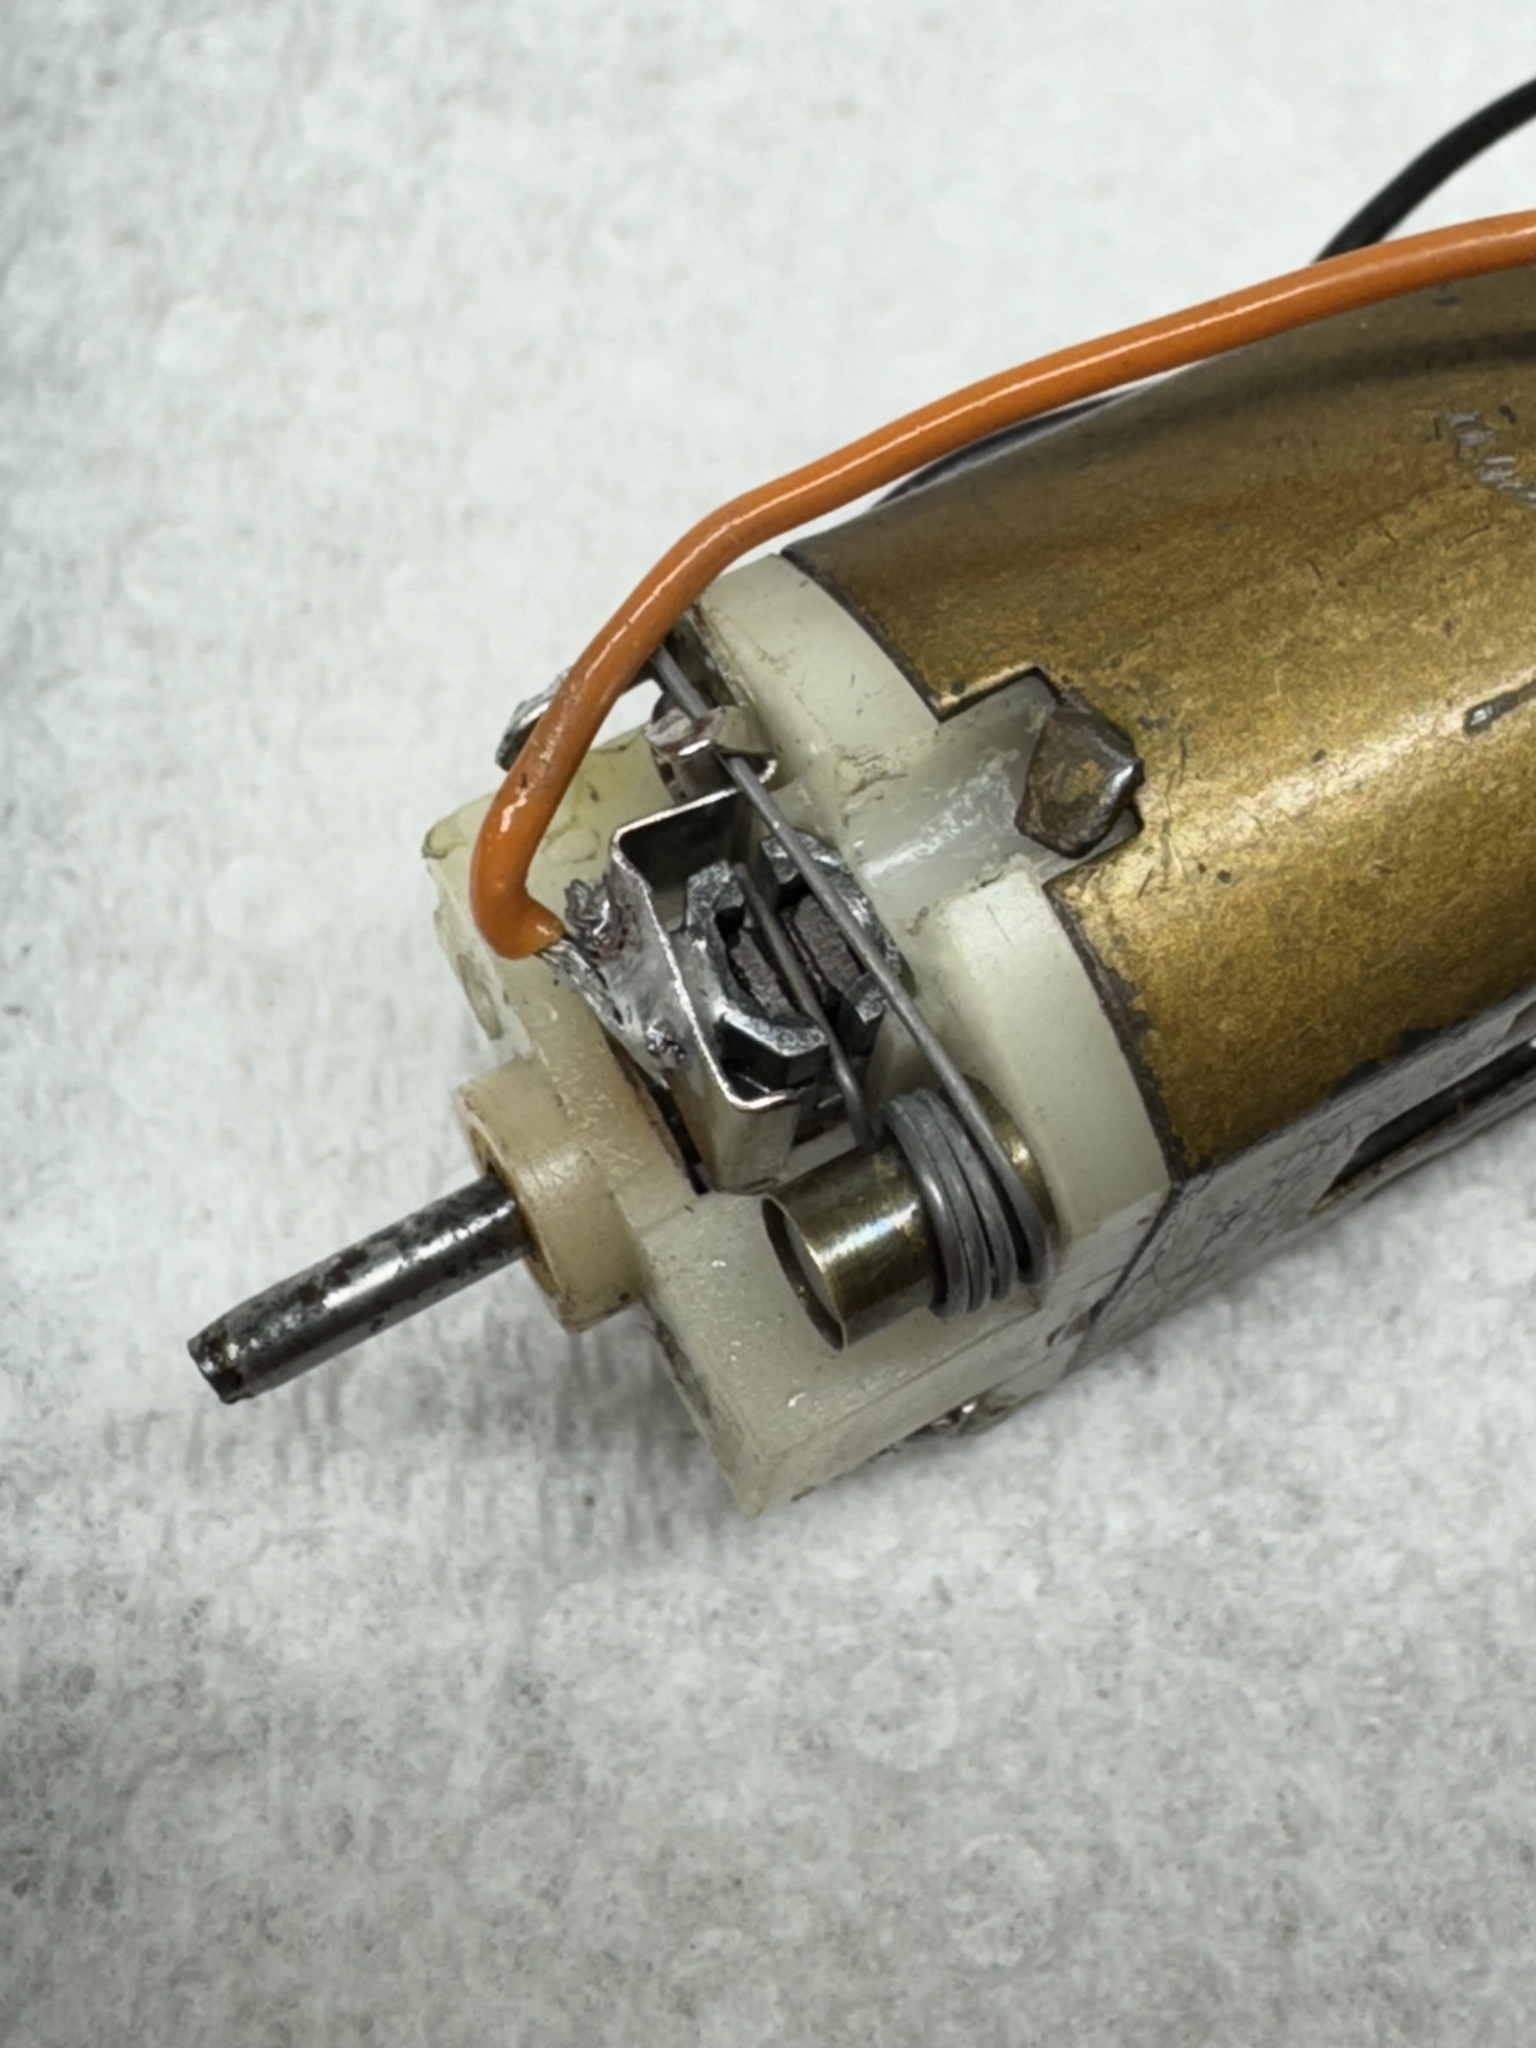
Brushes seem to not be riding on comm very centered

Timing:

Curious what info you guys will give. I pretty much dont know anything about building motors besides the basics and Im really bad at electrical stuff.
#3
-

- Administrator
-
- 8,001 posts Joined: 16-February 06
Grand Champion Poster
- Gender:Male
- Location:The Cumberland Plateau
Posted 13 November 2024 - 12:01 AM
First off send that armature to ProSlot for rebalancing and reconditioning. You may want to pick another from your stash to send along with it. It's always good to have spare armatures.
Then, assemble it with new spacers and motor brushes. As you say, move the phenoltic spacers from the comm end of the armature to the can end of the armature.
Make sure there is only a tiny bit of side to side play in the armature without binding when assembled.
Apply a very small dab of light synthetic oil to the bushings, and you should be ready to give it a try.
#4
-

- Full Member
-
- 2,740 posts Joined: 03-March 08
Posting Leader
- Gender:Male
- Location:New York
Posted 13 November 2024 - 07:57 AM
I've cobbled hundreds of motors together from "junk" parts, mostly looking for something to do LOL.
That arm doesn't belong in that can but who cares.
Here is what I've found in my experience.
Many of them ran hot especially with Hi Po arms or home rewinds.
The weak point in my opinion is the solder points on the comm.
These can be 50 years old or more.
These will often blow apart especially if you free rev the motor with no load which I don't recommend.
I usually look closely at these joints with my magnifier and if they look crappy I resolder them.
Since they don't really have much value I usually chuck the arms in a drill and clean them up with a flexible nail file.
I they are ugly after that I paint them flat black for looks.
Although most used brushes will probably work I try to go with new, just seems to work better.
Add a little tension to the brushes by opening the springs up a little, don't go overboard.
You can go ahead and paint the can as well.
Use anything you like but enamel takes very long to dry.
Most importantly, just have fun.
Joe
Joe Lupo
#5
-

- Full Member
-
- 14,992 posts Joined: 02-August 07
Age scrubs away speed!
- Gender:Male
- Location:New Boston, NH
Posted 13 November 2024 - 08:36 AM
Lots of good information from MG & Joe. I might add that the endbell looks like it's from a Russkit 23. It's not going to withstand the heat like a Mura. Also Russkit 23 magnets are stronger than their 22s. Their 23 arms was an improvement too as were the motor brush hear sink tubes. I don't know how your Parma magnets will work so try them & see. Their thinner magnets from S16D motors are stronger than their thicker 16D ones. I would expect any hot rewound arm to more rapidly eat up 16D brushes faster than 36Ds Have fun with your builds,
I intend to live forever! So far, so good.

#6
-
- Full Member
-
- 869 posts Joined: 03-February 19
Race Leader
- Gender:Male
- Location:SoCal
Posted 13 November 2024 - 09:37 AM
#7
-
- Full Member
-
- 869 posts Joined: 03-February 19
Race Leader
- Gender:Male
- Location:SoCal
Posted 13 November 2024 - 11:37 AM
#8
-
- Full Member
-
- 869 posts Joined: 03-February 19
Race Leader
- Gender:Male
- Location:SoCal
Posted 13 November 2024 - 12:08 PM
- ajd350 and olescratch like this
#9
-
- Full Member
-
- 14,992 posts Joined: 02-August 07
Age scrubs away speed!
- Gender:Male
- Location:New Boston, NH
Posted 13 November 2024 - 01:06 PM
Mark, to my knowledge, there is no modern 16D brushes. The ones available are NOS. A few years ago, Joe Lupo in post #4 had lots of the NOS 16D brushes, but I think they quickly sold out.
If you ever need a good 16D endbell for a can-mounted motor, the Parma Deathstar one will fit.
I intend to live forever! So far, so good.
#10
-
- Full Member
-
- 2,740 posts Joined: 03-March 08
Posting Leader
- Gender:Male
- Location:New York
Posted 13 November 2024 - 02:14 PM
Thanks for the plug Bill.
I have about 100 brushes left from a factory box of 10,000.
Let me know if anyone needs some.
Joe
Joe Lupo
#11
-

- Administrator
-
- 18,495 posts Joined: 20-February 06
Builder
- Gender:Male
- Location:Cleveland, Tennessee
Posted 13 November 2024 - 06:02 PM
The arm (in post #2) appears to be "reverse" timed, making it designed to rotate clockwise at endbell.
Exactly opposite of what the Mura sticker says.
If you are not rotating it at the correct polarity it will run hot.
Paul Wolcott
#12
-
- Full Member
-
- 869 posts Joined: 03-February 19
Race Leader
- Gender:Male
- Location:SoCal
Posted 13 November 2024 - 06:09 PM
Thanks! That’s the kind of stuff I need help with I was spinning it counter clockwise. guess I’ll have to refurb another crusty arm. so is how the comm tabs indexed with the laminations what dictates direction of rotation?The arm (in post #2) appears to be "reverse" timed, making it designed to rotate clockwise at endbell.
Exactly opposite of what the Mura sticker says.
If you are not rotating it at the correct polarity it will run hot.
#13
-
- Full Member
-
- 869 posts Joined: 03-February 19
Race Leader
- Gender:Male
- Location:SoCal
Posted 13 November 2024 - 06:19 PM
#14
-
- Full Member
-
- 869 posts Joined: 03-February 19
Race Leader
- Gender:Male
- Location:SoCal
Posted 13 November 2024 - 07:21 PM
- Jencar17, Larry Horner and Carter like this
#15
-

- Subscriber
-
- 7,075 posts Joined: 14-February 06
Grand Champion Poster
- Gender:Male
- Location:Captain Rick: The only vintage slot car nut in SW Oregon?
Posted 13 November 2024 - 08:36 PM
Hi Mark,
Looks like you're got a fun project going on. 
.............so is how the comm tabs indexed with the laminations what dictates direction of rotation?
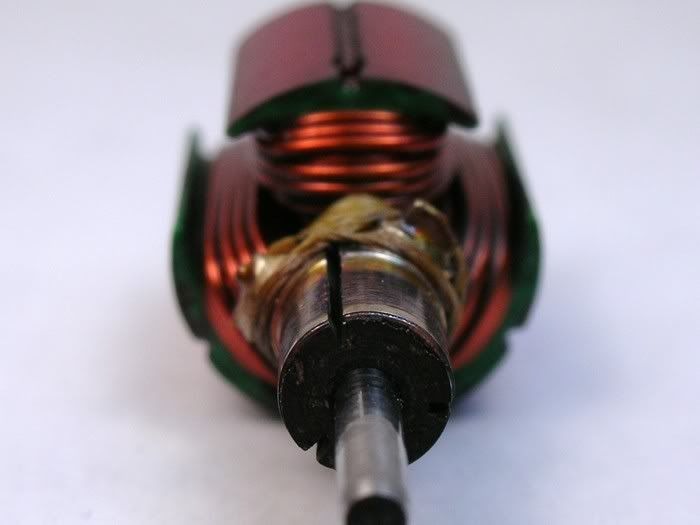
Personally, I look at the slots in the comm. Here's an armature that's mildly timed counterclockwise (CCW):
Rick Thigpen
Check out Steve Okeefe's great web site at its new home here at Slotblog:
The Independent Scratchbuilder
There's much more to come...
#16
-

- Subscriber
-
- 625 posts Joined: 20-February 21
Still Half-Fast After All These Years
- Gender:Male
- Location:Tucson, AZ
Posted 13 November 2024 - 09:05 PM
Be careful about not using an insulating washer on the comm end. I've seen comms where the segments are exposed on the end and can be shorted by a metal washer or the endbell bearing. Makes for an interesting troubleshoot of why the motor does not run or runs poorly and the endbell gets really hot fast.
Insulating washers run on the can end tend to break due to lack of support from the small shaft shoulder.
As long as the brushes aren't running off the end of the comm, brushes being off center to the length of the comm is usually well-tolerated. Perhaps not max performance, but works fine.
- Pablo and Mad Mark like this
#17
-
- Full Member
-
- 869 posts Joined: 03-February 19
Race Leader
- Gender:Male
- Location:SoCal
Posted 14 November 2024 - 12:14 PM
#18
-
- Full Member
-
- 14,992 posts Joined: 02-August 07
Age scrubs away speed!
- Gender:Male
- Location:New Boston, NH
Posted 14 November 2024 - 01:35 PM
We called the phenolic washers "oil slingers" because their diameter was bigger than that of the comm. This kept end bell bearing/bushing oil from reaching the comm. Not all comms are constructed the same. I see how they insulate some comms, particularly if you shorten some of them for a reason. When building motors, a phenolic washer is the first thing i put on the comm end of the armature shaft. I've never seen a need for a phenolic washer on the can end. Of the dozens of factory motors I've had apart, I've never seen one used there either.
On an assembled motor, I have placed a phenolic washer on the outside of the arm shaft to keep soldering acid out of the bearing when soldering on pinions. Sometimes I also use a split phenolic washer for pinion spacing. After pinion soldering, I remove this split washer leaving adequate pinion to bearing spacing. These techniques might not need to be used with inline chassis.
- SpeedyNH likes this
I intend to live forever! So far, so good.
#19
-
- Full Member
-
- 869 posts Joined: 03-February 19
Race Leader
- Gender:Male
- Location:SoCal
Posted 15 November 2024 - 06:58 PM
I pulled the magnets and switched which side they were on I also did a fiber tape shim since I thought the air gap looked a little big. tried again and car wouldnt even move so gave up.
luckily I made another motor which is pretty much the same thing besides different 16d modern magnets and a different arm from the same stash. I built this motor in like a hour if that and this one fricken rips!
- Carter likes this
#20
-
- Full Member
-
- 14,992 posts Joined: 02-August 07
Age scrubs away speed!
- Gender:Male
- Location:New Boston, NH
Posted 15 November 2024 - 08:36 PM
Maybe the first motor had a bad arm? If you have one, keep a good stock 16D arm around. If you have another motor that doesn't run properly, pull the arm & try how the stock arm runs. Any Slotworks or Parma Chinese arm can be used for this. It's cheaper than having a lot of test equipment around.
- Mad Mark likes this
I intend to live forever! So far, so good.
#21
-
- Full Member
-
- 869 posts Joined: 03-February 19
Race Leader
- Gender:Male
- Location:SoCal
Posted 15 November 2024 - 10:19 PM
Maybe the first motor had a bad arm? If you have one, keep a good stock 16D arm around. If you have another motor that doesn't run properly, pull the arm & try how the stock arm runs. Any Slotworks or Parma Chinese arm can be used for this. It's cheaper than having a lot of test equipment around.
That’s a good idea. think arm was bad. a different one from the Aguirre stash runs great it seems yay!
#22
-
- Full Member
-
- 869 posts Joined: 03-February 19
Race Leader
- Gender:Male
- Location:SoCal
Posted 08 December 2024 - 06:34 PM
Im sure there is a reason no ones doing this that I dont know but seems like it runs good on power supply even without the crappy used brushes breaking in yet.
#23
-
- Full Member
-
- 869 posts Joined: 03-February 19
Race Leader
- Gender:Male
- Location:SoCal
Posted 21 December 2024 - 10:58 AM
#24
-
- Full Member
-
- 14,992 posts Joined: 02-August 07
Age scrubs away speed!
- Gender:Male
- Location:New Boston, NH
Posted 21 December 2024 - 01:06 PM
That's good to hear. You have a combination that works to your satisfaction. Keep building your motors that way & see if they perform similarly.
I intend to live forever! So far, so good.
#25
-

- Full Member
-
- 4,878 posts Joined: 16-February 09
Posting Leader
Posted 21 December 2024 - 01:23 PM
The result here is that you have what appears to be a period correct motor, but with the advances of the FK series motors. There is a line of stupidity that can be crossed when restoring a period car to just play with, where you build a motor too hot to enjoy driving. This method stays short of that line, while being easy to build. I like it, and intend to try this myself. I like to run my old cars, but I don't want to fight with them.


