Jump to content


Photo

Russkit 25... maybe?


  • Please log in to reply
25 replies to this topic

#1 havlicek

havlicek

    OCD Rewinder

  • Subscriber
  • PipPipPipPipPipPipPipPip
  • 11,198 posts
  • Joined: 20-August 07
  • Gender:Male
  • Location:NY

Posted 16 March 2009 - 07:15 PM

In the recent thread about the ill-fated Russkit 25, Bill told me he had some "Russkit 25 lookalikes" he got somewhere and he was kind enough to send me one. If this isn't a Russkit 25, someone went to an awful lot of trouble to duplicate one :laugh2: More likely I suppose (and Bill also) is that these were all just a motor that was used by several different manufacturers...along with Russkit. Anyway, when I got the motor it was both interesting and funny. Funny because it's hard to believe this was brought out at a time when, according to Philippe the Champion and Mura motors were providing much improved performance. Interesting because it seemed to me that had they done things a little differently, the motor might have had some potential.

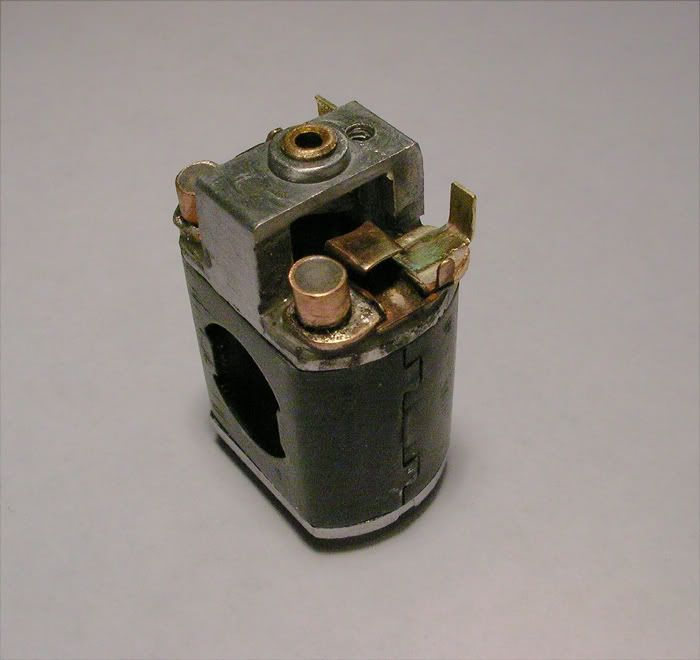
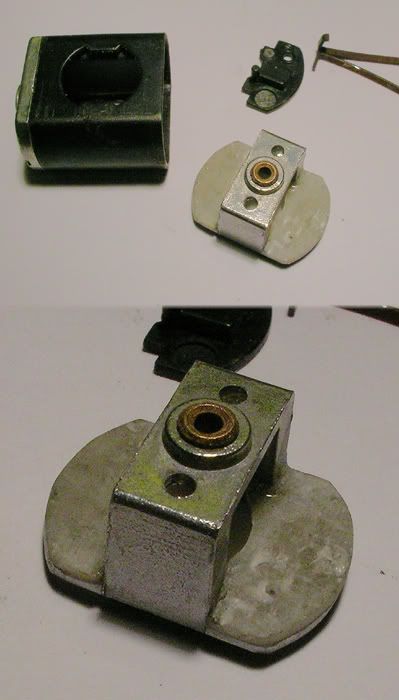
Anyway, I took the thing apart and it was clear right away that the endbell was in need to help...a lot of help. The brush carriers are molded plastic things that seem like they'd melt in a cup of coffee and there were floppy brass "hoods" that covered them and were pinned to the casting with a brass rivet and attached to the casting on the other end with a blob of silicone...and no where near perpendicular to the com. You can see one of them in the picture. So I removed those and layed-up four layers of fiberglass cloth and soaked it with high-temp epoxy, figuring it would be both a good insulator and fairly heat-resistant. When cured, I traced one of the plastic doo-hickeys on the fiberglass two times and cut them out. After all that, I bonded those to both sides of the endbell in preparation for building up something that is strong and more precise. I'm going to use some current Mura brush hoods, but have to devise a way to fasten them without creating shorts...I have some ideas. Anyway, here's what I have so far and I think I'm on the right track. Thanks again Bill!, this should be interesting :)
Posted Image

-john
John Havlicek


#2 Bill from NH

Bill from NH

    Age scrubs away speed!

  • Full Member
  • PipPipPipPipPipPipPipPip
  • 14,731 posts
  • Joined: 02-August 07
  • Gender:Male
  • Location:New Boston, NH

Posted 16 March 2009 - 08:08 PM

John, I have a c-can aluminum endbell from the early 70s. It used nylon 2-56 machine screw & phenolic arm spacers to keep the endbell hardware from shorting on the endbell. :)
Bill Fernald
 
I intend to live forever!  So far, so good.  :laugh2:  :laugh2: 

#3 stoo23

stoo23

    Race Leader

  • Full Member
  • PipPipPipPipPip
  • 552 posts
  • Joined: 26-July 08
  • Gender:Male
  • Location:Sydney, Australia

Posted 16 March 2009 - 09:03 PM

Camen Used to sell some Purple (ofcourse !,..lol), Endbell Hardware Screws in 2-56 that were Nylon or some similar material, I am looking at a 'Singular' New one right Now.

Maybe Joel still has them lying around or someone else,.. :D

Stewart Amos

Old Racer from Sydney, Australia
FASTUFF Race Proven Products


https://ascra.au


#4 havlicek

havlicek

    OCD Rewinder

  • Subscriber
  • PipPipPipPipPipPipPipPip
  • 11,198 posts
  • Joined: 20-August 07
  • Gender:Male
  • Location:NY

Posted 16 March 2009 - 09:23 PM

Hi Bill,

Once again thanks for the motor Bill, I'm doing this one and the way more conventional K&B Wildcat at the same time...this one's harder :laugh2: Anyway, I have a plan for the brush carriers that (I hope) bypasses all of the stuff with the screws. I started it over the last hour and so far so good, but I could easily fail miserably :unsure: If it works the way I hope it will, I'll have the benefit of a simple assembly that will use the larger modern springs and brushes. There will be other details that I still have to figure out, but the endbell is the hardest part!

Hi Stoo,

I spent a bunch of time thinking about screws and even tiny threaded tubes for the spring posts and there are clearance problems beneath the endbell and other issues that I "think" my plan gets around. I bet that if ten people went at this thing...they'd come up with 10 different solutions :blink:

-john
John Havlicek

#5 Bill from NH

Bill from NH

    Age scrubs away speed!

  • Full Member
  • PipPipPipPipPipPipPipPip
  • 14,731 posts
  • Joined: 02-August 07
  • Gender:Male
  • Location:New Boston, NH

Posted 17 March 2009 - 04:22 PM

Keith, my Parma liquid trigger insulation is long gone! But the other day I saw some "liquid electrical tape" sold at Home Depot in different colors. :)
Bill Fernald
 
I intend to live forever!  So far, so good.  :laugh2:  :laugh2: 

#6 havlicek

havlicek

    OCD Rewinder

  • Subscriber
  • PipPipPipPipPipPipPipPip
  • 11,198 posts
  • Joined: 20-August 07
  • Gender:Male
  • Location:NY

Posted 17 March 2009 - 06:52 PM

Hi Keith,

Yes...those are good materials and someone else here at one time posted about Micro Fasteners (maybe it was you?), and I bookmarked the page. Thanks.

-john
John Havlicek

#7 TSR

TSR

    The Dokktor is IN

  • Full Member
  • PipPipPipPipPipPipPipPip
  • 42,299 posts
  • Joined: 02-February 06
  • Gender:Male
  • Location:Marxifornia

Posted 17 March 2009 - 07:10 PM

In the recent thread about the ill-fated Russkit 25, Bill told me he had some "Russkit 25 lookalikes"

From what we know, the American manufacturer of this motor is the same as that of the Russkit 25, and there are few differences between the two. The cans and endbells are identical. The measured arm resistance is the same, but Russkit had two versions of this motor, the second with the Russkit name molded in the casting of the endbell and the drive changed from can-side to endbell side. There were two colors of the windings, red and green.

Philippe de Lespinay


#8 Horsepower

Horsepower

    **Numb Thumbs**

  • Full Member
  • PipPipPipPipPipPipPip
  • 4,343 posts
  • Joined: 16-February 06
  • Gender:Male
  • Location:Chicago

Posted 18 March 2009 - 01:54 AM

Why can't I do a search on "Russkit 25"? I keep getting the error message! I was just trying to find the old post where I installed a new arm in the Russkit 25. There was some other good info in it.
Gary Stelter
 
My life fades, the vison dims. All that remains are memories... from The Road Warrior

#9 havlicek

havlicek

    OCD Rewinder

  • Subscriber
  • PipPipPipPipPipPipPipPip
  • 11,198 posts
  • Joined: 20-August 07
  • Gender:Male
  • Location:NY

Posted 18 March 2009 - 05:18 AM

I tried too Gary, but came up empty? Anyway, I got a couple of steps closer to completing the endbell last night and hope to have it (just the endbell) assembled in the next day or so. It's a bit tricky and involves welding/brazing tiny little parts and I've burned my fingertips a little in the process. I guess the "no pain-no gain" saying applies :laugh2:

-john
John Havlicek

#10 Bill from NH

Bill from NH

    Age scrubs away speed!

  • Full Member
  • PipPipPipPipPipPipPipPip
  • 14,731 posts
  • Joined: 02-August 07
  • Gender:Male
  • Location:New Boston, NH

Posted 18 March 2009 - 10:13 AM

John, post plenty of photos, I still have my motor to build. :laugh2: Chris Chan's perimeter chassis build article from the Oct. '67 issue of Car Model is posted on Greg Holland's VSRN Website, if you want to build something authentic to put it in.
Bill Fernald
 
I intend to live forever!  So far, so good.  :laugh2:  :laugh2: 

#11 havlicek

havlicek

    OCD Rewinder

  • Subscriber
  • PipPipPipPipPipPipPipPip
  • 11,198 posts
  • Joined: 20-August 07
  • Gender:Male
  • Location:NY

Posted 18 March 2009 - 05:00 PM

Hi Bill,

Well, this is what I got...it ain't pretty but... :unsure:

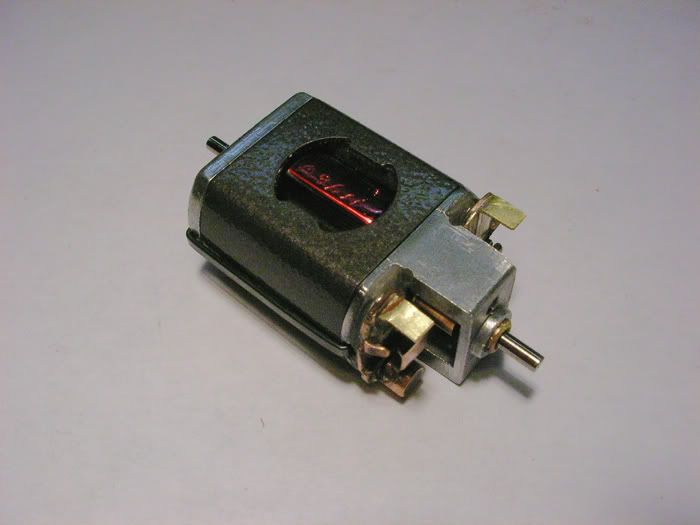
First, I clamped the hoods and carriers together from some C can hardware and brazed them using "EZ" (I think it melts at about 1200°F or so) silver. It comes in a syringe in powdered form mixed with brazing flux for making jewelry.

After that, I opened up one of the old screw holes and cut a short tube and passed it through the hole so it stuck out the bottom. I then brazed that to the assembly and then brazed another tube over that so I'd have a spring post that fit the Mura springs well. Afterwards I ground the bottoms flush.

Then I cut some little wire tabs to connect leads to and brazed them to the other side of the assemblies and did my best to clean the whole mess up some.

Then I cut a little relief in the endbell casting where it would come near these brush carrier thingies

Then I put an arm shaft in the can and endbell and passed a brush hood alignment tool through everything and used some high-temp epoxy to bond the both brush carriers to the fiberglass insulator while keeping the brush carriers straight and square to the shaft. I also filled the spring posts with epoxy to help "key" the whole assemblies to the fiberglass insulators below and this is the result:

Posted Image

It seems strong and while not the most beautiful job, it should function fine...I think :laugh2: Next I gotta strip the can, fill the seam and paint it so it looks pretty (er).

-john
John Havlicek

#12 Bill from NH

Bill from NH

    Age scrubs away speed!

  • Full Member
  • PipPipPipPipPipPipPipPip
  • 14,731 posts
  • Joined: 02-August 07
  • Gender:Male
  • Location:New Boston, NH

Posted 18 March 2009 - 07:17 PM

John, your motor is progressing nicely! :)
Bill Fernald
 
I intend to live forever!  So far, so good.  :laugh2:  :laugh2: 

#13 havlicek

havlicek

    OCD Rewinder

  • Subscriber
  • PipPipPipPipPipPipPipPip
  • 11,198 posts
  • Joined: 20-August 07
  • Gender:Male
  • Location:NY

Posted 18 March 2009 - 07:51 PM

...thanks Bill. It's tough to keep things neat when you're working on such small parts with a torch and brazing. I have a set of "pent-roof" brush hardware I was going to use "for the period", but then I thought to myself that this thing isn't going to be a "korrect" motor anyway :blush: and preferred the ability to use larger brushes and springs.

-john
John Havlicek

#14 havlicek

havlicek

    OCD Rewinder

  • Subscriber
  • PipPipPipPipPipPipPipPip
  • 11,198 posts
  • Joined: 20-August 07
  • Gender:Male
  • Location:NY

Posted 19 March 2009 - 04:12 PM

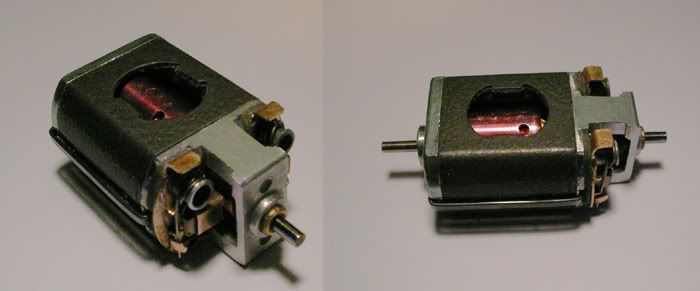
Got the can all sanded and painted ("hammer finish"), so I figured I'd stick an arm in it and reassemble it to get an idea of how it's looking. It has a cool kind of "industrial" look I think.

Posted Image

-john
John Havlicek

#15 Horsepower

Horsepower

    **Numb Thumbs**

  • Full Member
  • PipPipPipPipPipPipPip
  • 4,343 posts
  • Joined: 16-February 06
  • Gender:Male
  • Location:Chicago

Posted 19 March 2009 - 05:43 PM

Once again, a sow's ear is made into a silk purse. Nice job, John! But then, we expected that!.. :laugh2: :D :good:
Gary Stelter
 
My life fades, the vison dims. All that remains are memories... from The Road Warrior

#16 havlicek

havlicek

    OCD Rewinder

  • Subscriber
  • PipPipPipPipPipPipPipPip
  • 11,198 posts
  • Joined: 20-August 07
  • Gender:Male
  • Location:NY

Posted 19 March 2009 - 06:54 PM

Thank you very much Gary. I don't know about "silk purse", but the motor is pretty neat. The can is the opposite of how they are now...solid, and I'm actually going to try this one with the existing magnets after giving them a zap in my RGEO zapper...they seem pretty good :blink: The endbell casting is also really nice and heavy-duty and I'm looking forward to winding an arm for this thing...either a 28 or maybe I'll go for the gusto and do a 26! I can always swap out the magnets if need be. I have no idea what I'll actually do with it when it's done, but it sure has been fun getting there :)

-john
John Havlicek

#17 Bill from NH

Bill from NH

    Age scrubs away speed!

  • Full Member
  • PipPipPipPipPipPipPipPip
  • 14,731 posts
  • Joined: 02-August 07
  • Gender:Male
  • Location:New Boston, NH

Posted 19 March 2009 - 07:38 PM

"I have no idea what I'll actually do with it when it's done, but it sure has been fun getting there :)"


Build a copy of the Chris Chan chassis he built for the Russkit 25 in Car Model magazine. That's why I posted its link earlier. :)
Bill Fernald
 
I intend to live forever!  So far, so good.  :laugh2:  :laugh2: 

#18 havlicek

havlicek

    OCD Rewinder

  • Subscriber
  • PipPipPipPipPipPipPipPip
  • 11,198 posts
  • Joined: 20-August 07
  • Gender:Male
  • Location:NY

Posted 19 March 2009 - 08:25 PM

"I have no idea what I'll actually do with it when it's done, but it sure has been fun getting there :)"


Build a copy of the Chris Chan chassis he built for the Russkit 25 in Car Model magazine. That's why I posted its link earlier. :)


Hi Bill, and I forgot to say "thanks" for posting the link...neat car! I suppose I could do that, but I already have more cars than places to put them. (touche') ;)

-john
John Havlicek

#19 Jairus

Jairus

    Body Painter Extraordinaire

  • Subscriber
  • PipPipPipPipPipPipPipPip
  • 10,174 posts
  • Joined: 16-February 06
  • Gender:Male
  • Location:Salem, OR

Posted 19 March 2009 - 08:50 PM

Hey, that's pretty neat! :wub:

Jairus H Watson - Artist
Need something painted, soldered, carved, or killed? - jairuswtsn@aol.com

www.slotcarsmag.com

www.jairuswatson.net
http://www.ratholecustoms.com
Check out some of the cool stuff on my Fotki!


#20 havlicek

havlicek

    OCD Rewinder

  • Subscriber
  • PipPipPipPipPipPipPipPip
  • 11,198 posts
  • Joined: 20-August 07
  • Gender:Male
  • Location:NY

Posted 20 March 2009 - 05:19 AM

Thanks Jairus. I'm going to redo the endbell hardware both to try and get it a little neater, and to close the gap between the brush hoods and the com. Moving the hoods closer in means shaping/offsetting them a bit. So I look at all this as a "proof of concept" or trial run. Of course, it's going to be a pain to get all that stuff off there, but the motor is definitely worth the effort.

-john
John Havlicek

#21 havlicek

havlicek

    OCD Rewinder

  • Subscriber
  • PipPipPipPipPipPipPipPip
  • 11,198 posts
  • Joined: 20-August 07
  • Gender:Male
  • Location:NY

Posted 21 March 2009 - 01:28 PM

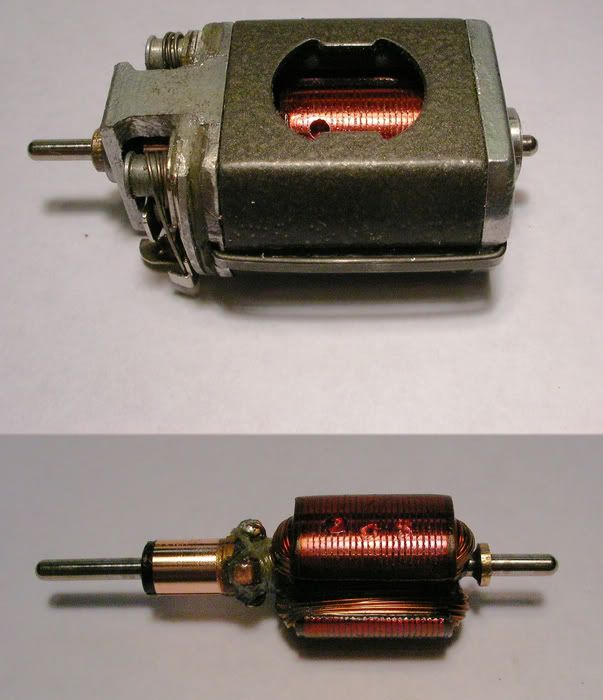
NOW I have it "done" (mostly). I removed all the old endbell hardware, cleaned things up a little and then it dawned on me...why not just drill the fiberglass insulator and screw the hoods on there? (I'm a little slow on the uptake). First I wanted to see if the fiberglass and epoxy was good for screwing into so I took anb extra piece and the stuff is SOLID. In fact it's difficult to drive the screws into after tapping and it locks up tight when they bottom out. So I made up a different pair of hoods and tabs, cut a bit more relief into the endbell casting on top and underneath just to be sure it wasn't going to short and voila!
Posted Image

I put a pretty hot #26 in there to test it out and it sings like crazy. Actually, the arm is definitely too much for the stock magnets and I'll wind a #28 for it when the spirit moves me. For now...the motor is solid and even looks pretty :)

-john
John Havlicek

#22 Horsepower

Horsepower

    **Numb Thumbs**

  • Full Member
  • PipPipPipPipPipPipPip
  • 4,343 posts
  • Joined: 16-February 06
  • Gender:Male
  • Location:Chicago

Posted 21 March 2009 - 04:49 PM

Very inspiring, John! The best looking (and maybe running) Russkit 25 I've ever seen! :wub: :clapping:
Gary Stelter
 
My life fades, the vison dims. All that remains are memories... from The Road Warrior

#23 havlicek

havlicek

    OCD Rewinder

  • Subscriber
  • PipPipPipPipPipPipPipPip
  • 11,198 posts
  • Joined: 20-August 07
  • Gender:Male
  • Location:NY

Posted 21 March 2009 - 08:01 PM

Very inspiring, John! The best looking (and maybe running) Russkit 25 I've ever seen! :wub: :clapping:


Thanks again Gary. It really bothered me before that things were sorta "there" but not quite. By taking it apart and doing it over I corrected the look, the gap from the hoods to the com (which is nice and tight now) and have the whole assemblies attached to the insulator the way they should be. I've been guilty many times of just leaving things alone instead of trying again...lazy. My "heroes" like Jairus, Rick and Steve Okeefe obviously don't have that problem :blush: As for how it runs...it's VERY smooth, surprisingly so and it winds like all get out, but it's getting warmer than the arm would in a can with better magnets and it sorta revs-up slightly less "snappy" which tells me that the magnets are not up to the arm (yeah I know it's "unscientific" :) ).

So now I have to decide whether to remove the magnets and replace them with say some modern D can magnets which aren't bad at all, and going with a hot wind....or doing something milder like a #28 awg which is probably closer to "correct" and leave the magnets alone. I have no idea what the motor can take and still be reliable with the stock magnets, or what was considered a fast wind for the can. I sure like the way it looks though, a very cool motor indeed! Anyone know if any of these were rewound back then and if so, what wind? Seems like it could definitely go further than a rewound 22 or 23??? Anyway, while I wait for info or inspiration, I have a lovely K&B Wildcat begging for attention. I know how I'm going to spend my Sunday :laugh2:

-john
John Havlicek

#24 havlicek

havlicek

    OCD Rewinder

  • Subscriber
  • PipPipPipPipPipPipPipPip
  • 11,198 posts
  • Joined: 20-August 07
  • Gender:Male
  • Location:NY

Posted 11 April 2009 - 09:17 AM

I did a #28 wind for the Russkit and changed the endbell hardware for modern D can brush hardware. The arm and motor are at around 2 amps and this is as hot as I would go for this setup and it's still a gigantic step up from stock. It would probably help to change the magnets, but the stock ones are glued in and there's no way of knowing for sure that doing all that would significantly improve performance. So this is how it stays:

Posted Image

-john
John Havlicek

#25 Bill from NH

Bill from NH

    Age scrubs away speed!

  • Full Member
  • PipPipPipPipPipPipPipPip
  • 14,731 posts
  • Joined: 02-August 07
  • Gender:Male
  • Location:New Boston, NH

Posted 11 April 2009 - 09:41 AM

Looks good John! Time to slap it in a car & see how it runs. :)
Bill Fernald
 
I intend to live forever!  So far, so good.  :laugh2:  :laugh2: 


Electric Dreams Online Shop