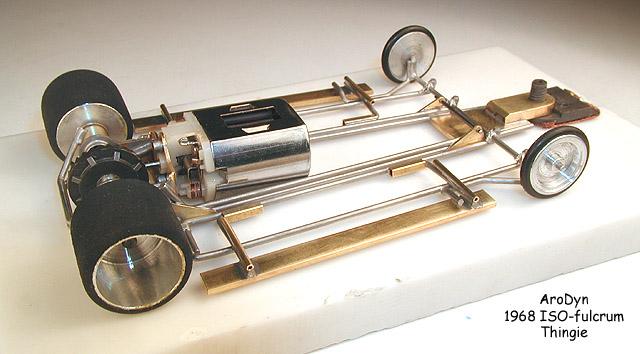
Jump to content


Photo

Thingie Tyro 2


  • Please log in to reply
7 replies to this topic

#1 Steve Okeefe

Steve Okeefe

    The Independent Scratchbuilder

  • Administrator
  • PipPipPipPipPipPip
  • 1,138 posts
  • Joined: 16-February 06
  • Gender:Male
  • Location:State of Independence

Posted 19 March 2013 - 09:11 PM


Thingie Tyro

Page 2


On to the side pans. First, we make up the parts:


31. Sidepan Parts.jpg


And then install them:


32. Sidepans Installed.jpg


The square hinge tubes are very slightly oversize, and allow the sidepan arms to move around a bit, keeping them floating loose and free.  Other builders have done something similar, using .055" piano wire in .063" ID round hinge tubes. It provided a lot more "klunk", maybe too much, and so it wasn't (as far as I know) widely used.


Don't forget to include the slight bend in the arms:


33. Sidepan Arm bends.jpg


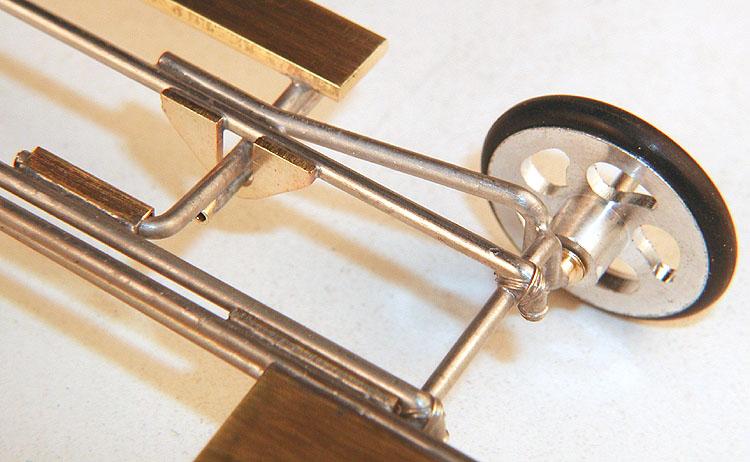
You may have noticed there are no side pan up stops. I noticed that too. What to do? How about extending the front axle braces to serve as up stops? All it requires is cutting out the ones I had already made and installed, and fabricating new ones to suit (easy, huh?):


34. Sidepan Upstop Added.jpg


Except for some fancy front wheels, I think we're done.


35. Okeefe ISO-fulcrum Thingie 01.jpg


36. Okeefe ISO-fulcrum Thingie 02.jpg


But wait!  There's more.


I've recently completed one of these chassis with some variations from the original.  First, I used .078" (1.98 mm) piano wire, instead of 1/16" (1.59 mm), for the upper motor bracket brace, and installed two wire wrappings on each side of the Iso hinge:


37. BM Bullet 01.jpg


Aside from being much stronger, I think it looks better, too.


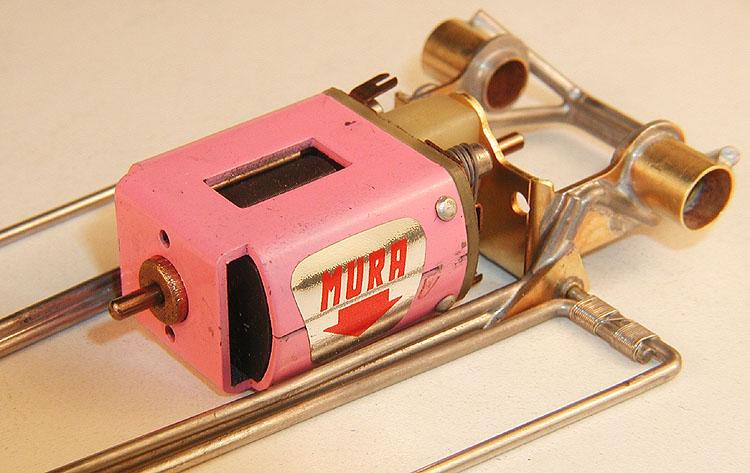
Next, I built the center section with the upper main rails bowed outwards slightly to fit a Mura B Production motor:


38. BM Bullet 02.jpg


Up at the front end, I used modern ProTrack pinhole front wheels, which have much wider hubs than the vintage disk type pinhole fronts I had been building with.  This forced some changes to the geometry, and the appearance, of front end of the chassis.


First, this chassis was originally designed to have the axle drops outside the body, so that at the point where the front axle passes through he body, it would be "down", and only minimal cutting would be required to clear the front axle.  The wider hubs meant that the bends that formed the "drop" in the drop front axle would have to be closer together, but not so close as to interfere with the body!  There was going to be very little space left between the body and the front axle drops!


Next, since the front axle braces attach to the front axle at the drops, the angle which they depart from the outer rails of the Iso section would be considerably smaller.  I have to admit I used this as a convenient excuse to abandon the "integrated" side pan up stop I'd been using for a completely different style of up stop.


So, first I shortened the side pans 1/8" (3.18 mm) to avoid the issue of having the side pans push the body outwards against the front axle drops.  Then, I installed "horseshoe" shaped up stops made from .032" (.79 mm) thick brass strip:


39. BM Bullet 03.jpg


40. BM Bullet 04.jpg


41. BM Bullet 05.jpg


I think it worked out just fine!


  • MarcusPHagen, Joe Mig and Bruce Wayne like this

Steve Okeefe


I build what I likes, and I likes what I build


#2 racie35

racie35

    On The Lead Lap

  • Full Member
  • PipPipPipPip
  • 359 posts
  • Joined: 14-May 13
  • Gender:Male
  • Location:Terre Haute, IN

Posted 23 May 2013 - 09:23 PM

Sweet!
Bruce Thomas

#3 havlicek

havlicek

    OCD Rewinder

  • Subscriber
  • PipPipPipPipPipPipPipPip
  • 11,198 posts
  • Joined: 20-August 07
  • Gender:Male
  • Location:NY

Posted 29 May 2013 - 07:24 AM


I think it worked out just fine!


No...it worked out far better than "fine", "stunning" is almost correct :)  (what's above stunning?).  When you can make such difficult work look so perfect, you know you've arrived!


-john


John Havlicek

#4 Bruce Wayne

Bruce Wayne

    Mid-Pack Racer

  • Full Member
  • PipPipPip
  • 197 posts
  • Joined: 02-September 11
  • Gender:Male
  • Location:Maryland Heights, MO

Posted 31 May 2013 - 10:10 PM

Steve,


To say that you have elevated this part of the hobby to an art form is an understatement!


Very well thought out, designed and executed. Sheer beauty to look at even if it just sat on a shelf. If that were not enough, as each iteration evolves they get even better.


Seeing your work is also very inspirational as I have never considered building a Thingie before, but sure would like to try one now just for the fun of it.


Bruce W. Frye

#5 HarV Wallbanger III

HarV Wallbanger III

    Racing inta OLD age!

  • Member at Peace
  • PipPipPipPipPipPipPipPip
  • 6,165 posts
  • Joined: 19-June 08
  • Gender:Male
  • Location:"Whisper'in Pine Ranch" Northern Nevada Sierras

Posted 01 June 2013 - 02:03 AM

......Pure Slot Chassis Porn!

WTG Steve!


Barney Poynor
12/26/51-1/31/22
Requiescat in Pace


#6 Steve Okeefe

Steve Okeefe

    The Independent Scratchbuilder

  • Administrator
  • PipPipPipPipPipPip
  • 1,138 posts
  • Joined: 16-February 06
  • Gender:Male
  • Location:State of Independence

Posted 01 June 2013 - 10:47 AM

All,


Thanks for the cudos, although I'm not too sure about the porn part... :shok:  :laugh2:


The "backstory" is I dreamed up the basic chassis design up in my head while on a two week consulting assignment to Vincenza, Italy (about 40 miles west of Venice).  The imaginings of a madman, eh?  :crazy:


I had little to distract me; no computer, and so no drawing app, or any access to the Internet (it was a short assignment).  All the TV shows were in Italian, as were the magazines and newspapers, etc.  The work I was doing ran from early in the morning to after dark, so I ended up in my (tiny) hotel room on weeknights.


Anyway, if it makes you happy to see it, I'm encouraged to build some more...  Thanks!


Steve Okeefe


I build what I likes, and I likes what I build


#7 Jairus

Jairus

    Body Painter Extraordinaire

  • Subscriber
  • PipPipPipPipPipPipPipPip
  • 10,174 posts
  • Joined: 16-February 06
  • Gender:Male
  • Location:Salem, OR

Posted 01 June 2013 - 11:36 AM

Now THATS a proxy chassis that works!  Nice work Steve, great post too.


Jairus H Watson - Artist
Need something painted, soldered, carved, or killed? - jairuswtsn@aol.com

www.slotcarsmag.com

www.jairuswatson.net
http://www.ratholecustoms.com
Check out some of the cool stuff on my Fotki!


#8 SlotStox#53

SlotStox#53

    Posting Leader

  • Full Member
  • PipPipPipPipPipPipPip
  • 4,084 posts
  • Joined: 13-March 13
  • Gender:Male
  • Location:TX

Posted 01 June 2013 - 03:28 PM


Anyway, if it makes you happy to see it, I'm encouraged to build some more...  Thanks!


Please do! Love seeing your creations :D certainly some great chassis building and designs :) really inspires others to try and recreate the designs.


Electric Dreams Online Shop