Jump to content


Photo

Emott Super Arm Batwinder


  • Please log in to reply
57 replies to this topic

#1 Steve Okeefe

Steve Okeefe

    The Independent Scratchbuilder

  • Administrator
  • PipPipPipPipPipPip
  • 1,139 posts
  • Joined: 16-February 06
  • Gender:Male
  • Location:State of Independence

Posted 31 August 2013 - 10:54 PM

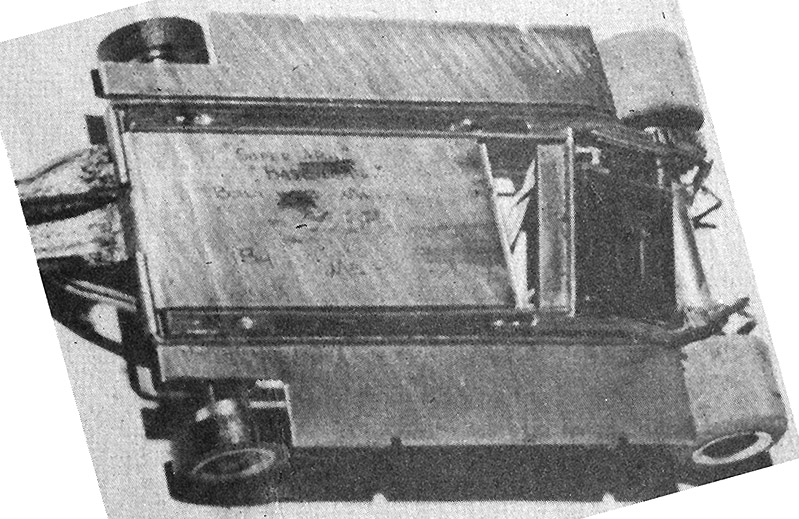
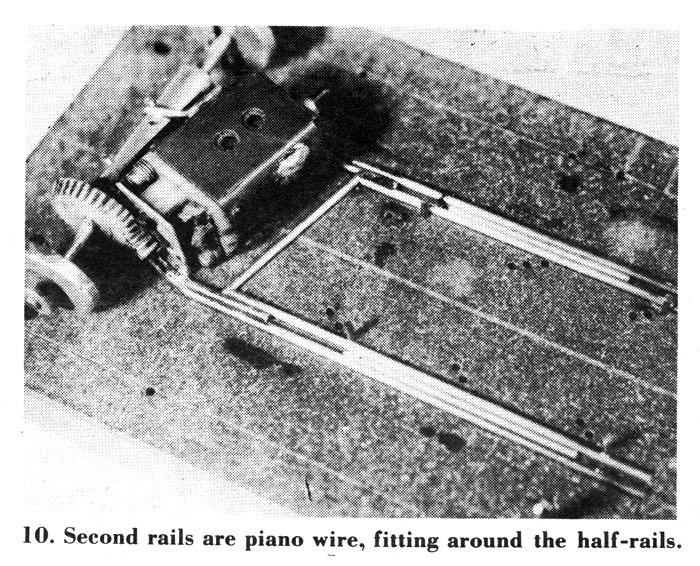
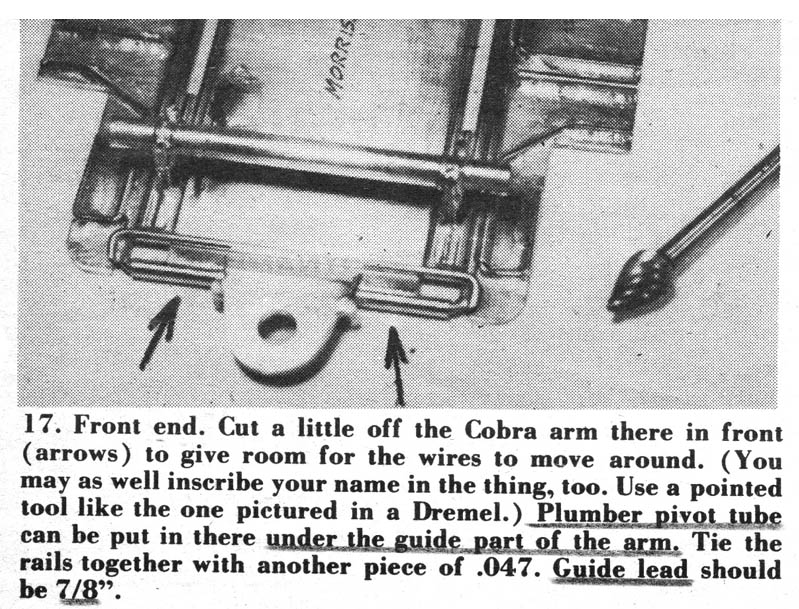
Early in 1969, Bob Emott stopped building chassis with motor boxes, and switched to a half-rail design.  Model Racing Jounal took notice of this in an illustrated article written by the editor, calling it a no-motor-box rear end, and describing how to build this "revolutionary" new design:


MRJ V1N9 p4-00.jpg


But the half-rail design was not new.  As far back as August 1968 at the Cobra Invitational at Buzz-a-Rama in Brooklyn, NY, Jerry Brady won the race with a chassis that had two important innovations: A plumber hinge arrangement and a half-rail center section.  Look carefully at this photo of Brady's chassis from the October 11, 1968 issue of MRJ and you can clearly see the half-rail center section:


680824 Cobra Inv Brady.jpg


Between the excitement created at the Cobra Invitational by Sandy Gross' highly innovative Puzzle Pan and four plumber hinge chassis including Brady's race winner, the half-rail design center section got lost in the glare and was not widely noticed until Bob Emott began using it.


On February 8, 1969 there was a manufacturer's race held in Hinsdale, IL at the Hinsdale Raceway.  Bob Emott built at least two of the cars that made the main, possibly three; one he ran himself and another driven by Howie Ursaner.  Bob probably also built the car entered by Chris Vittucci.  Mike Staskie won the race with a motorbox chassis car, but these two Emott half-rail design cars came in 2nd (center) and 3rd (right):


690208 Hinsdale 1-2-3.jpg


690208 Hinsdale Tech Chart.jpg


By now the plumber hinge had migrated to the front of the drop arm, but MRJ chose to notice the half-rail design center section first in their write-up.


Here's a close-up of Howie's third place car and an enlarged detail of the Tech Chart:


690208 Hinsdale Ursaner.jpg


690208 Hinsdale TC 1-2-3.jpg


Note the chassis is sized to fit a Mura endbell and a Champion can, which is significantly shorter than a motor built with the Mura "A" can.  With the 1969 rules now allowing 11/16" wide rear tires (up from 5/8"), while the overall width was still limited to 3", it was becoming harder to fit the motor in between the tires.


The nearly identical Emott chassis design that is the subject of this build comes from a topic elsewhere on this blog titled The Emott Archives, post #1:


Emott Super Arm Top.jpg


Emott Super Arm Botm.jpg


This chassis is very similar to the one driven by Howie at the Hinsdale race, including the left-side endbell-drive, which requires a clockwise motor.  It is dissimilar in that it has a modified stamped drop arm with a separate full-width guide tongue to fit a Jet Flag, a full width one-piece plumber hinge tube and inset side pan hinge tubes.


Bob called this series of chassis "Super Arm Batwinders", presumably because they were built with 1-1/4" wide drop arms.


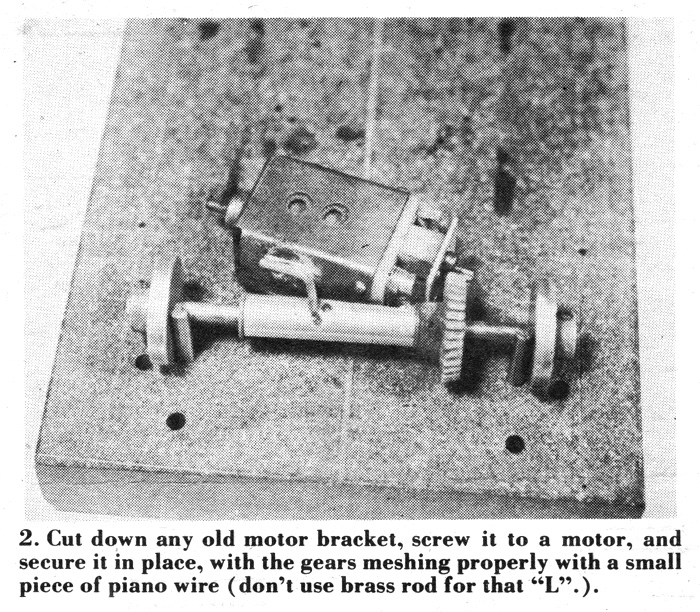
Here are some of the photos from the illustrated MRJ article describing the latest "chassis revolution", circa February 1969.  This is how the center section of this build will be constructed, except with left-side drive and a Champion can instead of a Mura "A" can:


MRJ V1N9 p4-01.jpg


MRJ V1N9 p4-02.jpg


MRJ V1N9 p4-03.jpg


MRJ V1N9 p4-04.jpg


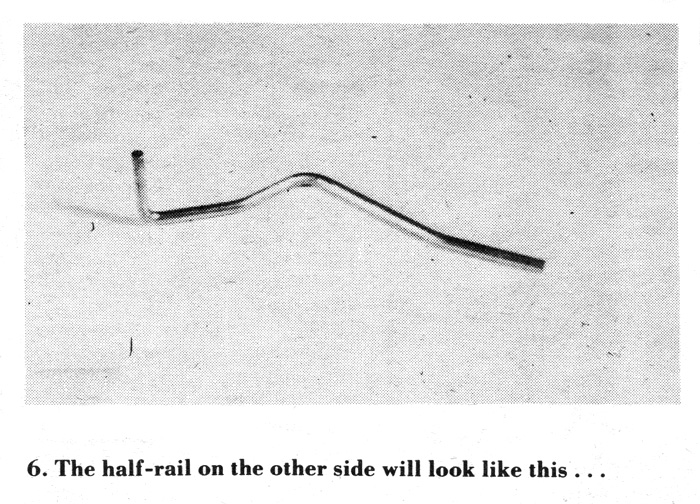
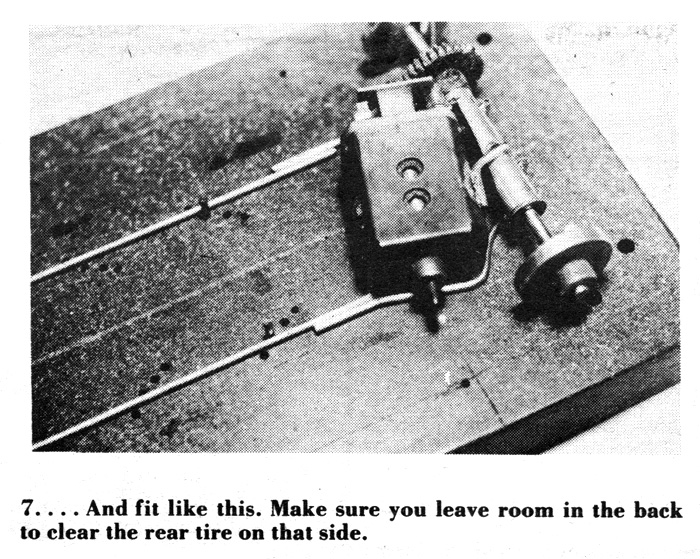
Note the extra bend Mike Morrissey included in the gear-side rail above (for a total of three bends); the Emott design gets the job done with only two bends by leaning the upright inwards to attach to the axle tube.  The less bends you use, the quicker and easier the build will go.


MRJ V1N9 p4-05.jpg


MRJ V1N9 p4-06.jpg


Note above the exaggerated rail shape to accommodate the longer Mura "A" can.  Again, Mike used an extra bend (for a total of four), where the Emott design gets the job done with only three bends and an inward leaning upright.  When building chassis, always try to limit the total number of bends in any one piece of wire or rod to three.


MRJ V1N9 p4-07.jpg


MRJ V1N9 p4-08.jpg


MRJ V1N9 p5-09.jpg


MRJ V1N9 p5-10.jpg


Here's the center section so far:


01. Center Section Quarter.jpg


02. Center Section Quarter.jpg


Some close-ups of the signature Emott details:


03. Front End Detail.jpg


04. Rear End Detail.jpg


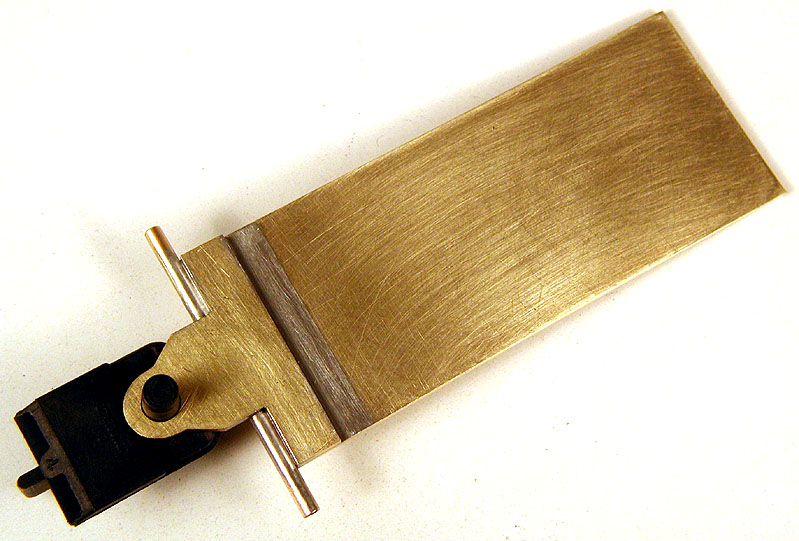
I don't have a stamped 1-1/4" wide Cobra drop arm, and even if I did I wouldn't be using it and hacking the guide holder off; intact 1-1/4" Cobra drop arms are far too rare to be doing that.  For this build, I will instead use .063" sheet brass for the slab and the guide tongue:


10. DA & Tongue.jpg


Cutting and notching a piece of 3/32" tube and soldering it all together completes the basic drop arm, shown here with a modern graphite guide:


11. DA Top.jpg


12. DA Bottom.jpg


Finishing off the drop arm with a hinge tube and slipping it into the center section looks like this:


20. Center & DA.jpg


Next up: Attaching the drop arm to the center section and building the plumber.


  • endbelldrive likes this

Steve Okeefe


I build what I likes, and I likes what I build


#2 Dave Fiedler

Dave Fiedler

    a dearly-missed departed member

  • Member at Peace
  • PipPipPipPip
  • 421 posts
  • Joined: 14-October 07
  • Gender:Male

Posted 01 September 2013 - 09:31 AM

Very,very Sano build!


Dave Fiedler
1953-2015
Requiescat in Pace

#3 TSR

TSR

    The Dokktor is IN

  • Full Member
  • PipPipPipPipPipPipPipPip
  • 42,299 posts
  • Joined: 02-February 06
  • Gender:Male
  • Location:Marxifornia

Posted 01 September 2013 - 10:37 AM

I don't have a stamped 1-1/4" wide Cobra drop arm


Steve,

I have three of them on their way to you Monday. Two are for chassis that you have for repairs, the third is a gift for your build.

P


  • team burrito likes this

Philippe de Lespinay


#4 Steve Okeefe

Steve Okeefe

    The Independent Scratchbuilder

  • Administrator
  • PipPipPipPipPipPip
  • 1,139 posts
  • Joined: 16-February 06
  • Gender:Male
  • Location:State of Independence

Posted 01 September 2013 - 11:19 AM

Darn!


Now I have to take back all those awful things I said... :laugh2:  :laugh2:


Thank you, Philippe  :hi:


  • team burrito likes this

Steve Okeefe


I build what I likes, and I likes what I build


#5 Steve Okeefe

Steve Okeefe

    The Independent Scratchbuilder

  • Administrator
  • PipPipPipPipPipPip
  • 1,139 posts
  • Joined: 16-February 06
  • Gender:Male
  • Location:State of Independence

Posted 01 September 2013 - 11:33 AM

Dave F.,


Thanks!


Keep watching, there's more to come.


Steve Okeefe


I build what I likes, and I likes what I build


#6 SlotStox#53

SlotStox#53

    Posting Leader

  • Full Member
  • PipPipPipPipPipPipPip
  • 4,084 posts
  • Joined: 13-March 13
  • Gender:Male
  • Location:TX

Posted 01 September 2013 - 12:57 PM

Great looking build so far Steve ! Bookmarked for reference, got some chassis to build that this will be perfect to follow along with when I'm ready :)

Get some practice in bending the rails first :laugh2:

#7 Pablo

Pablo

    Builder

  • Administrator
  • PipPipPipPipPipPipPipPip
  • 18,430 posts
  • Joined: 20-February 06
  • Gender:Male
  • Location:Cleveland, Tennessee

Posted 01 September 2013 - 04:13 PM

:popcorm1: :yahoo:


Paul Wolcott


#8 dan49

dan49

    Rookie Keyboard Racer

  • Full Member
  • Pip
  • 37 posts
  • Joined: 16-December 10
  • Gender:Male
  • Location:Linton, IN

Posted 02 September 2013 - 02:18 PM

I will apologize up front for hijacking this interesting post. The last big event I competed in prior to being sent to Vietnam was the Feb. 1969 Hinsdale race. I was nothing more than a local racer who came to participate in a major event and hang around with the well known names in the sport. With that being said, does anyone have a complete listing of the race results?
  • George Blaha and spiette like this
Dan Thorlton

#9 TSR

TSR

    The Dokktor is IN

  • Full Member
  • PipPipPipPipPipPipPipPip
  • 42,299 posts
  • Joined: 02-February 06
  • Gender:Male
  • Location:Marxifornia

Posted 02 September 2013 - 04:22 PM

Dan,

the races were well reported with detailed results in MCJ and MRJ, and Steve Okeefe has all the issues on a CD that you can get from him.  :)


Philippe de Lespinay


#10 Bill from NH

Bill from NH

    Age scrubs away speed!

  • Full Member
  • PipPipPipPipPipPipPipPip
  • 14,674 posts
  • Joined: 02-August 07
  • Gender:Male
  • Location:New Boston, NH

Posted 02 September 2013 - 07:02 PM

These Steve Okeefe CDs continue to be a wealth of information! Every slot racer ought to own copies. When I started slot racing, we didn't see print copies of MCJ or MRJ in New England. :)


Bill Fernald
 
I intend to live forever!  So far, so good.  :laugh2:  :laugh2: 

#11 SlotStox#53

SlotStox#53

    Posting Leader

  • Full Member
  • PipPipPipPipPipPipPip
  • 4,084 posts
  • Joined: 13-March 13
  • Gender:Male
  • Location:TX

Posted 02 September 2013 - 11:12 PM

These Steve Okeefe CDs continue to be a wealth of information! Every slot racer ought to own copies


Will have to speak to Steve about these cd/DVD information.... Oh Steve :D looking forward to seeing this beauty finished.. wonder what motor & body will be fitted :D ?

#12 TSR

TSR

    The Dokktor is IN

  • Full Member
  • PipPipPipPipPipPipPipPip
  • 42,299 posts
  • Joined: 02-February 06
  • Gender:Male
  • Location:Marxifornia

Posted 03 September 2013 - 09:31 AM

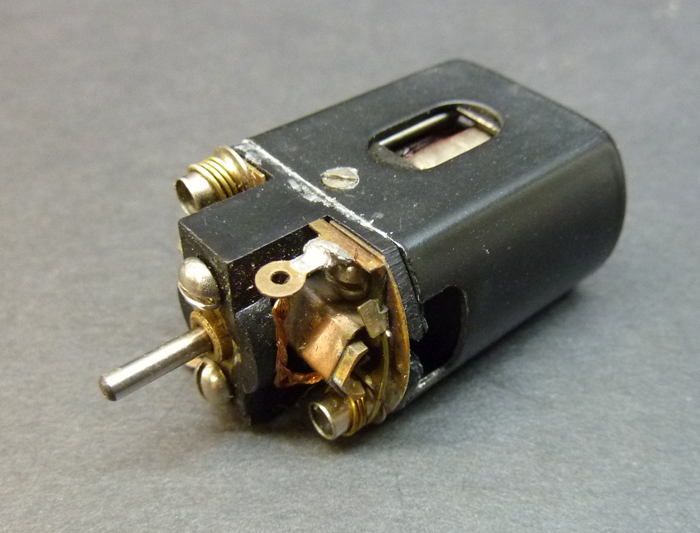
To be "period-korrekt" it will need a Champion 500-series black can motor with the ultra-scarce black "535" endbell, but that can be replaced by a period Mura dark-gray endbell since the Champion bells are like hens teeth.


champion_535_1.jpg


Another option would be to use a "Kean" setup with a Cox NASCAR can, a black Mura endbell and a simili-Kean armature...


Philippe de Lespinay


#13 SlotStox#53

SlotStox#53

    Posting Leader

  • Full Member
  • PipPipPipPipPipPipPip
  • 4,084 posts
  • Joined: 13-March 13
  • Gender:Male
  • Location:TX

Posted 03 September 2013 - 09:42 AM

Certainly some rare motor parts indeed Philippe!! That Champion motor looks sweet :)

#14 dan49

dan49

    Rookie Keyboard Racer

  • Full Member
  • Pip
  • 37 posts
  • Joined: 16-December 10
  • Gender:Male
  • Location:Linton, IN

Posted 03 September 2013 - 04:38 PM

I was able to attend the Hinsdale event and thought I would share a few memories. If my recollection is correct, we went down a few steps to enter the building. Our race team from the Milwaukee area arrived on Friday evening and the place was packed. Pit area was at a premium which added to the challenge of fine tuning a car. We stayed until the early morning hours trying to get track time. Finally made it back to the motel for a quick nap and then returned to the fray. I recall seeing Dave Bloom seated in a corner surrounded by his creations. I had received my draft notice the day before so I knew this was my last hurrah prior to being sent to Vietnam so out came the billfold for a D.B. paint job. Racing was intense during the entire event with a lot of good racing in all the heats. Just being in the same room with racers I had read about was an amazing experience for me. Wouldn't it be nice to have a "way back" machine and enjoy these past experiences again?
  • spiette likes this
Dan Thorlton

#15 Samiam

Samiam

    Posting Leader

  • Subscriber
  • PipPipPipPipPipPipPip
  • 4,759 posts
  • Joined: 18-January 12
  • Gender:Male
  • Location:Long Island, NY

Posted 03 September 2013 - 08:25 PM

Dan,

 The next best thing to Back Then is Retro Today. Some of the same racers you read about are still racing. And still winning!


Sam Levitch
 
"If you have integrity, nothing else matters, and if you do not have integrity, nothing else matters."
    Robert Mueller, special counsel (2013)
 
"... because people have got to know whether or not their president is a crook."
    Richard M .Nixon, Nov 17, 1973
 
"Fool me once, same on... shame on you. Fool me... you can't get fooled again."
    George W. Bush

#16 Steve Okeefe

Steve Okeefe

    The Independent Scratchbuilder

  • Administrator
  • PipPipPipPipPipPip
  • 1,139 posts
  • Joined: 16-February 06
  • Gender:Male
  • Location:State of Independence

Posted 03 September 2013 - 08:45 PM

Paul,


Regarding period-correct motors, Philippe is right; a Champion 500 series, or a motor built with a Champion can and Champion or Mura (dark gray) endbell.  See the Tech Chart.  Motors built with (longer) Mura "A" cans simply will not fit in this chassis.


Don't forget that because this is a left-side endbell drive chassis, you must use a clockwise rotation motor.


Again per the Tech Chart, 25 (or double 28) guage armatures were the only way to fly.


For bodies, a McLaren M8A or Lola 160 is right on target.  Again, see the Tech Chart.


Steve Okeefe


I build what I likes, and I likes what I build


#17 gascarnut

gascarnut

    Posting Leader

  • Full Member
  • PipPipPipPipPipPipPip
  • 3,938 posts
  • Joined: 16-February 06
  • Gender:Male
  • Location:Irvine, CA

Posted 03 September 2013 - 11:26 PM

Beautiful build, as always!

I see you are using two steel rails each side rather than one steel and one brass as per the photo of the Emott car and the Morrissey article.

Any reason for that decision?

Also, do you have the rest of that article posted somewhere? I would like to compare the finished car with a Morrissey frame that I have as I think that it could be the one used for the article or at least one very similar.

Thanks!
Dennis Samson
--------------------------
Scratchbuilding is life
Life is scratchbuilt

Samson Classics

#18 Steve Okeefe

Steve Okeefe

    The Independent Scratchbuilder

  • Administrator
  • PipPipPipPipPipPip
  • 1,139 posts
  • Joined: 16-February 06
  • Gender:Male
  • Location:State of Independence

Posted 04 September 2013 - 09:50 PM

Dennis,


Or should I say Mister Eagle Eyes?  Nice catch!  :good:   Yes, there is a good reason.  Here's the long version starting at the beginning:


After the original and very popular Batwinder series (with the tapered main rails and plumber hinge mounted behind the front axle), Bob incorporated at least three new major design features into his follow-on series of chassis, which he called the "Super Arm Batwinder":


1. Half rail construction center section including "L" uprights to the front axle tube, which replaced the one-piece motor-box design and simple uprights to the front axle tube.


2. An even wider drop arm, this time 1-1/4", eliminating the aesthetically pleasing (to me anyway) tapered main rails which along with the one-piece motor-box formed the double tapered center section.


3. Relocation of the plumber hinge from the center section behind the front axle to the front of the drop arm.


There was a fourth new feature, but it was added because the new 1969 rules now allowed it; the chassis was now built to 3-1/8" wide.


Note in all the photos of these chassis there are two notches in each side pan, near the body mount pin tubes.  These notches allowed Bob to extend the width of the chassis 1/16" on each side without having to stop production to re-drill his jig block.


Within each series of chassis there is an evolution of design, and the Super Arm Batwinders were no exception.  The notched side pans and brass & piano wire main rails indicate early examples of the series.  Early examples also had Cox guides.  Later examples (after Bob re-drilled his jig block) had no notches, all piano wire main rails and a few drop arms with guide tongues for Jet Flag guides (until the Jet Flag ready stamped drop arms appeared).


So, why the switch to all piano wire main rails?  Remember this new design has "L" uprights (to which both main rails are soldered) replacing the simple (and separately attached) uprights, and also that brass has a higher coefficient of expansion than steel:


Bob writes: "I would probably have built (this chassis) with both rails of piano wire. I didn't build too often with wire and rod in the same chassis as I felt the chassis would be stressed using two different materials."


The chassis I am building in this topic is to be an example of a middle version, thus, a guide tongue for a Jet Flag, both main rails piano wire and no notches in the side pans.


Steve Okeefe


I build what I likes, and I likes what I build


#19 TSR

TSR

    The Dokktor is IN

  • Full Member
  • PipPipPipPipPipPipPipPip
  • 42,299 posts
  • Joined: 02-February 06
  • Gender:Male
  • Location:Marxifornia

Posted 04 September 2013 - 10:00 PM

A tribute to the Master:


emott_1.jpg


  • Howie Ursaner likes this

Philippe de Lespinay


#20 Steve Okeefe

Steve Okeefe

    The Independent Scratchbuilder

  • Administrator
  • PipPipPipPipPipPip
  • 1,139 posts
  • Joined: 16-February 06
  • Gender:Male
  • Location:State of Independence

Posted 04 September 2013 - 10:37 PM

Dennis,


Here are the remaining photos from the MRJ article (don't forget to let us all know what you find):


MRJ V1N9 p5-11.jpg


MRJ V1N9 p5-12.jpg


MRJ V1N9 p5-13.jpg


MRJ V1N9 p5-14.jpg


MRJ V1N9 p5-15.jpg


MRJ V1N9 p5-16.jpg


MRJ V1N9 p5-17.jpg


MRJ V1N9 p5-18.jpg


Steve Okeefe


I build what I likes, and I likes what I build


#21 gascarnut

gascarnut

    Posting Leader

  • Full Member
  • PipPipPipPipPipPipPip
  • 3,938 posts
  • Joined: 16-February 06
  • Gender:Male
  • Location:Irvine, CA

Posted 05 September 2013 - 08:49 AM

Dennis,


Here are the remaining photos from the MRJ article (don't forget to let us all know what you find):


Steve,


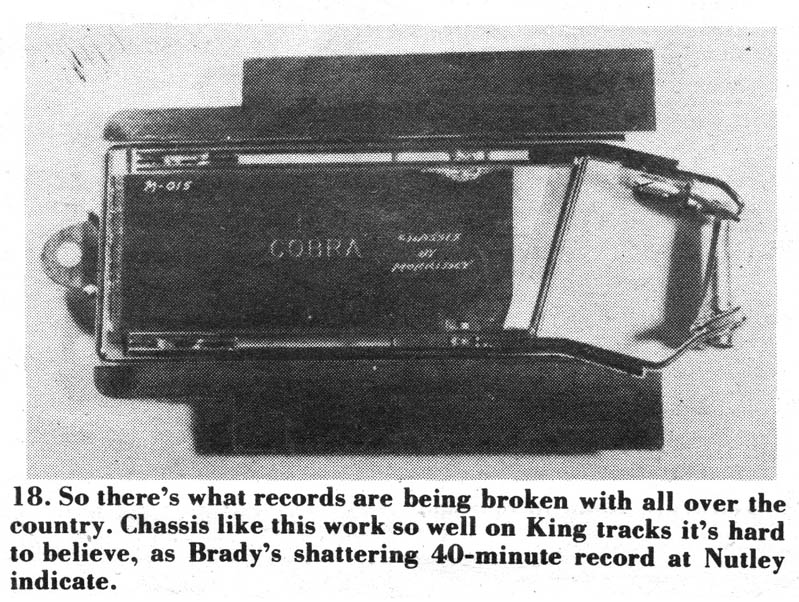
Thanks for the photos. Unfortunately the first few words below photo 11 are "The rest of these shots are of another chassis", so there's no way to know whether the one I have bears any relation to the one in the article. I note the serial # on the drop arm is M-015, whereas the one I have is C-055, I have no idea what the "M" or "C" may designate.


This is the one I have:

Morrissey07.jpg


I rebuilt it some years back, I think I could do a better job today, but when one considers its original condition, it's not too bad.


Morrissey02.jpg


Thanks, and my apologies for drifting your thread.


Dennis Samson
--------------------------
Scratchbuilding is life
Life is scratchbuilt

Samson Classics

#22 dc-65x

dc-65x

    Grand Champion Poster

  • Subscriber
  • PipPipPipPipPipPipPipPip
  • 6,928 posts
  • Joined: 14-February 06
  • Gender:Male
  • Location:Captain Rick: The only vintage slot car nut in SW Oregon?

Posted 05 September 2013 - 10:39 AM

Great thread and a great build Steve.... :popcorm1:


Great save on the Morrissey chassis Dennis. Hmmmm.........."May I have it?" :laugh2:


Rick Thigpen
Check out Steve Okeefe's great web site at its new home here at Slotblog:
The Independent Scratchbuilder
There's much more to come...


#23 Steve Okeefe

Steve Okeefe

    The Independent Scratchbuilder

  • Administrator
  • PipPipPipPipPipPip
  • 1,139 posts
  • Joined: 16-February 06
  • Gender:Male
  • Location:State of Independence

Posted 05 September 2013 - 11:11 AM

Dennis,


Now it seems I have lost my clue about the "M" and "C" designations.  I ASSumed the "M" in "M-015" stood for "Morrissey" (well, so much for that idea).  :unknw:


Aside from replacing the side pans the previous owner hacked-off, I notice two things about your Morrissey chassis:


1. The flush and split drop arm hinge design, which you retained.


2. The split cross brace, which you replaced.


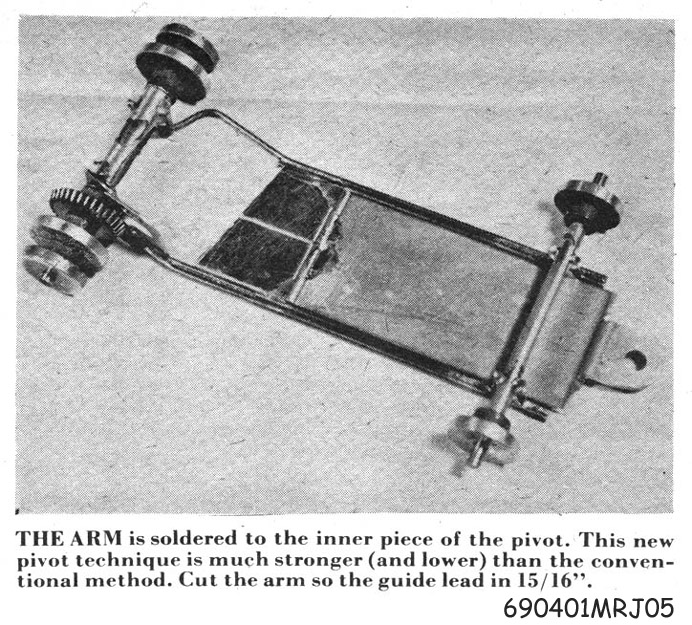
I'm no expert on Morrissey's chassis, but have a look at this photo from the April 1st issue of MRJ.  It's a Morrissey designed and built anglewinder GP F1:


690401MRJ05.jpg


Note the split pan section that the flush drop arm hinge is mounted on.  Mechanically, these are the same features (and in the same time period) as on your Morrissey sports car chassis; the "before" version.


It seems highly improbable that Morrissey would deliver a new chassis with the cross brace cut in half like that (precisely on the chassis centerline).  In my estimation it would be simpler to remove it or just leave it out altogether, but there it is.


More likely, it was cut later by its (then) owner, trying to increase chassis flex.


Anyway, just something to think about.  :hi:


Now I really do have to get back to cutting the side pans for this Emott replica build!


Steve Okeefe


I build what I likes, and I likes what I build


#24 Steve Okeefe

Steve Okeefe

    The Independent Scratchbuilder

  • Administrator
  • PipPipPipPipPipPip
  • 1,139 posts
  • Joined: 16-February 06
  • Gender:Male
  • Location:State of Independence

Posted 12 September 2013 - 12:07 AM

Progress on the build...


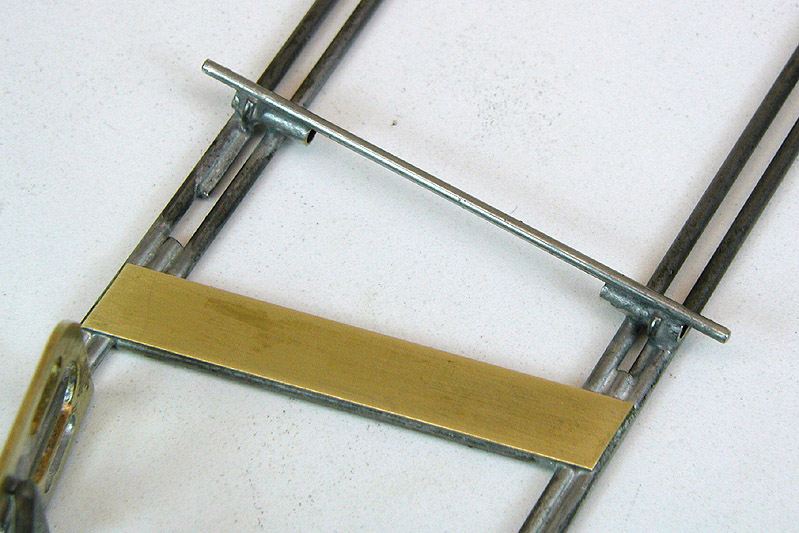
First, the drop arm hinge tubes, .032" piano wire braces and .047" plumber up stop:


21. Center & DA Hinge.jpg


With the drop arm assembled into the center section, it looks like this:


22.Center & DA Install.jpg


On to the plumber and side pans.


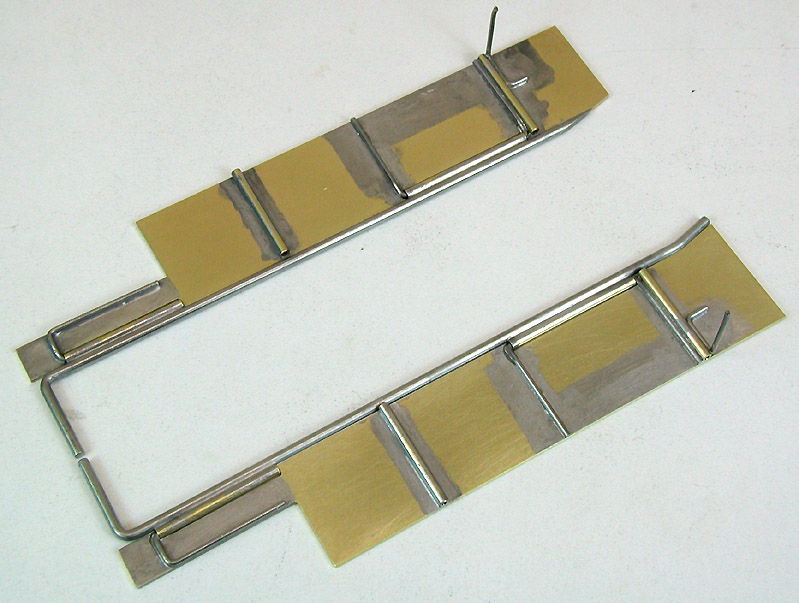
I started with the .063" plumber rails; cut, shaped and tinned.  Next the .032" side pans were cut out and notched for the 1/16" diameter hinge tubes.


Soldering the four hinge tubes to the plumber rails, I cut, shaped and tinned the six .032" piano wire hinge pins.  Because the side pans are .032"thick and the hinge tube wall thickness is only .016", I had to carve reliefs into the side pans for the hinge pins where they exit the hinge tubes.


After cutting the body mount pin tubes and shaping the two piano wire body braces, it was time to solder everything together... except the side pan hinges, of course; they're still supposed to move!  :blink:


The trick is to place a tiny drop of oil (I use common motor oil) in the hinges to exclude the solder, tin the piano wire parts, and use as little additional solder as you can get away with.  Even with acid flux the solder stays out of where ever the oil goes.


Of course, with the parts fitted so closely together, you could easily end up soldering the side pan directly to the hinge tube or the plumber rail.  :dash2: 


I use the Force to prevent this.   :wink3:   :laugh2:


When everything is all soldered up, it looks like this:


30. Plumber Rails & Floppies.jpg


That completes the major subassemblies.  When laid together, they look like this:


40. Major Subassys Top.jpg


41. Major Subassys Bottom.jpg


What's left is to tie the plumber rails together, install the pan hanger and shackles, add the details (like the lead wire loops) and clean everything up.


Almost finished!


  • MarcusPHagen likes this

Steve Okeefe


I build what I likes, and I likes what I build


#25 SlotStox#53

SlotStox#53

    Posting Leader

  • Full Member
  • PipPipPipPipPipPipPip
  • 4,084 posts
  • Joined: 13-March 13
  • Gender:Male
  • Location:TX

Posted 12 September 2013 - 09:36 AM

First class build Steve, looking really good !
Very inspirational :)


Electric Dreams Online Shop