Jump to content


Photo

CMF3 1237-series design and build progression


  • Please log in to reply
175 replies to this topic

#1 Rick Moore

Rick Moore

    CMF3

  • Full Member
  • PipPipPipPipPip
  • 500 posts
  • Joined: 22-November 09
  • Gender:Male
  • Location:Tampa

Posted 11 February 2016 - 09:35 PM

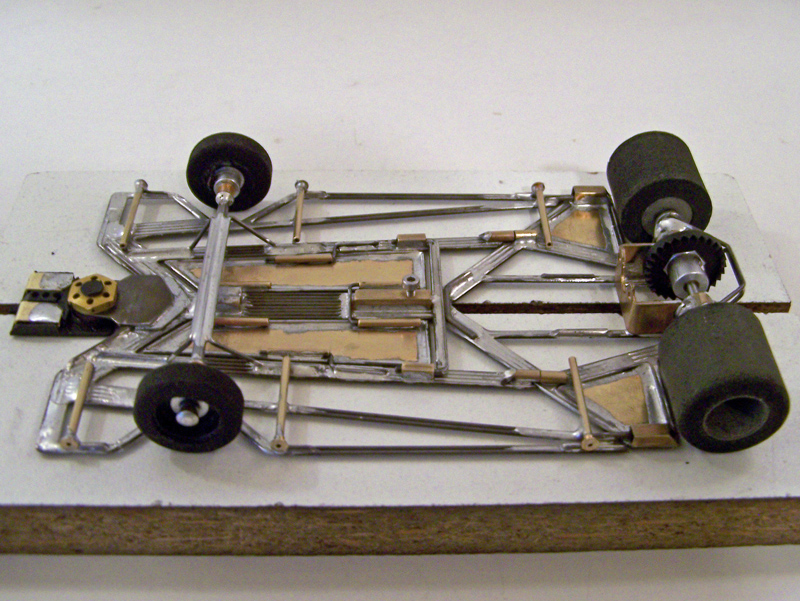
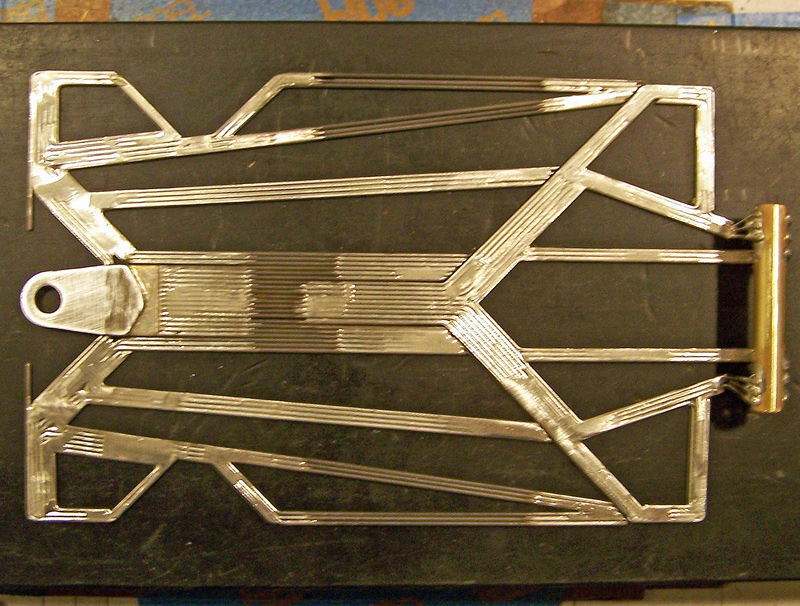
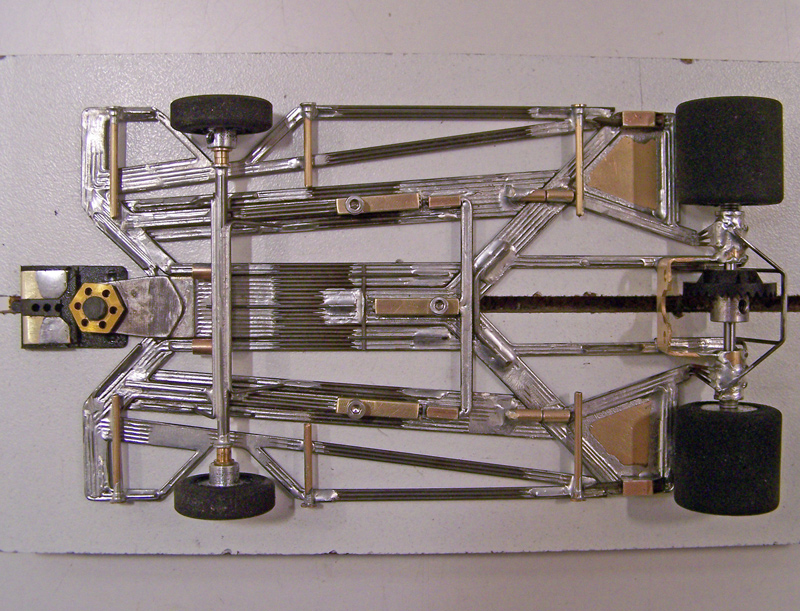
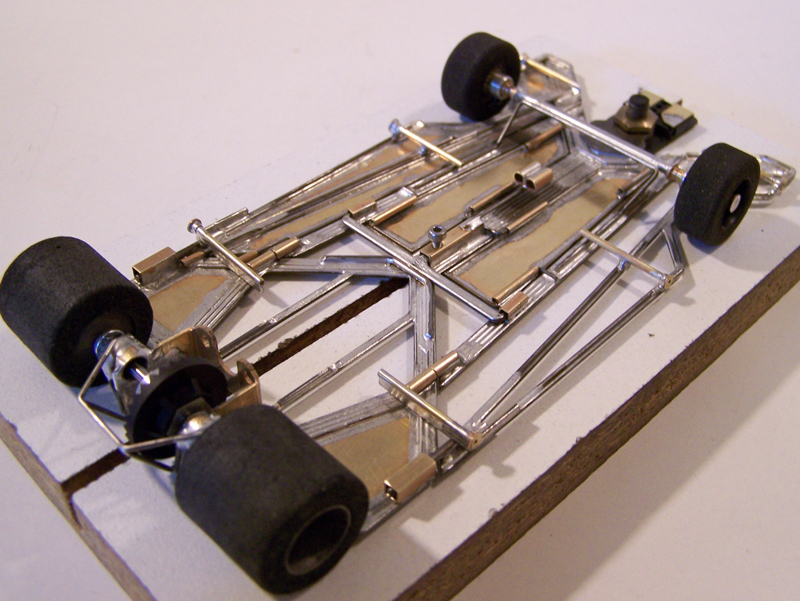
CMF3 1237-Series Design and Build Progression


I thought it might be amusing, and possibly informative (and hopefully not too annoying), to post a compilation of my last few chassis designs and builds to illustrate the progression through a series of chassis. While certainly nothing earth-shattering here, it was just a matter of the opportunity presenting itself, so I figured why not.


Background:


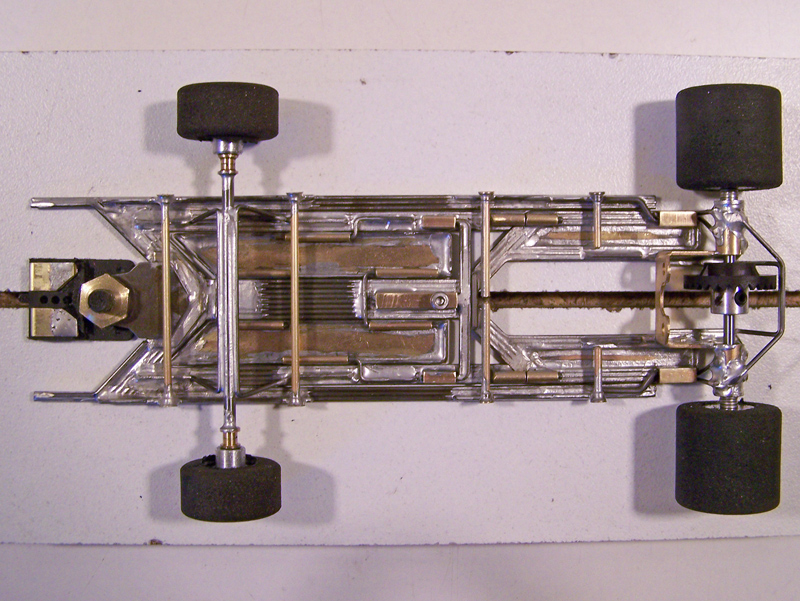
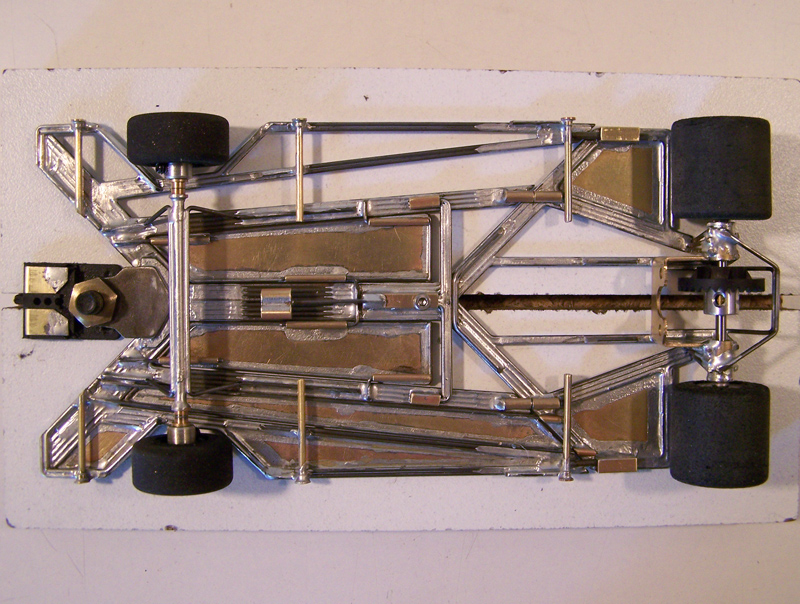
For the last couple of years I’ve been building chassis that were largely based on an initial design, the 1219. The 1219-based frames would morph through a lot of chassis, up to the 1233 (and even the unbuilt 1235), about which time I realized the 1219-series had pretty much run its course. After the tracks closed in west Florida, I took a break from scratchbuilding for about a year; however, early on during that respite I had doodled out a stick-figure of a chassis design with the moniker “1237”. Numerous doodles, notes, and drawings later, I not only had the 1237 design hashed out, but also its successor chassis, the 1238, the 1239 and the 1240.


So at the end of 2015 I was finally ready to start building again. Admittedly I was sorely tempted to skip some builds in this 1237-based progression, and almost did, but caution and reason finally won over, especially considering I had pretty much regretted any time I had skipped design/builds in the past, and more than once had to backtrack. I found out in those instances that when I would make more than one change to a chassis, the resulting chassis would invariably produce the same conundrum of trying to figure out which design/structural change caused what change in handling characteristic(s), and would just as invariably require the aforementioned backtracking of building the very same chassis I had skipped in the build sequence... Picture of an idiot in action.


Foreground:


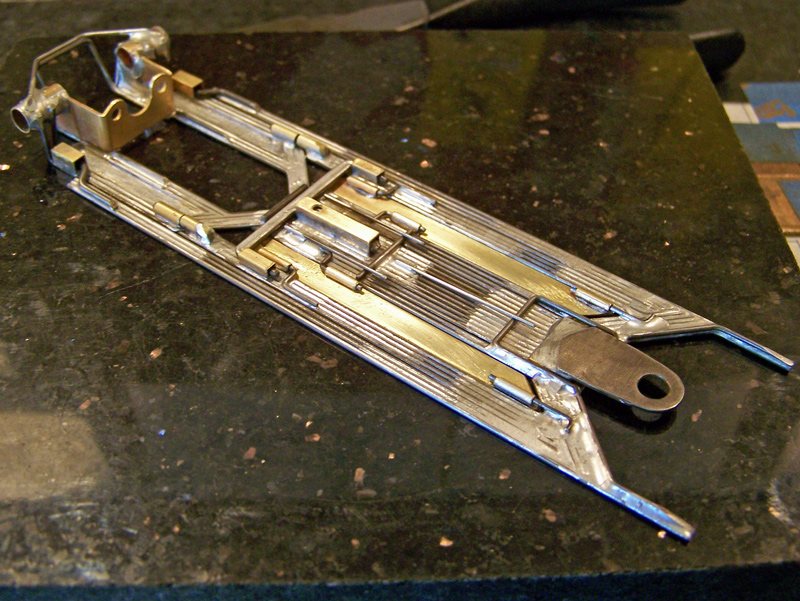
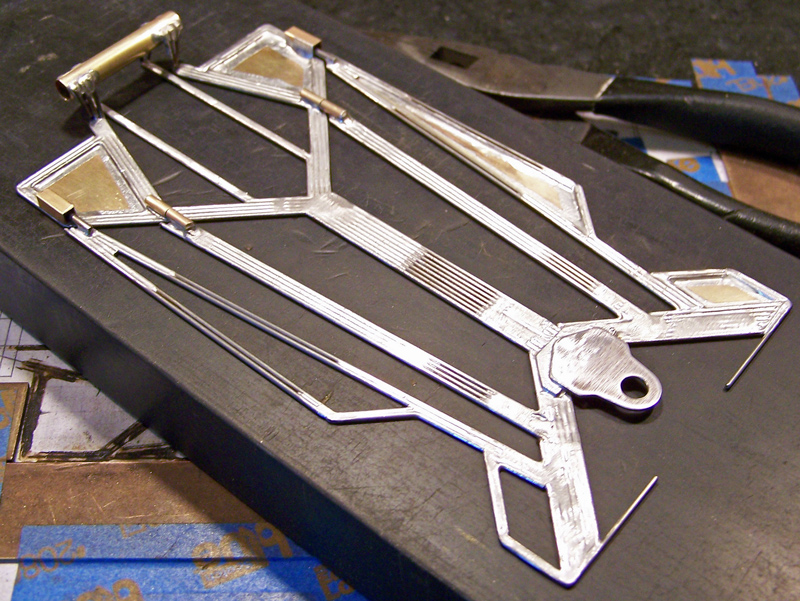
So, for your perusal, and maybe even some enjoyment, I will be posting the 1237-series design/build progression in subsequent posts to this thread, for the following chassis:


1237-Cc2

1237-Cc3

1238-Cc3

1239-Cc3

1240-Cc3


I figure long before the last chassis listed here I will have bored y’all into a coma, so any additional chassis posted may warrant additional medication…


Consider yourselves warned!


Rick/CMF3


  • endbelldrive, A. J. Hoyt, James Grandi and 1 other like this


#2 Rick Moore

Rick Moore

    CMF3

  • Full Member
  • PipPipPipPipPip
  • 500 posts
  • Joined: 22-November 09
  • Gender:Male
  • Location:Tampa

Posted 11 February 2016 - 09:48 PM

1237-Cc2


This first chassis in this series was more proof of concept than anything else. First I had to finalize the design (since all the subsequent chassis would be based upon this one). Next was to actually see if I could build it, as it had to be structurally, and how I wanted it to be functionally. Then it was time to poke, prod, twist, bend, fold, and mutilate the thing in my hands to see its dynamic characteristics, and how well they matched up with what I had been visualizing in my head. Finally it would get a few laps, just to see if it was drivable, or a POS; if the former to see its handling characteristics, and the latter to figure out what the inherent problem(s) was. After that I’d have a good idea where to go with the others and where the others would be going.


The Concept: The 1237 design is simple enough. The motor box / rear axle assembly, with lateral static pans forward of the rear tires, is pretty much the same that I designed for the 1229 chassis. From the forward apex of the rear section is a singular central main rail structure running forward to the guide tongue mount and laterally to the front wing structures. Rearward of the front wings are the wire-framed side “pans”; these are the same design I used for the 1233 chassis that worked rather well; the side pans loosely articulate with the chassis rear structure (0.055” wire inside 1/8” square brass tube). The oddity of the 1237 design are the two rails, between the side pans and the central main rail, that attach to the front structure and more tightly articulate with the chassis rear structure (0.055” wire inside 3/32” round brass tube); for lack of a better term, I call these the “buttress rails”. For this chassis the front axle spanning uprights are mounted atop the buttress rails.


See? Simple.


My first attempt to build the 1237 would be as a retro inline-drive chassis (the upper case “C” after the chassis design number), have a 3.875” wheelbase / 4.875” RAX-GPC (rear axle to guide pivot center) / 1.00” guide lead (the lower case “c” denoting these dimensions), and be framed using 0.039” wire (as denoted by the “2”); making it in terms of nomenclature a 1237-Cc2. For consistency in comparisons I would be keeping the same dimensions (“C”) for all first builds of each subsequent chassis.


I don’t build much of anything anymore using 0.047” wire for the chassis framing. And, for that matter, I’m pretty much done with 0.039” wire, opting for 0.032” wire as my preferred medium these days (and 0.032”wire framed chassis are denoted by a “3” at the end of the chassis ID number, for example, 1233-Cc3). I had already done comparisons of chassis built using 0.047” wire, 0.039” wire, and 0.032” wire on the 1225’s and the 1229’s, as well as a comparison of 0.039” wire and 0.032” wire on the 1233’s. At this point I have a fair idea what to expect when changing the wire size being used for the chassis framing. But I found out back on the 1225’s, that while you can largely take a 0.047” wire framed chassis and easily construct a version framed in 0.039”, to go from 0.039” wire with a design to 0.032” wire framing takes some consideration and adaptation. So for this first-time concept chassis I wanted to build in a better known medium, 0.039” wire, get it in my hands and on the track, before building in 0.032” wire.


And so, the result is this, the 1237-Cc2:


First some not-quite complete pictures:


1237-Cc2-03ae.jpg


1237-Cc2-02ae.jpg


1237-Cc2-01.2ae.jpg


And some not-so-in-focus (apologies) roller pictures:


1237-Cc2-21ae.jpg


1237-Cc2-22ae.jpg


1237-Cc2-23ae.jpg


1237-Cc2-24ae.jpg


The RTR car came in at 102.2 grams.


On its first test run on the Hillclimb at Fast Eddie’s, out of the box and with a mediocre motor, the 1237-Cc2 ran as fast as any of my 1229’s, and almost as fast as the 1233-Cc3 (the current benchmark in my stable). The handling was smooth and predictable, as well as being better than I predicted. Also, the adjustable bite bar came in handy as the just-cleaned-and-glued track ran in. Considering this is the “basic” version built in 0.039” wire of this chassis design (without all the “bells and whistles”, though some might say “smoke and mirrors”, of the 1229’s and 1233’s), these first test runs boded well for the 1237-based designs.


Of course, you never really know till you build them…


But for now at least I can check off “proof of concept”.


So, that’s one. Hang in there guys, this gets worse…


  • endbelldrive, Pablo and Chris Stemman like this

#3 Phil Worthy

Phil Worthy
  • Guest
  • Joined: --

Posted 12 February 2016 - 12:42 AM

Amazing. Love your stuff. Build on, Rick. Build on. Looking forward to it.

#4 Rick Moore

Rick Moore

    CMF3

  • Full Member
  • PipPipPipPipPip
  • 500 posts
  • Joined: 22-November 09
  • Gender:Male
  • Location:Tampa

Posted 16 February 2016 - 10:30 PM

1237-Cc3


So now it was time to build the same 1237 chassis, with all the same dimensions as stated before, but this time framed using 0.032” wire.


I found out some time ago on the 1225’s that going from 0.039” wire to 0.032” wire can produce, to say the least, dramatic results. My 1225-Ca2 (0.039”) had been fast and even competitive, so I figured I’d try building a 1225-Ca3 (0.032”). Right out of the box the 1225-Ca3 was crazy fast, turning some of my best lap times ever (with the typical mediocre test motor, not a save-it-to-race-it motor)… However, to turn those laps consistently was near impossible, as the friggin’ thing would literally explode out of the slot quite unexpectedly and rather spectacularly while making these high speed turns… While admittedly this was rather exciting from a driving perspective, from my builder’s perspective this was a disaster. A lot of test runs later, and a lot of poking, bending, and prodding later, I was able to figure out to some extent all (there were a bunch) the parts of the framing structures that were overloading, literally, like a spring.


By that time I had built the 1229’s and the 1233, so as a dual test of what I’d figured out I built the 0.032” wire framed 1229-Cc3 and 1233-Cc3. As well as being drivable and predictable, both of these turned out to be improvements over their 0.039” sister chassis. And the 1233-Cc3 was easily the fastest, and easiest to drive, chassis I had built to that time. So I was feeling more confident this time going from the 0.039” wire framed 1237-Cc2 to the 0.032” wire framed 1237-Cc3.


Enough of all the history. The 1237-Cc3 came out looking like this:


1237-Cc3-01ae.jpg


1237-Cc3-02ae.jpg


1237-Cc3-03ae.jpg


1237-Cc3-04ae.jpg


1237-Cc3-05ae.jpg


Not surprisingly, the 1237-Cc3 looks almost identical to the 1237-Cc2, as it should.


I was pretty sure the -Cc3 would weigh less than the -Cc2, but wasn’t sure how much. As it turned out, the RTR car for the 1237-Cc3 weighed in at 95.2 grams, 7 grams less than the 1237-Cc2. While this is below the 100-gram number thing that must be considered for applicability in some racing, it is not a consideration for comparison testing, since I need to compare the chassis “as is” to observe any differences between it and its predecessor chassis. If I want to later, I can always tack on some lead to test the chassis applicability to racing programs.


Okay, now for the test runs and comparison…


No. You see, I had been playing around with the 1237-Cc3, twisting, bending, poking, and prodding, side-by-side with the 1237-Cc2. It was doing everything I had expected it to do. And I knew I wouldn’t be able to get over to Fast Eddie’s Raceway that week…


And, so, without further ado or to do, I started building the 1238-Cc3. Why not?


And that is how, before the 1237-Cc3 ever got a lap in, I built the…


#5 Rick Moore

Rick Moore

    CMF3

  • Full Member
  • PipPipPipPipPip
  • 500 posts
  • Joined: 22-November 09
  • Gender:Male
  • Location:Tampa

Posted 16 February 2016 - 10:37 PM

1238-Cc3


Y’all getting bored yet? Or just annoyed? Admittedly it is a lot more fun designing and building these silly things than writing or reading about them…


Okay, now things start to get confusing, tedious, overcomplicated, and/or unintelligible. Consider yourselves warned.


The 1238 is an adaptation of the 1237 incorporating three major changes:


1) The isolation of the guide tongue mount from the chassis front assembly.

What was the single central main rail on the 1237, now on the 1238 only attaches to the guide tongue mount; attaching to the lateral aspects of this center-guide (CG) section, to attach the rear assembly and CG section of the chassis with the front assembly is,


2) The incorporation of indirect main rails (IMR’s).

In some areas called “Z-rails”, these would be more accurately described as “V-rails”. The first-medial rail of the IMR (3x 0.032”) attaches to the front-lateral side of the CG section, and projects parallel and rearwards. The second-lateral rail of the IMR’s (also 3x 0.032”) attaches to the rear-lateral aspect of the first rail, and project forward to connect with the front spanning wire assembly (and from there to the front wings, the side “pans”, and the buttress rails).Going back to the alpha-descriptor, they look like “VIV-rails”, where the “I” is the CG section.


3) The dynamic pans between the CG section and the buttress rails on the 1237’s have been eliminated on the 1238. This was done to better assess the CG/IMR configuration (with no impediment), and since they will also be eliminated on the subsequent 1239, this was the more opportune time to do this.


Okay, I know what some of you are saying, “Hey pin-head, that’s more than one change to the previous chassis in the build sequence.” Yep, you’re right. However, I’d already slugged through these changes with the 1219-based chassis (and even some earlier) and knew what to look for in the resulting chassis. Also, with only a single centered main rail there was no way I could isolate the guide mount without adding the indirect main rails (otherwise it would have had two main rails largely centralized, and I’ve already been down that road too). As for the dynamic pans, they were an “afterthought” on the 1237 to begin with, and could easily be accounted for (if necessary with tape, or outright removal).


Here are the roller pics for the 1238-Cc3:


1238-Cc3-01ae.jpg


1238-Cc3-02ae.jpg


1238-Cc3-03ae.jpg


1238-Cc3-04ae.jpg


1238-Cc3-05ae.jpg


Even though it is a little beefier looking in the center with the IMR’s, without the dynamic pans, this chassis felt light to me as I was building it. And it is. The RTR car of the 1238-Cc3 came out at 93.6 grams, 2.6 grams less than the 1237-Cc3, and 9.6 grams less than the 1237-Cc2, as well as being well under that 100-gram number thing. But, as before, the mass is inconsequential in the comparison of the design progression in terms of functionality. It is what it is. Besides, I was happy to see it come out this light, as I was well aware the mass would go up again when I built the 1239 chassis…


Okay, now, about those test runs…


That was the plan. The operable word being “was”. That “was”, until I screwed up my back at work. I wasn’t going anywhere, much less driving on the pain meds… By the time my back got somewhat functional, Joey (“The World Famous Slot Car Dog”) had his back go out, so another week nursing him back to health would follow…


In the meantime, after more poking and prodding of the 1238-Cc3, the 1237-Cc3, and the 1237-Cc2, and since I was stuck here anyway, I started building the 1239-Cc3, and…


Now I am starting to have some serious misgivings about having moved along in this build progression so far without any test laps. But, like a man determined to put his head through a brick wall…


Idiocy in one manifestation or another seems to be an inherent character trait for my part…


  • endbelldrive likes this

#6 Rick Moore

Rick Moore

    CMF3

  • Full Member
  • PipPipPipPipPip
  • 500 posts
  • Joined: 22-November 09
  • Gender:Male
  • Location:Tampa

Posted 18 February 2016 - 02:06 PM

During construction of the 1239, I got to this point in the frame-out (before addition of the front axle rails) where I realized the 1238 and the 1239 were identical.


1239-Cc3-FO-01ae.jpg


I am obviously easily amused.


#7 Rick Moore

Rick Moore

    CMF3

  • Full Member
  • PipPipPipPipPip
  • 500 posts
  • Joined: 22-November 09
  • Gender:Male
  • Location:Tampa

Posted 18 February 2016 - 02:48 PM

1239-Cc3


Will the madness ever end?!?!


Okay, now things start to get interesting… If you found the last chassis pointlessly confusing and overly complicated, my suggestion would be to stop reading now; things will only get worse exponentially at this point…


The 1239 is the 1238 with the addition of Front Axle Rails (FAR’s). For those new to my builds, the FAR’s are chassis rails for the sole purpose of mounting the front axle uprights, in effect “isolating” any forces working on the front wheels from the rest of the chassis directly. Controlling the FAR’s, like a bite bar, are spring wires that can have their tension adjusted (Variable Spring Wire, VSW).


On the previous 1219-based chassis there was one Y-shaped spring wire in the VSW control box (with adjustment screw); for the 1237-based chassis there would be separate left-side and right-side front axle VSW control boxes and adjustment screws. Neat! On the 1239, each left and right FAR is comprised of two rails (3x wire each) medially and laterally flanking (and attached to the rear of) the buttress rails.


It all looks like this:


1239-Cc3-01ae.jpg


1239-Cc3-02ae.jpg


1239-Cc3-03ae.jpg


1239-Cc3-04ae.jpg


1239-Cc3-05ae.jpg


Cool looking, huh? When I said I wasn’t concerned about the previous two chassis being below 100 grams as RTR cars, here’s why; the 1239-Cc3 as an RTR came out to 100.0 grams, proving once again it is better to be lucky than good.


Okay, now I’ve got three new chassis since the 1237-Cc2 that need…


#8 James Grandi

James Grandi

    On The Lead Lap

  • Full Member
  • PipPipPipPip
  • 473 posts
  • Joined: 31-May 10
  • Gender:Male
  • Location:Cranston, RI

Posted 18 February 2016 - 02:54 PM

Rick, your stuff is amazing. I've been building frames for 2 years and can't even imagine doing something like this, let alone fully understanding it. Love reading it though, it makes me think. I noticed something in this last set of pictures, an axle tube set in place before the bracket. What do you use for a bracket, and do you always cut the bracket legs to mount the axle tube in place first?
James Grandi
obSCEne Chassis
HVR BB Fronts
Bodies by Weaver

"There is no such thing as a race you are destined to lose. You will always have a chance."
 

#9 Rick Moore

Rick Moore

    CMF3

  • Full Member
  • PipPipPipPipPip
  • 500 posts
  • Joined: 22-November 09
  • Gender:Male
  • Location:Tampa

Posted 18 February 2016 - 02:56 PM

Test Runs!


It took me long enough. Made it over to Fast Eddie’s Raceway last night and got these cars some laps on the Hillclimb.


For testing purposes I always try to keep the set-ups as close to identical as possible: the same bodies all set up the same (except for the color between the white and black), same guides, wiring, gearings, tires… and motors, which is fairly easy since I have a bunch of less-than-stellar but very consistent Pro Slot Puppy Dogs in my inventory.


1237-Cc3 versus 1237-Cc2:


After running the previously tested 0.039” wire framed 1237-Cc2 for some laps, I put on the 0.032” wire framed sister chassis the 1237-Cc3. My recognition of the smoother handling and drivability from previous 0.032”-0.039” chassis comparisons on the 1237-Cc3 was immediate, like in the first lap. Slightly quicker, and more consistent, as well as being able to be pushed harder, and at the same time more forgiving. And happily, with some relief, it showed none of the bad traits I’d learned on the 1225-Ca3. Oddly enough, this pretty much relegates the predecessor 1237-Cc2 chassis to the role of dust collector. Slot car chassis life spans can be so short…


1238-Cc3 versus 1237-Cc3:


So now it is time to compare the effects on handling characteristics by isolating the guide mount and adding the indirect main rails (IMR’s). These two chassis are so similar on the track, the only difference being the ability to go a little deeper into a turn with the 1238-Cc3; in other words, it will save your behind when you screw up. I drove these two chassis more than all the others. It was a blast! I’d beat the time of one with the other, then top that time with the first one, and then… This went on for a while. But after many laps I had to give the nod to the 1238-Cc3, finally pushed to a 0.02-second quicker lap time, and for the aforementioned saving my behind numerous times. Really, that was some serious fun!


1239-Cc3 versus… uh… nothing, really…


So I put the 1237-Cc3 away, and began to test the 1238-Cc3 versus the newest in the progression the 1239-Cc3. Okay, that was the plan. I put the 1239-Cc3 on and it ran like poop… the really stinky smelly kind… when it occurred to me I’d forgot to set any of the adjustment screws… duh… So, I went back to my boxes, to set it up… at which point it occurred to me I had no idea how I should set the three adjustment screws (bite bar; right FAR; left FAR). Hunh? Okay, so I took a big WAG at it; I set the bite bar screw at minimal positive pressure, and for the FAR’s I turned them down about two-thirds, with the left screw slightly tighter (lead on, high bank deadman) than the right screw (180, kink, donut). And put it back on the track… Lights out! Without trying the 1239-Cc3 ran more than 0.07 second faster than the 1238-Cc3, whose best lap I was not able to better. And then, not even trying, running the 1239-Cc3 I turned even faster laps, eventually topping the 1238’s best lap by 0.15 second… Considering I’d been running the 1238 for quite some time and knew it well, and only ran a few laps on the 1239 with shot-in-the-dark settings, that was enough for me. There is no comparison. The 1239 is that much better. In a few laps it completely obsoleted the other three chassis.


Epilogue:


There you have it so far. Each successor 1237-based chassis in the progression is an improvement on the predecessor. That’s good enough at this point for me. Funny though; it all came out just like I thought it would, making me think “Hey, I could have skipped those builds, just like I thought”… I need to keep chanting the Mythbusters’ mantra, “Failure is always an option.”


However, and unfortunately, last night I was also trying a few set up changes on the 1229’s and 1233’s, that were not so successful, to put it mildly. This meant I didn’t get any reasonable comparison of the 1239-Cc3 versus its similarly component-oriented 1229-Cc3 counterpart, or the 1233-Cc3.


I am also aware that I need beaucoup de more test laps with the 1239-Cc3, and at some point have a greater understanding of the three adjustment screw settings. This is a process that took some time on the 1219-based 1310’s and 1225’s with only one VSW screw, so balancing and fine tuning the three adjustments on the 1239 may take a bit longer, and…


So, more testing is in order…


That said, I’ll probably just plunge headlong into the 1240 anyway. I see no point in trying to change myself at this juncture in my life…


Besides, this was fun.


Later gators!


Rick / CMF3


1237-prog-01a-ae.jpg


1237-prog-01b-ae.jpg


  • MarcusPHagen likes this

#10 Rick Moore

Rick Moore

    CMF3

  • Full Member
  • PipPipPipPipPip
  • 500 posts
  • Joined: 22-November 09
  • Gender:Male
  • Location:Tampa

Posted 18 February 2016 - 03:14 PM

Hey James! Thanks for the kind words. As for the motor bracket... well...


Where I was back in the '60s we used a lot of those rather thin Russkit motor brackets, and we'd always build up our rear axle tubes with a lot of uprights. So in the 90's when I started building again, and in-line motor brackets were a scarcity, I'd just build a tight-fitting motor box, solder the motor in and not even use a motor bracket. And the chassis worked just fine.


Edit: Also, if you look at the top and right-rear views of the chassis, you'll see I make and install (prior to the motor bracket installation) a one-wire/four-bend "gear guard" projecting from the inside rear of the motor box and upwards at an angle; atop this I attach a one-wire/two-bend "spreader" wire that also attaches to the top of the axle tubes. Besides protecting the crown gear, this set up adds additional rigidity to the rear axle tubes.


Fast-forward to the 00's and the retro-craze sweeping the slot car nation. Rules say you have to have a motor bracket. Okay. But I'd still build my chassis the same way, and just add the motor bracket eventually.


What I use is a modified JK D3F122, because it's small, and I make it smaller (but legal). I also mount the bracket so the motor sits at an angle, where the endbell side is flush with the bottom of the plane of the chassis, and the drive end is raised so the motor shaft intersects the midline of the rear axle.


I know, way too much information. Sorry. If I did anything the simple way, I'd just get bored...


Rick / CMF3


  • endbelldrive likes this

#11 James Grandi

James Grandi

    On The Lead Lap

  • Full Member
  • PipPipPipPip
  • 473 posts
  • Joined: 31-May 10
  • Gender:Male
  • Location:Cranston, RI

Posted 21 February 2016 - 08:34 PM

Rick,


While I may not always understand exactly whats going on/why something is done, I appreciate the explanations. I use a pretty decent number of motor mounts that are pre-angled when I build, but the JK has never been on that is. I presume you do a fair amount of bending with the bracket legs/bracket face to get the angle you desire and get the legs to sit how you want? Or, since the bracket in these cars seems to be more of a motor mount location rather than a stressed member of the frame, are you less concerned with how to remainder of the bracket sits as long as the motor is how you want it?


Your adjustment screws greatly intrigue me. What I wonder about those isn't so much the purpose, but rather what it is that they are adjusting. Will tightening down an adjustment screw add some sort of tension to the chassis, or is it more of a flex control method?


James Grandi
obSCEne Chassis
HVR BB Fronts
Bodies by Weaver

"There is no such thing as a race you are destined to lose. You will always have a chance."
 

#12 SlotStox#53

SlotStox#53

    Posting Leader

  • Full Member
  • PipPipPipPipPipPipPip
  • 4,084 posts
  • Joined: 13-March 13
  • Gender:Male
  • Location:TX

Posted 21 February 2016 - 11:08 PM

Wow! Amazing designs/thinking, wire bending and soldering skills, Rick.  :D

Very interesting reading your thoughts and theories leading to the designs. How do the times run with these unique cars compare to the more standard *Retro* builds?


#13 Rick Moore

Rick Moore

    CMF3

  • Full Member
  • PipPipPipPipPip
  • 500 posts
  • Joined: 22-November 09
  • Gender:Male
  • Location:Tampa

Posted 22 February 2016 - 08:48 AM

Replies, Part 1:


Hi James.


Your second presumption regarding the motor bracket, where it is not a “stressed member of the frame” is the more precise. I just cut the bracket to fit the frame. To get the JK D3F122 to fit as I like it I cut off the tops of the axle tube “holes”, then shave about 1/16” - 1/8” off the back and “holes” (depending on the chassis framing) to put the face of the motor about 1/2” forward of the rear axle centerline. To get the angled motor mount I use the hi-tech apparatus pictured below:


04-anglebracket-ae.jpg


That’s an old FK motor can, a 2-mm drill bit, and a 3/16” brass tube (to fit inside the 7/32” rear axle tube) with a 2-mm hole drilled through its center.


Of note, back in 2011 on my 1310 chassis I made two chassis the same, except for the motor mount, where one was hypoid mount, and the other was angled. There was absolutely no discernable difference in handling or lap times between the two chassis. But I’ve always used the angled inline motor mount for FK-type motors since then, as the one discernable difference was that it was relatively easier to set the gear mesh with the angled mount (which in and of itself wasn’t that big of a deal to begin with).


As regards the screw adjustments, the answers would be: Yes, and Yes.


Yes: The adjustable bite bar, something new for me to try on these 1237-based chassis, is used to vary the amount of chassis “twist” between the front and rear of the chassis. Seems to work, though, having only tried it twice thus far, I want to try it more to observe the effect over a wider range of track conditions (and more tracks would be nice too).


Yes: The variable spring wire adjustment for the front axle rails adjusts the tension to those rails, and correspondingly to the front axle and wheels. This was discovered, also back in 2011, by pure accident on the 1310’s and 1225’s (which only have a single Y-shaped spring wire for the left and right front axle rails). When I first built them I used a fixed (soldered in place) spring wire, and eventually realized by varying the tension on the spring wire I could drastically alter the handling characteristics of the chassis. So I made another “hi-tech” item, a control box (a piece of 1/8” square brass tube with a motor mount screw stuck in it) to adjust the spring wire.


VSWT-05ae2.jpg


It worked. If I backed out the adjusting screw to the least tension the car became “loose” (oversteer, so to speak), and when I tightened it down too much the car would “push” (or understeer). That was cool. At least I liked it. As a side note, after that point I only would buy natural rubber tires (donuts really) since I could make the car as tight or loose as warranted simply by turning the screw.


Now all I have to do is get used to having separate left and right front axle adjustments along with the bite bar adjustments… Hey, it’s fun. But I’m easily amused.


Replies, Part 2:


Hi Paul.


It should be noted that all my cars have one inherent problem: I drive them. I hold no illusions as to the level of my slot car driving abilities. And with my general infrequency of practicing (and testing) these days, my level has gone from somewhere in “mediocre” to something I would characterize as bordering “abysmal”.


But the chassis as weird (y’all can say it, I know they are) as they might be are actually rather competitive. Unfortunately I don’t get to go out and play with the GRRR kids as much as I’d like to these days, largely due to my working weekends at the hospital for the past two-and-some years. But in the past I could usually get these cars to give some of the retro guys in these parts a run for their money. Even managed a few wins in there. And Bryan Warmack, a real slot car driver, managed to get a win on the King at BPR with my 1236 after he’d done some expert tweeking on it.


So I’d say they are “comparable”. Are they “better”? I would never make such a generalized and categorically inept statement. But I wouldn’t say they are “worse” either. Besides, I like them. But, admittedly I’m biased. (And, as some have noted, “bent”, like the wire on my chassis…)


Thanks for asking gentlemen! Have fun!


Rick / CMF3


  • bluecars likes this

#14 Rick Moore

Rick Moore

    CMF3

  • Full Member
  • PipPipPipPipPip
  • 500 posts
  • Joined: 22-November 09
  • Gender:Male
  • Location:Tampa

Posted 22 February 2016 - 09:33 AM

Re: Adjusting Screws


I should probably add a small addendum in this thread regarding the matter of adding adjustment screws to a chassis at this time, especially for those who might have taken some leave of their senses and are considering giving them a try.


The location of the adjustment screw(s) on the chassis is important.


In other words, there are places you don’t want to put them, as I have found.


Simply put, when you go torqueing down on these suckers there has to be an equal amount of force going into the chassis component upon which they are mounted. If the structure upon which they are mounted is not significantly more rigid than the spring wire and the component the spring wire is affecting, there will be a corresponding deformation of the structure upon which it is mounted. And, as I have found, that ain’t always so good.


Sort of a disclaimer…


Rick / CMF3


#15 Rick Moore

Rick Moore

    CMF3

  • Full Member
  • PipPipPipPipPip
  • 500 posts
  • Joined: 22-November 09
  • Gender:Male
  • Location:Tampa

Posted 04 March 2016 - 11:19 AM

With a disregard for prudence, and preferring the quicker fun fix for the slot car junkie in me, I’ve been throwing bits of the 1240-Cc3 together. I decided to photo the build for my own reference, however it is completely lacking in presentation quality, so not to worry, I won’t be putting all that folderol up here.


But, since the build “complexity” is increasing, and as a courtesy for those few wanting to see more detail, here are three quick pics of the main framing and the addition of some of the superstructural items to date.


Not much left to do at this point: gear guard and motor bracket, front axle uprights, body mount pin tubes, miscellaneous spring wires… Have to wait till next week, since my “work week” starts tonight… Nap time…


Have fun!


Rick / CMF3


1240-Cc3-frame-out-01ae.jpg


1240-Cc3-frame-out-02ae.jpg


1240-Cc3-frame-out-03ae.jpg


  • endbelldrive likes this

#16 Rick Moore

Rick Moore

    CMF3

  • Full Member
  • PipPipPipPipPip
  • 500 posts
  • Joined: 22-November 09
  • Gender:Male
  • Location:Tampa

Posted 10 March 2016 - 04:36 PM

1240-Cc3


I told you this gets worse.


The 1240 is the 1239 with a set of rails on the left and right sides running from the forward aspect of the Rear Assembly (motor box, flanking static pans and rear axle tube) along the lateral and medial aspects of the space between and not connected to the Indirect Main Rails and medial Front Axle Rails; and internally attached to the forward aspect of these rails are two wire “pans” running rearward. These rails/pans act as a vibration/harmonic dampening system for the chassis’ basic structure of the Rear Assembly and the Center-Guide section.


That was confusing. Suffice it to say the similar incorporation of this type of rail/pan components on the 1219-based 1233’s was a dramatic improvement over the predecessor 1229’s (which were dang good chassis to begin with).


So the goal all along was to create a similar set of functional components as the 1233 on the 1237-based chassis, while adding the Adjustable Bite Bar, having separate left and right Variable Spring Wires for the Front Axle Rails (instead of a single VSW), having less mass, and being easier to build. That’s all.


Sorry for the headache. The 1240-Cc3 looks like this:


1240-Cc3-01ae.jpg


1240-Cc3-02ae.jpg


1240-Cc3-03ae.jpg


1240-Cc3-04ae.jpg


1240-Cc3-05ae.jpg


1240-Cc3-RTR-02ae.jpg


The 1240-Cc3 weighs in at 105.5 grams RTR, 4.7 grams more than the predecessor 1239-Cc3 (100.8g in final RTR configuration), but 2.0 grams less than the component-comparable 1233-Cc3, despite having more “shtuff”. And the 1240-Cc3 actually was easier to build than the 1233-Cc3. Not bad.


Now for some initial test runs on the Hillclimb at Fast Eddie’s:


1240-Cc3 versus 1239-Cc3:


First, let me say that track conditions would best be described as “loose”.

Second, let me say the motor in the 1240-Cc3 was not as good as static testing showed, and was noticeably lacking compared to the motor in the 1239-Cc3. Still, the 1240 ran comparable lap times, and was only 0.04s off the 1239’s best time. Not bad, considering…


1240-Cc3 versus 1233-Cc3:


Third, under the track conditions, nothing else was even getting around the track as well as the 1239 and 1240, including the 1233-Cc3…


In any case, a lot more testing of these chassis is required from this point on.


If anything of note comes up, I’ll let y’all know. Otherwise I’ll try not to annoy anyone further as much as possible…


Rick / CMF3


#17 Rick Moore

Rick Moore

    CMF3

  • Full Member
  • PipPipPipPipPip
  • 500 posts
  • Joined: 22-November 09
  • Gender:Male
  • Location:Tampa

Posted 21 April 2016 - 10:03 AM

1237-based retro F1 chassis


Since my last F1 build, the A212-c2 (F1 version of the 1229), was well over two years ago, and thinking a 1237-based design might lend itself well to the application, I decided to build a minimum of three F1’s.


First up:


A214-c2  – F1 version of the 1237;

A215-c2  – F1 version of the 1238.


Then (more on this later):


A216-c2;

or,

A217-c2.


All are “c” dimension chassis (3.875/4.875/1.00) at this point of consideration, however I had also been toying with the idea of possibly building another chassis, one of these designs, using “e” dimensions…


Because these retro F1’s have the 100-gram number thing for racing applicability in these parts (the only reason I build them), and from previous experience, I decided to only build 0.039” wire framed chassis (“2”). Calculations have always shown that any 0.032” version (“3”) of my wire framed chassis would require either the incorporation of massive brass components or the addition of larger quantities of lead, either of which negates any desire for my part to even build a 0.032” wire framed F1 chassis; previous 0.039” frames had typically come out in the mid-90’s RTR, and that was bad enough. (…it is what it is…)


First up, the…


#18 Rick Moore

Rick Moore

    CMF3

  • Full Member
  • PipPipPipPipPip
  • 500 posts
  • Joined: 22-November 09
  • Gender:Male
  • Location:Tampa

Posted 21 April 2016 - 10:07 AM

A214-c2


Nuts and bolts: The motor box is “1229”-based with flanking static pans; center main rail (8x wire); articulated buttress rails (4x wire each); side pans (3x wire each); two dynamic pans between the central main rail and buttress rails (0.010” brass sheet with 0.032” wire perimeter).


A214-c2-b02ae.jpg


A214-c2-b03ae.jpg


A214-c2-b04ae.jpg


A214-c2-01ae.jpg


A214-c2-02ae.jpg


A214-c2-03ae.jpg


A214-c2-04ae.jpg


A214-c2-05ae.jpg


Had to add about 4.0 grams of lead to the dynamic pans to get it to 99.8 grams RTR (I’ll worry about the 0.2 grams later). Since I tend to build my F1’s to fit a particular body, in this case the Parma Matra MS80, I install a 0.024” wire “sissy bar” attached to the rear axle tubes and extending upwards into the body’s rear wing/spoiler.


Next up...


  • Tex likes this

#19 Rick Moore

Rick Moore

    CMF3

  • Full Member
  • PipPipPipPipPip
  • 500 posts
  • Joined: 22-November 09
  • Gender:Male
  • Location:Tampa

Posted 21 April 2016 - 10:11 AM

A215-c2


I also decided to go ahead and build the A215-c2 immediately after completion of the A214-c2.


Nuts and bolts: The motor box is 1229-based with flanking static pans; center main rail (8x wire) extending to guide mount with flanking indirect main rails (2x-2x wire each) attaching to front spanning (“wing”) assembly; buttress rails (4x wire each); side pans (3x wire each); two dynamic pans between the lateral indirect main rails and buttress rails (0.025” brass plate).


A215-c2-b01ae.jpg


A215-c2-b02ae.jpg


A215-c2-b03ae.jpg


A215-c2-01ae.jpg


A215-c2-02ae.jpg


A215-c2-03ae.jpg


A215-c2-04ae.jpg


A215-c2-05ae.jpg


The A215 ran about 2 grams heavier than the A214, so for this one, with the same Matra MS80 body (and sissy bar installed), I added about 2.0 grams of lead to the dynamic pans, which got the RTR car to 100.5 grams.


And now…


  • Tex likes this

#20 Rick Moore

Rick Moore

    CMF3

  • Full Member
  • PipPipPipPipPip
  • 500 posts
  • Joined: 22-November 09
  • Gender:Male
  • Location:Tampa

Posted 21 April 2016 - 10:12 AM

A214-c2 and A215-c2 Test Runs:


I needed to see the differences in the handing characteristics between the A214 and the A215 (with the addition of indirect main rails, or IMR’s) before building the next chassis. Not surprisingly, space limitations on the narrow F1’s (1.625” maximum width) makes design options and construction possibilities more restrictive. On past F1 build progressions the IMR’s were a welcome addition (my first comparison for F1’s were the A304 & A305 back in 2010), but I was finding on the CanAm 1237-based chassis that this advantage was less “dramatic” than on previous designs (the hypothesis at this time being the possible “moderating effects” of the articulated buttress rails, but who knows…), so I wanted a newer quantification for these similarly designed F1’s before proceeding. The next F1 chassis build would be one of two possible chassis designs using front axle rails with variable spring wires:


1) A216-c2; IMR’s not incorporated; it would basically be the A214 with front axle rails.


Or (and);


2) A217-c2; IMR’s incorporated; it would basically be the A215 with front axle rails (or F1 version of the 1239).


(Of course, there really is nothing stopping me from building both… I just like to maintain the illusion I have the ability to maintain some miniscule level of self-control… yeah… right…)


Both the A214-c2 and A215-c2, besides being run in comparison to each other, would be run in comparison with the A212-c2 (basically an F1 version of the 1229 chassis).


Test Runs:


On the Hillclimb last night at Fast Eddie’s Raceway, the track in very good condition, both the A214-c2 and the A215-c2 outran and outperformed the predecessor A212-c2. What was surprising was how much better.


As for the A214 versus the A215, well… Even considering the two somewhat lackluster motors I had in the A215 (funny how they test so nice and turn out to be duds…) versus the far superior motor that was in the A214 (funny how they test just so-so, and turn out to be screamers…), in effect ignoring the straight speeds and overall lap times (the A214 was looking really, really good)… The handling characteristics of these two chassis are VERY similar, not unlike the initial test runs of the 1237-Cc3 and 1238-Cc3, but even more so. This one was real tough to call. At this point I’d have to lean towards the A214 (but was it a bias caused by that motor), however…


More testing (with more equivalent motors) is definitely in order for these two F1 chassis, especially since, not unlike their CanAm brethren, initial testing was so favorable. There is now the even greater likelihood, if not outright certainty, I’ll wind up building BOTH the A216 and the A217, it is just a question of which chassis gets built first…


Aren’t slot cars just terrible?


#21 Rick Moore

Rick Moore

    CMF3

  • Full Member
  • PipPipPipPipPip
  • 500 posts
  • Joined: 22-November 09
  • Gender:Male
  • Location:Tampa

Posted 21 April 2016 - 10:16 AM

Update:


The 1238-Cc3, which when originally built did not have the dynamic pans (like on the 1237’s), has now had the pans added. This brought the RTR mass up to 99.5 grams, so a small 0.5-g piece of lead was added to make it that even 100 number thing. The 1237-Cc3 also got 5.0 grams of lead added to its dynamic pans, getting it to an even 100 RTR. I was more than satisfied with the chassis-to-chassis comparisons I’d made, and can now explore the characteristics and applicability of each chassis. The more I tweaked the set ups and got more laps on the 1238 and the 1237’s, the better they got and the more I liked them.


The 1239-Cc3 and the 1240-Cc3 are still the easiest and fastest to drive, and easily run lap times within thousandths of a second of each other. That said, I’m still trying to figure out the adjustment settings and set-up nuances of these two chassis.


But, with the changes and tuning tweaks, the two 1237’s and the 1238 are much better and closer in overall performance than they were initially. The 1238-Cc3 has now survived two major wall shots (both to the left-front), and still has the potential to turn laps within a hundredth of a second of the 1239 and 1240. And the 1237-Cc2 and 1237-Cc3 are less than five-hundredths behind…


I will say categorically, all five chassis are just a joy to run.


Have fun!  ;) 


Rick / CMF3


#22 Bill from NH

Bill from NH

    Age scrubs away speed!

  • Full Member
  • PipPipPipPipPipPipPipPip
  • 14,274 posts
  • Joined: 02-August 07
  • Gender:Male
  • Location:New Boston, NH

Posted 21 April 2016 - 07:43 PM

Rick, have you had the opportunity to see how competitive your latest cars are against the rest of the Florida retro fields? At one point in time, I know they were very competitive there.


Bill Fernald
 
I intend to live forever!  So far, so good.  :laugh2:  :laugh2: 

#23 Rick Moore

Rick Moore

    CMF3

  • Full Member
  • PipPipPipPipPip
  • 500 posts
  • Joined: 22-November 09
  • Gender:Male
  • Location:Tampa

Posted 21 April 2016 - 09:27 PM

Hey there, Bill!


Nope, not for some time now. Last race I got to was the Southern Shootout at the Viper Pit about two years ago (man, that B-Main CanAm race was something else…). I decided after the wife died in 2009 it was time for a career change, so I went back to school (yeah, I was the “old guy” in the classes) and got my AAS degree and certification as an x-ray tech in 2013. I was fortunate to get hired shortly thereafter at Tampa General Hospital, and now I work the weekend graveyard shifts… doing two 16-hour shifts and one 8-hour shift, knocking out 40 hours from 10:00 PM Friday night to 6:00 AM Monday morning… I tend to sleep a lot on Mondays after having my “happy hour” breakfast at the Village Inn… Hey, I’m no friggin’ spring chicken anymore, I need naps… long ones.


For me to get to one of the GRRR weekend races requires me to take off the equivalent of a “work week”. So far I couldn’t get the time off for last year’s or this January’s GRRR races at Fast Eddie’s in Pinellas Park (just across Tampa Bay from me) due to scheduling. I’ll probably try again later this year for the GRRR races in August and/or September. We’ll see…


Honestly, at this point, it will probably be more of a test of my mediocre driving ability than the chassis… They’ve been the only thing that ever really gave me a snowball’s chance in…  :rolleyes: 


In any case, it’ll be fun, and I’m looking forward to the opportunity for sure, as well as just saying “Hey” to everyone again. And Joey (“The World Famous Slot Car Dog”) is long overdue for a pizza coma…


Rick / CMF3


#24 Rick Moore

Rick Moore

    CMF3

  • Full Member
  • PipPipPipPipPip
  • 500 posts
  • Joined: 22-November 09
  • Gender:Male
  • Location:Tampa

Posted 12 May 2016 - 12:39 PM

Update:


CanAm’s:


On the 1239-Cc3 and 1240-Cc3 I am just now coming to tenuous grip with the tuning, using the three adjustment screws in concert with one another. There are A LOT of combinations! At this point the 1239 is outperforming the 1240, running lower and fastest lap times every time out. The motor/gearing combo on the 1239 is such that until anything runs as fast or faster, I ain’t going to mess with it. I swear this motor was never this good before. However, it may just be a motor suited perfectly for this chassis, a phenomenon I’ve seen before, and have no explanation for. Finding an equitable “right” power plant for the 1240 is still ongoing.


Similarly the motor/gearing set-ups for the 1237-Cc2 and 1237-Cc3 get better and better. Oddly, these are motors that were previously mediocre at best… and the current one in the 1237-Cc3 was found in the “dog” pile, and last two test evenings has continued to get faster and faster (initially a few hundredths off the 1237-Cc2’s pace, and now within a thousandth). Last night both ran about 0.03s behind the 1239’s best times (however, I never really have to push the 1239 to see what it can do, as it does it with little effort). It is nice and encouraging to see both chassis, the “basic” design, performing so well at this level.


The 1238-Cc3 is probably wondering why its motor is still running the same as it always has, and what the heck those others cars have been eating lately… still within a tenth of the others, but definitely showing the capabilities to perform as well.


F1’s:


No doubt about it, the A214-c2 is just outright better than the A215-c2. But this doesn’t mean there is anything wrong with the A215, but that the A214 takes to the Hillclimb like a duck to water. If the A214 makes the same progress as the 1237’s, I’ll be more than satisfied.


At this point the next F1 build will definitely be the A216-c2, basically be the A214 with front axle rails and VSW adjustments.


And while I was at it, thinking I could have even more fun…


#25 Rick Moore

Rick Moore

    CMF3

  • Full Member
  • PipPipPipPipPip
  • 500 posts
  • Joined: 22-November 09
  • Gender:Male
  • Location:Tampa

Posted 12 May 2016 - 12:51 PM

1237-based Retro Stock Cars


At Fast Eddie’s Raceway in Pinellas Park, besides the Hillclimb, Ed also has a drag strip and a big oval track. All my scratchbuilt drag cars from the 90’s have long since been scrapped for parts, except for my TF dragster that has been relegated to “knick-knack” status for more than a decade-and-a-half, and would require some serious work to get “functional”…


Not quite as old, but I still had to literally clean the dust off, is my last/only retro stocker, the 1310-D (the 1310’s being the “panned” sister-version of the all-wire 1225’s), that I built back in 2011. I built to fit the OS ’68 Dodge Charger body, which, for appearances purposes only allows for a 5/8” guide lead; probably could have shoved the guide out farther for the full 3/4” allowed, but… Let’s face it, that OS ’68 Charger is just one gorgeous slot car body. Looks good just sitting there, but looks stellar going around the track… And here was this nice big honking oval track sitting right there… So I cleaned it up, put some runny bits back on it, leaded up the left pans (RTR about 131 grams), and headed for Ed’s oval... I had a ball! And to my surprise this old car would turn “competitive” lap times… a five year old car… Cool!


Well, dontchyaknow, this just meant I had to build me some new retro stock cars based on the 1237-series… And though that ’68 Charger is just one beautiful body, I’ll be using the Parma Cyclone this time to take full advantage of the dimensions this body allows in this class.


1237-D2o


This is a fairly straight-forward knock out of the 1237 chassis design adapted to retro Stock Car dimensions. The original 1237-Cc2 continues to just get better the more I test it, and considering the successful testing of the F1 version A214-c2, I figured this would be a good place to start.


Of note, even though the wheelbase is 4.5”, but with the shorter guide lead at 0.75”, making the RAX-GPC 5.25”, compared to the CanAm 1237-Cc3 that has a RAX-GPC of 4.875”, on the Stocker 1237-Do2 the main rail, buttress rails and side pans are only 0.125” longer. This was something I thought about trying back when I first built the 1229’s, because the rear assembly (motor box / drive / rear axle) was pretty much its own entity on the chassis that I could make longer as desired; in fact the rear assembly on the 1233’s and the 1237-based chassis are a little longer than the 1229’s. So, for this 1237 Stocker version the rear assembly is even longer; 0.25” longer. I’m as curious as anyone to see how this works.


The other note is that this is a purpose-built oval track chassis, hence the pans loading the left side.


Here are the pics:


1237-D2o-b01ae.jpg


1237-D2o-b02ae.jpg


1237-D2o-b03ae.jpg


1237-D2o-01ae.jpg


1237-D2o-02ae.jpg


1237-D2o-03ae.jpg


1237-D2o-04ae.jpg


1237-D2o-05ae.jpg


The RTR car came in at 119.3 grams, which is dang close to the 120 gram minimum for the class, and right where I wanted it. Once again, it is better to be lucky than good… I’d already pre-cut a range of lead pieces to fit the various pans (totaling about 19 grams), so it will be easy to tune for the oval track, but I wanted to start with the lowest mass possible, observe the chassis characteristics, and add on from there.


Initial Test Run!


Not bad at all, really. Out of the box the 1237-D2o was just as quick as the 1310-D. Considering that I’ve been tuning the 1310-D for the oval over my last bunch of visits, and that it has the variable spring wire (VSW) adjustment for the front axle rails that the 1237-D2o does not, this again bodes well for the design/build. Unfortunately I only did preliminary lead weight tuning, because I forgot to bring the double-sided tape that I had set on my work counter where I wouldn’t forget it… If this was the first time something like this had happened I’d be happy…


Anyway, if 1237-D2o improves as much as the 1237-Cc2 (and 1237-Cc3) with continued testing, well…


But I’m already thinking about the next builds…


More fun to come!


Rick / CMF3


  • Tex likes this


Electric Dreams Online Shop