Jump to content


Photo

Roth's Orbitron in resin


  • Please log in to reply
16 replies to this topic

#1 Detroit Dave

Detroit Dave

    Mid-Pack Racer

  • Full Member
  • PipPipPip
  • 158 posts
  • Joined: 06-December 13
  • Gender:Male
  • Location:White Lake, MI

Posted 27 September 2016 - 09:38 AM

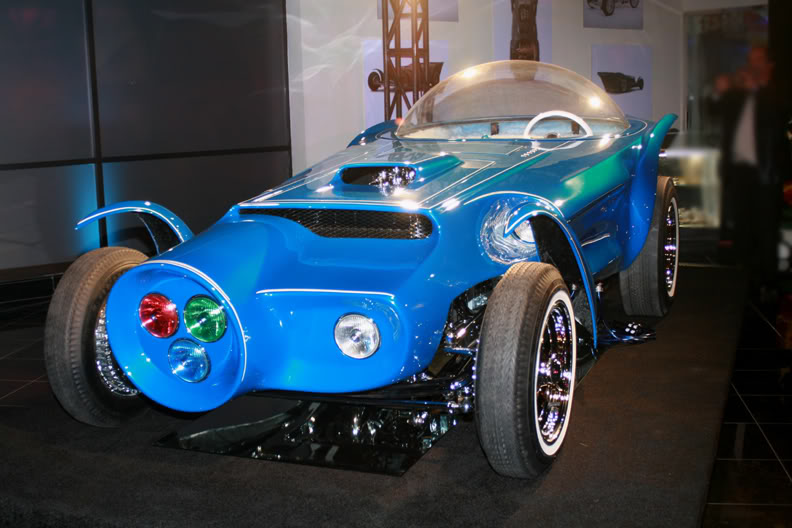
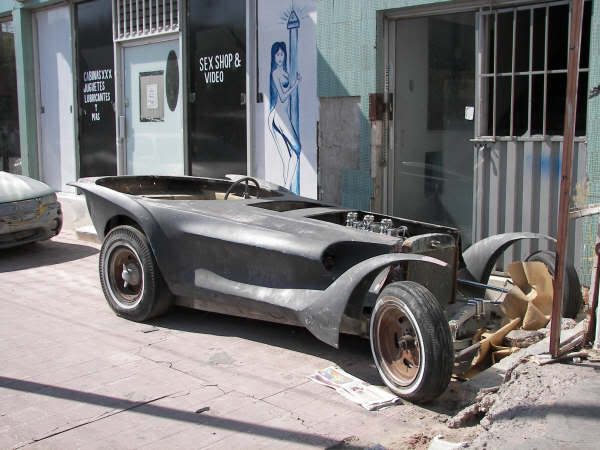
I've got a new project on the workbench that I can't wait to get my teeth into.  

I'm hoping it will end up looking a lot more like:

orb3.jpg

Than this:

ORBITRON024.jpg


My starting point is a partial resin model of the Orbitron I got several months ago and a MPC chassis that has been kicking around the parts box for more than two years.  I gave up hope that I would stumble across an affordable MPC Jefferies Mantaray body for it.  So I see this as the next best thing!


Here is the starting point.

001.JPG


  • Jencar17 and garyvmachines like this
Dave Roberts


#2 Slot Car Mods Magazine

Slot Car Mods Magazine

    Mid-Pack Racer

  • Full Member
  • PipPipPip
  • 112 posts
  • Joined: 25-February 16
  • Gender:Male
  • Location:Sherwood Park, Alberta, Canada

Posted 27 September 2016 - 01:24 PM

I'm looking forward to this one...


Ron Todhunter
-----------------------------------------
SLOT CAR MODS MAGAZINE
"Everybody's Slot Car Magazine"
info@slotcarmods.com
-----------------------------------------

#3 jokar124

jokar124

    Mid-Pack Racer

  • Full Member
  • PipPipPip
  • 113 posts
  • Joined: 25-May 14
  • Gender:Male
  • Location:Cambridge, Ontario, Canada

Posted 27 September 2016 - 10:13 PM

Me too. Who makes this resin kit and where can I get one? And does anyone make a model of Roth's "Druid Princess" ?


Jo Salvaterra

#4 Detroit Dave

Detroit Dave

    Mid-Pack Racer

  • Full Member
  • PipPipPip
  • 158 posts
  • Joined: 06-December 13
  • Gender:Male
  • Location:White Lake, MI

Posted 28 September 2016 - 07:34 AM

Hendrick resin makes this kit. bought mine through an online auction but I suspect this is the source.

I have not seen a model of the Driud Princess.  That would be a very cool build.  


Dave Roberts

#5 Mbloes

Mbloes

    Race Leader

  • Subscriber
  • PipPipPipPipPip
  • 629 posts
  • Joined: 19-April 12
  • Gender:Male
  • Location:Los Angeles, CA

Posted 28 September 2016 - 11:33 AM

I love bubble tops - the Silhouette is another one.


It looks like those front fenders (on your kit) need a ton of work, though.


Mike Bloes

#6 Detroit Dave

Detroit Dave

    Mid-Pack Racer

  • Full Member
  • PipPipPip
  • 158 posts
  • Joined: 06-December 13
  • Gender:Male
  • Location:White Lake, MI

Posted 29 September 2016 - 08:52 AM

I agree with the comment on the fenders.  The parting line for the fender is actually a good half inch or so back from the end of the resin but the line and surface are clear and clean.  So it should be just a matter of using the Dremel tool to work my way back to those.  I am wondering how fragile resin is compared to other materials I have worked with in the past.  If anyone has insight into the tendancy of the resin to shatter vs bend with minor impacts I'd like to hear it.  I am considering how much resin I want to remove from the model to both lighten the body or to add details. The body is currently as much as 3/8 of an inch in places. If the resin is fragile I may want to keep more thickness as a means to retain strength.  If the resin is somewhat flexible I may remove more resin and add in brass tubing to build strength.  My first step is going to be to create the missing bubble top and hood, so I still have some time before the cutting occurs.  


Dave Roberts

#7 Dave Crevie

Dave Crevie

    Posting Leader

  • Full Member
  • PipPipPipPipPipPipPip
  • 4,478 posts
  • Joined: 16-February 09

Posted 29 September 2016 - 03:18 PM

How brittle the resin is depends on the supplier. The resin I use stays a little flexible long after it has been cast. The

resin bodies I made have hit the floor without breaking. How the resin is catalyzes also affects how brittle it becomes.

Most resins can handle grinding and sanding OK, but keep the heat down. 


#8 Detroit Dave

Detroit Dave

    Mid-Pack Racer

  • Full Member
  • PipPipPip
  • 158 posts
  • Joined: 06-December 13
  • Gender:Male
  • Location:White Lake, MI

Posted 07 October 2016 - 08:38 AM

So the carving of the Resin begins!  I created a couple of flat mounting planes in the body sides for the mounting brackets to fit into.  This also required some minor re-positioning inboard of the brackets on the chassis.  I also carved out some space for the front axle and the guide flag post.  This also gave me a couple of resin chunks to test and found them to be quite strong and fairly flexible.  Good news. 

Chassis setup2.jpg


The resulting positioning of the body on the chassis looks very promising.

Chassis setup.jpg


Dave Roberts

#9 Detroit Dave

Detroit Dave

    Mid-Pack Racer

  • Full Member
  • PipPipPip
  • 158 posts
  • Joined: 06-December 13
  • Gender:Male
  • Location:White Lake, MI

Posted 07 October 2016 - 08:44 AM

An idea went off in my head and I had a "bright" idea for the bubble top!  :D

bubble.jpg


I cut down a plastic package for a light bulb and laid it into a lid for a large medicine bottle.

Then poured in some epoxy around the base of the top which added some rigidity to the bubble top.  It will need a bit more structure but it is moving in the right direction. 


Dave Roberts

#10 Detroit Dave

Detroit Dave

    Mid-Pack Racer

  • Full Member
  • PipPipPip
  • 158 posts
  • Joined: 06-December 13
  • Gender:Male
  • Location:White Lake, MI

Posted 10 November 2016 - 10:24 AM

Slight update as I have been distracted by another project.  My friend Jay dropped off a MPC MantaRay body that I couldn't resist working on.  I have created some basic shapes for the missing hood and bubble top and have started to clean up some of the excess resin.  

hood.jpg

Will need to fillet the scoop to  blend into the hood better and I am going to create a better base for the bubble top using the current one as a template.


Dave Roberts

#11 Detroit Dave

Detroit Dave

    Mid-Pack Racer

  • Full Member
  • PipPipPip
  • 158 posts
  • Joined: 06-December 13
  • Gender:Male
  • Location:White Lake, MI

Posted 29 November 2016 - 01:23 PM

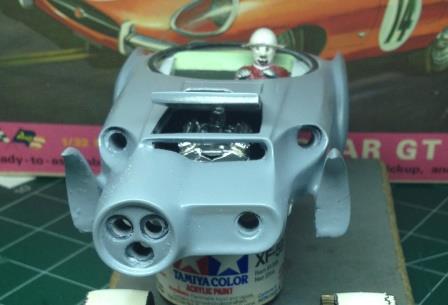
Nearing completion of the body refinements.  Unfortunately the car is looking a lot like the second picture at the top instead of the restored show car at the top. 

primer.jpg


In addition to cleaning up the lines around the fenders, I have also been digging into the resin to find the back side of the light openings.  I want to attempt a lighted car this time around. 

under.jpg


I'm also trying to define how the mechanicals will relate to the body so that I can create an interior that has some level of detail and driver figure to go in it.  


  • Tex likes this
Dave Roberts

#12 Detroit Dave

Detroit Dave

    Mid-Pack Racer

  • Full Member
  • PipPipPip
  • 158 posts
  • Joined: 06-December 13
  • Gender:Male
  • Location:White Lake, MI

Posted 07 December 2016 - 08:45 AM

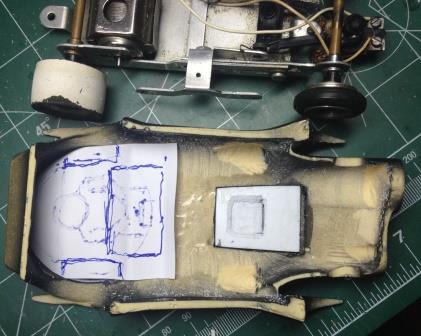
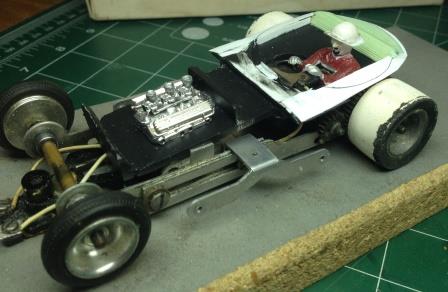
Moving things along slowly.  Started to create the interior plate out of sheet Styrene, model engine parts and a Revell driver. 

Tray.jpg

The key is to clear the brushes on the motor so that I can add some depth to the interior.  Not a lot of room here. 


I'm also trying to create a Roth looking driver figure that is wearing an old style German WW2 surfer helmet out of the Revell driver.   Not confident that this is going to work out yet.  

helmet.jpg


Here is how it all looks with the body on top of it. 

underhood.jpg


  • olescratch likes this
Dave Roberts

#13 Detroit Dave

Detroit Dave

    Mid-Pack Racer

  • Full Member
  • PipPipPip
  • 158 posts
  • Joined: 06-December 13
  • Gender:Male
  • Location:White Lake, MI

Posted 16 December 2016 - 10:37 AM

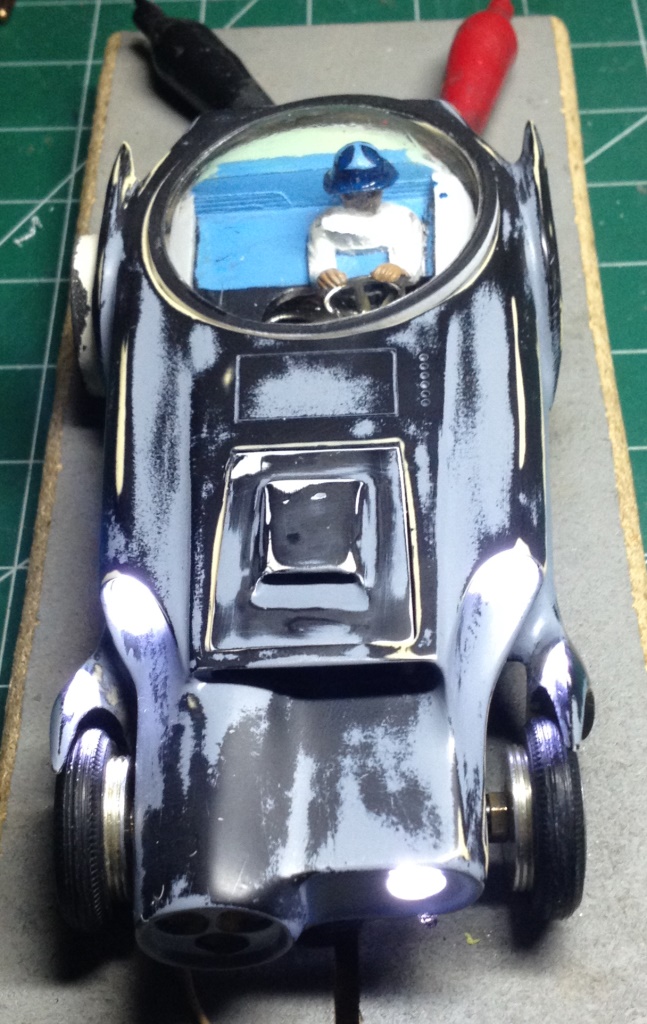
The Orbitron is getting closer to being ready for final primer and paint.  Last changes are going in to the body for the packaging of the lighting and the body mounts.  I changed from doing a side mount to the body to adding front and rear styrene bosses to the interior tray before it gets epoxied to the body.  

packaging.jpg

I can't wait to see how the lighting will highlight the body after paint.  I still need to finish fitting the front multi-light and the rear tail lights.  

lighting.jpg


  • miko likes this
Dave Roberts

#14 Detroit Dave

Detroit Dave

    Mid-Pack Racer

  • Full Member
  • PipPipPip
  • 158 posts
  • Joined: 06-December 13
  • Gender:Male
  • Location:White Lake, MI

Posted 17 February 2017 - 09:37 AM

Orbitron is now painted and now it is time to get on with the final chassis wiring and interior work.  Paint took a few unexpected turns.  The next layer of paint I applied over the paint above refused to dry.  4 weeks of waiting and still remained soft.  Only one thing could be done and that was to strip it down to the resin and start over.  Based on some input from a friend I gave the resin body a good wash in dish soap and the left to soak in water for a few days.  Dried it out and then began to prime and fair it once again.  The Chrome enamel went on reasonable well but I did manage to get one lone fish eye on the hood.  I decided to live with this. Next up was the 50 year old Testor Roth Orbitron blue out of the 1/4 oz. Jar.  It appeared to have dissolved into solution well with a bit of stirring and a lot of shaking.  However when I tried to run it through the airbrush the pigment began to clog the airbrush but I somehow managed to fight my way through it.  Not perfect but it will work.  Followed this up with coat of pearl clear and she's ready to go.  

Pearlclear.jpg


  • Jairus and garyvmachines like this
Dave Roberts

#15 Jairus

Jairus

    Body Painter Extraordinaire

  • Subscriber
  • PipPipPipPipPipPipPipPip
  • 10,174 posts
  • Joined: 16-February 06
  • Gender:Male
  • Location:Salem, OR

Posted 17 February 2017 - 09:48 AM

Looks like a very fun project and you are doing GREAT!  :good:


Jairus H Watson - Artist
Need something painted, soldered, carved, or killed? - jairuswtsn@aol.com

www.slotcarsmag.com

www.jairuswatson.net
http://www.ratholecustoms.com
Check out some of the cool stuff on my Fotki!


#16 Detroit Dave

Detroit Dave

    Mid-Pack Racer

  • Full Member
  • PipPipPip
  • 158 posts
  • Joined: 06-December 13
  • Gender:Male
  • Location:White Lake, MI

Posted 20 February 2017 - 07:34 AM

Thanks for the encouragement!


Dave Roberts

#17 Detroit Dave

Detroit Dave

    Mid-Pack Racer

  • Full Member
  • PipPipPip
  • 158 posts
  • Joined: 06-December 13
  • Gender:Male
  • Location:White Lake, MI

Posted 27 February 2017 - 03:24 PM

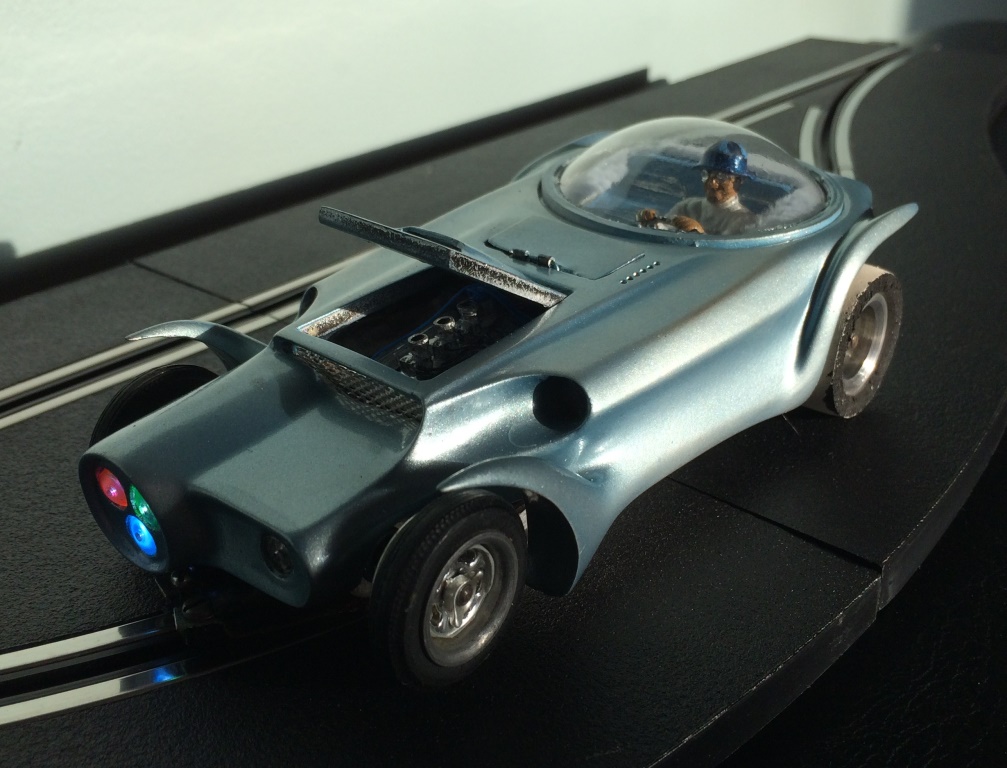
Just a few remaining details to work out.  

Done.jpg

The multi color light turned out great and it actually does shine as a white in the overlap at the center of the beams as Roth had intended.  


Dave Roberts


Electric Dreams Online Shop