

Hi,
This may be one of the most difficult tasks for a beginner, as soldering the bushings or ball bearings on a flexi is sometimes hard to do properly. The difficulty lies in the alignement, even using a set-up board and jig wheels. I use a long axle and jig wheels and even then sometimes I have to do it more than once to achieve good spin.
What happens usually is after soldering, still the axle does not rotate as freely as desired or, it seems OK when soldering but afterward I have has to do it again...
So the reason of this topic is to ask how do you set up your bushing or ball bearings for free spin?? What tools do you use??
Hope this will help many people around here .
Best regards,

Best way install bearings in a flexi chassis?
Started by
Pontes1
, Jan 12 2017 12:42 PM
28 replies to this topic
#1

Pontes1
-
- Full Member
-

- 51 posts Joined: 08-November 13
Backmarker
- Gender:Male
- Location:Portugal
Posted 12 January 2017 - 12:42 PM
Fernando Pontes
#2
swodem
-

- Subscriber
-
- 1,176 posts Joined: 29-October 14
Checkered Flag in Hand
- Gender:Male
- Location:Auckland, NZ
Posted 12 January 2017 - 01:11 PM
The best tip I can give is the soldering iron.
You need a fine chisel tip that has enough mass to deliver enough heat
The best I have used so far is the 50w Weller with a PL133 tip. Next best is a Good CXR80 with a 5mm Chisel tip.
I get everything lined up with the long setup axle and THESE excellent axle setup blocks .
I apply some flux to the flange of the bushing and rotate the bushing carefully using and X-Acto knife, to get the flux in a small quantity around the entire circumference of the bushing surface where it mates with the chassis. Then I just touch the top edge of the bushing with the soldering iron tip (having just loaded it with some solder) and let it heat and flow around the bushing. Doesn't look like much but it gets right around the bushing.
Obviously the bushing flange goes to the outside as all strong (crash) forces are pushing the wheel onto the bushing. If you mount the bushing with the flange on the inside the wheel in a wreck is applying a force to push it off the axle tower.
Steve Meadows
#3
Cheater
-

- Root Admin
-
- 25,793 posts Joined: 14-February 06
Headmaster of the asylum
- Gender:Male
- Location:Norcross, GA
Posted 12 January 2017 - 01:16 PM
Fernando,
You'll find some good ideas for aligning bushings in this THREAD.
Gregory Wells
Never forget that first place goes to the racer with the MOST laps, not the racer with the FASTEST lap
#4
MSwiss
-

- IRRA National Director
-
- 25,990 posts Joined: 16-April 06
Grand Champion Poster
- Gender:Male
Posted 12 January 2017 - 02:19 PM
Greg,
Unless I missed something, I don't see alignment tips in that thread.
To line them up, a common way is to put a spring in between them, to push them out and up against some sort of square shouldered device (jig block or collar) on the axle.
If you use something that doesn't have set screws, you have to add them on the outside.
You adjust collars so the flange of the bushing/ bearing is as close to the uprights as possible, but without touching them.
You do this to take the uprights, not being perfectly parallel, out of the equation.
You use plenty of flux and plenty of heat, and work fast, making sure the solder has flowed between the miniscule gap between the flange and the upright.
Mike Swiss
Inventor of the Low CG guide flag 4/20/18
IRRA® Components Committee Chairman
Five-time USRA National Champion (two G7, one G27, two G7 Senior)
Two-time G7 World Champion (1988, 1990), eight G7 main appearances
Eight-time G7 King track single lap world record holder
17B West Ogden Ave., Westmont, IL 60559, (708) 203-8003, mikeswiss86@hotmail.com (also my PayPal address)
Note: Send all USPS packages and mail to: 692 Citadel Drive, Westmont, Illinois 60559
#5
Cheater
-
- Root Admin
-
- 25,793 posts Joined: 14-February 06
Headmaster of the asylum
- Gender:Male
- Location:Norcross, GA
Posted 12 January 2017 - 02:30 PM
You did miss it. Here's a paste.
"They also benefit from very careful alignment. There are gage pin sizes available that fit the S7 axle bushings with virtually no play and if aligned with one, it's pretty amazing how well axles will spin. With quality axles (like Koford) an unbalanced rear axle/tires/gear assembly will self-rotate to put the heavy point down so long as you haven't oiled it, just like ball bearings will do. (I've demonstrated this effect to several Slotblog members over the years...)."
The point about not oiling them is because it adds just enough friction to prevent the self-rotation.
I've used the spring method you detail in the past and the key element to having that work well is that the outside 'faces' of the bushings need to be precisely 90 degrees to the axial centerline of the bushing bore. That's usually the case with machined bushings like the the Slick 7 bronze ones, but not always the case with molded/sintered oilites. It's not a bad technique actually.
But using a tightly-fitting gage pin gives bushing bores that are nearly perfectly parallel as well as nearly perfectly centered.
Gregory Wells
Never forget that first place goes to the racer with the MOST laps, not the racer with the FASTEST lap
#6
MSwiss
-
- IRRA National Director
-
- 25,990 posts Joined: 16-April 06
Grand Champion Poster
- Gender:Male
Posted 12 January 2017 - 02:30 PM
Not sure of David Liebenthal still has these, but it works great.
The square collars are slightly concave, so when using with ball bearings, it only pushes up against the outer diameter of the BB.
PRI axle bearing installation tool for 3/32" axles
The square collars are slightly concave, so when using with ball bearings, it only pushes up against the outer diameter of the BB.
PRI axle bearing installation tool for 3/32" axles
Mike Swiss
Inventor of the Low CG guide flag 4/20/18
IRRA® Components Committee Chairman
Five-time USRA National Champion (two G7, one G27, two G7 Senior)
Two-time G7 World Champion (1988, 1990), eight G7 main appearances
Eight-time G7 King track single lap world record holder
17B West Ogden Ave., Westmont, IL 60559, (708) 203-8003, mikeswiss86@hotmail.com (also my PayPal address)
Note: Send all USPS packages and mail to: 692 Citadel Drive, Westmont, Illinois 60559
#7
Zippity
-

- Banned
-
- 5,278 posts Joined: 05-March 06
Grand Champion Poster
- Gender:Male
- Location:Wellington, New Zealand
Posted 12 January 2017 - 02:34 PM
Always apply a generous helping of oil to the inside of the bearing/bushing, before applying the solder. 
I place a small collar with a set screw, between the bearing/bushing and the setup block when I do mine.
I place a small collar with a set screw, between the bearing/bushing and the setup block when I do mine.
- Pete L. and SlowBeas like this
Ron Thornton
#8
Cheater
-
- Root Admin
-
- 25,793 posts Joined: 14-February 06
Headmaster of the asylum
- Gender:Male
- Location:Norcross, GA
Posted 12 January 2017 - 02:35 PM
Not sure the PRI installation tool is still available, but I couldn't reach David by phone to check. If he calls back, I'll post whether or not they are.
Gregory Wells
Never forget that first place goes to the racer with the MOST laps, not the racer with the FASTEST lap

#10
MSwiss
-
- IRRA National Director
-
- 25,990 posts Joined: 16-April 06
Grand Champion Poster
- Gender:Male
Posted 12 January 2017 - 02:50 PM
You did miss it. Here's a paste."They also benefit from very careful alignment. There are gage pin sizes available that fit the S7 axle bushings with virtually no play and if aligned with one, it's pretty amazing how well axles will spin. With quality axles (like Koford) an unbalanced rear axle/tires/gear assembly will self-rotate to put the heavy point down so long as you haven't oiled it, just like ball bearings will do. (I've demonstrated this effect to several Slotblog members over the years...)."The point about not oiling them is because it adds just enough friction to prevent the self-rotation.I've used the spring method you detail in the past and the key element to having that work well is that the outside 'faces' of the bushings need to be precisely 90 degrees to the axial centerline of the bushing bore. That's usually the case with machined bushings like the the Slick 7 bronze ones, but not always the case with molded/sintered oilites. It's not a bad technique actually.But using a tightly-fitting gage pin give bushing bores that are nearly perfectly parallel as well as nearly perfectly centered.
I did miss that.
How do get the right size gage pin?
Send McMaster Carr your bushings? LOL.
Regardless, I'm not a fan of forcing a tight shaft into a BB and then using it.
If you have a situation where you don't have a lot of play between your bushing/BB and upright hole, the less invasive way of doing what your talking about, is to wrap a rubberband around your normal fit axle and pull it up and around your guide tongue.
It will load your bushing/BB the same way a tight shaft will.
That's the technique, wing car guys with precise EDM cut chassis, and components, quickly install BBs, sometimes before a race, but especially useful between a Semi and a Main.
Mike Swiss
Inventor of the Low CG guide flag 4/20/18
IRRA® Components Committee Chairman
Five-time USRA National Champion (two G7, one G27, two G7 Senior)
Two-time G7 World Champion (1988, 1990), eight G7 main appearances
Eight-time G7 King track single lap world record holder
17B West Ogden Ave., Westmont, IL 60559, (708) 203-8003, mikeswiss86@hotmail.com (also my PayPal address)
Note: Send all USPS packages and mail to: 692 Citadel Drive, Westmont, Illinois 60559
#11
Cheater
-
- Root Admin
-
- 25,793 posts Joined: 14-February 06
Headmaster of the asylum
- Gender:Male
- Location:Norcross, GA
Posted 12 January 2017 - 02:54 PM
David Liebenthal just rang me back and he is still able to supply the PRI-902 axle bearing installation tool.
It's worth mentioning that he make a similar tool for installing motor busings and bearings.
It's worth mentioning that he make a similar tool for installing motor busings and bearings.
Gregory Wells
Never forget that first place goes to the racer with the MOST laps, not the racer with the FASTEST lap
#12
Cheater
-
- Root Admin
-
- 25,793 posts Joined: 14-February 06
Headmaster of the asylum
- Gender:Male
- Location:Norcross, GA
Posted 12 January 2017 - 02:58 PM
I did miss that.
How do get the right size gage pin?
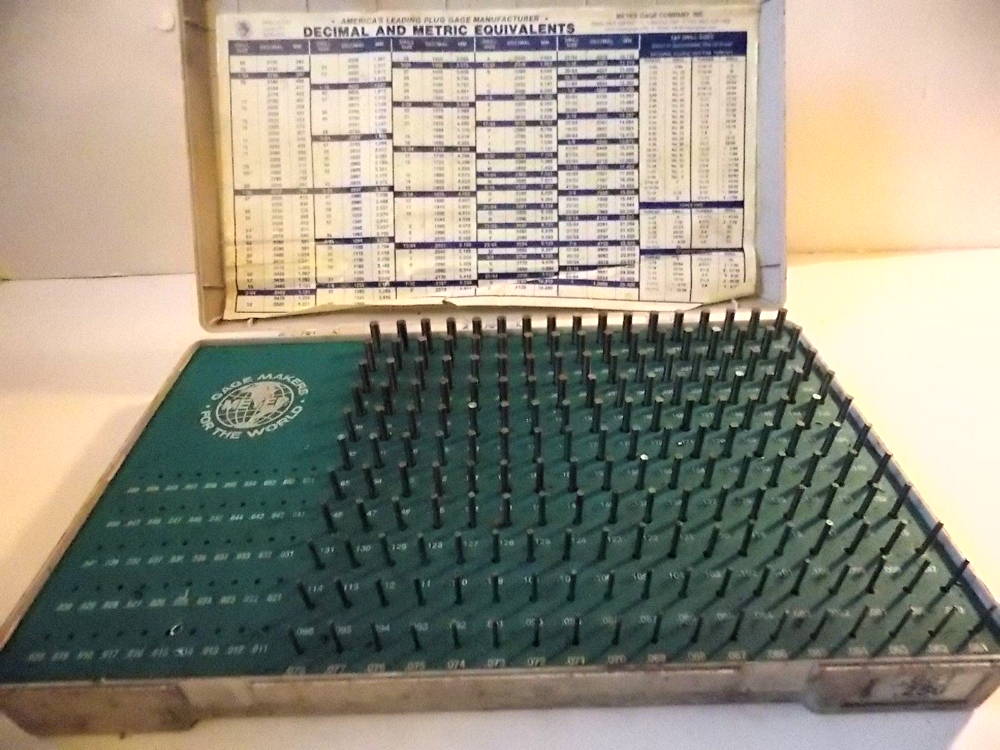
I bought one of these sets for cheap off eBay a number of years ago, which made it fairly easy to find the right size pin.
Using a gage pin to align bushings in the best method I've ever tried.
Gregory Wells
Never forget that first place goes to the racer with the MOST laps, not the racer with the FASTEST lap
#13
MSwiss
-
- IRRA National Director
-
- 25,990 posts Joined: 16-April 06
Grand Champion Poster
- Gender:Male
Posted 12 January 2017 - 03:04 PM
Let me reword that.
How does someone who hasn't bought a set of used gage pins, off of eBay, get the right size? LOL.
How does someone who hasn't bought a set of used gage pins, off of eBay, get the right size? LOL.
Mike Swiss
Inventor of the Low CG guide flag 4/20/18
IRRA® Components Committee Chairman
Five-time USRA National Champion (two G7, one G27, two G7 Senior)
Two-time G7 World Champion (1988, 1990), eight G7 main appearances
Eight-time G7 King track single lap world record holder
17B West Ogden Ave., Westmont, IL 60559, (708) 203-8003, mikeswiss86@hotmail.com (also my PayPal address)
Note: Send all USPS packages and mail to: 692 Citadel Drive, Westmont, Illinois 60559
#14
MSwiss
-
- IRRA National Director
-
- 25,990 posts Joined: 16-April 06
Grand Champion Poster
- Gender:Male
Posted 12 January 2017 - 03:13 PM
PS: Do you have to wait for everything to cool off to get the pin out?
Mike Swiss
Inventor of the Low CG guide flag 4/20/18
IRRA® Components Committee Chairman
Five-time USRA National Champion (two G7, one G27, two G7 Senior)
Two-time G7 World Champion (1988, 1990), eight G7 main appearances
Eight-time G7 King track single lap world record holder
17B West Ogden Ave., Westmont, IL 60559, (708) 203-8003, mikeswiss86@hotmail.com (also my PayPal address)
Note: Send all USPS packages and mail to: 692 Citadel Drive, Westmont, Illinois 60559
#15
Zippity
-
- Banned
-
- 5,278 posts Joined: 05-March 06
Grand Champion Poster
- Gender:Male
- Location:Wellington, New Zealand
Posted 12 January 2017 - 03:38 PM
Not sure the PRI installation tool is still available, but I couldn't reach David by phone to check. If he calls back, I'll post whether or not they are.
Make your own.
Take a spring out of an old Biro.
Use 2 collars made from the metal parts of an old plastic spur or crown gear.
Nothing easier
- Steve Deiters likes this
Ron Thornton
#16
Steve Deiters
-

- Full Member
-
- 2,317 posts Joined: 28-May 07
Posting Leader
- Gender:Male
- Location:Cincinnati, OH
Posted 12 January 2017 - 03:43 PM
I install the bearings (make sure they fit easily) in the uprights, slide an axle into the bearings, take DuBro 3/32 collars and slip them over the axle butting them up against the bearings that are in position. Solder the bearings from the back side. Loosen the collars and see if the axle is free spinning. Reheat the solder on the bearings if needed for slight adjustment to achieve better alignment.
My preference is also to have a notched tube running between the bearings, but some rules in some areas may not allow that. It beefs the whole drive assembly up. Helps to keep the bearings aligned in the event of a major wall hit. You can also use that tube to further secure your motor with braces.
#17
MSwiss
-
- IRRA National Director
-
- 25,990 posts Joined: 16-April 06
Grand Champion Poster
- Gender:Male
Posted 12 January 2017 - 03:57 PM
For ball bearings, the PRI tool are properly machined.
The above parts are not.
The above parts are not.
- tonyp likes this
Mike Swiss
Inventor of the Low CG guide flag 4/20/18
IRRA® Components Committee Chairman
Five-time USRA National Champion (two G7, one G27, two G7 Senior)
Two-time G7 World Champion (1988, 1990), eight G7 main appearances
Eight-time G7 King track single lap world record holder
17B West Ogden Ave., Westmont, IL 60559, (708) 203-8003, mikeswiss86@hotmail.com (also my PayPal address)
Note: Send all USPS packages and mail to: 692 Citadel Drive, Westmont, Illinois 60559
#18
Pablo
-

- Administrator
-
- 18,490 posts Joined: 20-February 06
Builder
- Gender:Male
- Location:Cleveland, Tennessee
Posted 12 January 2017 - 04:03 PM
If your ball bearings aren't spinning free after installation, it's probably not an alignment problem - probably a rinsing problem.
I scrub real good with a toothbrush and liquid soap, then rinse with lighter fluid several times, then WD-40 them.
If it's bushings or oilites not spinning free, it's probably an alignment problem.
Cheater's gage pin technique is for bushings and oilites, not BBs.
If you don't have one, simply use the fattest axle you have to align them.
I have a spring gizmo also, and I love it on flexis.
Here's another tip - get everything set up, then tack and check before going full bore with the soldering.
Paul Wolcott
#19
Cheater
-
- Root Admin
-
- 25,793 posts Joined: 14-February 06
Headmaster of the asylum
- Gender:Male
- Location:Norcross, GA
Posted 12 January 2017 - 04:26 PM
Mike,
I'll reply to your last question first: with the Slick 7 bushings, you can pull the pin out hot, I think, though I rarely did. Normally would let everything cool a bit to be certain the solder was fully hard.
Keep in mind that the reason this worked so well was the consistent sizing of the Slick 7 busings. I never used it much with oilite axle bushings, though I did use nominal 2 mm gage pins for motor bushings (this was when ball bearings weren't allowed in scale classes).
It only takes a couple of pins to cover the range of possible sizes.
3/32" in decimal is .09375" and gage pins are normally made in .001 increments. Pin gages are made in different tolerance 'classes:' ZZ, Z, X, and XX. ZZ gages have an inch tolerance of .0002", with the next three having inch tolerances of .0001", .00004", and .00002". Obviously, the ZZ pins are the cheapest of the four classes to purchase.
Pin gages are made in both plus and minus variants.
A ZZ class 'minus' pin gage of marked diameter .0938" will vary between .09380" and .09378" in diameter.
A ZZ class 'plus' pin gage of marked diameter .0938" will vary between .09380" and .09382" in diameter.
And so forth for the other three tolerance classes.
The bore of a bushing is going to be (should be) larger than the .09375" axle diameter; so you start with a .0983" pin. For the Slick 7 bushings, the 'minus' ZZ .0938" pin fit with no discernible play. If there was some play, then I would have tried a 'plus' ZZ pin.
For most bushings, it would probably only take those two size pins (an .0938" minus and an .0938" plus) to find one that will fit with no play. It would suprise me if any decent quality bushing would require a .0939" gage pin. Or a .0937" pin (meaning the bushing bore was actually smaller than a true 3/32").
Couple of caveats. The standard length of a gage pin is 2 inches. Fortunately, that is long enough to work with most stamped steel chassis. (For example, the rear uprights on a Turbo-Flex chassis are 1-3/16" wide.)
Individual pins can be difficult to find and buying them one at a time can get expensive. The cheap Chinese gage pin sets sold on eBay are decent quality and almost absurdly inexpensive. I've seen the normal 'small' set of ZZ pin, 190 pieces by .001 diameter from .061" to .250" for under $25. And that's for new pins, Mike. I can't recall ever seeing a set of used gage pins offered on eBay.
Gregory Wells
Never forget that first place goes to the racer with the MOST laps, not the racer with the FASTEST lap
#20
Cheater
-
- Root Admin
-
- 25,793 posts Joined: 14-February 06
Headmaster of the asylum
- Gender:Male
- Location:Norcross, GA
Posted 12 January 2017 - 04:28 PM
Cheater's gage pin technique is for bushings and oilites, not BBs.
Correct.
Gregory Wells
Never forget that first place goes to the racer with the MOST laps, not the racer with the FASTEST lap
#21
Ralph Thorne
-

- Full Member
-
- 2,152 posts Joined: 30-September 08
Posting Leader
- Gender:Male
- Location:Snellville, GA
Posted 12 January 2017 - 04:44 PM
It's also important to note if you're using Slick 7 bushings the bushing hole in the chassis must be significantly opened up, if not there's no way it will ever be correct. Not an issue if you're using adjustable bushings.
Ralph Thorne
ralph@ralphthorneracing.com
RTR Facebook page
#22
Cheater
-
- Root Admin
-
- 25,793 posts Joined: 14-February 06
Headmaster of the asylum
- Gender:Male
- Location:Norcross, GA
Posted 12 January 2017 - 05:10 PM
Regardless, I'm not a fan of forcing a tight shaft into a BB and then using it.
Just wanted to say that the gage pin isn't forced into the bushings. It slides right in. It's just there's no discernable play between the pin and the bushing.
And as Pablo pointed out, this is a technique applicable to bushings only, not ball bearings. Most ball bearings will tolerate a small bit of misalignment as I understand it.
Gregory Wells
Never forget that first place goes to the racer with the MOST laps, not the racer with the FASTEST lap
#23
MSwiss
-
- IRRA National Director
-
- 25,990 posts Joined: 16-April 06
Grand Champion Poster
- Gender:Male
Posted 12 January 2017 - 05:36 PM
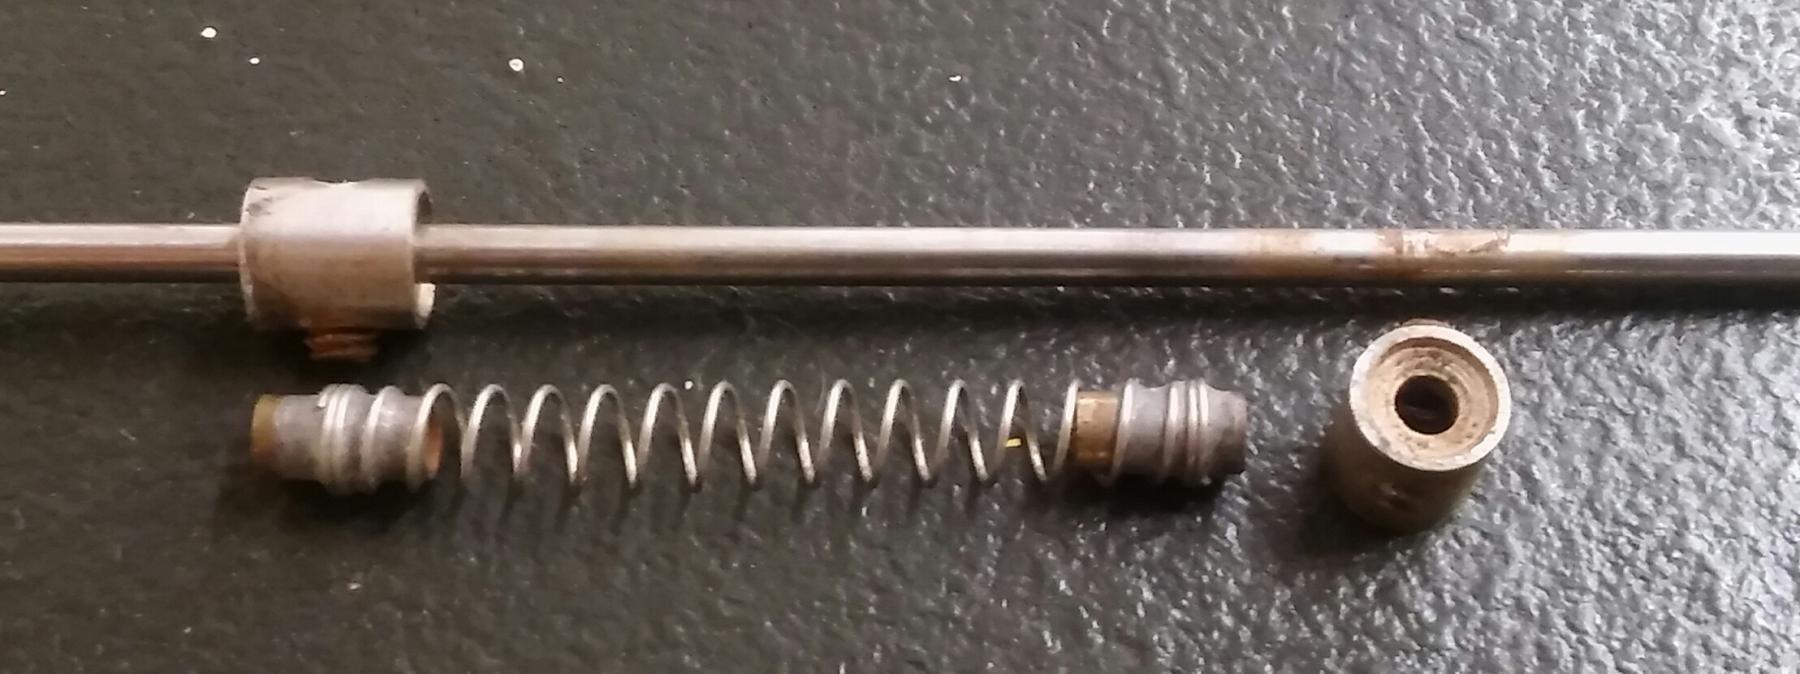
Here's a closeup of David's tool, with the soldered pieces of 3/32" ID brass tubing, soldered to the spring, and the recess on the collars, which makes it superior to use for BBs, vs a ball point pen spring and gear hubs.
The quick and easy rubberband method, when everything is pretty much perfect, with the chassis and the uprights.
Mike Swiss
Inventor of the Low CG guide flag 4/20/18
IRRA® Components Committee Chairman
Five-time USRA National Champion (two G7, one G27, two G7 Senior)
Two-time G7 World Champion (1988, 1990), eight G7 main appearances
Eight-time G7 King track single lap world record holder
17B West Ogden Ave., Westmont, IL 60559, (708) 203-8003, mikeswiss86@hotmail.com (also my PayPal address)
Note: Send all USPS packages and mail to: 692 Citadel Drive, Westmont, Illinois 60559
#24
swodem
-
- Subscriber
-
- 1,176 posts Joined: 29-October 14
Checkered Flag in Hand
- Gender:Male
- Location:Auckland, NZ
Posted 12 January 2017 - 05:52 PM
Always apply a generous helping of oil to the inside of the bearing/bushing, before applying the solder.
I place a small collar with a set screw, between the bearing/bushing and the setup block when I do mine.
Never oil a ball bearing before soldering it in. Quite the opposite is true, clean it of all oil before soldering by soaking in solvent
The heat of the soldering iron cooks the oil to a sludge like the stuff at the bottom of your frying pan. Good luck ever cleaning that out.
Steve Meadows
#25
Bill from NH
-

- Full Member
-
- 14,930 posts Joined: 02-August 07
Age scrubs away speed!
- Gender:Male
- Location:New Boston, NH
Posted 12 January 2017 - 07:42 PM
If you don't want to wait while they soak, you can speed things up with an ultrasonic cleaner.
Bill Fernald
I intend to live forever! So far, so good.
I intend to live forever! So far, so good.


