Jump to content


Photo

Joel Montague '73 Nats replica with Havlicek Mura power


  • Please log in to reply
158 replies to this topic

#26 Pablo

Pablo

    Builder

  • Administrator
  • PipPipPipPipPipPipPipPip
  • 18,370 posts
  • Joined: 20-February 06
  • Gender:Male
  • Location:Cleveland, Tennessee

Posted 15 December 2017 - 11:00 PM

Spur gear will probably arrive tomorrow....meanwhile, I'm anxious  :D


This would be impossible for me without dc-65x's thread.

I truly appreciate the history, and I'm grateful dc-65x rose above it all and kept it alive.


I soldered some pieces onto grooverunner's masterpiece "drop arm" tonight.

Just laying the pieces down and soldering them is easy. But doing it "right" takes a lot of work. I hope I nailed it :D


IMG_7813.JPG


  • Jencar17 and grooverunner like this

Paul Wolcott


#27 Pablo

Pablo

    Builder

  • Administrator
  • PipPipPipPipPipPipPipPip
  • 18,370 posts
  • Joined: 20-February 06
  • Gender:Male
  • Location:Cleveland, Tennessee

Posted 21 December 2017 - 12:31 AM

Still waiting on the Faas gear, but trust me, it's coming :D

Meanwhile, I did a test run on painting an open cockpit Porsche 917 - good thing I bought several  :dance3:


Just so happens this body is legal for a flexi class I race, so I used this one as a pre-test just to see:

-what the colors would look like - Parma White and Model Master Grape Pearl

-how it will trim and mount for the Joel car, air control, spoiler, and clear things like the motor, flag, wheels, etc.


I put inside decals on the test body but they are just to gussy it up for flexi racing.

Both white and purple worked fine - gave me a chance to see how they work as far as PSI, backup, coverage, etc


IMG_7817.JPG


  • Jencar17, MSwiss, olescratch and 1 other like this

Paul Wolcott


#28 Pablo

Pablo

    Builder

  • Administrator
  • PipPipPipPipPipPipPipPip
  • 18,370 posts
  • Joined: 20-February 06
  • Gender:Male
  • Location:Cleveland, Tennessee

Posted 23 December 2017 - 06:35 PM

It's beginning to look like Christmas - got the 42 Faas in the mail, and UPS brought a box of holiday Omaha Steaks  :dance3:

Special thanks to the undisclosed gear donor, and it bears repeating, without good friends this would be impossible :friends:


Standard rear axle mock up to determine tube length, using all the actual parts. Looks like about 1.235" :)


IMG_7842.JPG


  • Jencar17 and mike1972chev like this

Paul Wolcott


#29 Pablo

Pablo

    Builder

  • Administrator
  • PipPipPipPipPipPipPipPip
  • 18,370 posts
  • Joined: 20-February 06
  • Gender:Male
  • Location:Cleveland, Tennessee

Posted 23 December 2017 - 07:03 PM

Poor Man's lathe (electric drill), a Dremel with 409 cutoff wheel, 400 and 2,000 grit sandpapers.

Ends are perfectly concentric and polished


IMG_7847.JPG


  • Jencar17 likes this

Paul Wolcott


#30 Samiam

Samiam

    Posting Leader

  • Subscriber
  • PipPipPipPipPipPipPip
  • 4,747 posts
  • Joined: 18-January 12
  • Gender:Male
  • Location:Long Island, NY

Posted 23 December 2017 - 08:25 PM

You're a thou over. :D


  • Pablo likes this
Sam Levitch
 
"If you have integrity, nothing else matters, and if you do not have integrity, nothing else matters."
    Robert Mueller, special counsel (2013)
 
"... because people have got to know whether or not their president is a crook."
    Richard M .Nixon, Nov 17, 1973
 
"Fool me once, same on... shame on you. Fool me... you can't get fooled again."
    George W. Bush

#31 Pablo

Pablo

    Builder

  • Administrator
  • PipPipPipPipPipPipPipPip
  • 18,370 posts
  • Joined: 20-February 06
  • Gender:Male
  • Location:Cleveland, Tennessee

Posted 23 December 2017 - 09:00 PM

That's the beauty of cheap digital calipers, Sam, I can vary the measurement by a thou or two :curtsey:


My plan here is to solder home the new ball bearings from the start, and simply keep them clean.

I notched the tubes in 4 places to allow solder to flow.

I'll use silver solder so the joints won't melt when I apply 60/40 nearby to attach chassis wires n whatnot.


IMG_7851.JPG


  • Jencar17, grooverunner and mike1972chev like this

Paul Wolcott


#32 Pablo

Pablo

    Builder

  • Administrator
  • PipPipPipPipPipPipPipPip
  • 18,370 posts
  • Joined: 20-February 06
  • Gender:Male
  • Location:Cleveland, Tennessee

Posted 23 December 2017 - 10:33 PM

Tubing centered, gear and jig blocks in place


IMG_7865.JPG


IMG_7855.JPG


Next step will be notching the tube to get the motor in tight as possible :)


  • Jencar17 and mike1972chev like this

Paul Wolcott


#33 olescratch

olescratch

    olescratch

  • Subscriber
  • PipPipPipPipPip
  • 977 posts
  • Joined: 19-July 13
  • Gender:Male
  • Location:Ravenna, OH

Posted 24 December 2017 - 07:47 PM

Looking good! You can't help but learn from these tutorials, and there are many of us that will admit to needing tutoring!  What keeps the solder from getting into the bearings?


John Stewart

#34 Pablo

Pablo

    Builder

  • Administrator
  • PipPipPipPipPipPipPipPip
  • 18,370 posts
  • Joined: 20-February 06
  • Gender:Male
  • Location:Cleveland, Tennessee

Posted 24 December 2017 - 07:58 PM

Good question, John, I'll try and remember to explain that when I solder them.


What good is a jig motor if it isn't exactly the same as the real motor? Not much.

Trimming the tube and setting the motor angle to fit the jig motor, then realizing the real motor won't fit, sucks.


To preclude that from happening, I did the best I could by:

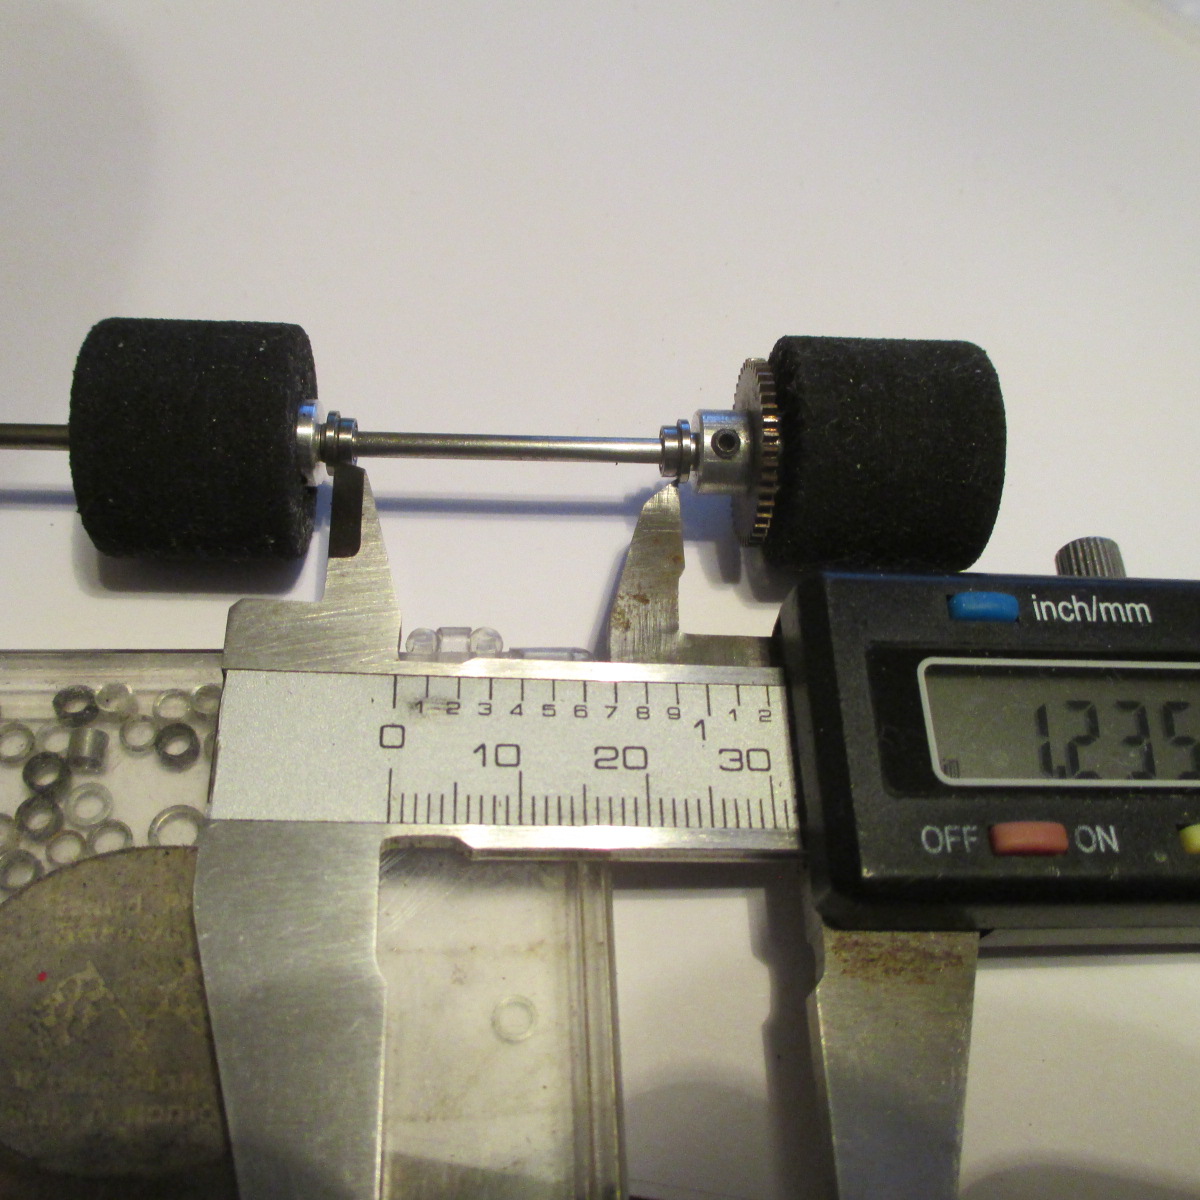
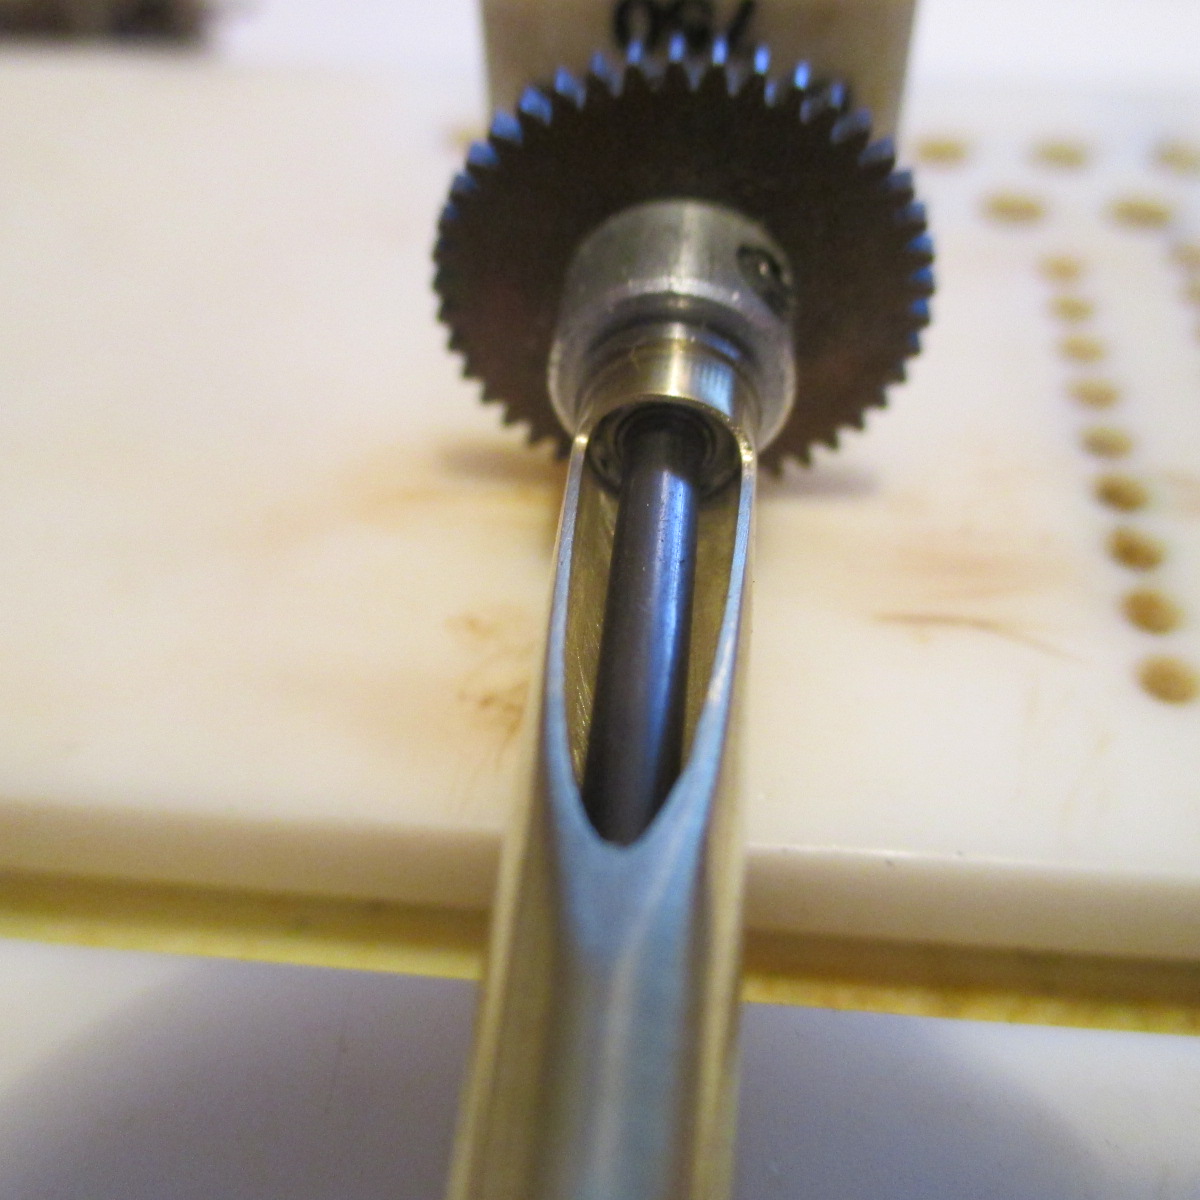
-using exactly the same brand and size pinion on both

-ensuring the length from can end to pinion is exactly the same (Krazy Glued both pinions in place temporarily)

-Krazy Gluing a junk magnet in the jig can to emulate the real motor's magnet setup


IMG_7867.JPG


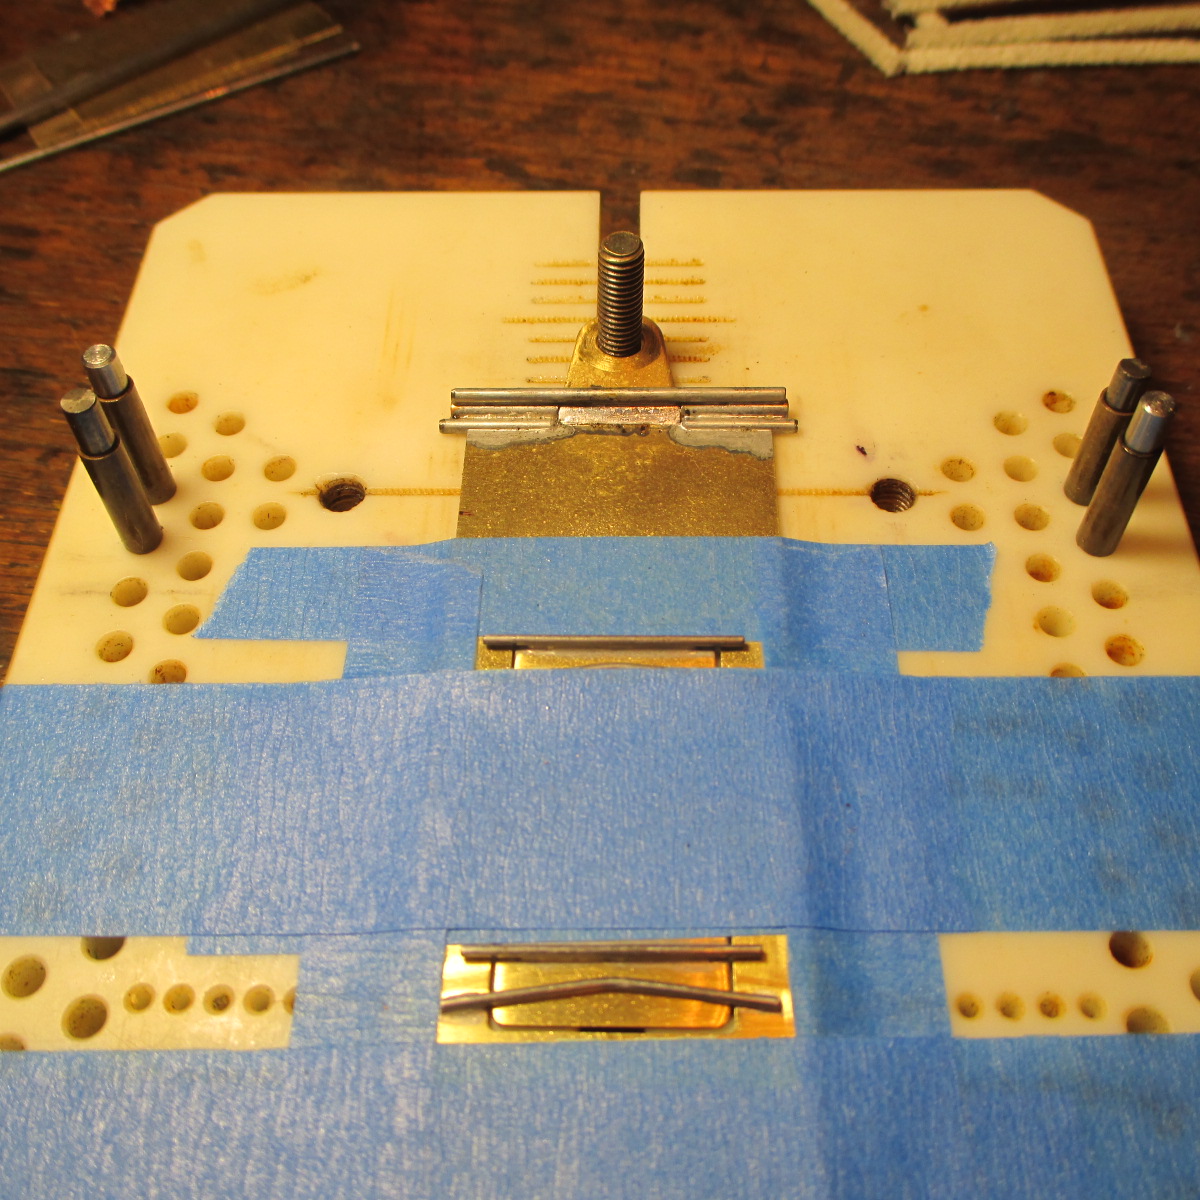
Here's another thing that sucks - making a perfect axle tube, planning the notch, cutting it and realizing it's not perfect.

This time I made a rough aluminum tube, put some old BB's in it, and jigged it up as a test mule for the notching.

If I screw one up I'll just toss it until I succeed, then make an identical cut to the good one :)


IMG_7872.JPG


  • Jencar17 and olescratch like this

Paul Wolcott


#35 Pablo

Pablo

    Builder

  • Administrator
  • PipPipPipPipPipPipPipPip
  • 18,370 posts
  • Joined: 20-February 06
  • Gender:Male
  • Location:Cleveland, Tennessee

Posted 24 December 2017 - 10:47 PM

The final tube notch cut


IMG_7887.JPG


Jig motor snuggled right in there nice n tight


IMG_7875.JPG


  • Jairus and Jencar17 like this

Paul Wolcott


#36 Pablo

Pablo

    Builder

  • Administrator
  • PipPipPipPipPipPipPipPip
  • 18,370 posts
  • Joined: 20-February 06
  • Gender:Male
  • Location:Cleveland, Tennessee

Posted 24 December 2017 - 11:58 PM

Looking good! You can't help but learn from these tutorials, and there are many of us that will admit to needing tutoring!  What keeps the solder from getting into the bearings?


Soldering ball bearings can be tricky.

I always apply ATF in a needle oiler bottle wherever I don't want acid and solder to flow


IMG_7889.JPG


Paul Wolcott


#37 Pablo

Pablo

    Builder

  • Administrator
  • PipPipPipPipPipPipPipPip
  • 18,370 posts
  • Joined: 20-February 06
  • Gender:Male
  • Location:Cleveland, Tennessee

Posted 25 December 2017 - 12:47 AM

The Koford M333 solder flowed nice.

Merry Christmas and Good Night :D


IMG_7894.JPG


  • Jairus and Jencar17 like this

Paul Wolcott


#38 Jairus

Jairus

    Body Painter Extraordinaire

  • Subscriber
  • PipPipPipPipPipPipPipPip
  • 10,174 posts
  • Joined: 16-February 06
  • Gender:Male
  • Location:Salem, OR

Posted 25 December 2017 - 12:51 AM

Looking great! Night. :thank_you2:


Jairus H Watson - Artist
Need something painted, soldered, carved, or killed? - jairuswtsn@aol.com

www.slotcarsmag.com

www.jairuswatson.net
http://www.ratholecustoms.com
Check out some of the cool stuff on my Fotki!


#39 bluecars

bluecars

    Checkered Flag in Hand

  • Full Member
  • PipPipPipPipPipPip
  • 1,273 posts
  • Joined: 26-June 13
  • Gender:Male
  • Location:Tuskegee, AL

Posted 25 December 2017 - 09:25 AM

How do you keep the bearings from being contaminated when tumbling at the end?


Robert "Red" Valantine :diablo: 


#40 Pablo

Pablo

    Builder

  • Administrator
  • PipPipPipPipPipPipPipPip
  • 18,370 posts
  • Joined: 20-February 06
  • Gender:Male
  • Location:Cleveland, Tennessee

Posted 25 December 2017 - 11:37 AM

Contaminated by what? BB's come out of my tumbler absolutely perfect every time.


  • tonyp likes this

Paul Wolcott


#41 tonyp

tonyp

    Grand Champion Poster

  • Member at Peace
  • PipPipPipPipPipPipPipPip
  • 15,325 posts
  • Joined: 12-February 07
  • Gender:Male
  • Location:Sanford, FL, land of lizards and big roaches

Posted 25 December 2017 - 01:53 PM

I go over my race cars after each race reset the front axle and tumble with no issues.


Sent from my iPhone using Tapatalk
  • Pablo likes this

Anthony 'Tonyp' Przybylowicz

5/28/50-12/20/21
Requiescat in Pace


#42 Pablo

Pablo

    Builder

  • Administrator
  • PipPipPipPipPipPipPipPip
  • 18,370 posts
  • Joined: 20-February 06
  • Gender:Male
  • Location:Cleveland, Tennessee

Posted 25 December 2017 - 08:22 PM

My grooverunner drop arm seemed longer than the Camen part Capt. Rick used.

I measured an "888" arm at 2.633" from the coined edge to the back, so I trimmed mine.

If it's not historically perfect, I don't mind, and I don't consider it a critical measurement


IMG_7899.JPG


Paul Wolcott


#43 olescratch

olescratch

    olescratch

  • Subscriber
  • PipPipPipPipPip
  • 977 posts
  • Joined: 19-July 13
  • Gender:Male
  • Location:Ravenna, OH

Posted 25 December 2017 - 09:08 PM

Thanks for the reply.  Seems like I got the answers to a couple more issues that may come up.


John Stewart

#44 grooverunner

grooverunner

    Mid-Pack Racer

  • Full Member
  • PipPipPip
  • 146 posts
  • Joined: 10-December 15
  • Gender:Male
  • Location:MA

Posted 25 December 2017 - 11:35 PM

Paul,

You are right to trim it .I make them longer on the back end so you can trim them to any length you my need. Think 4 1/2'' chassis.


Ken


Ken  Hill

#45 Pablo

Pablo

    Builder

  • Administrator
  • PipPipPipPipPipPipPipPip
  • 18,370 posts
  • Joined: 20-February 06
  • Gender:Male
  • Location:Cleveland, Tennessee

Posted 25 December 2017 - 11:52 PM

Cool, thanks Ken. It's working out perfectly for me.


Paul Wolcott


#46 Pablo

Pablo

    Builder

  • Administrator
  • PipPipPipPipPipPipPipPip
  • 18,370 posts
  • Joined: 20-February 06
  • Gender:Male
  • Location:Cleveland, Tennessee

Posted 26 December 2017 - 08:22 PM

Of all the intricate wire work in the rear end, this 3 bend piece is probably the most critical to get right.

It mandates the motor attachment position - get it wrong and things aren't going to fit.


This is the situation I touched on earlier about the importance of being able to slip the actual motor in for a check.

Never assume if the jig motor shoehorns in, all is OK.


I cheated a little by using .055 wire - easier to bend and it allowed me to keep the motor as far left as possible


IMG_7902.JPG


Paul Wolcott


#47 Pablo

Pablo

    Builder

  • Administrator
  • PipPipPipPipPipPipPipPip
  • 18,370 posts
  • Joined: 20-February 06
  • Gender:Male
  • Location:Cleveland, Tennessee

Posted 26 December 2017 - 08:51 PM

Tack and a check. Yup, it's tight but it's perfect


IMG_7920.JPG


  • miko likes this

Paul Wolcott


#48 Pablo

Pablo

    Builder

  • Administrator
  • PipPipPipPipPipPipPipPip
  • 18,370 posts
  • Joined: 20-February 06
  • Gender:Male
  • Location:Cleveland, Tennessee

Posted 26 December 2017 - 10:05 PM

Finally I can get the rare 45+ year old Gunther Faas gear out away from the "acid party" and polish it.

It's not something you can just walk down to your local slot shop and grab another one


IMG_7925.JPG


  • mike1972chev likes this

Paul Wolcott


#49 Pablo

Pablo

    Builder

  • Administrator
  • PipPipPipPipPipPipPipPip
  • 18,370 posts
  • Joined: 20-February 06
  • Gender:Male
  • Location:Cleveland, Tennessee

Posted 27 December 2017 - 12:31 AM

My rear end is done :)


IMG_7933.JPG


IMG_7935.JPG


  • miko and Peter Horvath like this

Paul Wolcott


#50 dc-65x

dc-65x

    Grand Champion Poster

  • Subscriber
  • PipPipPipPipPipPipPipPip
  • 6,830 posts
  • Joined: 14-February 06
  • Gender:Male
  • Location:Captain Rick: The only vintage slot car nut in SW Oregon?

Posted 27 December 2017 - 12:04 PM

Nice rear end Pablo........ :o...............I mean great looking center section Pablo  :laugh2: 


  • SlotStox#53 likes this

Rick Thigpen
Check out Steve Okeefe's great web site at its new home here at Slotblog:
The Independent Scratchbuilder
There's much more to come...


Electric Dreams Online Shop