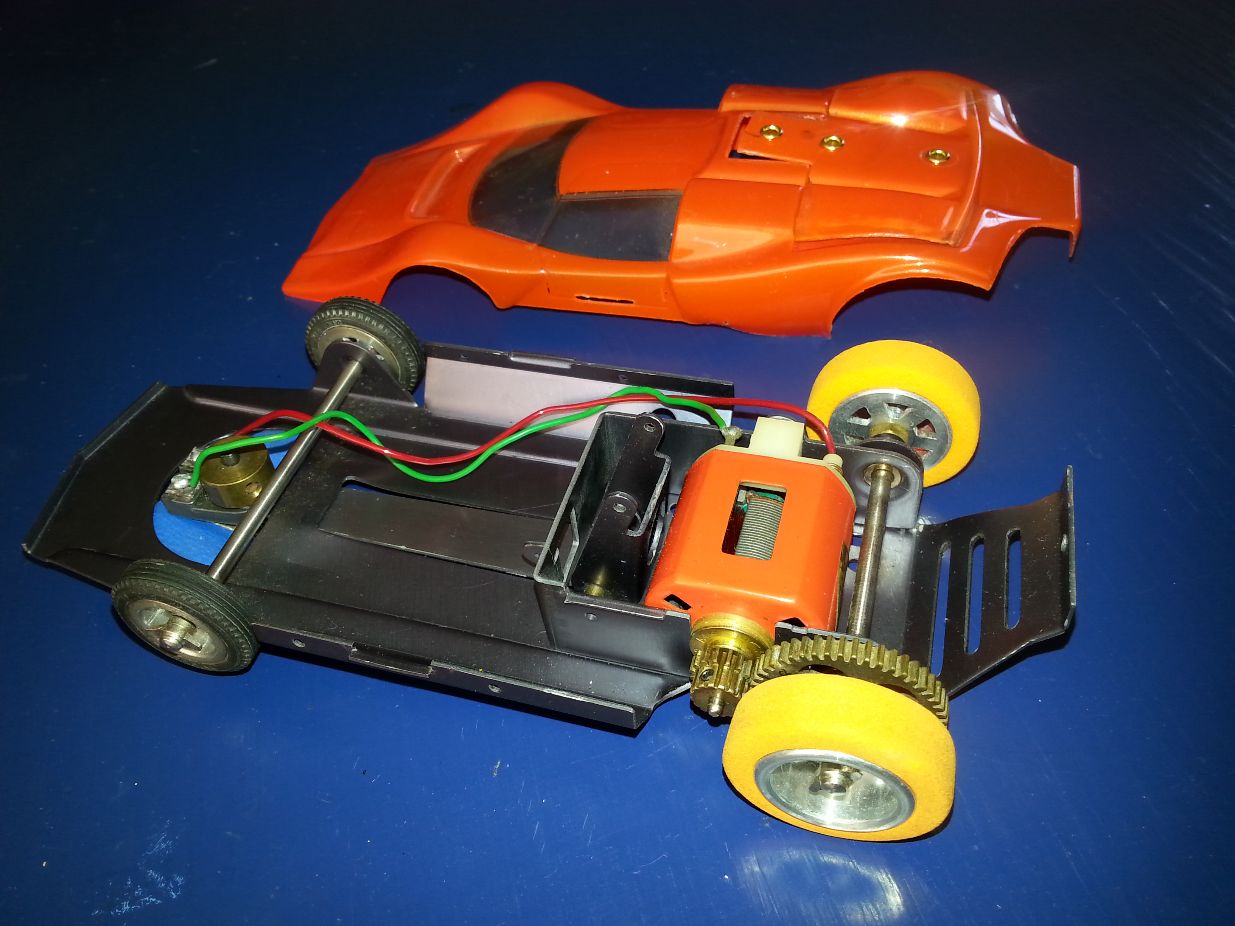
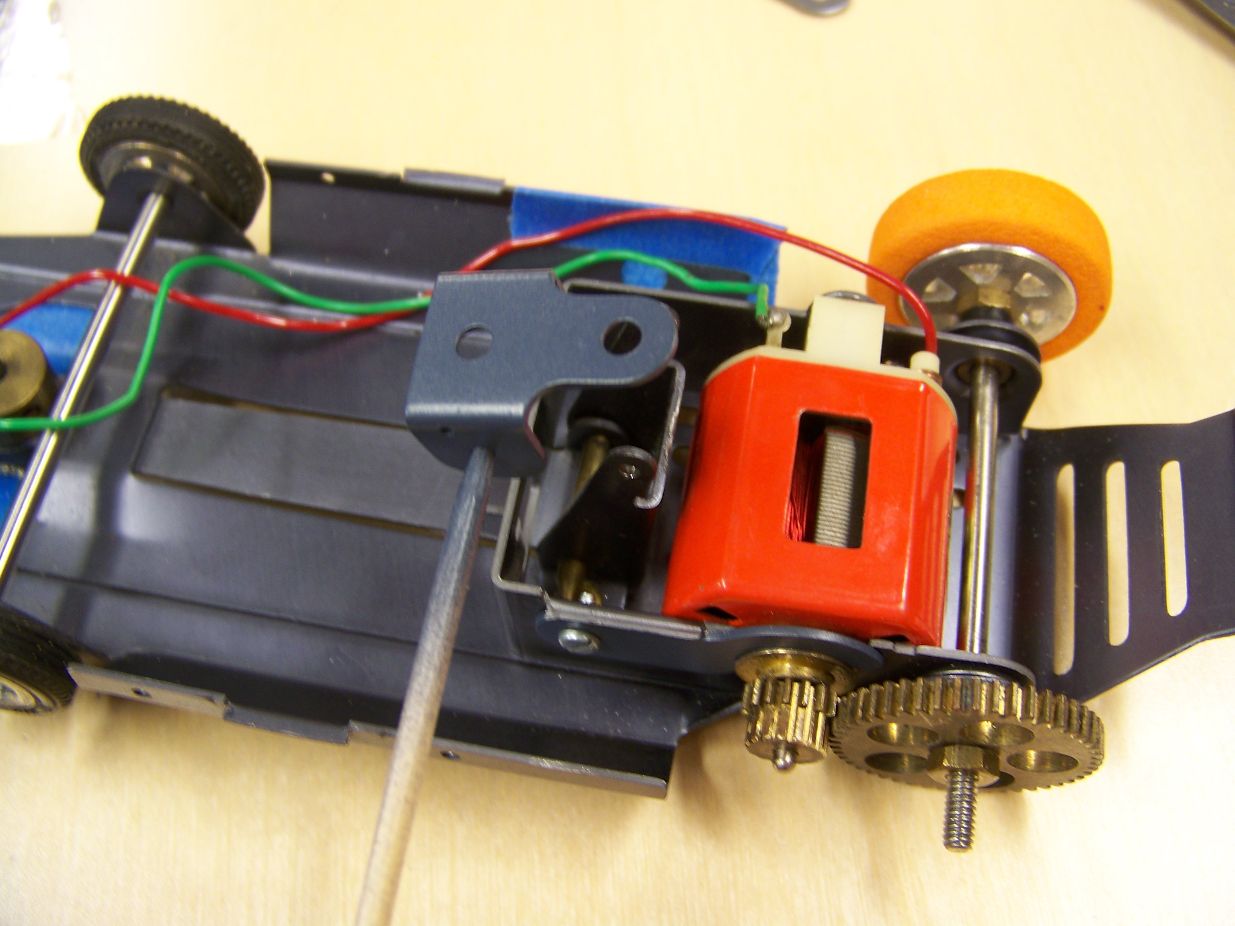
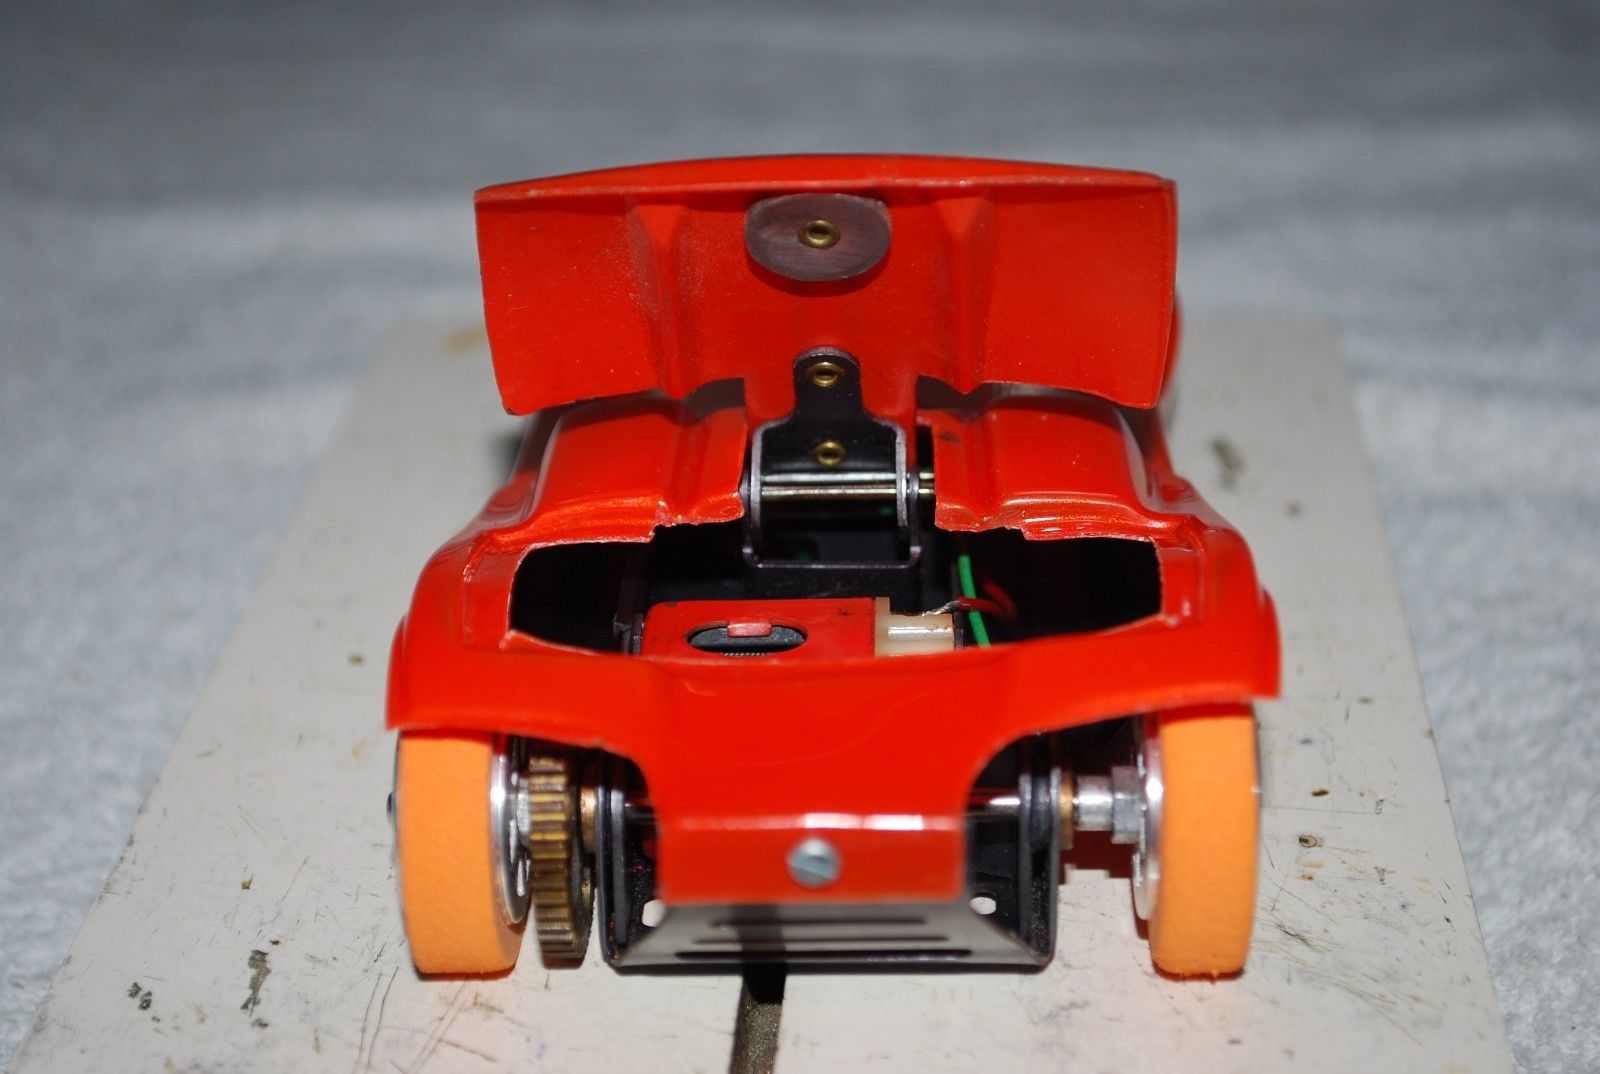
I am restoring a Classic Stinger its all factory but is missing its wing hinge and wire. I am capable of making a replacement but if someone has a part for sale or loan so I can make a duplicate it will make the job a lot easier. Even a paper template would work.
I read most of the old posts on this subject but thought it better to start fresh. Any help will be much appreciated. I will post pics if any one cares.

Classic Stinger revisited
#1

Posted 24 March 2018 - 08:23 PM
- Old Pilot and Geary Carrier like this
#2

Posted 25 March 2018 - 08:41 AM
I am afraid I have only worked on restoring them. Do not own one to help you out with your project.
But I do have a Fotki Folder with photos. That's the best I can do.
http://public.fotki....lassic-stinger/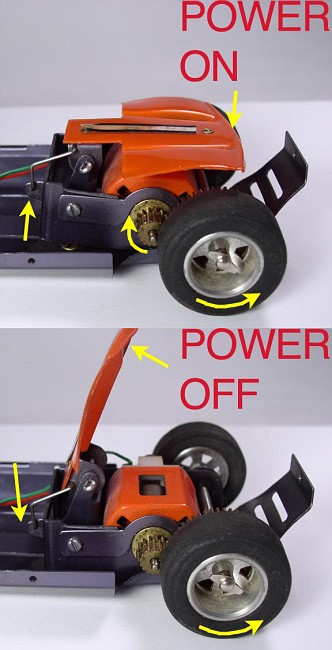
- Jencar17, Old Pilot and Geary Carrier like this
Jairus H Watson - Artist
Need something painted, soldered, carved, or killed? - jairuswtsn@aol.com
www.slotcarsmag.com
www.jairuswatson.net
http://www.ratholecustoms.com
Check out some of the cool stuff on my Fotki!
#3

Posted 25 March 2018 - 01:28 PM
Thanks Jairus, for taking the time. Love the blue Stinger you did awhile back.
This is what I have so far, I did set up the rear axle and even found the correct 16/48 gear set ( I think) and 4 of the 2 prong Classic knock offs. But realized I now need the motor bracket for the 36D. How did I end up with three 26D motor brackets.
Is the body at bottom (no wing) the rare Stinger 2 body, it feels original but does not have have as much metallic as the one above?
- Jencar17, Geary Carrier and mike1972chev like this
#4

Posted 29 March 2018 - 06:07 PM
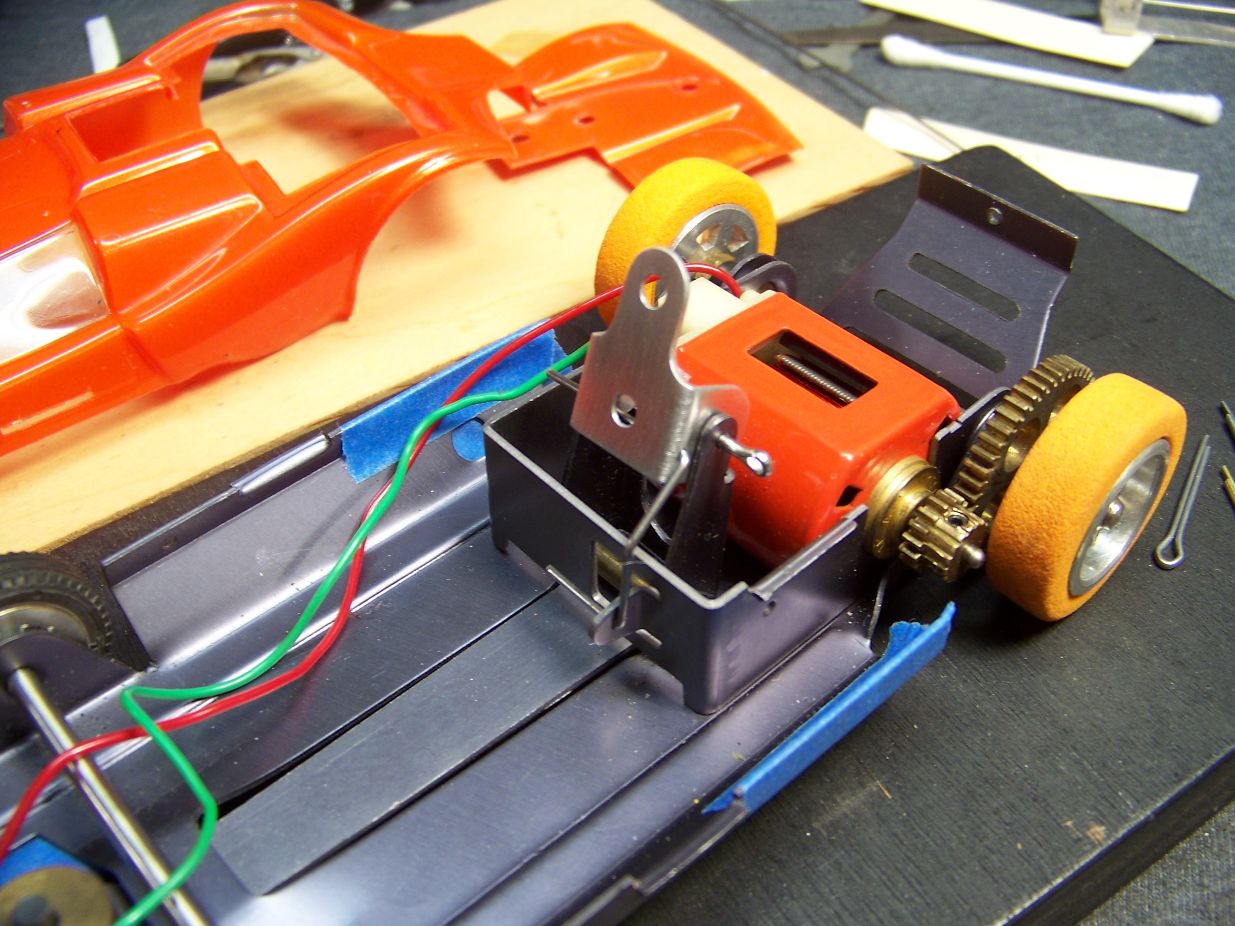
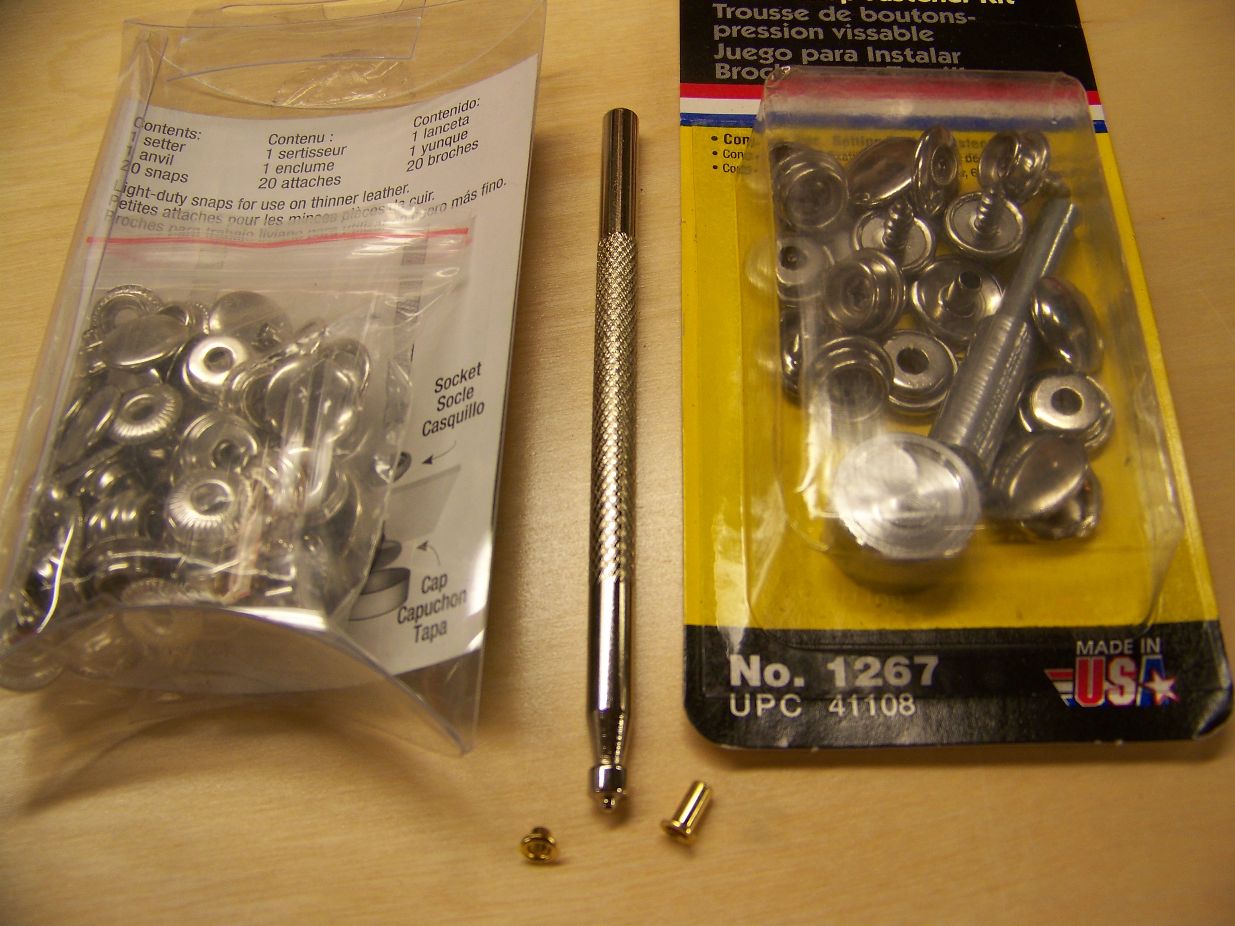
Progress so far, thanks to Electric Dreams who had the 36D motor mount in stock. Just finding an original red wire long enough and stock new braids was a challenge. Did manage to find an assortment pack of eyelets at Michael's to attach the hinge to the wing. What is the weight at the back made of, lead or steel ?
Still looking for the wing hinge, motor clip and wire. If anyone can help me out It would save me a lot of time. Even a close up pic straight on would help.
- Pablo, Jencar17 and Geary Carrier like this
#5

Posted 18 April 2018 - 10:07 PM
So I gave up thinking I would see a Stinger hinge for sale. Today, I sat down and made one. A few cardboard mock-ups and working from pics I found and Jairus sent. I think it's close enough. I got lucky in that my wire brush wooden handle was the perfect width to make a form tool. Bent it, drilled it, and then shaped it.
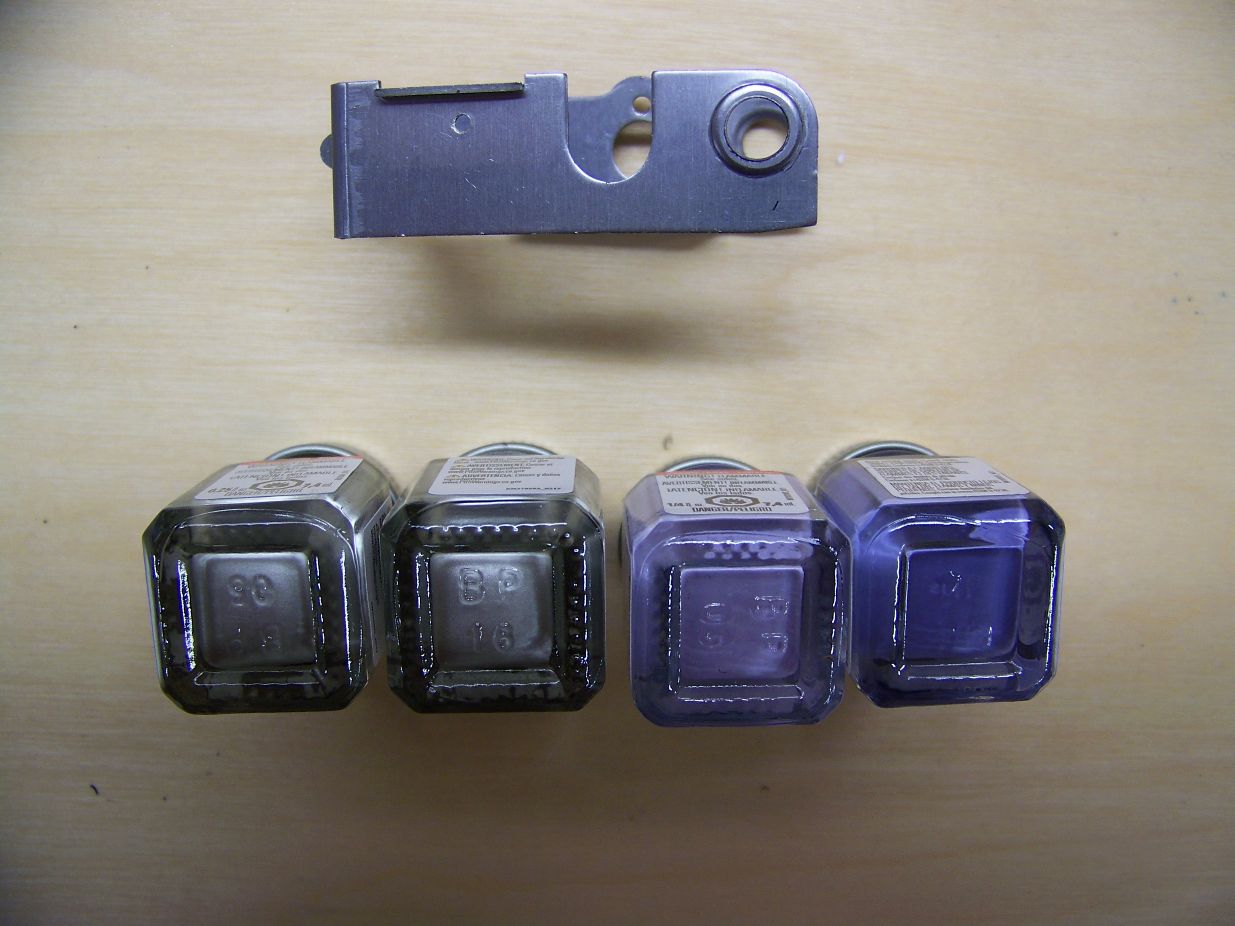
The next job will be trying to match the color of that anodizing. It must only be close, as even Classic had several variations from different batches. No hobby shop in my town, so Micheal's saved the day again. They also had a tool to flair out the brass eyelets. Still need to make that little motor mount hook. I will make that next to paint it with the hinge. The last part to make is the Lead?? Weight. I have the diameter nailed down at 5/8," any bigger, and it would interfere with the return at the back of the wing. The Cox mag wheel is .6", used to match the pics I found. Not sure how thick it is. If someone could measure theirs, I would be grateful.
Thanks to Mike1972chev, I now have paper stickers for the graphics. Getting close on this one.
- Geary Carrier likes this
#6

Posted 18 April 2018 - 10:21 PM
Looks GREAT Martin!
A little gun blueing will help, but few I'll notice either way.
I found double sided tape for attaching the wing, removed the need for the stupid rivits.
Jairus H Watson - Artist
Need something painted, soldered, carved, or killed? - jairuswtsn@aol.com
www.slotcarsmag.com
www.jairuswatson.net
http://www.ratholecustoms.com
Check out some of the cool stuff on my Fotki!
#7

Posted 18 April 2018 - 10:47 PM
I did not think of gun blueing, I thought that only worked on steel? I was going to mix a little purple with silver but spray super thin so the aluminum shows thru.
I may use the tape idea also but put the rivets in as well. No kill like over kill. I do this stuff for my satisfaction so the challenge is getting as close to stock as possible and still keep it fun.
Thanks for all the hints and tips Jairus.
#8

Posted 19 April 2018 - 06:38 PM
Made the motor clip then mixed up a little silver, purple, blue and black and got close, not perfect but I think good enough since once the body is on you will never see it, except in the shadows. Like I said even the classic anodizing is not all the same.
I wish someone could measure that weight on the wing. I feel like that is important to the way the wing works. I just need the thickness to get it close. Is it lead or steel ???
- Pablo likes this
#9

Posted 19 April 2018 - 08:34 PM
Looks Fantastic Martin!
The weight was steel. Large thick steel washer.
Jairus H Watson - Artist
Need something painted, soldered, carved, or killed? - jairuswtsn@aol.com
www.slotcarsmag.com
www.jairuswatson.net
http://www.ratholecustoms.com
Check out some of the cool stuff on my Fotki!
#10

Posted 20 April 2018 - 12:03 AM
Thanks for the encouragement Jairus. I am tring to scale it from angled pics but at some point I may just go with my gut. The POWER OFF pic you found is a bit of a clue, you can just see it from that side shot.
5/8" D. and maybe .100" thick unless someone corrects me (pretty please)
I will put it back on the self for now. Its not like I don't have more projects.
#11

Posted 20 April 2018 - 12:53 AM
I did find these pics.
Take a look at the bottom pic. It looks like someone hit it several times with a small ball peen hammer to tighten it up. The metal looks soft like lead. What do think ?
I have even seen some with a frosty appearance, so now I am wondering if it is a zinc like material ?
Found this also
http://www.derbymonk...ghts-s/1857.htm
#12

Posted 20 April 2018 - 07:35 AM
Could be lead.
I just don't remember.
Went through all my pics of Stingers and guess I didn't take any decent shots of the weight.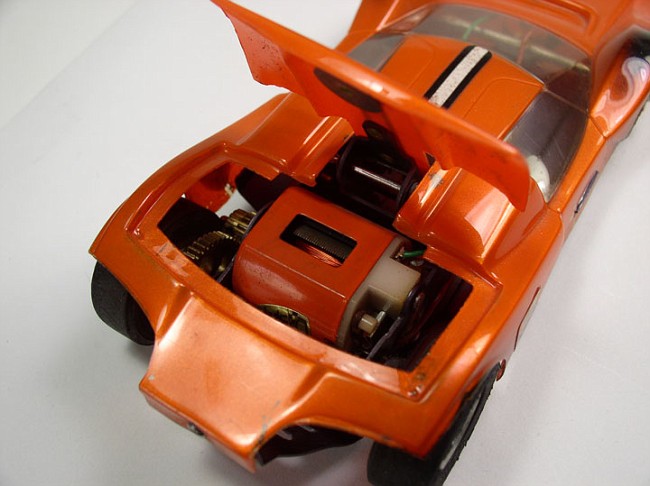
The size looks like the engineers took a nickel out of their pocket and taped it in just to make the prototype work in my humble opinion.
Jairus H Watson - Artist
Need something painted, soldered, carved, or killed? - jairuswtsn@aol.com
www.slotcarsmag.com
www.jairuswatson.net
http://www.ratholecustoms.com
Check out some of the cool stuff on my Fotki!
#13

Posted 20 April 2018 - 07:50 AM
Could be lead.
I just don't remember.
Went through all my pics of Stingers and guess I didn't take any decent shots of the weight.
The size looks like the engineers took a nickel out of their pocket and taped it in just to make the prototype work in my humble opinion.
Could be lead.
I just don't remember.
Went through all my pics of Stingers and guess I didn't take any decent shots of the weight.
The size looks like the engineers took a nickel out of their pocket and taped it in just to make the prototype work in my humble opinion.
The weight has been punched out of soft sheet lead.
Size: 1\2" diameter and just shy of 3\32" thick.
I can send a photo a little later of the whole setup, let me know.
gene
- Jairus likes this
Gene Adams AKA Gene/ZR1
ZR1 Corvette owner
Hand-carved balsa bodies, resin body plugs, silicone molds, vacuum bodies
Genes_World@ymail.com
#14

Posted 20 April 2018 - 10:43 AM
Thanks Gene/Jairus for your help on this.
Gene is possible for you to measure an original weight? in the meantime I will look for some sheet Lead.
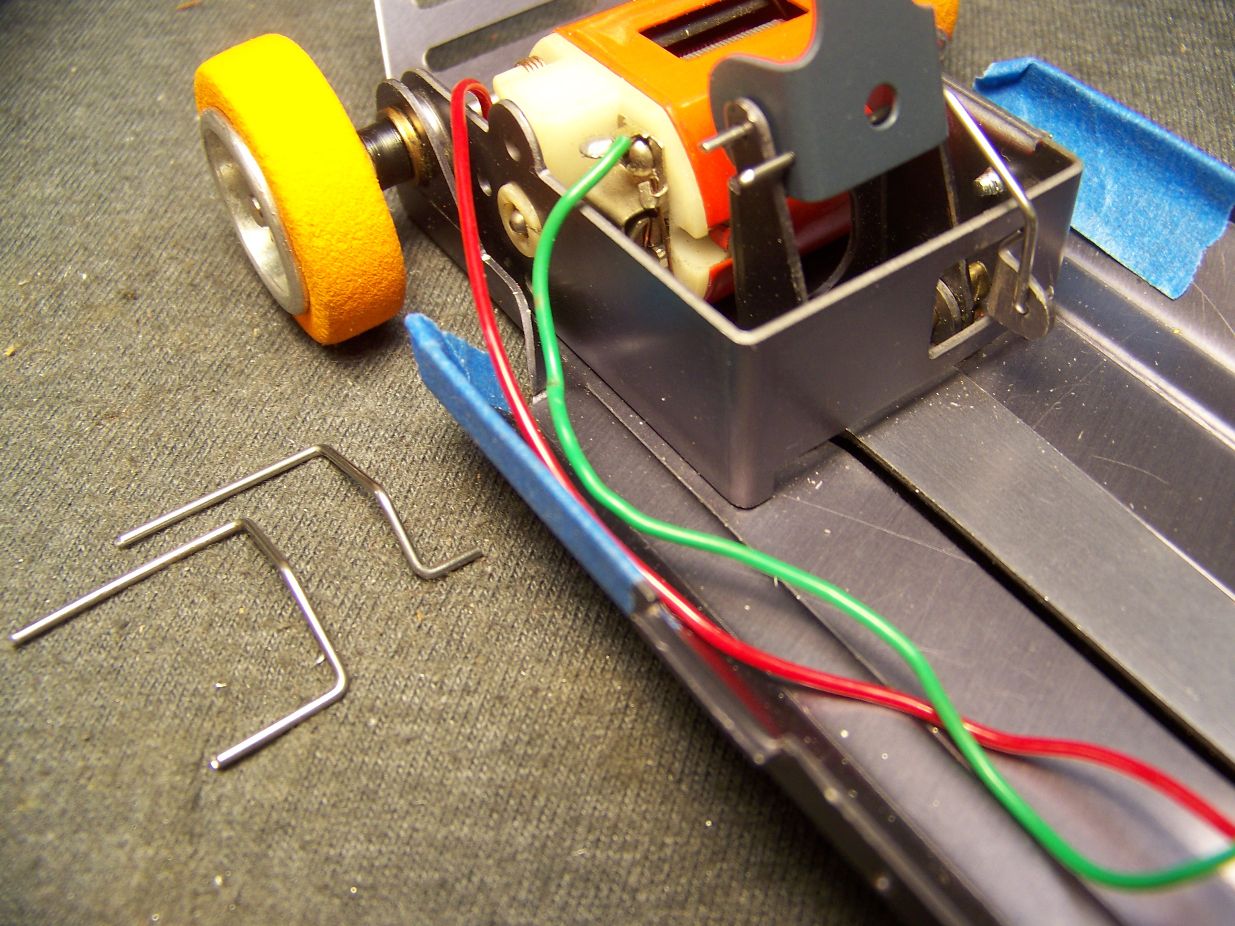
If you look at the way i have my actuation wire arranged, it comes in from the left on both the hing hole and the motor mount hole at the bottom, what stops it falling out? My thought was bend a new wire it would insert in to the hinge the same way (on the top) it does now, but at the bottom, bend the hook that goes into the motor mount in the opposite direction so it comes in from right hand side. It would be easy to flex into the hole and would not let the wire walk back out. This way it would be easy to disassemble and not require un bending of the wire ends. Not sure how Classic did it. I am sure I am over thinking it, but I do enjoy the process.
Thanks again guys.
#15

Posted 20 April 2018 - 12:31 PM
Thanks Gene/Jairus for your help on this.
Gene is possible for you to measure an original weight? in the meantime I will look for some sheet Lead.
If you look at the way i have my actuation wire arranged, it comes in from the left on both the hing hole and the motor mount hole at the bottom, what stops it falling out? My thought was if bend a new wire it would insert in to the hinge the same way it does now, but at the bottom, bend the hook that goes into the motor mount in the opposite direction so it comes in from right hand side. It would be easy to flex into the hole and would not let the wire walk back out. This way it would be easy to disassemble and not require un bending of the wire ends. Not sure how Classic did it. I am sure I am over thinking it, but I do enjoy the process.
Thanks again guys.
Martin
I have no way to weigh this with accuracy. The location of the weight/lead disc will affect everything. I would try a small piece of double stick tape on the lead disc/flap, until a working location of the lead disc is located for mounting.
Gene
Gene Adams AKA Gene/ZR1
ZR1 Corvette owner
Hand-carved balsa bodies, resin body plugs, silicone molds, vacuum bodies
Genes_World@ymail.com
#16

Posted 20 April 2018 - 01:27 PM
-That is confusing ![]() I am looking for the dimensions of the weight not the weight of the weight and I will wait for your reply. "Whose on first"
I am looking for the dimensions of the weight not the weight of the weight and I will wait for your reply. "Whose on first" ![]() thanks Gene.
thanks Gene.
#17

Posted 20 April 2018 - 02:01 PM
-That is confusing
I am looking for the dimensions of the weight not the weight of the weight and I will wait for your reply. "Whose on first"
thanks Gene.
Martin
I know who's on first ![]()
Scroll up to post no.13 Posted Today, 08:50 AM
I responded as stated below in post no.13;
The weight has been punched out of soft sheet lead.
Size: 1\2" diameter and just shy of 3\32" thick.
I can send a photo a little later of the whole setup, let me know.
gene
(Since I previously gave you the dimensions, I just thought you may also wanted the weight).
Gene Adams AKA Gene/ZR1
ZR1 Corvette owner
Hand-carved balsa bodies, resin body plugs, silicone molds, vacuum bodies
Genes_World@ymail.com
#18

Posted 20 April 2018 - 03:44 PM
Sorry Gene, I did read those numbers and thought that was a guess form memory, The factory hole in my wing would fit a Lead washer of .6"D but if you say its .5" x 090" ish thick that is what I will make it.
If you get time to take a pic that cannot hurt. Either way thanks for your help.
#19

Posted 20 April 2018 - 05:07 PM
Sorry Gene, I did read those numbers and thought that was a guess form memory, The factory hole in my wing would fit a Lead washer of .6"D but if you say its .5" x 090" ish thick that is what I will make it.
If you get time to take a pic that cannot hurt. Either way thanks for your help.
Martin
The disc is next to the 1925 penny
regards g;
Gene Adams AKA Gene/ZR1
ZR1 Corvette owner
Hand-carved balsa bodies, resin body plugs, silicone molds, vacuum bodies
Genes_World@ymail.com
#20

Posted 20 April 2018 - 10:09 PM
Thanks Gene, I did scale your pic and came up with .487"D on the weight, so unless penny's have changed there dimension. I get .75"=3/4" for a penny's D.
Are you restoring this blue Stinger?
This pic shows (I think) a better way to install the actuation wire. This method lines up better top to bottom and can never fall out. Not sure why Classic did not do it this way?
#21

Posted 21 April 2018 - 05:37 AM
Thanks Gene, I did scale your pic and came up with .487"D on the weight, so unless penny's have changed there dimension. I get .75"=3/4" for a penny's D.
Are you restoring this blue Stinger?
This pic shows (I think) a better way to install the actuation wire. This method lines up better top to bottom and can never fall out. Not sure why Classic did not do it this way?
Martin
I am not restoring a Stinger cause I don’t have one, but what I have been working on is a new body mold and flap that will correctly sit on the flap opening on the body with out looking like a hack job. This body will be 0.030 thick.
It will just take a little more time to get this correct.
You can go to Harbor Frieght and get a hollow hole punch set, it will have a 1\2” diameter punch, reasonable price.
Thanks g:
Gene Adams AKA Gene/ZR1
ZR1 Corvette owner
Hand-carved balsa bodies, resin body plugs, silicone molds, vacuum bodies
Genes_World@ymail.com
#22

Posted 21 April 2018 - 06:43 PM
Well, that was not that easy. Lead sucks to work with. I used my 20 ton press to squeeze several pieces of 1/8" Lead I found at our local scrap yard. You basically print any flaws in the surfaces you are pressing between.So found the smoothest surfaces I could, then put that between card stock. Pres until you have .90" . To much squeeze and its a do over. Then put the 1/2" gasket cutter in the press and press 1/2" circles.
Now they are stuck in gasket cutter, tap it out and you damage the soft material, blow it out is the approved method. But I leaned you chuck up the whole cutter and Lead circle in the lathe while its still stuck in the cutter this makes sure it is on center. Not like the first one I did on the drill press. Now you can hand thread a 1/8" axle into the slightly undersized hole (.120")to seal, so you can blow it out.
Its crazy to think what took the classic 2 seconds to do, took me close to 2 hours.
Oh well its done now and can probably make them in 10 minutes. But I will never need another. ![]()
![]()
![]()
- Jairus likes this
#23

Posted 21 April 2018 - 07:29 PM
If you had any, arch punches would have shortened the labor time.
I intend to live forever! So far, so good.
#24

Posted 21 April 2018 - 11:09 PM
Thanks Bill for your input. I did look locally for the arch punch you mention, but I realized the punch set I had would cut and hold the Lead weight nicely for the hole in the middle. Once I figured out to lubricate the punch it popped out with about 75psi, no problem.
When I center punched, center drilled then drilled the drill walked of center. Its like drilling cheese. So the lathe was the best way and the punched I had held it perfectly on center. The time to be saved would have been finding some .90" thick Lead material. Was able to find it at McMaster Carr but did not want to wait.
6"x 6"
3/32" -0.008" to 0.008" Cold Worked Hardened Fed. Spec. QQL-201F 9032K273 $16.33 + shipping + 2 days
Next time
#25

Posted 28 April 2018 - 10:57 AM
The chassis and wing are mounted, so happy with that. Still have to apply stickers so when that is done I will post a pic of the finished car.
Gene as i may of mentioned I had taken the wing from another damaged body. The wing I used was glued to the body and took awhile to dissolve the glue and loosen and save the wing. My question is do you plan to make a replacement wing and the body or just the wing? I am interested in both but I could fix the donor body with just a wing. Also anyone out there ever found or mixed that beautiful Classic metallic orange ?
Jairus, your the expert painter have you ever found that orange? I looked high and low for a nail polish paint, but no luck. The soft body Revel cars have a similar kind of paint in that it has a gold mix to it, but is not a standard candy. Any thoughts on how they achieved such beautiful eye popping colors back in the day ?


