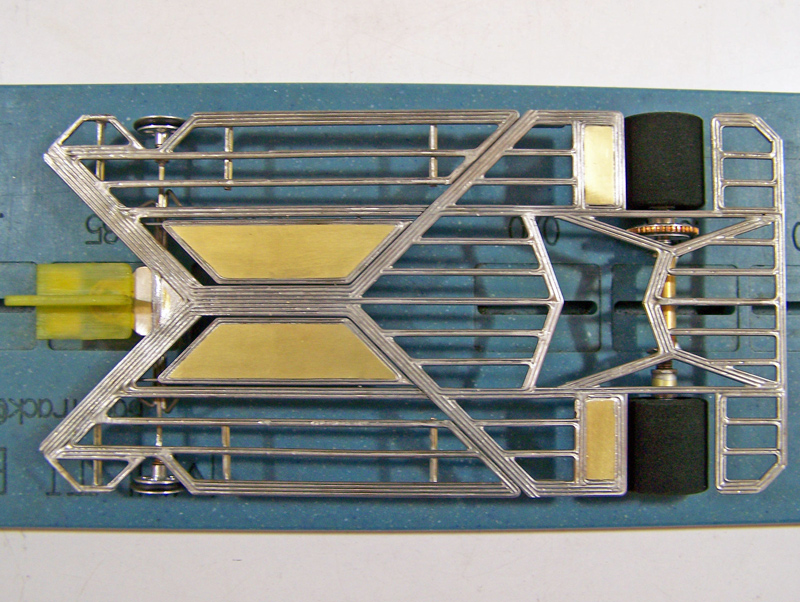
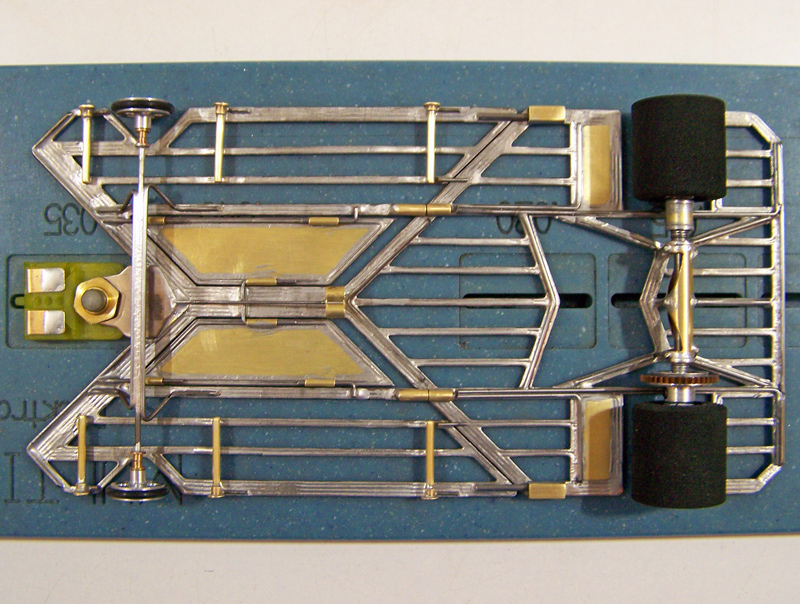
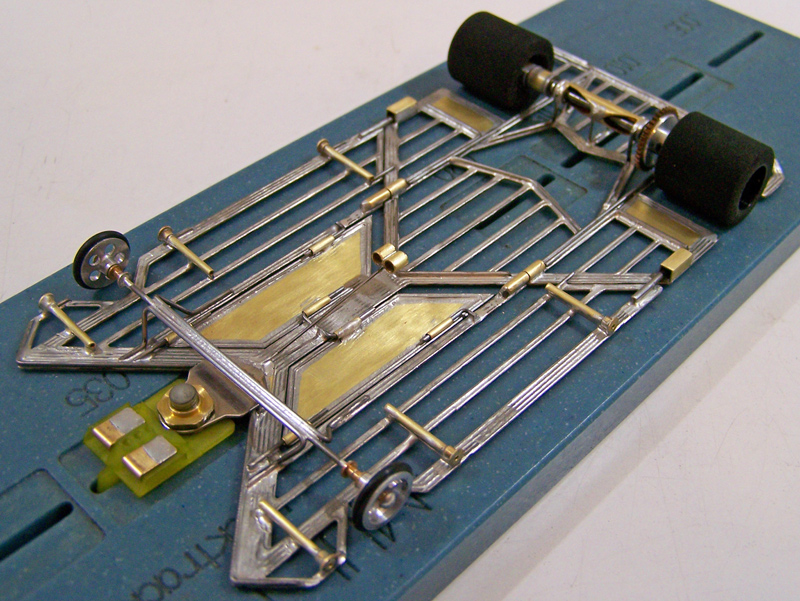
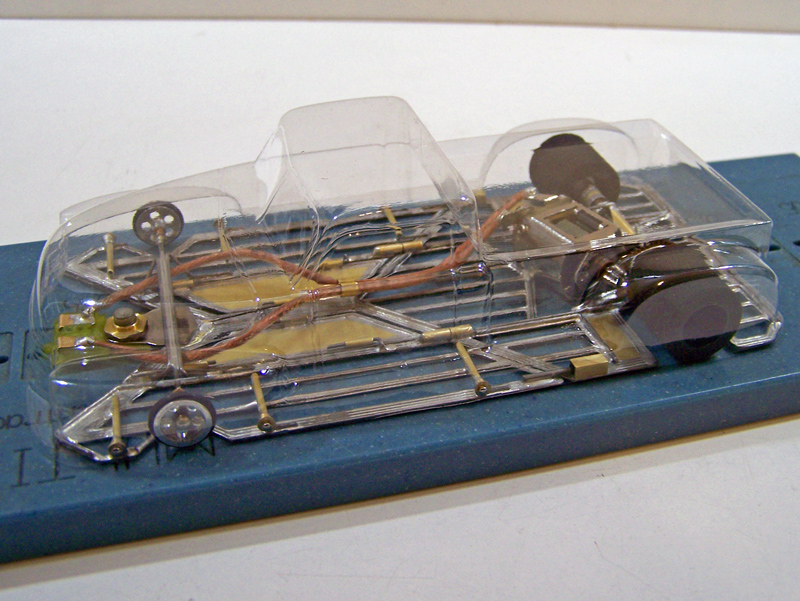
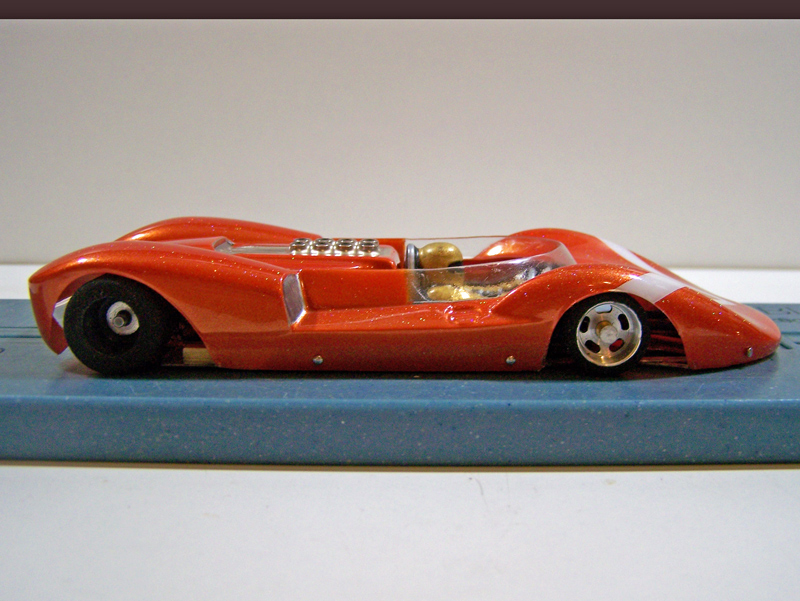
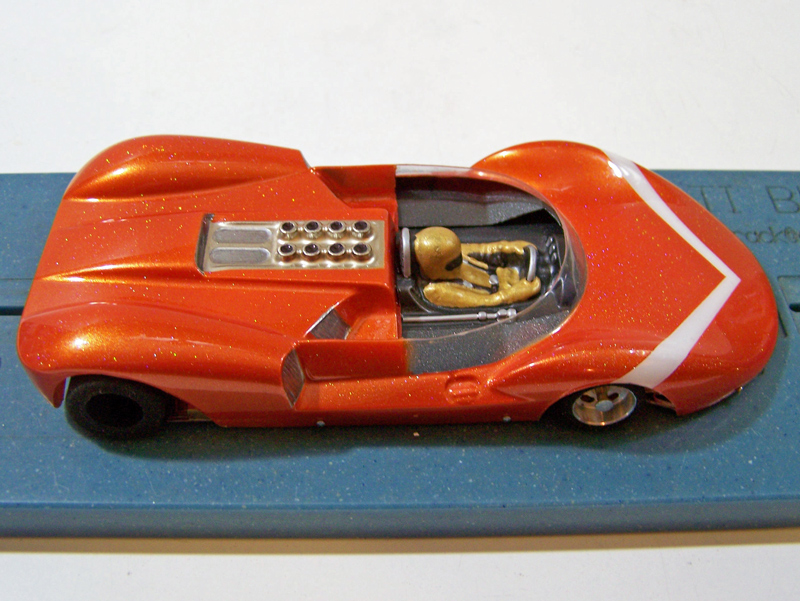
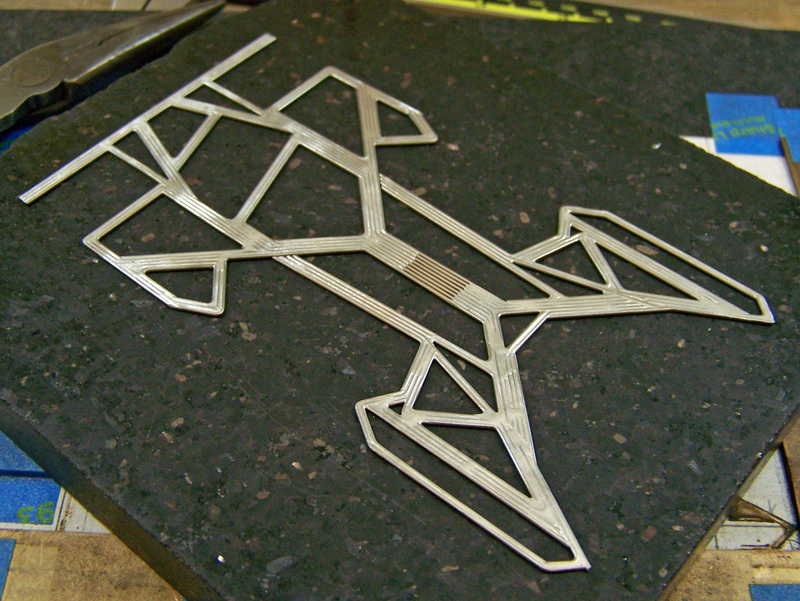
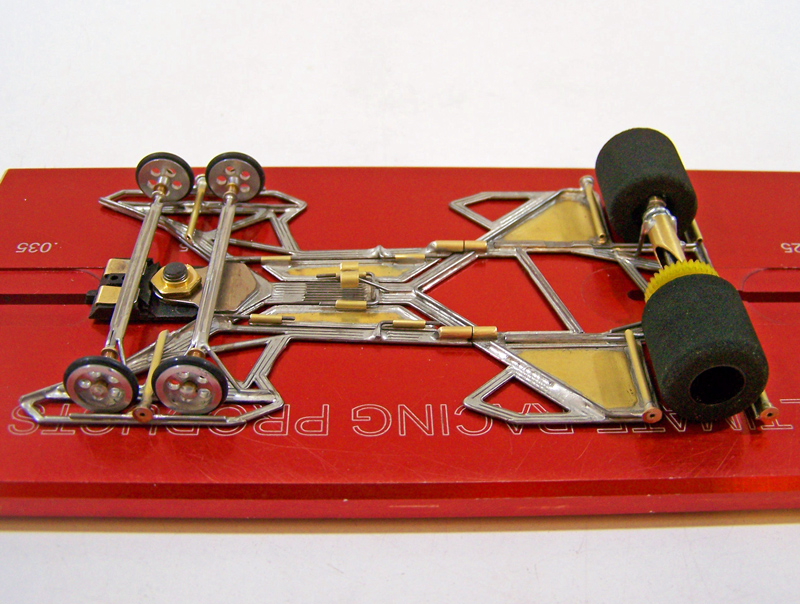
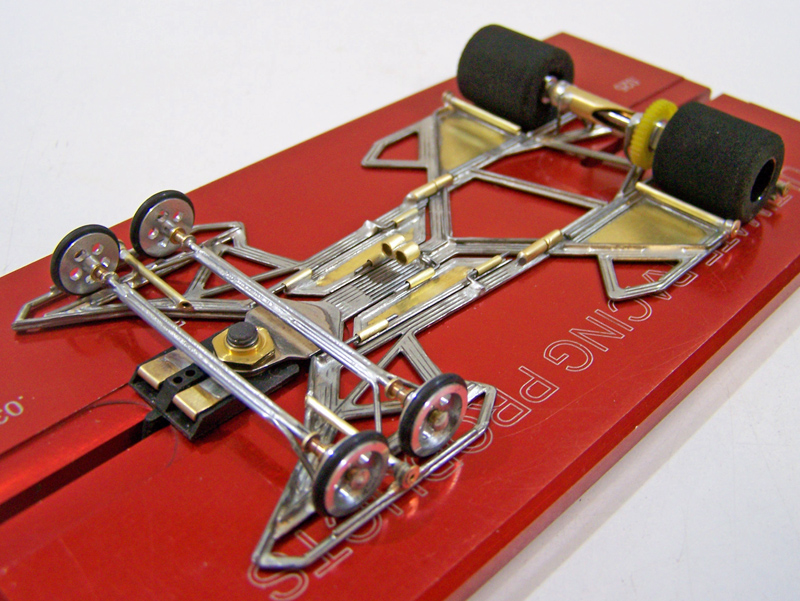
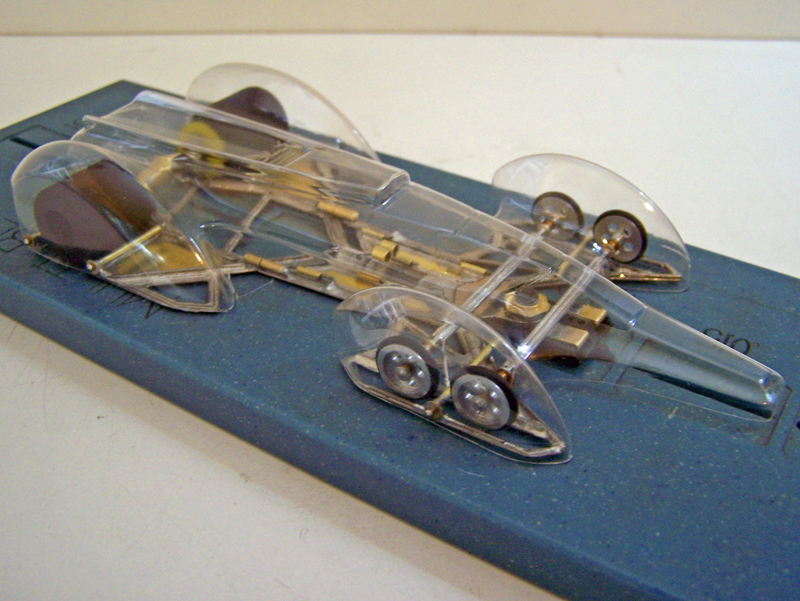
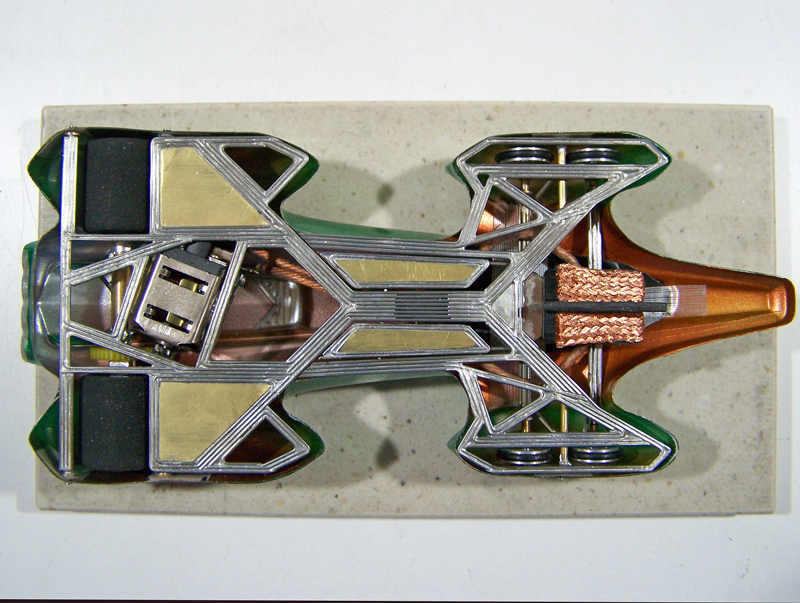
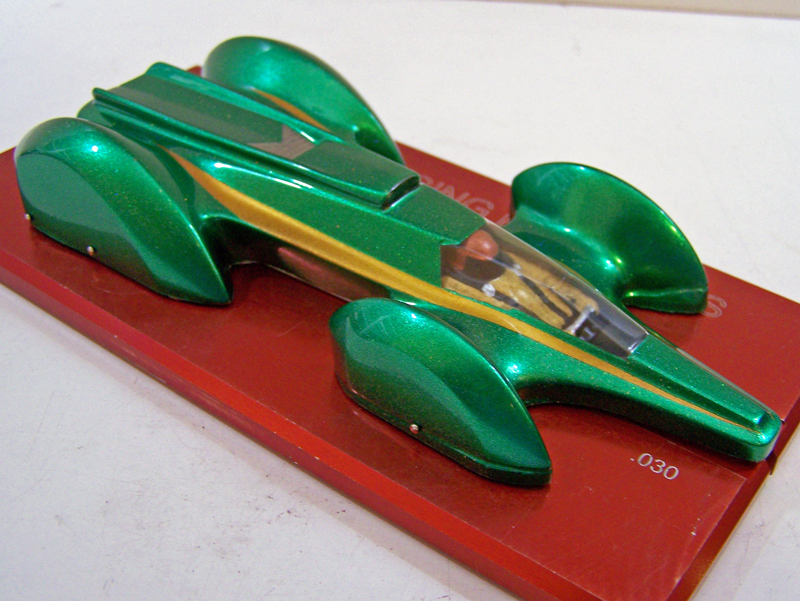
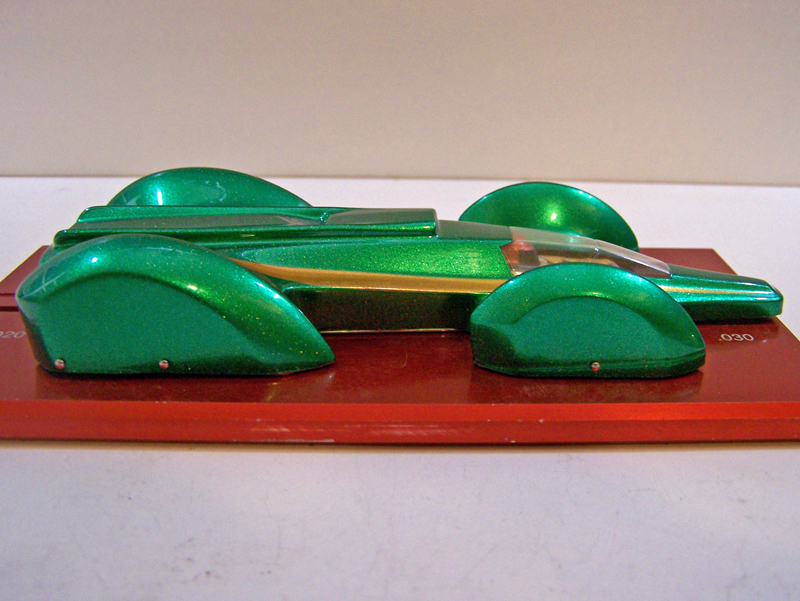
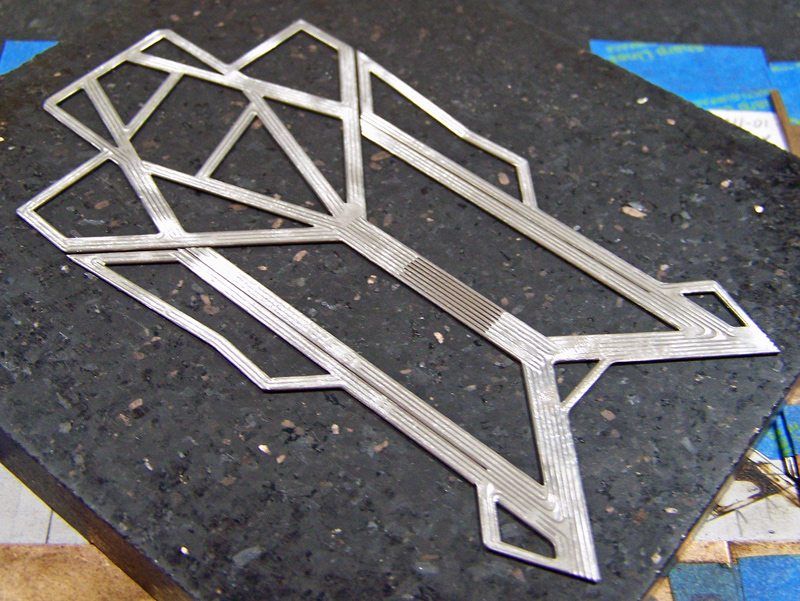
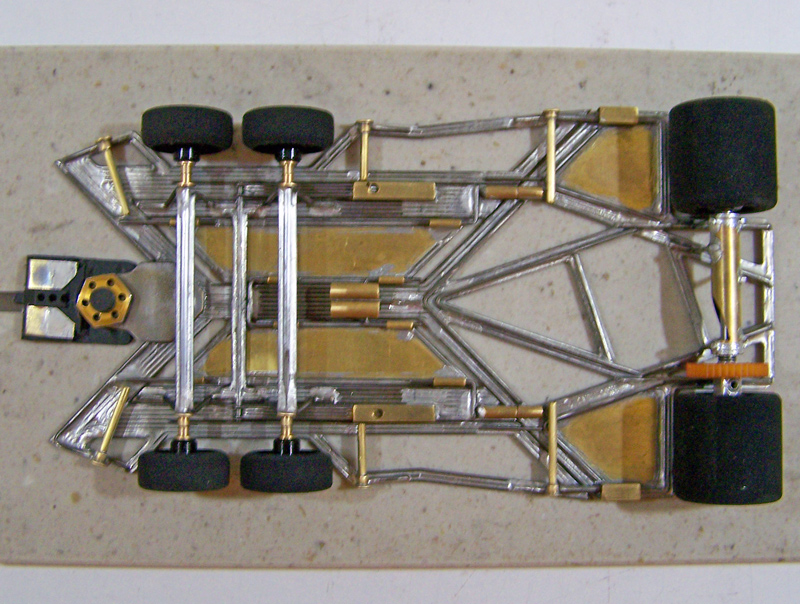
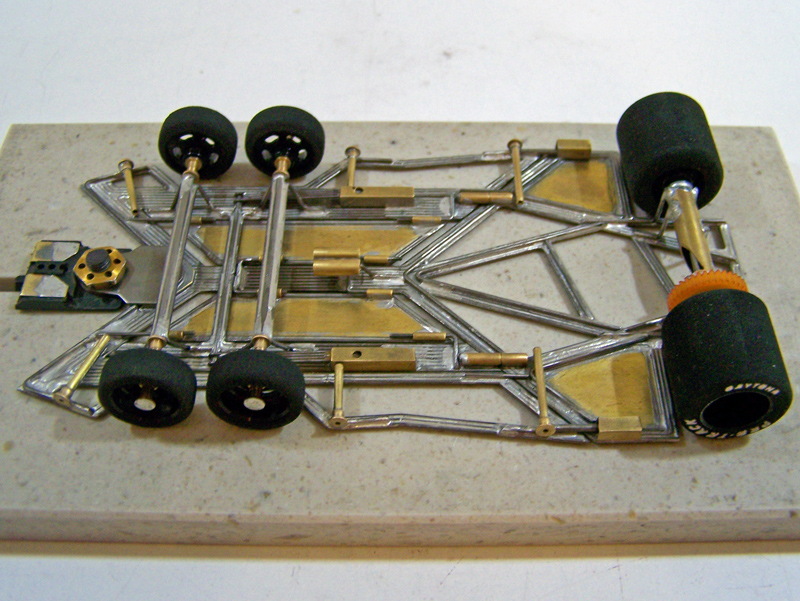
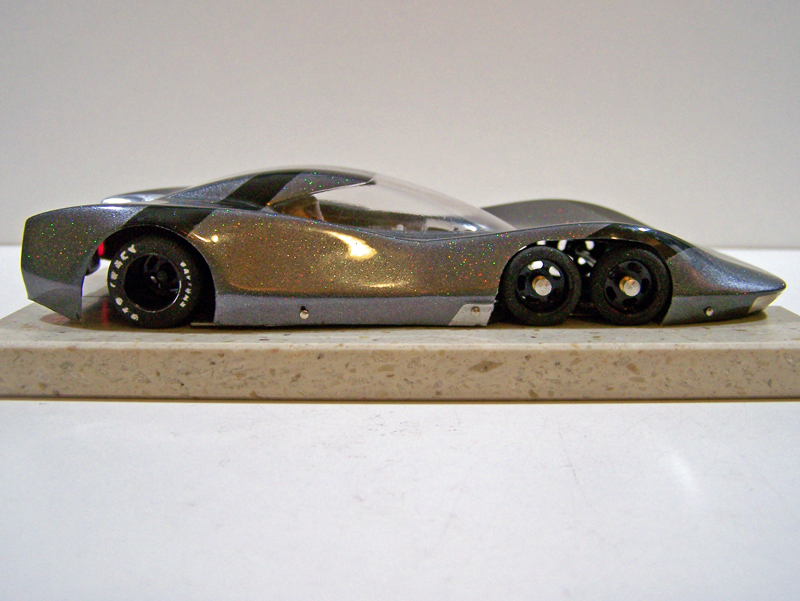
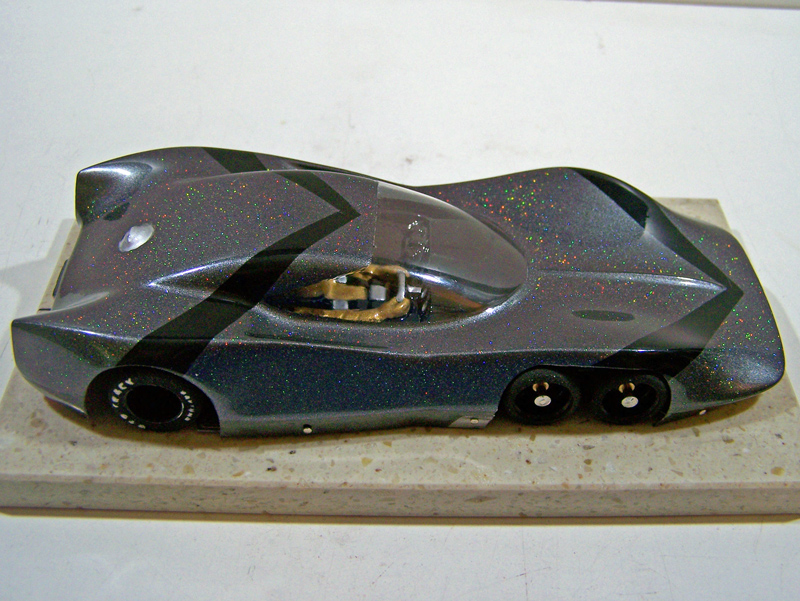
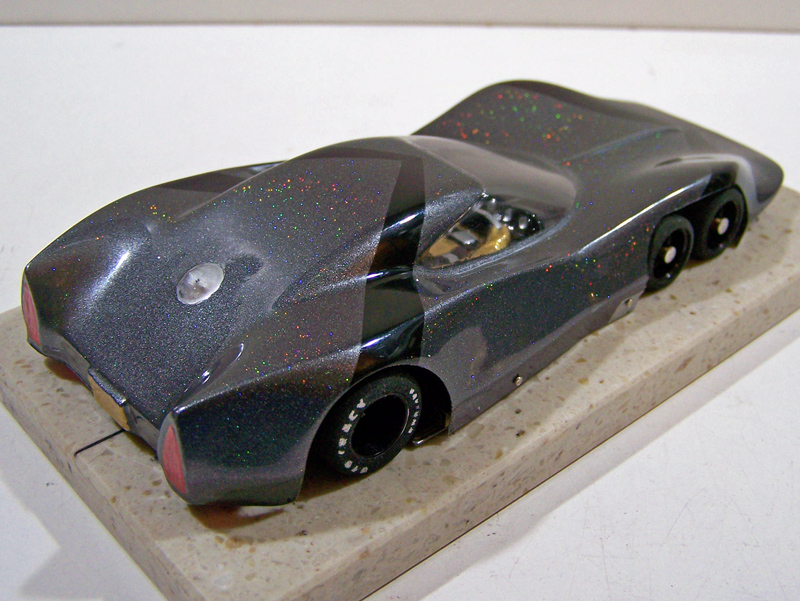
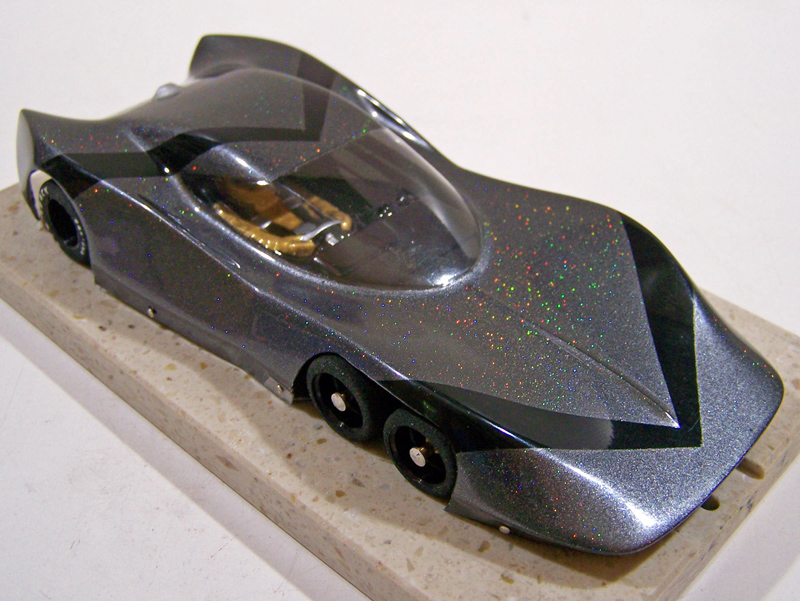
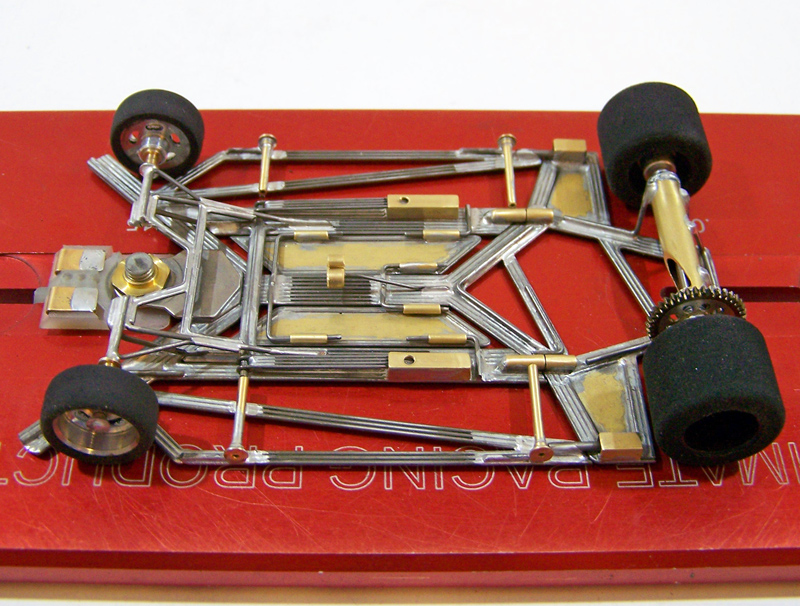
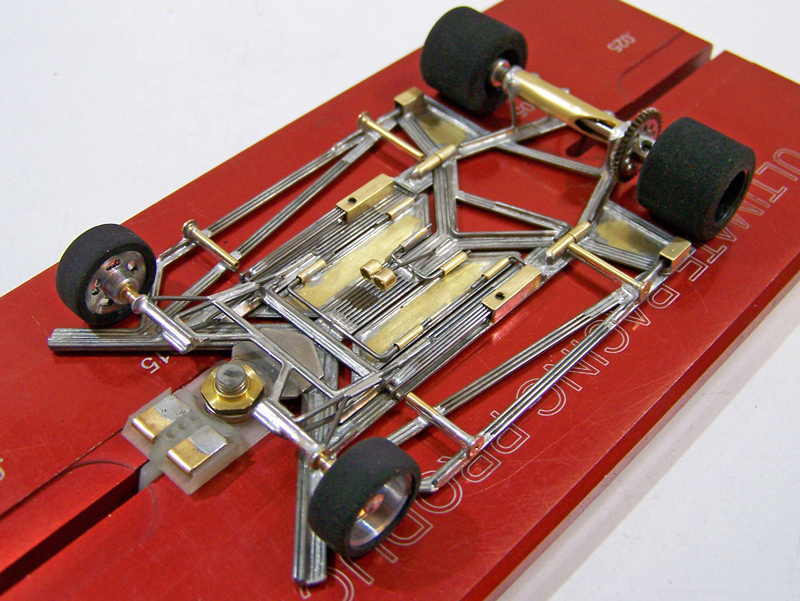
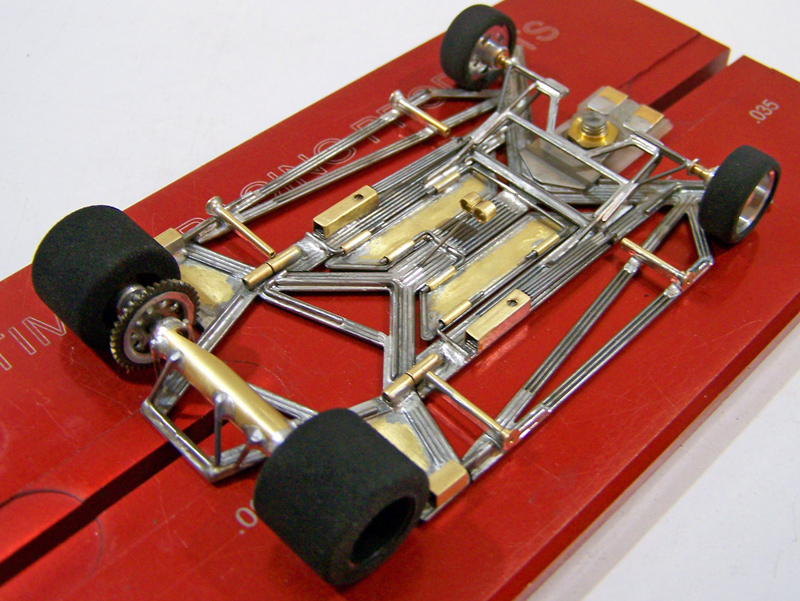
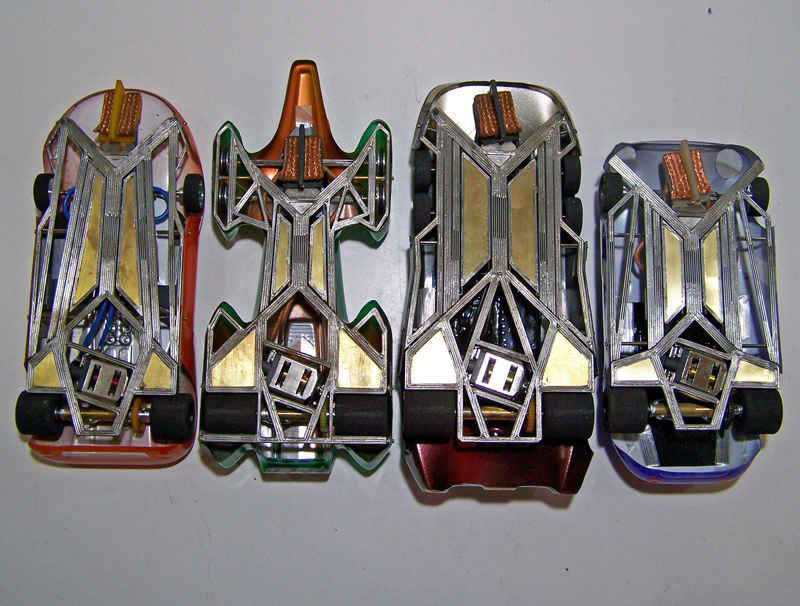
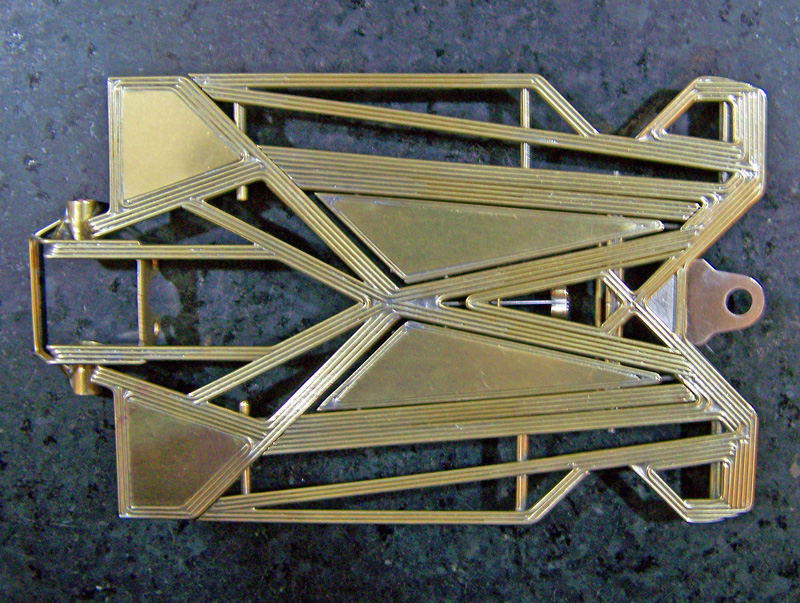
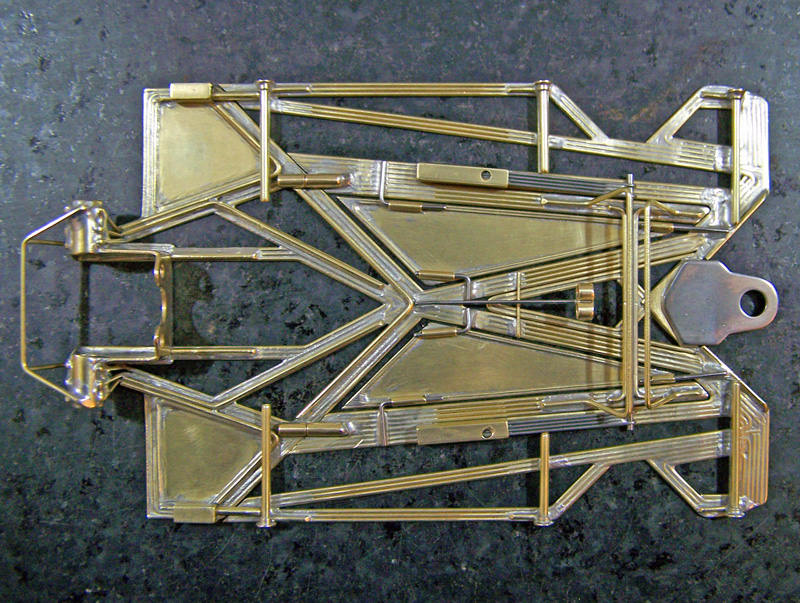
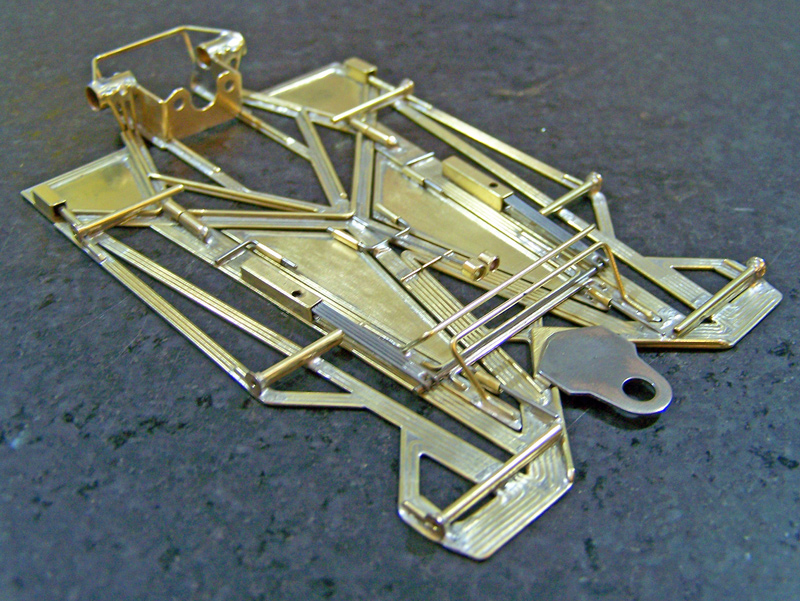
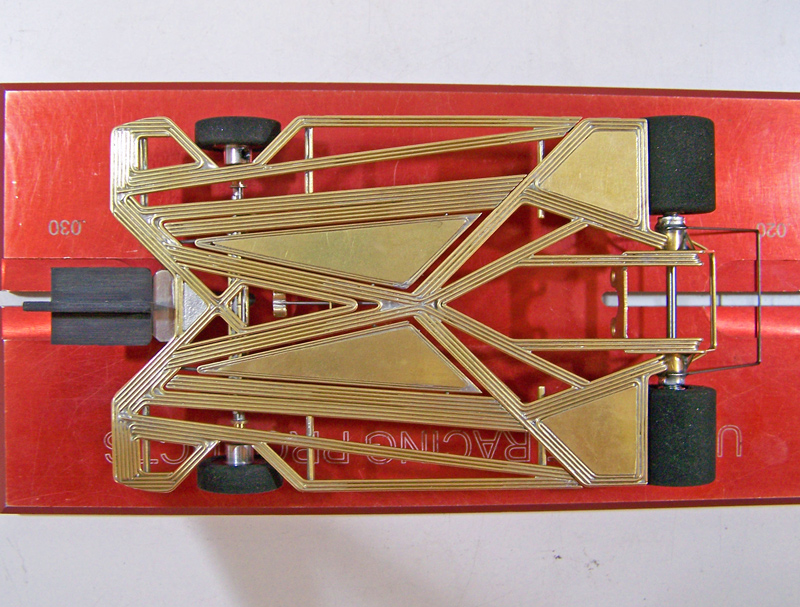
That's a killer F1 chassis!

CMF3 'just for fun' chassis
#51

Posted 10 April 2020 - 05:37 PM
- Tim Neja likes this
A motor is only as fast as the chassis it's in.
Dominic Luongo
Like Dominator Custom Chassis on Facebook
NERR photos from 2012-April 2016
NERR photos from 2016 to now
#52

Posted 10 April 2020 - 06:53 PM
Dang, Bob, either you’re taking notes or you’ve got one serious memory. LOL
The 1305-C and 1236-Cc2, both 1219-Series retro CanAm chassis, had the two converging main rails attach either side immediately lateral of the guide mount (as did most of the various main rails in the 1219-Series), as opposed to intersecting immediately behind the guide mount (as on the above A401-01).
Bob, glad you didn't know me back in the 70's, 80's, and 90's; you'd be reminding me of... well... let's not go there... LOL
Rick / CMF3
Yes Rick it was from memory, I was at work and didn't have reference to my notes.
I remember the 1305 for two reasons; I had asked Marty about an Iso chassis so he pointed me to you, and the amount of time you ran the 1305 when you were developing new designs every few weeks.
#53

Posted 22 April 2020 - 02:05 PM
1405-01; 2D, or Not 2D…
Screw the slings and arrows, take arms with Hakko and Dremel, and suffer another outrageous chassis design, it is 2D…
In this case one of the incarnations of the Chaparral 2D… In this case not the ’66 Daytona version (with fin mounted rear spoiler), nor the ’66 Nurburgring version (with the “snorkel” intake), but the intermediate ’66 Sebring version. Something about the 2D in whatever version I’ve always liked, but I still don’t think I could describe it even after all these years. In any case, and once again, this slot car polycarb body repop version is from that time before slot car bodies became exaggerated standard width/wheelbase bastardizations of race cars (but, honestly, I like the bastardizations too). What that means in this case is this Chappy 2D body at the base would only allow for a 2.625” wide chassis frame, but be able to cover >2.9” width for the rear tires (the track of the fronts was going to be a wait and see what looks better after the chassis got done). That’s a lot of cases (all lower, not legal, none with beer…). The question, 2D, became what kind of chassis I wanted to put under it… It’s a Chaparral, it should be something different…
And that’s when things got weird.
First I decided to make a parallel rail all steel wire frame, with gapped rails filling a drop arm and the hinged side pans, sort of a steel wire semi-“jail door”. Next, the main rail framing would extend forward of the front wheel wells to front wings shaped to fit the front of the 2D body, as well as into static quadrangular frames forward and aft of the hinged side pans, and also to extend the framing to fill the front wheel well lateral of the main rail between the forward static side pan and the front wings; those and the other steel wire “framed” sections of the chassis (i.e., not the drive sections, the drop arm, or the side pans) would be filled with thin brass sheet to also give the chassis a pseudo-semi-“lead sled” look to go with the “jail rails”. That should look strange. And, to give it all a good swift kick in the rear the chassis would be an anglewinder drive sized for “FK” type motors; for aesthetics I would use the same symmetrical design for the chassis rear motor/drive framing as I had on the open-wheel A401-01 chassis. I decided to throw caution and reason to the wind and use 0.032” wire to frame this chassis. While I was drawing up the rough draft I opted for another strictly aesthetic touch incorporating the “same” framing angles used for the motor box for the framing edges between the static pans and hinged side pans…
And that’s when things got really weird…
Anglewinders are either built for clockwise or counterclockwise motors, right? Right. You can’t build a chassis for both CW and CCW motors, right? Uh… well… not sure why you’d want to even if you could… but… maybe…
Well, sitting at the drafting board I figured out that I could, if I wanted to... It worked on paper, at least… And then I drew it into the 1405 chassis design, so I guess I wanted to… I’ve no doubt this has likely been done before by someone and/or another, but I hadn’t done it, so done it I would. As I drew out the plan I was fully aware that all my efforts in this regard didn’t really matter, as the likelihood of my ever switching between CW drive motors (Falcon 7, PS P-Dog, JK HR) and CCW drive motors (TSR) on this car was about slim to none. Still, it added another bit of odd-ball symmetry, along with pointless functionality, that just made doing it that much more appealing.
For you military history geeks, this thought process would be a mix of a Farragut “Damn the torpedoes…” and a McAuliffe “Nuts”…
The anglewinder drive on the narrow frame, along with the rear track dictated by the body meant I’d have some restrictions as far as rear tire width, which wasn’t a problem as I had originally intended to use narrower tires on this car to see how they’d look on one of these “narrow” body builds; so for the 2D the rears were going to be 0.600” wide 1/32 “Euro” tires, with a 0.750” diameter (something readily available); the fronts would be used 0.225” wide retro CanAm/GTC fronts cut down to 0.6825” diameter (something I have an immediate availability to, and quite a few at that).
I’ll leave out all the other weird ideas I had that didn’t get included in this build…
And this is how that mish-mash of ideas came out; the 1405-01:
Perchance to dream… Nightmarish looking thing, ain’t it?
And that’s one short rear axle tube. There were a couple ways I could have addressed the short non-drive side spacer for the rear axle. I could have just stuck in a bunch of 3/32” axle spacers, but that seemed tacky. Or I could have just cut a piece of 1/8” tubing to stick in there, but that seemed chintzy. Instead, and staying true to myself, I decided to make a pointlessly more complex 7/32” tube with ball bearings in each end to fill the 0.28” space. While the value of this accoutrement is certainly debatable, it made me laugh, so it was worth it.
The sissy bar is another oddity on this build. Usually for a sissy bar I’ll just run a 2-bend (or 4-bend, if a kink is requisite) piece of 0.024” wire and wrap the ends around the rear axle tube. On the 1405-01 there isn’t all that much axle tube to speak of; however, since the 1405 uses the symmetric anglewinder rear assembly with the framed sprocket area making the chassis plenty wide enough, I opted to run the sissy bar from the sides of the chassis rear up and into the underside of the Chappy 2D’s spoiler.
When it finally came time to decide what motor to put in this car I went with an old TSR, for no other reason than I just had to have this Chappy 2D with the drive gears on the seemingly wrong right side, where it would be visually bass-ackwards from all the other CMF3 JFF anglewinders. Besides, I can always change it to a CW motor any time I want to… That still seems weird… kind of cool, but definitely weird.
Specs crapola: All chassis framing wire is 0.032”; brass pans are 0.010” sheet. WB = 3.8125”, RAX-GPC = 4.4375”, GL = 0.625”. Max chassis width 2.625”; rear tire track 2.960”; front tire track 2.875”. Keeping with the 0.032” wire “light frame” theme, all hinges are 0.032” wire in 1/16” tubing. Drop arm (down) and hinged side pans (up) only move about 0.015” vertical. RTR mass is a mere 87.3 grams.
Oh, yeah, about those 1/32nd “Euro” 0.750”d x 0.600”w rear tires I thought I had… I probably should have taken them out of the bottle… maybe even actually looked at them… forgot I used them a while back… turned out the ones in the bottle were old, used, and only 0.720” d… so, if you thought they looked a little small in the photos, guess what… they are… oh well, not like I don’t have plenty of time to get some… picture of an idiot in action…
Paint job, as usual, is another CMF3 “can’t see it from my house” (well, actually I can) work of mediocrity. Purists will be only mildly pleased that the body is mostly white, but otherwise largely dismissive. And I’m still too lazy to get any nice interiors, maybe someday, so that pretty much sums that up too. The 3/8” high rear spoiler gave it the “slot car not model car” look; and, to remove any doubt, I left out any interior below the rear windows intentionally so all the slot car weirdness down below is clearly visible from above.
This ill has been borne. Time to fly to another chassis we know not of.
Later, slot car spamlets!
Rick / CMF3
- Dominator, boxerdog, Geary Carrier and 3 others like this
#54

Posted 01 July 2020 - 06:04 PM
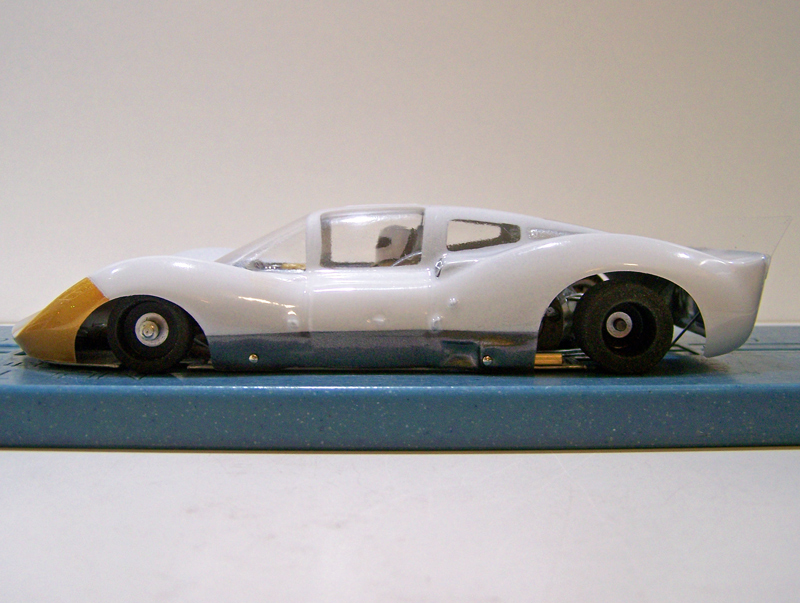
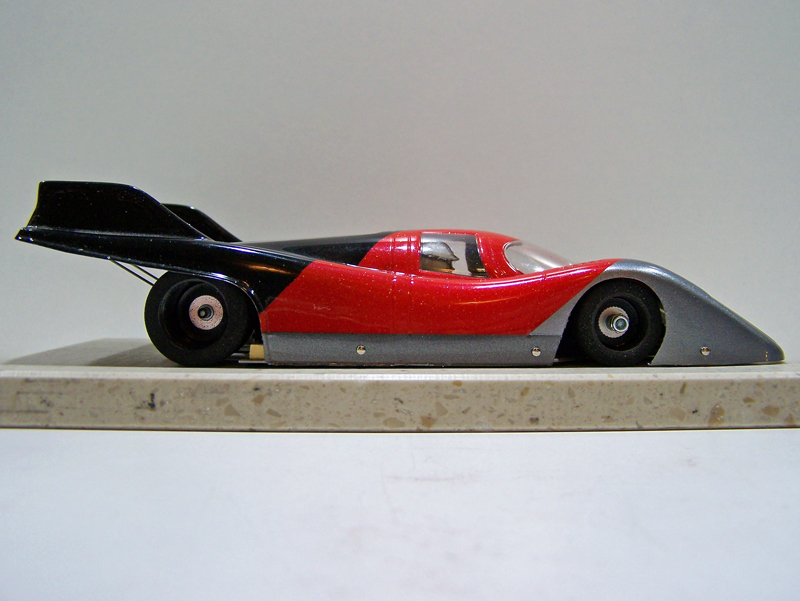
1406-01; Porsche 917
Another one of those bodies I got from Victor/TrueScale years ago (there were quite a few, and still more…) that has been sitting around Team CMF3 World Headquarters (sounds better than “all that crap in the back room”), this one being a beautiful polycarbonate rendition of the 1971 Porsche 917K (listed on the TSR site as the “Porsche 917 TSR” back then). I can’t even begin to estimate the number of times over those years I’ve pulled it out and contemplated yet another chassis for it… but this time I made it stick… probably just need to wash my hands (and/or between my ears)…
Eddie Fleming gets honorable mention, or partial blame, for this one, depending on your mindset. More analogous to: He threw the ball, and I chased it…
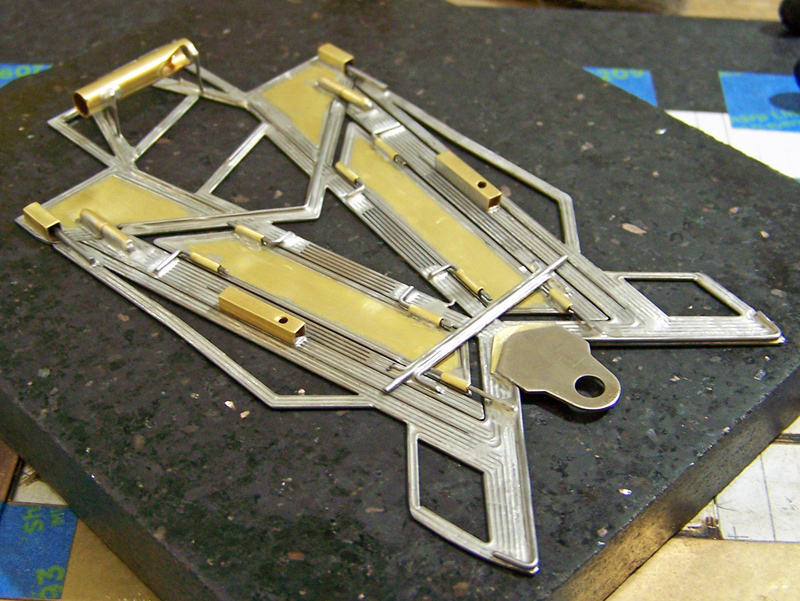
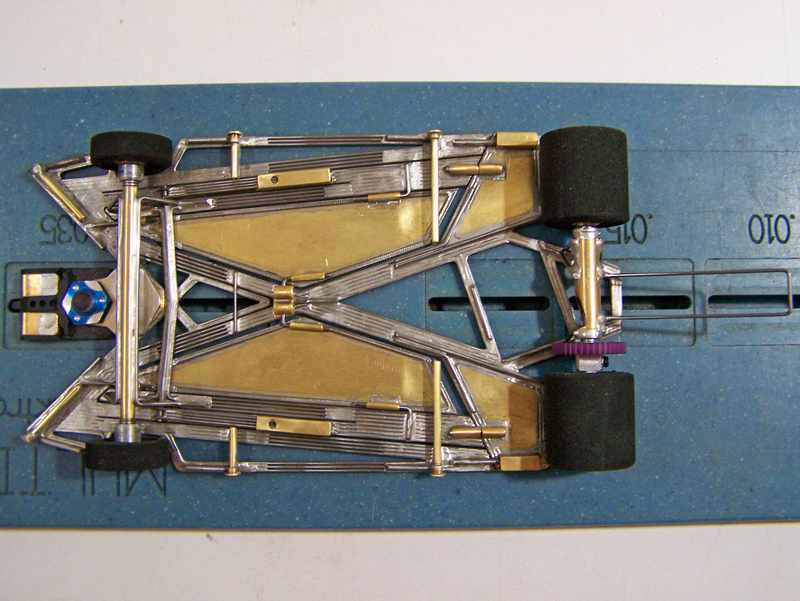
The idea for the 1406-01 Porsche 917 sports car chassis grew from the A401-01 Lotus 56B F1 chassis. The 1406 would have the same symmetric anglewinder rear drive section, and the same “V” main rails converging behind the guide mount. To expand the frame width in the rear there would be another wider angled “V” in the frame running from center line forward of the motor box to framed static pans forward of the rear tires. Front and side chassis components would be taken from the 1237-Series designs; front wings, triangulated side pans, buttress rails, and front axle rails. For aesthetics, the common medial rail of the front wings / side pans was given a slightly greater angle in relation to the mid-line, making this rail parallel to the main rails. On the 1406 the buttress rails and FAR’s are full lateral in position, adjacent to the “side pans” (at the same angle as the main rails and side pans). This full-lateral buttress rail placement is a variation on the 1237-Series that needed to be tried, the thought being it would be better to work it out on a JFF build, and more fun (readers of that other annoying thread of mine take warning… there’s a lot of poop going to hit that fan…). As such, and despite some reservations, the chassis frame would be made using 0.032” wire.
This 917 is a weird animal for a slot car body. Over the years I’ve considered all manner of dimensional possibilities for this thing, but, not surprisingly, I wanted it to be different, and it was obvious it would be different no matter what. On the 1406-01 the WB is only 3.625”, with a RAX-GPC of 4.375”, making the GL 0.75”. That’s SHORT for a 1/24 scale car, and especially so under a body that is 6.75” long; there’s A LOT of rear overhang on this puppy. On a matter of lesser concern, the 917’s body sides have a slight concave curve between the rear and front wheel wells that would need to be addressed and built into the frame sides.
Tires were another matter. Regular 0.8125” d retro tires in the rear just didn’t look big enough for some reason; so I went for BIG, using some JK 8785’s trued to 0.875” diameter. At that point it was between the wide 0.8125” d retro stock car fronts, or 0.75” d retro F1 fronts; the F1’s got the final nod.
My thinking going into this build was that everything about it was all wrong… like that would stop me…
This was going to be fun!
It was! The 1406-01 Porsche 917 TSR:
I put 0.024” wire framed 0.010” brass sheet dynamic pans on the 1406-01 between the FAR’s and the main rails, with more fore-aft travel than usual, thinking this might help offset or dampen some of the small-wire short-frame with big tires problems I kept visualizing. Who knows… The rear static pans are 0.032” brass plate.
With the body’s long rear overhang (approx. 1.56” behind the rear axle line), I considered building some system of raised wire support struts extending from the chassis rear from which to run a sissy bar to the rear spoiler, so that it would be vaguely similar to the actual 917K. Eventually I decided that would be too much junk-in-the-trunk of this thing, and resorted back to a simpler-smaller 0.024” wire sissy bar running from the rear axle tube.
For ponies, I had some PS 4002-FK’s sitting here at the CMF3 Skunkworks, and this seemed like as good of a car as any to use one. All buttoned up and ready to run it came out to 101.3 grams.
The way the body was popped gave it a “rear window” that doesn’t exist on the actual 917K. One plan was to cut it out and place a piece of lexan underneath, without any attempt to put in something to look like the 917’s cooling fan, instead painting it a translucent anodized silver (like I had on the rear deck “panel” on the Competition Asp) so the slot car bits underneath were semi-visible. But the more I looked at it the more I wanted to keep the shape of the “pop”, leaving this “window” in place, opting not to leave it clear but going with the translucent anodized silver to accentuate the fact it isn’t supposed to be there. Not being a purist I had no problem with this minor discrepancy. I still like the way it looks. Other opinions may vary…
So, along with that, another mind-numbingly unimaginative CMF3 tri-color chevron paint job of mine, using bright gun metal, metallic mica red, and black, with gun metal side pods, and translucent anodized gold for the headlamp covers. The interior I found for this is old, obviously used, and just happened to fit. You’re welcome.
With all due consideration of my own circumstances within the current epidemiological event, I do not have the option to be nonchalant regarding the matter, so home is where I’m at for the foreseeable future. Guess I’ll while the hours away with the tunes cranked up and building some more chassis… what a shame… We’ll see if the opportunity presents itself for a quick excursion to Fast Eddie’s to throw some more moolah into his coffers...
That’s coffers, not coughers…
Stay safe, and have fun.
Rick / CMF3
- Tim Neja and Lou E like this
#55

Posted 01 July 2020 - 07:30 PM
Ill proudly tale the blame on that one Rick.
Beautiful car and work.
- Rick Moore likes this
#56

Posted 21 October 2020 - 09:37 AM
1407-01; Iso Grifo A3/C
Taking a break from the 1237-Series builds to give me some time to think things through on that end. I may have noted before I have some bodies that have been lurking around the CMF3 Skunkworks for years… may have been noted quite a few times… applicable once again… I already have four other “rough” design lay outs of some JFF builds, but I had the final draft for the 1407-01, so that was a good place to start.
This time the body is the 1964 Iso Grifo A3/C. Maybe it was “the time” back then, or possibly the onset of adolescent hormones, but I really loved the way some of the cars from that year looked *, the Iso Grifo A3/C being one. Some years back when Victor/TrueScale came out with this Iso Grifo body he did some in polycarbonate, of which this is one. ( * Still looking for some good-looking 1/24th scale lexan pops of the Porsche 904 and Shelby Daytona Coupe… hint, hint…)
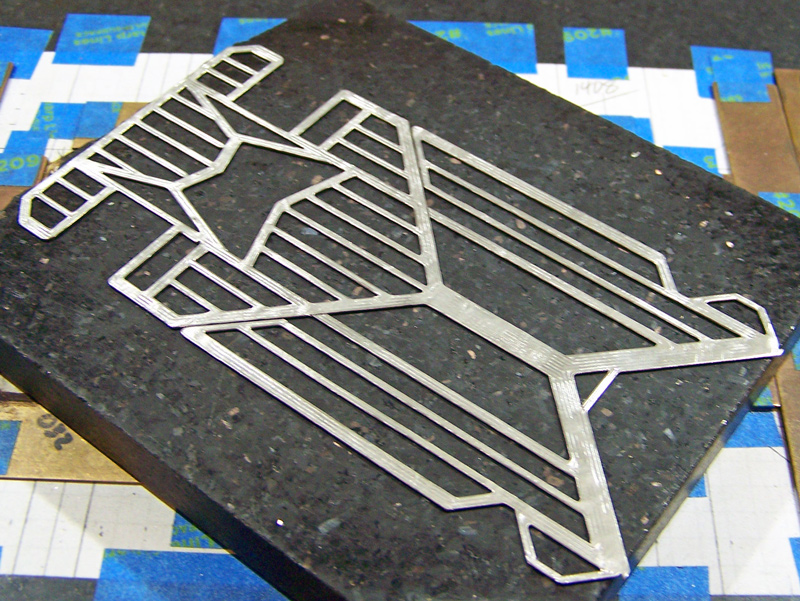
I always wanted to put a chassis under this body that was as much of an aesthetic statement as anything else… and could never come up with anything that just seemed to “fit” the body, the criteria, and my liking… Recent forays in the 1270 Sub-series of the 1237-Series and some JFF designs finally got me going in a direction I liked, so I went with a 1273 based “X-railed” anglewinder frame.
If y’all have forgotten your basic trigonometry, you might want to skip this part. I started drawing out the frame design where all the rail angles were simple tangents / cotangents; 1/1, 1/2, 1/3, 1/4, and up to 1/12 for the medial side pan rails. I liked the way it looked, on paper at least, there was something simple to the angles… or maybe it’s me that’s simple as well as easily amused... my money is on the latter…
The 1407-01, Iso Grifo A3/C:
Chassis frame is 0.032” wire.
Yeah, it sure may look like a 1237-Series chassis, but the anglewinder drive and the Iso Grifo’s dimensions made this build a whole different kettle of fish.
To fit the body: Chassis width is 3.00”; wheelbase is 3.9375; RAX-GPC is 4.375”; that makes a short guide lead of 0.4375”. Accordingly the front wings are much smaller than usual and truncated. Rear tires are 0.750”d x 0.810”, and fronts are 0.700”d x 0.225” (more use for re-trued worn-down retro’s), with clearances being 0.030” rear and 0.015” front. Tracks are narrow to stay within body’s wheel-well overhang; rear is 2.865” and front is 2.835”; made things a rather tight fit, but that’s part of the fun. Using 0.750”d rears would also give me the option to switch over to 0.750”d x 0.600”w rears if the 0.810’s turned out to be too much rubber. Tolerances for the rear axle tube were tight and short, only 0.866” long; seven (4 rear, 3 front) superstructure rear axle uprights were used to keep it secure. The front wheels also had close tolerances; a 3” threaded-end front axle was used (to make spacing adjustment available as required), shortened by cutting into two halves and soldered into a 1/8” brass tube that was soldered into the superstructure spanning front axle uprights. The short guide lead also necessitated moving the FAR torsion bar rearwards (and was angled to run perpendicular with the FAR’s), modifying the front spanning axle upright, and slightly extending the length of the upright portion of the rear spanning axle upright.
During much of the design process I considered extending the chassis frame out to the lower body rear to fill in the car’s underside, but every design incarnation, no matter how sparse, just kept coming back as too much junk in the trunk for this car. The Iso Grifo has a lot of body behind the rear axle, and is about as long as the Porsche 917K. So after numerous doodles and sketches I finally nixed that idea, going with just the minimal frame out back and a sissy bar coming off the short and rather crowded rear axle tube.
This was a rather challenging chassis build, no doubt I made it more than it needed to be, but as it came together and was finally completed it had “the look” I wanted for this car, so any additional effort for my part was all the more rewarding.
For ponies initially I was somewhat reluctantly going to put another PS P-Dog in this one, but while looking through a bin of “has-been” motors I found a PS P-Dog, number “2” it was marked, a very old Pup Dog, the “second” one I bought when they came out, a motor that had been in and out of a lot of cars, through a couple races, and generally with a lot of miles on it and never refurbished, the result being the can bearing was shot, and the demise of the P-Dogs for competition removed it from the needs-work pile and into slot car pony purgatory. Also among those has-been motors was another “old” but “new-at-the-time” JK Hawk 6 with very few laps on it and a blown arm (surprise, surprise) that I had never bothered to get a reliable replacement arm for. So, with a little finagling, I stuck the P-Dog arm from number 2 into the Hawk 6 set-up. Seemed to spin up nicely, especially for the purposes of this car, so why not use it? And the Hawk 6 set-up just seemed to “look better” to me in this frame, for some reason, not sure what or why. Besides, if it turns out it runs like the other “number 2”, I can always throw another P-Dog or something else in the car.
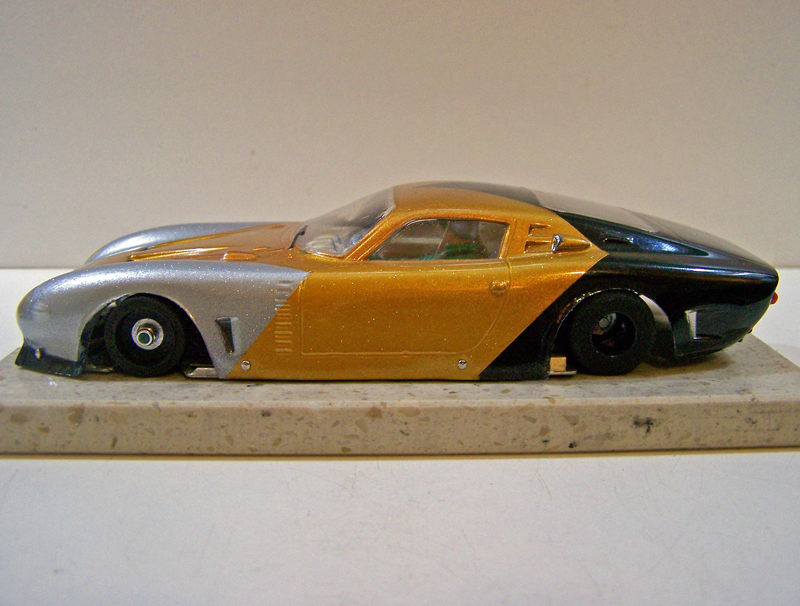
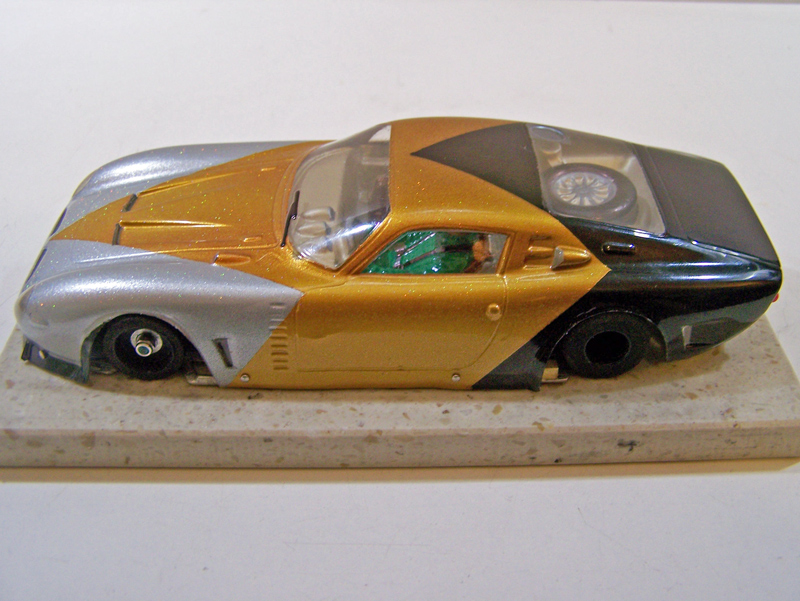
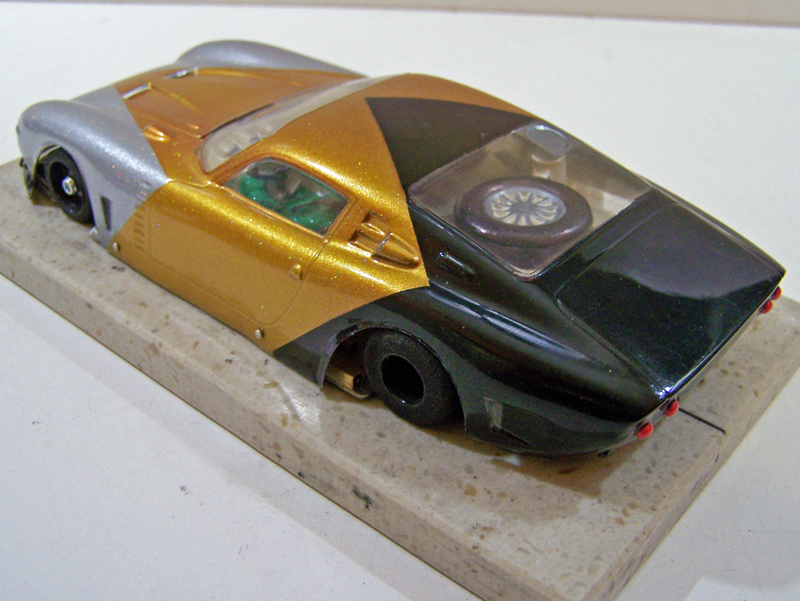
Another to-be-expected exercise in excremental effort from the CMF3 paint shop, a tri-color silver, gold, and black modified-chevron livery, chosen to vaguely “mimic” the chassis underneath (steel wire, brass plate/tube, tires/guide); largely predictable and unimaginative, the way I like it. Rather than trimmed away, I kept the excess lexan below the nose of the body as sort of a pseudo-aero add-on. Left as many air vents clear on the body as I could, but the little ones finally did me in. Victor supplied the Iso Grifo with one of the nice interiors that go with this body, which I didn’t screw up too bad; since this is an anglewinder the interior fit without any modifications, clearing everything underneath, but like everything else on this build it was still a close fit. I thought about adding a short black rear spoiler to the back, had it cut up and ready, but I decided to leave it off; I can always put it on if I change my mind. I just like the lines of the Iso Grifo A3/C. However, I am still looking for a suitable “gas cap” to put in the upper-right corner of the rear window...
All put together the 1407-01 Iso Grifo A3/C came out to 99.6 grams. Tidy.
You know, to finally be putting some of these beautiful TrueScale bodies into running slot car form conjures feelings of gratification with a touch of melancholia; the dreams of the future finally becoming a passing tactile moment to be held in the ever-present past…
Perhaps I should go to a place of serenity and meditate upon this further…
Or maybe have a cup of coffee, a cigarette, and say screw it…
Place your bets…
Later, slot car junkies.
Rick / CMF3
- Tex, Tim Neja, Lou E and 2 others like this
#57

Posted 05 November 2020 - 09:21 PM
1408; Pick-Up Lines
“All a friend can say is, ‘Ain’t it a shame’”.
It’s been quite a while since I’ve built a truck. About twelve years. And the last one was the really weird “dualie” 1106 that was the initial car posted in this CMF3 JFF thread. I like trucks. Everybody likes trucks. And some of my all-time favorite slot car races were for a flexi 4-inch Nastruck class… same rules as GTP, except with a truck body… on a King track… crazy fast with no downforce… great races… but if things went bad, they would often go bad very quickly… and very badly… but still a lot of fun! Yeah, trucks are cool…
I relatively recently got this Oleg ’51 Chevy Pick-Up body (#0120) because I wanted to build another truck, giving me the excuse to design and build a somewhat different sort of chassis for it, and have some cheap thrills. I started thinking, and that’s never a good thing…
When you go to the big auto auctions all the pick-ups have those really nice custom wood truck beds in the rear (or at least rear deck lids over an equally pristine deck). They may be trucks, but you don’t put junk in those trunks. There is really no way to build a slot car pick-up truck “bed” with the motor and gears back there, at least none I’ve thought of so far that seemed satisfactory… even moving the motor up front wouldn’t quite get it either… That nixed the idea of a slot car “show truck” rear, at least for the time being… So it was time for alternative ideas… I toyed with the notion of cutting out the rear deck on the body, but it just wasn’t grabbing me… or, maybe leaving it clear, but that wasn’t doing it either… it came down to painting the rear deck a translucent color…
That’s when I started doodling out ideas for the 1408 chassis. The Oleg ’51 Chevy P-U body is 3.25” wide, something I haven’t seen in the JFF’s of late, so with a broad canvas there wouldn’t be the usual squeezing things in. Yea! But generally I wanted to keep in mind the chassis rear would be “visible” from above, so I wanted the frame to have symmetry, at the same time being an anglewinder drive. As silly as it sounds, I wanted the chassis to have a “cab frame” and a “bed frame”. To that end I wound up using a modified version of the design for the rear motor/drive section from the 1405-01, the Chaparral 2D anglewinder car that can have either CW or CCW drive motors, for the visually symmetric motor box. Forward of that the main rails continue parallel, with five more parallel rails in between (sort of like on the 1403-01 Porsche Carrera 6 drop-arm). As the chassis comes under the cab it takes on the character of a 1237-Series frame, where the main rails converge along 45-deg angles to a single center main rail that runs forward to the guide mount, from which runs the 45-deg front spanner. From the front spanner there would be parallel buttress rails that come back to the rear main rails. Dynamic pans would be placed between the center main rail and the buttress rails. Instead of triangulated side pans extending from the front wings and front wheel wells, I made the side pans quadrangles with the medial edge parallel also. The static side pans I usually incorporate forward of the rear wheels would be smaller, with more parallel filler rails forward of them. To finish things out under the “see-through” rear deck, the chassis frame would extend back out to the full width behind the rear wheels and to the body rear, and use more filler rails. The idea was all those parallel rails would give the frame under the rear deck that “show truck bed” look, where they have beautiful metal framed wood stripped decks, albeit without the wood, much less the beauty.
I figured it would be pretty screwy looking, honestly, but that wouldn’t be out of the ordinary in this thread.
The 1408, ‘51 Chevy Pick-Up:
This was another build that was just plain fun through the whole process. Truck = Cool
The front wheels on this pick-up are for all intents and purposes just there for aesthetics (I hate stickers), and are only 0.5” d O-rings (DRS 149S); besides, not much else would have easily fit under the body fenders. The rear fenders were less restrictive, and I opted for 0.750”d x 0.810” rears. No need for a sissy bar on this one, the body’s rear bumper rests right on the frame.
RAX-GPC is 4.75”; wheelbase, of no consequence, is 4.375”. Chassis frame is 0.032” wire. With all that useless and counter-productive framing hanging out the rear, the dynamic pans are 0.024” wire framed 0.010” brass where I can add any adjunct lead if needed… I figured this thing was going to handle like a truck.
For ponies I went with a JK Hawk 3, simply because it has the open can with the armature more clearly visible.
The paint job is another one of my “squint your eyes and it doesn’t look so bad” half-assed offerings, a two-tone “Vee” of gold front and metallic red rear, with the translucent rear deck being anodized champagne gold; side steps and front grill are bright gun metal.
All together it came out to 90.5 grams.
Considering the degree of uselessness designed into the chassis, this is definitely more of a “slot car show truck”. For sure, I don’t want to be backing into anything. But like any “show truck” where the functionality has pretty much been built out of the “truck” part, same goes here for the “slot car” part. But it don’t “show” too bad…
Then again, the goofy mish-mash 1405-01 Chaparral 2D ran light-years better than I expected (so much so that it has become one of my favorites to pull out for some “play time”, and so much so I’ve actually been considering building another 1405…), so you just never know about these goofy JFF chassis and cars. But, that’s part of the attraction…
“Lately it occurs to me
What a long, strange trip it’s been.”
Rick / CMF3
- Tex, Tim Neja, Eddie Fleming and 1 other like this
#58

Posted 10 December 2020 - 06:52 PM
1409-01; La Kook-a-rat-cha
Living in America’s favorite dangling peninsula, Floridada, we know a good deal about coocoorotchers, particularly the really big ones, aka the American Cockroach, or Periplaneta Americana, but commonly referred to as the “Palmetto Bug” by resident Florididlians since it sounds better, for locals and to visiting tourists, than calling them “Big-Mother-F Cockroaches”; Palmetto Bugs also have the capability to take flight, which will scare the living beejeezers out of those unsuspecting said tourists, and is also why it is the Floridada State Bird…
Almost as common in the annals of slot car lore, during the Great Slot Car Outbreak from that magical happy-time of The Sixties (everything was so much better then… cough… cough…), and some fifty-plus years later still charming slot car geek survivors from that time as they go cranky into that long dark nappy, was the unforgettable Cox La Cucaracha… For a month or two, which in those days equaled dog-years in slot car time, La Cucarachas proliferated like, uh, well, like cockroaches, when you couldn’t go into the raceway without seeing a swarm of these things scurrying around the tracks, and in the hands of the more speed-crazed types with whatever hot 16D shoved into it… until such time as the more genteel hobbyist would get discouraged being moving speed bumps for the speed-crazed morons, and those infected or infested speed-crazed morons would go back to scratchbuilding, or just give up racing slot cars because they didn’t scratchbuild…
I never owned one. I didn’t even want one. My own run with production cars had ended. Besides, being a young miscreant snob speed-crazed moron who was scratchbuilding, I preferred slot cars that resembled “real” race cars. Still, being a kid, like most 60’s kids, with a questionable value system, easily exemplified by my attitudes towards the TV fare of the time, I still thought all these “thing” slot cars were for the most part pretty cool, but equally for the most part kind of silly, an attitude I would carry over to the subject of girls, with much greater consequences…
Having somehow survived the consequences, and being much older than predicted by anyone, I have developed a much greater appreciation for those things that are cool-silly. Acquiescing, it was time to get a La Cucaracha in the CMF3 slot car stable.
Production? Seriously? No. No, no, no, no. Certainly not. I’ll leave those for the serious slot car collectors. Better for me to use a re-pop body and make a scratchbuild chassis for it, so everyone is happier.
This will not be an in-line iso-fulcrum Coca-rocha chassis. Instead this CMF3 Cocker-roach rendition will be an anglewinder, with front axle rails extending from the motor/drive assembly (semi-iso, if you like), with center main rail and buttress rails… sort of a hybrid 1237-Series / 1219-Series design, something I’ve wanted to give a try anyway…
Get out your pesticide, the CMF3 1409-01 La Cucaracha / La Palmetto Bug:
The idea of mixing a largely 1237-Series design with 1219-Series FAR’s would seem like a simple combination, and even appears as such on paper, but the wire layout for the framing of the two design series are not really compatible. I knew this from the git-go. This JFF Cuc build seemed like a good opportunity to give it a try for future reference anyway. While it was a bit of a challenge, it is, as can be seen, nonetheless possible. Appropriately filed under other useless knowledge…
Framing is 0.032” wire, of course. RAx-GPC is 4.75”, WB is 3.75”, and GL is 1.00”. Max chassis width is 2.50”. Rears are 0.750”d x 0.600”w JK T202/8732 1/32 Euro tires; I considered using 0.750”d x 0.810”w rears but they just didn’t “fit”, or more accurately didn’t “look right” under the rear of the Cuc body for some reason or another; besides, I thought the 0.600’s would make it more fun to drive (like the Chappy 2D). The fronts are ProTrack PTC-166. Rear and front tracks are 2.825”. Chassis clearance is 0.030” rear to 0.010” front; low and mean.
Besides the standard orange, Cuc bodies came in all sorts of colors, making for my part the color choice or choices and paint scheme for my Cuc a weird mental endeavor of its own, staring at the unpainted clear body for lengthy periods of time that would under any other circumstances be considered obsessive (thankfully other slot cars geeks will be more understanding of this type of behavior, deeming it a typical foible that comes with the hobby…). I wasn’t even all that keen on painting it in my equally obsessive CMF3 tri-color chevron. And the more imaginative and/or involved the pattern and colors, while initially appealing, never seemed to be holding my interest.
Finally it came down to this: it’s a Cuc. The shape of the body alone says it all, having become some sort of icon in the pantheon of slot car bodies. Keep it simple stupid. I finally opted for metallic orange, being partial salutation to all the orange Cuc’s before. Rather than the racing stripes often found on Cuc’s, I added a tapered white Vee stripe on the front as the only top-side identifier that it is part of the CMF3 stable. Some trim colors. Done.
The interior was another matter. Never being a big fan of the original rendition with the stuck-on driver and roll bar that had the habit of detaching themselves in the heat of battle (yes, I know this can be remedied…), I made some painted modifications to what would be the clear portion of the windscreen, cut out the rest, inserted a “F1” interior to keep the driver centered, while leaving out any roll bar and apologies.
Ponies would be yet another leftover P-Dog for the P-Bug.
All put together and RTR the CMF3 1409-01 Cuca-Palmetto-racha-bug weighs in at 86.5 grams.
The rest is all history and/or hysteria.
“La Cucaracha, La Cucaracha
Everybody should have one
La Cucaracha, La Cucaracha
Just cool-silly slot car fun
Cha-cha-cha”
Bug out.
Rick / CMF3
- Tex, Tim Neja, Eddie Fleming and 1 other like this
#59

Posted 10 December 2020 - 11:08 PM
By the power vested in me as a life- long Floridian I dub thee Palmettoracha! I absolutely love the paint. It reminds me of the TSRF I painted in my usual all yellow livery with a bit of metallic added. Without a doubt the coolest paint job I've ever done. Funny thing is try as I might I just can't reproduce it no matter how I try! ![]()
Sorry for the hijack... Now back to your regularly scheduled Rick Moore technical tour-de-force!
Jay Guard
IRRA Board of Directors (2022-Present),
Gator Region Retro Racing Director (2021-Present)
SERRA Co-Director (2009-2013)
IRRA BoD advisor (2007-2010)
Team Slick 7 member (1998-2001)
Way too serious Retro racer
#60

Posted 11 December 2020 - 01:25 AM
In Australia the doggone roaches take flight and go kamikaze! ![]()
I've built a lot of custom Cucs, and yours is the only one that truly scares me.
I love it, Rick ![]()
![]()
![]()
![]()
Paul Wolcott
#61

Posted 11 December 2020 - 09:04 AM
State bird you say?
Great work as usual.
#62

Posted 11 December 2020 - 09:45 AM
Howdy, Jay! Hijack away; I don’t care. Using past references stored in my cranial void, it’s sort of like I’d be sitting at home drinking vodka Collins and someone shows up with gin and tonic… By this point it is pretty obvious I like my metallic paints, and the Tamiya PS-61 Metallic Orange is a real eye-popper (too bad they haven’t made a metallic yellow…), but even with the metallics I pre-paint with the Tamiya PS-53 Lamé Flake to add more glitter to the sparkle; “party colors” it might be said, with enhancements optional…
Greetings Mr. Pablo! I’ve been happily watching all your Cuc builds; cool stuff; looked like a lot of fun, and they inspired me to join the party so to speak. And this Cuc was a lot of fun to build! Nice to know I was able to add some “fear factor” to my Cuc, wanting to inspire some Southern “skeered” when I pull this thing out of the slot car box, though it still isn’t anything as frightfully traumatic as when a Palmetto bug comes flying at you…
Hey, Eddie! Hope all’s well with you and yours “way-up north” there! Okay, maybe I was just mocking the actual Floridada state bird…
Rick / CMF3 ![]()
#63

Posted 11 December 2020 - 10:34 AM
I would like to point out that having married into a Midwest family I was dismayed to learn the state bird of Minnesota is the mosquito.
Rick it is good to see you here, it is nice to know you’re on this side of the lawn.
#64

Posted 19 December 2020 - 10:11 PM
1410; Astro-Nuts
I really love my Shinoda Dart II and Competition Asp thingie slot cars, as slot car chassis builds, as slot cars, and as eye candy. I’m always looking for some-thingie else to add to this pair. I found…
Let’s be honest, the Classic Astro V was one really weird looking thing, even for a thingie. Probably why I wanted to have one of those bodies. That and that habit of mine to want to build a chassis frame to fit as completely as possible under the body for which it is intended, and with intention being the Astro V that was going to be a challenge.
Compared to the wide-open spaces under the ’51 Chevy Pick Up, designing the chassis for the Astro V was going to be… well… a bit more restrictive…
Some things were decided at the onset. Big tall skinny wheels? No. Small, contemporary, and in the case of the rears a lot wider, using 0.810” wide rears if I could shoe-horn the suckers in there; my guess-timation was I might be able to get up to 0.750” diameter under the body, maybe; I could always change to 0.600” wide rears if I chickened out, but in the case of the Astro V body the 0.600’s just looked “chintzy” compared to the 0.810’s (not sure why the rear-end visuals were such, at least to me, but where the 0.810’s looked too wide/much on the Cuc, the Astro V just seemed to need wide 0.810’s). Making matters worse I decided the tires would not be visible from the side view, the painted body covering all wheels/tires, front and rear, visible only at the tiny gap between the body and the track. In-line? Nope, not a chance if I could help it; if I could fit it out, it HAD TO BE an anglewinder with 0.810’s inside that weird body, and that was that.
With those simple parameters, and the weird confines of the Astro V body, the drafting board was wide open for some narrow business.
First off I had to trim one of these Astro V bodies down to where I liked it… with the loopy sides on this thing this is a time consuming process (in case you’re considering building one yourself)… but without a body to use as a template I’d be whizzing in the dark…
With an under-body rear track of somewhere in the 2.860” to 2.890” range, an anglewinder with 0.810”w x 0.750”d rears would be tight, even using an old P-Dog for ponies, but theoretically it was possible. That set the rear axle location, and resulting motor box.
The guide pivot location was the next conundrum, trying to figure out how far forward I could place the guide and have it still be functional within the extremely narrow confines of the Astro V’s front end. Using as reference what I’d been able to get away with on the A224-01 Competition Asp build, I figured the guide pivot center could be at most 3.875” forward of the rear axle.
The front axle then became the next hurdle. Anything near centering it under the Astro V’s front wheel bodywork put the front axle over the guide pivot, making the guide nut inaccessible. At this point I started to consider various alternatives, using various axle configurations and front wheels (since they would not show I had a fair number of options), none of which were satisfying. Somewhere in this I started playing around with some DRS 149S 0.5”d O-ring fronts, looking at where I could place them, either behind or in front of the guide pivot… and got the idea I might be able to put them both behind AND in front of the guide pivot… making it a 6-wheeler… that would be cool... Again, tight quarters to work with, but it worked, placing the two 0.047” axles at 3.5625” and 4.1875” forward of the rear axle (or +/- 0.3125” from the guide pivot center). Cool!
Now that I had the major players in place it was time to draw up the frame to connect it all together. Rather than going with curving lines, to match the body’s bottom curves, I wanted to have straight angular chassis lines as visual juxtaposition, filling under the body as much as possible. After sketching in a bunch of lines I picked out the ones I wanted. The anglewinder rear drive assembly became another symmetric A401 / 1405 layout, add on a center main rail and buttress rails, with framing filling out the wheel side pods. No need for side pans on the Astro V. All I had to do was figure out how to run all the 0.032” wire bits to create the frame before making the final draft.
The 1410 Astro V was going to be one of those builds that at some point I just had to jump in head first, as all the notes and scribbles of Plan X vs Plan Y, maybe’s vs maybe-not’s, and a few I-have-no-idea’s couldn’t be addressed until the conceptual started to take physical form…
The CMF3 1410 Astro V:
Fits rather nicely. But barely. Rather barely. The clearances in the drive section are super-tight, with the spacing for the 0.810” w rears and sprocket at critical tolerances. The two front axles and two pair of front wheels didn’t have much wiggle room either; setting the twin sets of front axle uprights, including making a one-off dummy dual-axle set-up, was another “that’s going to be close” that turned into a “oh crap that’s way closer than I thought”. Rear track ended up at 2.885” and front track (inside the framing) is 2.705”.
During this entire process I kept asking myself what moron came up with this idea… I do this for fun, right?
Static pans are 0.010” brass sheet. The ridiculously small dynamic pans, between the center main rail and buttress rails, are 0.024” wire framed 0.010” brass sheet, and probably of little-to-no function, added for S&G’s because I thought they were pointless and silly looking.
Body mount pin tube location was another “maybe, let’s see...” matter. The narrow middle of the body had sufficient twist to match the chassis, so this was left unpinned, pinning the body at the wheel side pods. The body front is pinned between the front wheels (that just sounds weird); the body rear is pinned fore and aft of the rear tires (that is weird). The actual body mounting was interesting (translation: nerve wracking)
Another aesthetically questionable paint job out of the CMF3 paint shop. Taking a cue from the Cuc, I let the shape of the body do the talking, doing a simple metallic green with gold accent stripes (an “almost Vee”) and some minor silver trim colors. That’s why this is posted in the Scratchbuilding section, where the chassis will maybe get a “that’s weird”, as opposed to the Body Painting section, where the reaction would be more along the lines of “this guy sucks”.
All buttoned up the CMF3 1410 Astro V came out to 82.7 grams.
All the conundrums and eye-rolls aside, this chassis was a highly enjoyable build. (I know… get a life… fat chance…) Despite having a lot of subject-to-change elements itself, I was able to knock out the chassis framing in one day. After the chassis framing I was able to make “decisions” on things like static and dynamic pans, spine rails, uprights for the rear axle tube and front axles, body mounting, all that stuff, or at least had an idea what was and wasn’t possible… The superstructure was added more leisurely over the course of two days. Since I’d scheduled this weekend off from work at the hospital for some much needed R&R, I was able to finish it up on the fourth day, today. (And, if anyone is wondering, yes, I got the first shot of the vaccine on Tuesday; just a sore shoulder the next day, when I started the 1410 chassis build.)
One screwy looking slot car, that’s for sure. And quite the exercise in existential obsessiveness. But, enjoying the challenges it presented, I had way too much fun through the whole chassis design and build process for this Astro V thingie-thing… reminding me of the depths to which my life has sunk… could be worse, I guess… ask me if I care…
Later, slot car geeks.
Rick / CMF3
- Pablo, Tex, Tim Neja and 3 others like this
#65

Posted 19 December 2020 - 10:31 PM
Very beautiful in it's complexity ![]()
![]()
![]()
Rick you are certifiable. I love your foray into Thingies ![]()
Feels good to escape at times from the "retro rules police" occasionally, eh? ![]()
Paul Wolcott
#66

Posted 22 December 2020 - 04:10 PM
Thanks, Mr. Pablo. I’ve been “certifiable” pretty much from the get-go, and see no reason to change horses in mid-stream. And Joey says to say “Hi” to JoJo, and thinks they should both get puppy-hugs and snackies.
The “break” was for the most part necessitated by this past year’s continuing circumstances (folks need to remember what my current profession is…). The more competition oriented 1237-Series builds were not getting the amount of test time they require, and I had gone so far into those designs/builds that I just had to stop. That’s cool, since it is never a bad thing to just sit back and think things through from time to time. Rather enjoying it to be honest.
Another factor was looking at all these freaking bodies I just seem to keep buying, which brought about the introspective question, “Are you ever going to do anything with all these?”, and the occasional feeling my wife is still looking over my shoulder… Admittedly, they were way overdue.
Then on one of my rare excursions this year to Fast Eddie’s Raceway, Ed and I were talking and laughing about some of our “less serious” slot cars, and how some people just don’t get the why. “Hey, you’ve got to have fun”, was Eddie’s comment, and I heard him loud and clear.
Speaking of fun, I might as well take this time to make an update report about the JFF builds from this year that have gotten some laps on those rare excursions:
The A401-01 / Lotus 56B is wicked fast and scary to drive. That says it all.
The 1405-01 / Chaparral 2D is a blast! For a mish-mash chassis, it handles great, and I think the 0.600” wide rears add “fun factor” to the drive. Just too cool.
The 1406-01 / Porsche 917K is a rocket, and handles like a dream. Fastest JFF car, and I haven’t found the limit yet.
The 1407-01 / Iso Grifo A3C is a well-planted cruiser, and does it beautifully as well. A smile inducer.
The 1408 / ’51 Chevy Pick-Up is a handling jaw-dropper; I would have never thought it’d be that good, and it’s fast too (almost as fast as the 1406 / 917 !?!?). If you don’t believe me, ask Eddie.
So, yes, I really can’t wait to get over to Fast Eddie’s for some fun-runs on the new 1409-01 / La Cucaracha and the 1410 / Astro V… Meanwhile, I have this other thingie body here that…
Let’s face it, nothing says “fun” in slot car terms more than thingies. Okay, I haven’t tried building a rubber duck yet… ![]()
Rick / CMF3
- Tex likes this
#67

Posted 21 January 2021 - 02:05 PM
1411-01 Bat Ray
The thingie foray continues. I wanted one of those real shwoopy-looking body thing-a-ma-thingies in my gaggle of silly-goose JFF slot cars, and opted for the, nana-nana-nananana-na, Bat Ray.
Compared to the Cuc and the Astro V, the Bat Ray was going to be wide open spaces to work with; none of that “how close is it going to be” or “will it even fit” craziness… No doubt I’d be able to make the build weird enough to screw that up…
Early on in the what-chassis-to-build process I decided to make the Bat Ray another 6-wheeler (and, yes, there was a moment when I considered making it an 8-wheeler…), using a similar dual front axle layout as on the 1410 Astro V build (not surprising since this design came immediately after that one), but this time there was no problem trying to fit them around the guide post since the front axles are well behind. On the Bat Ray for fronts I wanted to use the ProTrack PTC-166 front wheels, like I had used on the Cuc; the PTC-166’s come with various colored hubs, so for Bat-stealth I went with black. Unlike the Astro V, the dualie-fronts on the Bat Ray would be on front axle rails this time. The rear wheels would be visible on the Bat Ray side view, the body’s rear wheel wells cut out, but how much of the body would be cut out showing the dualie-fronts, all, none, or a portion, would be addressed after chassis completion when I could get a good look-see. Other than that, the only thing I knew was it would be an anglewinder.
Not surprisingly, another mish-mash adaptation of various designs resulted. To some extent it is a 1259, with a mathematically derived point of intersection between the angled forward rails of the rear motor/drive assembly and the single center main rail. The forward section of the motor/drive assembly also starts out like a 1259 and transitions into a 1406 at the rear. Also like on the 1406 / 917K, the sides of the Bat Ray curve so the side pan lateral sides would be built to fit, as well as conforming the front wings to fit the body; with this in mind I made the side pans a little wider than usual, and made the medial line parallel with the main rail / center line. As on the 1273, the buttress rails are located at the max-lateral position just adjacent and medial of the side pans; and the FAR’s are attached to and just medial of the buttress rails, hopefully making the FAR’s as long as possible to have room for the two sets of front axle uprights for the dual 1/16” front axles.
And that was that. Nothing to it, right?
The CMF3 1411-01 Bat Ray:
Shwoopy.
Unlike the Astro V that I knocked out in four days, I’ve been leisurely building the Bat Ray over the ensuing weeks; sort of the difference between a “go-and-git” versus taking something to read while you’re in there…
The framing wire is 0.032”. Pretty much impossible to discern, I changed some of the wire layout on the 1411; I thought it might be a bit better structurally, but more complicated to construct, the latter being more of the factor as I just wanted to see if I could do it for future reference. As has been the case on most of these JFF builds of late, I used 0.039” wire for the rear and front axle uprights (all being superstructure), and the spine wires. Been experimenting with the spine wires on these JFF’s; “spine wires” (or just “spines” as I call them) are simply wires placed atop the chassis framing to add stiffness where desired; they can be soldered across their entire length or partially; I’m happy to say it’s been an educational process.
Bat-numbers: RAx-GPC is 4.625”; WB’s are 3.25” and 4.00”; GL is confusing. Max chassis width is 3.00”. Track rear and front are 3.00” and 2.76” respectively. Clearance rear to front is 0.040” to 0.015”. RTR the Bat Ray came out to 96.2 grams.
As you can see, once I got a look at this thing with the body sitting on it I decided to cut away the front wheel wells to show off the dualie fronts. Keeping the fronts under the body would have necessitated an even narrower track.
For more Bat-stealth aesthetics I used 0.790”d x 0.800”w ProTrack Daytona Stockers with the black hubs (PTC-N254BL) to match the ProTrack PTC-166 black hub fronts. Cool Bat-beans
The CMF3 paint shop kept it simple, again letting the shape of the body doing most of the talking; went with a lamé / gun metal for that flashy-stealth machine look, adding two discrete black tapered V-stripes for the semi- CMF3 livery look, and some minor trim colors for the headlamp covers, filler cap, vent grills, taillights, and license plate. Sweet.
Let’s be real, the Bat Ray is one of those bodies that is just good-looking from any and every angle; looks good sitting, looks good moving... uh… hold on… I just realized that’s how I used to talk about… uh… (sigh)… never mind… getting old sucks…
Dream on, slot car kidz.
Rick / CMF3
- Jencar17, Tex, Lou E and 2 others like this
#68

Posted 01 February 2021 - 11:40 PM
I do not look hear very often, but when I do I am always blown away.
You are a true artist/engineer. Love what you are doing ![]() Keep em coming, very cool
Keep em coming, very cool ![]()
#69

Posted 29 September 2021 - 08:02 PM
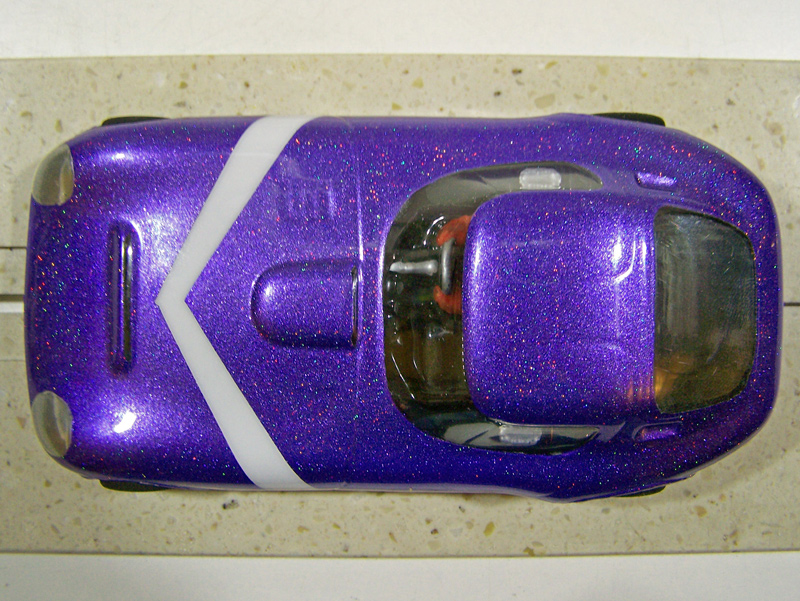
1412 / Cheetah; the 5-Pound Bag
To put it bluntly, I needed a less “serious” distraction for some mental rehab, and despite having a few 1237-Series designs lined up for builds, my assessment was a meaningless CMF3 Just-For-Fun build was more appropriate with consideration of external circumstances…
What better way to follow the JFF thingie foray than by building a chassis for a Cheetah, the real car that almost looked like a thingie, and another icon of slot car bodies…
I never had a Cheetah in any incarnation back in “the day”. But a lot of other kids did, as there sure seemed to be a lot of them running around the tracks at the raceways. Cute little suckers. Not to feel left out, though admittedly a little late, some time back I decided to get myself a polycarb repop Cheetah body and see what I could come up with to put under it…
As a slot car body the Cheetah would qualify as both a shrunken 1/24th and oversized 1/32nd scale body. Weird. In any case, I knew I wanted to lower and rake the body as much as possible, which as it would turn out wasn’t all that much, but it gave the Cheetah an even more evil-looking profile. As on the Cuc, the rears would be 0.750”d x 0.600”w JK T202/8732 1/32 Euro tires, and the fronts ProTrack PTC-166’s. Dimensionally I decided to go with a RAx-GPC of 3.50” and the WB at 3.5625”, making the GL a negative 0.0625”… Urf. Sure, I could’ve tweaked those numbers a bit, but I didn’t want to… The chassis width would be 2.75”. A narrow chassis and body, but with 0.600”w rears at least an anglewinder drive would be possible…
And that’s when the gears, pulleys, and belts under the cranial hood came to an abrupt halt. I had no idea what chassis I wanted to build for this. At the time I still had the Iso Grifo, Chevy ’51 PU, Cucaracha, Astro V, and Bat Ray lined up ahead of the Cheetah, so it wasn’t like there was much of a hurry to figure it out… But even after they were done I wasn’t all that much further along in the design process…
While I was pondering designs for the 1412 / Cheetah I had a half-humorous thought: For all those slot car geeks who desire a return to “racing like it was” before the speed-crazed morons drove most of the more casual racers out of the ranks, I’m thinking a rule set using the Cheetah as a spec body would be a worthy consideration. With absolutely no “aero” the Cheetah body would certainly bring back a lot of the desired “driver” aspect. As for what you can put under it, with all the other limiting factors the Cheetah presents, chassis/motor/set-up combinations could prove rather varied and probably rather interesting… at least until some speed-crazed moron invents a better mouse-trap… or Cheetah-trap… Besides, just seeing a pack of Cheetahs zooming around the track would be a blast-from-the-past and definitely good for some laughs… Silly idea…
Eventually the designing focal point became the guide mount and the front axle above it. A couple ideas came… and went…
The eventual design for the 1412 Cheetah became a modified 1237-based anglewinder layout. No apologies for the repetitiveness on my part, I figured the dimensional confines and the front axle set-up were going to have enough of my attention I didn’t need to add any more confusion than necessary. The buttress rails on the Cheetah’s frame would be parallel to the center main rail and sufficiently lateral (though not max’ed) to have long-enough front axle rails medial to the buttress rails where the front axle uprights, two per side, could project forward to the “solid” front axle that would subsequently be cut out between the uprights after installation, while adding some cross-bracing between the upper portion of the rear front axle upright just far enough back to allow access to the guide nut. Rear axle tube uprights would be superstructure atop the framing wires as well. No room for front wings under the snub-nosed Cheetah body, but the front spanner assembly was extended forward of the front wheels as far as the body would allow and reinforced with spine wires in an attempt to give some modicum of protection to those front wheels sticking out like sore thumbs way up front on this thing. With any luck this design might make the oddly proportioned Cheetah handle a little better… maybe… who knows… With low expectations in the practicality department, I’ll be looking for anything in the range of “handful-but-fun” as an acceptable outcome.
One way to find out… Just took me a while to get ‘round-2-it…
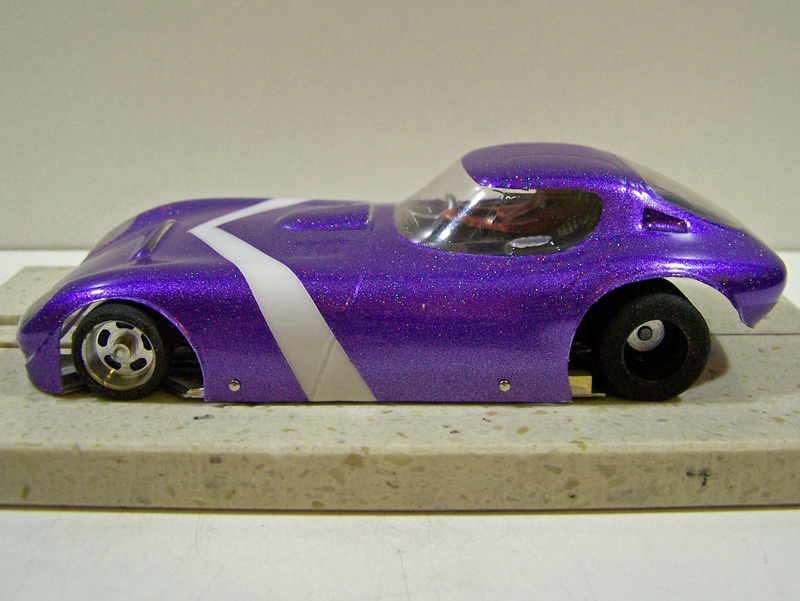
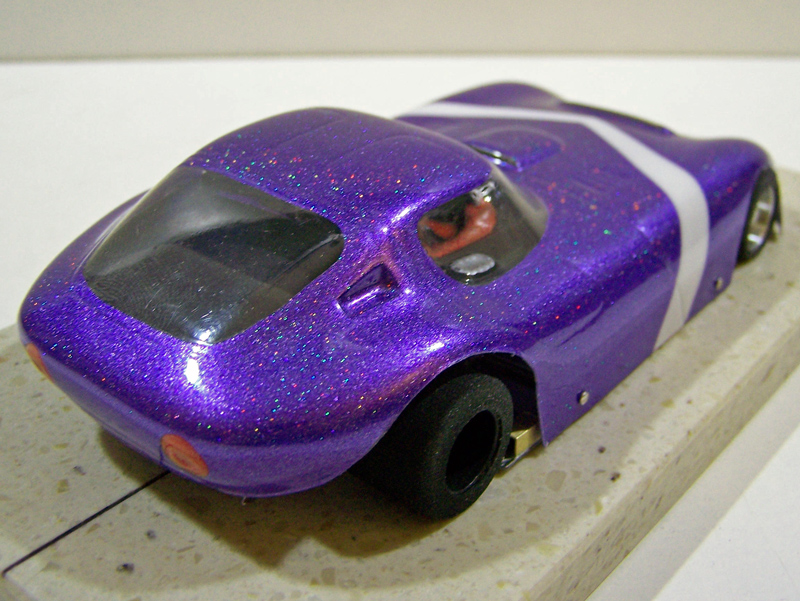
The 1412 Cheetah:
The 1412 / Cheetah is the proverbial “10 pounds of crap in a 5-pound bag”. In actuality it weighs in at an RTR mass of 79.9 grams.
The wheel track width for both the fronts and the rears is just a little more than the chassis width, which visually puts the tires wider than the confines of the body’s upper curve of the wheel wells. This is not an uncommon practice for Cheetah slot cars, and some of the actual 1:1 Cheetahs, and for my purposes added to the “5-pound bag” look that just seemed appropriate for this car.
Ponies on the 1412 / Cheetah are yet another from the seemingly endless supply of PS P-Dogs. (And now it would appear I also have an endless supply of JK HR motors available for the JFF builds…)
The CMF3 paint shop once again simply chickened out on this one, going for a single solid color with another semi-CMF3 tapered Vee stripe in white. The Cheetah is another one of those iconic slot car bodies that just speaks for itself, so why screw it up. The question was what color. Cheetahs come in a lot of colors. After viewing images of real car and slot car Cheetahs I noticed the one missing color was purple. Purple seemed a bit outrageous, which in the case of the Cheetah is perfect. And it came out p-u-r-p-l-e purple, the pics barely doing it justice. I left some of the excess “pop” around the front wheel well cut-outs as pseudo-aero; that, and the CMF3 chicken-in-charge just wanted everything possible out there, even this little bit extra lexan, in front of those just-waiting-to-get-screwed-up front wheels. Interior is a mish-mash of nothing special, along with the decision to forego the spare tire below the rear window, there being enough poop in this bag already…
Looks like a disaster waiting to happen if you ask me. A purple disaster. I’m trying to remember why I even wanted a Cheetah… oh, yeah, peer pressure… What a moron…
Despite my lackluster purple efforts, the 1412 / Cheetah is still pretty cool looking, if nothing else. I like it, despite all my misgivings including fully expecting it to handle like the aforementioned “5-pound bag”.
One way to find out… but not yet... in the meantime…
JFF Thingie Update:
The 1409-01 La Cuca-Palmetto-racha-bug handles way better than any La Cuc I recall, is scary-stupid fast, and looks pretty-dang-good doing it. Appropriately epitomizes cool-silly. Great for laughs. I play with this one a lot.
The 1410 Astro V handles like an Astro V. Okay, maybe a good deal better than the original incarnation, but that is not saying much. I’m surprised it stays in the slot, but it does rather well, which I take as a minor accomplishment. Utterly ridiculous looking thing going around the track. Perfect.
The 1411-01 Bat Ray has its own peculiar personality, no doubt the dualie-fronts being contributing factors, but it’s a fine cruiser. And going around the track it looks absolutely stellar, that is, if and when you can see it. Against the dark track surface it is just a dark blur of light reflections. Definitely has the desired “stealth-mode”. Way cool. Love it.
Anyway…
As for the 1412 Cheetah, I think I need to take a trip over to Fast Eddie’s Raceway to spend an evening just playing with the JFF cars. I definitely need more play time… a lot more play time… maybe next week… Just have to make time for it regardless, as I try to get by doing the minimal amount of the getting-pretty-deep real-life crap, the size of the bag always too small…
So much crap, so little time. Don’t forget to wash your hands. Have fun!
Rick / CMF3
- Pablo, Tex, Eddie Fleming and 1 other like this
#70

Posted 29 September 2021 - 10:00 PM
I too like the Cheetah slot car body, even if it was a horrible real race car. The purple really makes it stand out. Was that body from Dom's Raceway in NJ? I see on eBay, he's re-popping a few vintage bodies, including a Cheetah. I need to order a couple from him.
I intend to live forever! So far, so good.
#71

Posted 30 September 2021 - 08:04 AM
Very cool little cat Rick.
I have had some thoughts about your chassis layouts for some time. Most of your later chassis have almost no parallel rails and most of the rails are constructed with different lengths of wire I have been thinking that all this probably cuts down on harmonic vibrations in the chassis. I don't recall you saying anything about Harmonics, and am wondering what your thoughts on the subject are?
#72

Posted 30 September 2021 - 10:00 AM
Hey, Bill. Yes, I got the Cheetah body, as well as the three previous CMF3 JFF build bodies, the La Cucaracha, Astro V, and Bat Ray, from Dom (FYI, ebay aka sizzlerdom). It was the Astro V body that I came across by accident one day, I just had to have it, and then saw all the other cool bodies he had, and… have I mentioned I am a slot car body junkie… anyway… I added the Cheetah to the order almost as an afterthought, and now I’m really glad I did. Definitely gave a much needed attitude adjustment for me, screwy chassis, silly purple, and all.
Howdy, Eddie. Harmonics, as well as loading, become major considerations with all-wire chassis frames, and more so as the wire diameter gets smaller. The various and generally shorter lengths of multiple wire rails at various angles significantly decreased these effects, as well as adding structural strength with a minimum of mass. The harmonics, loading, and strength issues for 0.032” wire framed chassis were the contributing factors to the 1237-Series designs; the coma-inducing CMF3 1237-Series Design Concept thread blathers about that stuff, waders optional…
Rick / CMF3
- MSwiss, Bill from NH, Dominator and 2 others like this
#73

Posted 29 March 2022 - 10:44 PM
1414-01; Shiny Happy Brassy Chassis
Let’s be honest. Everybody loves looking at those old-style brass rod framed chassis. They’re so pretty with all that shiny brass rod and plate. Stirs up a sense of nostalgia.
Nostalgia is subjective, however. I still cringe thinking way-back-when about the brass rod chassis that some of the local slot car geeks, myself included, tried to race at our home raceway, the track being a monster 240’ Mila Miglia Glas-track. Stupid fast, the odds of avoiding a high-speed crash during a race were pretty much slim to none. Bent the living crap out of those brass wire brain-farts, subsequently scavenged for parts to build another chassis before the next race. Two of the local racers stuck to building steel wire chassis, and in fairly short order we all went back to steel (some steel and brass hybrids, but even those were mostly steel).
But those brass chassis sure were pretty, right? Well, at least they were before they got all fubar bent up. And, if nostalgia is subjective, then pretty is a relative term. At our raceway we just slapped them together as fast as we could between the twice-weekly races. I don’t recall anyone having a tumbler, some may have considering their other interests, but I’m positive no one used a tumbler, or for that matter wasted any time trying to make the chassis pretty and shiny, especially considering their rather short life expectancy.
But five-and-a-half decades later, if one is so inclined, one can take one’s time building one of these brass beauties, and take the time to make it all jewelry shiny, with no concern about it getting mangled in a race in the next couple of days. For me it was the “so inclined” part I was having trouble getting over…
For S&G’s I would occasionally ponder the hypothetical: If I were to build an all brass rod framed chassis these days, what would it be…? Certainly not that crap I built way back then… and not a copy of something someone else had built… You know, just not my cup-o-tea…
One day, while vacillating between considering doing what I was supposed to be doing and considering doing more considering so that I would wind up not doing anything I was supposed to be doing, the latter easily winning out with no regrets for my part, the idea of trying to build an all brass rod framed version of one of my current all steel wire designs popped into the squishy stuff between my ears… maybe an all brass wire version of one of the 1237-Series designs… maybe even one of the chassis designs with diverging main rails and the iso-guide mount… I was pleased at the time this pointless pondering successfully wasted more time, even though despite the time consumed the results were at best marginally conclusive: such a chassis probably wouldn’t be possible, was probably a bad idea, and it would be utterly ridiculous anyway…
The “possible” part sounded like a dare, the “bad idea” part has never been a deterrent, and the “utterly ridiculous” part is usually all the motivation I need…
After an additional time-wasting mental exercise considering what would be required to modify the chassis main frame build from 0.032” steel wire to brass rod, I came to the realization I might actually try to do this. (These thought processes are why most people are amazed I’m still alive…)
First things first, what body to use… The bodies I recall racing back in those dark ancient slot car days of my “brass-chassis period” had been the Lotus 40, Lola T-70 roadster, and the McLaren M1B (“Mk2”), so some re-pops of these seemed like the way to go. This allowed me to spend a disproportionate amount of time looking through the accumulation of bodies I already have, followed by even more time scanning the interwebs for more bodies. Hey, when it comes to putting off what I should be doing I am highly experienced. Anyway, I eventually came across the NeAn Lola T-70 Mk II body on the webs, mulled it over for a significant amount of time, and finally decided that this Lola T70 should be the body for this brassy-car. Then, not-so promptly, ordered it while also buying another slew of other NeAn bodies along with it, because I need more bodies that I have no idea what I am ever going to do with… but, hey c’mon, they’re kinda cool looking…
By now it should be apparent I obviously have no idea what I’m doing while I’m not doing what I should be doing… it gets worse…
As it so happens I don’t have very much brass rod around here at CMF3 Headquarters. Massive quantities of steel wire, but not brass rod. Imagine that, huh? This allowed more time-killing to order up 0.020”, 1/32”/0.032”, 1mm/0.039”, 1.5mm/0.059”, and 1/16”/0.062” brass rod.
This was already becoming a long build and I hadn’t even decided on the chassis design much less started building. But I was having fun, or at least having more fun than if I was doing what I was supposed to be doing.
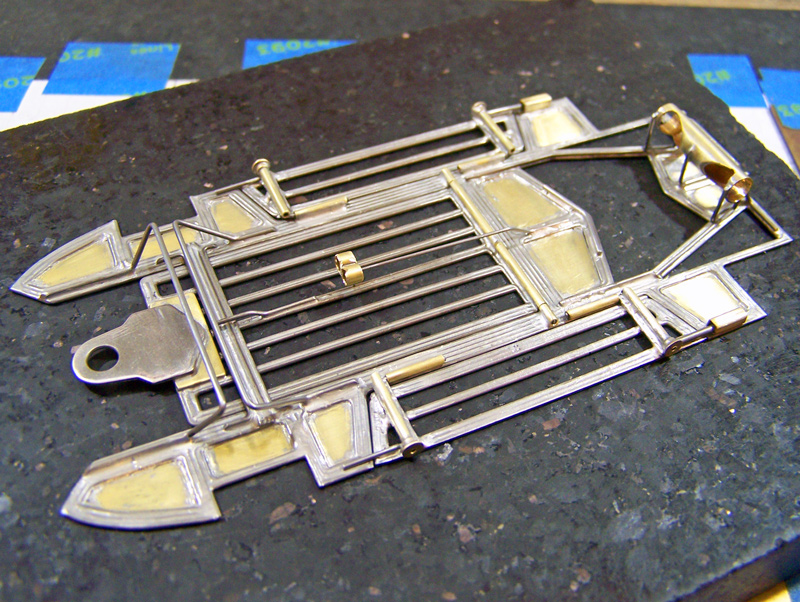
The chassis design for this utterly ridiculous attempt, after much more hemming and hawing, wound up being a modified version of the 1258.2-Cb3. The NeAn Lola body has a 3.75” wheelbase, like a “b” dimensioned chassis, but instead of the “b” with a 1.00” guide lead and 4.75” RAx-GPC, the Lola only allowed for a 0.875” GL / 4.625” RAx-GPC, or 0.125” shorter than a “b”. This would move the front of the chassis at the front wings back that same 0.125”, while the curve of the front of the Lola body would need a minor revision to the front wing sides to better fit. The shorter RAx-GPC also moved the point of convergence (POC) of the rear motor / drive assembly and the diverging main rails 0.0625 closer to the rear axle, keeping the “1258” POC at the centerline midpoint between the rear axle and guide pivot centers. The relocation of the POC also slightly altered the angles for the diverging main rails, and the rear motor / drive assembly’s lateral and medial forward aspect rails. More time spent on the drafting board…
Then there were the structural considerations for the chassis build. You can’t build an all brass wire chassis frame out of 0.032” wire brass, can you? Anything using that small of a diameter would just wind up being a bent pretzel… It would probably have to be larger diameter wire, 0.062”, or at least 0.059”, or maybe, just maybe 0.039”. Once all the brass wire arrived I began playing with it… multiple 0.032” brass wire rails just might work… Pretzel logic being as it is, there was one way to find out…
While the main framing would be entirely brass, a few superstructural items on the chassis would remain steel: the front axle rail (FAR) 0.024” spring wires in particular, along with the FAR torsion bar 0.047” center wire, the 0.032” dynamic pan hangers, the 0.055” buttress rail articulation wires, and the 0.024” support wire for my lead wire tubes. I also learned way-back-when brass wire sissy bars aren’t such a good idea and kept it 0.024” steel wire. And while I probably could’ve come up with a brass guide tongue for this build, I stuck with steel.
In the warped world of CMF3 chassis design ID numbers this all brass rod frame couldn’t be called a 1258, or a 12XX-anything, since the 12XX’s are specifically all steel wire frames. So it gets filed under the 14XX ID numbers where all things even weirder than usual go to reside, especially considering there will never (or should ever) be a CMF3 all-brass wire frame “series” of chassis designs. And thus this extended waste of time became the 1414-01, the -01 seemingly pointless as if I’m going to build another one of these, but just in case…
So, I’ve got the design, the brass, the body, and the idiotic motivation.
The 1237-Series cars are in an extended test mode before any new designs or builds will happen over there, so there was no hurry to build this pointless brassy-chassis, getting relegated to filling in the space-time between the annual agenda of other non-slot car FL distractions at this time of year. Nothing like having fun in between having fun. Eventually, in terms of a time frame, was just right for this build…
Lots of brass, with no class, you bet your…
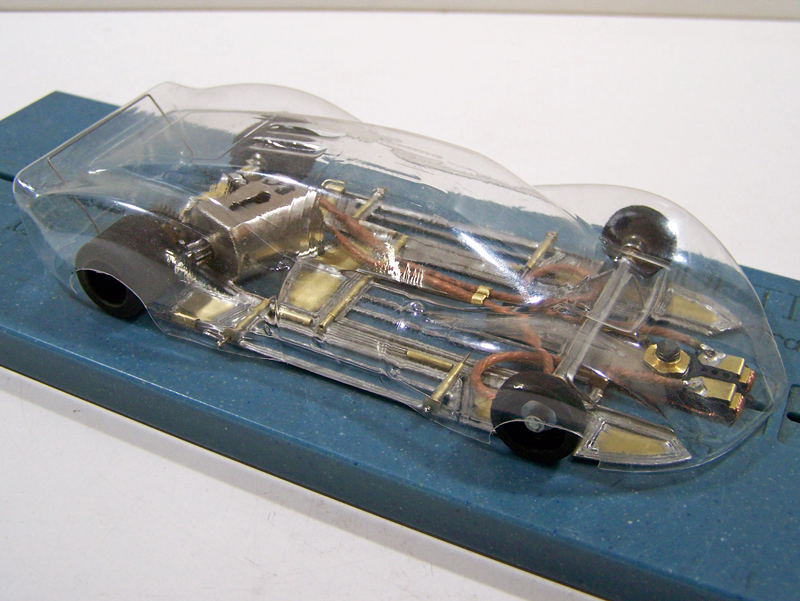
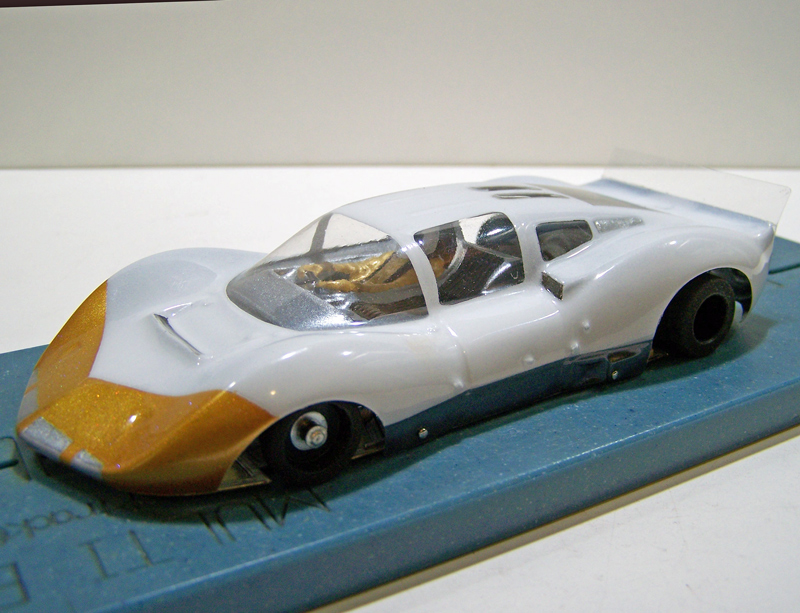
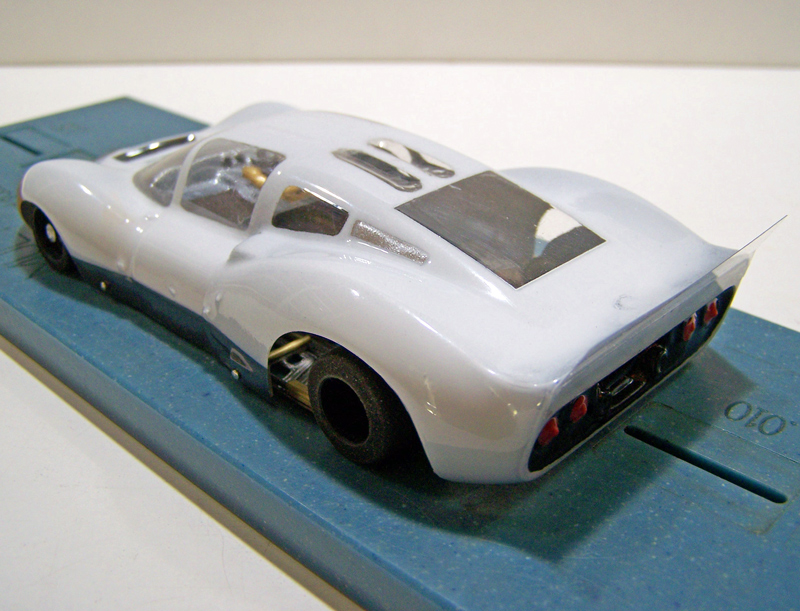
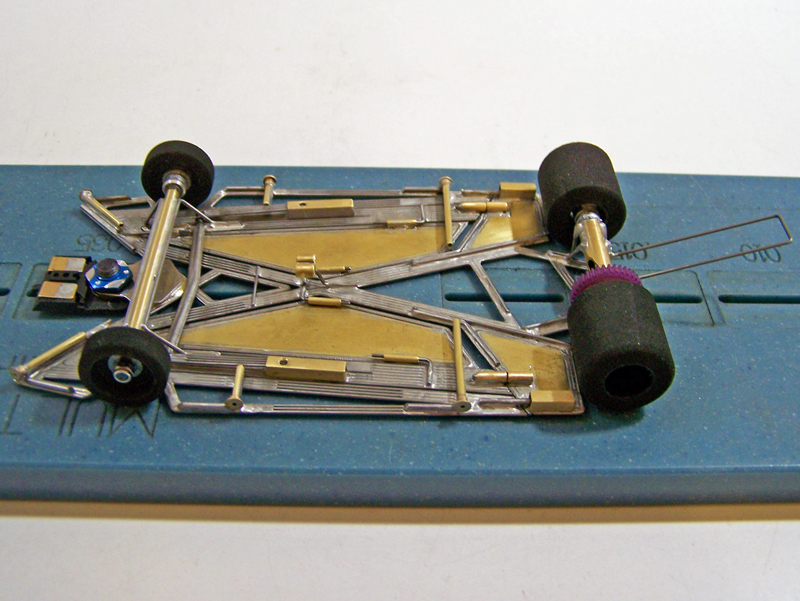
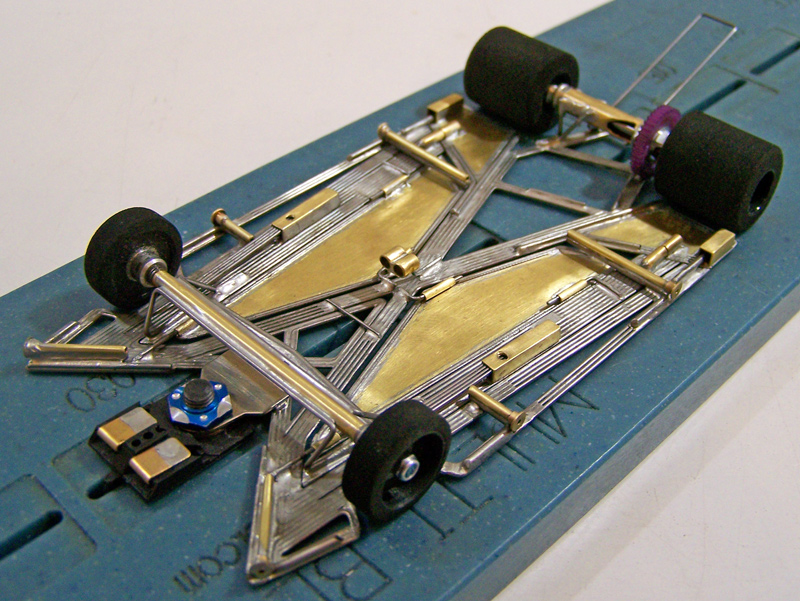
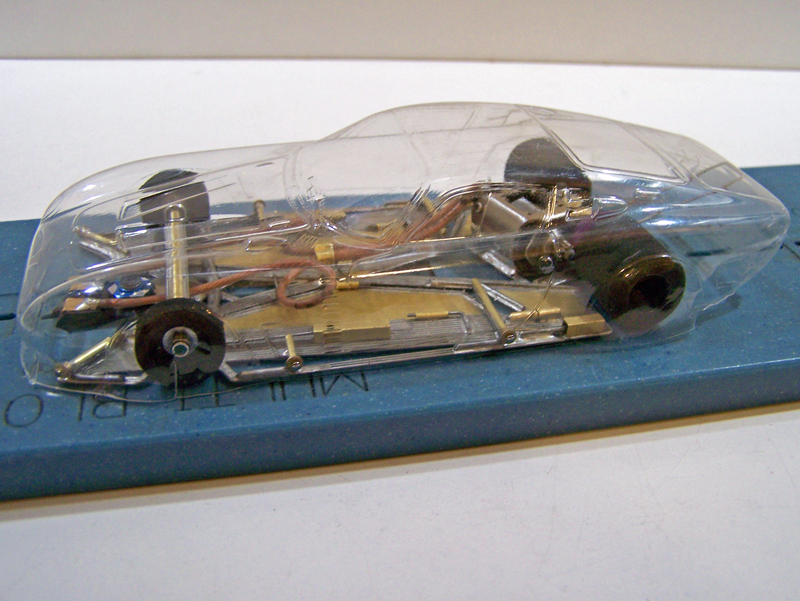
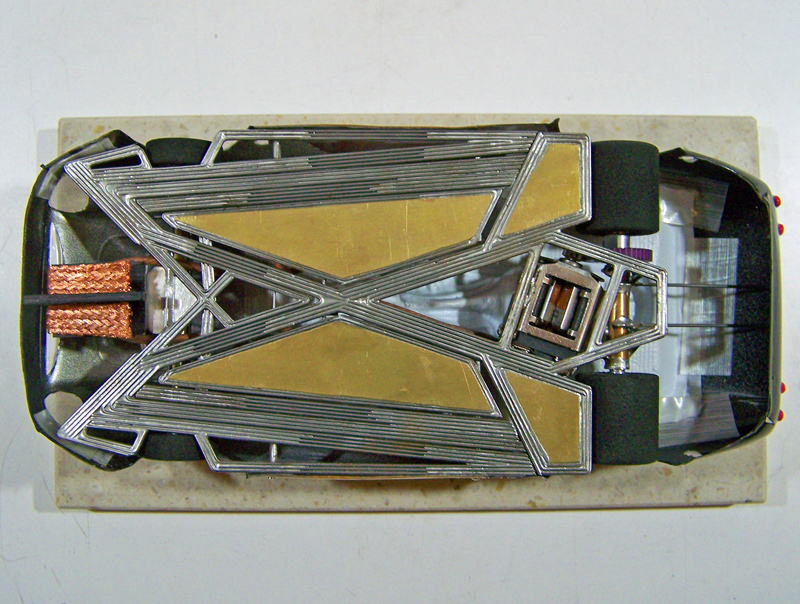
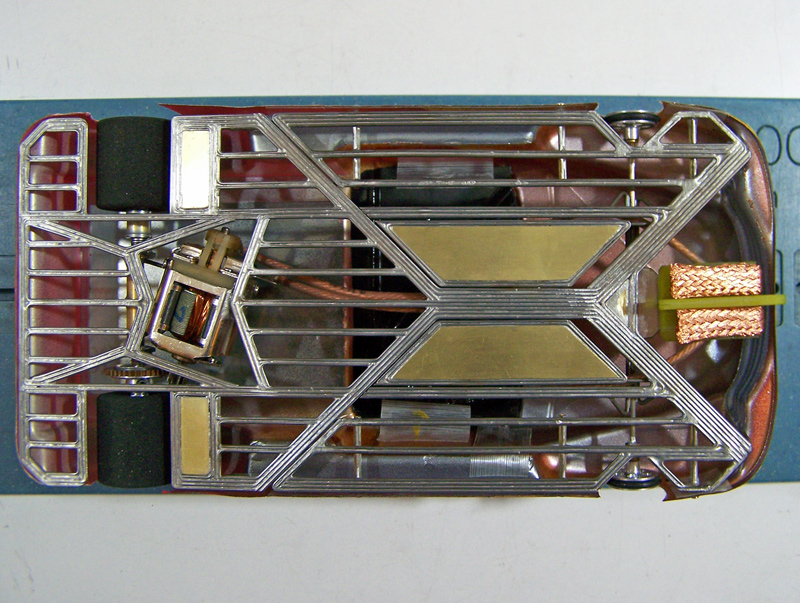
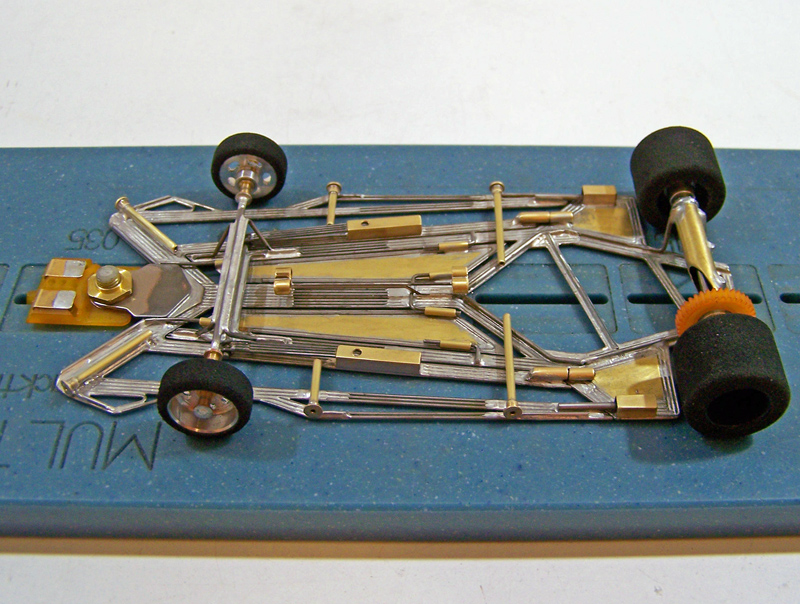
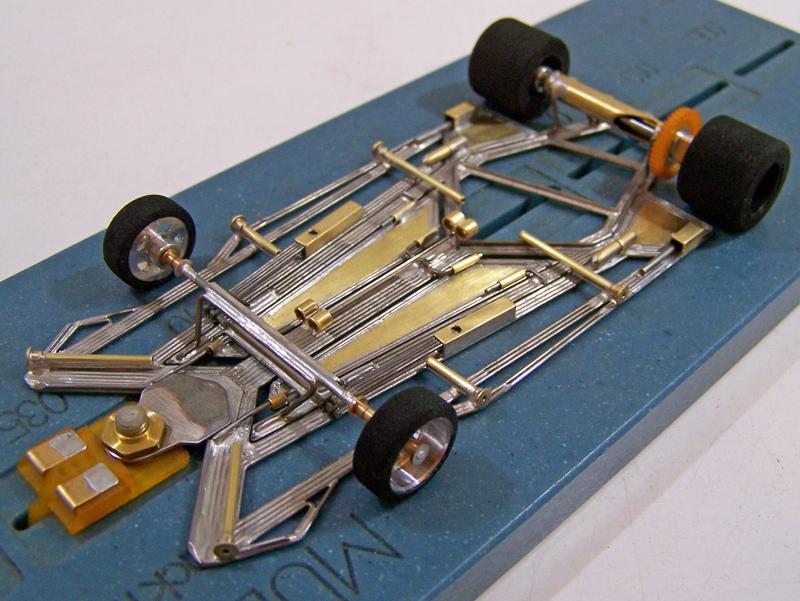
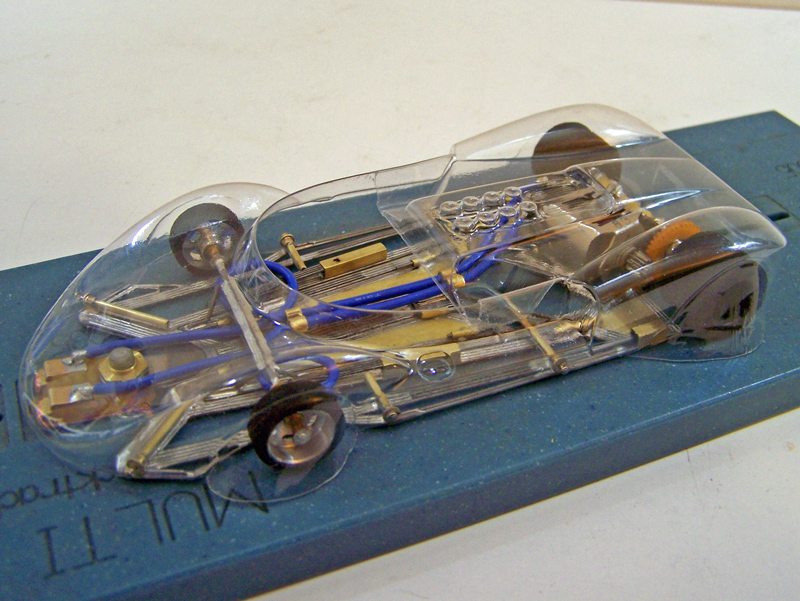
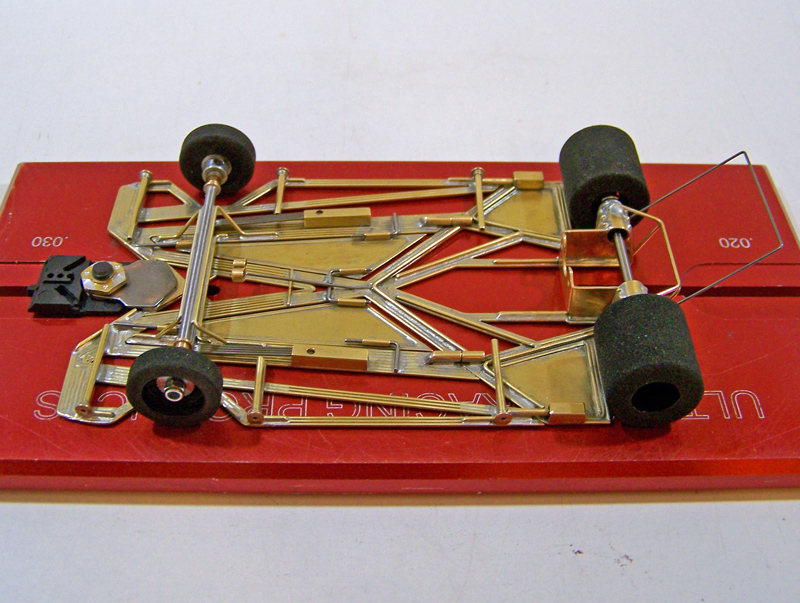
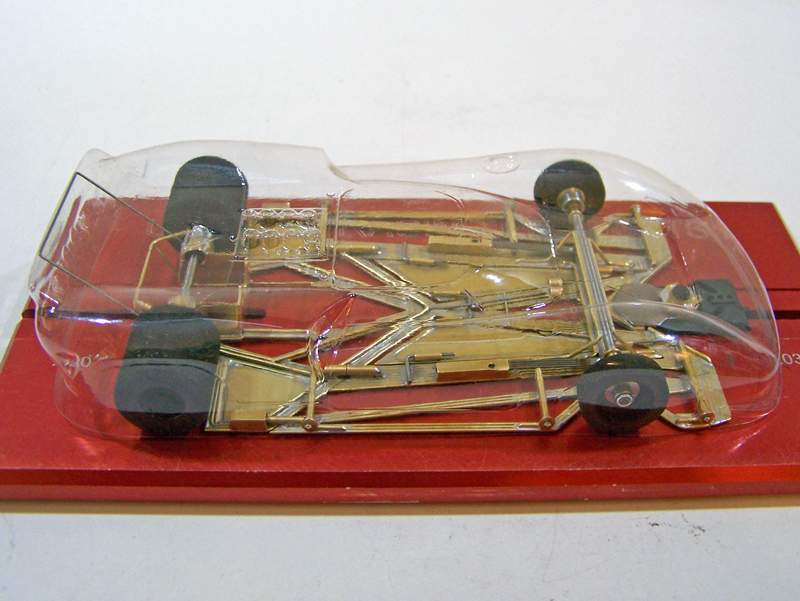
The 1414-01:
That is just completely ridiculous looking. Admittedly from my perspective the 1237-Series designs look pretty “normal” at this point, but seeing one built out in brass is downright bizarre.
The more than half-century since I’d built a brass wire framed chassis definitely reared its ugly little head and reminded me why. Royal pain in the X, where X = brass - br. After all the years of steel the brass felt like bending a wet noodle. Finicky too, especially in the smaller diameters. Made some practice bends in a piece of the 0.032” brass wire before starting the build, finding out it is easy to get an errant bend in the stuff, so I had to keep my needle-nose and fingers on their toes.
I don’t know if any others out there have built a 1/24th scale chassis frame using 0.032” diameter brass wire… few if any would be my guess.
Unlike on a steel wire chassis I did not do a solder flooding of the brass wire rails after the main framing was completed. I was satisfied with the overall amount of solder the framing rails showed between the wires. Remember, this is in no way intended for racing, so rail strength was never a concern and could be minimal. The general aesthetic of the main frame, top and bottom, came out better than I thought it would, or at least not as bad as I thought it would. Took a little more time than I’d usually spend cleaning it up, that’s for sure. Then again, time-killing was the name of the game with this build, and it drew a royal flush (the applicability of that last word to toilets not to be overlooked). After the main framing it was just a matter of not screwing it up adding all the superstructure.
The dynamic pans are still 0.010” brass sheet, but instead of being framed with 0.024” steel wire are framed with 0.020” brass wire. Sure, I could have just cut some 0.025” brass plate dynamic pans for this brassy-chassis, but I still like the look of the wire-framed pans (and they weigh less than the cut plate while still allowing me to add mass as desired).
Despite the constant “I must be out of my … mind” refrain, and the persistent thought that at any and every point the entire build would go terribly wrong, I really enjoyed this build. Not sure if that means I’ve developed really good coping skills or have completely given up on the reality of things…
Shiny-happy brassy stats: RAx-GPC 4.625”, WB 3.75”, GL 0.875”. Chassis max width 3.125. Tires are worn down retro rears 0.775” d and retro CanAm/GTC fronts 0.740” d. Clearances are 0.030” rear and 0.015” front. RTR car came out to 95.9 grams. For ponies I opted for one of the plethora of used JK Hawk Retro’s infesting a cabinet shelf, alongside the bunch of remaining P-Dogs, destined for more JFF builds.
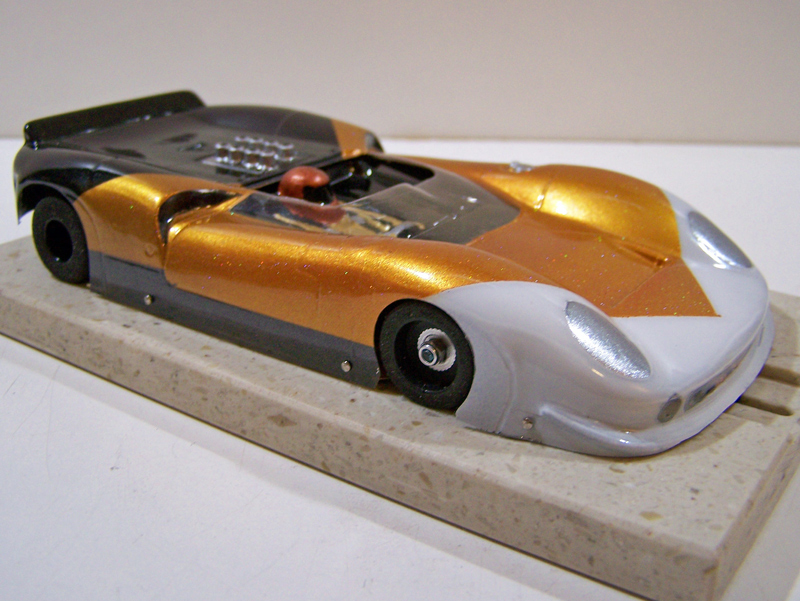
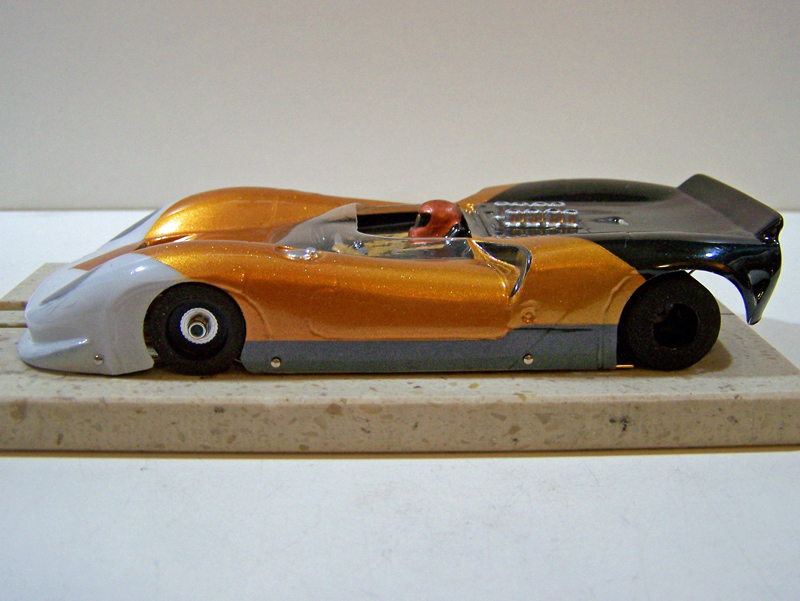
The CMF3 paint shop had plenty of time to consider the color scheme for this one before and during the build, though looking at it you wouldn’t think any thought went into it at all. For my part historical brass chassis period correctness would have been painted with white sides/fenders and the center being either blue, red, or green. I considered the ensuing history of my “team” paint schemes as well: with the return to steel wire frames the car would have been a red right side/fender, white center, blue left side/fender paint job; after that with the advent of the anglewinders came the first two-color “Vee” painted cars… then the long hiatus… and return in ’95 with the present all-too-familiar “double-Vee” Team CMF3 white front / “color” center / black rear chevron. The original CMF3 chevrons were all white / gold / black, and the more I looked at the Lola body the more I thought that was what it should be… once the chassis got done it was overly apparent this is in no way a “period-correct” brass frame car, the thinking being the body paint should be more appropriate to the vintage… How boring and predictable… No apologies… Besides, I have an extra Lola body just in case I want to change it up later…
I thought about adding a taller / wider spoiler extension atop the Lola’s molded in rear spoiler for more of that slot car look, but once I got it painted up it just didn’t look like it needed it to me.
Not surprisingly, since this was an overly long process, from conception to final slot car, the 1414-01 would be presented with an equally overly long post, misery loves company and all that folderol. Admit it, you didn’t read all that crap anyway...
It’s kind of funny, the things we think are just not possible... at least until you say “Why not?’, and go for it...
Rick / CMF3
- Tim Neja, Eddie Fleming, John Luongo and 1 other like this
#74

Posted 30 March 2022 - 04:06 AM
amazing work! well done!
#75

Posted 30 March 2022 - 06:48 AM
Unique chassis, to be sure, Rick. If it get's bent, I wouldn't want to have to straighten it out. Now it needs an F1 mate in all brass. ![]()
I intend to live forever! So far, so good.


