

MMmmm.... BIG wire!

Tony P's steel cars
Started by
dc-65x
, Jul 06 2008 05:45 PM
124 replies to this topic
#76

Tex
-

- Full Member
-

- 9,244 posts Joined: 07-July 06
Grand Champion Poster
- Gender:Male
- Location:Denton, TX
Posted 18 May 2010 - 10:38 PM
Richard L. Hofer
Remember, two wrongs don't make a right... but three lefts do! Only you're a block over and a block behind.
Remember, two wrongs don't make a right... but three lefts do! Only you're a block over and a block behind.
#77
Phil Irvin
-

- Full Member
-
- 1,764 posts Joined: 21-July 08
Checkered Flag in Hand
- Gender:Male
- Location:Wesley Chapel, FL
Posted 18 May 2010 - 11:23 PM

A very nice, tasty little treat. I once tried to thin the cans by placing them in a vice and playing shoe shine using 180 grit emery cloth strip. I did it once....Not twice! I couldn't tell of any advantage....At the time.

OLPHRT
PHIL I.
#78
Bill from NH
-

- Full Member
-
- 14,762 posts Joined: 02-August 07
Age scrubs away speed!
- Gender:Male
- Location:New Boston, NH
Posted 19 May 2010 - 06:35 AM
Rick, the motor came out looking very nice! In the northeast,it was common practice in the 70s & 80s to grind the can's sides thinner, to about .015, especially on Grp. 20 setups. Walt did it & so did Russ Boyington, another CT pro & motor builder. I didn't own a grinder, so I made a plug to turn cans down on my Unimat. That hole in the front side of the can would have been used to set magnets to a slug with a wire "C" spring during glueup. The other side of the can has the axle slot.
Bill Fernald
I intend to live forever! So far, so good.
I intend to live forever! So far, so good.
#79
dc-65x
-
- Subscriber
-
- 6,979 posts Joined: 14-February 06
Grand Champion Poster
- Gender:Male
- Location:Captain Rick: The only vintage slot car nut in SW Oregon?
Posted 23 May 2010 - 07:37 PM
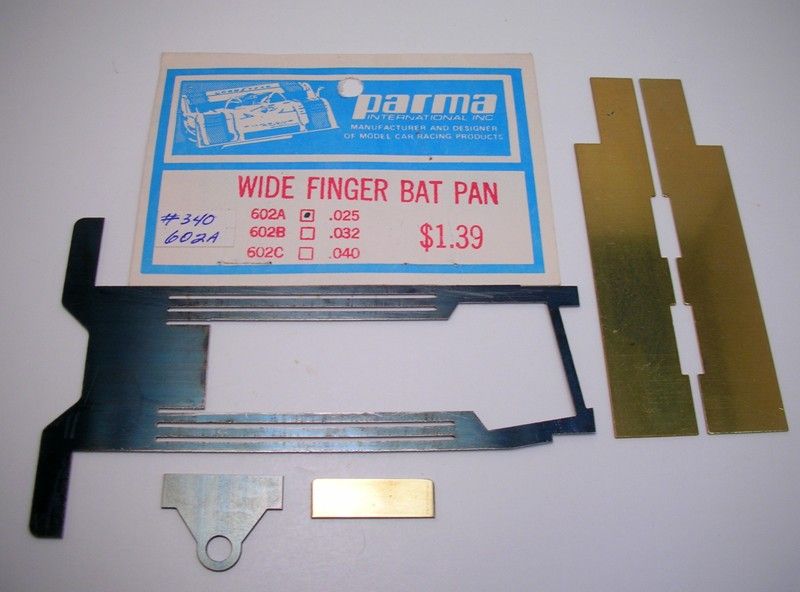
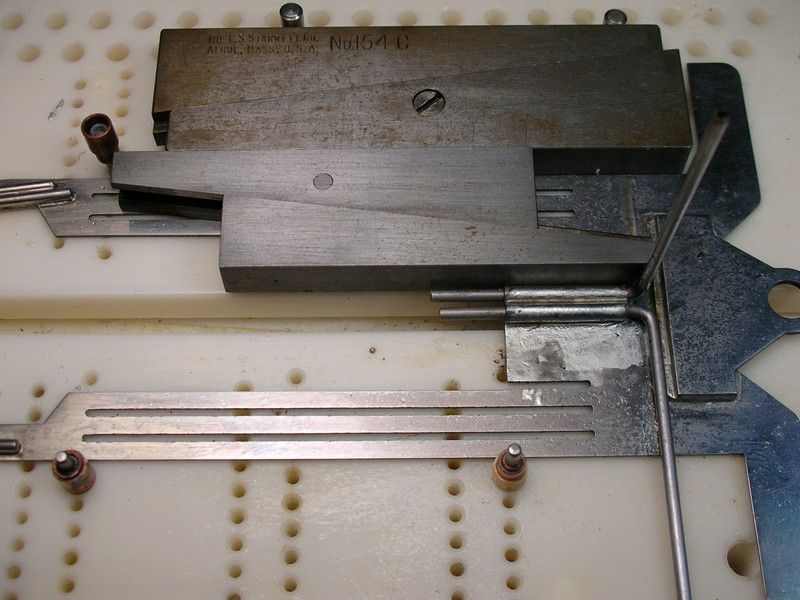
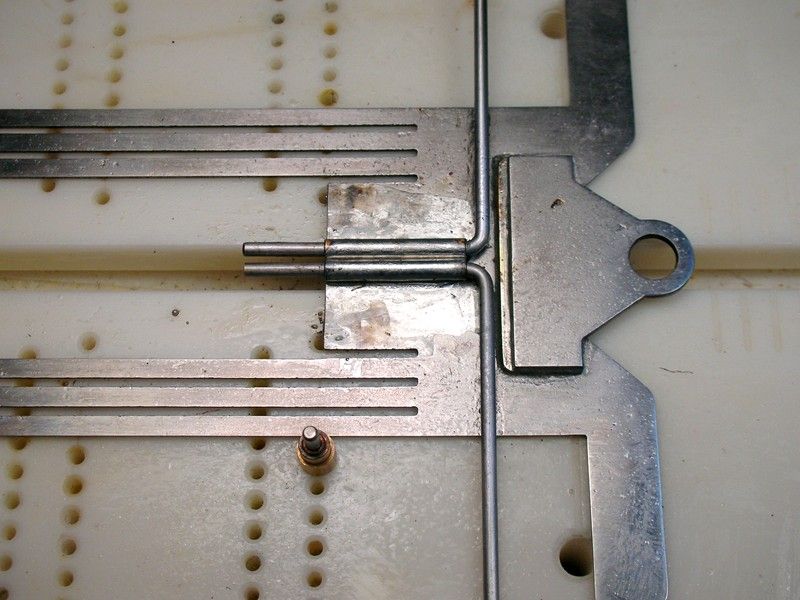
Here are the parts is parts for the chassis. Laser cut (for the last time  ) center section and guide tongue, .025" guide tongue spacer and the Korrect style Parma pans:
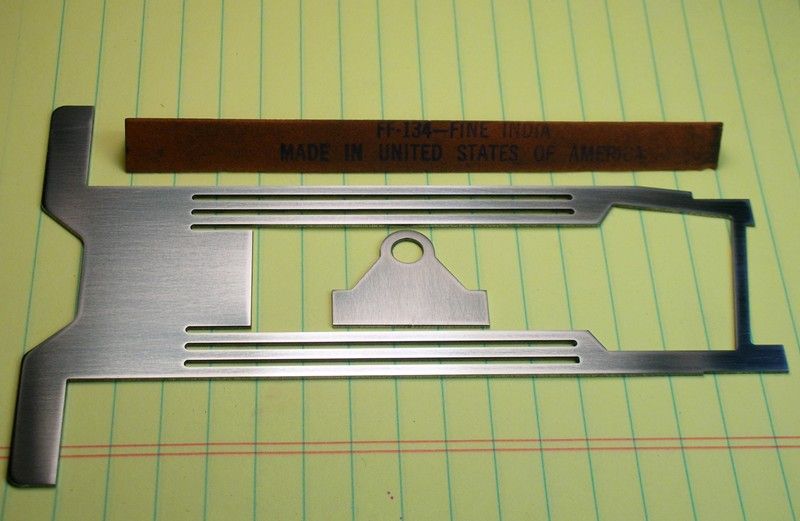
The steel is so hard a file won't touch it so I had to use an India stone to deburr it:
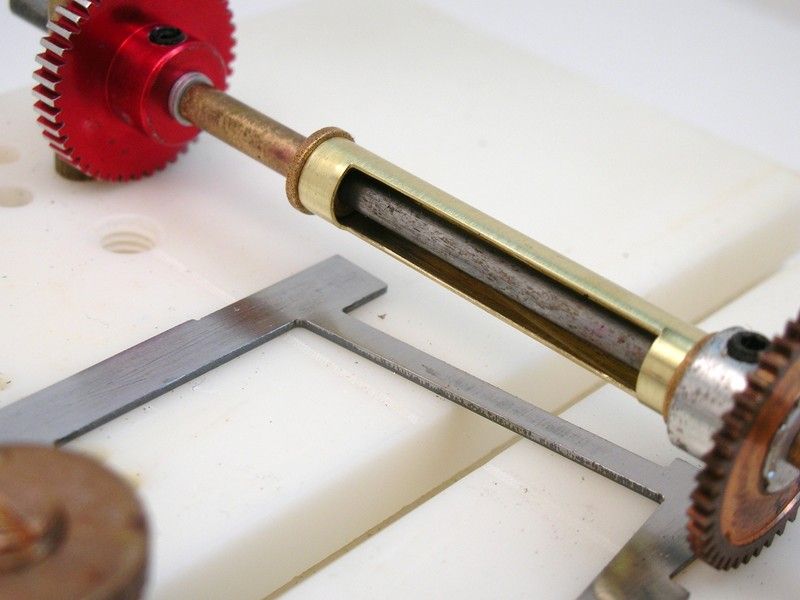
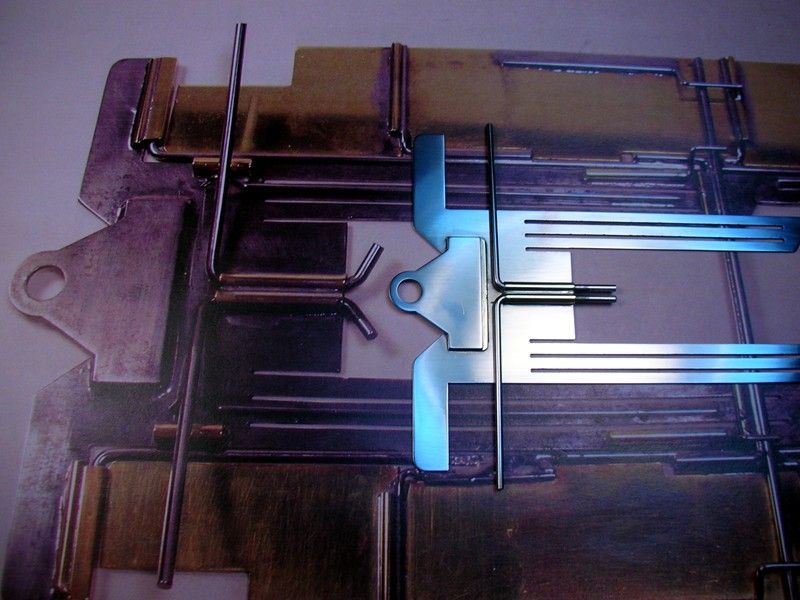
With the axle tube cut out...........
..........the rear end and center section are jigged up in my Rick's jig.......
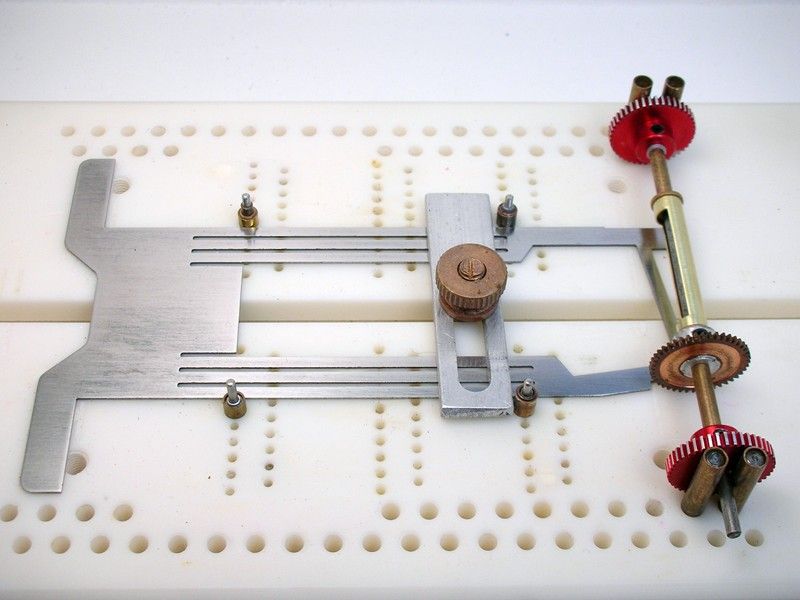
...and the four axle braces installed:
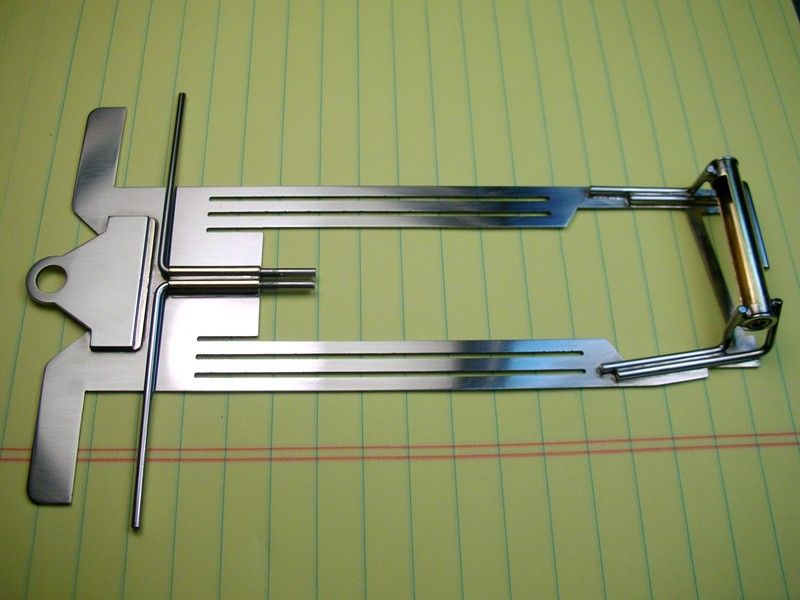
Here it is all cleaned up and shiny:
The guide tongue was installed using the T-slot feature in my Rick's Jig to lock it down. Some Teflon guide spacer held the front of the tongue at the right height:

I used some adjustable parallels in the chassis jig to position the front axle pivot tubes:
All cleaned up:
Time to stop for tonight:
) center section and guide tongue, .025" guide tongue spacer and the Korrect style Parma pans:The steel is so hard a file won't touch it so I had to use an India stone to deburr it:
With the axle tube cut out...........
..........the rear end and center section are jigged up in my Rick's jig.......
...and the four axle braces installed:
Here it is all cleaned up and shiny:
The guide tongue was installed using the T-slot feature in my Rick's Jig to lock it down. Some Teflon guide spacer held the front of the tongue at the right height:
I used some adjustable parallels in the chassis jig to position the front axle pivot tubes:
All cleaned up:
Time to stop for tonight:
Rick Thigpen
Check out Steve Okeefe's great web site at its new home here at Slotblog:
The Independent Scratchbuilder
There's much more to come...
#80
Rick
-

- Full Member
-
- 8,844 posts Joined: 17-February 06
Grand Champion Poster
- Gender:Male
- Location:PA
Posted 23 May 2010 - 07:43 PM
WOW!!
Rick Bennardo
"Professional Tinkerer"
scrgeo@comcast.net
R-Geo Products
LIKE my Facebook page for updates, new releases, and sales: Rgeo Slots...
Lead! The easy equalizer...
#81
GaryA
-

- Full Member
-
- 27 posts Joined: 06-February 09
Rookie Keyboard Racer
- Gender:Male
- Location:Dunlap, TN
Posted 31 May 2010 - 08:23 AM
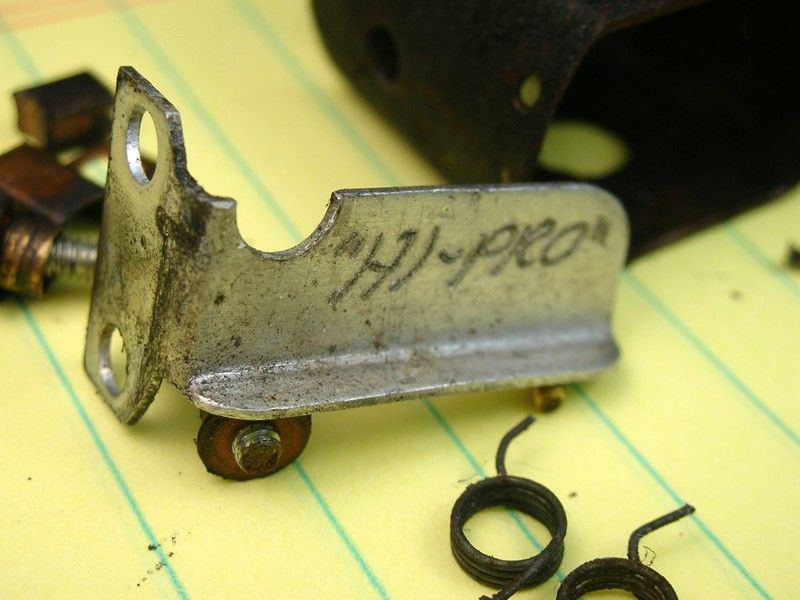
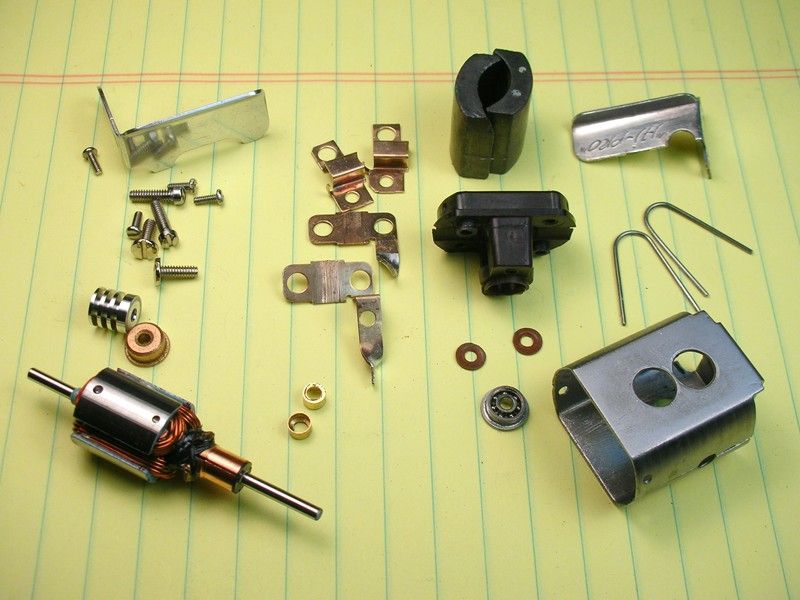
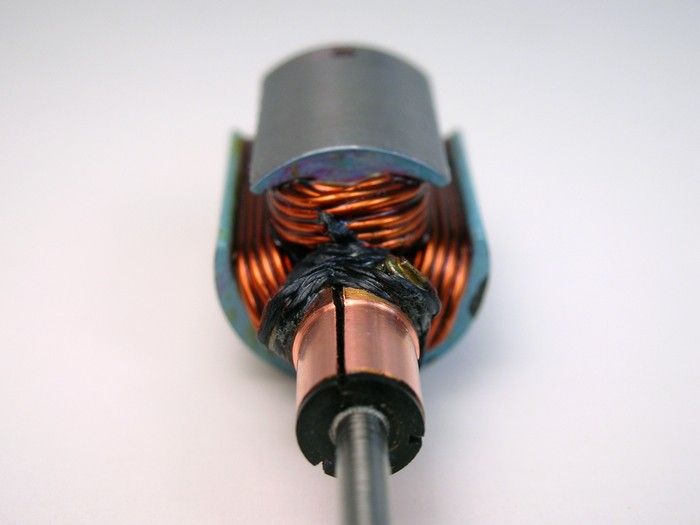
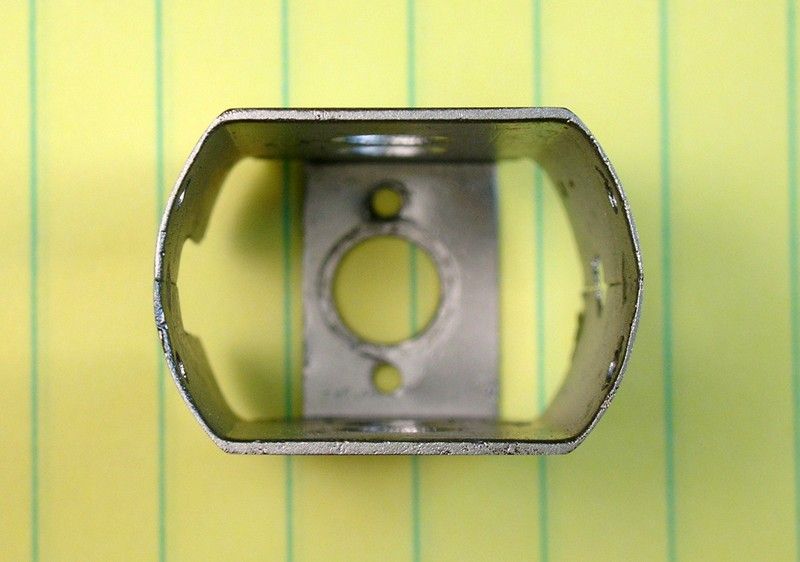
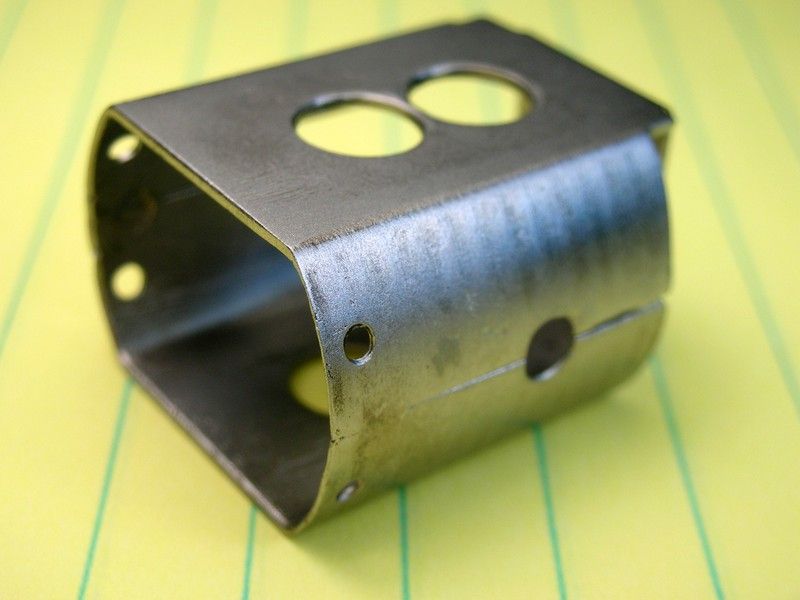
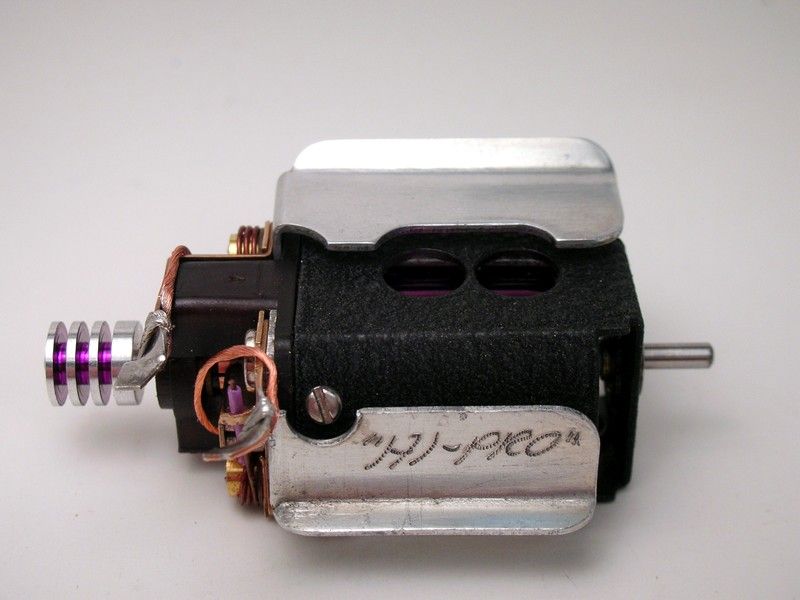
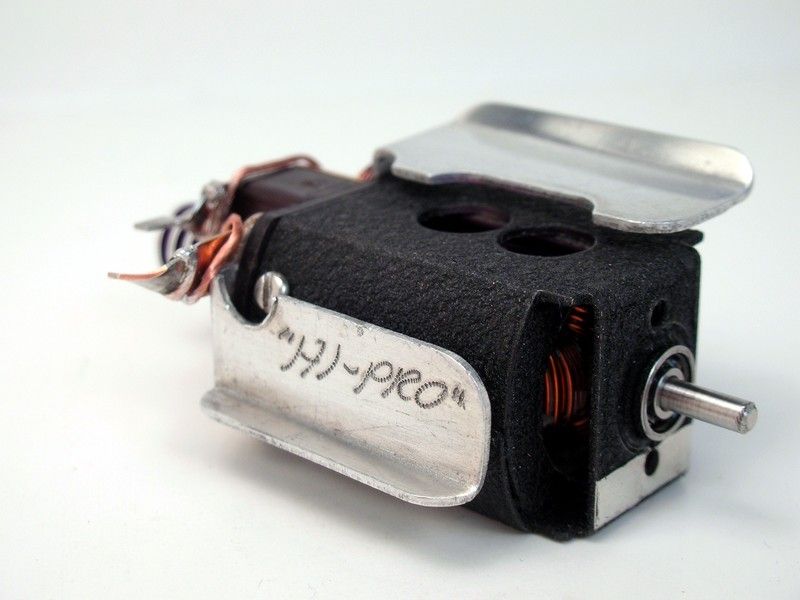
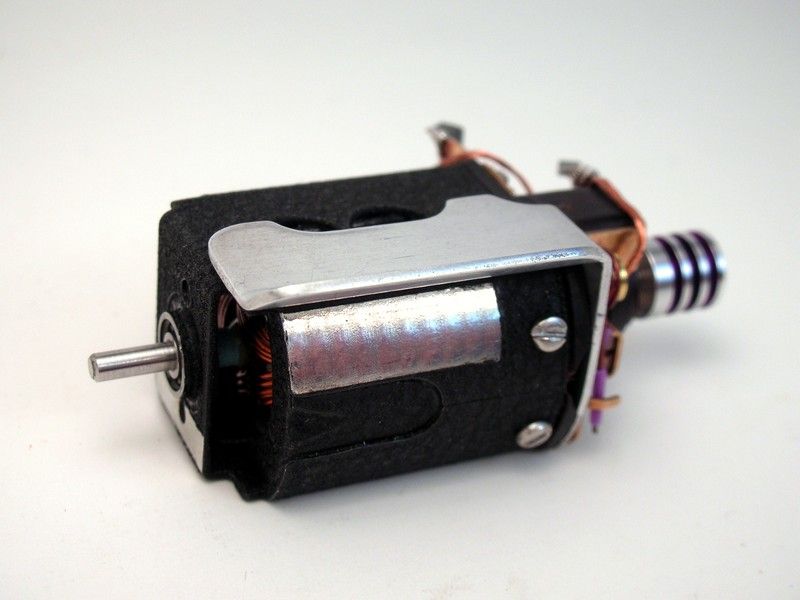
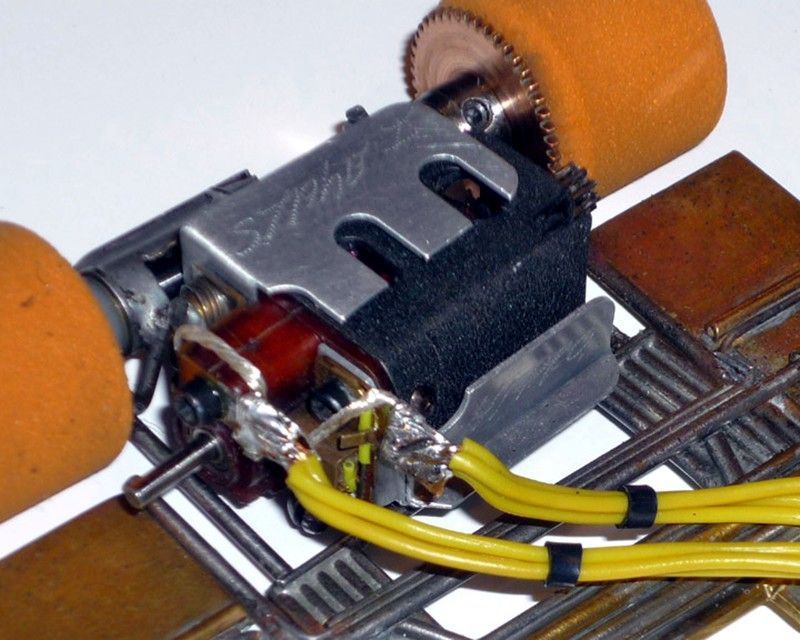
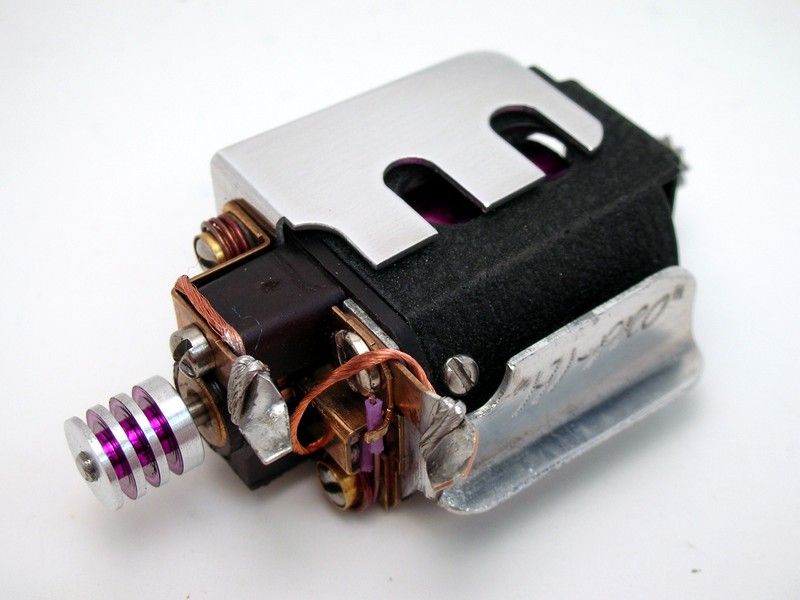
Walt built very nice motors judging from the two I have. I can certainly tell he is a machinist....more on that in a bit. First here is the Hi-Pro motor torn down in its all misery caused by the former owner:
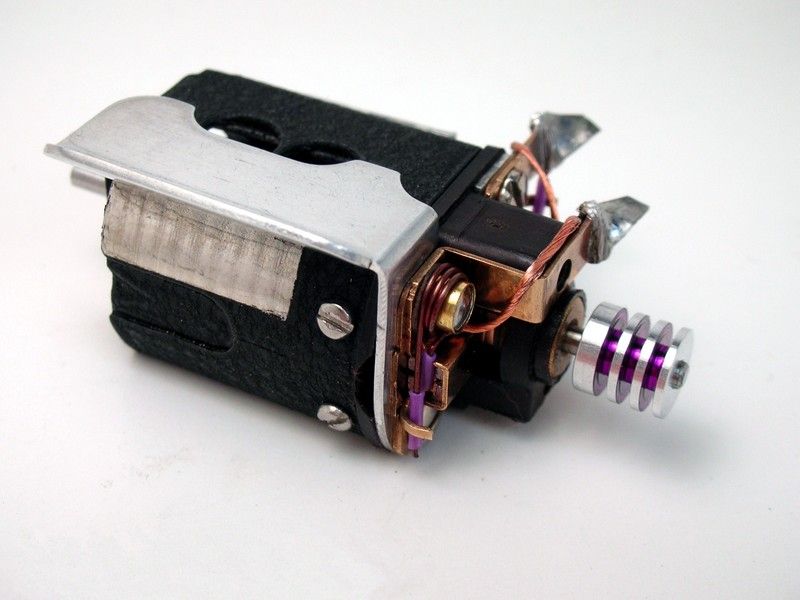
I like the insulated brush spring posts:
This is a much modified heat sink that is really a cool piece:
Here are the parts on the right all cleaned up. On the left the hardware, comm cooler, fresh endbell bearing, open armature and a Mura heat sink are new. I'm guessing there was a full coverage heat sink on this motor that the former owner literally ripped off. What's left of it as well as the intact heat sink match the only set of full coverage heat sinks I have. Rather than break up that set I decided to modify a Mura heat sink to look like the ones used on the other Hi-Pro motor I showed above. I changed the hardware style and added the comm cooler because it made me happy:
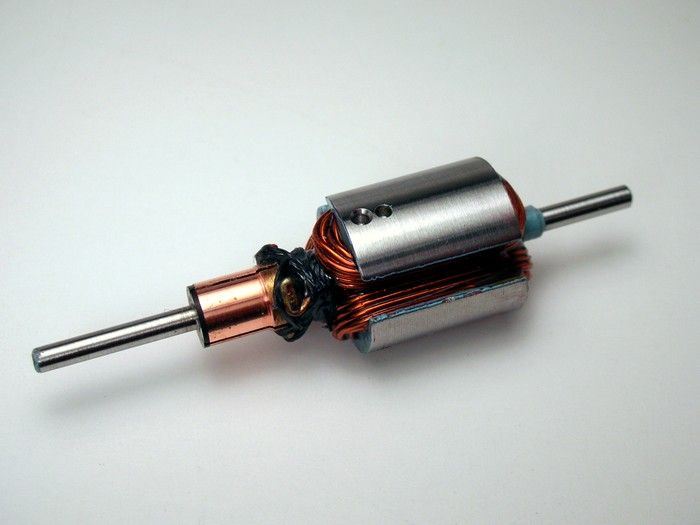
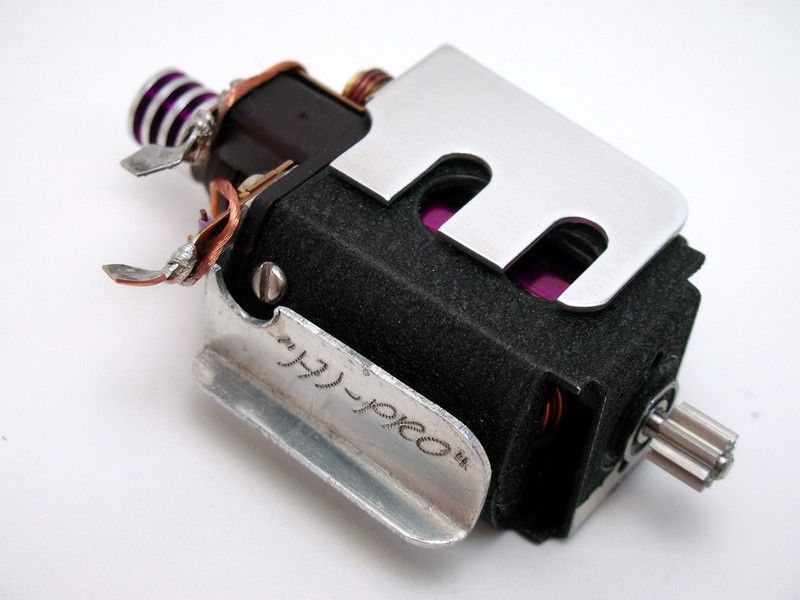
That new armature is one of the new 21T-24GA on a vintage Champion blank that Ron Hershman helped me with. It's wound by Dan De Bella with a new modern comm and Ron tied, epoxied and balanced it. I have one in my Neat Things Diamond and it screams:
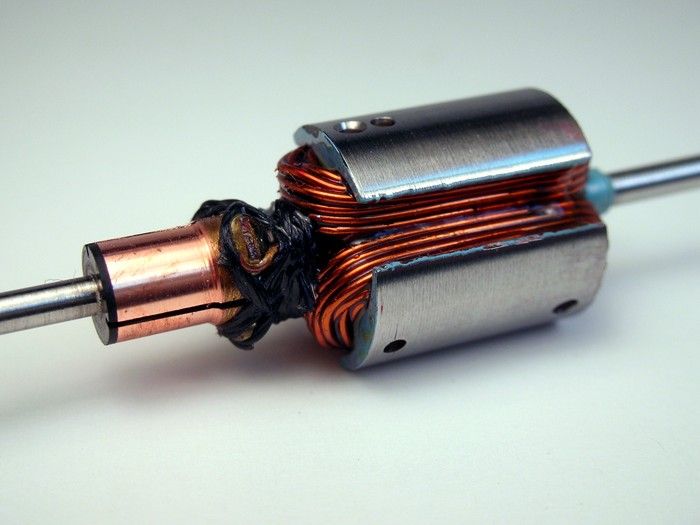
A closer look:
A look at the mild timing:
I know these arms are a success not only because they run great and didn't overheat but when I ran it at Eddie's and Rodney said, "What motor is that, it sounds like a wing car!"... NEATO!
Anyway check out what Walt the machinist did to the can. He turned (I think) or ground the sides down to less than .015" thick
:
Isn't that cool. The can is fragile so I had to use the Micro bead blaster to clean off all the rust. Notice the hole in the side......I wonder what that's for? I also like the jumbo cooling holes on the top and bottom:
Here's the finished motor. It draws about 2 1/2 amps and doesn't get way hot. I'm running Gold Dust brushes and Modern Champion light brush springs:
I like it and I hope Walt would too.
Chassis time...........

Rick:
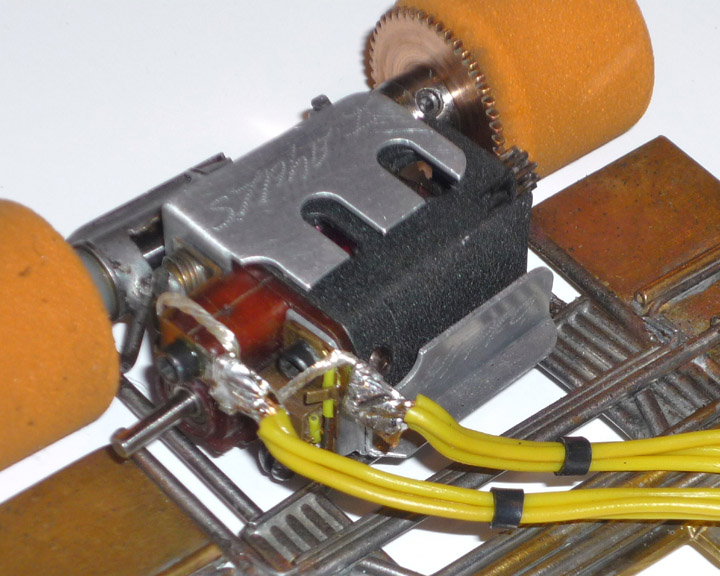
Here is a picture of one of Walt's motors in my Tony P Da-Iso. It shows you what the other heat sink probably looked like.
Gary A
Attached Images
Gary Abramowicz
#82
dc-65x
-
- Subscriber
-
- 6,979 posts Joined: 14-February 06
Grand Champion Poster
- Gender:Male
- Location:Captain Rick: The only vintage slot car nut in SW Oregon?
Posted 31 May 2010 - 11:34 AM
Rick:
Here is a picture of one of Walt's motors in my Tony P Da-Iso. It shows you what the other heat sink probably looked like.
Gary A
Hi Gary,
Thank you for the picture. It make sense that it would be a "full coverage" style heat sink.
If anyone has one to sell or trade please let me know. I'd like to restore my Hi-Pro motor as "Korrect" as possible
.
Rick Thigpen
Check out Steve Okeefe's great web site at its new home here at Slotblog:
The Independent Scratchbuilder
There's much more to come...
#83
dc-65x
-
- Subscriber
-
- 6,979 posts Joined: 14-February 06
Grand Champion Poster
- Gender:Male
- Location:Captain Rick: The only vintage slot car nut in SW Oregon?
Posted 31 May 2010 - 01:49 PM
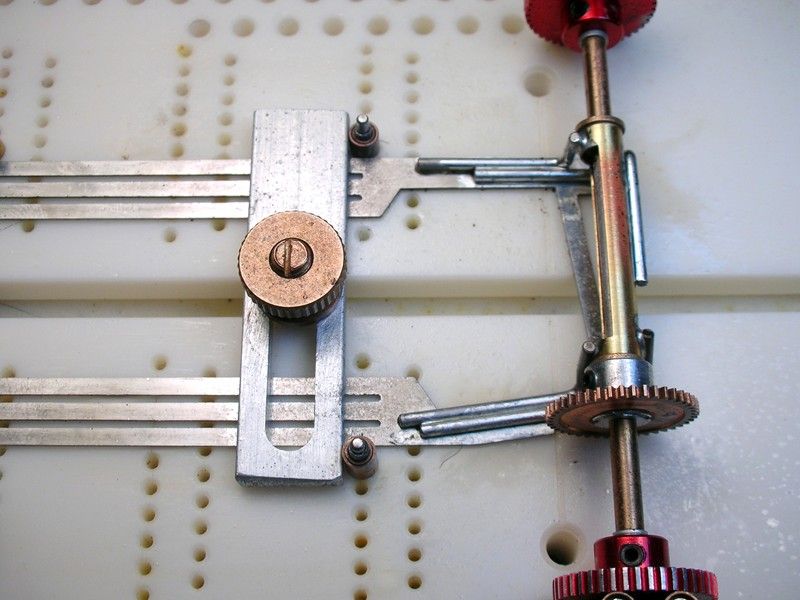
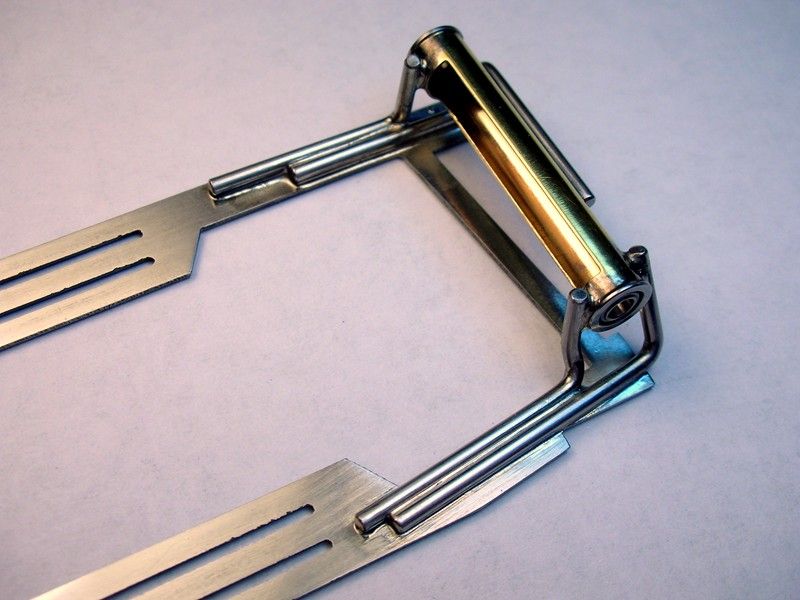
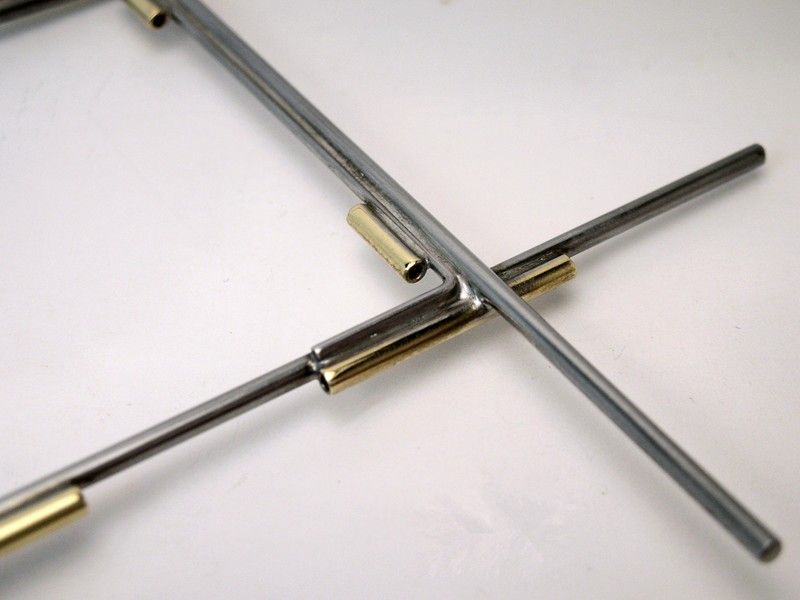
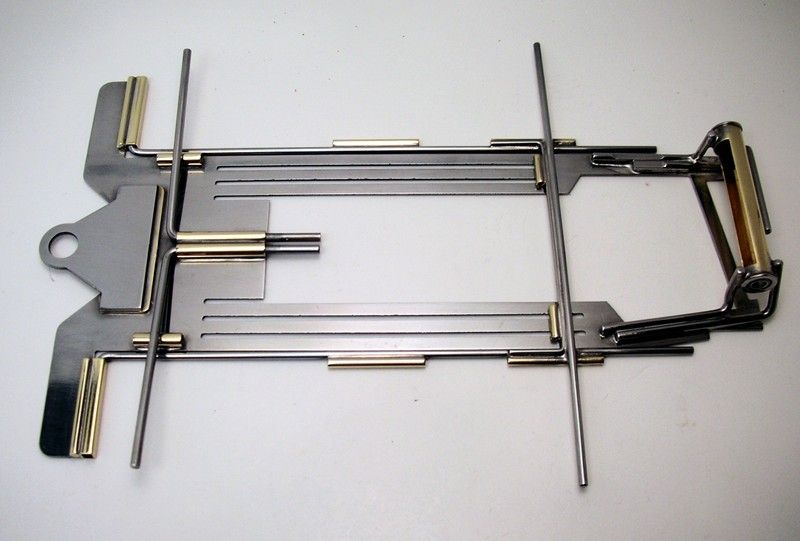
It's plumber time. My old Rick's jig clamping a piece of 3/32" square tube for the plumber hinge. The plumber rails are .055" wire:
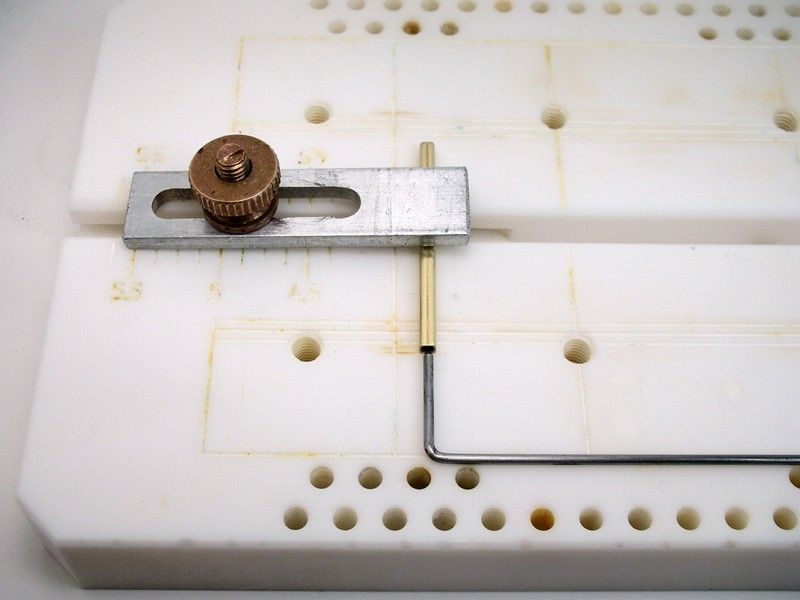
A small bend is needed in the plumber or it won't lay flush with the bottom of the chassis. This is bad:
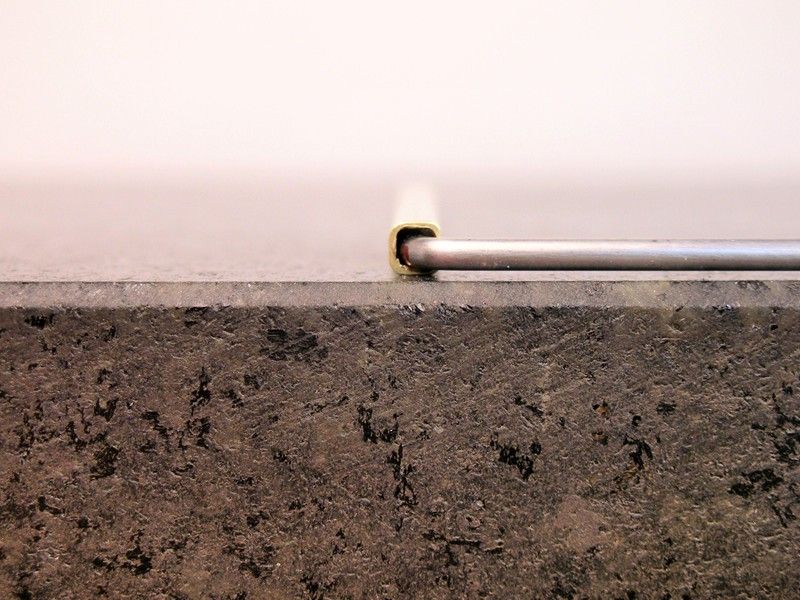
This is mo better:
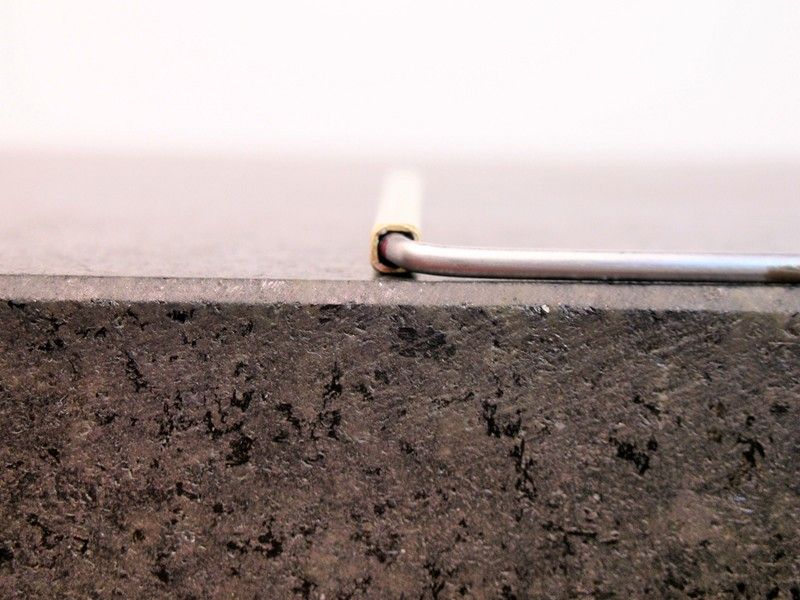
Here's the setup I used to attach the square plumber hinge tube and the 1/16 brass rod bullet proofer:
The method shown in the picture below worked out so well I wanted to share it:
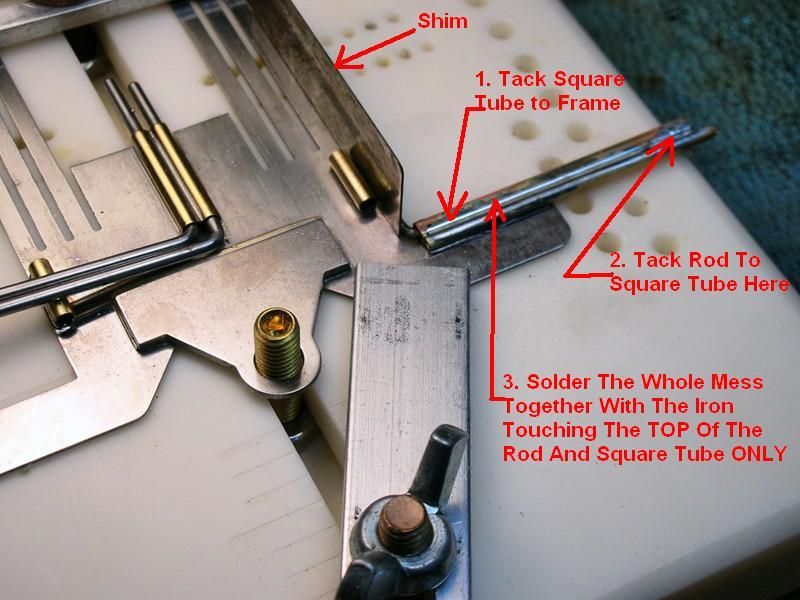
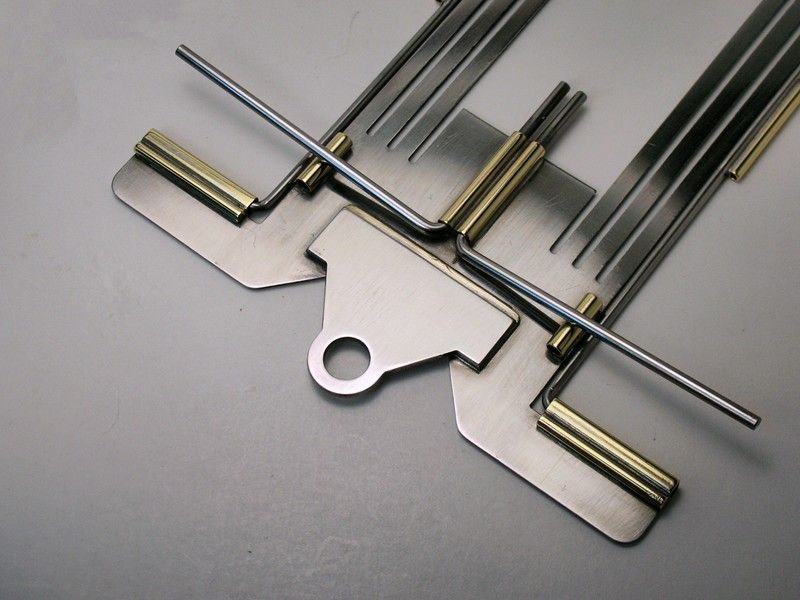
The iron never touched the frame after the first small tack of the square tube to the frame. Here's what it looks like after sanding the solder off the tops of the square tube and rod:
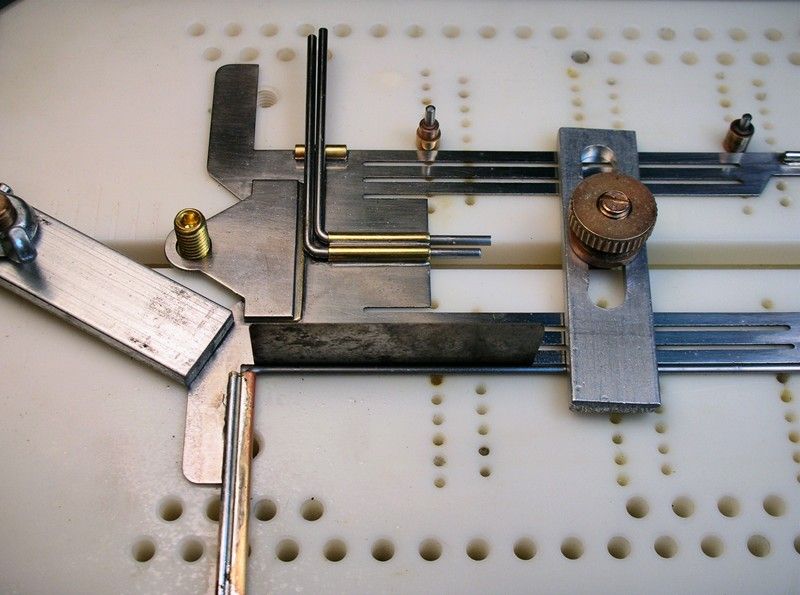
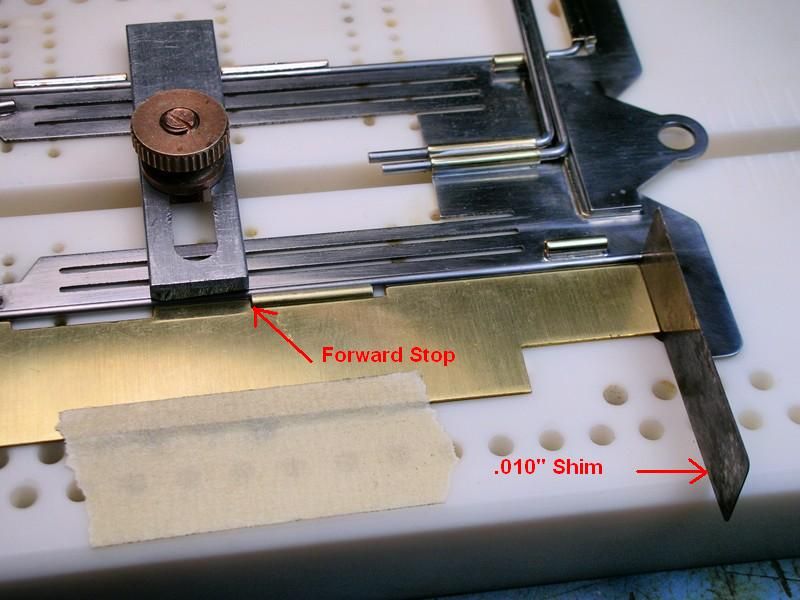
I attached the pan hinge tubes to end up with about 1/32" of for and aft play. A .010" shim at the forward stop keeps the pans from hitting the bumper:
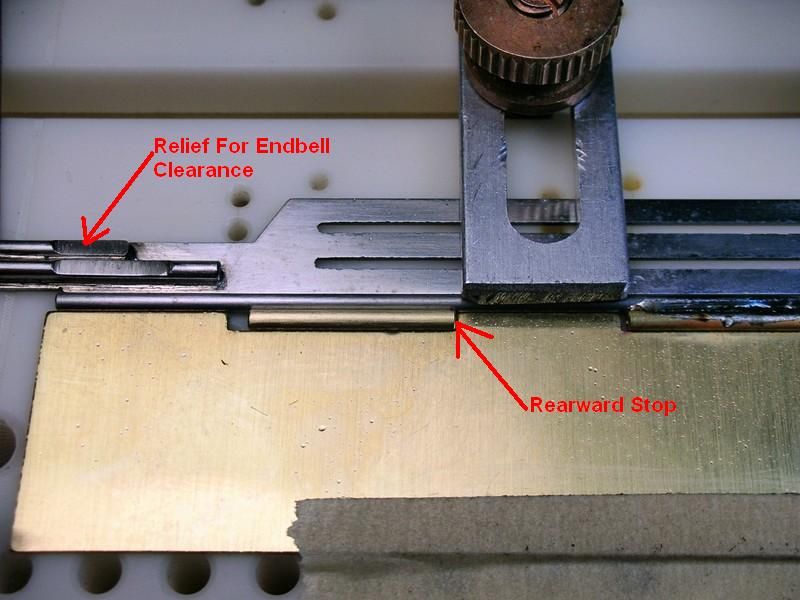
A thicker shim sets the amount of rearward travel. I also ground a relief in the half rails for a little more endbell clearance:
Here the rear hinge tubes are prep'd for the plumber cross piece (.055" wire):
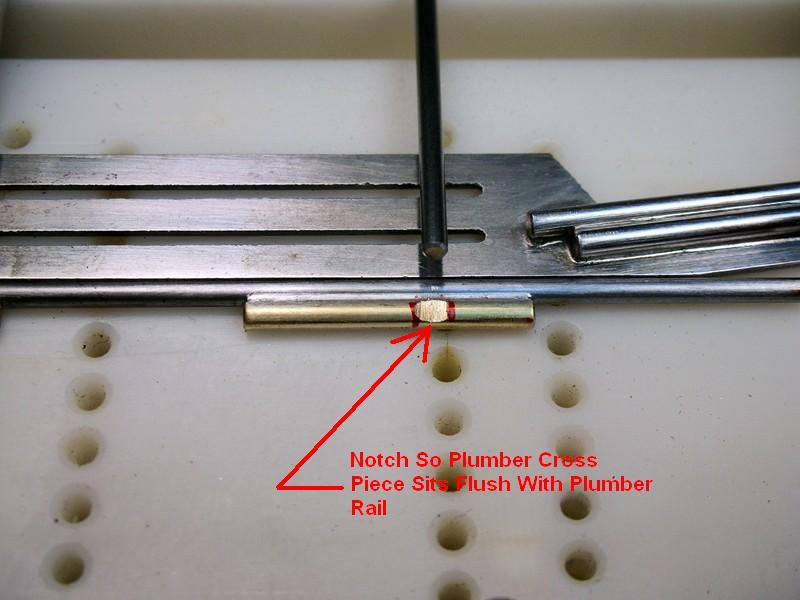
A U-shaped piece of .032" wire bullet proofs the pan hinge tube and plumber cross piece:
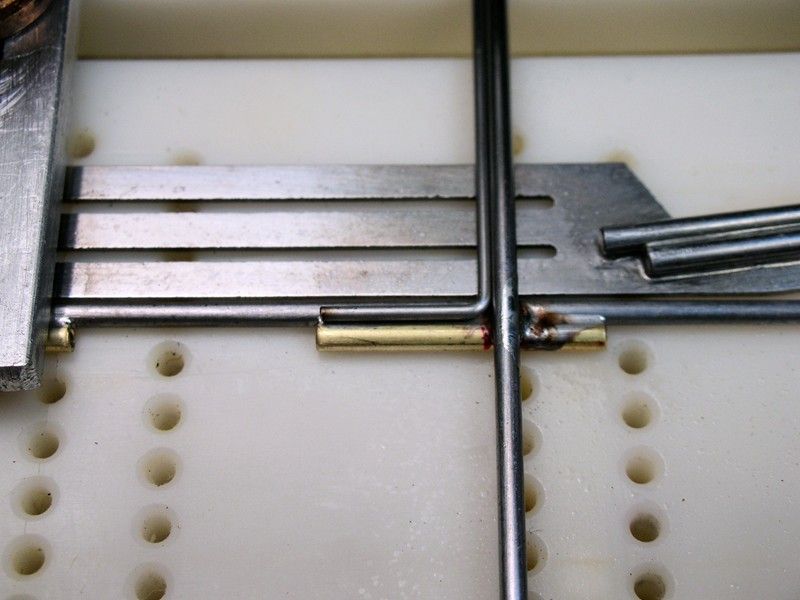
And finally a couple of pieces of 1/16" brass tube act as the plumber down stops:
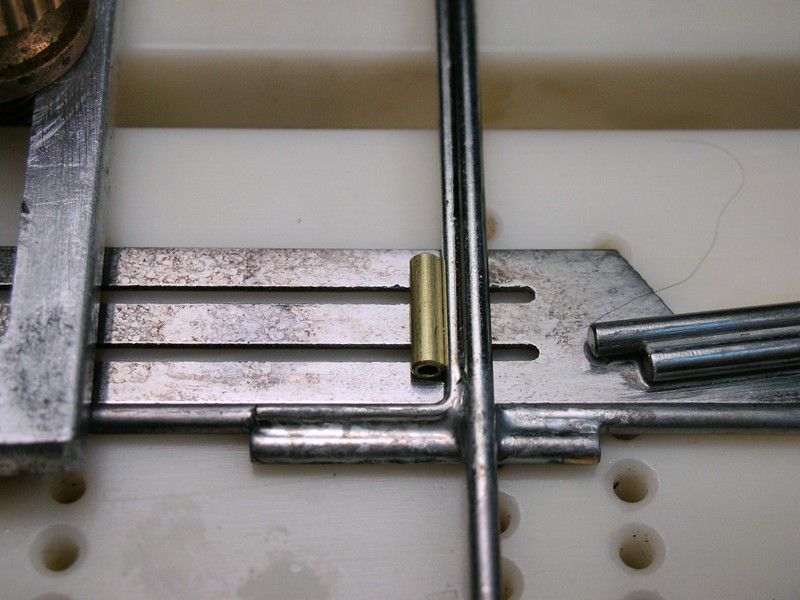
Here it is in its clean and shiny goodness:
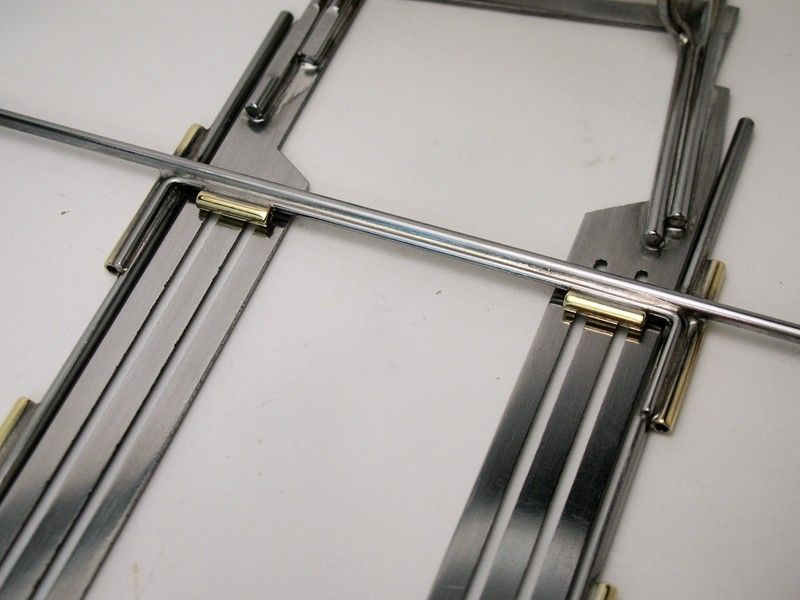
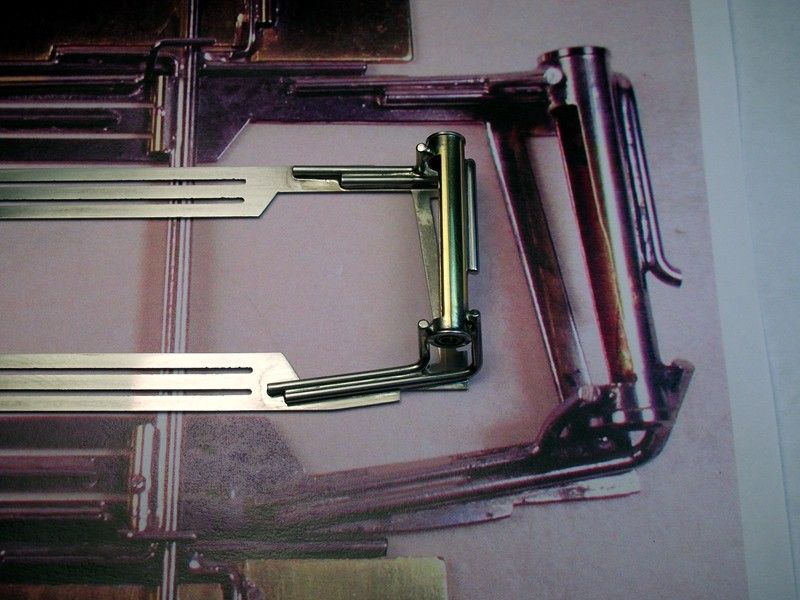
Here are a couple of shots showing the plumber setup with the center section swung out of the way:

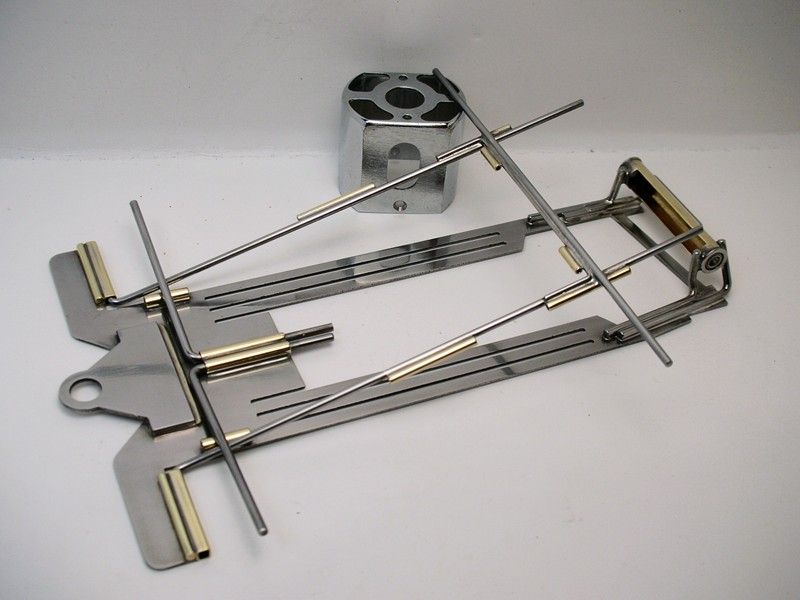
Next up its "Pan City Earl".....
A small bend is needed in the plumber or it won't lay flush with the bottom of the chassis. This is bad:
This is mo better:
Here's the setup I used to attach the square plumber hinge tube and the 1/16 brass rod bullet proofer:
The method shown in the picture below worked out so well I wanted to share it:
The iron never touched the frame after the first small tack of the square tube to the frame. Here's what it looks like after sanding the solder off the tops of the square tube and rod:
I attached the pan hinge tubes to end up with about 1/32" of for and aft play. A .010" shim at the forward stop keeps the pans from hitting the bumper:
A thicker shim sets the amount of rearward travel. I also ground a relief in the half rails for a little more endbell clearance:
Here the rear hinge tubes are prep'd for the plumber cross piece (.055" wire):
A U-shaped piece of .032" wire bullet proofs the pan hinge tube and plumber cross piece:
And finally a couple of pieces of 1/16" brass tube act as the plumber down stops:
Here it is in its clean and shiny goodness:
Here are a couple of shots showing the plumber setup with the center section swung out of the way:
Next up its "Pan City Earl".....
Rick Thigpen
Check out Steve Okeefe's great web site at its new home here at Slotblog:
The Independent Scratchbuilder
There's much more to come...
#84
Tex
-
- Full Member
-
- 9,244 posts Joined: 07-July 06
Grand Champion Poster
- Gender:Male
- Location:Denton, TX
Posted 31 May 2010 - 02:15 PM
I love lookin' at shiny metal. Niiiice.
Richard L. Hofer
Remember, two wrongs don't make a right... but three lefts do! Only you're a block over and a block behind.
Remember, two wrongs don't make a right... but three lefts do! Only you're a block over and a block behind.
#85
JerseyJohn
-

- Subscriber
-
- 4,203 posts Joined: 05-September 07
Jersey John
- Gender:Male
- Location:Northern NJ
Posted 31 May 2010 - 03:00 PM
Beautiful work as always Phil. Thanks for sharing..
John Chas Molnar
"Certified Newark Wise Guy since 1984" (retired)
"Certified Tony P Chassis God 2007.2023
Retro Chassis Designer-Builder

#86
Horsepower
-

- Full Member
-
- 4,343 posts Joined: 16-February 06
**Numb Thumbs**
- Gender:Male
- Location:Chicago
Posted 31 May 2010 - 04:18 PM
Geez Rick, you are REALLY a true metal artisan! I was just skimming pages and when I saw that chassis picture I stopped dead. If I ever get another million dollars I'm going to ask you to build one for me.
Gary Stelter
My life fades, the vison dims. All that remains are memories... from The Road Warrior
My life fades, the vison dims. All that remains are memories... from The Road Warrior
#87
endbelldrive
-

- Member at Peace
-
- 1,740 posts Joined: 16-February 06
Checkered Flag in Hand
- Gender:Male
- Location:Witless Protection Program
Posted 31 May 2010 - 04:31 PM
Looking good...bring on the pans! 
Bob Suzuki
8/19/54-8/?/21
Requiescat in Pace
8/19/54-8/?/21
Requiescat in Pace
#88
dc-65x
-
- Subscriber
-
- 6,979 posts Joined: 14-February 06
Grand Champion Poster
- Gender:Male
- Location:Captain Rick: The only vintage slot car nut in SW Oregon?
Posted 31 May 2010 - 04:42 PM
I'm hardly, I mean, hard at it now . I've got the L-arm springs and plumber up-stops installed on the center section. Pans are coming up ........
. I've got the L-arm springs and plumber up-stops installed on the center section. Pans are coming up ........
Rick Thigpen
Check out Steve Okeefe's great web site at its new home here at Slotblog:
The Independent Scratchbuilder
There's much more to come...
#89
tonyp
-

- Member at Peace
-
- 15,325 posts Joined: 12-February 07
Grand Champion Poster
- Gender:Male
- Location:Sanford, FL, land of lizards and big roaches
Posted 01 June 2010 - 02:39 PM
How come you are not done? I could do 2 of those a day including cutting out the center with a dremel. Very nice....
Anthony 'Tonyp' Przybylowicz
5/28/50-12/20/21
Requiescat in Pace
#90
dc-65x
-
- Subscriber
-
- 6,979 posts Joined: 14-February 06
Grand Champion Poster
- Gender:Male
- Location:Captain Rick: The only vintage slot car nut in SW Oregon?
Posted 01 June 2010 - 05:02 PM
Hi Tony,
I know, I’m really slow. I’ve got at least three 8 hour days in the chassis so far and it’s still not quite finished .
I’ve been thinking about you when I’m struggling trying to line something up, hold it in place and solder it at the same time…..”how in the heck did Tony do this?” Or when I’m trying to get 90 degree bend in a piece of wire. I end up fiddling around checking it with a square and first I bend it too much……then not enough…..then too much AGAIN .
I’m having fun but thank goodness I don’t have to do this for a living!
I know, I’m really slow. I’ve got at least three 8 hour days in the chassis so far and it’s still not quite finished
.I’ve been thinking about you when I’m struggling trying to line something up, hold it in place and solder it at the same time…..”how in the heck did Tony do this?”
Or when I’m trying to get 90 degree bend in a piece of wire. I end up fiddling around checking it with a square and first I bend it too much……then not enough…..then too much AGAIN . I’m having fun but thank goodness I don’t have to do this for a living!
Rick Thigpen
Check out Steve Okeefe's great web site at its new home here at Slotblog:
The Independent Scratchbuilder
There's much more to come...
#91
tonyp
-
- Member at Peace
-
- 15,325 posts Joined: 12-February 07
Grand Champion Poster
- Gender:Male
- Location:Sanford, FL, land of lizards and big roaches
Posted 01 June 2010 - 05:12 PM
It is really coming out nice. The funny thing is I look at some of the ols stuff and say the same thing, "how the hell did I do that" lol. I know for sure I could see a hell of a lot better back then....
Anthony 'Tonyp' Przybylowicz
5/28/50-12/20/21
Requiescat in Pace
#92
Phil Irvin
-
- Full Member
-
- 1,764 posts Joined: 21-July 08
Checkered Flag in Hand
- Gender:Male
- Location:Wesley Chapel, FL
Posted 01 June 2010 - 07:56 PM
It is really coming out nice. The funny thing is I look at some of the ols stuff and say the same thing, "how the hell did I do that" lol. I know for sure I could see a hell of a lot better back then....
That and your gettin too damn picky in your ol age. Back then. It was "THAT LOOKS ABOUT RIGHT". Now its "WHERE IS THAT DIGITAL CALLAPER AND THE RIGHT ANGLE EDGER"....
BENTHERDUNTHAT....
PHIL I
#93
tonyp
-
- Member at Peace
-
- 15,325 posts Joined: 12-February 07
Grand Champion Poster
- Gender:Male
- Location:Sanford, FL, land of lizards and big roaches
Posted 02 June 2010 - 07:51 AM
Phil How true. Dremel, Champion Jig, some pliers a couple of files and a rusty venier caliper.
I build the same way today, Just with a new jig, a rusty dial caliper and a couple more files.... Oh yea a 21st century battery powered dremel. I don't use all the trick tools these young kids do today.... If i did it would take me 10 times as long to build.
Are you going to come down Sunday to race?
Anthony 'Tonyp' Przybylowicz
5/28/50-12/20/21
Requiescat in Pace
#94
Prof. Fate
-

- Member at Peace
-
- 6,580 posts Joined: 20-February 06
a dearly-missed departed member
- Gender:Male
- Location:Salt Lake City, UT
Posted 02 June 2010 - 10:55 AM
Hi
Eyes? These days we build by intuition!
Fate
Eyes? These days we build by intuition!
Fate
Rocky Russo
3/6/48-1/1/12
Requiescat in Pace
3/6/48-1/1/12
Requiescat in Pace
#95
tonyp
-
- Member at Peace
-
- 15,325 posts Joined: 12-February 07
Grand Champion Poster
- Gender:Male
- Location:Sanford, FL, land of lizards and big roaches
Posted 02 June 2010 - 11:27 AM
Since I started building again my biggest investment is for OTT lamps. I have 3 on my bench to try and get enough light.
Anthony 'Tonyp' Przybylowicz
5/28/50-12/20/21
Requiescat in Pace
#96
Alchemist
-

- Full Member
-
- 2,699 posts Joined: 11-November 09
Posting Leader
- Gender:Male
- Location:Far, far away
Posted 02 June 2010 - 09:43 PM
I have nothing but admiration for your craftsmanship Rick! What magnificent pieces - works of art buddy!!!
Hope to see ya at Eddies some Sunday soon Rick!!
Hope to see ya at Eddies some Sunday soon Rick!!
Ernie Layacan
#97
dc-65x
-
- Subscriber
-
- 6,979 posts Joined: 14-February 06
Grand Champion Poster
- Gender:Male
- Location:Captain Rick: The only vintage slot car nut in SW Oregon?
Posted 05 June 2010 - 09:06 PM
Rick:
Here is a picture of one of Walt's motors in my Tony P Da-Iso. It shows you what the other heat sink probably looked like.
Gary A
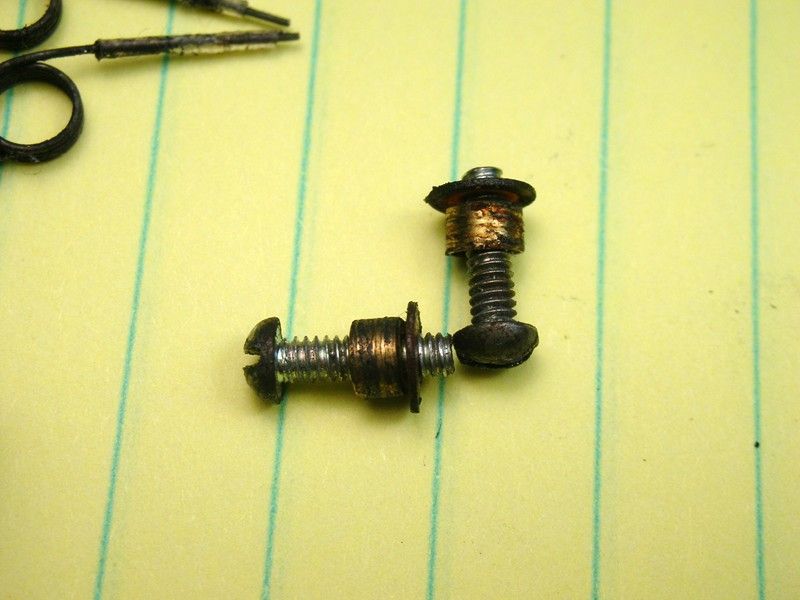
Thanks again for the picture Gary. I was lucky enough to come up with the Korrect heat sink. I also added the extra screw to the buss bar as the endbell was tapped 2-56 for it:
Now to finish up the chassis………
Rick Thigpen
Check out Steve Okeefe's great web site at its new home here at Slotblog:
The Independent Scratchbuilder
There's much more to come...
#98
GaryA
-
- Full Member
-
- 27 posts Joined: 06-February 09
Rookie Keyboard Racer
- Gender:Male
- Location:Dunlap, TN
Posted 06 June 2010 - 02:07 PM
Thanks again for the picture Gary. I was lucky enough to come up with the Korrect heat sink. I also added the extra screw to the buss bar as the endbell was tapped 2-56 for it:
Now to finish up the chassis………
Rick:
Glad you were able to find the heat sink. The motor looks good. And the chassis is coming along great. Can't wait to see it all finished.
Gary Abramowicz
#99
havlicek
-

- Subscriber
-
- 11,198 posts Joined: 20-August 07
OCD Rewinder
- Gender:Male
- Location:NY
Posted 06 June 2010 - 02:15 PM
The motor looks good
Boy, there's an understatement! The motor and chassis look WONDERFUL Rick!
-john
John Havlicek
#100
dc-65x
-
- Subscriber
-
- 6,979 posts Joined: 14-February 06
Grand Champion Poster
- Gender:Male
- Location:Captain Rick: The only vintage slot car nut in SW Oregon?
Posted 06 June 2010 - 04:01 PM
Thanks guys . The chassis is finished and in the tumbler until this afternoon. I'm using just plan water with the ceramic media. I don't want any "mysterious pitting" to happen to the steel center section. No more laser cut parts for me.......the Laser Dude's laser is dead......bummer.
Noose's original car had these front wheels so I'll run them too:
I restored a rusty used set. Here's a before and after the restoration:
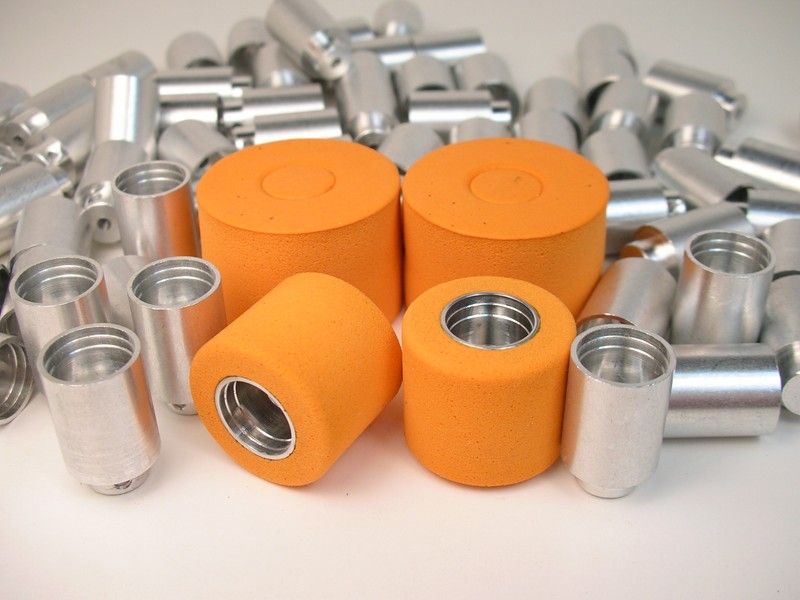
For "show" I'm using fresh Riggen orange rubber and our repop Associated rear wheels (at the track I'll be running Alpha Piranha’s):
Gears.....I have a NOS vintage 43T Fass spur on the left. I'd like to run this car a lot and save the vintage gear. So, I bought this Fass 43T on a Buy It Now on Ebay. Also shown is its packaging and a modern 8T Sonic pinion:
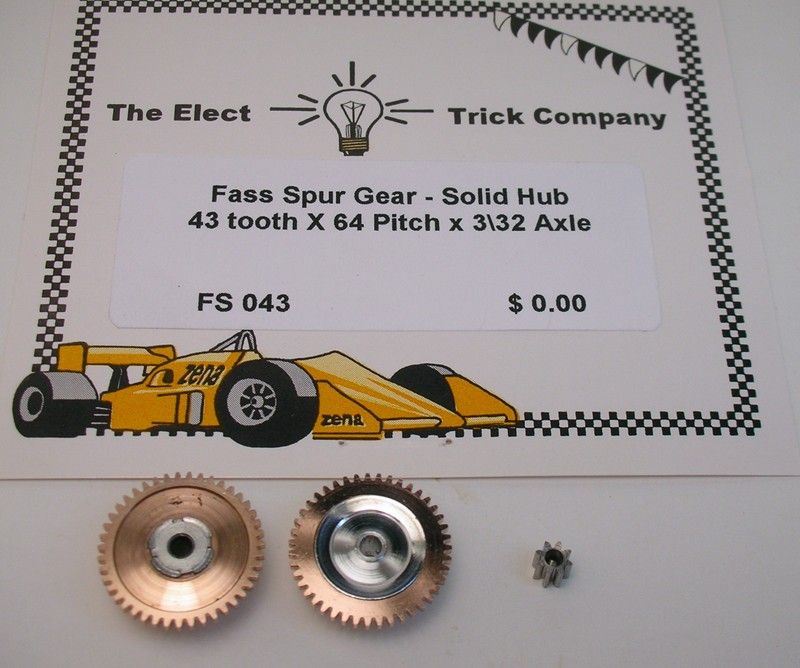
Does anyone know if that more modern Fass gear is currently available???
It's Time! 6 hours of tumbling is over. Time to see the results.............
. The chassis is finished and in the tumbler until this afternoon. I'm using just plan water with the ceramic media. I don't want any "mysterious pitting" to happen to the steel center section. No more laser cut parts for me.......the Laser Dude's laser is dead......bummer.Noose's original car had these front wheels so I'll run them too:
I restored a rusty used set. Here's a before and after the restoration:
For "show" I'm using fresh Riggen orange rubber and our repop Associated rear wheels (at the track I'll be running Alpha Piranha’s):
Gears.....I have a NOS vintage 43T Fass spur on the left. I'd like to run this car a lot and save the vintage gear. So, I bought this Fass 43T on a Buy It Now on Ebay. Also shown is its packaging and a modern 8T Sonic pinion:
Does anyone know if that more modern Fass gear is currently available???
It's Time! 6 hours of tumbling is over. Time to see the results.............
Rick Thigpen
Check out Steve Okeefe's great web site at its new home here at Slotblog:
The Independent Scratchbuilder
There's much more to come...


