

Hello there!
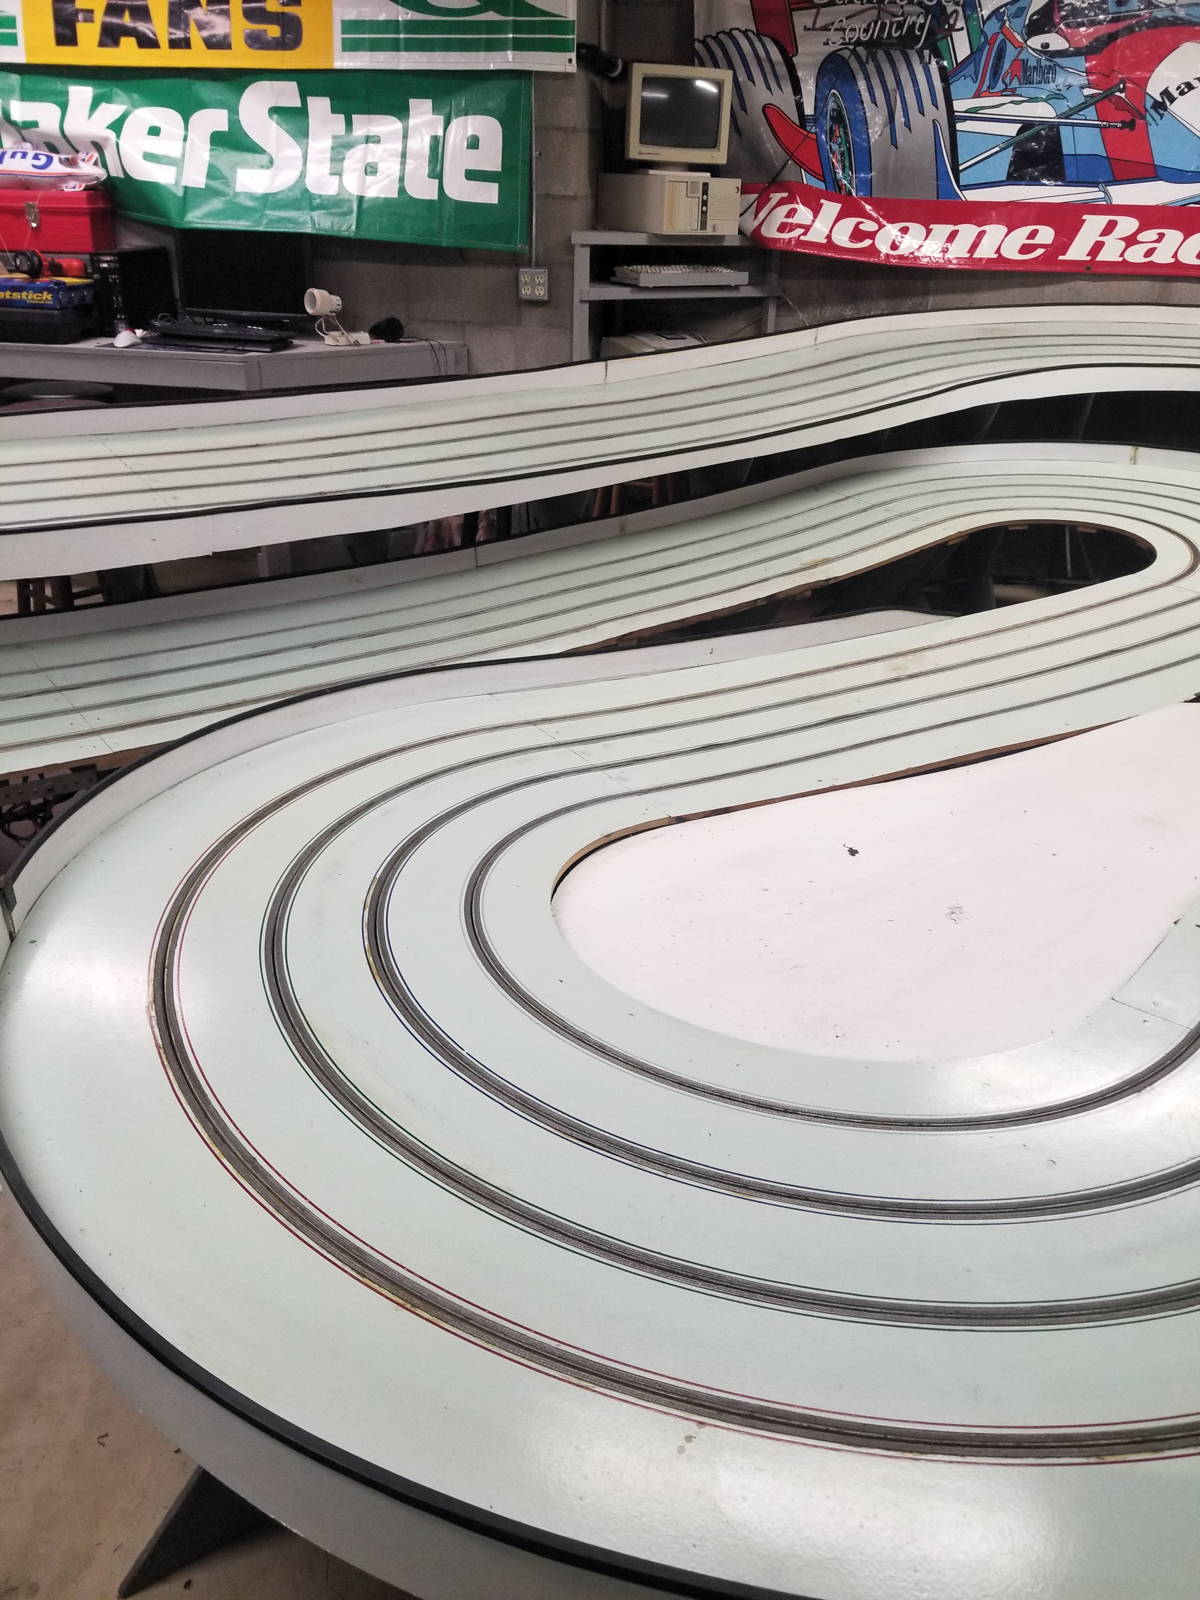
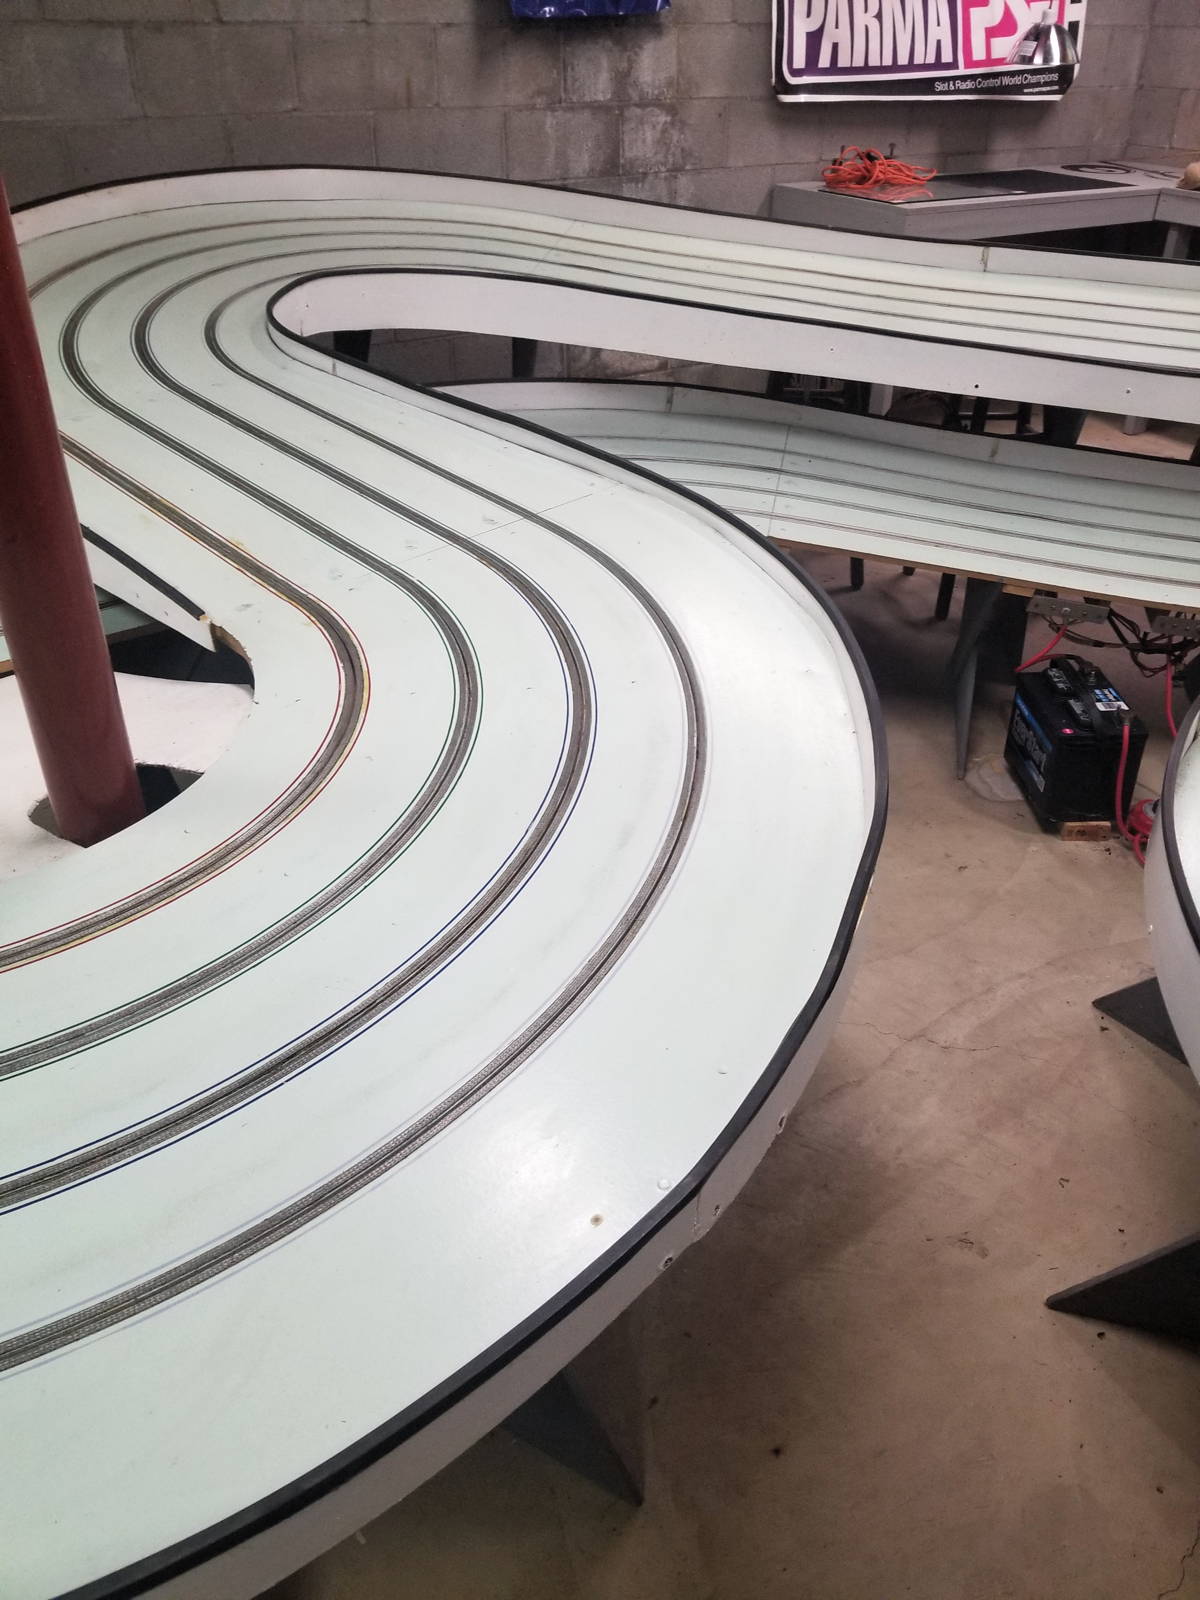
My name is AJ Fox, and recently I purchased a four-lane wooden slot car track from a gentleman named Rich in North Canton, OH.
It needs some restoration and rebraiding, and I was hoping you, or someone you know, would be able to help guide me through it! I looked through the forums and I couldnt find much on restoring an MDF track, only building new. I worry about sanding the high spots, and damaged areas, because I dont know how the MDF will react. I'd like to sand the entire track down, but again I don't want to ruin it, either.
Anyway, please let me know if you can help out! Thanks,
AJ Fox
Manager/Co-owner QCMP
(330) 771-1534
www.raceqcmp.com


Need advice on rehabbing a track
Started by
AJ_Fox_QCMP
, Jan 10 2019 11:39 PM
49 replies to this topic
#1

AJ_Fox_QCMP
-
- Full Member
-

- 16 posts Joined: 10-January 19
Rookie Keyboard Racer
- Gender:Male
- Location:Salem, OH
Posted 10 January 2019 - 11:39 PM
- Lou E, Peter Horvath, Samiam and 3 others like this
AJ Fox
Manager Quaker City Motorsports Park
Salem, Ohio 44460
(330) 771-1534
www.raceqcmp.com
Manager Quaker City Motorsports Park
Salem, Ohio 44460
(330) 771-1534
www.raceqcmp.com
#2
old & gray
-

- Full Member
-
- 1,211 posts Joined: 15-April 11
Checkered Flag in Hand
- Gender:Male
- Location:CT
Posted 11 January 2019 - 12:13 AM
Hi AJ,
Here is a thread on a restoration of a 1990 King track.
Pioneer Valley Slot Club: return of the King
Good luck with your track it looks nice.
Bob Schlain
#3
gfox
-

- Full Member
-
- 119 posts Joined: 07-March 13
Hack, according to some
- Gender:Male
- Location:OH
Posted 11 January 2019 - 07:12 AM
AJ,
Stop in or call Mark Kitto at Mark's Model World in Canton. He's built many tracks and is a wealth of knowledge.
Greg Fox
#4
MattD
-

- Full Member
-
- 3,561 posts Joined: 13-August 11
Posting Leader
- Gender:Male
- Location:IN
Posted 11 January 2019 - 07:59 AM
No problem sanding the track surface till it is smooth. A belt sander works pretty good. Of course, the braid must be removed. Once it is smooth, if the slot is still 3/8" deep all is fine. If it is too shallow, the slot will need to be routed again.
Same issue with the gains for the braid. With light sanding, this shouldn't be an issue. Gains are especially easy to cut by hand guided router with a special bit you can get from suppliers. Fresh coat of paint and re-install braid. Pre-taped braid with double-sided tape makes this the easiest part of the job.
Lots of paints available. Simple gloss latex works fine for home tracks and club tracks where chemicals are not applied to the track or tires.
Matt Bishop
#5
Cheater
-

- Root Admin
-
- 25,778 posts Joined: 14-February 06
Headmaster of the asylum
- Gender:Male
- Location:Norcross, GA
Posted 11 January 2019 - 08:02 AM
Stop in or call Mark Kitto at Mark's Model World in Canton. He's built many tracks and is a wealth of knowledge.
If the track came from North Canton, Mark may have built it or may have known about it.
Gregory Wells
Never forget that first place goes to the racer with the MOST laps, not the racer with the FASTEST lap
#6
AJ_Fox_QCMP
-
- Full Member
-
- 16 posts Joined: 10-January 19
Rookie Keyboard Racer
- Gender:Male
- Location:Salem, OH
Posted 11 January 2019 - 10:00 AM
I have stopped in and talked to Mark once, but he was busy so I didn't get all the answers I was looking for. He's a really nice guy! I plan on making another trip to see him. I'm a total newbie with this stuff, and it's been a little overwhelming trying to figure things out.
What kind of paint would I need to use if I did want to add glue to the corners of the track? And what glue is used for that?
I bought the router bit to clean up the recesses for the braid, and 1,000' of pre-taped braid from Slot Car Corner. I'd like to rewire the entire track, but I'm not very savvy when it comes to wiring. It currently uses a deep cycle battery, and I know Mark's uses transformers.
I just want a nice, up-to-date track. Speaking if which, it came with a computer from the early '80s that doesn't work. Who sells timing systems for these things?
Thanks everybody for the help!!
AJ Fox
Manager Quaker City Motorsports Park
Salem, Ohio 44460
(330) 771-1534
www.raceqcmp.com
Manager Quaker City Motorsports Park
Salem, Ohio 44460
(330) 771-1534
www.raceqcmp.com
#7
MattD
-
- Full Member
-
- 3,561 posts Joined: 13-August 11
Posting Leader
- Gender:Male
- Location:IN
Posted 11 January 2019 - 03:29 PM
Professor Motor offers a nice 4 lane track wiring module, Very simple, very neat, breakers on each lane.
Matt Bishop
#8
MarkH
-

- Subscriber
-
- 530 posts Joined: 26-November 12
Race Leader
- Gender:Male
- Location:St. Louis
Posted 11 January 2019 - 07:25 PM
We used Rustoleum 5300 series epoxy paint in light gray, one of many available. Two coats with a 1/4" nap roller produces an excellent finish. The first coat will not look to good but after the second it will be very good.
This stuff is very tough and easy to apply.
The short version of steps:
1) Clean the track two-three times with naphtha to fully degrease. Include racing surface and walls
2) Pull braid off
3) Vacuum clean
4) Sand racing surface and walls smooth
5) Identify ding/chips and fill with body filler. Be sure wood is not oily. Grind to dry wood if required.
6) Sand smooth repairs
7) Recut gains with specialty cutter to clear old glue and establish fresh wood. Depth to be .005-.010" plus the thickness of the braid. Add in .005 or .010" for the tape. I cut mine to .035-.038". Measure to be sure. final depth of braid to be .005-.010"
8) Vacuum clean
9) With a paintbrush, apply Rustoleum 5300 to gains. it must be smooth. Keep the slot clean of runs and/or build up. Feather to zero on racing surface
10) Roll racing surface with Rustoleum - two coats
11) Paint inside of walls black
12) Paint outside of walls your preferred color
13) Let fully dry for a few days - the 5300 takes a few days to fully harden
14) Lay VHB Tape. the .005" is good but you might need the .010" depending on how deep the clean cut is on the gains. The .010" seems to hold better. ??? Keep the tape close to the slot. The braid can roll up from the slot area while racing but if the tape is close to the edge it is much less likely. Important: leave the paper backing on the tape until you are ready to apply the braid
15) Precut to length the braid per section
16) Clean the braid in lacquer thinner by soaking in can. Wipe clean and hang to fully dry (about 5 minutes). With lacquer thinner-soaked clean cloth, wipe the braid just before application. Do not handle the braid without gloves. Oil from skin will ruin bond to tape
17) Wearing lent free gloves, apply the braid to the taped sections. Only do one side of the slot at a time. Do not pull/stretch the braid. Press firmly to tape. After both sides of the slot are laid, use a roller or small piece of MDF to press the braid firmly into the tape. The tape will off-gas for a few days so it is important not to get any thinner or oil on the braid until the tape if fully setup
18) Assemble track
19) Wire-nut all the braid drops to ensure continuity
20) Wire for power and scoring
If you are interested I have a wiring diagram that will allow you to throw a single rocker switch to change racing directions. While not something all want to do, we have four of our five club tracks wired as such and it works great.
Good luck, be patient and have fun.
- tonyp, Lou E, B.C. and 1 other like this
Mark Horne
SERG - www.slotcarenduro.club
"Racing is life... everything else is just waiting." Steve McQueen - LeMans
There are only two things in life that make me feel alive. Racing is one of them.
#9
Ramcatlarry
-

- Subscriber
-
- 2,956 posts Joined: 08-March 06
Posting Leader
- Gender:Male
- Location:Barrington, IL 60010
Posted 11 January 2019 - 11:52 PM
Bare wood should always be sealed with a stain-blocking primer and a second color primer to blend the final color. Sanding each section individually can lead to dips at the section joints. If possible, bolt the track together to ensure flattness of the joints and blending of high spots - both in surface and braid areas. MDF can have bumps if rain damage occurs. Leveling the bumps is quite possible if needed.
If the track was braided continuously new, consider section braiding it to extend the life of the braid; you never know when the track might get moved. Braid can last many years and owners. The vertical ends of the track would need to be recessed for the braid drops squarely so that shorts do not happen upon assembly
Wiring taps are much easier attached at the section connections. Always use stranded wire for slot tracks. Uses can dictate wattage required as 1/32 plastic cars only need a minimum of 18ga while commercial grade cars like 12ga or bigger for cobalt motors with power and ground taps less than 20 ft apart. Add circuit breakers to protect everything in white and red lines.
- MattD and MarkH like this
Larry D. Kelley, MA
retired raceway owner... Raceworld/Ramcat Raceways
racing around Chicago-land
Diode/Omni repair specialist
USRA 2023 member # 2322
IRRA,/Sano/R4 veteran, Flat track racer/MFTS
Host 2006 Formula 2000 & ISRA/USA Nats
Great Lakes Slot Car Club (1/32) member
65+ year pin Racing rail/slot cars in America
#10
Jay Guard
-

- IRRA National Director
-
- 2,909 posts Joined: 10-December 06
Posting Leader
- Gender:Male
- Location:DeLand, FL
Posted 12 January 2019 - 09:49 AM
I highly recommend using Rustoleum 5300 epoxy paint, it's super durable (and a bit expensive) and while latex will work it tends to be porous and after a good bit of use it is very hard to clean. I know this from firsthand experience as the track I have was originally painted with some kind of latex and it was impossible to get the "dirt" out of the pores. It might be OK if you used a gloss latex, but mine was painted with flat or semi-gloss and it was impossible to clean.
I also highly recommend rebranding the track in sections. Larry's recommendation above works well but an easier approach is to drill holes about 6 inches on each side of the section joints. Then braid each section and drop the braid down through the holes leaving a 10" pigtail beneath. Assemble the track and then add a "jumper" piece of braid to bridge the joint and connect the braid ends under the track. If you ever have to take the track apart all that will have to be rebraided will be the small jumper sections and not the entire track.
BTW... I came up with a neat way to connect the pigtails under the track, simply roll the two pieces of braid together and then secure with a zip tie across the middle of the "roll." It makes a neat little bow tie that provides a huge amount of electrical contact and doesn't damage the braid itself like a mechanical connector might do.
- NSwanberg and boxerdog like this
Jay Guard
IRRA Board of Directors (2022-Present),
Gator Region Retro Racing Director (2021-Present)
SERRA Co-Director (2009-2013)
IRRA BoD advisor (2007-2010)
Team Slick 7 member (1998-2001)
Way too serious Retro racer
#11
MattD
-
- Full Member
-
- 3,561 posts Joined: 13-August 11
Posting Leader
- Gender:Male
- Location:IN
Posted 12 January 2019 - 01:03 PM
I like joining sections as Jay mentioned above. I call that a pass thru joint. It is a simple way to make really flush track joints and not worry with a small routed slot the braid goes thru where the track pieces meet. It is also a good way to re-connect braid on a track that was braided in one run. Just cut the braid at each jopint and then convert to pass thru joints as Jay mentioned.
Matt Bishop
#12
AJ_Fox_QCMP
-
- Full Member
-
- 16 posts Joined: 10-January 19
Rookie Keyboard Racer
- Gender:Male
- Location:Salem, OH
Posted 13 January 2019 - 03:17 AM
Thanks all for the suggestions thus far!
Jay, do you have a picture of how you do the braid sectioning? I planned on just dropping them at each section's end where they join, but I'd like to see how you do it!
Also, as far as the rustoleum epoxy paint goes, can it be applied directly to sanded mdf or should i use a primer? Slot car corner recommended not using oil based primers and just go latex, but I didn't ask about epoxy paint.
AJ Fox
Manager Quaker City Motorsports Park
Salem, Ohio 44460
(330) 771-1534
www.raceqcmp.com
Manager Quaker City Motorsports Park
Salem, Ohio 44460
(330) 771-1534
www.raceqcmp.com
#13
MattD
-
- Full Member
-
- 3,561 posts Joined: 13-August 11
Posting Leader
- Gender:Male
- Location:IN
Posted 13 January 2019 - 12:36 PM
what I call a pass thru joint. Two sections of track can be mounted completely flush with no provision for braid drops. Length can vary for each section, drop length can vary as needed.
.
Dropped braids can be wire nutted, twisted and taped, or just laid flush to each other and a nail driven thru them into a wood cross brace.
This is also a good way to not have to rebraid a track that is braided after complete assembly. Simply cut braid at each track section joint. Drill holes and drop braid. Finish the joint with a new piece of braid that bridges the joint.
This is not my idea, just how I have seen it done.


- Samiam and olescratch like this
Matt Bishop
#14
AJ_Fox_QCMP
-
- Full Member
-
- 16 posts Joined: 10-January 19
Rookie Keyboard Racer
- Gender:Male
- Location:Salem, OH
Posted 19 January 2019 - 07:30 AM
Alright I've received my braid and router bit for the gains. I went and got a new compact Makita router because my bosch is huge and didnt feel right.
My biggest questions right now are:
Could I use epoxy seal garage floor paint made by seal krete instead of the rustoleum 5300? The 5300 is super pricey and there isnt much on the web about it. Plus it needs an activator whereas the seal krete doesn't. You can buy it at lowes which is nice too.
My next question is what kind of filler should I use for the gains where pulling up the braid messed it up? I bought both DAP plastic wood and automotive body filler.
Thanks for any help in advance!
AJ Fox
Manager Quaker City Motorsports Park
Salem, Ohio 44460
(330) 771-1534
www.raceqcmp.com
Manager Quaker City Motorsports Park
Salem, Ohio 44460
(330) 771-1534
www.raceqcmp.com
#15
MarkH
-
- Subscriber
-
- 530 posts Joined: 26-November 12
Race Leader
- Gender:Male
- Location:St. Louis
Posted 19 January 2019 - 07:43 AM
I have put the 5300 on 3 tracks and this stuff wears like iron. It also cleans up real easy with naphtha when prepping the track for spray glue. The spray glues works excellent. I used less than a gallon of 5300 on my 108ft track with two coats. ZORO was the cheapest place I found to buy.
A friend has some kind of garage floor paint on his track and it absorbs the glue when spread on. I don't know for sure but suspect the wood may be getting some of the glue the paint is taking in. Just a guess.
If you can at all afford it, spend the extra money for the 5300 as it is a one time investment in your track.
We used body filler to repair everything on the racing surface, gains and walls. Let it setup then finish sand or router as normal. Don't use Durhams wood repair, it will grow over time and could cause problems.
Mark Horne
SERG - www.slotcarenduro.club
"Racing is life... everything else is just waiting." Steve McQueen - LeMans
There are only two things in life that make me feel alive. Racing is one of them.
#16
AJ_Fox_QCMP
-
- Full Member
-
- 16 posts Joined: 10-January 19
Rookie Keyboard Racer
- Gender:Male
- Location:Salem, OH
Posted 19 January 2019 - 08:06 AM
Thanks Mark for the quick response! I'll go ahead and buy the 5300 then. Roughly how long does the paint last once you mix in the activator?
As for the body filler, is this what you're talking about?
https://www.homedepo...-0265/202077783
I bought this because it said non shrinking
https://www.homedepo...00585/207193523
AJ Fox
Manager Quaker City Motorsports Park
Salem, Ohio 44460
(330) 771-1534
www.raceqcmp.com
Manager Quaker City Motorsports Park
Salem, Ohio 44460
(330) 771-1534
www.raceqcmp.com
#17
MarkH
-
- Subscriber
-
- 530 posts Joined: 26-November 12
Race Leader
- Gender:Male
- Location:St. Louis
Posted 19 January 2019 - 08:54 AM
Prime the whole surface with a quality product before the 5300. Be sure to have NO runs or build up in the gains/racing surface. Be sure everything is prepped and ready for the first coat.
Only mix half of the 5300. It needs to sit for 10 minutes or so to start the activation before application.
You have an easy 30 minutes up to 45 minutes to paint the surfaces. Use a 1/4" short nap roller it will generate a nice texture perfect for our needs. If you have help, using a quality brush, one person should work ahead and coat the gains while the second rolls the racing surface. Be sure not to fill the gains with the rolled paint. When not if it happens have the guy with he brush smooth out the gain area. Follow up with the roller to generate the textured surface in that area. Just a real light touch is all that is needed. Keep paint out of the slots. It only took us about 20-25 minutes to paint the 108 feet.
The first coat will look horrible. Seems like we waited about an hour for the first coat to setup then applied the second coat. Follow the same steps as the first coat. The second coat will come to life and look great. Throw away the rollers after each use. So buy 2-4 rollers as needed.
Be sure to let the 5300 setup for several days before moving on to the next step. On my track we waited 5 days before applying the tape and braid. This stuff gets harder over time.
On another note, I used the regular Home Depot / Lowes MDF. It is lighter weight than the recommended 90-120lb stuff the pros might be using. I had some trouble with the slots in the corners breaking when cars would de-slot. After some trials I found the Ultra Thin super glue one can buy at the hobby shops fixed the problem. I bought a plastic bottle with a metal needle point and applied the super glue to both sides of the slots in the corners. Just from the top corner of the slot down and let it wick into the MDF. It fixed my problem and I have not seen anymore slot damage.
I bring this up because I wish I had performed the application before painting. If you do this before painting, keep the glue off the gain.
Mark Horne
SERG - www.slotcarenduro.club
"Racing is life... everything else is just waiting." Steve McQueen - LeMans
There are only two things in life that make me feel alive. Racing is one of them.
#18
MattD
-
- Full Member
-
- 3,561 posts Joined: 13-August 11
Posting Leader
- Gender:Male
- Location:IN
Posted 19 January 2019 - 12:39 PM
You may try just painting the slot and the gains the lane color, red, white, black, whatever, latex worked fine for me. After a couple days tape the slot and gains with 3/4 wide masking tape, lightly. Then roll your two coats of track finish and don't worry with the gains or slot. Remove the tape and you will end up with the slot and little bit of the gains painted lane color. After braiding, it will look great and not have the loud pin striping on each side of the braid. Lane color will be subtle but very visable.

- Lou E and MarkH like this
Matt Bishop
#19
AJ_Fox_QCMP
-
- Full Member
-
- 16 posts Joined: 10-January 19
Rookie Keyboard Racer
- Gender:Male
- Location:Salem, OH
Posted 20 January 2019 - 02:41 AM
I like that idea Dale, Thanks! I was debating on painting over the epoxy once it had dried but it would probably last longer if I applied the latex to the bare mdf once I route it.
AJ Fox
Manager Quaker City Motorsports Park
Salem, Ohio 44460
(330) 771-1534
www.raceqcmp.com
Manager Quaker City Motorsports Park
Salem, Ohio 44460
(330) 771-1534
www.raceqcmp.com
#20
AJ_Fox_QCMP
-
- Full Member
-
- 16 posts Joined: 10-January 19
Rookie Keyboard Racer
- Gender:Male
- Location:Salem, OH
Posted 25 January 2019 - 06:04 PM
What kind of material do most tracks use to make the walls? Right now my track is using 1/4" particle type board and its really flimsy.
AJ Fox
Manager Quaker City Motorsports Park
Salem, Ohio 44460
(330) 771-1534
www.raceqcmp.com
Manager Quaker City Motorsports Park
Salem, Ohio 44460
(330) 771-1534
www.raceqcmp.com
#21
MarkH
-
- Subscriber
-
- 530 posts Joined: 26-November 12
Race Leader
- Gender:Male
- Location:St. Louis
Posted 25 January 2019 - 06:16 PM
I used MDF on the straights and the larger radii corners. On the inside I used two layers of 1/4" plywood. The will be easy to bend in one direction to make the tight inside walls. Screw and glue the first layer to your blocks. Use plenty of PL3 adhesive or equivalent and plenty of clamps with the second layer. Let fully cure before removing clamps
I left the walls taller than needed and trimmed them down to final height from the racing surface. Be sure to leave the outside corners taller to catch a de-slot. Then I trimmed trim the bottom to the thickness / height, about 10-12". Then the lower walls were blended into the higher corner walls. I also lowered some of the walls a bit for better drive sight lines in a couple of spots. After all the heights were good, I used a 60 grit sheet on a block of wood and rounded all the top wall edges.
Mark Horne
SERG - www.slotcarenduro.club
"Racing is life... everything else is just waiting." Steve McQueen - LeMans
There are only two things in life that make me feel alive. Racing is one of them.
#22
MSwiss
-

- IRRA National Director
-
- 25,968 posts Joined: 16-April 06
Grand Champion Poster
- Gender:Male
Posted 25 January 2019 - 07:27 PM
If you are looking not to destroy cars, don't use any type of 1/4", 3/8", or 1/2" wood or particle board product.What kind of material do most tracks use to make the walls? Right now my track is using 1/4" particle type board and its really flimsy.
The best stuff to use, hands down, although a bit expensive, is 3/32" Lexan®.
You can see through it, so visibility is great, no matter the height.
And it really soaks up the shock of a wreck, without damaging the car.
- Michael Jr. likes this
Mike Swiss
Inventor of the Low CG guide flag 4/20/18
IRRA® Components Committee Chairman
Five-time USRA National Champion (two G7, one G27, two G7 Senior)
Two-time G7 World Champion (1988, 1990), eight G7 main appearances
Eight-time G7 King track single lap world record holder
17B West Ogden Ave., Westmont, IL 60559, (708) 203-8003, mikeswiss86@hotmail.com (also my PayPal address)
Note: Send all USPS packages and mail to: 692 Citadel Drive, Westmont, Illinois 60559
#23
MattD
-
- Full Member
-
- 3,561 posts Joined: 13-August 11
Posting Leader
- Gender:Male
- Location:IN
Posted 25 January 2019 - 07:43 PM
I used 1/2 MDF for outside walls and a double layer of 1/4 MDF for inside. It was much easier when I cut it into 12=1-4 inch strips and bent it circular and held it in that shape with a ratchet tie down strap for a couple days before I used them. They retain the curve after a few days and make it much easier to do a tight curve. Just what I did and it worked OK.
Matt Bishop
#24
AJ_Fox_QCMP
-
- Full Member
-
- 16 posts Joined: 10-January 19
Rookie Keyboard Racer
- Gender:Male
- Location:Salem, OH
Posted 26 January 2019 - 08:22 PM
Thanks again guys! Do you have any suggestions on how to remove the old yellow glue that's left behind from pulling up the braid? I tried scraping it off but it's taking forever and still doesn't do a great job. I'll take pics once I figure how to scale them down on my phone.
AJ Fox
Manager Quaker City Motorsports Park
Salem, Ohio 44460
(330) 771-1534
www.raceqcmp.com
Manager Quaker City Motorsports Park
Salem, Ohio 44460
(330) 771-1534
www.raceqcmp.com
#25
MSwiss
-
- IRRA National Director
-
- 25,968 posts Joined: 16-April 06
Grand Champion Poster
- Gender:Male
Posted 26 January 2019 - 08:44 PM
You can use a router with the bit that is used to cut the braid recess on new tracks.
But you have to be real careful not to go too deep.
If you want to remove it with a bit of elbow grease, use Trinity Sticky Fingers.
It should soften up the glue where it becomes easy to scrape off.
But you have to be real careful not to go too deep.
If you want to remove it with a bit of elbow grease, use Trinity Sticky Fingers.
It should soften up the glue where it becomes easy to scrape off.
Mike Swiss
Inventor of the Low CG guide flag 4/20/18
IRRA® Components Committee Chairman
Five-time USRA National Champion (two G7, one G27, two G7 Senior)
Two-time G7 World Champion (1988, 1990), eight G7 main appearances
Eight-time G7 King track single lap world record holder
17B West Ogden Ave., Westmont, IL 60559, (708) 203-8003, mikeswiss86@hotmail.com (also my PayPal address)
Note: Send all USPS packages and mail to: 692 Citadel Drive, Westmont, Illinois 60559


