

Hi Pablo,
I have tried 60/40, and for me silver solder just seemed to work better...but I DO tin the area first with 60/40 as that seems to help!

Filling old can screw holes with solder
Started by
havlicek
, Sep 19 2019 07:05 AM
32 replies to this topic
#26

havlicek
-
- Subscriber
-

- 11,198 posts Joined: 20-August 07
OCD Rewinder
- Gender:Male
- Location:NY
Posted 21 September 2019 - 10:36 AM
John Havlicek
#27
MSwiss
-

- IRRA National Director
-
- 26,012 posts Joined: 16-April 06
Grand Champion Poster
- Gender:Male
Posted 21 September 2019 - 10:49 AM
Now that I understand what you are doing, a brass jewelers screw should be a convenient filler to solder in.
It would just require a little bit of restraint, when grinding the head, or stub, down to flush, as not to heat it up too much, and fall out.
It would just require a little bit of restraint, when grinding the head, or stub, down to flush, as not to heat it up too much, and fall out.
- Jaeger Team likes this
Mike Swiss
Inventor of the Low CG guide flag 4/20/18
IRRA® Components Committee Chairman
Five-time USRA National Champion (two G7, one G27, two G7 Senior)
Two-time G7 World Champion (1988, 1990), eight G7 main appearances
Eight-time G7 King track single lap world record holder
17B West Ogden Ave., Westmont, IL 60559, (708) 203-8003, mikeswiss86@hotmail.com (also my PayPal address)
Note: Send all USPS packages and mail to: 692 Citadel Drive, Westmont, Illinois 60559
#28
Jaeger Team
-

- Full Member
-
- 519 posts Joined: 27-January 17
Race Leader
- Gender:Male
- Location:Palermo, Italy
Posted 22 September 2019 - 03:52 AM
Hi Maurizio,
It would be easier to put the metal on the inside as described above, since the metal would only have to be taken down enough to make fitting the end bell work...not so much as to almost disappear under paint. I'll probably start just filling the hole with rod or a screw, instead of trying to make solder alone fill the hole.
Now that I understand what you are doing, a brass jewelers screw should be a convenient filler to solder in.
It would just require a little bit of restraint, when grinding the head, or stub, down to flush, as not to heat it up too much, and fall out.
It definetely seems to me the best way ! (Now I see how triky was my suggestion)
Maurizio Salerno
#29
havlicek
-
- Subscriber
-
- 11,198 posts Joined: 20-August 07
OCD Rewinder
- Gender:Male
- Location:NY
Posted 22 September 2019 - 05:41 AM
Hi Maurizio...yep, I'm starting to think that the best way is to (*as Mike and others noted) use some filler metal (*screw, rod, etc.) and stop torturing myself. A lot of these old can holes are rather large as well as being stripped-out, to make matters worse. A #2 tapping screw that's been wrangled in and out over time can do a lot of damage! 
John Havlicek
#30
havlicek
-
- Subscriber
-
- 11,198 posts Joined: 20-August 07
OCD Rewinder
- Gender:Male
- Location:NY
Posted 22 September 2019 - 06:14 AM
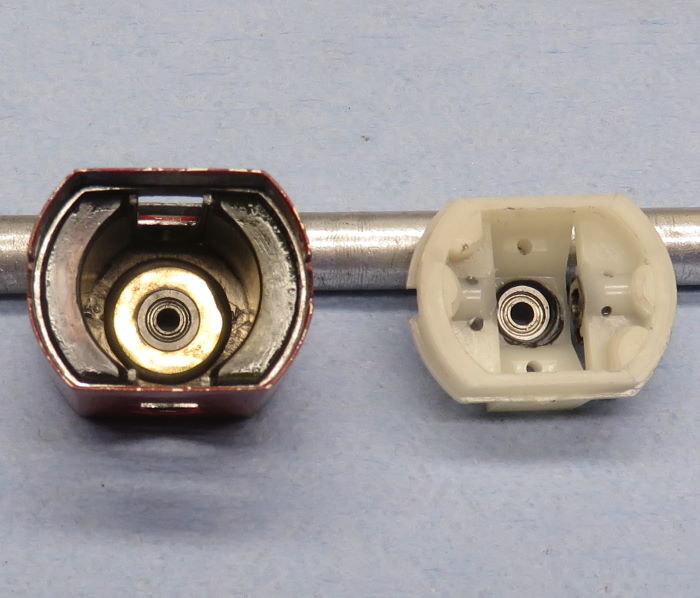
With the old can holes filled and the can painted, adapters and bearings installed, it was time to get busy on the inside stuff.
-An FC280 Mabuchi donated it's magnets. These are as strong or stronger than Arcos, but like the Arcos need a shim to get to an appropriate size I.D. or "hole" in the 26D can. In their original FC280 home, they make for a dead-bang perfect hole around .020" - .025" over the .590" arm diameter, so using the FC280 can itself for the shim is a natural. In order to make that work, you can't just cut the length down, you also have to do a bunch of thinning-down of the can metal. You also need to watch the sharp corners of the resulting shim, because the inside corners of the 26D can are not sharp, but have a slight radius. That alone can make the shim not work...I found this out the hard way first time I tried this.
-The FC280 magnets themselves are also longer than the stock 26D magnets. They will JUST fit if you remove the magnet stop stabs at the rear of the can, but building an arm to fit will result in a very short tail-spacer...even shorter than usual for these motors, so in this case I shortened the magnets to the same length as the earlier Mabuchi 26D magnets. That is a messy time-consuming job, but you also save a little weight because the magnets are the heaviest single part of the 26D setup. Measuring the magnets before and after confirms that the cutting doesn't seem to hurt their strength, and the just-over .400" stack length of the 26D arm makes the longer magnets unnecessary.
-After making the shim and cutting the magnets to length, the original magnets, U-clips and shim can all get installed as a single assembly with some epoxy to keep it all in place...although it's a very snug fit and I doubt it would shift around at all.
-The end bell hardware is normal, and I most often don't solder the hoods anymore. Instead, I drill the end bell and bed the brush tubes or "heatsinks" in JB Weld. I think this is probably better insurance against melt-down.
NOW I can build and space an arm. For this, the same FC280 donor motor gave up it's arm blank after stripping and shortening it. ***This one had 230 turns of hair thin wire on it!

- Geary Carrier likes this
John Havlicek
#31
Geary Carrier
-
- Full Member
-
- 614 posts Joined: 23-April 16
Race Leader
- Gender:Not Telling
- Location:CT
Posted 22 September 2019 - 11:53 AM
Nice package John,
29 turns of 27...
Yes, to be sure, this is it...
#32
havlicek
-
- Subscriber
-
- 11,198 posts Joined: 20-August 07
OCD Rewinder
- Gender:Male
- Location:NY
Posted 22 September 2019 - 01:30 PM
Thanks Geary. I generally keep these old Mabuchis on the more conservative side, and 29/27 would be a pretty radical wind for such a motor. I did this one 44/28R (*the "R" being for reverse wind), as I think it will be still within the realm of "reasonable" (*although way way faster than your average stock "blue wire 26D") as well as more like what might have been done back then. After all, there is still the same plastic end bell to contend with, and I would like for this motor to be able to go into a thingie or some other road racer.
The 44/28R:
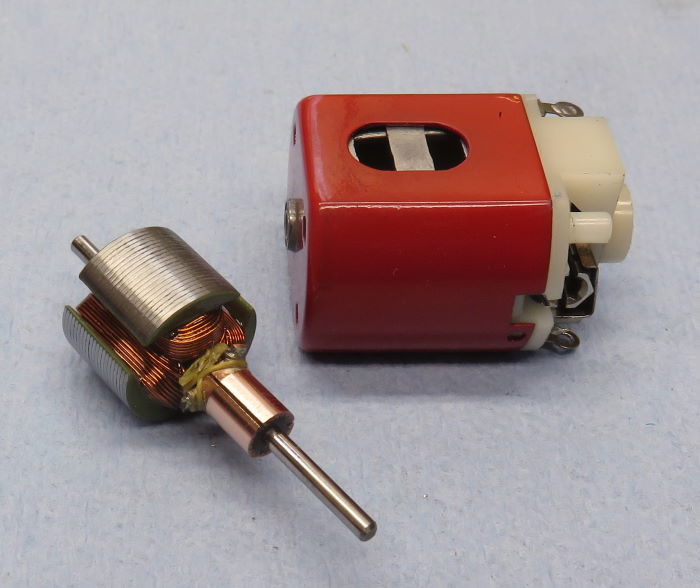
"Mocked-up" temporarily, and in the setup:
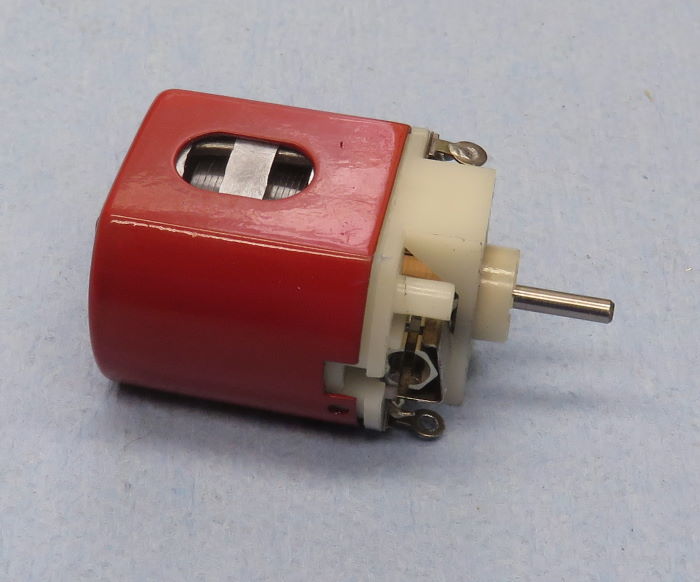
...out she goes to Paul Pfeiffer for grind/balance in the next group of arms!
PS...I had a brief conversation with a vintage expert about the 26D and what winds were done, not counting home-brewed stuff. He pretty much confirmed that he wasn't sure, but thought *maybe* there were some #26 wire arms done, but that 26D developement hit a wall as the Muras began to take over.
- Jencar17, olescratch, Geary Carrier and 1 other like this
John Havlicek
#33
Dave_12
-

- Full Member
-
- 138 posts Joined: 06-June 24
Mid-Pack Racer
- Gender:Male
- Location:Sydney, Australia
Posted 29 August 2024 - 08:56 PM
if the magnets have been removed then silver braze the holes is the best way . When the can cools down any excess can be tidied up with a rotary tool.
The can will look like new then
- Bill from NH likes this
David Rees


