Jump to content


Photo

A tale of two Bandits - part 2


  • Please log in to reply
36 replies to this topic

#1 Larry Horner

Larry Horner

    On The Lead Lap

  • Full Member
  • PipPipPipPip
  • 404 posts
  • Joined: 18-March 17
  • Gender:Male
  • Location:San Francisco

Posted 11 January 2020 - 02:49 PM

Part 1 of this saga began with a quest to recreate my first Dynamic Bandit (http://slotblog.net/...of-two-bandits/). And with the huge help of a number of members and Pablo’s craftsmanship to take it over the finish line, I now have a very sweet handling Bandit indeed! And it’s just like something one might have encountered back in the day. But since I had an extra Bandit body (thanks Gene!), I wanted to see about making the most performant Bandit I could with my own meager build skills and modern parts and design concepts. And so begins part 2 of this saga…


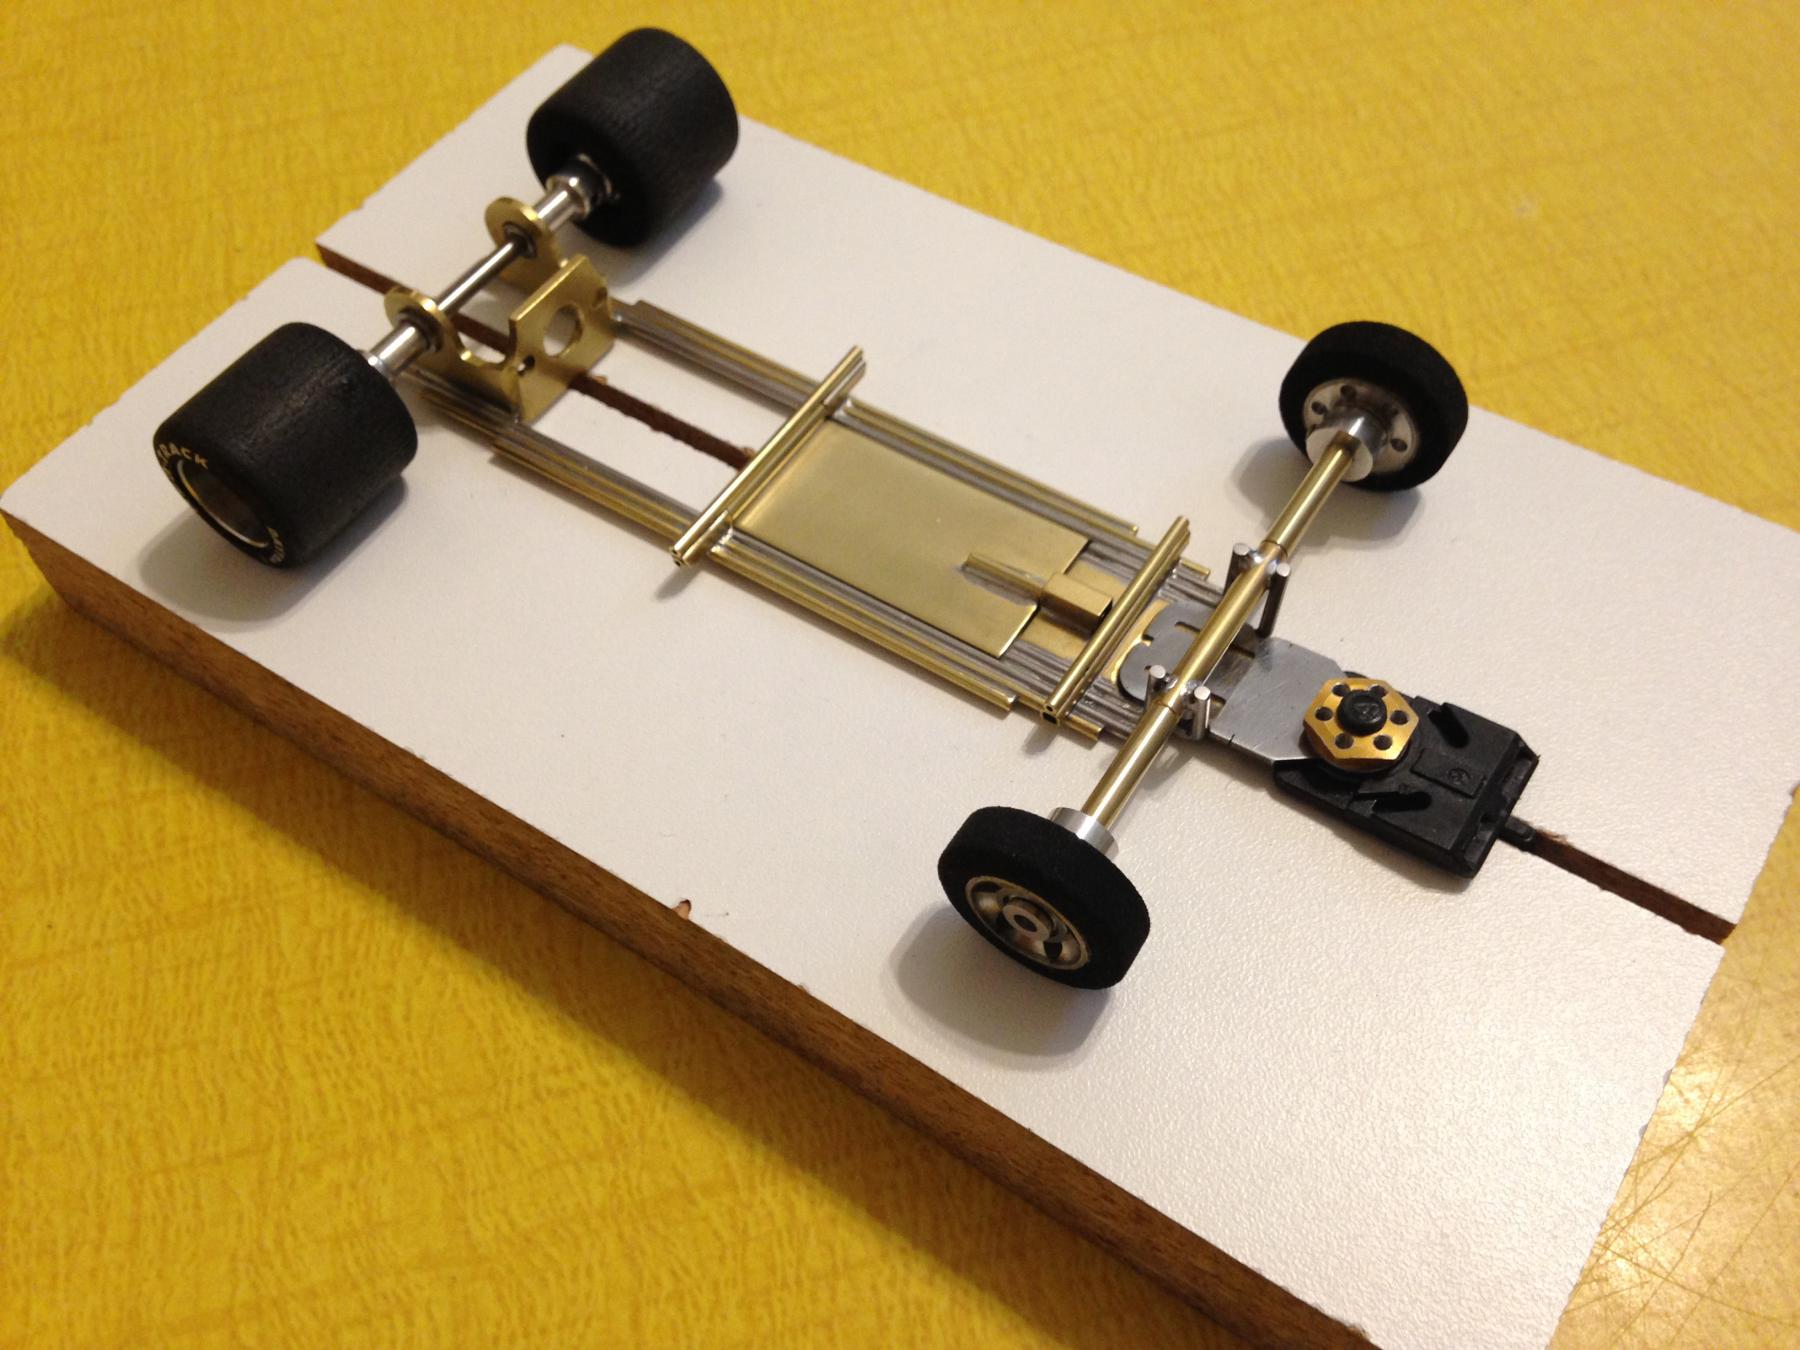
For the basic design, I choose to go with a contemporary IRRA F1 layout sans the outriggers as there just isn’t the room under a Bandit body. So basically it will be a standard 3/4” stainless steel loop flanked by a pair of brass rods. It will also have the defacto floating inner pan although in this case it will be a plumber design (sorry Dennis). Finally I’ll be using modern hardware as well, namely an offset RGEO motor bracket and MSwiss 2 degree guide tongue.


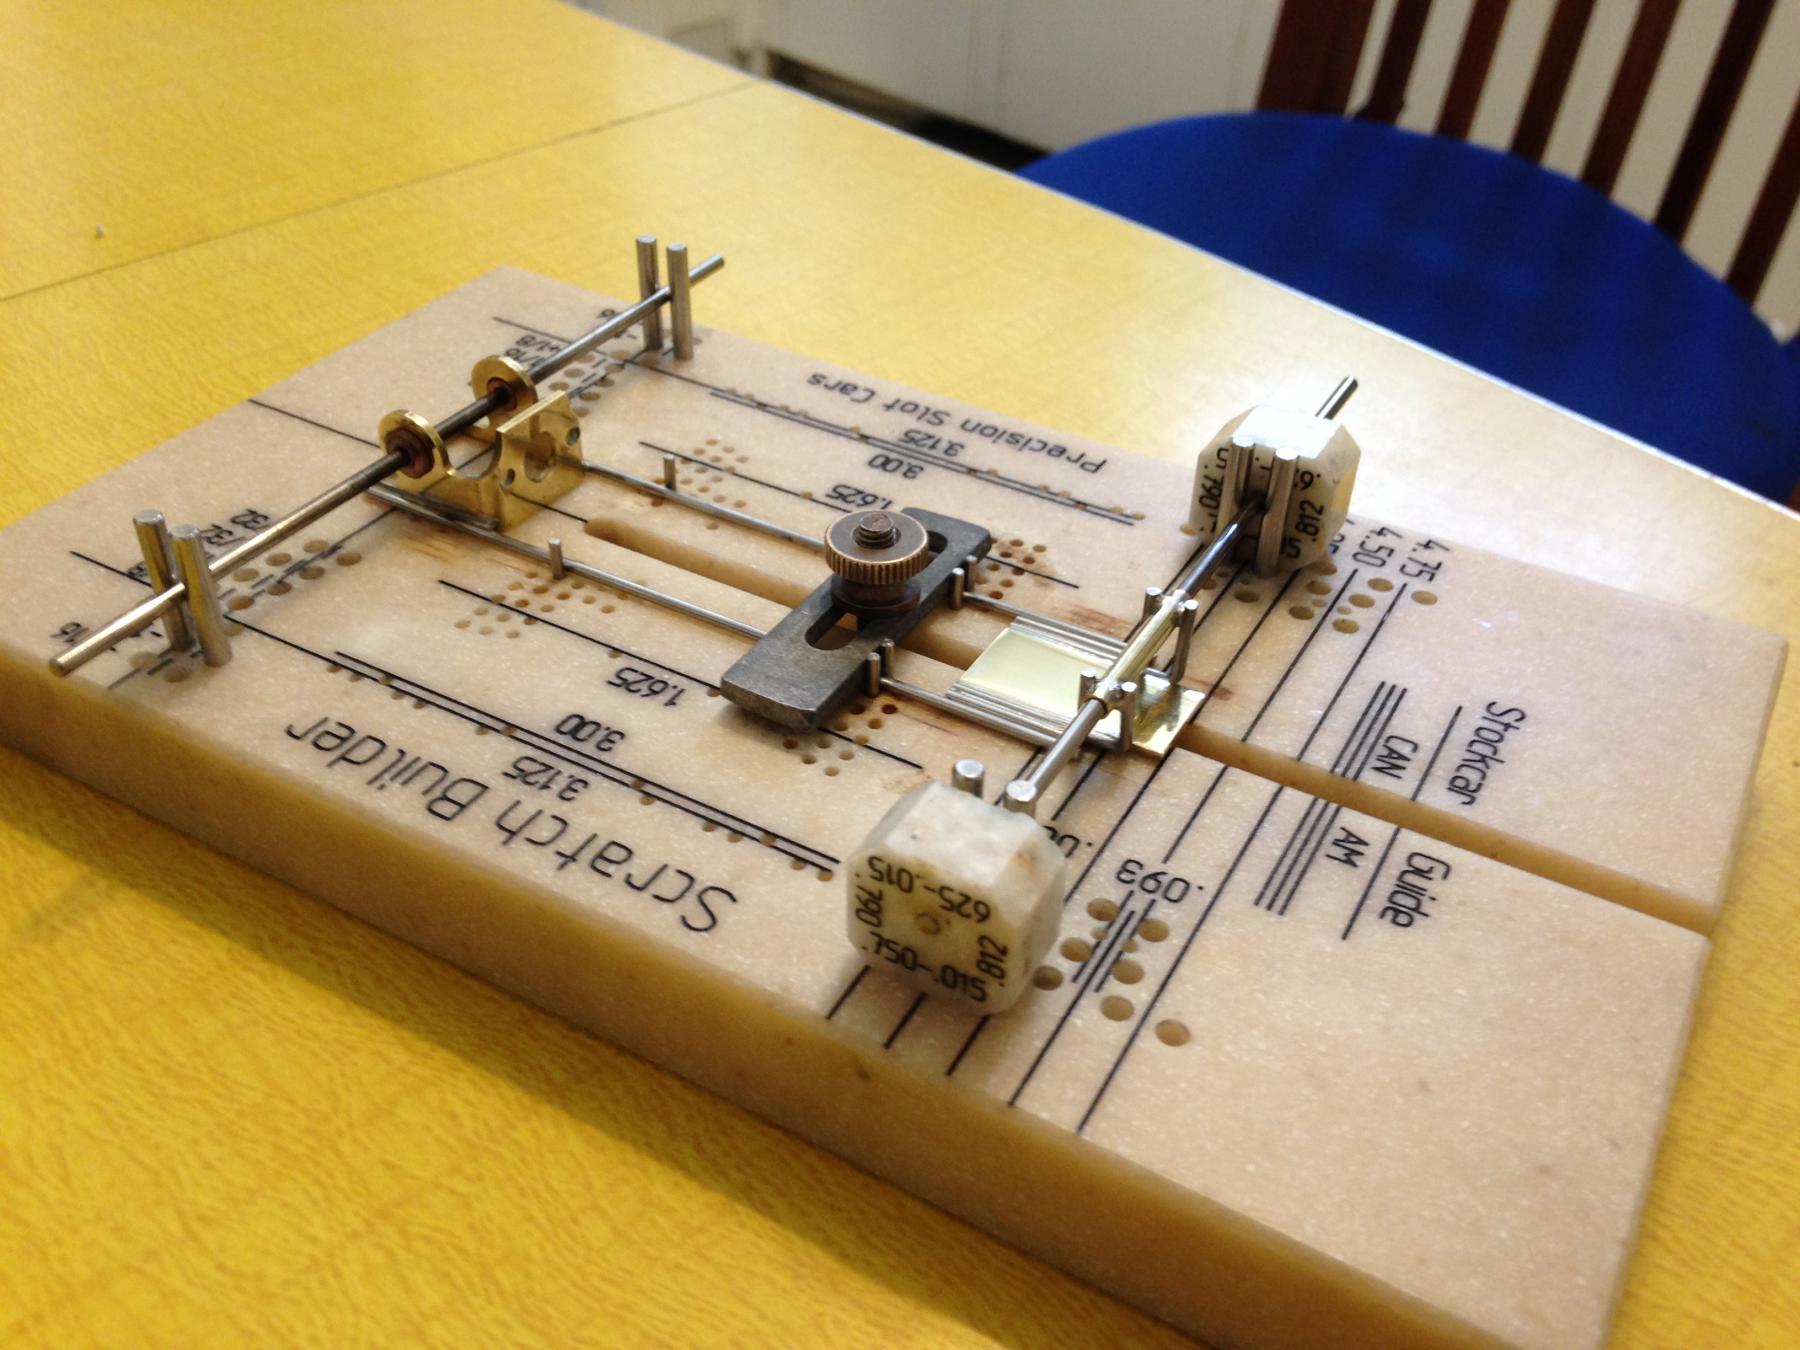
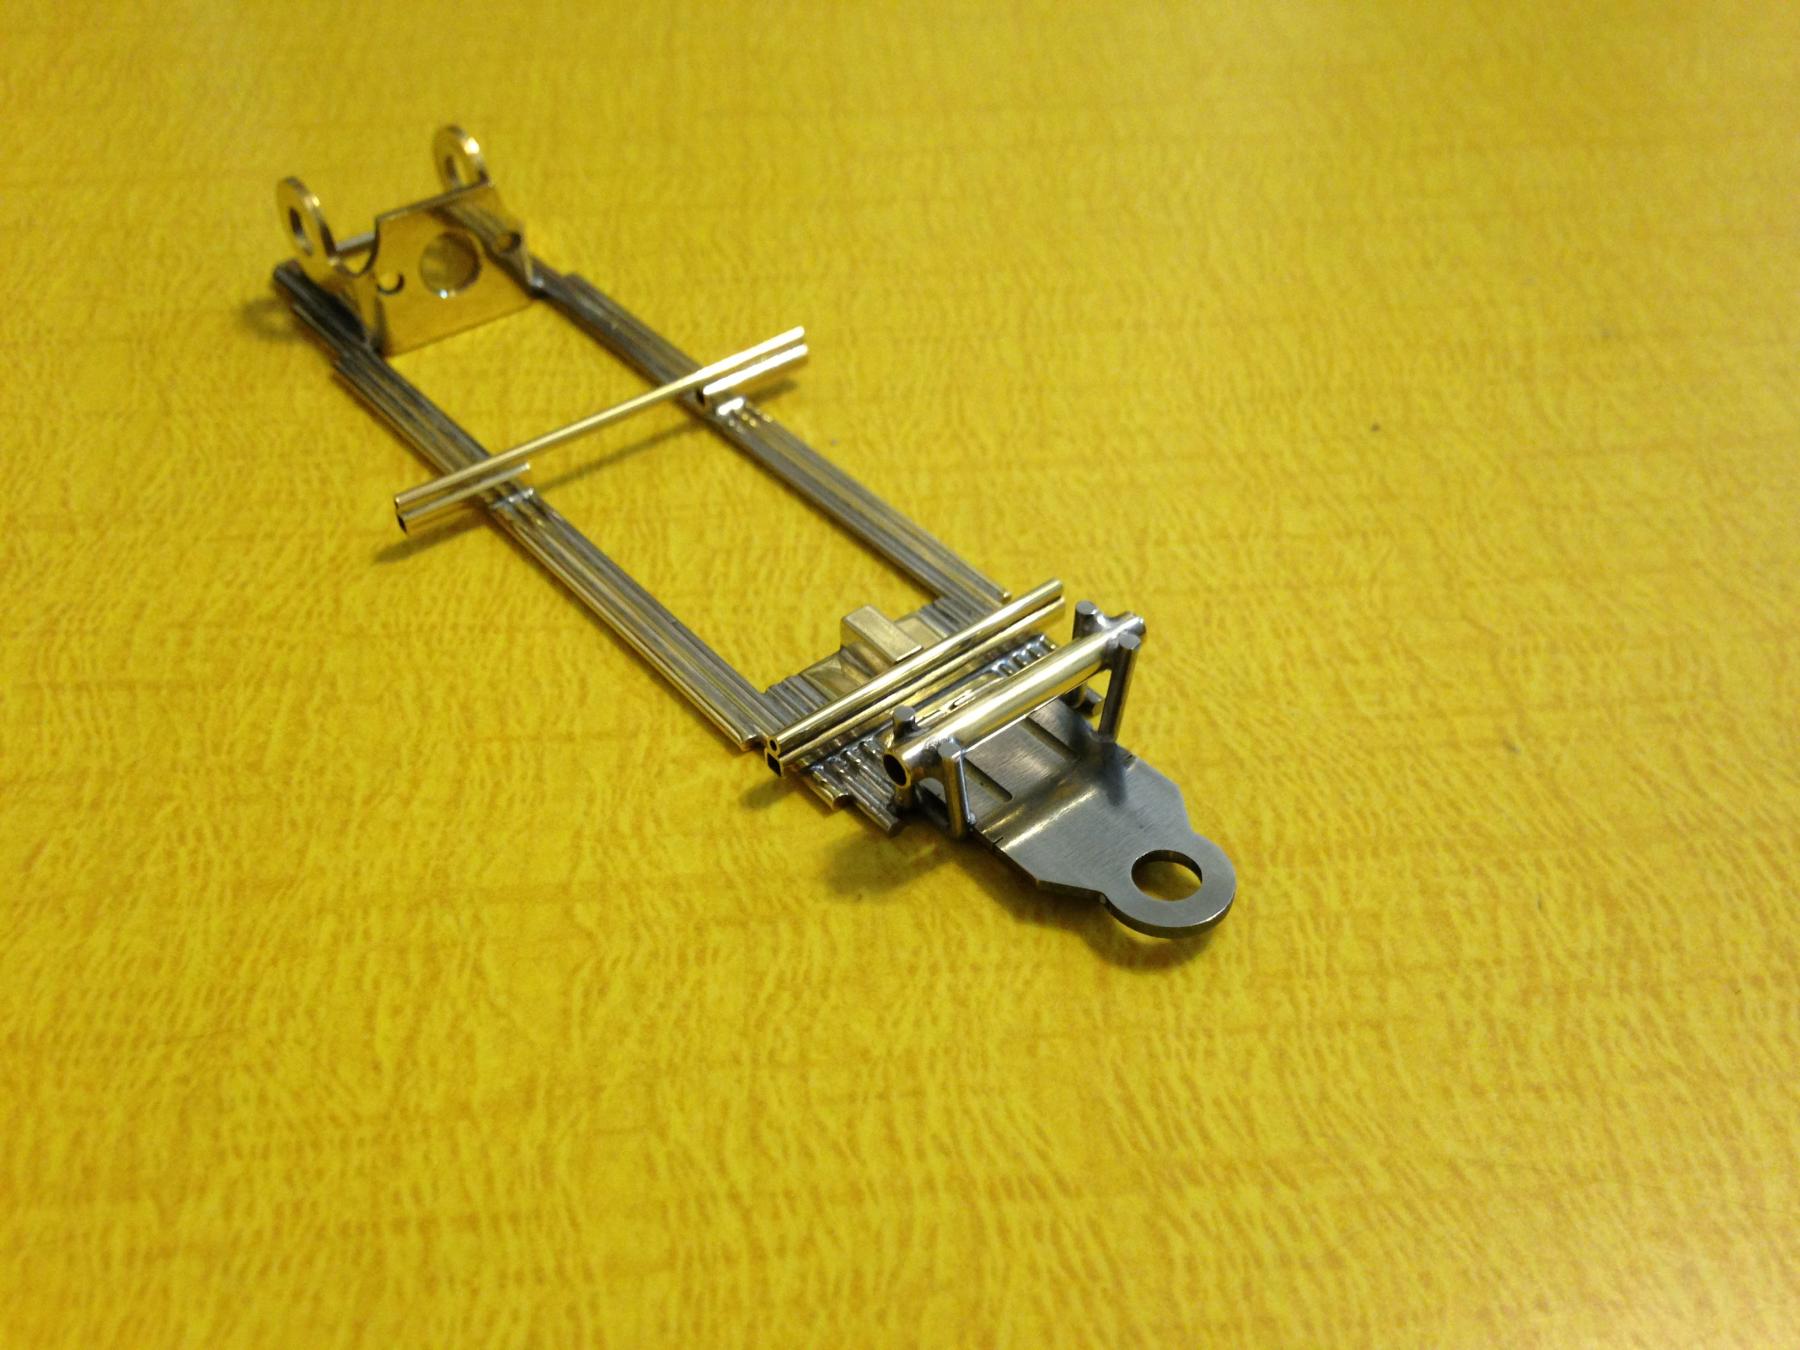
I realized a sticky point in this design would be the ultra narrow Bandit front end so I decided to start there first. My idea was to build it as a 3/4” subsection that I could later drop into the main loop. This ended up being a 1” strip of 1/2” by 1/16” brass flanked by 1/16”” SS axel risers. I’m also concerned with the front end being fairly fragile so I’m not going to have a solid axel but rather solder in some 3/32” tubing between the risers. My thinking here is that I can use hollow axels which are easy to replace and hopefully will bend in a major impact leaving the main frame undamaged … that’s the theory anyway!


Below are some construction shots of front subassembly construction:

Attached Images

  • 01 - Front Construction.JPG
  • 02 - Front Subassembly.JPG

  • Jencar17, olescratch and Geary Carrier like this


#2 Larry Horner

Larry Horner

    On The Lead Lap

  • Full Member
  • PipPipPipPip
  • 404 posts
  • Joined: 18-March 17
  • Gender:Male
  • Location:San Francisco

Posted 11 January 2020 - 02:56 PM

Here I'm cobbling together the main frame loop and dropping in the frontend sub-assembly.

Attached Images

  • 03 - Main Loop.JPG
  • 04 - Front Installation.JPG

  • Jencar17 likes this

#3 Larry Horner

Larry Horner

    On The Lead Lap

  • Full Member
  • PipPipPipPip
  • 404 posts
  • Joined: 18-March 17
  • Gender:Male
  • Location:San Francisco

Posted 11 January 2020 - 02:58 PM

Finally I've added the brass side rails and so completes the basic chassis loop.

Attached Images

  • 05 - Brass Rails.JPG

  • Pablo, Jencar17, ajd350 and 3 others like this

#4 Pablo

Pablo

    Builder

  • Administrator
  • PipPipPipPipPipPipPipPip
  • 18,353 posts
  • Joined: 20-February 06
  • Gender:Male
  • Location:Cleveland, Tennessee

Posted 11 January 2020 - 04:14 PM

I like it  :D   :good:   :popcorm1:


Paul Wolcott


#5 Martin

Martin

    Posting Leader

  • Full Member
  • PipPipPipPipPipPipPip
  • 3,900 posts
  • Joined: 22-February 09
  • Gender:Male
  • Location:US

Posted 11 January 2020 - 07:36 PM

Go buddy go :clapping:


Martin Windmill

#6 Larry Horner

Larry Horner

    On The Lead Lap

  • Full Member
  • PipPipPipPip
  • 404 posts
  • Joined: 18-March 17
  • Gender:Male
  • Location:San Francisco

Posted 12 January 2020 - 02:02 PM

Thanks for the props guys!


With the main loop finished, I moved on to the front body mounts next. These are just standard pin tubes but raised on 3/32" box tubing to move them up a bit higher in the body. A side effect is that this should also help tie the plethora of chassis rails together.


Attached Images

  • 06 - Front Body Mount.JPG

  • Jencar17 likes this

#7 Larry Horner

Larry Horner

    On The Lead Lap

  • Full Member
  • PipPipPipPip
  • 404 posts
  • Joined: 18-March 17
  • Gender:Male
  • Location:San Francisco

Posted 12 January 2020 - 02:06 PM

And since my pan is going to use a plummer hinge, it needs to be controlled. So here I've added a snippet of U channel to provide a top stop.


Attached Images

  • 07 - Pan Stop.JPG

  • slotbaker, Pablo, Jencar17 and 1 other like this

#8 Larry Horner

Larry Horner

    On The Lead Lap

  • Full Member
  • PipPipPipPip
  • 404 posts
  • Joined: 18-March 17
  • Gender:Male
  • Location:San Francisco

Posted 12 January 2020 - 02:12 PM

Next up is adding the rear 3/32 box tubing to support the rear pin tube. Here I've cut out the central section in which the hinge will go. The second shot has the pin tube added. I'll adjust the width of the front and back pin tubes later when I mount the body.

Attached Images

  • 08 - Pan Hinge.JPG
  • 09 - Pan Hinge with Body Mount.JPG

  • slotbaker, Pablo, Jencar17 and 3 others like this

#9 Bill from NH

Bill from NH

    Age scrubs away speed!

  • Full Member
  • PipPipPipPipPipPipPipPip
  • 14,274 posts
  • Joined: 02-August 07
  • Gender:Male
  • Location:New Boston, NH

Posted 12 January 2020 - 09:44 PM

Larry, you're a very accomplished chassis builder. Your quality workmanship is very similar to Rick Thigpen's. I would think you've been at it for awhile. :)


Bill Fernald
 
I intend to live forever!  So far, so good.  :laugh2:  :laugh2: 

#10 Larry Horner

Larry Horner

    On The Lead Lap

  • Full Member
  • PipPipPipPip
  • 404 posts
  • Joined: 18-March 17
  • Gender:Male
  • Location:San Francisco

Posted 12 January 2020 - 11:25 PM

Well thank you Bill but I'm not even close to Captain Rick's league! But curiously we do have one thing in common. Eddie's Slot Car World used to be Rick's old haunt when he lived in the Bay area and now it's my home track (https://eddies-slot-...d.business.site). If you're ever in the Bay area, Eddie's is a hoot!


#11 Larry Horner

Larry Horner

    On The Lead Lap

  • Full Member
  • PipPipPipPip
  • 404 posts
  • Joined: 18-March 17
  • Gender:Male
  • Location:San Francisco

Posted 14 January 2020 - 01:12 AM

Next on the agenda was mounting the guide tongue. An issue here is that the MSwiss tongue is slightly wider than 1/2” which is the space between my front axel risers. Solution was to notch both sides of the tongue a tad to allow clearance for the risers. And since the riser splay out at the top, it’ was easy to slide the tongue in at the top and drop it into place.


And now after Bill’s earlier accolades, it’s time to bring it back to earth. With as much work as I’d put into the various pieces up front, I was afraid to use the tried and trued method of heating the crap out of the tongue to bond it to the chassis. So instead I found some super slow cure epoxy that claims to be stronger than JB-Weld. So I keyed the brass under the tongue, applied a liberal amount of epoxy and dropped the tongue into the goo. And a great thing about this tongue is that it has interior cutouts thru which the goo gushed hence the tongue is very stoutly keyed to the chassis. The purist in me says this is cheating and the realist says it is a simple and effective solution. Then again, modern F! cars are basically glued together so I’m gonna cut myself some slack.  :o 


Here is a shot of the chassis with tongue followed by a detailed shot from the front where you can see the epoxy (that gushed out of the slots) sanded flush to the deck of the tongue.

Attached Images

  • 10 - Tongue Installed.JPG
  • 11 - Tongue Detail.JPG

  • slotbaker, Jencar17 and Eddie Fleming like this

#12 Larry Horner

Larry Horner

    On The Lead Lap

  • Full Member
  • PipPipPipPip
  • 404 posts
  • Joined: 18-March 17
  • Gender:Male
  • Location:San Francisco

Posted 15 January 2020 - 01:15 AM

Lastly it is time to do the floating pan. Nothing fancy, just a piece of 1/16” plate with a hinge and a stop bar.

Attached Images

  • 12 - Pan.JPG

  • Pablo and Jencar17 like this

#13 Larry Horner

Larry Horner

    On The Lead Lap

  • Full Member
  • PipPipPipPip
  • 404 posts
  • Joined: 18-March 17
  • Gender:Male
  • Location:San Francisco

Posted 15 January 2020 - 01:18 AM

Here is the finished chassis. Despite my efforts to add weight wherever I could, it’s still a very meager 38gm. Once I get it rolling, me thinks it is going to need a little additional ballast. I have plans of powering this bantam weight with a Pro Slot Puppy Dog motor which I think might be a good match.

Attached Images

  • 13 - Finished Chassis.JPG

  • Pablo, Jencar17, Regis4446 and 1 other like this

#14 Larry Horner

Larry Horner

    On The Lead Lap

  • Full Member
  • PipPipPipPip
  • 404 posts
  • Joined: 18-March 17
  • Gender:Male
  • Location:San Francisco

Posted 15 January 2020 - 01:32 AM

And here is the semi rolling chassis. It’s fitted with Dennis Sampson double BB fronts (highly recommended) and is one low and narrow beast. Now I just need to finish blue-printing the motor, have a body fitted and painted (Pablo?) and take it for a test drive at Eddie’s. Thanks for reading everyone!

Attached Images

  • IMG_0753.JPG

  • Pablo, Jencar17, olescratch and 1 other like this

#15 Martin

Martin

    Posting Leader

  • Full Member
  • PipPipPipPipPipPipPip
  • 3,900 posts
  • Joined: 22-February 09
  • Gender:Male
  • Location:US

Posted 15 January 2020 - 01:47 AM

Clean workmanship Larry, look forward to seeing it mated to its Bandit body. :good:


Martin Windmill

#16 Pablo

Pablo

    Builder

  • Administrator
  • PipPipPipPipPipPipPipPip
  • 18,353 posts
  • Joined: 20-February 06
  • Gender:Male
  • Location:Cleveland, Tennessee

Posted 17 January 2020 - 06:14 PM

Bandit #2 Gene/ZR1 body rough trimmed and hand sanded with 320 and 400 grits


IMG_4727.JPG


This car won't be anything like your daddy's Bandit at all. Stay tuned  :crazy:  :D


  • Jencar17 and Rotorranch like this

Paul Wolcott


#17 Bill from NH

Bill from NH

    Age scrubs away speed!

  • Full Member
  • PipPipPipPipPipPipPipPip
  • 14,274 posts
  • Joined: 02-August 07
  • Gender:Male
  • Location:New Boston, NH

Posted 17 January 2020 - 07:01 PM

Larry, there have been a few brass/wire slot car chassis constructed entirely with epoxy, no soldering used. Edo, in Switzerland, has a couple of them.


Bill Fernald
 
I intend to live forever!  So far, so good.  :laugh2:  :laugh2: 

#18 Larry Horner

Larry Horner

    On The Lead Lap

  • Full Member
  • PipPipPipPip
  • 404 posts
  • Joined: 18-March 17
  • Gender:Male
  • Location:San Francisco

Posted 17 January 2020 - 08:13 PM

Thanks Bill and good to know! In the not so distant past, I've trashed good work with too much heat and in this case, just didn't want to risk it. Now I won't feel so guilty.


Body's looking good Pablo ... now if there were only some way to speed up the USPS.  :wacko2:


For those following along, the only problem with Bandit #1 is that Eddies where I race is very dark and it's hard to see ... not the cars fault but it is what it is. So this car is going to be bright yellow with black stripes. Pablo's already named it the Bumble Bee Bandit.


#19 Bill from NH

Bill from NH

    Age scrubs away speed!

  • Full Member
  • PipPipPipPipPipPipPipPip
  • 14,274 posts
  • Joined: 02-August 07
  • Gender:Male
  • Location:New Boston, NH

Posted 17 January 2020 - 10:34 PM

Body's looking good Pablo ... now if there were only some way to speed up the USPS.  :wacko2:


You could try the pony express. :laugh2:  :laugh2:


Bill Fernald
 
I intend to live forever!  So far, so good.  :laugh2:  :laugh2: 

#20 Alan Dodson

Alan Dodson

    Mid-Pack Racer

  • Full Member
  • PipPipPip
  • 178 posts
  • Joined: 10-January 16
  • Gender:Male
  • Location:Wichita, KS

Posted 17 January 2020 - 11:36 PM

Unfortunately, the pony express was forced to cease operations because of..................Bandits! :laugh2:


  • Pablo likes this

#21 Pablo

Pablo

    Builder

  • Administrator
  • PipPipPipPipPipPipPipPip
  • 18,353 posts
  • Joined: 20-February 06
  • Gender:Male
  • Location:Cleveland, Tennessee

Posted 21 January 2020 - 07:39 PM

Bumble Bee Bandit has arrived at The Wolcott Ranch. Up close I can say the workmanship is world-class  :heart:  :heart:  :heart:  :heart:


My job is fairly simple - trim, pin, and paint the body.  Auto Club and Dynamic decals inside, Pactra black trim tape outside for the stripes. Color will be (a custom mix of vibrant) yellow acrylic Parma Faskolor backed with Faswhite  :)


Paul Wolcott


#22 Larry Horner

Larry Horner

    On The Lead Lap

  • Full Member
  • PipPipPipPip
  • 404 posts
  • Joined: 18-March 17
  • Gender:Male
  • Location:San Francisco

Posted 21 January 2020 - 09:17 PM

Thanks Pablo but I have to give credit to Dennis Sampson who both taught me the fundamentals of soldering and also told me to buy a Hakko. Since then I've learned to destroy brass and piano wire at a much lower rate!


#23 Bill from NH

Bill from NH

    Age scrubs away speed!

  • Full Member
  • PipPipPipPipPipPipPipPip
  • 14,274 posts
  • Joined: 02-August 07
  • Gender:Male
  • Location:New Boston, NH

Posted 21 January 2020 - 10:28 PM

Now I know why you're so good, Dennis taught you! :laugh2:  :laugh2:


Bill Fernald
 
I intend to live forever!  So far, so good.  :laugh2:  :laugh2: 

#24 Pablo

Pablo

    Builder

  • Administrator
  • PipPipPipPipPipPipPipPip
  • 18,353 posts
  • Joined: 20-February 06
  • Gender:Male
  • Location:Cleveland, Tennessee

Posted 22 January 2020 - 05:34 PM

Trimming was pretty straightforward, just use the cut lines. It simply requires trimming a little at a time, going slow, check, cut, check. Then hand sanded starting with 320, then 400, then 2,000. And some Dremel use. In the end, body is level, edges are smooth, and the car slips on like a glove  :)


IMG_4787.JPG


Next step: harpoon the pin holes. I chucked the tool up to my drill, sanded it clean, and sharpened the tip  :diablo: This has to be perfect, first try


IMG_4788.JPG


Larry approved my test swatch for color, Fasyellow with a couple microdots of Createx Fluorescent Orange, backed with Faswhite


IMG_4742.JPG


  • Jencar17 and Rotorranch like this

Paul Wolcott


#25 Larry Horner

Larry Horner

    On The Lead Lap

  • Full Member
  • PipPipPipPip
  • 404 posts
  • Joined: 18-March 17
  • Gender:Male
  • Location:San Francisco

Posted 23 January 2020 - 12:07 AM

Body's looking good Pablo!  :good: I'm always amazed at how fast things progress once you take over. I know you claim to work slow but you're way faster than I am for sure.


Electric Dreams Online Shop