Jump to content


Photo

Lancer Honker build 2.0


27 replies to this topic

#1 dc-65x

dc-65x

    Grand Champion Poster

  • Subscriber
  • PipPipPipPipPipPipPipPip
  • 7,001 posts
  • Joined: 14-February 06
  • Gender:Male
  • Location:Captain Rick: The only vintage slot car nut in SW Oregon?

Posted 06 February 2025 - 01:20 PM

How can I not build one of these beauties............
 
honker (3).jpg
 
honker (1).jpg
 
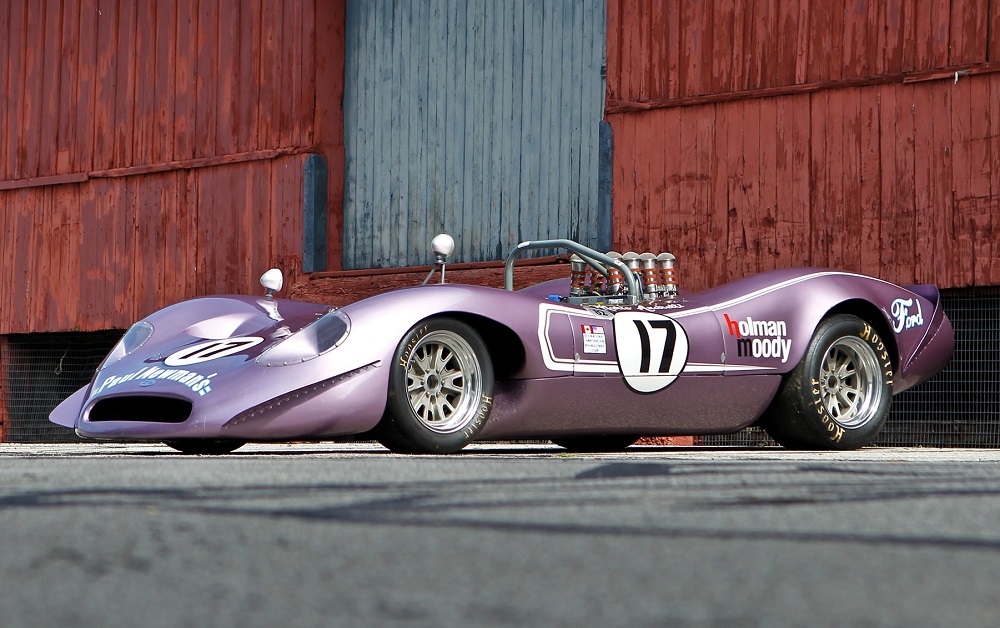
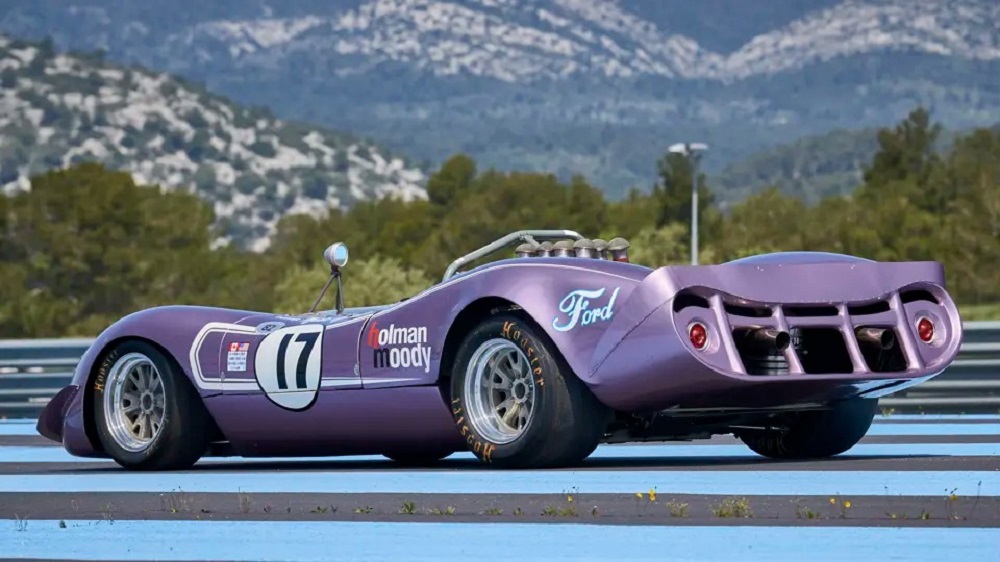
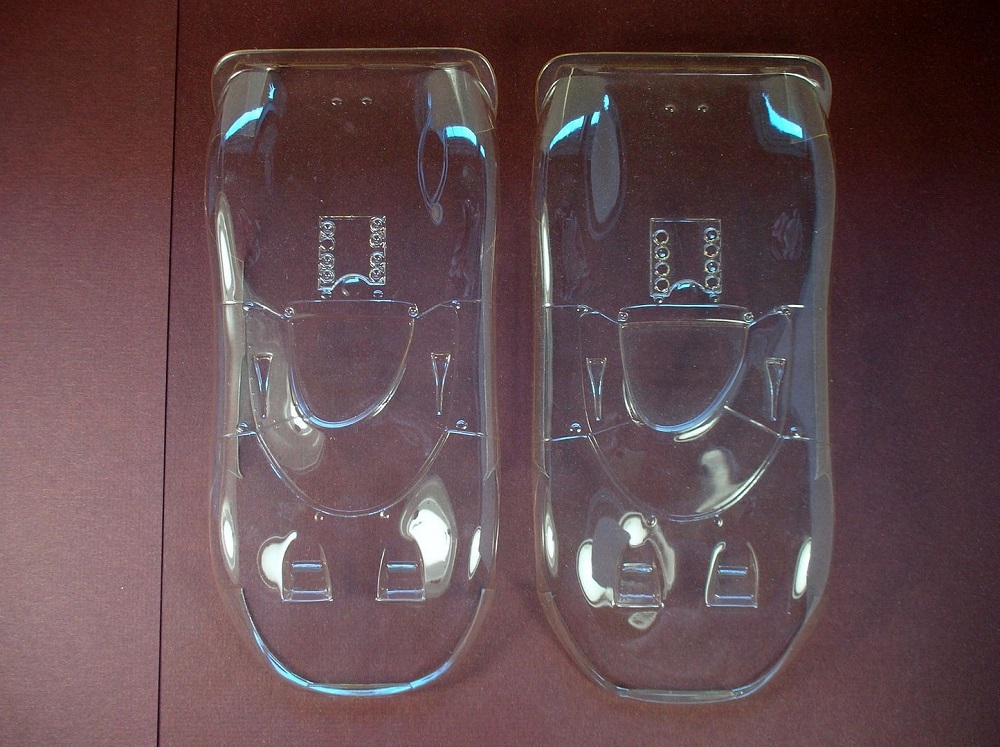
.............when I have this equally stunning Lancer scale lightweight body:
 
honker body (1).jpg
 
I'm going with the Lancer's narrower scale version on the left:
 
honker body (2).jpg
 
I'm approaching this build the same way I intended to build it in my last build thread..........but that one turned into a King Cobra build.  :crazy:


Here's a link to that thread:


Lancer Honker build now a King Cobra!


I want to have some fun with my scale bodies like my Lancer Honker so I’m going to open things up from my usual approach to vintage building by doing the following:

  • Approach this build as if I was a hobbyist back in the early 70’s building just for the fun of it.
  • Use any vintage or repop vintage component available from the early 1960’s to the early 1970’s.
  • Use any style of vintage motor and chassis design from the early 1960’s to the early 1970’s.
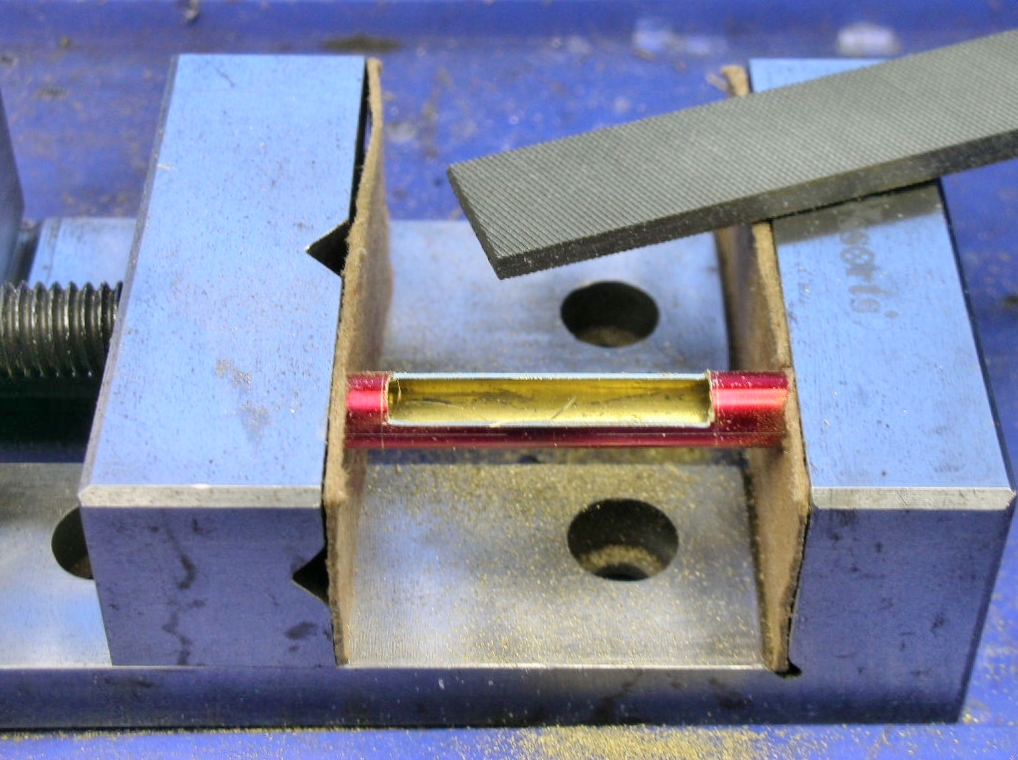
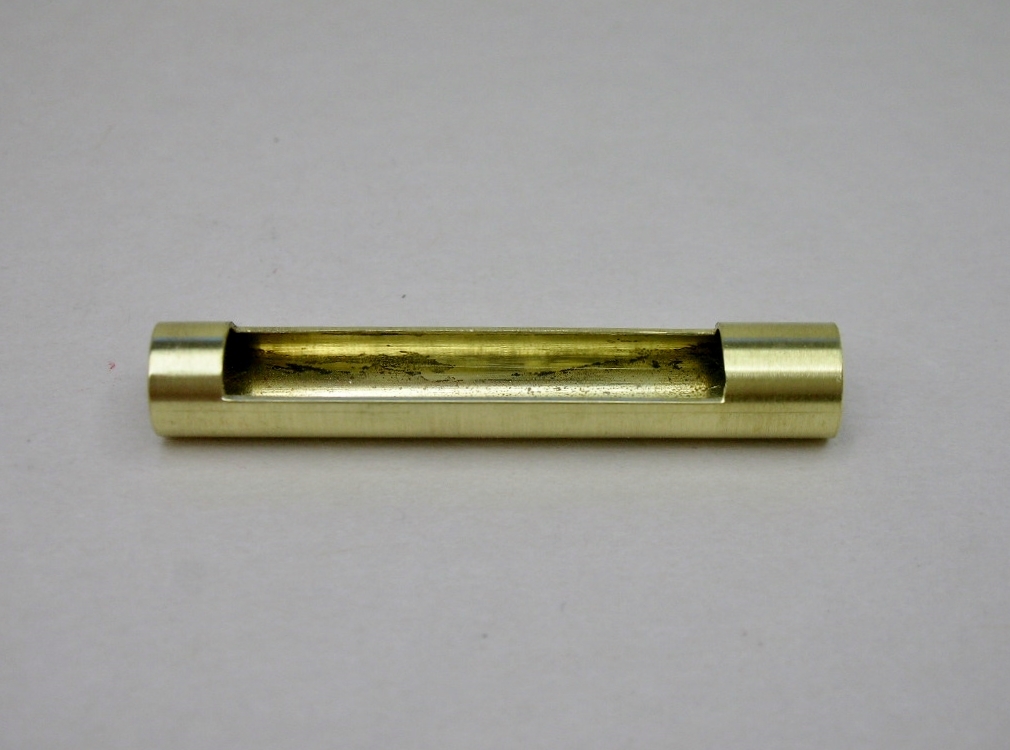
OK, time to take my time machine back to the early 1970’s and get to work on my Honker.


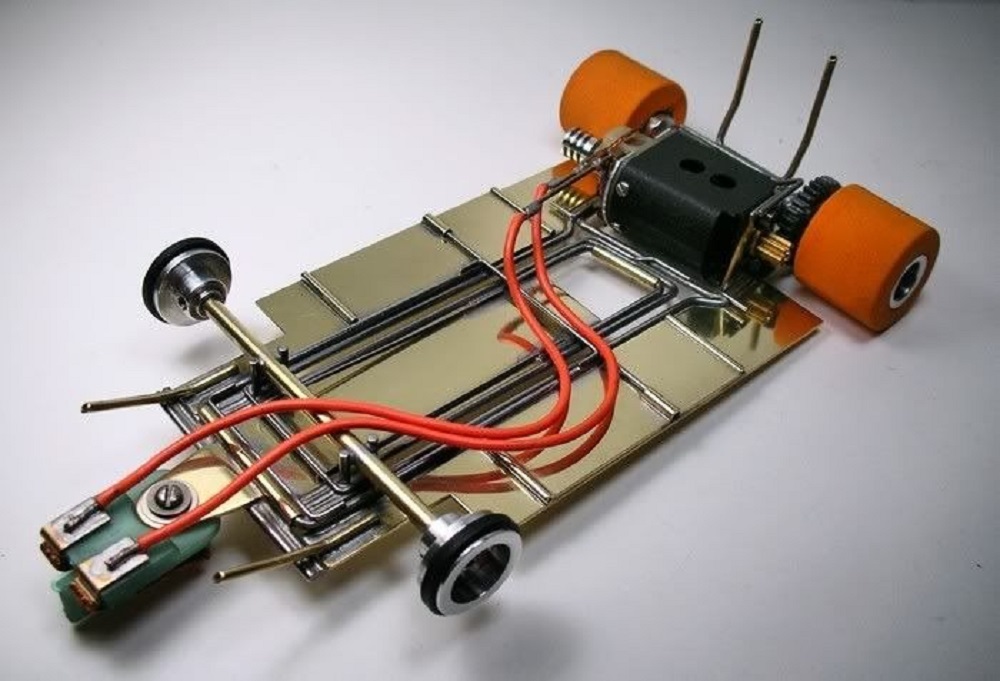
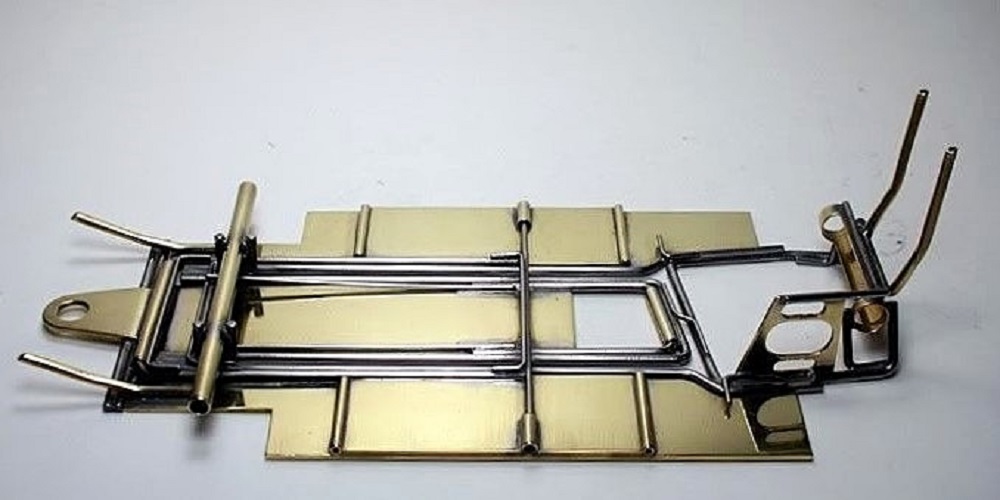
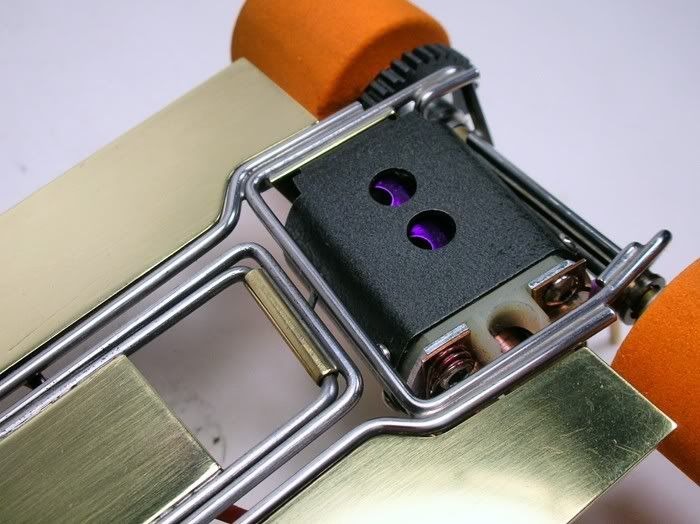
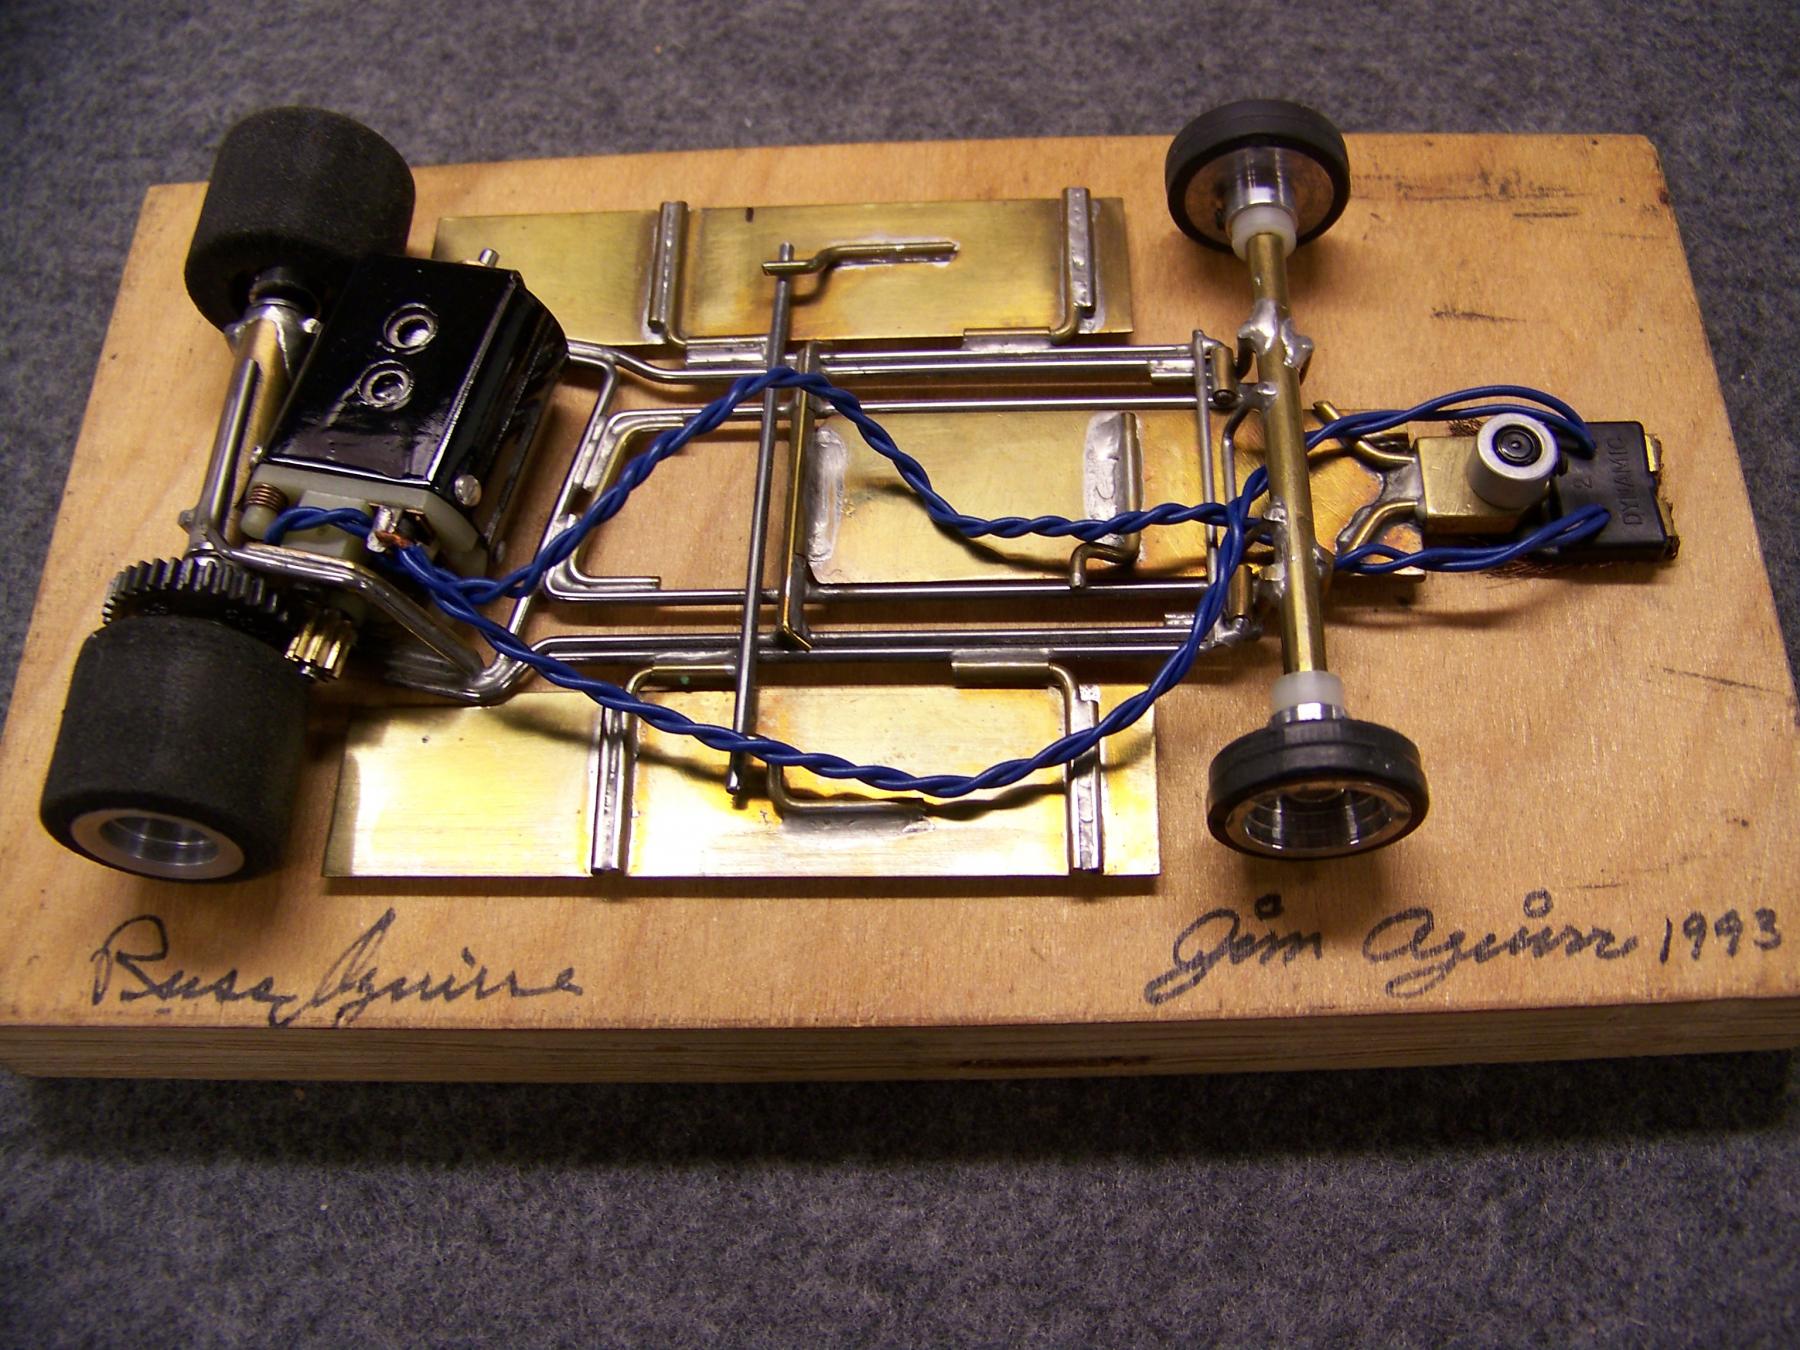
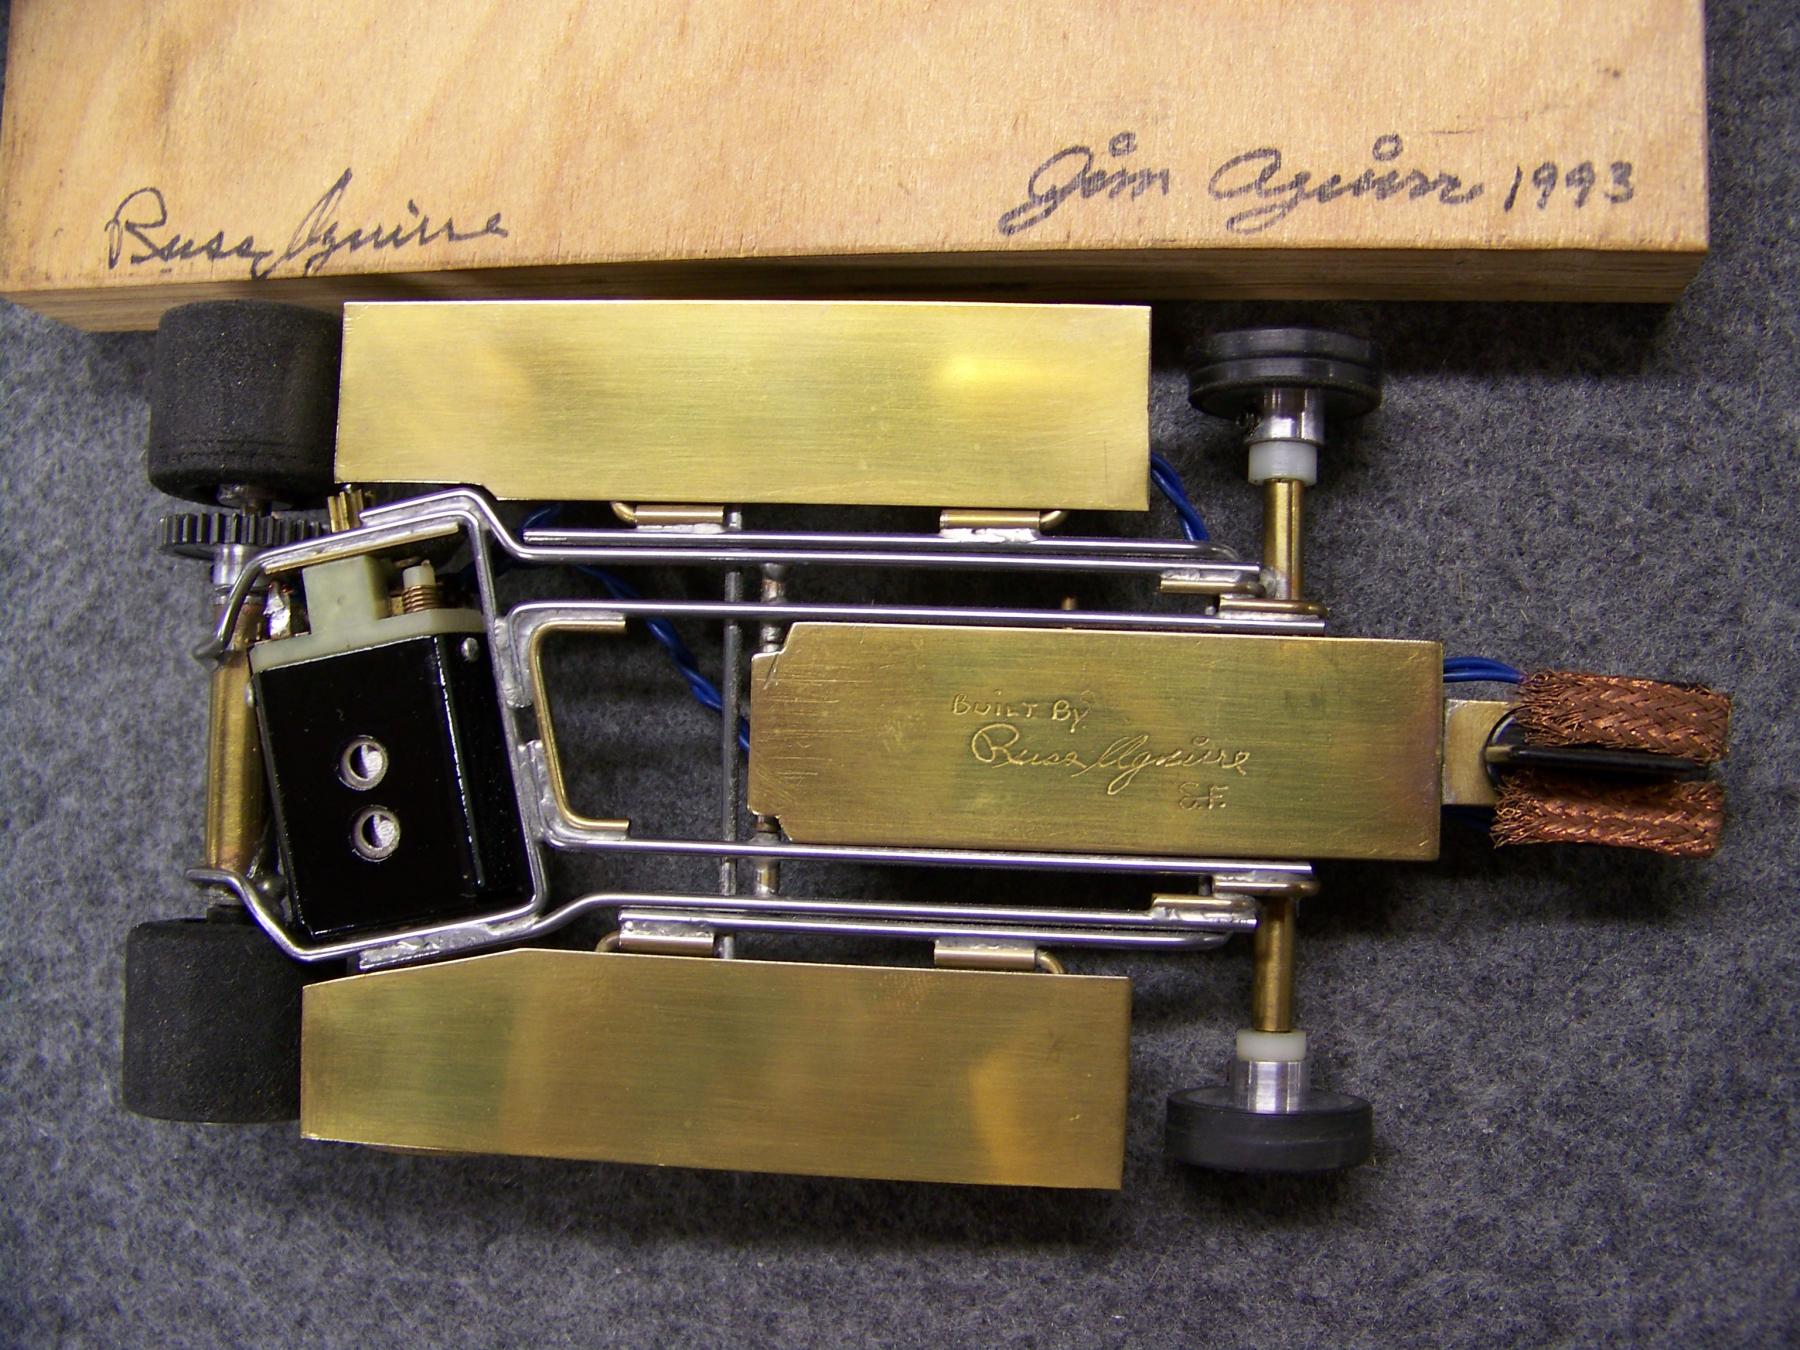
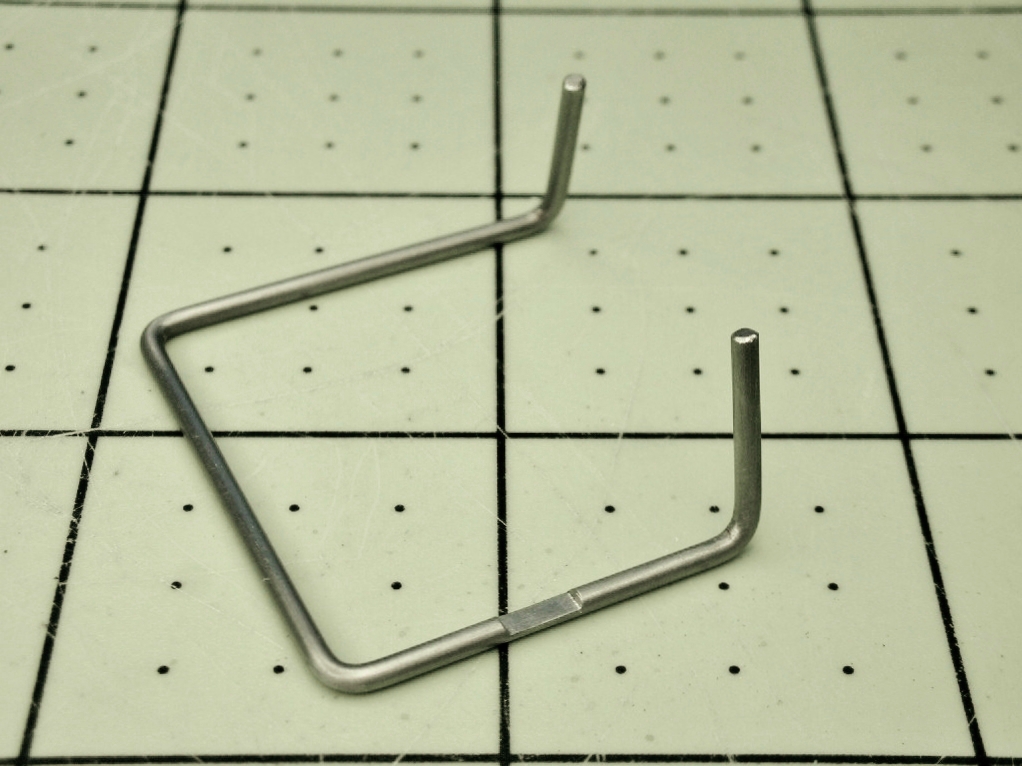
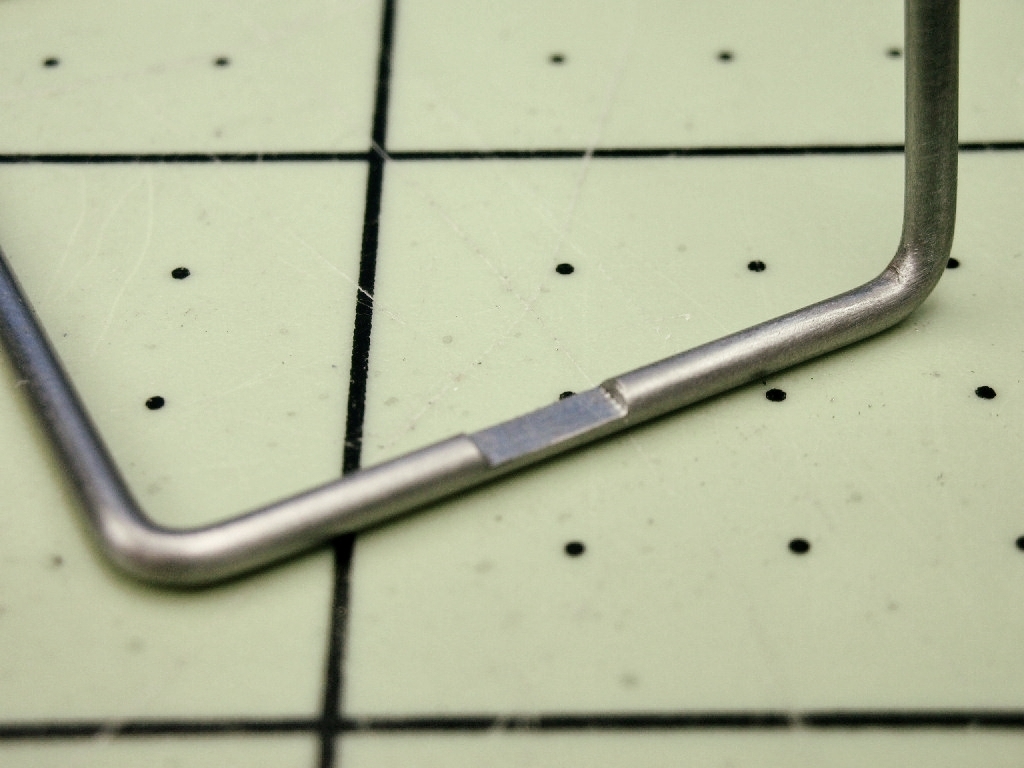
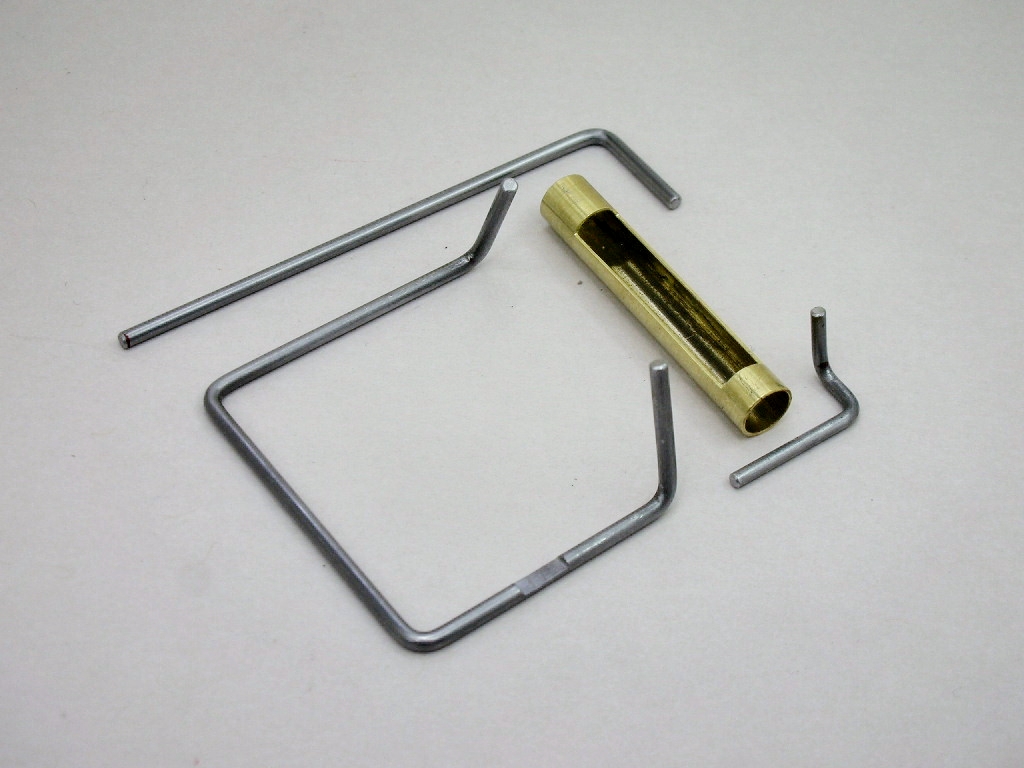
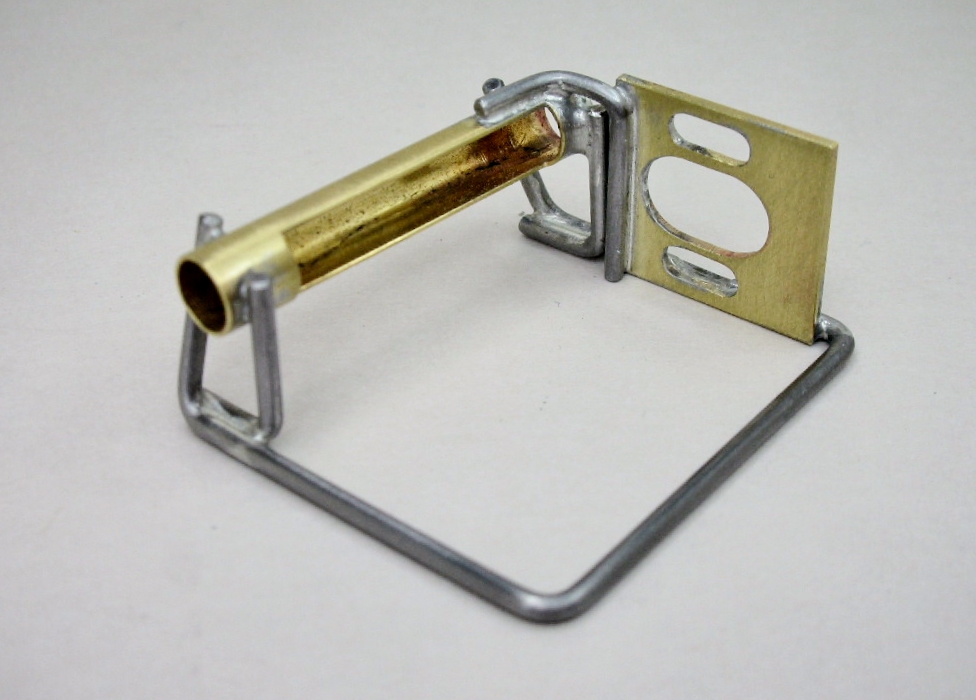
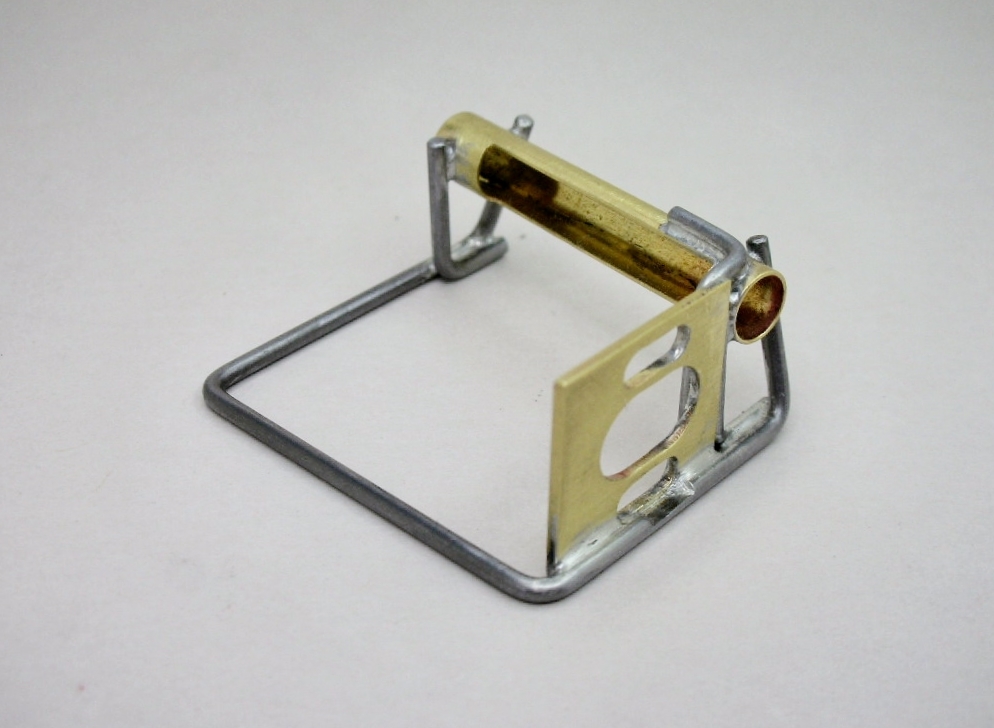
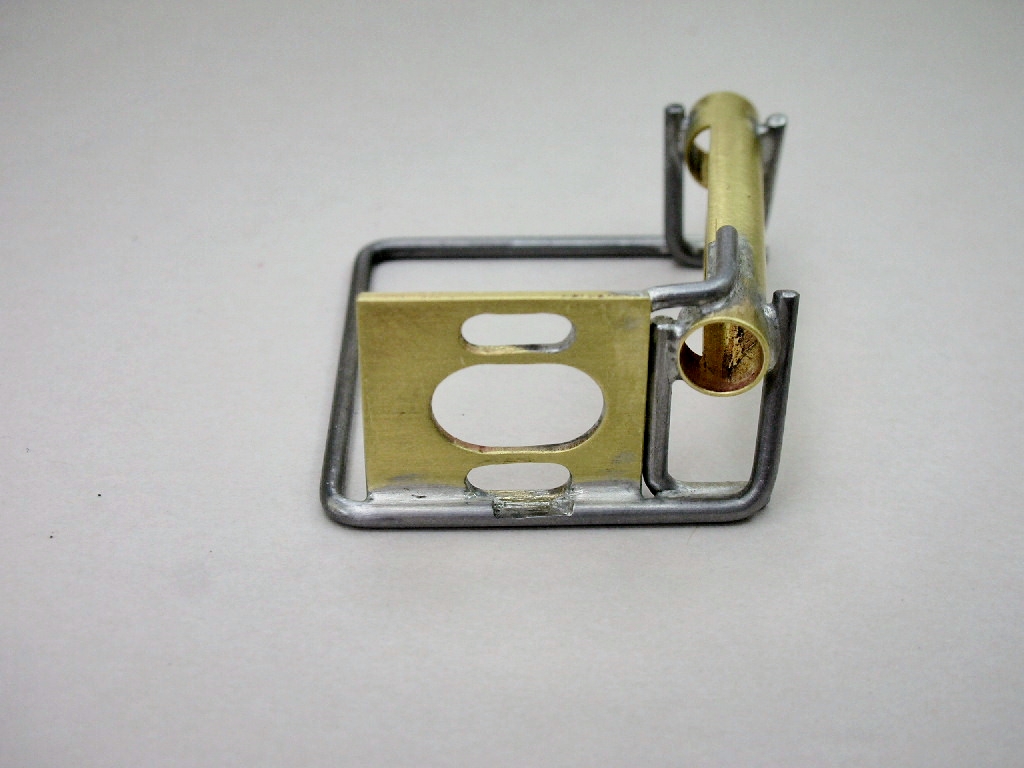
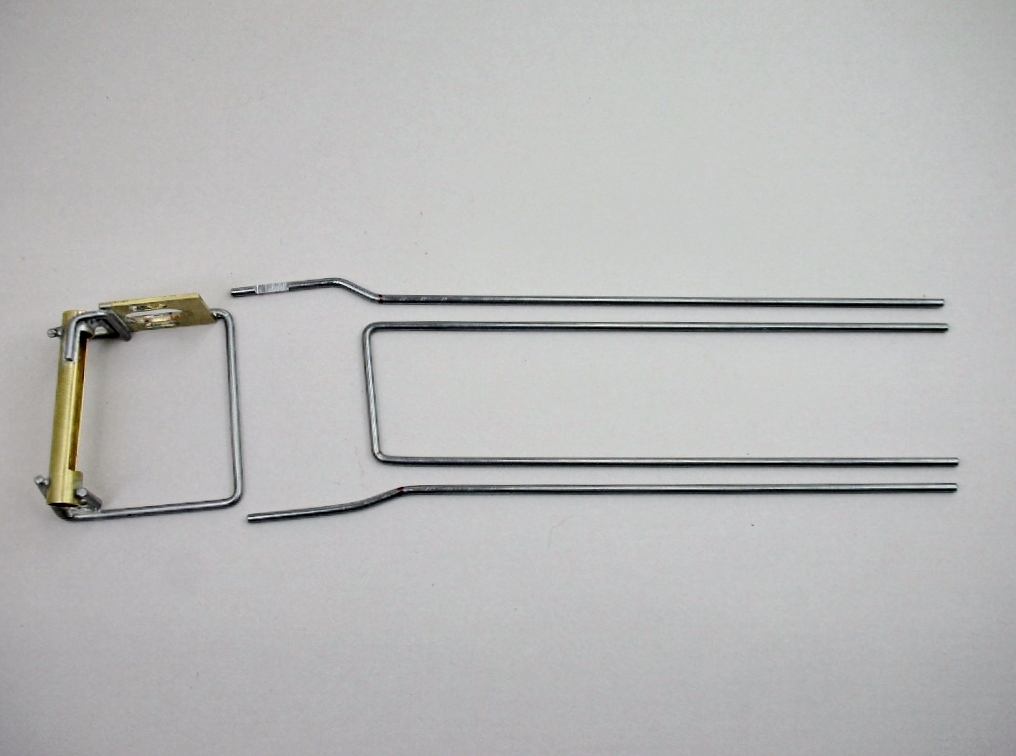
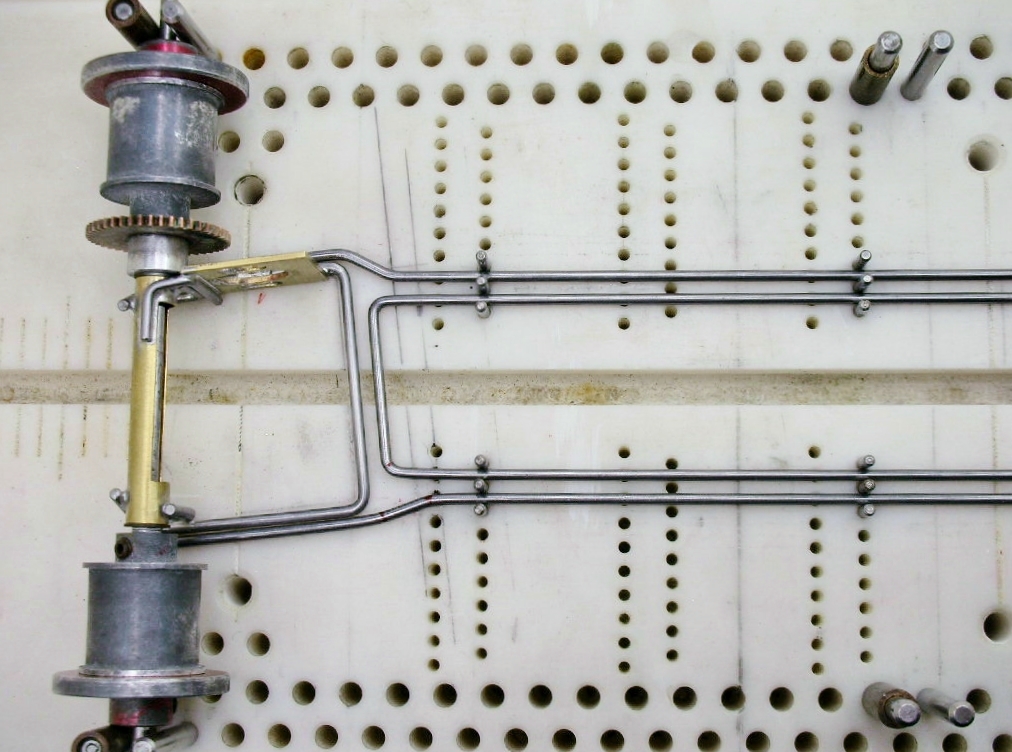
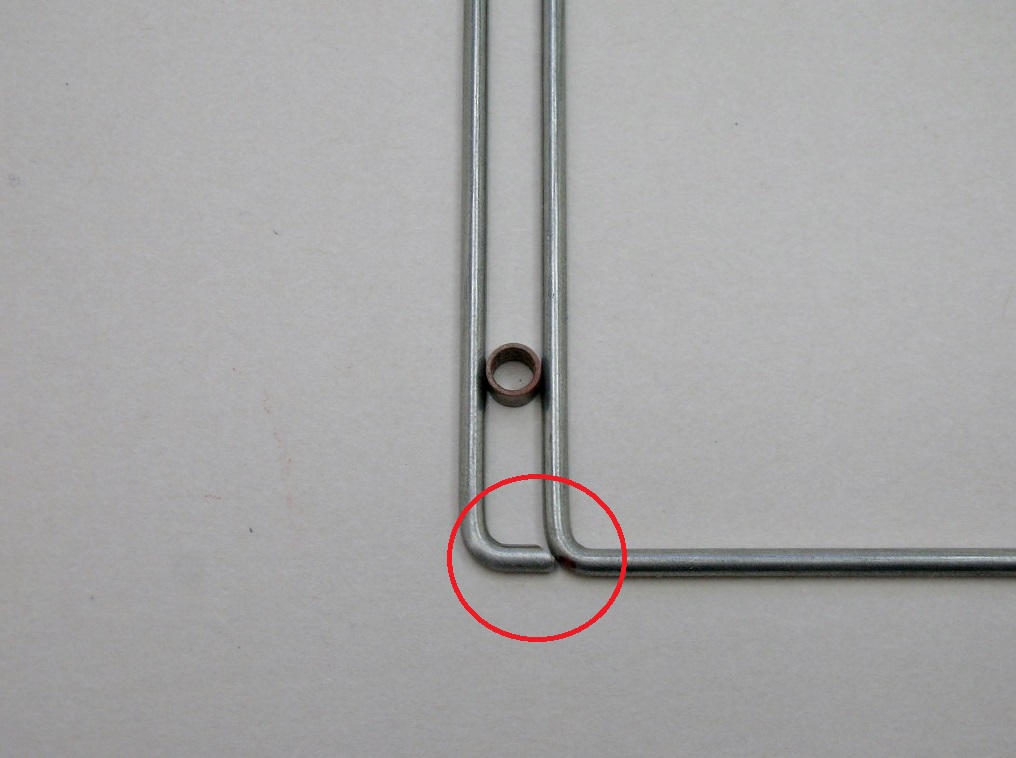
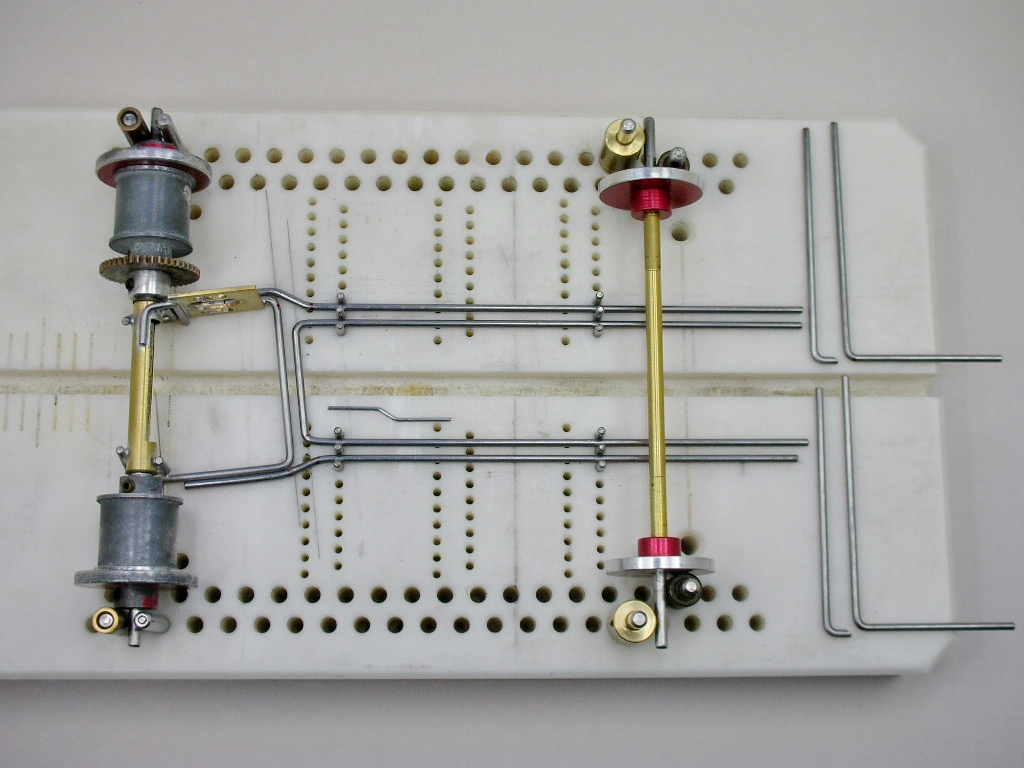
This time my Honker is going to be a scale anglewinder with chassis design inspiration from perhaps an unusual source:   :D


AguirreGP021.jpg


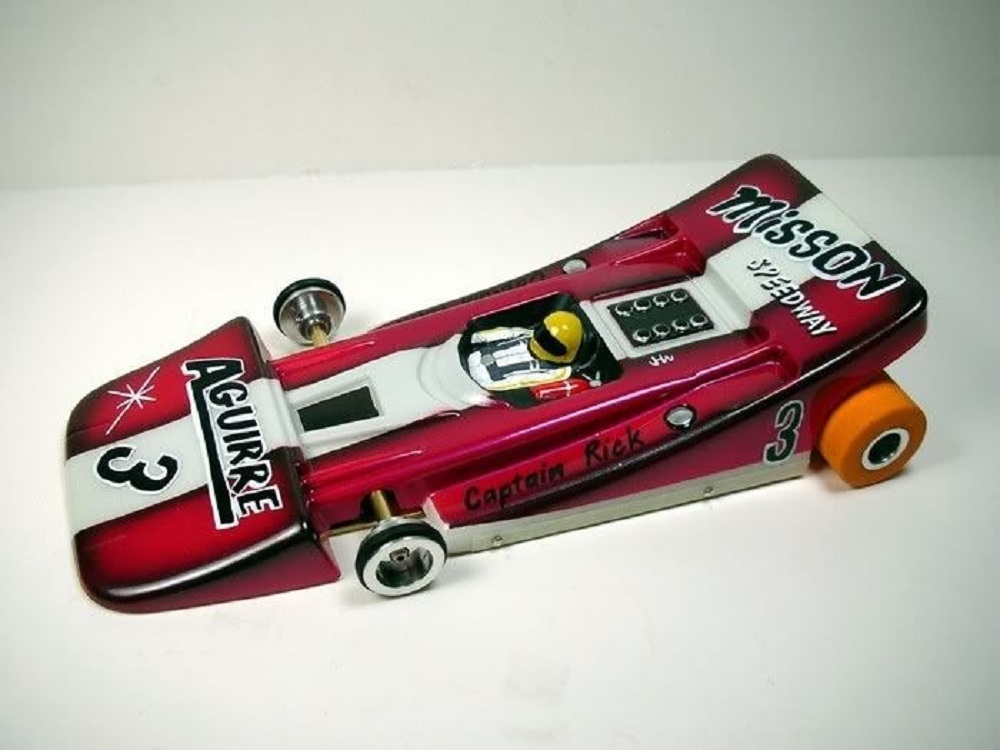
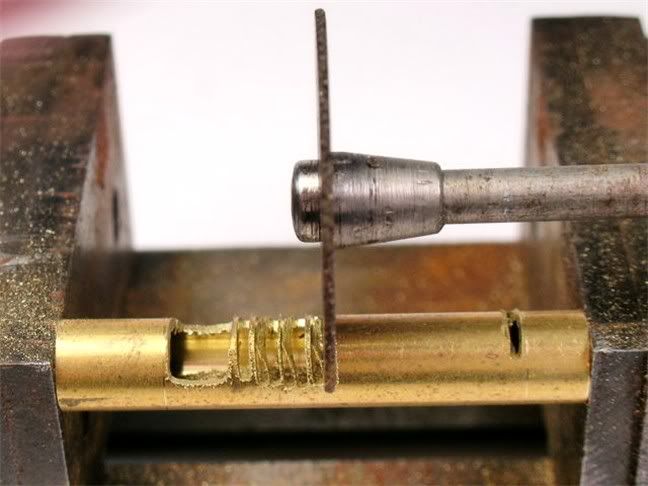
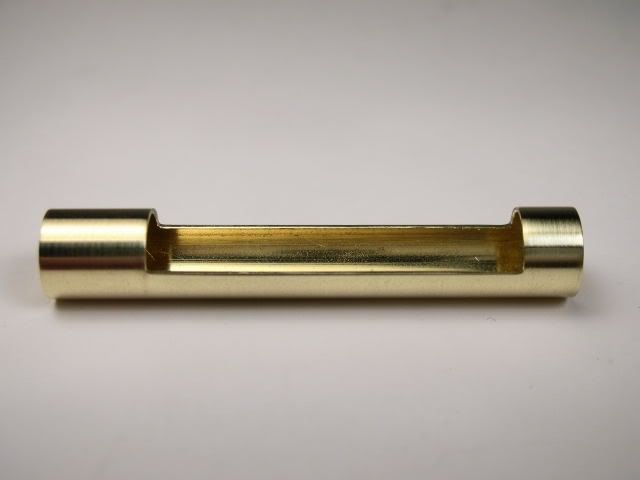
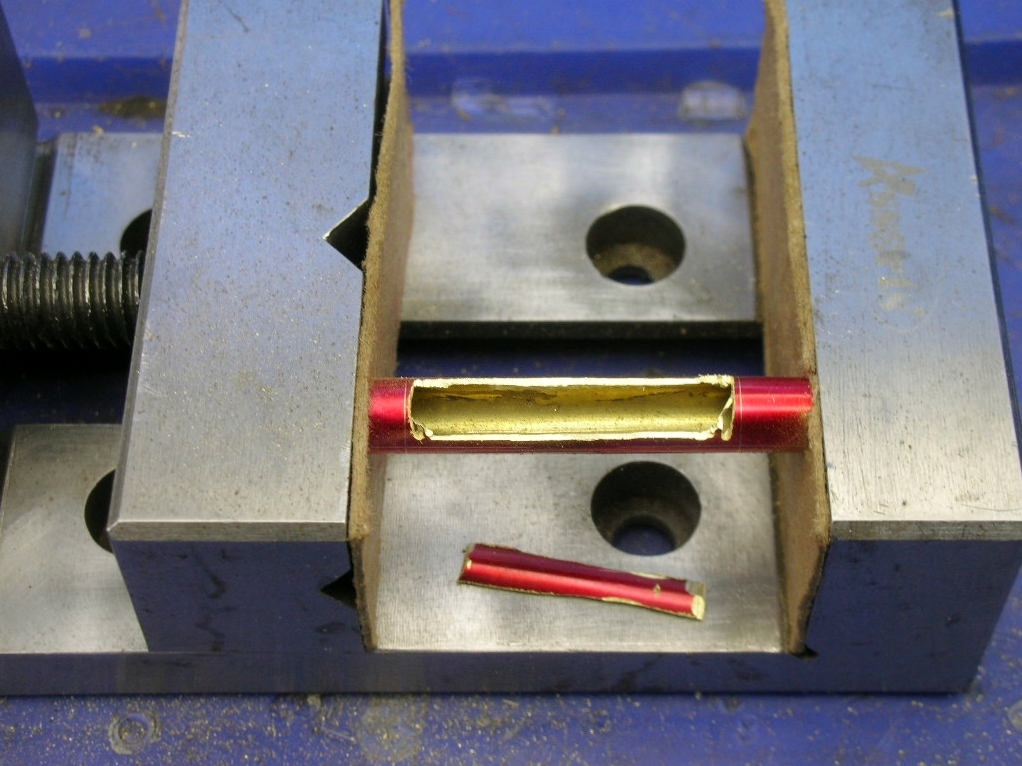
Pics of this GP car with a clone I built of an Aguirre chassis are coming up.... :dance3:


  • don.siegel, Tex, Alchemist and 2 others like this

Rick Thigpen
Check out Steve Okeefe's great web site at its new home here at Slotblog:
The Independent Scratchbuilder
There's much more to come...


#2 dc-65x

dc-65x

    Grand Champion Poster

  • Subscriber
  • PipPipPipPipPipPipPipPip
  • 7,001 posts
  • Joined: 14-February 06
  • Gender:Male
  • Location:Captain Rick: The only vintage slot car nut in SW Oregon?

Posted 06 February 2025 - 06:09 PM

Here's the early 70's Aguirre GP car with the body off:


AguirreGP015.jpg


AguirreGP011 (2).jpg


I'm using the Aguirre center section design combined with the drop arm, plumber and pan setup from the typical "Lee Gilbert style" 4-rail chassis:


AguirreGP006.jpg


I find this Z-shaped gizmo that connects the motor box to the inner main rails to be pretty cool:


AguirreGP019.jpg


AguirreGP018.jpg


  • vfr750, Tex and Eddie Fleming like this

Rick Thigpen
Check out Steve Okeefe's great web site at its new home here at Slotblog:
The Independent Scratchbuilder
There's much more to come...


#3 Bill from NH

Bill from NH

    Age scrubs away speed!

  • Full Member
  • PipPipPipPipPipPipPipPip
  • 14,820 posts
  • Joined: 02-August 07
  • Gender:Male
  • Location:New Boston, NH

Posted 06 February 2025 - 07:57 PM

That "Z" appears to keep the inner rails from bouncing out of sync with the outer rail movement. I've not seen it used before.


Bill Fernald
 
I intend to live forever!  So far, so good.  :laugh2:  :laugh2: 

#4 Tex

Tex

    Grand Champion Poster

  • Full Member
  • PipPipPipPipPipPipPipPip
  • 9,245 posts
  • Joined: 07-July 06
  • Gender:Male
  • Location:Denton, TX

Posted 07 February 2025 - 10:24 AM

it would seem to allow more flex.... (?)


Richard L. Hofer

Remember, two wrongs don't make a right... but three lefts do! Only you're a block over and a block behind.

#5 dc-65x

dc-65x

    Grand Champion Poster

  • Subscriber
  • PipPipPipPipPipPipPipPip
  • 7,001 posts
  • Joined: 14-February 06
  • Gender:Male
  • Location:Captain Rick: The only vintage slot car nut in SW Oregon?

Posted 07 February 2025 - 01:09 PM

I've not seen it used before either Bill. I built the Aguirre chassis clone 20 years ago and no longer have it (thanks for loaning me the original for my build Rodney!). I think it must have more flex with the 2 inner main rails not connected solidly with the motor box Tex. We'll find out soon.    :D


To fit the scale Honker body my chassis will be only 2 7/8" wide. I don't want to use "skinny pans" so I need a narrower center section than a traditional 4-rail chassis with an 1 1/4" drop arm. That's why I'm trying this Aguirre design.


To fit the scale Lancer Honker body the chassis will be build for these specs:
 
3 13/16" wheelbase


7/8" drop arm width


13/16" guide lead

 
2 7/8" overall chassis width
 
2 7/8" front track width

 
3" rear track width
 
15/16" diameter front tires
 
1" diameter rear tires
 
1/16" track clearance


  • Pablo and Eddie Fleming like this

Rick Thigpen
Check out Steve Okeefe's great web site at its new home here at Slotblog:
The Independent Scratchbuilder
There's much more to come...


#6 Bill from NH

Bill from NH

    Age scrubs away speed!

  • Full Member
  • PipPipPipPipPipPipPipPip
  • 14,820 posts
  • Joined: 02-August 07
  • Gender:Male
  • Location:New Boston, NH

Posted 07 February 2025 - 03:06 PM

Had I wanted to add more flex, I'd have tried smaller diameter piano wire, such as .055 & .047, or even some brass rod. 


  • NSwanberg likes this
Bill Fernald
 
I intend to live forever!  So far, so good.  :laugh2:  :laugh2: 

#7 dc-65x

dc-65x

    Grand Champion Poster

  • Subscriber
  • PipPipPipPipPipPipPipPip
  • 7,001 posts
  • Joined: 14-February 06
  • Gender:Male
  • Location:Captain Rick: The only vintage slot car nut in SW Oregon?

Posted 07 February 2025 - 03:23 PM

That's what makes scratch building so interesting Bill, there are different ways to achieve what you are after. As for me, I just thought the Aguirre design looked cool!   :laugh2:  :victory:


  • Bill from NH, NSwanberg and Eddie Fleming like this

Rick Thigpen
Check out Steve Okeefe's great web site at its new home here at Slotblog:
The Independent Scratchbuilder
There's much more to come...


#8 Larry Horner

Larry Horner

    On The Lead Lap

  • Full Member
  • PipPipPipPip
  • 472 posts
  • Joined: 18-March 17
  • Gender:Male
  • Location:San Francisco

Posted 07 February 2025 - 03:36 PM

I love the detail where the pans are sculpted to follow the contour of the frame rails ... that is indeed very cool looking!


#9 Bill from NH

Bill from NH

    Age scrubs away speed!

  • Full Member
  • PipPipPipPipPipPipPipPip
  • 14,820 posts
  • Joined: 02-August 07
  • Gender:Male
  • Location:New Boston, NH

Posted 07 February 2025 - 05:45 PM

The Aguirre brothers were both very good slot car racers & they sold some neat slot car parts to others. We never used their chassis locally during the 70s, but their O-ring fronts & small hub rear tires were popular.


Bill Fernald
 
I intend to live forever!  So far, so good.  :laugh2:  :laugh2: 

#10 gluebomb

gluebomb

    Mid-Pack Racer

  • Full Member
  • PipPipPip
  • 134 posts
  • Joined: 30-August 10
  • Gender:Male
  • Location:Canada

Posted 08 February 2025 - 07:30 PM

Really like the way you're "mixing it up" a little with these builds, the scale aspect also.

It's like dropping in on the member of some cool 70's era club, MESAC or NAMRA maybe, and getting a seat at the bench. 

And we get a Honker after all - Nice !

S.


Simon Wing

#11 dc-65x

dc-65x

    Grand Champion Poster

  • Subscriber
  • PipPipPipPipPipPipPipPip
  • 7,001 posts
  • Joined: 14-February 06
  • Gender:Male
  • Location:Captain Rick: The only vintage slot car nut in SW Oregon?

Posted 08 February 2025 - 09:38 PM

Thank you Simon.  :victory:    You described exactly what is on my mind with my this and my previous build thread. 


I really like the pans sculpted to follow the contour of the frame rails too Larry. Well, maybe not while I"m trying do it!   :laugh2:


Rick Thigpen
Check out Steve Okeefe's great web site at its new home here at Slotblog:
The Independent Scratchbuilder
There's much more to come...


#12 Martin

Martin

    Posting Leader

  • Full Member
  • PipPipPipPipPipPipPip
  • 4,272 posts
  • Joined: 22-February 09
  • Gender:Male
  • Location:US

Posted 08 February 2025 - 11:05 PM

I was lucky enough to find and buy an Aguirre original car sitting in a display case at a small local slot car shop.  I was excited to clean it up and preserve its beauty.

Found in the 80s I later was able to meet the Aguirre brothers at a pro race in 93. I took the car to show them and they were happy to sign the wood block that I display the car on. 

Hope this adds to your build thread Rick. 


102_5229.JPG


102_5236.JPG


It did not come with a this Elfin body but it is a survivor, repaired, restored and to me seemed to be a nice fit.


102_5238.JPG


  • Jencar17, Tex, Bill from NH and 3 others like this
Martin Windmill

#13 dc-65x

dc-65x

    Grand Champion Poster

  • Subscriber
  • PipPipPipPipPipPipPipPip
  • 7,001 posts
  • Joined: 14-February 06
  • Gender:Male
  • Location:Captain Rick: The only vintage slot car nut in SW Oregon?

Posted 10 February 2025 - 05:52 PM

Nice car Martin.
 
I had a fellow Slotbloger PM me with this request:
 

I have a request for you. In one of your next builds can you show how you make the cutout on rear axle tubes - both the straight cutout and the angled cutout. I haven't been able to master this and have gone thru a lot of 7/32" tubing trying to make these. I've ended up using the Cobra pre-cut angled tubes as a replacement.

  
I have a hard time with this too but I’m persistent!   :crazy:
 
I’m sure there are lots of different methods and I was using this one:
 

............ We need a torque tube for the rear axle. PdL's original is 1.250" long with .250" on the 2 bearing side and .140" on the single bearing side. If you don't like doing a horizontal cut with the cut off wheel you can "nibble" it out thusly and finish it with a file:
 
chassis-1.jpg
 
The finished part:
 
chassis-2.jpg


I remember PdL asking me why I didn’t just make 2 vertical and 2 horizontal cuts and be done with it?    :laugh2:  Well I now follow his advice and that's the method I'm comfortable with.


First the cut lines are scribed in the axle tube:


axle tube cutout (1).JPG


The vertical end cuts are first. It's hard to see where the horizontal cut is ending so I make sure to stop short:


axle tube cutout (2).JPG


Then I come back and and connect the 4 cuts with the cutoff wheel and nibble away from the top where I can see what I'm doing:


axle tube cutout (3).JPG


I don't worry about getting really close to my layout lines because this Grobet Swiss pattern pillar file with safe parallel sides makes really quick work of what's left:


Grobet Swiss Pattern File Pillar Regular 8 Inch Cut 2.jpg


Here most of the remaining material has been removed with the coarser of my 2 pillar files:


axle tube cutout (6).JPG


A finer cut pillar file finishes the job. Calipers work great to measure along the cut to make sure it's parallel.


axle tube cutout (5).JPG


OK, so that's what I'm comfortable with. I'm sure there are a zillion ways to accomplish this that may work better for some than others.


As they say, "Your results may vary".    :D


  • Pablo, Slot Car Rod and Eddie Fleming like this

Rick Thigpen
Check out Steve Okeefe's great web site at its new home here at Slotblog:
The Independent Scratchbuilder
There's much more to come...


#14 Mark Onofri

Mark Onofri

    Posting Leader

  • Full Member
  • PipPipPipPipPipPipPip
  • 2,485 posts
  • Joined: 18-November 20
  • Gender:Male
  • Location:Syracuse, NY

Posted 11 February 2025 - 03:05 AM

Having created enough scrap brass than I care to admit, I'm also interested in the method for angle cutting the axle tube.🤔

#15 Bill from NH

Bill from NH

    Age scrubs away speed!

  • Full Member
  • PipPipPipPipPipPipPipPip
  • 14,820 posts
  • Joined: 02-August 07
  • Gender:Male
  • Location:New Boston, NH

Posted 11 February 2025 - 10:04 AM

I make two vertical cuts with a small round cutter in my Unimat & connect them horizontally with two Dremel disc cuts. Finally, I use a small flat file to remove any burrs & make any needed adjustments. I also used my Unimat to square up the tube ends.


Bill Fernald
 
I intend to live forever!  So far, so good.  :laugh2:  :laugh2: 

#16 Mark Onofri

Mark Onofri

    Posting Leader

  • Full Member
  • PipPipPipPipPipPipPip
  • 2,485 posts
  • Joined: 18-November 20
  • Gender:Male
  • Location:Syracuse, NY

Posted 11 February 2025 - 03:30 PM

If I only had one

#17 Bill from NH

Bill from NH

    Age scrubs away speed!

  • Full Member
  • PipPipPipPipPipPipPipPip
  • 14,820 posts
  • Joined: 02-August 07
  • Gender:Male
  • Location:New Boston, NH

Posted 11 February 2025 - 03:58 PM

Can be done with just a Dremel or one of its clones. I bought a B&D hand-held at Walmart as a backup for my Dremel.


Bill Fernald
 
I intend to live forever!  So far, so good.  :laugh2:  :laugh2: 

#18 Mark Onofri

Mark Onofri

    Posting Leader

  • Full Member
  • PipPipPipPipPipPipPip
  • 2,485 posts
  • Joined: 18-November 20
  • Gender:Male
  • Location:Syracuse, NY

Posted 15 February 2025 - 08:34 PM

https://youtu.be/WlO...CcmPnFIXg0Qy9Qu
I was going to try one of these but.......

#19 dc-65x

dc-65x

    Grand Champion Poster

  • Subscriber
  • PipPipPipPipPipPipPipPip
  • 7,001 posts
  • Joined: 14-February 06
  • Gender:Male
  • Location:Captain Rick: The only vintage slot car nut in SW Oregon?

Posted 15 February 2025 - 09:25 PM

With the axle tube conquered, it's time to go after my personal nemesis......the dreaded motor box.   :shok:    :laugh2:


1f09c180-8103-44c2-b8ee-3fbb5ba73978.jpg


I only made one scrapper before this one. It fits around the motor with maybe .030" more clearance than the minimum required but I'll take it.   :)


I filed my usual notch for the bottom motor attachment screw head clearance:


honker chassis (1).JPG


The motor box, axle tube and its 2 braces (one left long for now):


honker chassis (2).JPG


Next, into the jig for soldering.........


  • Pablo and Tex like this

Rick Thigpen
Check out Steve Okeefe's great web site at its new home here at Slotblog:
The Independent Scratchbuilder
There's much more to come...


#20 Bill from NH

Bill from NH

    Age scrubs away speed!

  • Full Member
  • PipPipPipPipPipPipPipPip
  • 14,820 posts
  • Joined: 02-August 07
  • Gender:Male
  • Location:New Boston, NH

Posted 15 February 2025 - 10:26 PM

When motor brackets were used locally in the early 70s, it was commonplace to grind a flat on the bottom of the motor box. That area & the bracket were wire-wrapped using a fine gauge wire. I think only a top screw was then used. 


Bill Fernald
 
I intend to live forever!  So far, so good.  :laugh2:  :laugh2: 

#21 dc-65x

dc-65x

    Grand Champion Poster

  • Subscriber
  • PipPipPipPipPipPipPipPip
  • 7,001 posts
  • Joined: 14-February 06
  • Gender:Male
  • Location:Captain Rick: The only vintage slot car nut in SW Oregon?

Posted 16 February 2025 - 03:16 PM

Yes, I've seen vintage chassis setup that way Bill. It's a great way to solidly get a motor in place.   :good:


I'm building at a leisurely pace just for fun and I'll bet nobody ever has or ever will setup motor brackets the way I do.  :wacko2:     :laugh2:  


motor can machined flat on the mounting surface

motor can tapped for 2-56 machine screws

motor bracket adjusted (bent) if necessary and lapped flat

motor bracket screw and bearing slots clearanced if necessary


Setup this way I can barely loosen the motor mounting screws and the motor slides back and forth smooth, "like a sled on snow." I can take the motor in and out a zillion times during my build and not have to worry about self tapping screws distorting the can or striping out. When the motor goes in for the final time the gear mesh is easy to adjust and it's soldered in place with the usual bracing.   


Everything in the jig and ready to solder:


honker chassis (3).JPG


Out of the jig and a rough cleanup:


honker chassis (4).JPG


honker chassis (5).JPG


honker chassis (6).JPG


  • Pablo, Bill from NH, ajd350 and 2 others like this

Rick Thigpen
Check out Steve Okeefe's great web site at its new home here at Slotblog:
The Independent Scratchbuilder
There's much more to come...


#22 Bill from NH

Bill from NH

    Age scrubs away speed!

  • Full Member
  • PipPipPipPipPipPipPipPip
  • 14,820 posts
  • Joined: 02-August 07
  • Gender:Male
  • Location:New Boston, NH

Posted 16 February 2025 - 05:06 PM

We went to soldered-in motors & eliminated the brackets because it made for easier & quicker motor changes during a race. I remember my first scratchbuilt wing chassis I used a motor bracket, but none have since. That chassis also used 1/8" axles, 3/4" fronts, & 7/8" rears. It wasn't very competitive on a king track.


I built some chassis for the local raceway to sell when they couldn't get 888's from Rehco. Those 6 or 8 chassis all had motor brackets too.


Bill Fernald
 
I intend to live forever!  So far, so good.  :laugh2:  :laugh2: 

#23 SpeedyNH

SpeedyNH

    Old Engineer

  • Full Member
  • PipPipPipPipPip
  • 767 posts
  • Joined: 18-July 15
  • Gender:Male
  • Location:Cow Hampshire

Posted 17 February 2025 - 08:14 AM

nice jig wheels. you make those? 


Steve Lang


#24 dc-65x

dc-65x

    Grand Champion Poster

  • Subscriber
  • PipPipPipPipPipPipPipPip
  • 7,001 posts
  • Joined: 14-February 06
  • Gender:Male
  • Location:Captain Rick: The only vintage slot car nut in SW Oregon?

Posted 17 February 2025 - 11:41 AM

Those jig wheels are what happened when I bought a whole boatload of Weldun spur gears at the Good Guys Swap meet 25 years ago.  :crazy:  


Rick Thigpen
Check out Steve Okeefe's great web site at its new home here at Slotblog:
The Independent Scratchbuilder
There's much more to come...


#25 dc-65x

dc-65x

    Grand Champion Poster

  • Subscriber
  • PipPipPipPipPipPipPipPip
  • 7,001 posts
  • Joined: 14-February 06
  • Gender:Male
  • Location:Captain Rick: The only vintage slot car nut in SW Oregon?

Posted 19 February 2025 - 12:01 PM

The main rails bent to wrap around the motor box:


honker chassis (8).JPG


And ready to go in the jig:


honker chassis (7).JPG


The front axle uprights. The one in back gets a little bevel to tuck up tighter to it's partner in front:


honker chassis (9).JPG


Go time:   :dance3:


honker chassis (10).JPG


All soldered up and ready for trimming and a cleanup:


honker chassis (11).JPG


  • Pablo, Tex, Bill from NH and 2 others like this

Rick Thigpen
Check out Steve Okeefe's great web site at its new home here at Slotblog:
The Independent Scratchbuilder
There's much more to come...


Electric Dreams Online Shop