Posted 13 February 2012 - 08:20 PM
Scott Bader and I tried to assemble one yesterday at the museum. This is what we found:
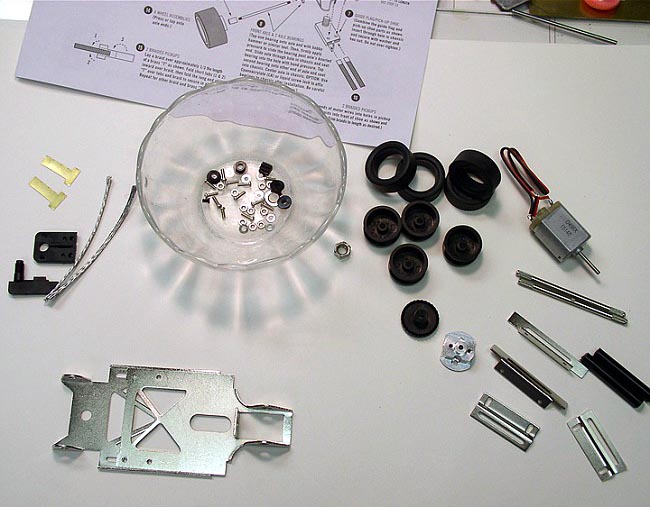
1/ The box is very nice and the components well packed. The kit was complete but we found 2 extra nuts. Never hurts because those 2mm little suckers have a tendency to escape and hide.
2/ The 2-piece nickel plated steel chassis is nicely stamped and quite strong, but the design has two major flaws:
- The guide flag cannot turn more than a few degrees without the lead wires interfering with the front of the chassis, with a high risk of severing them.
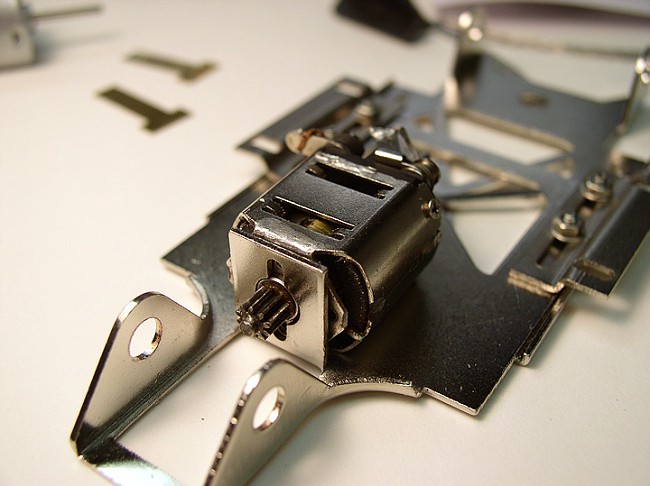
- The rear-axle mounts are far too narrow (for absolutely no reason), so the actual motor mount that folds up from between the mounts is also too narrow and could not be used for a standard FA, FC or FK motor, so the AMT folks devised a fully machined aluminum adapter (???!!!) for the motor, that had to be made with a very long shaft to clear it.
- The screws used to assemble the chassis and the side body mounts have tiny heads but need a fairly large Phillips screwdriver in relation to their size, and this must have a "flat" ground to its end so as to "fill" the screws heads, otherwise the screwdriver will turn inside the screws heads.
- Some of the nuts needed some work to even fit over the screws threads.
Now to the assembly:
- First, we found that the motor mount is not square with the chassis, so it is necessary to bend it more vertical to insure that the motor is flat on the chassis and that the gear mesh not be hypoid. You need a nice, flat pair of pliers to to the job.
- The 2-piece body mounts are not an intelligent design. A one-piece design would have been doing the same job with MUCH less of a hassle to assemble. The body mounts are also captured by the screws defining the wheelbase, so you must adjust that first before securing the fist part of the mounts.
- Once the two chassis parts plus the two body mounts are together, one can assemble the outer parts of the body mounts according to the body used. Thing is, the kit instructions recommends "double-sided tape" for the final assembly of the body to the mounts, and that IS a bad joke: one assembled, you cannot remove the body. Indeed, the retaining nuts for the mount are not captive, and there is no way to hold them so the screws would turn and turn, and one would be effectively stuck. IF you decide to use the tape, first solder the two nuts in place so that the body can be removed.
- After the basic chassis is assembled, the strange (and seemingly afterthought) adapter is bolted to the motor first. Be sure to use the two SHORTER screws provided (but not isolated) in the hardware baggie. Identify them first. The longer screws with interfere with the armature and lock the motor. By the way, there was no need to have the longer screws to begin with because they stick past the nuts by a good margin in the whole assembly, so having the same screws everywhere would have worked just fine. Never mind.
- Now time to push the plastic pinion in place. Observe the pinion, it has a very slight conical shape so that it can be expelled from the mold. Put the larger end on the shaft FIRST. Push all the way until flush with the shaft, then a little more, otherwise the crown gear will not reach the pinion.
Now, bolt the motor and its bizarre adapter in the chassis.
- And here is where the s*** hits the fan: as you install the plastic axle bushings in place, you will discover that there is not enough clearance for the crown gear to clear the offside bushing. Brilliant! Easiest way to resolve this is to shorten the axle bushing on the offside of the gear by about 1/16". Use your handy-dandy Dremel disc (as Lee Gilbert used to say) to perform this after you stick the axle bushing flange first onto one of the axles.
- More s***: after this is done, you need to assemble one wheel to the rear axle, the one with the "flat" in its center. And guess what: it will take some force to do so because the design is frankly, quite stupid. Indeed, taking a page from the 1959 Strombecker cars, the AMT design engineer (and he should remain nameless to avoid receiving a bag of hate mail from very unhappy customers) found it necessary to have the ends of the axles not only serrated, but also of greater diameter than the actual smooth surfaces on said axles. Yes, it is dumb. But where Strombecker (and later, those brilliant feats of engineering that were the Eldon cars) used an interrupted bearing surface allowing axles assemblies to simply snap in their location, the AMT folks wants you to push these oversize axles ends through the wheel holes and the axle bearings.
First, the wheels, unless you assemble them on an industrial drill press of similar fixture, will never be straight and will wobble. Trust me on this, how could it be otherwise in a piece of soft plastic?
Second, before you push the axles, you need to measure and cut the wheel spacers so that the body will clear the wheels and tires. Yes, cut the wheel spacers to size. Excuse me??? Indeed, AMT, unlike any of the 1960's kit makers that had more active cells in their brains, does not provide you with one of those injected tree with a dozen different size spacers, but with two lengths of plastic tubing, that YOU have to cut to length. WHAT???
In the nice kits they produced in 1964 and 1965, AMT did provide spacers in all sizes, but I guess 47 years have reduced their brains to mush.
Once you realize that there is no way around it, you have no choice but to use a Dremel disc to cut the necessary bits because trying the back-N-forth method with a # 11 X-Acto blade or an X-Acto saw will simply try your patience and may cause serious damage to your fingers. Better check your insurance policy first before attempting this at home.
Third, after slipping the spacer on the axle (and better make sure its size is right because I defy anyone of removing the wheels once in place), as you push the axle through the axle bearing using forcible entry (which is a crime in most states), you effectively damage the bearings.
Fourth, once the axle has (forcibly) cleared the first bushing and the gear (push straight, do not attempt to rotate the axle), you need to use the second wheel spacer against the offside bushing to allow the axle to once again, force its way through as the bushing will otherwise part company with the chassis in protest.
Once this is done, you need to FIRST fit the little black screw in the gear, only to find out that it is too short to lock the gear in place. Do not try to tighten the screw once its head reaches the gear's hub because it will simply turn inside the thread. If you try using a longer screw, the screw head must be tiny because otherwise it will hit the pinion shaft. Did I tell you that this thing was poorly engineered? Let me repeat this again in spades.
Now for the offside wheel, you must force it upon the axle, but before performing this metal to plastic violation, you must block the shaft from keeping its from more travel through the already installed inside wheel, so you need to find a blind circular object to block it. Is not this fun?
-OK, now to the front axle. Same thing, cut your spacers, push one wheel onto the axle (we used a lead mallet...) then force the axle through the mistreated bushings and same story for the second wheel, block the axle from going too far on the fist wheel or you might find yourself with a loose free wheel on the axle's center and no way to remove it.
- By now, you have discovered that not only does the gear turn 1/4 of a turn on the rear axle whatever you like it or not, but the gears have a terrible mesh, like if the pinion was a 48-1/2 pitch while the crown was more of the 47-1/2 persuasion. Lord!
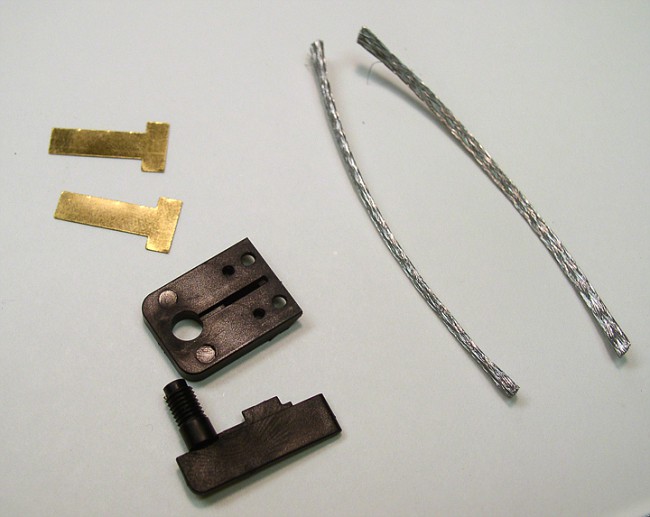
- Last but not least, the guide assembly, and this is another source of screaming against the genius who figured this one out. Indeed, if the two-piece threaded guide actually works OK, its thread is a bit weak to retain the nut locking it in place, but this can be corrected with a bit of adhesive and is actually a good feature compared to the mickey-mouse push-on design of virtually all current "plastikars" in both 1/24 and 1/32 scale. But as previously mentioned, the guide simply cannot turn much because the lead wires block it from doing so. BRILLIANT!
But this is not the worst: the kit provides for "do it yourself" braided contacts, where one is supposed to use the supplied narrow braided wire and little stamped brass "T" shaped bits and bend them over the wire. Unfortunately the braided wire is too narrow to be retained by those clips, and even after one flattens the material to make it as wide as possible, bending of the clips over and retaining the braided material it is an exercise in frustration. The clip parts are too short to retain the material, unless the ends of the braided contacts are filled with solder, and of course most of these kits customers have all the equipment necessary to perform all the necessary fixes for this abomination of a design to be completed without one going ballistic as everyone knows.
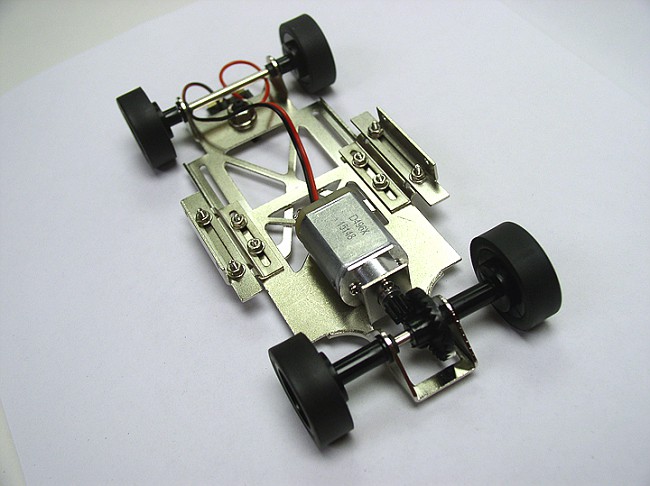
Victory, we got our kit now assembled, it's ready to go. A drop of oil here and there and we place it on the track, and it actually runs! Very slow, and like a crab! For some reason, the thing sets itself in a 30 degree angle and tries to negotiate the whole track like if it had a wheel locked. We inspect it, find nothing of the kind, but if still runs sideways. Fortunately it is too slow to crash itself, so at least there is some redemption in the design, one will not have to go to every corner to retrieve the rolled-over pile.
I guess, this lack of performance in itself matches the whole car's engineering. On a scale of 1 to 10, we gave it a 3 for a nice effort regarding the packaging. This is after giving it a minus 15 for every mistake that every part of this kit appears to be.
Let's however mention one good point: two window styles are being offered, one separate injected plastic, the other option a one-piece vacuum formed "smoked" unit. Excellent.
More bad points: no interior of any kind, and no chromed wheel inserts to hide those awful wheels.
AMT had a great opportunity to simply copy what they had done 47 years earlier with great success, as their 1966 two-piece brass chassis was one of the simplest, best handling models that could be purchased over the counter. In 2012, they failed at even matching that, and terribly. Let's hope that for their next effort, they will actually listen to the people who can help them instead of listening to the people that gave them such bad advice.
And AMT, please fire your design engineer, NOW.