Jump to content


Photo

Texas Two Rail


  • Please log in to reply
28 replies to this topic

#1 Steve Okeefe

Steve Okeefe

    The Independent Scratchbuilder

  • Administrator
  • PipPipPipPipPipPip
  • 1,136 posts
  • Joined: 16-February 06
  • Gender:Male
  • Location:State of Independence

Posted 25 June 2013 - 01:40 PM

Recently I bought a Rick's (R-Geo) jig.  Other builders on this Blog have made all sorts of happy noises about it, so I figured it was worth a try.


So far, I'm happy with it too, particularly the large number of precisely located holes, which not only makes squaring and centering much easier, but provides for many combinations of oddly sized and shaped chassis configurations.


That being said, I will add that I've quickly become aware that its continued precision as a jig is heavily dependent upon how it is treated; so be sure you read-and-heed the instructions, and give it lots of TLC!


Anyway, now it's time to build something with this shiny new jig.


About six years ago Rick Thigpen and I built replicas of one of Bob Emott's more popular chassis designs - a late 1968 Batwinder.  Rick did the machine work for the composite drop arms and I did the reverse-engineering and formed the piano wire for the one-piece motorboxes.  Worked out pretty well.  Here's my completed replica:


03. 6812 Emott Batwinder.jpg


Having worked out what I believed to be the critical Batwinder dimensions and proportions, I decided to also build my own iterpretation of the style, mostly just for the fun.  I wanted this to be an ealier version; say about July of 1968, so I gave it a narrower drop arm and no plumber or batpans.  I also made it a left-side drive, because the Batwinder was right-side drive, and I was just fooling around with the chassis architecture.


I called it a "Texas Two Rail" because when I built it (and the Emott Batwinder) I was on a temporary consulting and support assignment in El Paso, Texas, and living in a hotel room.  My employer kept me there for three months - joy - but that's another story.


Here's the finished chassis:


05. 6807 Texas 2 Rail top.jpg


06. 6807 Texas 2 Rail bottom.jpg


The "new" Texas Two Rail (the subject of this thread) will have further refinements, including a built-up 7/8" slab drop arm and right-side drive because it's "period-correct" for mid 1968.  I also increased the taper on the outer main rails because I think it looks good.


So to be clear, this is not a replica build, in fact, aside from learning how to use my Rick's jig the main idea of this build is to test a concept that involves combining "period-correctness" with "using what's widely available to build with".  More on that later, depending on whether or not the idea ends up being a "zero hour return"  (Hi, Don!   :wave: )


Here's a DRAFT drawing of what I have in mind:


08. Draft Design.jpg


I haven't settled on how I want to do the drop arm downstop, so it's not there yet.  I may shift other things around as I learn more about what I can do with my Rick's jig.


In the meantime, let's get started.  First, bend some piano wire for the Emott style one-piece motorboxes (how to do this can be found here):


10. Emott Style Motor Boxes.jpg


Next, set up the rear axle.  I used .750" wide wheels because they are "full width" (for 1968) and also a Cobra spur because it is wider than almost any other gear that is currently available.  I can still use a 1-1/8" long axle tube with a half-dozen .005'" washers for fine adjustment and stay within 3 inches.


Emott used a 1-1/16" long axle tube on his Batwinders mostly I believe because he wanted his chassis to be adaptable to any gears and wheels that came along.  I'm not worried about that design specification.


11. Rear Axle Setup.jpg


For jig axle material, I use this stuff.  Comes in 12 inch lengths so you can cut it to any length you want for the jig, and it resists corrosion much better than non-stainless steels.


12. Jig Axle Material.jpg


One of the things I want any jig I use to be able to do is show the motor angle.  I will use this to position the motorbox correctly so everything else will fit the way it's supposed to.  I discovered that if you put the 1/8" pegs in the certain holes and lay a steel rule up against those pegs, you can pencil in a line that precisely matches the correct motorbox angle.  Like this:


13. Draw The Line.jpg


Remove the pegs and here's what it looks like from the front.  Ready to build up the motorboxes:


14. Motorbox Angles.jpg


Using some locating pins to position two temporary rails 1-1/2" apart, tweak and locate the motorbox so that:

1. Both free ends are in contact with the axle tube.

2. The motorbox is in contact with the temporary rail on the gear side.

3. The forward edge aligns parallel with the pencil line.


Like this:


15. Line Up And Solder In.jpg


If you formed the piano wire part carefully and precisely, it should just drop into place and be ready to solder.  Here are three motorbox subassemblies, ready to build chassis with:


16. Motorbox Subassemblies.jpg


Next up: Main rails and front axle tube.


  • endbelldrive and Peter Horvath like this

Steve Okeefe


I build what I likes, and I likes what I build


#2 HarV Wallbanger III

HarV Wallbanger III

    Racing inta OLD age!

  • Member at Peace
  • PipPipPipPipPipPipPipPip
  • 6,165 posts
  • Joined: 19-June 08
  • Gender:Male
  • Location:"Whisper'in Pine Ranch" Northern Nevada Sierras

Posted 25 June 2013 - 03:08 PM

Beautiful work Steve!


Barney Poynor
12/26/51-1/31/22
Requiescat in Pace


#3 Don Weaver

Don Weaver

    Checkered Flag in Hand

  • Subscriber
  • PipPipPipPipPipPip
  • 1,821 posts
  • Joined: 26-October 07
  • Gender:Male
  • Location:Lexington. SC

Posted 25 June 2013 - 03:13 PM

I want one! :love:


Don Weaver


Don Weaver

​A slot car racer who never grew up!


The supply of government exceeds demand.
L.H. Lapham
 
If the brain-eating amoeba invades Washington
it will starve to death...


#4 dc-65x

dc-65x

    Grand Champion Poster

  • Subscriber
  • PipPipPipPipPipPipPipPip
  • 6,830 posts
  • Joined: 14-February 06
  • Gender:Male
  • Location:Captain Rick: The only vintage slot car nut in SW Oregon?

Posted 25 June 2013 - 04:30 PM

WEEEEEEEEEEEEE!!!!!!!!!!!!!!!!!!!!!!!!


It's great to see you back at the bench building Steve!


I'll be watching this one.... :popcorm1: :drinks: :D


Rick Thigpen
Check out Steve Okeefe's great web site at its new home here at Slotblog:
The Independent Scratchbuilder
There's much more to come...


#5 don.siegel

don.siegel

    Grand Champion Poster

  • Subscriber
  • PipPipPipPipPipPipPipPip
  • 5,762 posts
  • Joined: 17-February 06
  • Gender:Male
  • Location:Paris, France

Posted 25 June 2013 - 04:51 PM

Absolutely zero returns Steve - but lots of hours! 


Don 


#6 Gator Bob

Gator Bob

    Grand Champion Poster

  • Banned
  • PipPipPipPipPipPipPipPip
  • 13,391 posts
  • Joined: 12-April 11
  • Gender:Not Telling
  • Location:.

Posted 25 June 2013 - 05:03 PM

Outstanding !!!


:good:  :good:


Posted Image
                            Bob Israelite

#7 SlotStox#53

SlotStox#53

    Posting Leader

  • Full Member
  • PipPipPipPipPipPipPip
  • 4,084 posts
  • Joined: 13-March 13
  • Gender:Male
  • Location:TX

Posted 25 June 2013 - 05:55 PM

Awesome start Steve :) Looking forward to following this one :D


#8 John Miller

John Miller

    This space for rent

  • Full Member
  • PipPipPipPipPipPip
  • 1,150 posts
  • Joined: 12-November 07
  • Gender:Male
  • Location:Hartford, MI

Posted 25 June 2013 - 09:15 PM

Nice tip for motor box angle.  Sweet work too.


"Racing makes heroin addiction look like a vague wish for something salty" - Peter Egan

ProSlot.png


#9 Steve Okeefe

Steve Okeefe

    The Independent Scratchbuilder

  • Administrator
  • PipPipPipPipPipPip
  • 1,136 posts
  • Joined: 16-February 06
  • Gender:Male
  • Location:State of Independence

Posted 27 June 2013 - 09:37 PM

Moving right along...


Setup the Rick's jig with a motorbox and a front axle tube, and cut and bend some .063" piano wire outside rails.


20. Outside Rails.jpg


Tin the rails and solder them in so they look like this:


21. Outside Rails Soldered.jpg


Cut, fit and solder in the .063" brass inside rails, spaced 7/8" apart, like this:


22. Inside Rails.jpg


Install an .016" thick by 1/4" wide strap brace and trim to fit:


23. Strap Brace.jpg


Add an .063" piano wire "L" brace on the side opposite the gear, cut a recess in the bottom and tie it down with brass wire:


24. L Brace and Tie.jpg


Repeat, repeat again (no such thing as too much fun), and we have some center sections:


25. Center Sections.jpg


Quick, which one is not like the others?   :prankster2:


Steve Okeefe


I build what I likes, and I likes what I build


#10 SlotStox#53

SlotStox#53

    Posting Leader

  • Full Member
  • PipPipPipPipPipPipPip
  • 4,084 posts
  • Joined: 13-March 13
  • Gender:Male
  • Location:TX

Posted 27 June 2013 - 10:28 PM

Excellent chassis Steve, I do believe its the one on the left being the other side drive :D ?!

Very nice design and build :) will use the Emott motor box info for a future 1969/70 anglewinder chassis that I will be doing for a hot B can :D

Build on Sir !

#11 Steve Okeefe

Steve Okeefe

    The Independent Scratchbuilder

  • Administrator
  • PipPipPipPipPipPip
  • 1,136 posts
  • Joined: 16-February 06
  • Gender:Male
  • Location:State of Independence

Posted 28 June 2013 - 11:31 AM

Yes, of course - you win the prize!  I have no idea what the prize is, but you win...


Anyway if you're going to build a motorbox chassis for a B-Motor (and if you want it to be "period-correct") it will need to be a late design motorbox chassis coupled with an early model B-Motor.  The two periods overlap in the first three months (give or take) of 1969.


If strict period-correctness is not your goal (and there's NOTHING wrong with that), I encourage you to build what makes you happy.  Ya' gotta build what makes you happy.  Rick T. (Mr. period-correct) has been telling me this for years, and he's absolutely right.


  • SlotStox#53 likes this

Steve Okeefe


I build what I likes, and I likes what I build


#12 SlotStox#53

SlotStox#53

    Posting Leader

  • Full Member
  • PipPipPipPipPipPipPip
  • 4,084 posts
  • Joined: 13-March 13
  • Gender:Male
  • Location:TX

Posted 28 June 2013 - 11:42 AM

I hear you on building what makes you happy ,Rick and yourself have got it right :)

Looking forward to seeing more of the Texas two rail :D

#13 Steve Okeefe

Steve Okeefe

    The Independent Scratchbuilder

  • Administrator
  • PipPipPipPipPipPip
  • 1,136 posts
  • Joined: 16-February 06
  • Gender:Male
  • Location:State of Independence

Posted 02 July 2013 - 07:54 PM

Time for some sidepans.


Start by cutting some 3/32" brass tube into 7/16" (.437") long pieces.  Then chamfer one end of each piece:


30. Sidepan Hinge Tubes.jpg


I use a 90 degree countersink to cut the chamfer, but a common 1/8" or 5/32" drill bit (with a 118 degree included angle tip) should work nearly as well.


Next, cut and bend some .063" piano wire for hinge arms and relieve (smooth out) the indentation on the inside of the bend with a small file:


31. Sidepan Hinge Arms.jpg


This is done to allow the piano wire hinge arms to be inserted fully in to the hinge tube and swivel without binding.  :good:   Here's an example of what I mean:


32. Hinge Details.jpg


Do this for all four hinge tubes and all four hinge arms.  It's extra work but the results cannot be consistently achieved any other way.  Pro builders in the late 60's and early 70's commonly used this trick on their chassis builds.  :hi:


Place the center section in the jig and set up some pins so you can lay in a temporary cross piece.  Align the two rear hinge tubes with that temporary cross piece (chamfered end towards where the hinge arm will be inserted) and solder them to the center section:
 

33. Align Tubes.jpg


This little alignment trick does not work at all well unless the hinge tubes are chamfered and the hinge arms are relieved because the hinge arms won't seat fully into the hinge tubes without binding, making aligning them and getting them to work correctly all but impossible.   :dash2:    
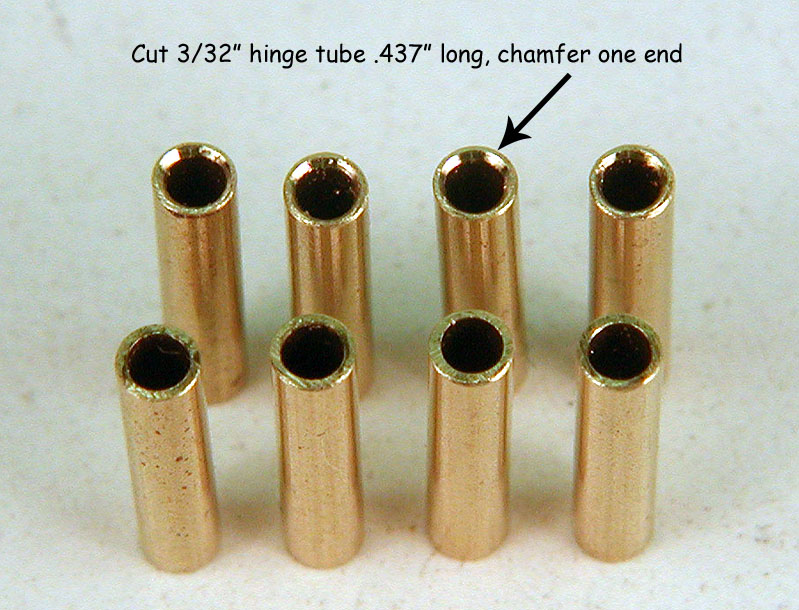
Repeat the process for the front tubes.


Cut two 2-7/8" lengths of .032" x 1/2" brass strip for the sidepans.  Lay them on the jig using pins to locate them laterally and align the rear edge with a pencil line 9/16" from the rear axle centerline.


Insert the hinge arms into the hinge tubes, tweaking the angle so all four arms are 90 degrees to the chassis centerline.  You will probably have to file a shallow bevel into the rear hinge arm opposite the gear at the point where it is inserted into the hinge tube because the outside chassis rail interferes where it bends outward at that point.


Now add bends in all four hinge arms so each arm sits flat on its .032" sidepan:


34. Bend Hinge Arms.jpg


Remove the hinge arms and tin them, both to control corrosion inside the hinges and to make it easier to solder them to the sidepans.  Again, extra work but the results, IMHO, are worth the effort.  :D


Repeat and repeat again, and we have three installed sets of side pans:


35. Sidepans Installed.jpg


Next up: Drop arms.


  • MarcusPHagen likes this

Steve Okeefe


I build what I likes, and I likes what I build


#14 SlotStox#53

SlotStox#53

    Posting Leader

  • Full Member
  • PipPipPipPipPipPipPip
  • 4,084 posts
  • Joined: 13-March 13
  • Gender:Male
  • Location:TX

Posted 02 July 2013 - 08:10 PM

Great tips for the pan hinges/tubes with the chamfering and relieved arms ! Noted for future reference thanks :good:

The Texas Two Rails are looking really sweet :clapping:


#15 Bob Emott

Bob Emott

    a dearly-missed departed member

  • Member at Peace
  • PipPipPipPip
  • 373 posts
  • Joined: 17-October 06
  • Gender:Male

Posted 04 July 2013 - 07:44 AM

What drop arm did you use?


Robert Emott, Jr
12/15/40-4/21/14
Requiescat in Pace

#16 Bob Emott

Bob Emott

    a dearly-missed departed member

  • Member at Peace
  • PipPipPipPip
  • 373 posts
  • Joined: 17-October 06
  • Gender:Male

Posted 04 July 2013 - 07:59 AM

And lots of great building tips.   I had a jig that I used to bend motor boxes made on a piece of Formica counter top material just like my first building jig.    Howie Ursaner asked me to show my jig to  Lou at Cobra manufacturing, and Lou was the first to manufacture a commercially available slot car building jig.   I found a complete Cobra building on Ebay a number of years ago, and it is a prized part of my small collection of slot car parts...   Now If I could only find a Champion  building jig to go with it.....


Robert Emott, Jr
12/15/40-4/21/14
Requiescat in Pace

#17 Duffy

Duffy

    a dearly-missed departed member

  • Member at Peace
  • PipPipPipPipPipPipPip
  • 3,791 posts
  • Joined: 25-January 09
  • Gender:Male
  • Location:Geographically Brooklyn, Politically Berkeley

Posted 04 July 2013 - 08:03 AM

Bob, I still wanna see a demo on how you built chassis upside-down...


Michael J. Heinrich
1950-2016
Requiescat in Pace
 
And I am awaiting
perpetually and forever
a renaissance of wonder

#18 SlotStox#53

SlotStox#53

    Posting Leader

  • Full Member
  • PipPipPipPipPipPipPip
  • 4,084 posts
  • Joined: 13-March 13
  • Gender:Male
  • Location:TX

Posted 04 July 2013 - 08:04 AM

Love hearing about how all the slot car parts ,tools etc all came about . Any chance of a picture of the Cobra building Jig Bob? :D

#19 dc-65x

dc-65x

    Grand Champion Poster

  • Subscriber
  • PipPipPipPipPipPipPipPip
  • 6,830 posts
  • Joined: 14-February 06
  • Gender:Male
  • Location:Captain Rick: The only vintage slot car nut in SW Oregon?

Posted 04 July 2013 - 10:37 AM

Great article Steve. :good:


Chamfering and relieving the hinge tubes is a great tip. It also helps a plumber rail system move freely especially when using .062" wire instead of the later .055".


Now I have to stop being lazy and tin my hinges to help prevent corrosion from locking them up :dash2:


Onward Steve :)


Rick Thigpen
Check out Steve Okeefe's great web site at its new home here at Slotblog:
The Independent Scratchbuilder
There's much more to come...


#20 Steve Okeefe

Steve Okeefe

    The Independent Scratchbuilder

  • Administrator
  • PipPipPipPipPipPip
  • 1,136 posts
  • Joined: 16-February 06
  • Gender:Male
  • Location:State of Independence

Posted 04 July 2013 - 01:36 PM

Bob,


I haven't specified or used any drop arm yet, but I was planning to make it the subject of my next post.


Historically we know you used stamped drop arms, mostly Cobra, for this style chassis in 1968, and that those drop arms were used with Cox Quick-Change guides.


The idea here is to encourage current scratch builders to use what is widely available today to recreate those beautiful old designs, not so much for racing (there is no racing class for chassis like this) but just for the fun of building and driving and maybe once in awhile to educate the youngsters and newbies about how all their modern stuff came about.


Anyway, Cox Quick-Change guides and Cobra drop arms are highly prized these days as "vintage collectibles" so I won't use them for this kind of build.


Today, the popular guide is of course the Jet Flag derivative, and while stamped drop arms (example: REHCo) can be had, they are not "widely" available and won't fit the Jet Flag without significant modification.  So, my approach on this first chassis is to use the Jet Flag derivative and fabricate a suitable drop arm to fit from brass stock.


  • SlotStox#53 likes this

Steve Okeefe


I build what I likes, and I likes what I build


#21 Steve Okeefe

Steve Okeefe

    The Independent Scratchbuilder

  • Administrator
  • PipPipPipPipPipPip
  • 1,136 posts
  • Joined: 16-February 06
  • Gender:Male
  • Location:State of Independence

Posted 04 July 2013 - 01:51 PM

Rick,


I guess those old phart chassis builders from the 60's knew a little bit about what they were doing, huh?  :hi:


  • endbelldrive likes this

Steve Okeefe


I build what I likes, and I likes what I build


#22 Steve Okeefe

Steve Okeefe

    The Independent Scratchbuilder

  • Administrator
  • PipPipPipPipPipPip
  • 1,136 posts
  • Joined: 16-February 06
  • Gender:Male
  • Location:State of Independence

Posted 14 July 2013 - 03:02 AM

Okay, this is where the build starts to get interesting, or maybe starts to get into trouble.  :sarcastic_hand: 


The idea all along has been to to encourage current scratchbuilders to use what is widely available today to recreate those beautiful old designs, not so much for racing (there is no racing class for chassis like this) but just for the fun of building and driving and maybe once in awhile to educate the youngsters and newbies about how all their modern stuff came about.


The easiest and I think most effective way to do this is to show a comparison of the same build done three different ways.


So, the implementation of the basic design of the three chassis will begin to diverge as we get to the part of the build where we would be using real-deal vintage parts (if we had them...  :( )


The period-correct guide for this chassis is a Cox "Coxalloy" quick-change:


40. Cox 3842 Guide.JPG


The drop arm of choice would be a 1/16" thick stamped brass item made by Cobra:


41. Cobra Drop Arm.jpg


As it turns out I do have a Cox guide, but no 7/8" wide Cobra drop arm (the one in the photo is 3/4").  I could widen the Cobra drop arm with two pieces of 1/16" brass rod (one on each side), and I would in a "New York second" if I were building for a race, but I'm not and I don't care for the "look" anyway.


I do like the way this Mini Wheels drop arm is at least the right width and has built-in guide stops...


42. Mini Wheels Drop Arm.jpg


But I don't have one of those either.  :mad:  Does any of this "...but I don't have one of those either" stuff sound familiar?


Something I do have, and you could too because it is still available from a few dealers (example: PCH), is a REHCo 7/8" wide stamped drop arm:


42. REHCo Drop Arm.jpg


The REHCo drop arm has the right dimensions, but not quite the right shape, so we need to fix that.  Another problem with the REHCo drop arm is that most of them are slightly bent, twisted or otherwise not straight or flat.


Spend as much time as you need tweaking the slab and the riser (the part where the guide goes) so they are both absolutely straight, flat and parallel to the block.  Extra time spent, but it is definitely worth the effort.


Then slit the riser on both sides of the guide hole with a cut-off wheel in your Dremel, bend and twist the two "tails" so they form guide stops just like the Mini Wheels guide, add a hinge tube and clean the whole mess up:


43. PCOD Drop Arm.jpg


Now we have a drop arm and guide for our period-correct version chassis.  But for the other two chassis I am going to build a "re-creation" version and a "Retro Runner" version to show off the differences.


For the "re-creation" and the "Retro Runner" drop arms, we will use a modern derivative of the Jet Flag made by Starburst, commonly known as a "graphite" guide.  The guide for the "re-creation" will be cut down and made to look like the Cox guide, where the guide for the "Retro Runner" drop arm will be used as-is.


The guide tongues for both drop arms will be the same, made from 1/16" thick brass strip, but the slabs need to be slightly different lengths to accommodate the different shape guides. 


Complete with hinge tubes, they look like this:


44. Recreation Drop Arm.jpg


45. Retro Runner Drop Arm.jpg


Comparison bottom view showing all three drop arms with guides at full turn and up against their built-in guide stops:


46. Three DA Guide Stops.jpg


Same  view with the guides removed:


47. Three DA Bottom.jpg


Slipped into their respective center sections, but not yet installed, the drop arms and guides look like this:


48. Three Amigos.jpg


Progressively from left to right the vintage flavor of the build is maintained without using (rare/expensive/hard-to-find) vintage parts...  :i-m_so_happy: 


  • MarcusPHagen likes this

Steve Okeefe


I build what I likes, and I likes what I build


#23 dc-65x

dc-65x

    Grand Champion Poster

  • Subscriber
  • PipPipPipPipPipPipPipPip
  • 6,830 posts
  • Joined: 14-February 06
  • Gender:Male
  • Location:Captain Rick: The only vintage slot car nut in SW Oregon?

Posted 14 July 2013 - 10:17 AM

I love that Period "Korrect" drop arm.....may I have it? :D


Rick Thigpen
Check out Steve Okeefe's great web site at its new home here at Slotblog:
The Independent Scratchbuilder
There's much more to come...


#24 SlotStox#53

SlotStox#53

    Posting Leader

  • Full Member
  • PipPipPipPipPipPipPip
  • 4,084 posts
  • Joined: 13-March 13
  • Gender:Male
  • Location:TX

Posted 14 July 2013 - 10:26 AM

Great progress and thanks for showing a scratch builder the ways of the force! Really do love that Korrect drop arm :D

*Buys some REHco drop arms asap*!!!!

Love that mint in box cox guide aswell :D

#25 gas

gas

    Backmarker

  • Subscriber
  • PipPip
  • 68 posts
  • Joined: 28-December 08
  • Gender:Male
  • Location:NM

Posted 03 August 2013 - 05:19 PM

Seeing your motorboxes brings back memories of how difficult they were to bend up for a 13-14 year old with limited scratchbuilding experience. As a 21 year old 888 style chassis were alot easier.


George Ewing

Retired USAF, retired Ford service tech.


Electric Dreams Online Shop