

Actually the extra holes will kill the return path of the magnetic field and should free up the motor for more rpm.

Dynamic’s '67 GE motor - just a "Mirage"?
Started by
dc-65x
, Aug 25 2016 09:05 PM
85 replies to this topic
#26

tonyp
-

- Member at Peace
-

- 15,325 posts Joined: 12-February 07
Grand Champion Poster
- Gender:Male
- Location:Sanford, FL, land of lizards and big roaches
Posted 02 September 2016 - 07:59 PM
Anthony 'Tonyp' Przybylowicz
5/28/50-12/20/21
Requiescat in Pace
#27
dc-65x
-
- Subscriber
-
- 7,018 posts Joined: 14-February 06
Grand Champion Poster
- Gender:Male
- Location:Captain Rick: The only vintage slot car nut in SW Oregon?
Posted 03 September 2016 - 10:12 AM
I think that might be an added benefit Tony. Maybe I won't have to gear the thing 2.5:1 and it might run a little cooler too.
Rick Thigpen
Check out Steve Okeefe's great web site at its new home here at Slotblog:
The Independent Scratchbuilder
There's much more to come...
#28
dc-65x
-
- Subscriber
-
- 7,018 posts Joined: 14-February 06
Grand Champion Poster
- Gender:Male
- Location:Captain Rick: The only vintage slot car nut in SW Oregon?
Posted 28 September 2016 - 07:44 PM
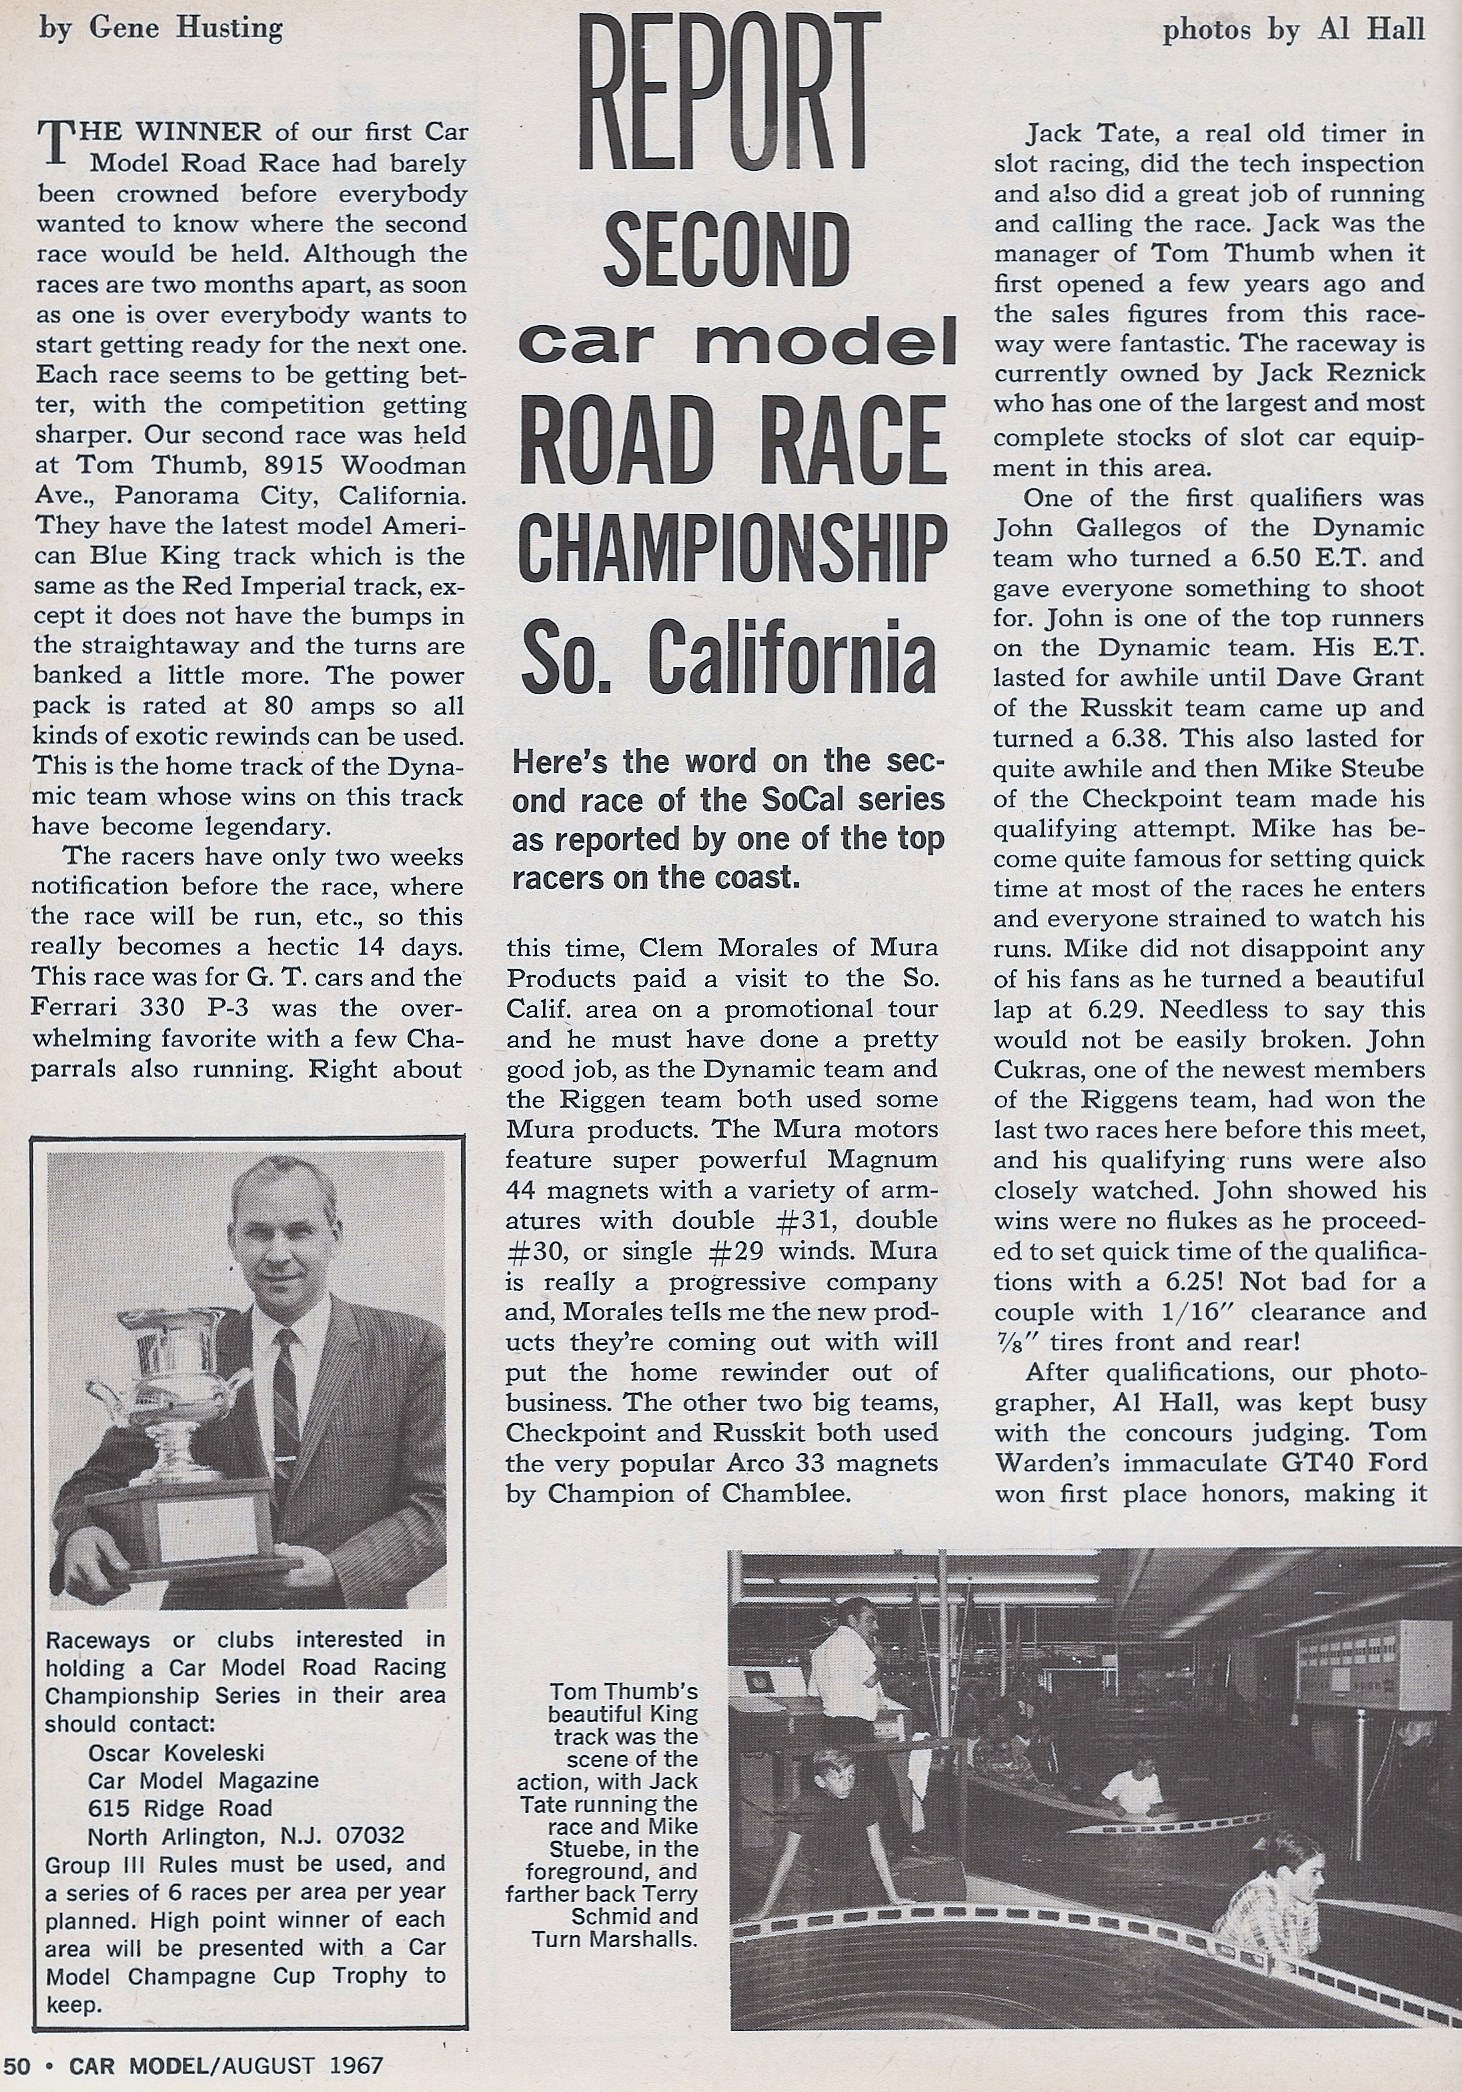
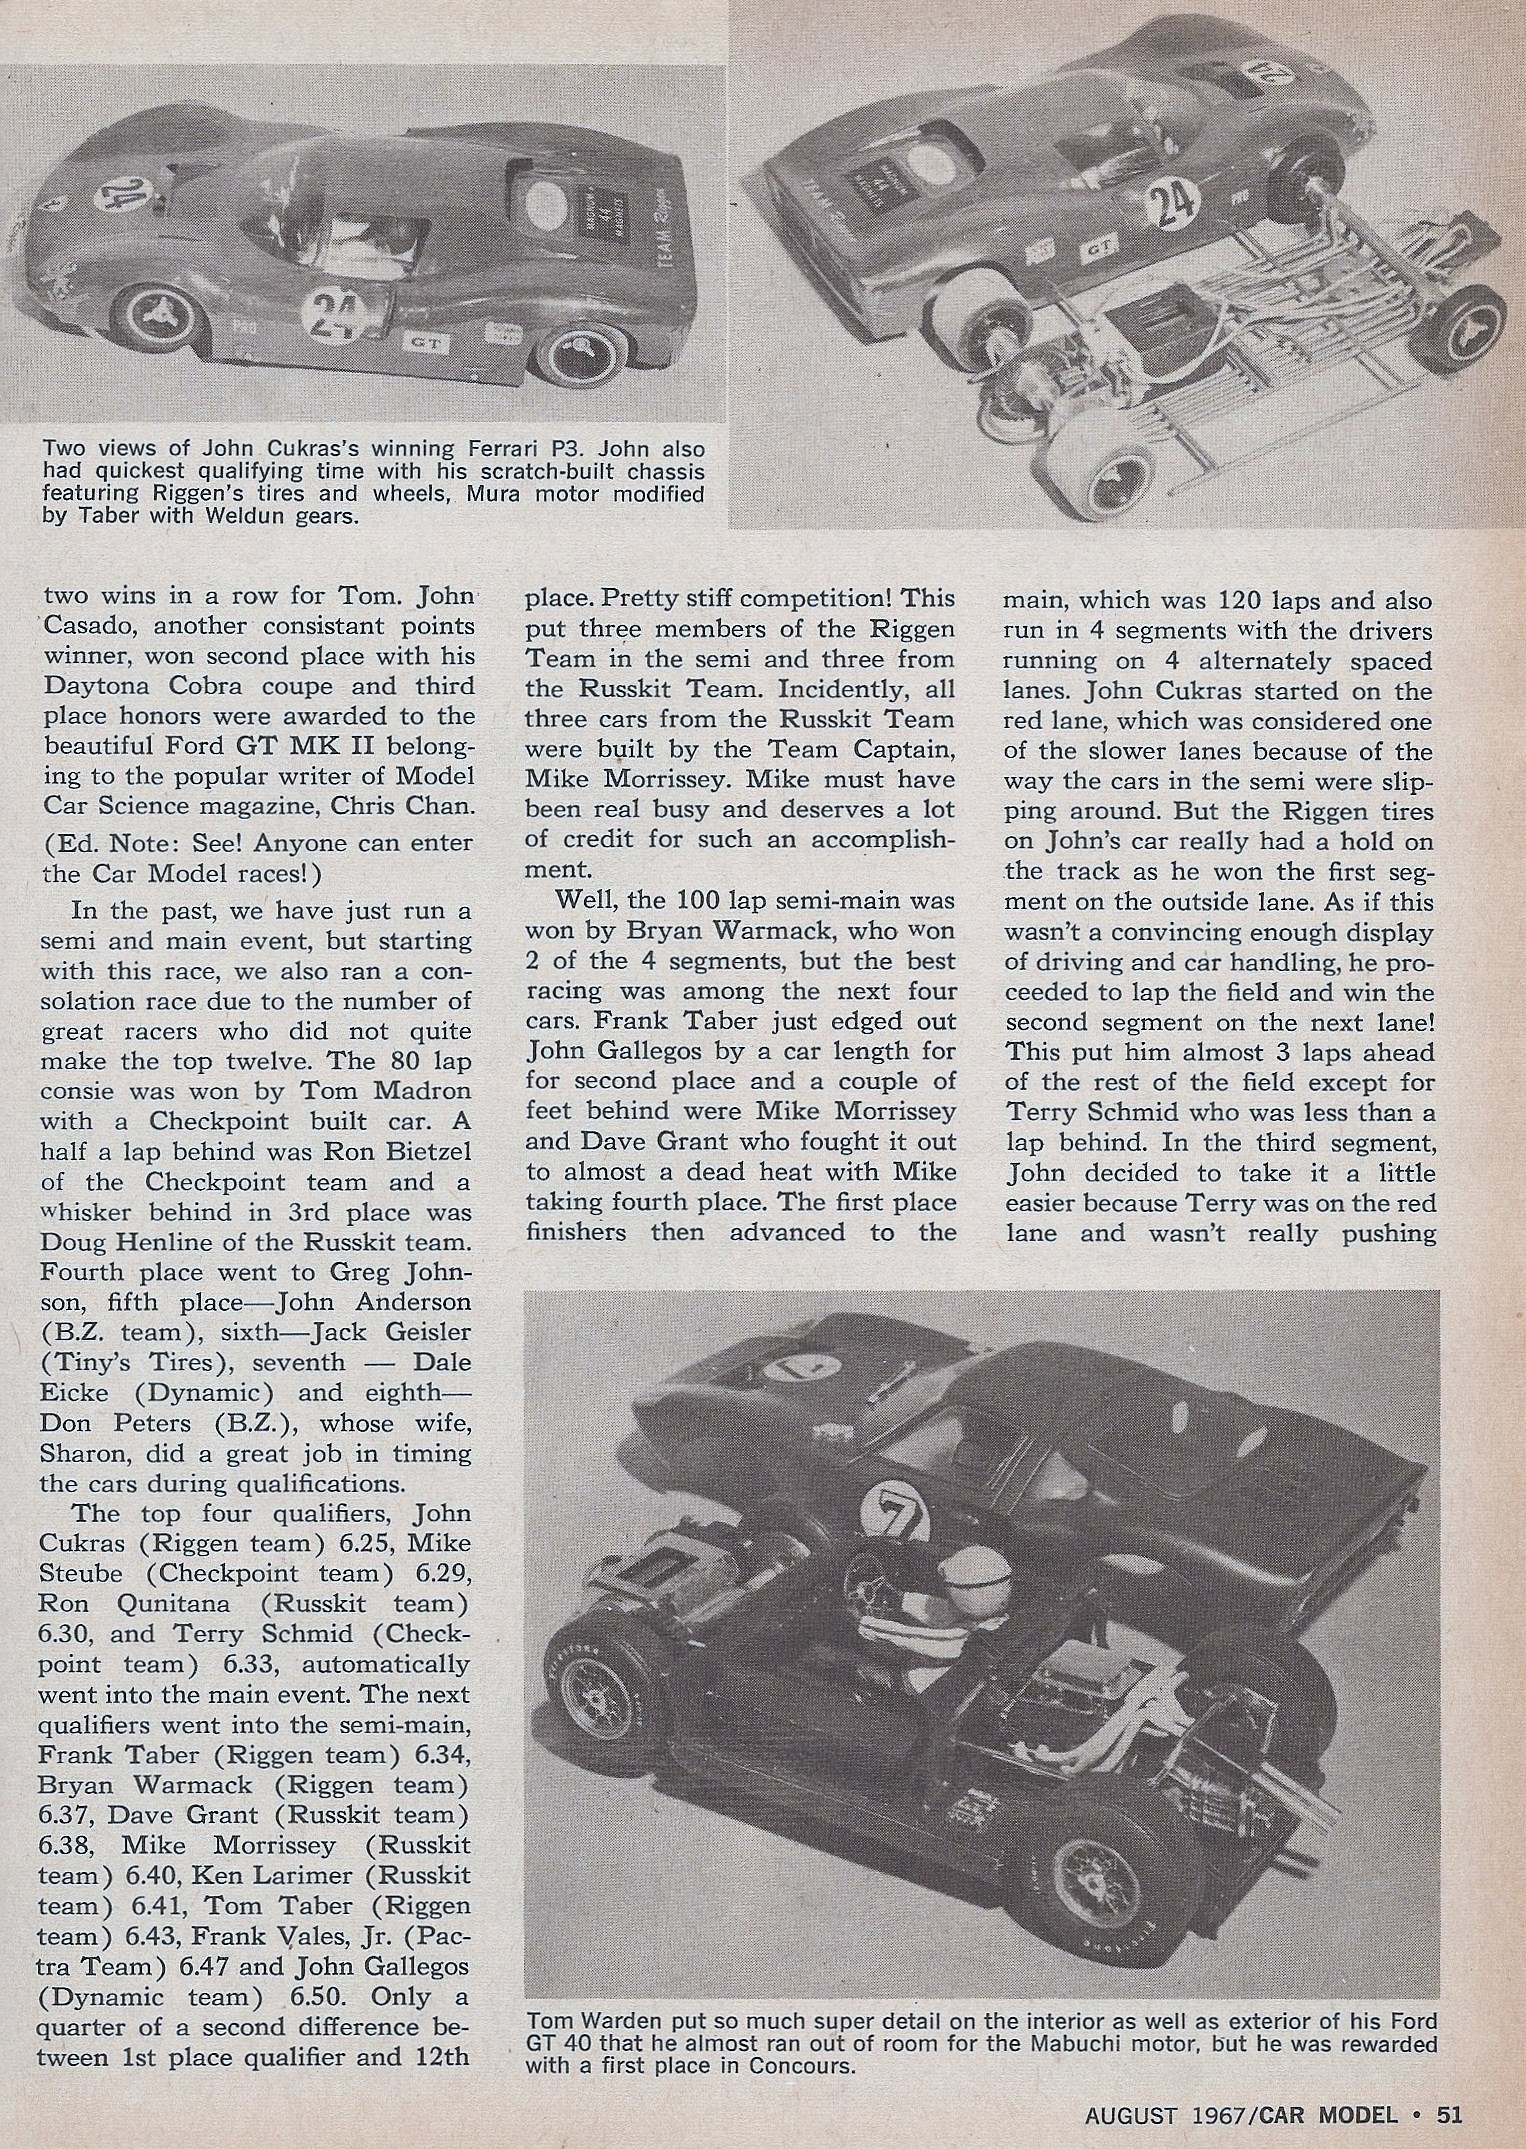
I've chosen a chassis design to pattern my car after. It's Ron Quintana's 4th place finisher in the second 1967 Car Model Magazine Race. I want to try this chassis with its 4 tightly spaced rails per side and heavy drop arm:

Here's the entire race report (click on the picture to enlarge):


I also needed to decide on what rear wheels to use so I could make the "korrect" length of rear bearing holder or "duffy". The wider the rear wheel, the shorter the duffy needs to be.
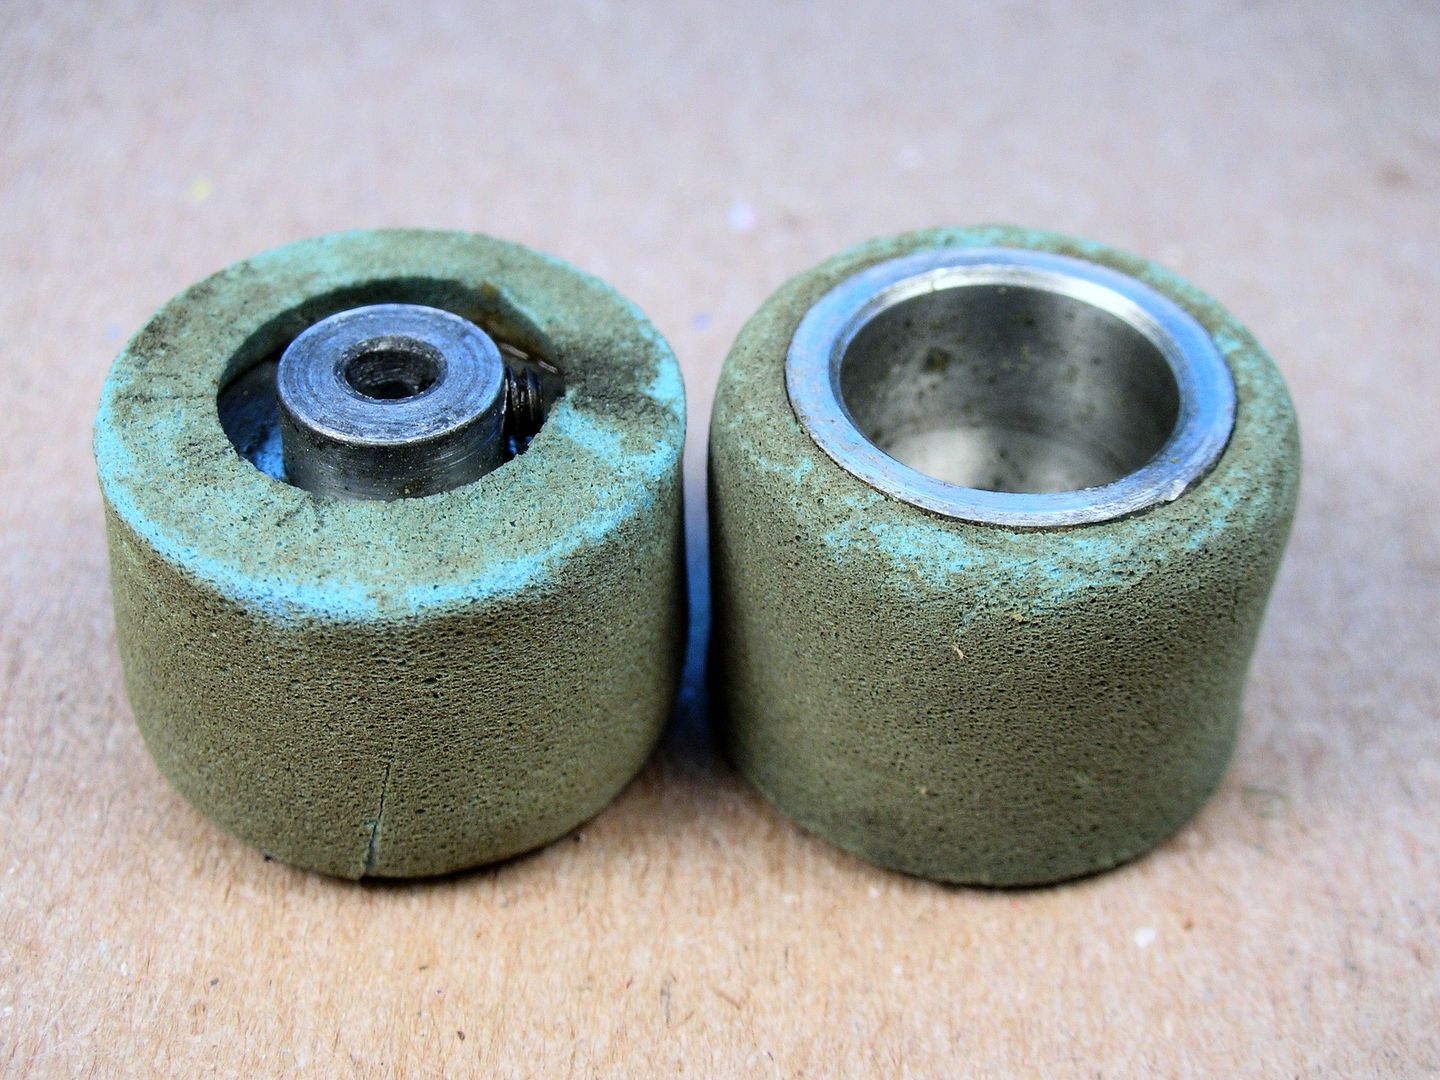
Like many of the Car Model racers I'm going with some Weldon wheels that only have a 1/2" of tire mounting surface. To get the legal maximum tire width of 5/8" I'll let the rubber hang over the back just like these well worn originals:
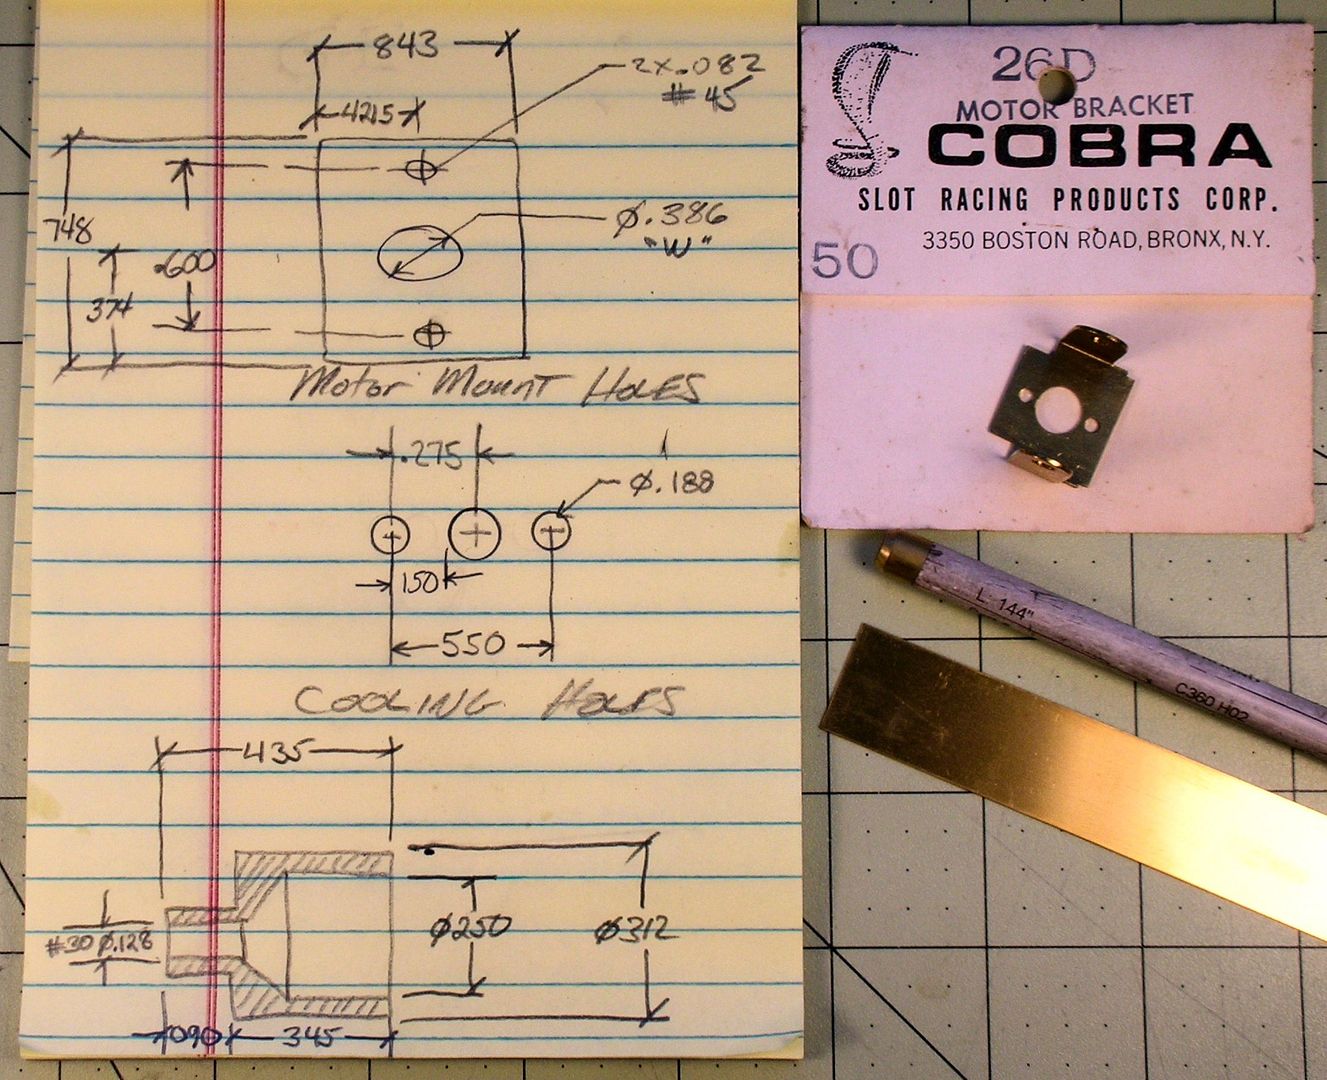
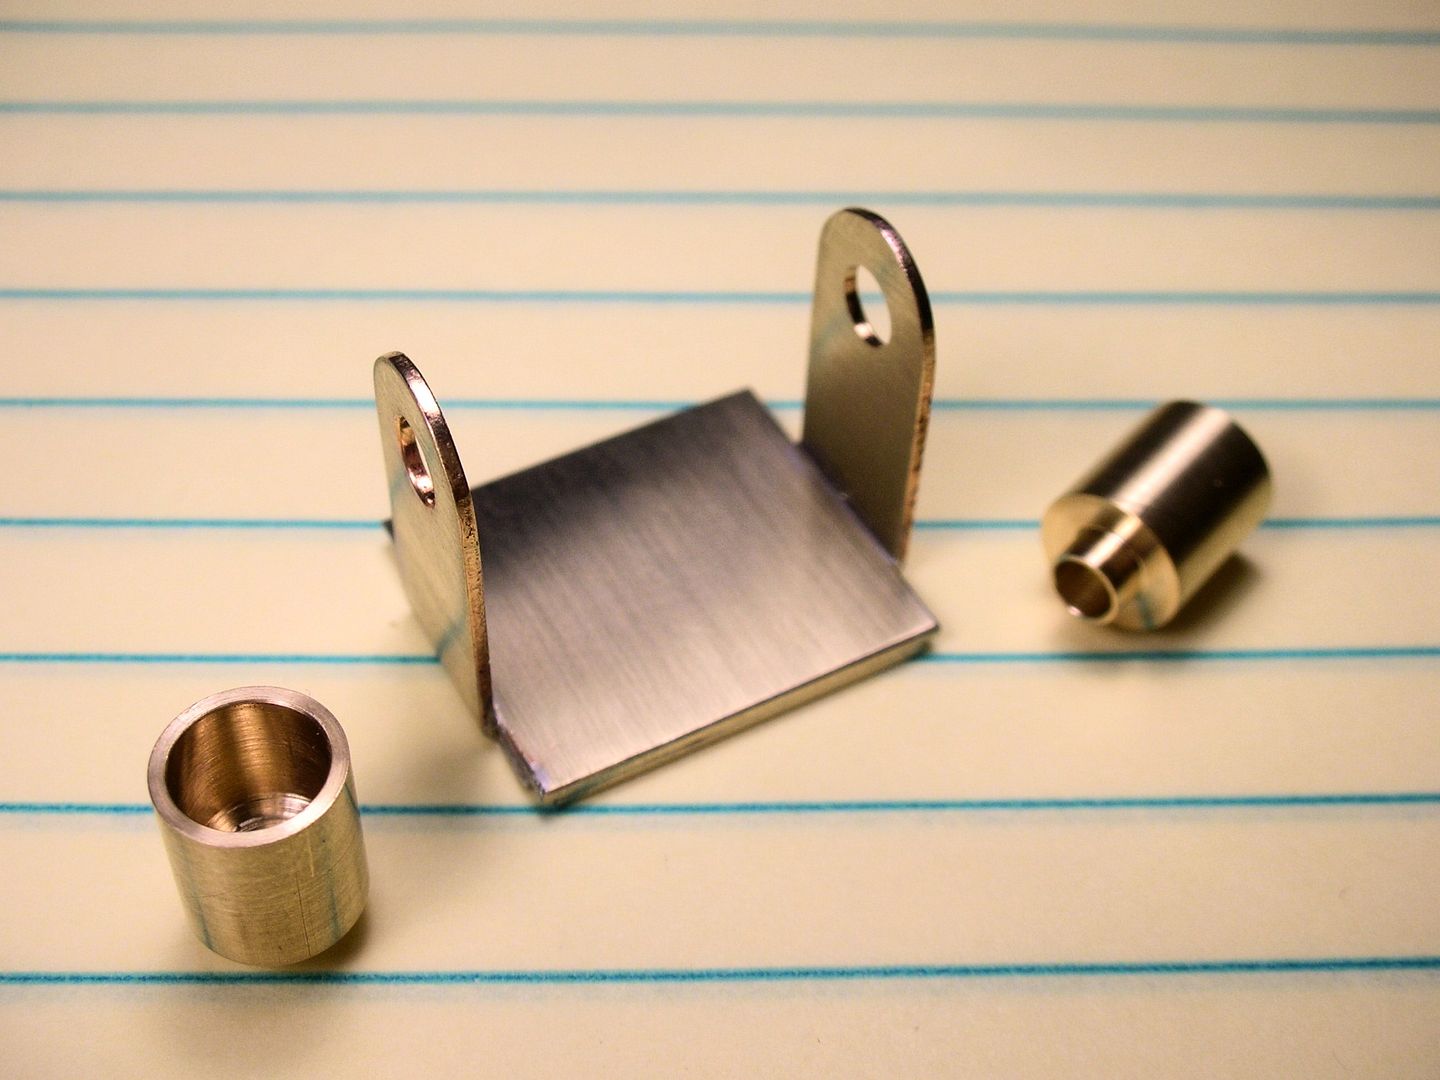
With that decided I made up a sketch and gathered up the material for the duffy's and the modifications needed for a Cobra 26D rear axle bracket:
Here the duffys are finished and a blank plate soldered to the motor bracket ready for it's new bearing and mounting holes:
Time to get this baby into my "Rick's Jig" and build that chassis:
- Jencar17, Tim Wilkins and C. J. Bupgoo like this
Rick Thigpen
Check out Steve Okeefe's great web site at its new home here at Slotblog:
The Independent Scratchbuilder
There's much more to come...
#29
Tim Wilkins
-

- Full Member
-
- 1,500 posts Joined: 22-February 13
- Gender:Male
- Location:Williamsport, PA
Posted 28 September 2016 - 08:04 PM
Blue "Silver Hornet"? i like it
"If everything seems under control, you're not going fast enough" - Mario Andretti
#30
dc-65x
-
- Subscriber
-
- 7,018 posts Joined: 14-February 06
Grand Champion Poster
- Gender:Male
- Location:Captain Rick: The only vintage slot car nut in SW Oregon?
Posted 28 September 2016 - 09:05 PM
I didn't notice that blue effect the lighting caused in the picture until you mentioned it. I like it too! Maybe I should try some of that "cold bluing solution" on the motor to really turn it blue. 
Rick Thigpen
Check out Steve Okeefe's great web site at its new home here at Slotblog:
The Independent Scratchbuilder
There's much more to come...
#31
don.siegel
-

- Subscriber
-
- 5,873 posts Joined: 17-February 06
Grand Champion Poster
- Gender:Male
- Location:Paris, France
Posted 29 September 2016 - 06:16 AM
Hey Rick,
Nice chassis choice, but... given that the rewound Russkit probably weighs about half of the GE, shouldn't you add another rail or two to the chassis? No room to add anything on the drop arm, but a little more weight on the chassis might help.
Of course, that's all theoretical, but these things have a LOT of torque...
Don
#32
Bill from NH
-

- Full Member
-
- 14,870 posts Joined: 02-August 07
Age scrubs away speed!
- Gender:Male
- Location:New Boston, NH
Posted 29 September 2016 - 06:40 AM
If more weight is needed, it could be added as a 5th main rail, as multi-rod outriggers along the body, or in both locations.
Bill Fernald
I intend to live forever! So far, so good.
I intend to live forever! So far, so good.
#33
Pablo
-

- Administrator
-
- 18,471 posts Joined: 20-February 06
Builder
- Gender:Male
- Location:Cleveland, Tennessee
Posted 29 September 2016 - 07:30 AM
Duffy is surely smiling from above 
- Samiam likes this
Paul Wolcott
#34
dc-65x
-
- Subscriber
-
- 7,018 posts Joined: 14-February 06
Grand Champion Poster
- Gender:Male
- Location:Captain Rick: The only vintage slot car nut in SW Oregon?
Posted 29 September 2016 - 09:51 AM
Duffy is surely smiling from above
I hope so too Pablo
A pan type chassis like my Ram Boochie would probably handle best for this beast:

I decided to approach the build as an LA racer might in 1967. The motor itself adds lots of mass and I can always add as many rails as will fit in the 3" wide chassis if it comes to that......we'll see. 
- Jencar17 and C. J. Bupgoo like this
Rick Thigpen
Check out Steve Okeefe's great web site at its new home here at Slotblog:
The Independent Scratchbuilder
There's much more to come...
#35
dc-65x
-
- Subscriber
-
- 7,018 posts Joined: 14-February 06
Grand Champion Poster
- Gender:Male
- Location:Captain Rick: The only vintage slot car nut in SW Oregon?
Posted 23 October 2016 - 04:59 PM
Rodney thought it would be interesting to compare the GE motors height and weight with the other common 1967 motors:
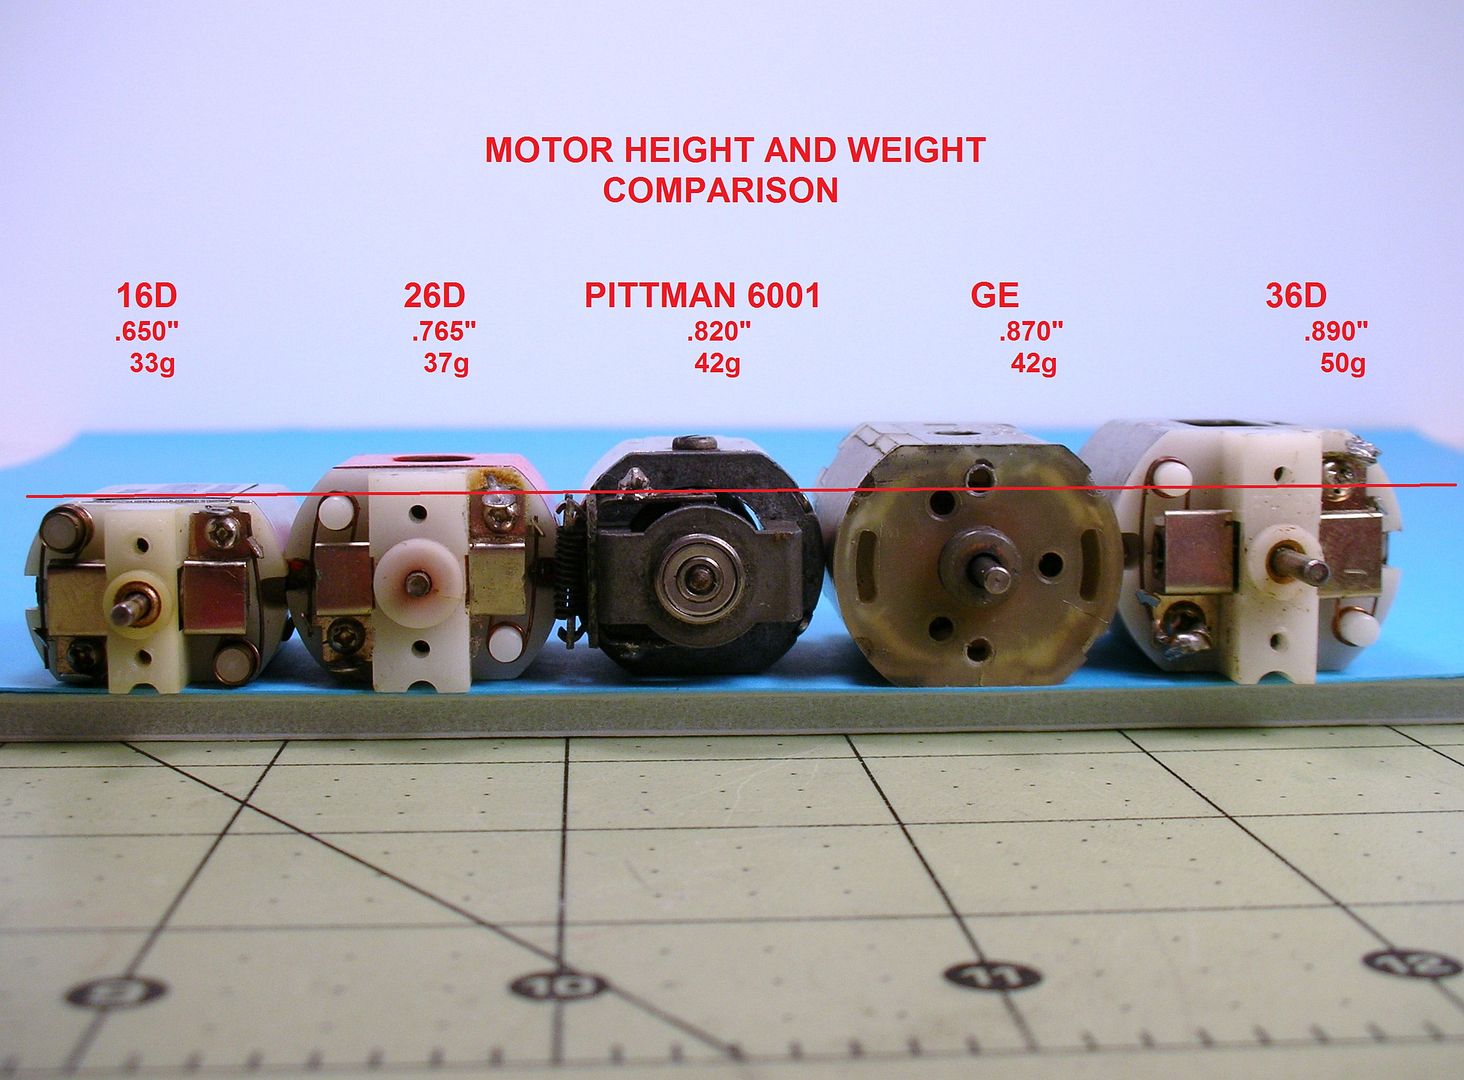
So the GE is a bit smaller than the giant 36D but it's still one big motor 
So.......I'm going to change my mind on chassis design.  I'm not really changing the design because of the motor comparison above but because I saw this picture and I think a similar design would be fun to build (photo courtesy of Los Angeles Slot Car Museum):
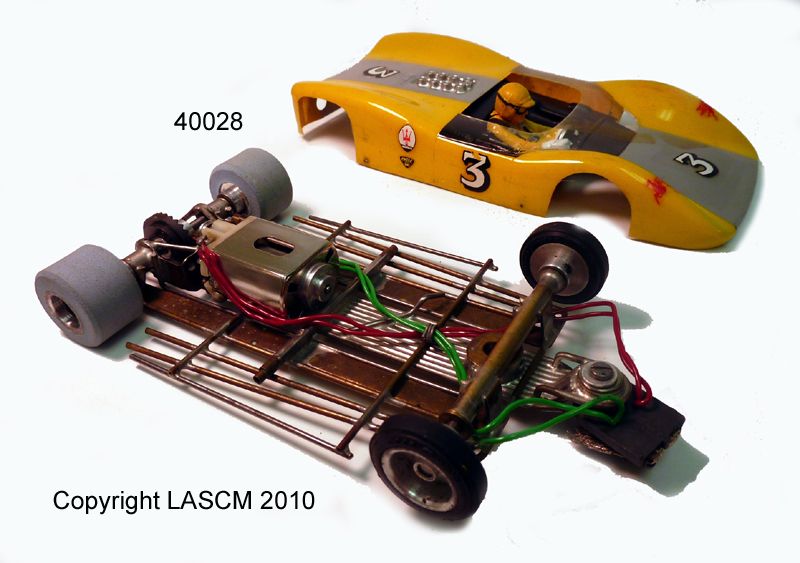
This super cool Terry Schmidt chassis is going to be my inspiration for the build.
Here are the pieces for the first wave of chassis assembly including the brass rod and piano wire main rails, 1/4" brass strip "rails", motor bracket "L" braces, drop arm hinge tube and up stop plus 4 little square brass spacers:
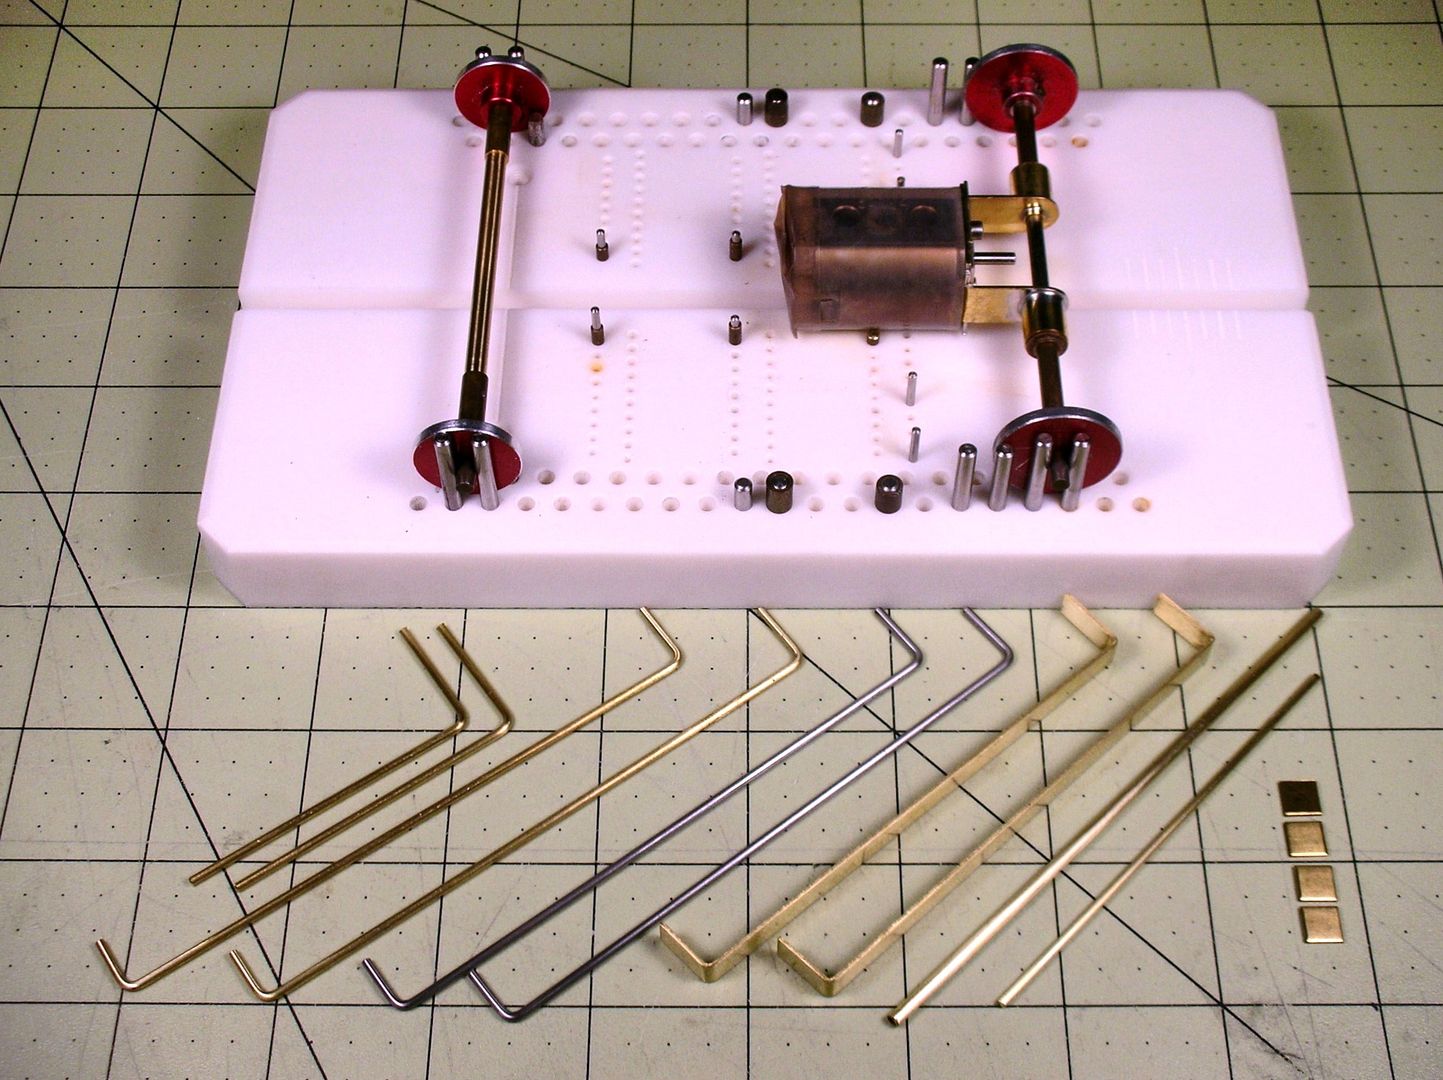
I'm a believer in letting my Rick's chassis jig do as much of the parts alignment as possible. So I leave many chassis parts extra long so they can align with the jig pins. Here's the jig ready to begin:
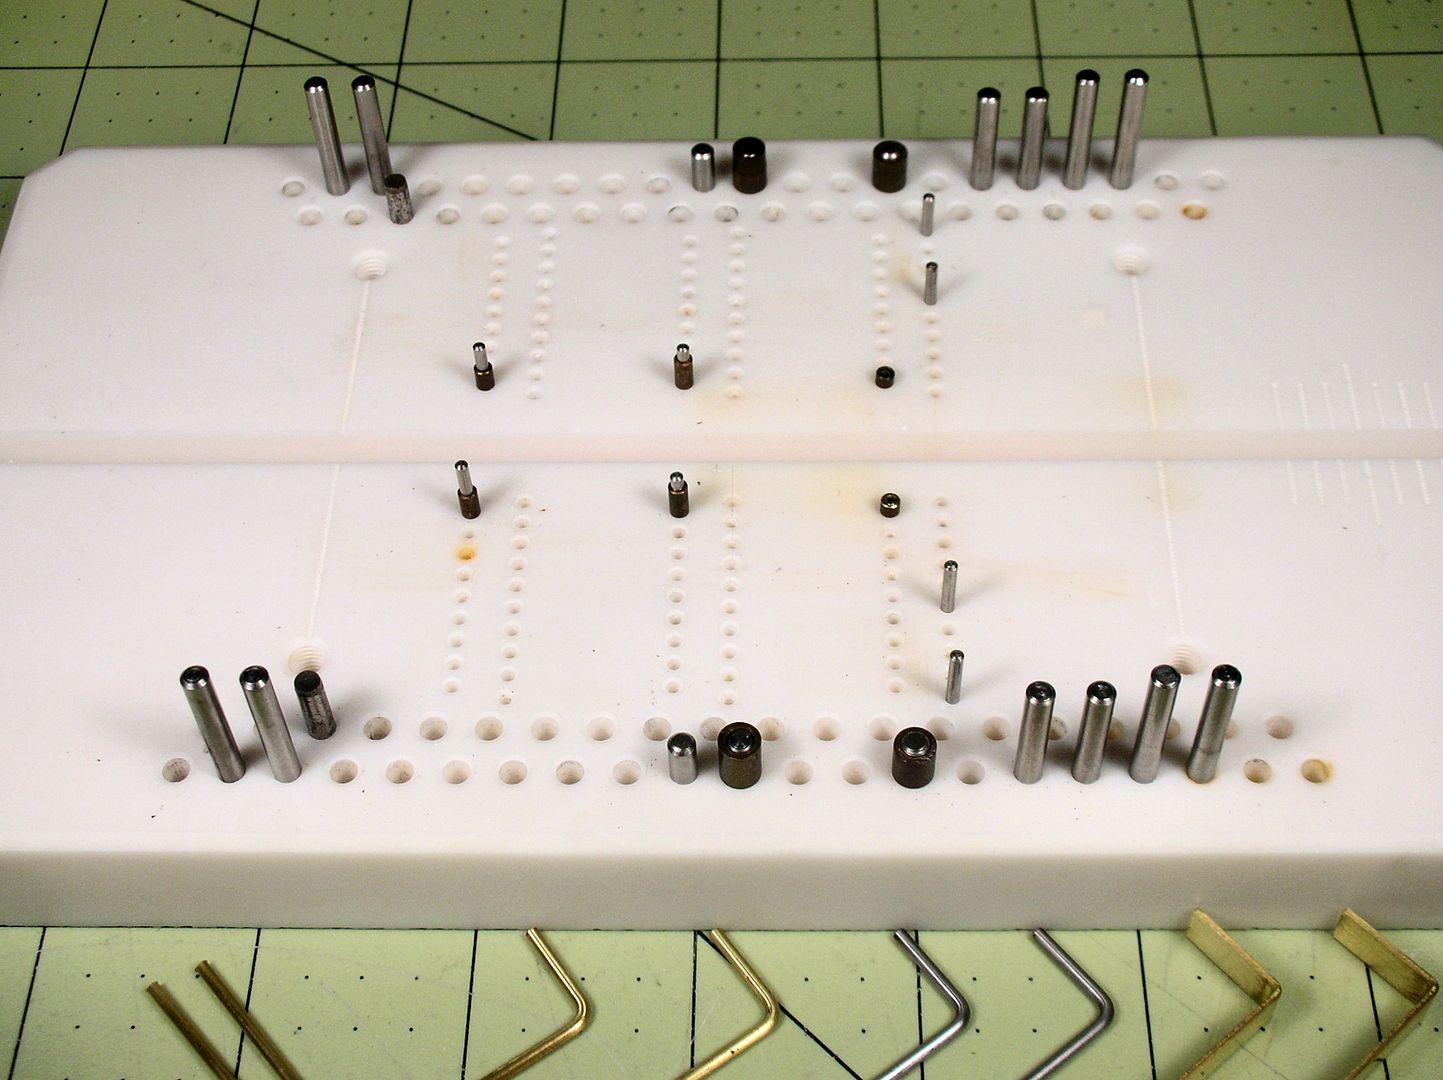
The partial chassis and all the jig pieces drying after washing all the acid flux off:
Onward..........
- slotbaker, Pablo, Jencar17 and 3 others like this
Rick Thigpen
Check out Steve Okeefe's great web site at its new home here at Slotblog:
The Independent Scratchbuilder
There's much more to come...
#36
Pablo
-
- Administrator
-
- 18,471 posts Joined: 20-February 06
Builder
- Gender:Male
- Location:Cleveland, Tennessee
Posted 23 October 2016 - 07:18 PM

Paul Wolcott
#37
dc-65x
-
- Subscriber
-
- 7,018 posts Joined: 14-February 06
Grand Champion Poster
- Gender:Male
- Location:Captain Rick: The only vintage slot car nut in SW Oregon?
Posted 23 October 2016 - 08:02 PM
Hi Pablo,
I trimmed of excess crap-o-la and put the buff to the center section:
Body mounts are next......
- slotbaker, Jencar17 and C. J. Bupgoo like this
Rick Thigpen
Check out Steve Okeefe's great web site at its new home here at Slotblog:
The Independent Scratchbuilder
There's much more to come...
#38
Horsepower
-

- Full Member
-
- 4,343 posts Joined: 16-February 06
**Numb Thumbs**
- Gender:Male
- Location:Chicago
Posted 24 October 2016 - 04:14 AM
THAT is an incredible piece of work! Not only beautiful, but it looks bullet proof. 
Gary Stelter
My life fades, the vison dims. All that remains are memories... from The Road Warrior
My life fades, the vison dims. All that remains are memories... from The Road Warrior
#39
dc-65x
-
- Subscriber
-
- 7,018 posts Joined: 14-February 06
Grand Champion Poster
- Gender:Male
- Location:Captain Rick: The only vintage slot car nut in SW Oregon?
Posted 26 October 2016 - 08:09 PM
Thanks Gary
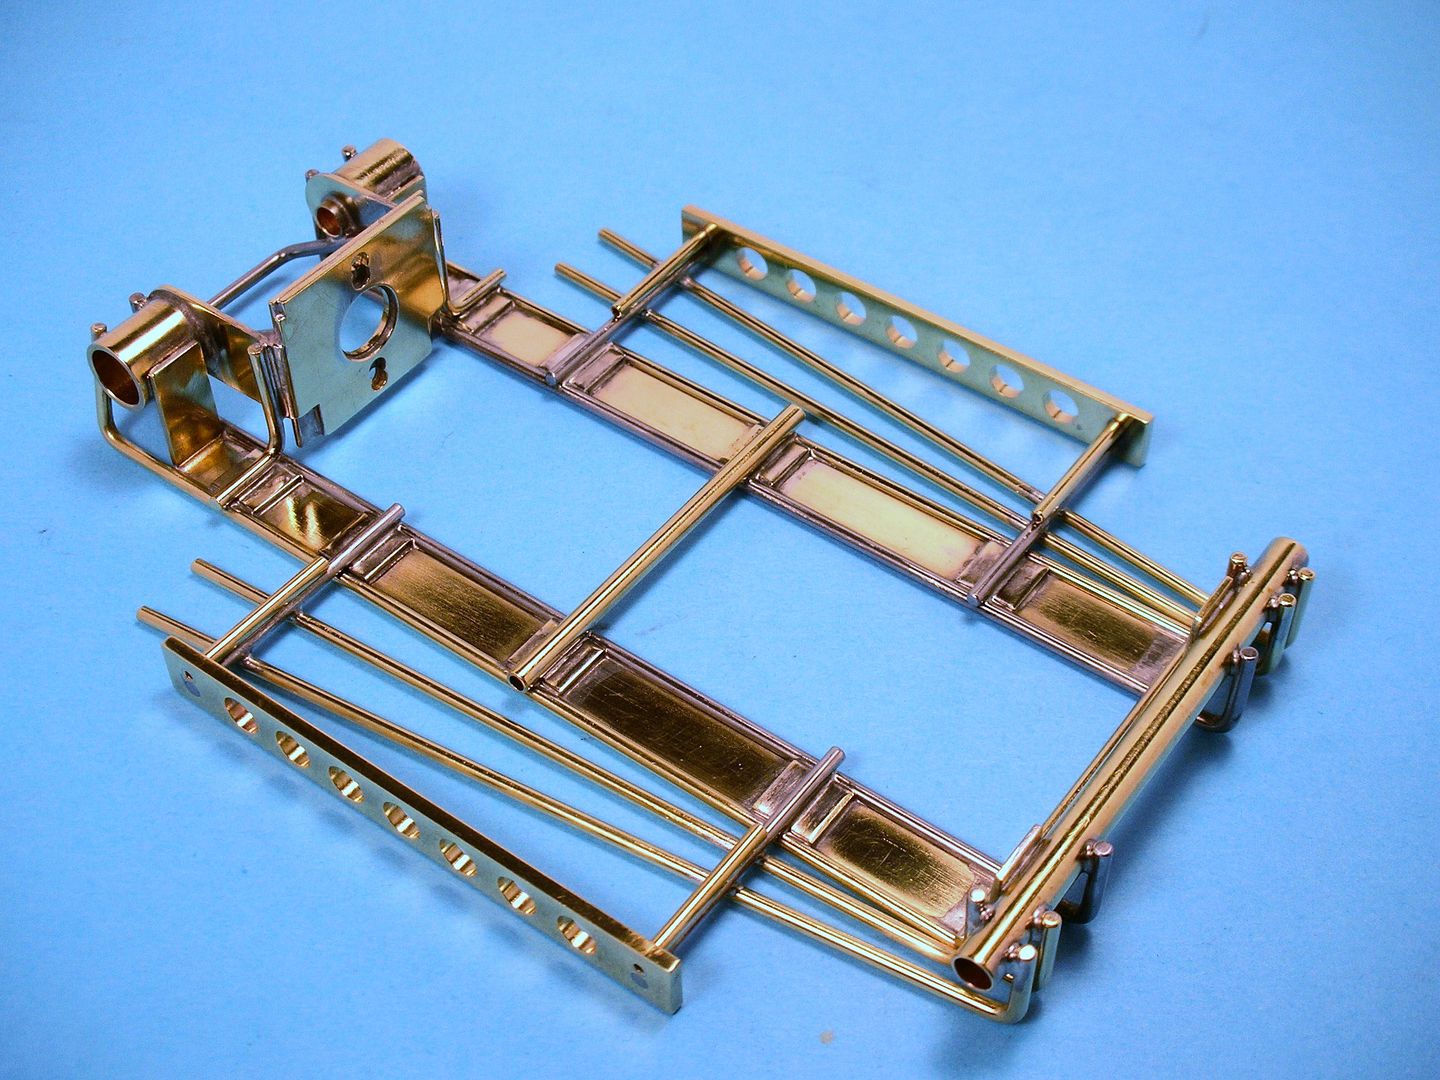
The big GE motor is tall and so are the 1" diameter tires it requires. The Mirage body is sitting a bit higher than the traditional body mounting pin tubes sitting on the frame rails will accommodate. So......I came up with another use for 1/4" brass strip:
I'm using these pieces to support the sides of the body and raise up the pin tube outrigger body mounts:
I decided since I'm following Terry Schmidt's build and using piano wire for the inside frame rail, I'm also going to use it for the outrigger mounts:
Brass pin tubes sit directly above the piano wire mounts:
Next up are the rest of the frame rails........
- slotbaker, Jencar17, Tim Wilkins and 1 other like this
Rick Thigpen
Check out Steve Okeefe's great web site at its new home here at Slotblog:
The Independent Scratchbuilder
There's much more to come...
#40
Pablo
-
- Administrator
-
- 18,471 posts Joined: 20-February 06
Builder
- Gender:Male
- Location:Cleveland, Tennessee
Posted 27 October 2016 - 07:30 AM
Totally trick and very slick 

Paul Wolcott
#41
dc-65x
-
- Subscriber
-
- 7,018 posts Joined: 14-February 06
Grand Champion Poster
- Gender:Male
- Location:Captain Rick: The only vintage slot car nut in SW Oregon?
Posted 28 October 2016 - 08:53 PM
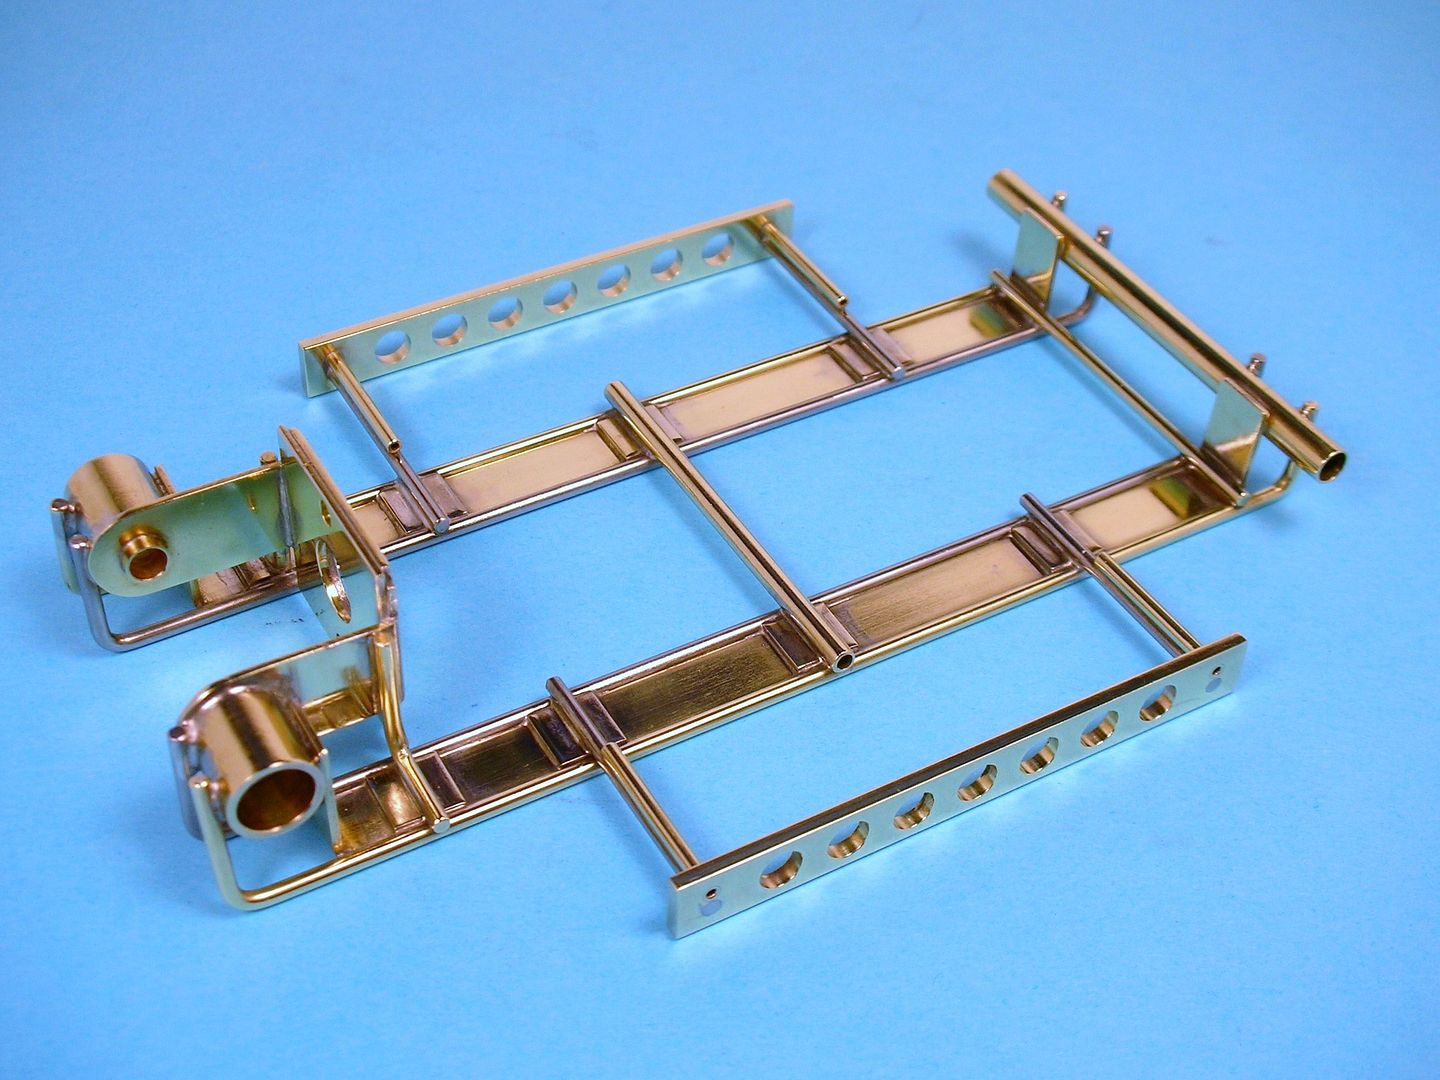
More progress. The coolest looking part of Terry's chassis design........the angled outer rails:
I looked through the 1967 Car Model and ARCO race reports and found an evolution from arched brass to squared piano wire axle bracket braces. With the rest of the chassis using piano wire bits, I went with this:
Now it's time for some fun with a drop arm.......I hope!
- slotbaker and C. J. Bupgoo like this
Rick Thigpen
Check out Steve Okeefe's great web site at its new home here at Slotblog:
The Independent Scratchbuilder
There's much more to come...
#42
Bill from NH
-
- Full Member
-
- 14,870 posts Joined: 02-August 07
Age scrubs away speed!
- Gender:Male
- Location:New Boston, NH
Posted 28 October 2016 - 09:10 PM
That chassis design always reminds me of a sunrise. Nice job, as usual Rick, on this chassis.
Bill Fernald
I intend to live forever! So far, so good.
I intend to live forever! So far, so good.
#43
Jairus
-

- Subscriber
-
- 10,174 posts Joined: 16-February 06
Body Painter Extraordinaire
- Gender:Male
- Location:Salem, OR
Posted 29 October 2016 - 10:13 AM
Now that is a perfect car for "Nerfing" the competition. Bullet proof and beautiful Rick.
- NSwanberg likes this
Jairus H Watson - Artist
Need something painted, soldered, carved, or killed? - jairuswtsn@aol.com
www.slotcarsmag.com
www.jairuswatson.net
http://www.ratholecustoms.com
Check out some of the cool stuff on my Fotki!
#44
dc-65x
-
- Subscriber
-
- 7,018 posts Joined: 14-February 06
Grand Champion Poster
- Gender:Male
- Location:Captain Rick: The only vintage slot car nut in SW Oregon?
Posted 31 October 2016 - 10:10 PM
Thanks Jairus, but I'd never nerf.....he! he! he!
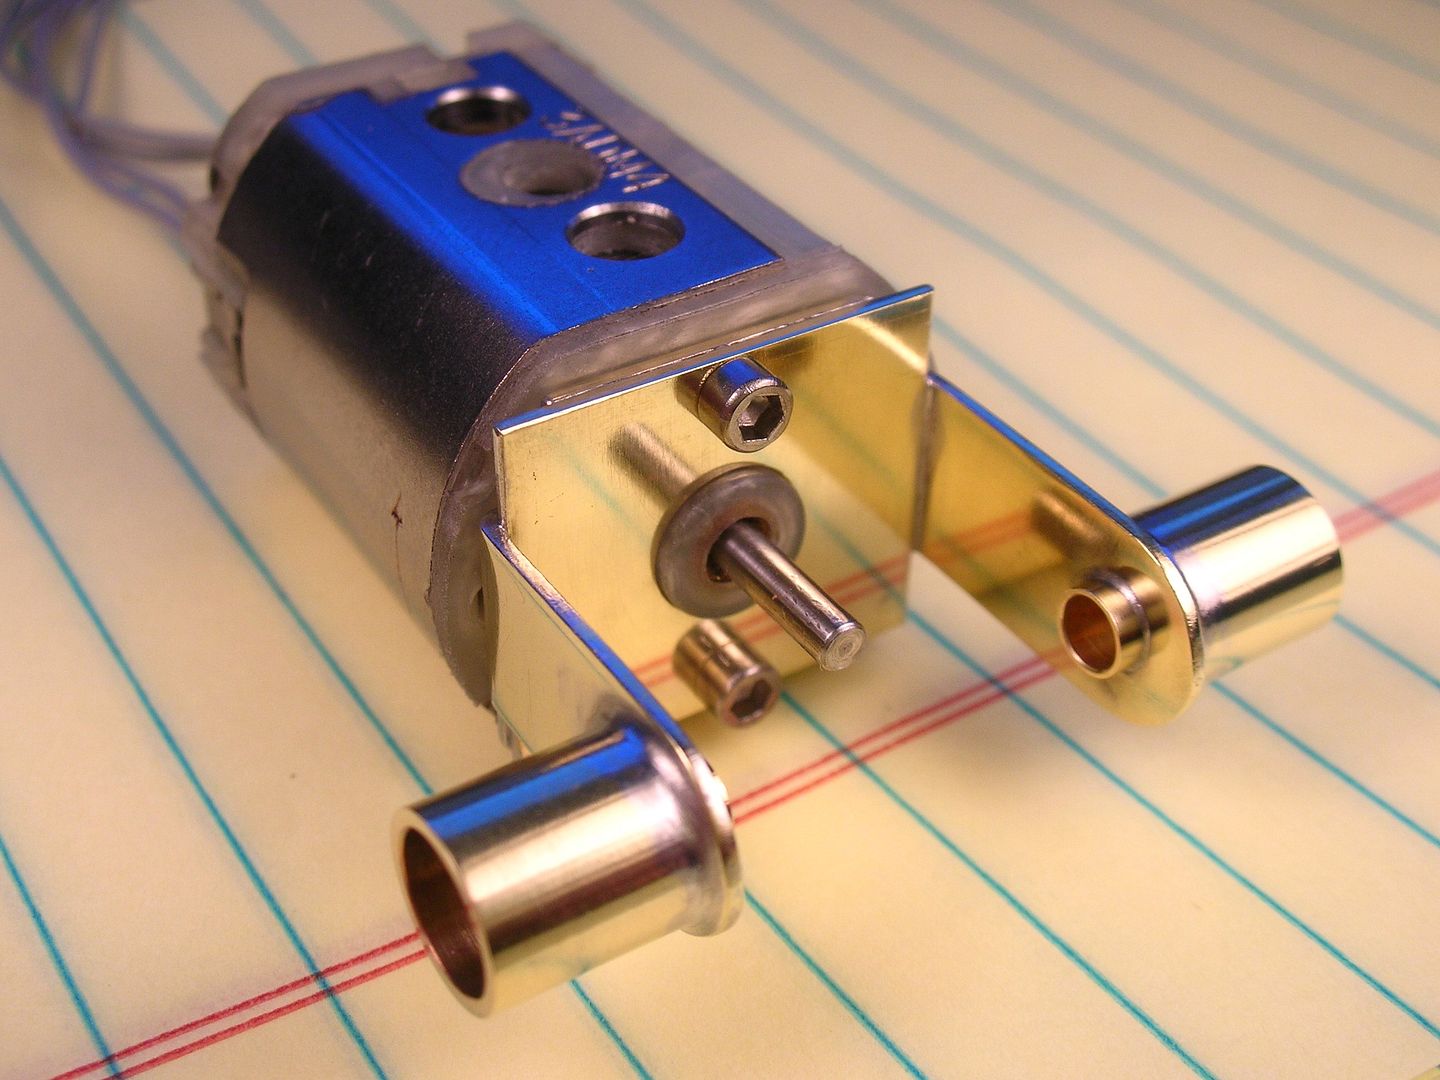
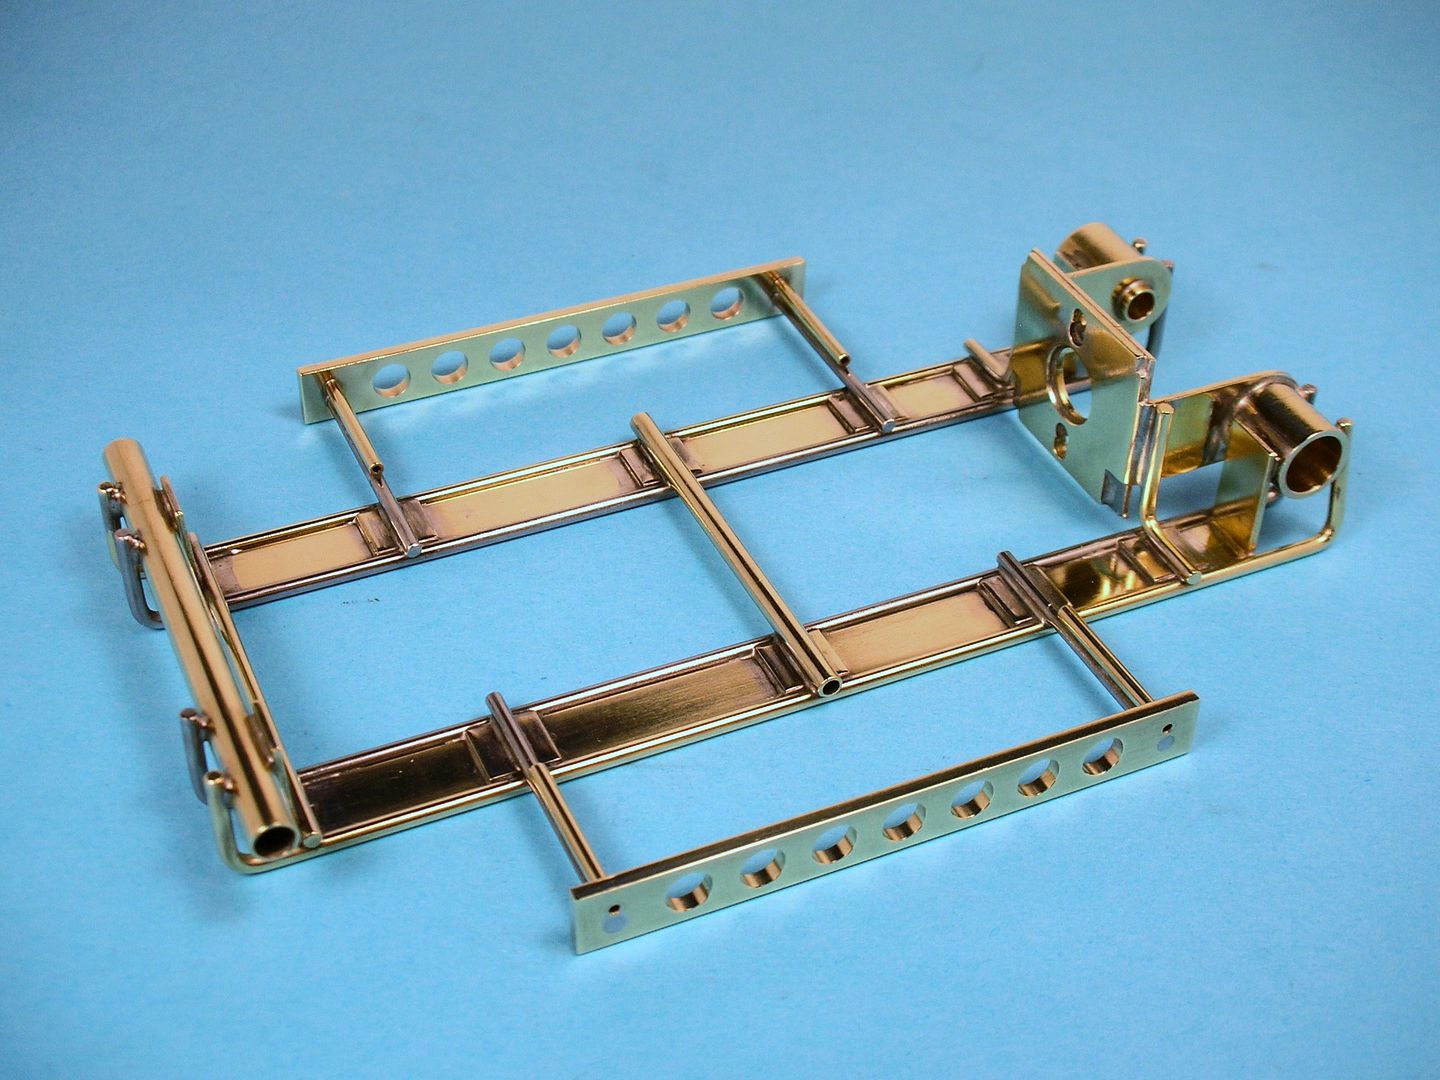
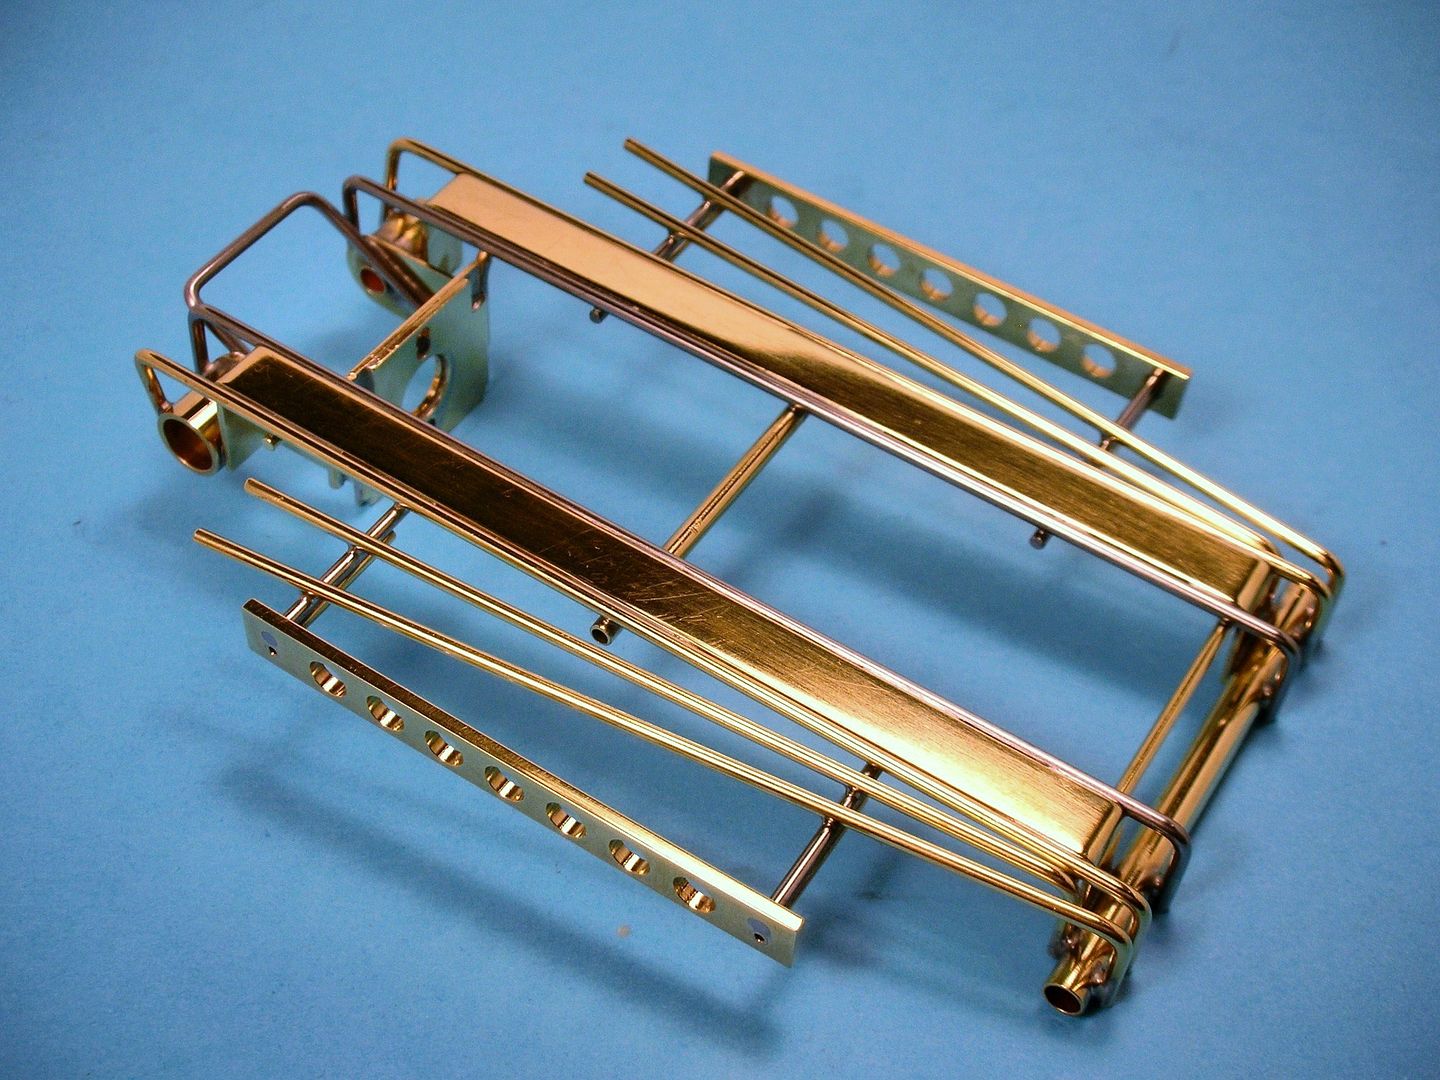
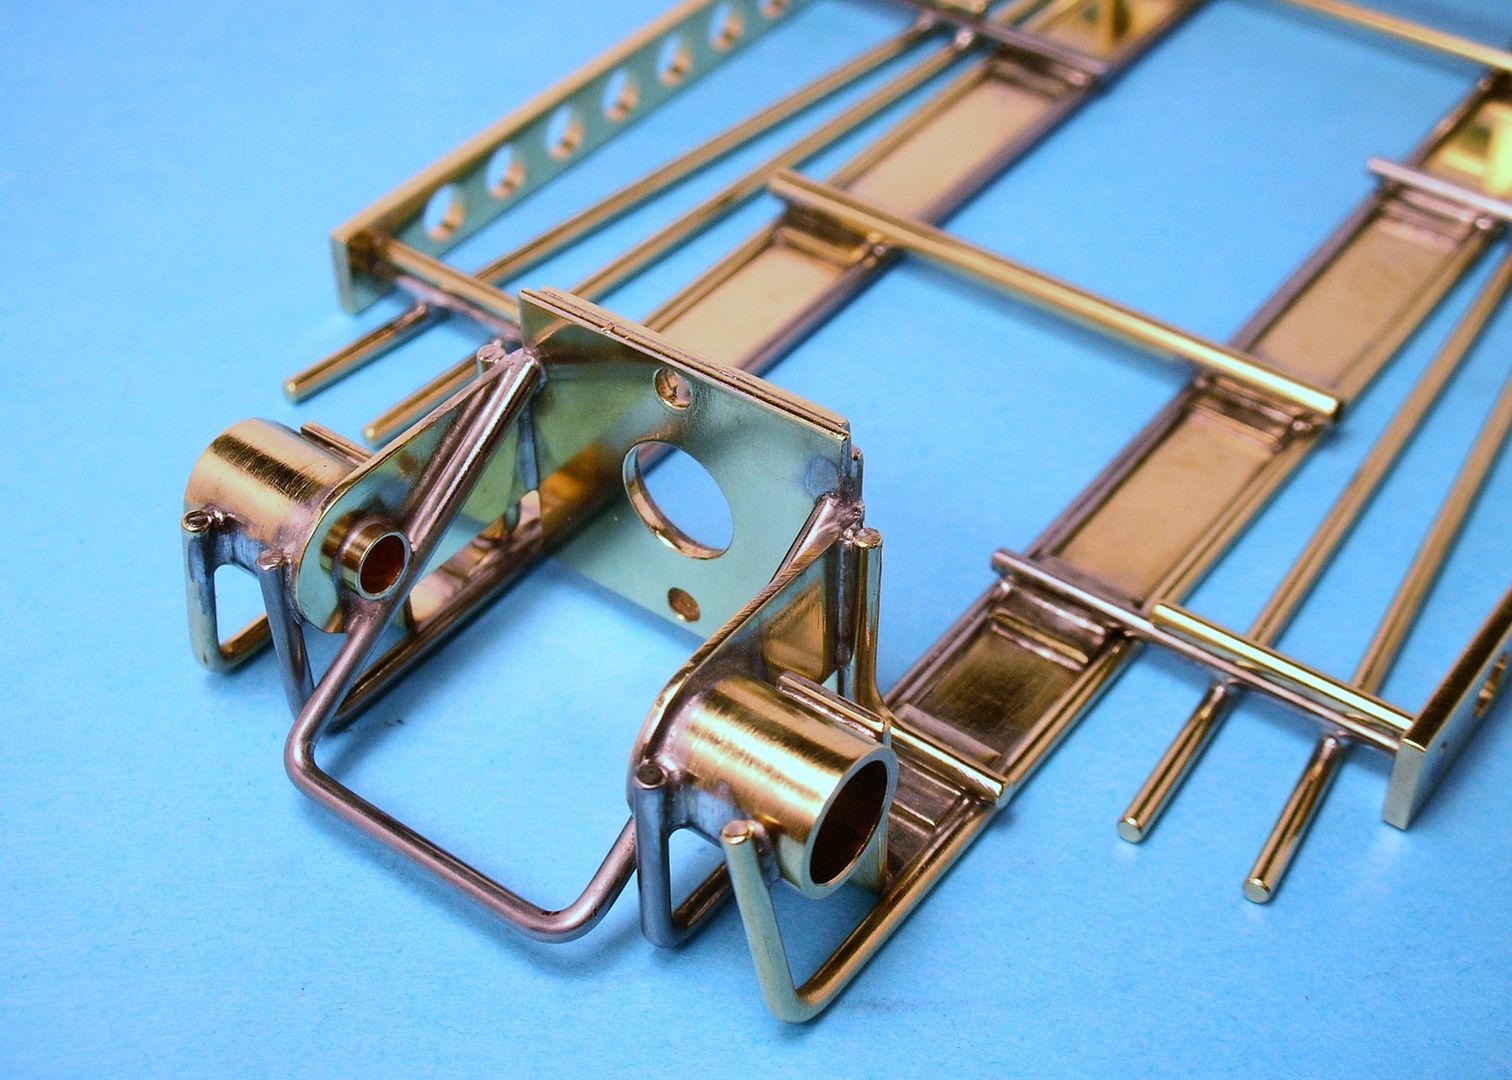
Here's the start of the drop arm. I tried to tie the drop arm "theme" with the main chassis by using a 1/4" brass strip. Here are the first pieces all lined up in my Rick's jig:
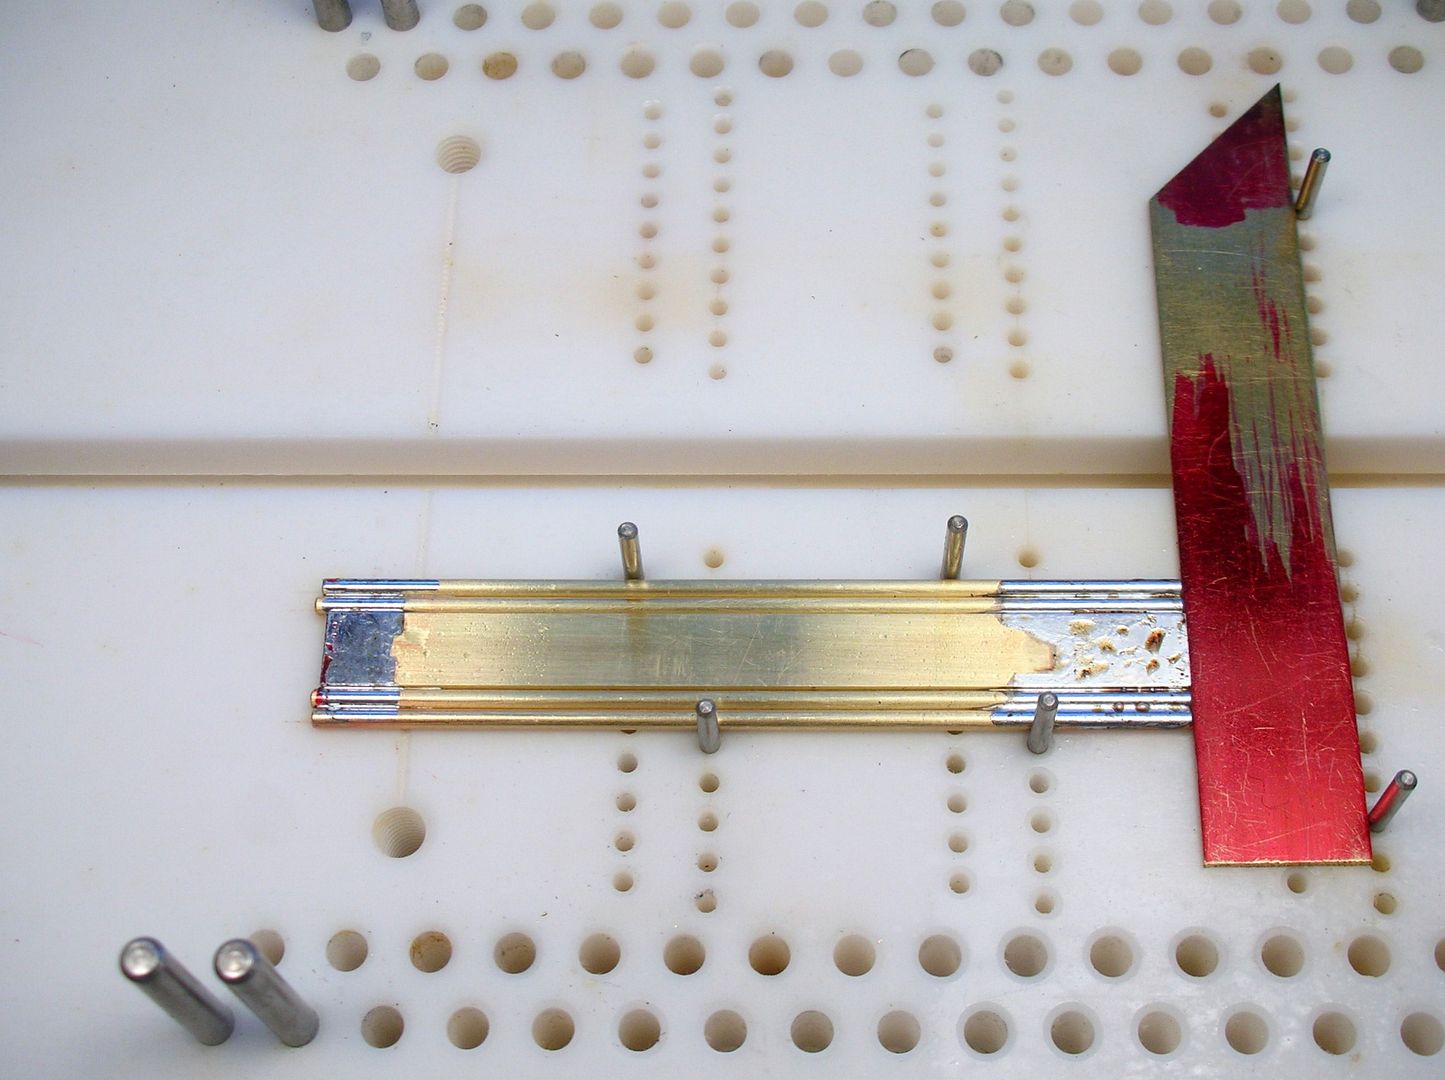
Next the Dynamic pillow block and its reinforcement goes on:
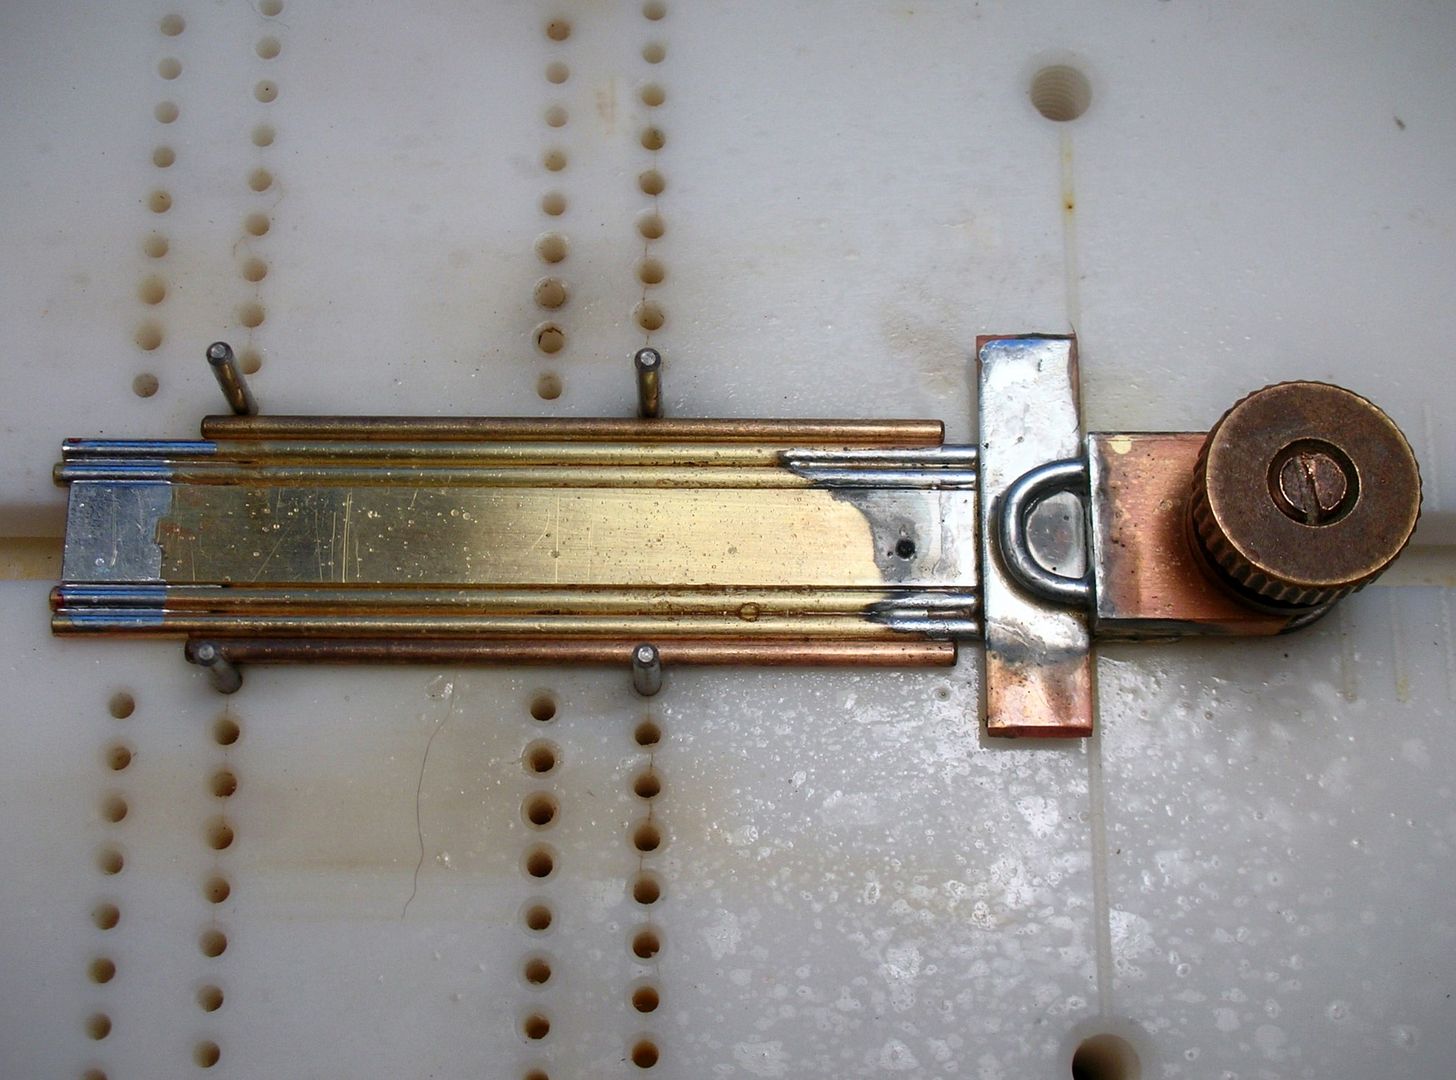
And some angled outer rails go on to mimic the outer rails on the frame to finish things off:
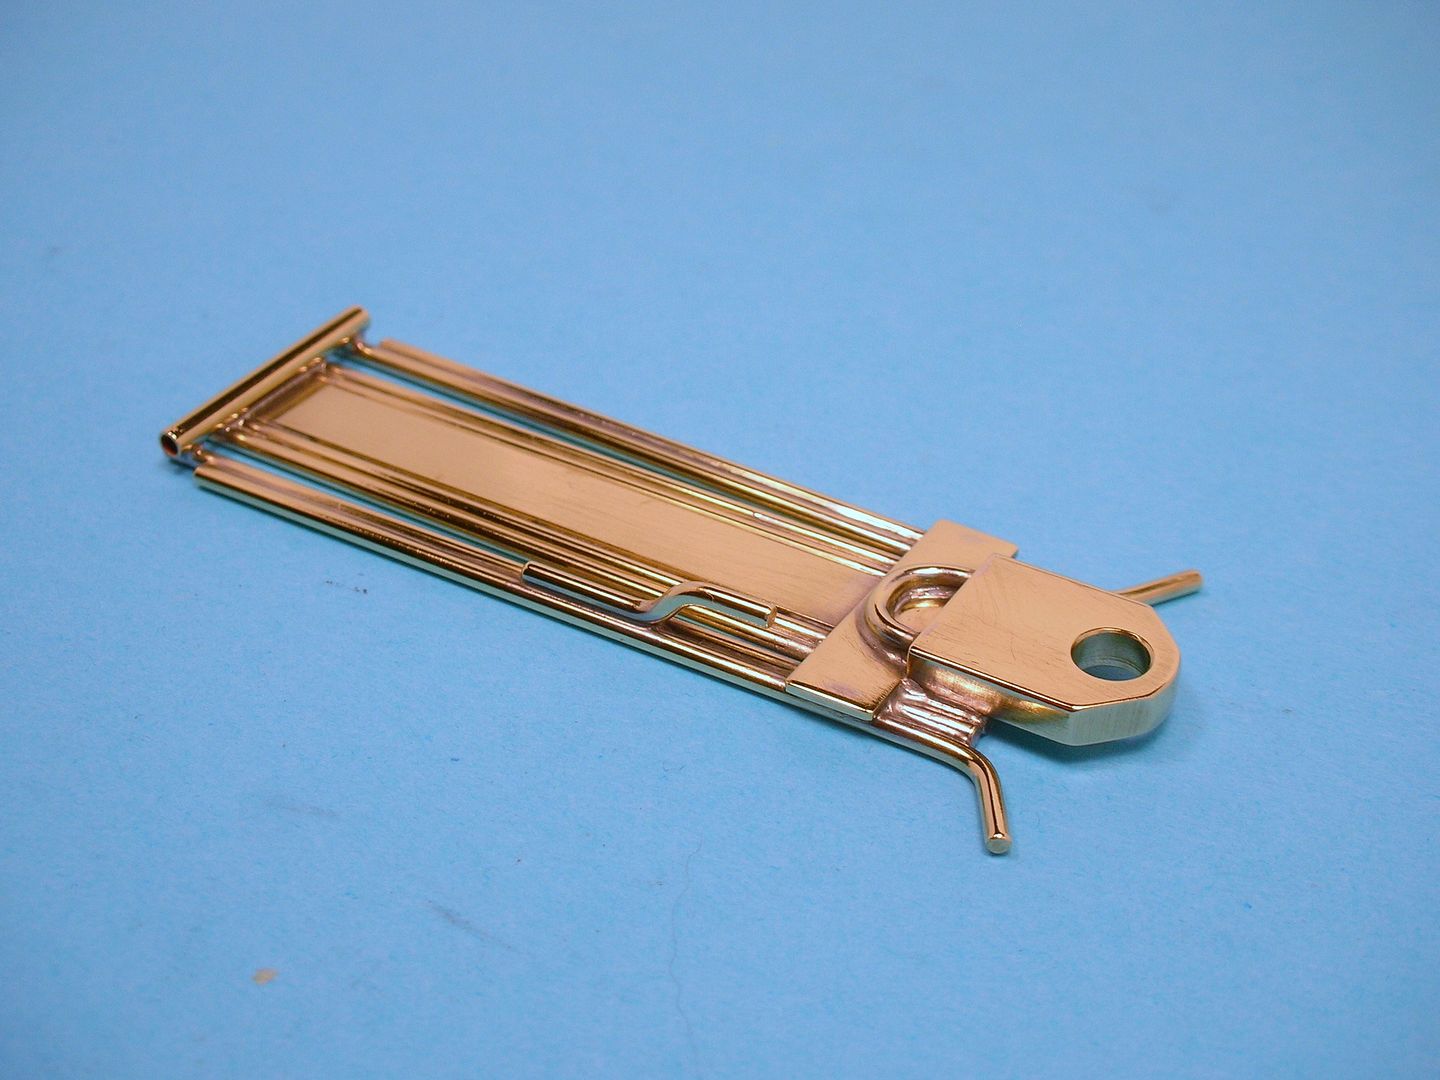
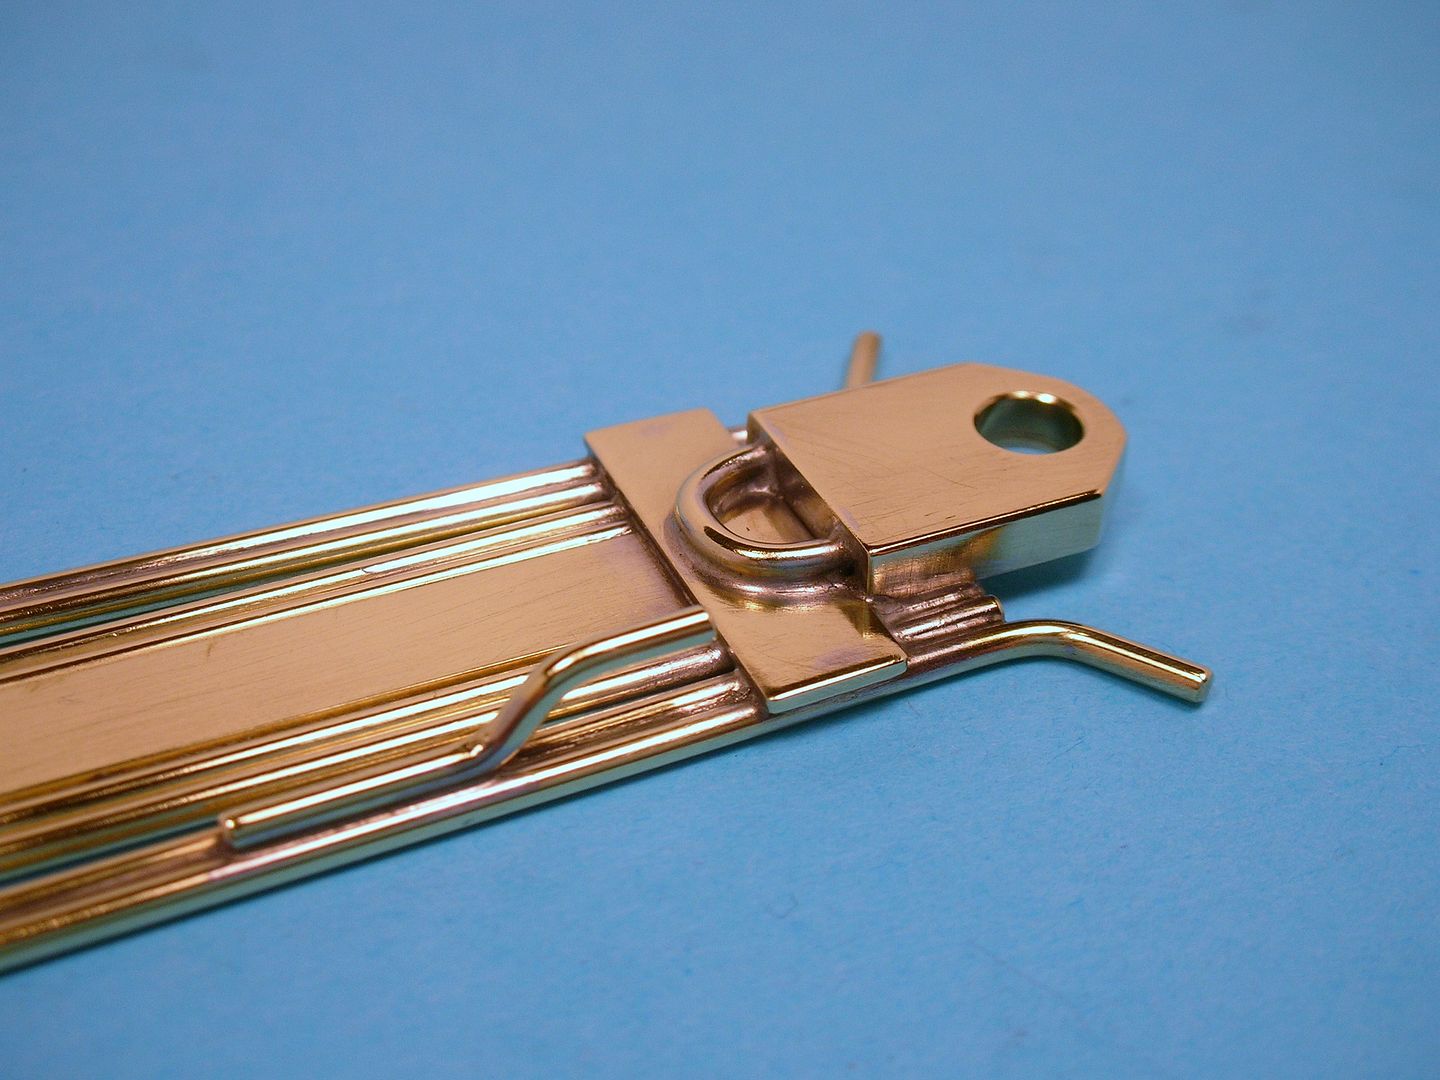
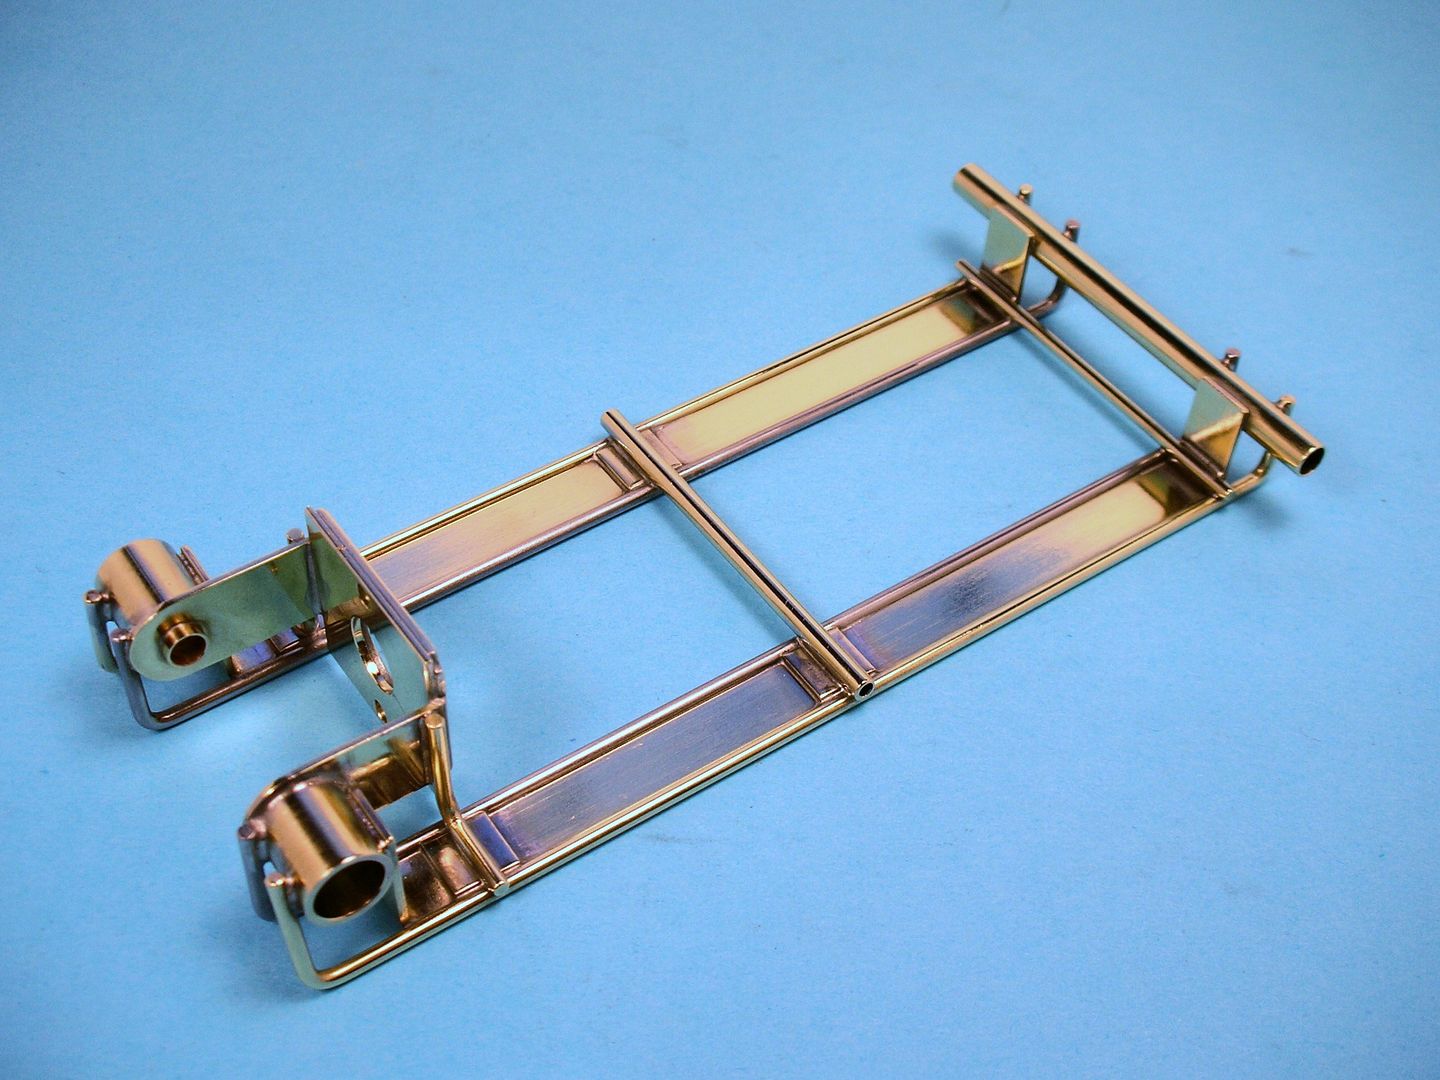
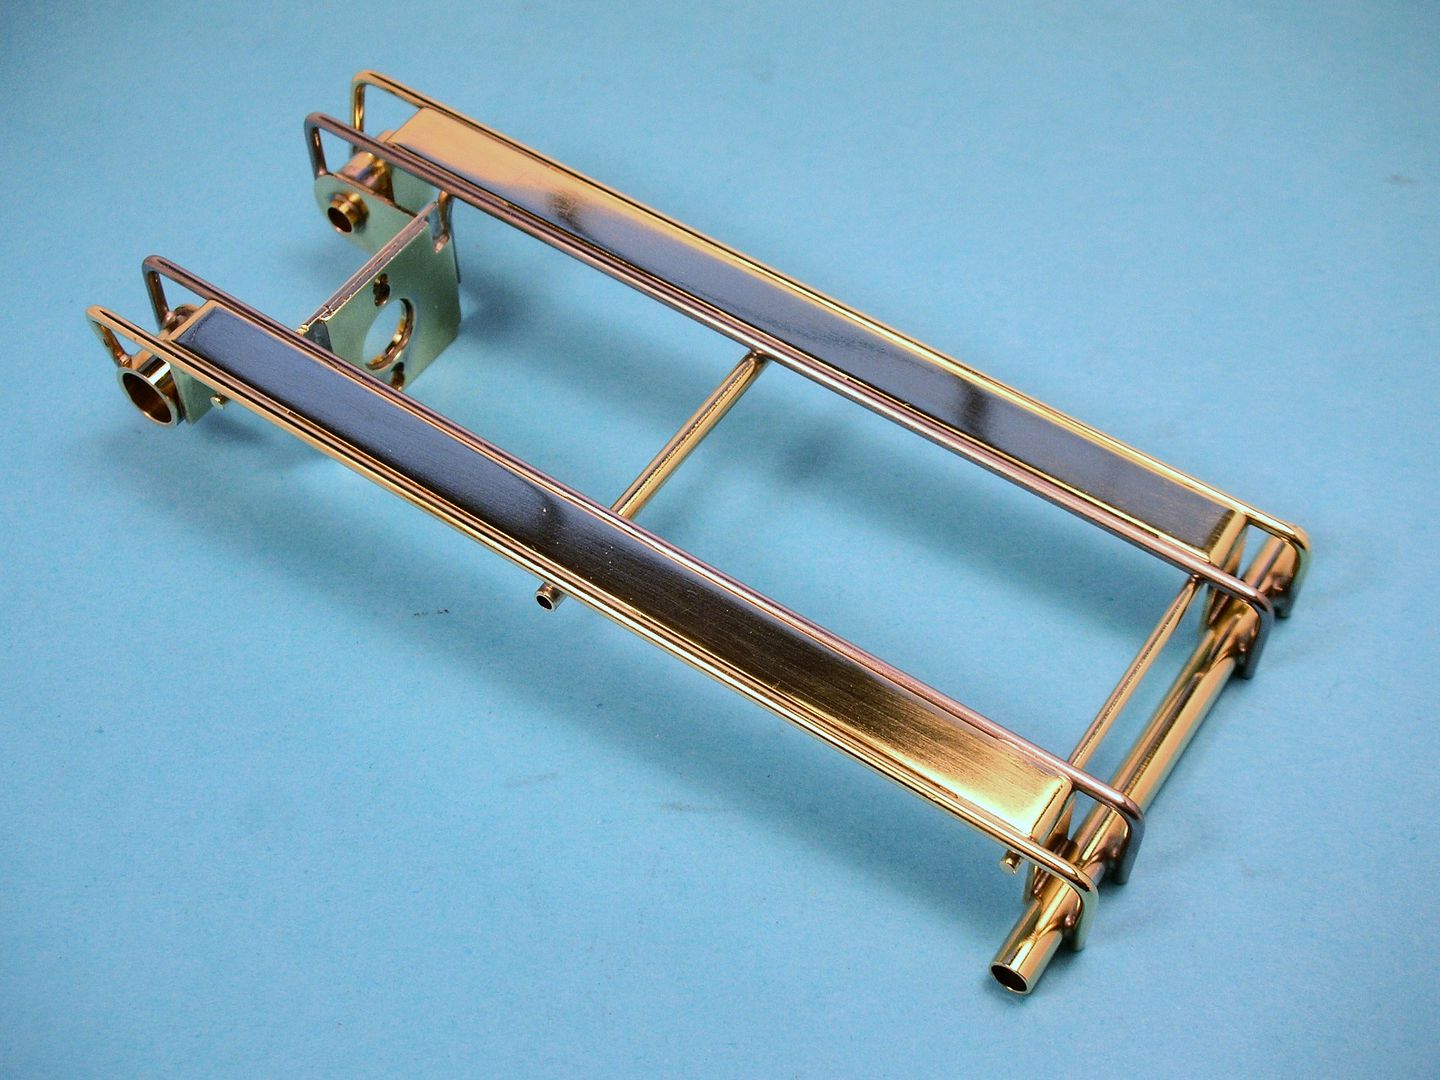
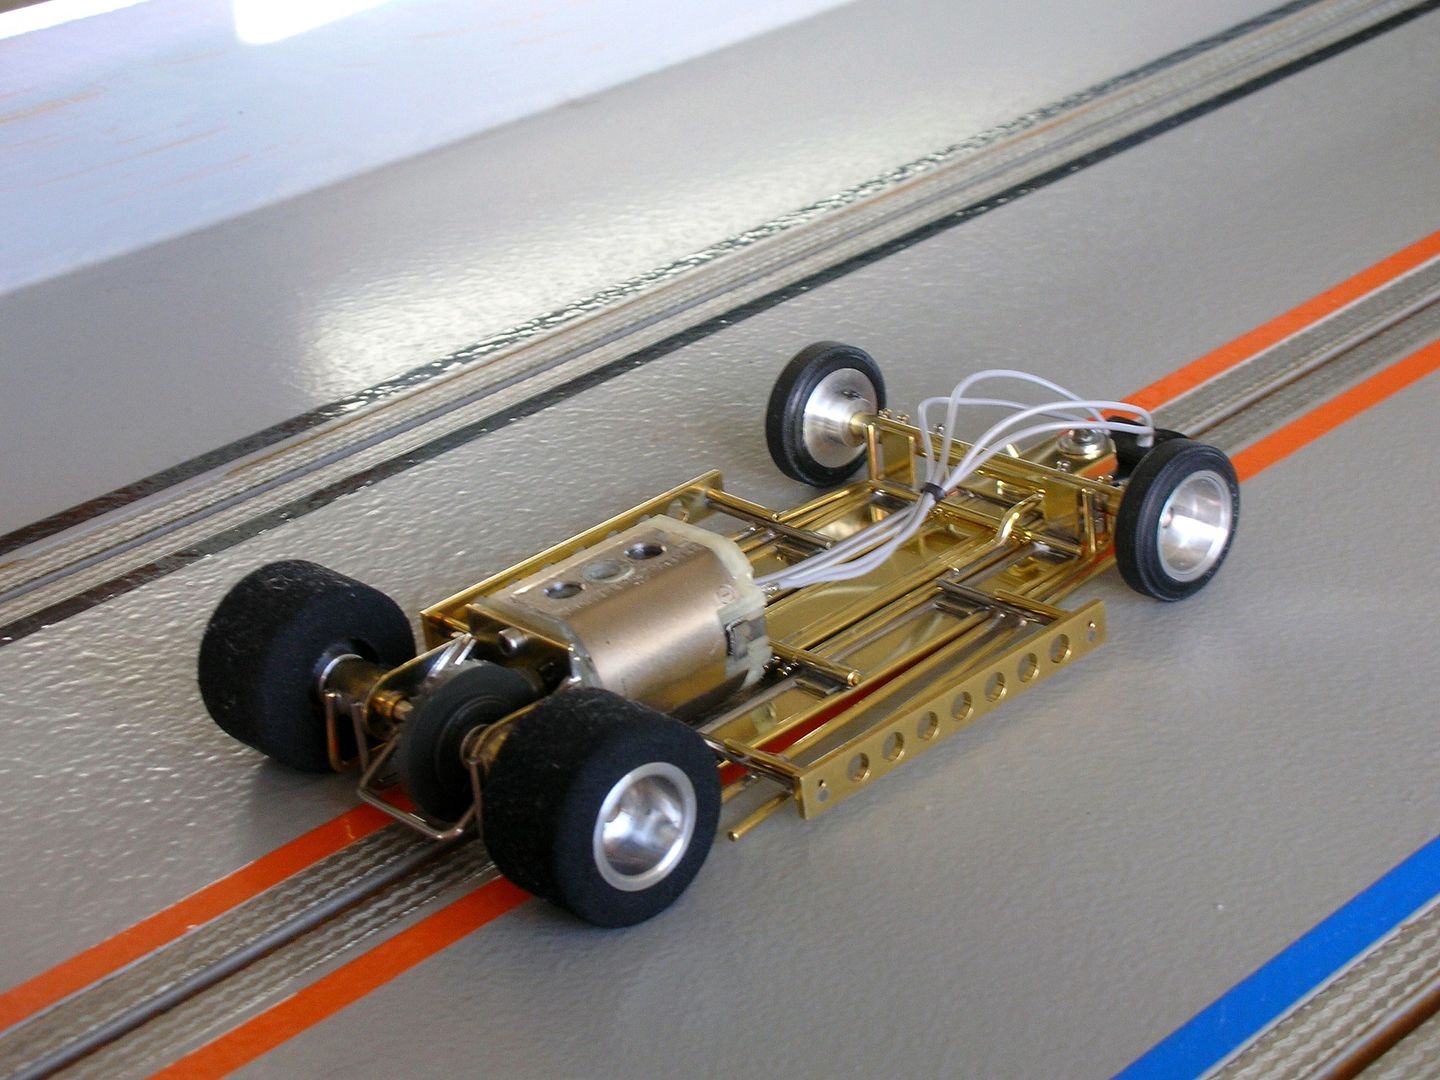
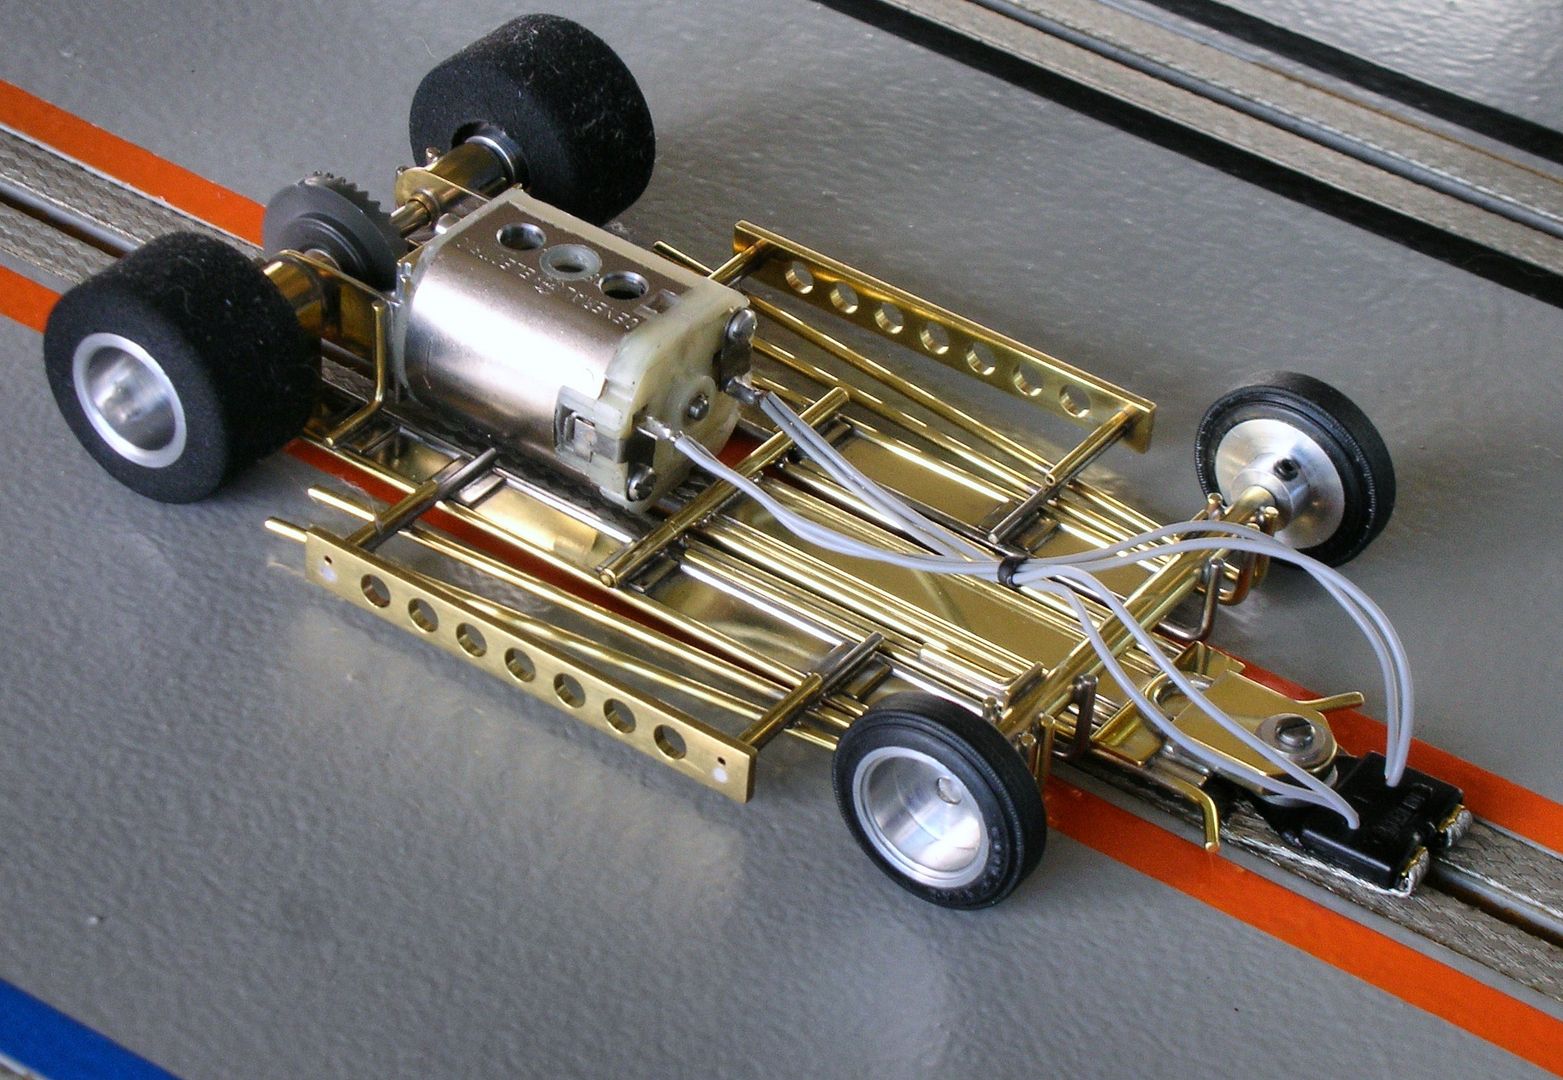
The finished chassis:
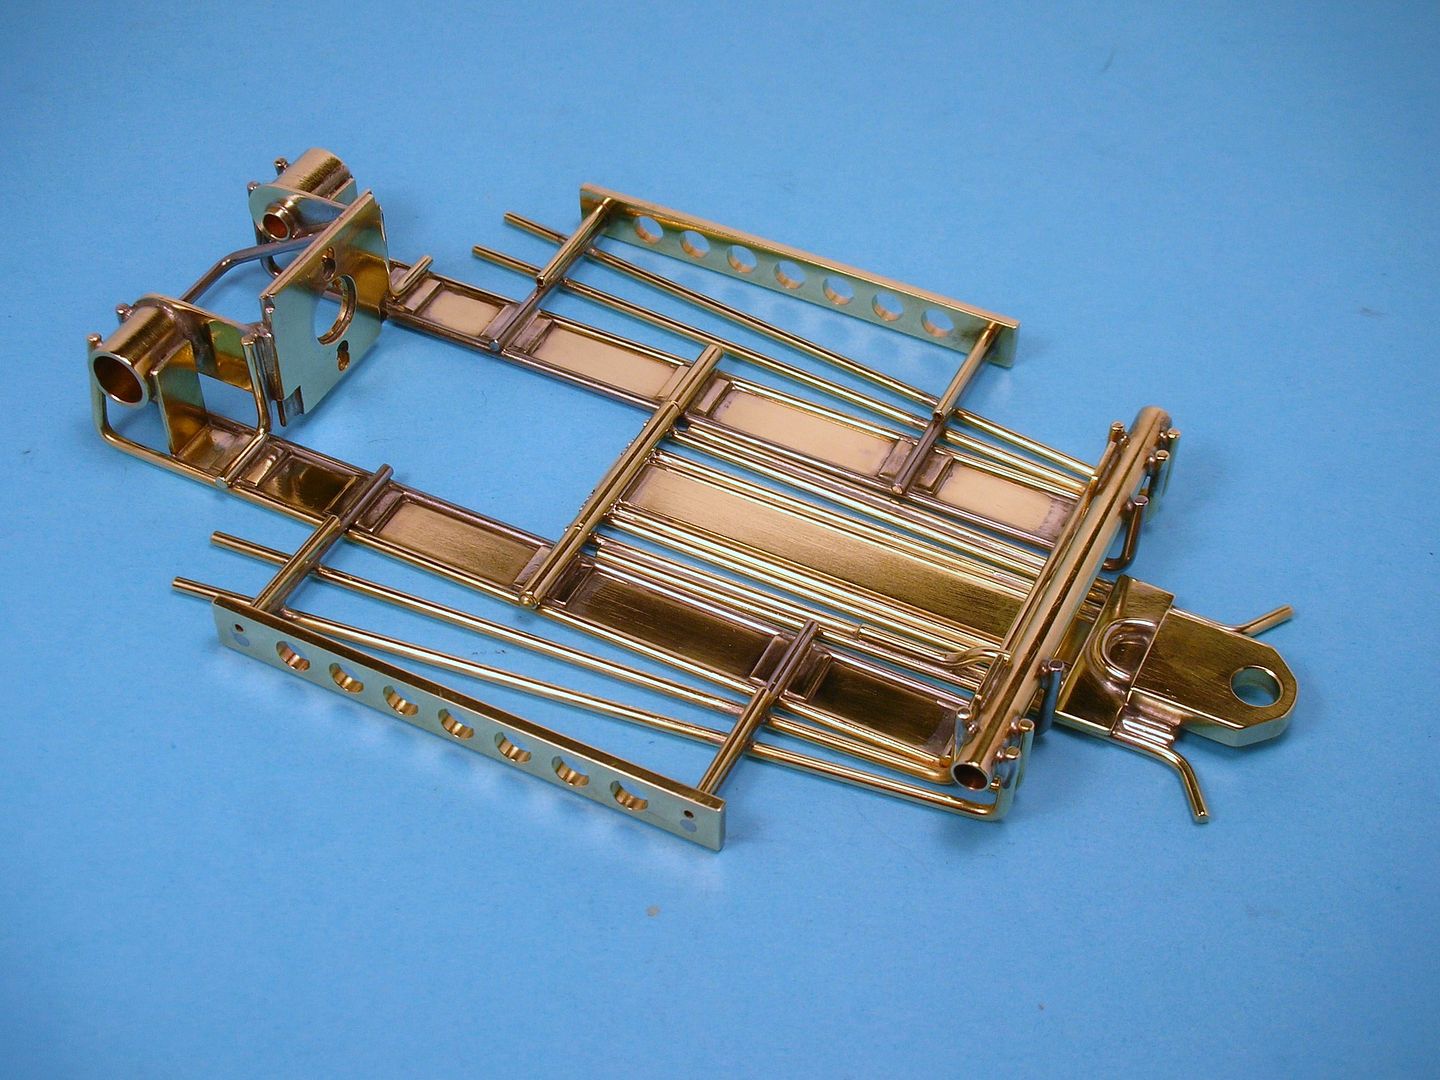
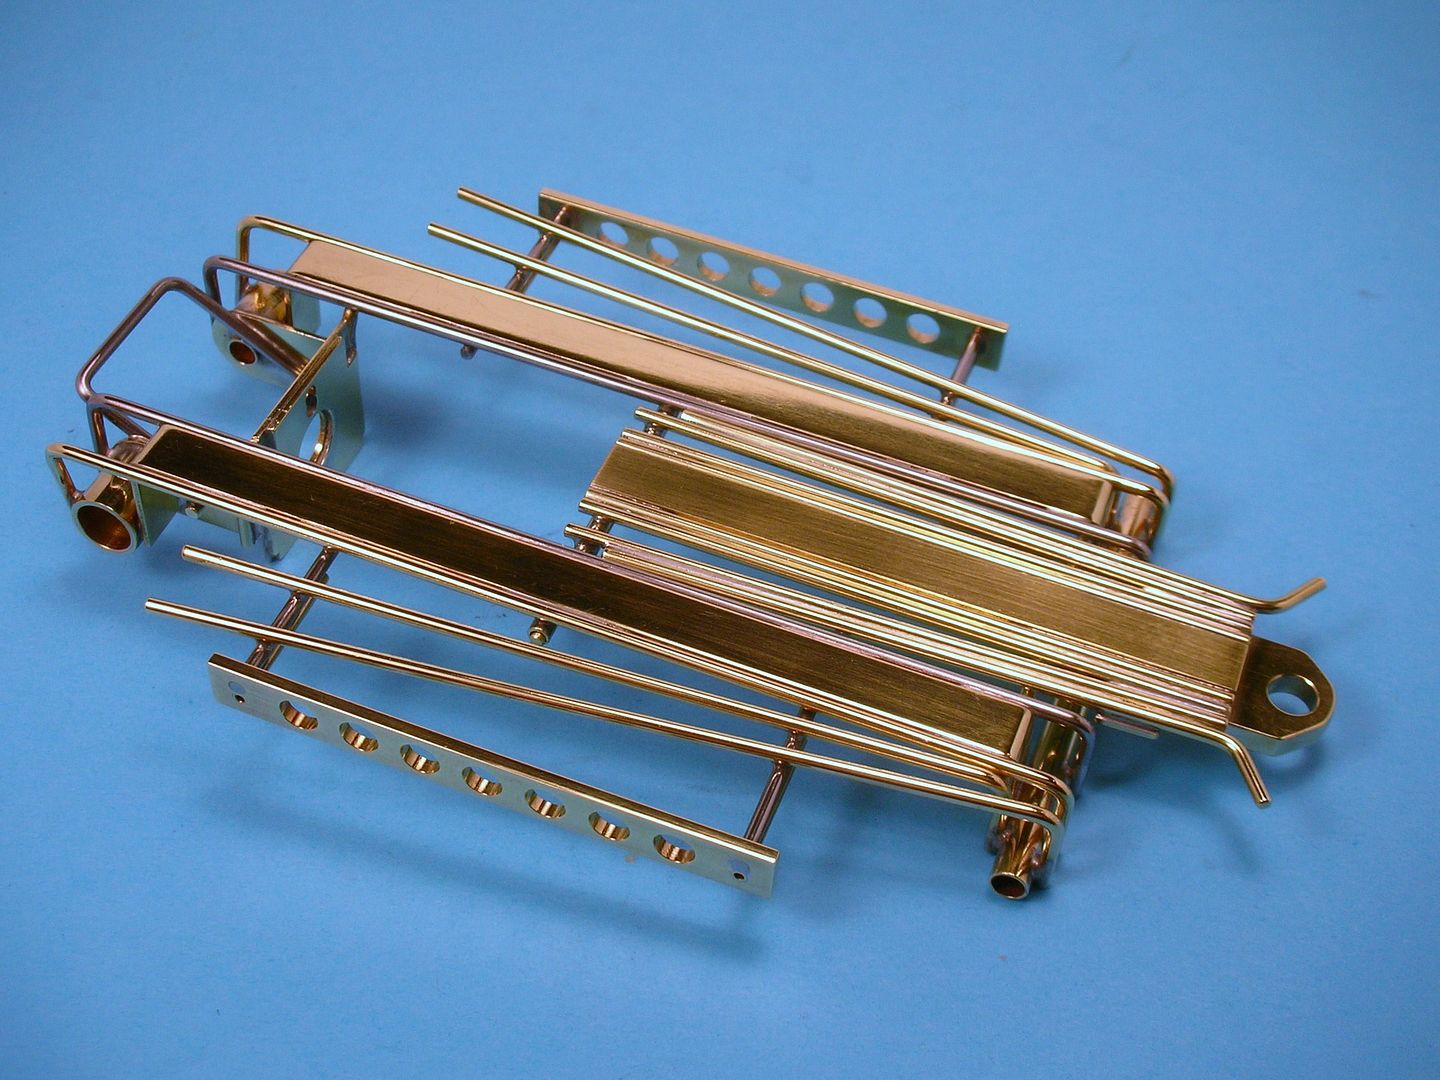
Time to get the roller assembled and onto the test track.....
- slotbaker, Samiam, Tim Wilkins and 2 others like this
Rick Thigpen
Check out Steve Okeefe's great web site at its new home here at Slotblog:
The Independent Scratchbuilder
There's much more to come...
#45
Pablo
-
- Administrator
-
- 18,471 posts Joined: 20-February 06
Builder
- Gender:Male
- Location:Cleveland, Tennessee
Posted 01 November 2016 - 11:06 AM
You made that drop arm look so easy 
Paul Wolcott
#46
dc-65x
-
- Subscriber
-
- 7,018 posts Joined: 14-February 06
Grand Champion Poster
- Gender:Male
- Location:Captain Rick: The only vintage slot car nut in SW Oregon?
Posted 02 November 2016 - 11:31 AM
Hi Pablo,
It's my Rick's Jig that really makes lining things up easy.
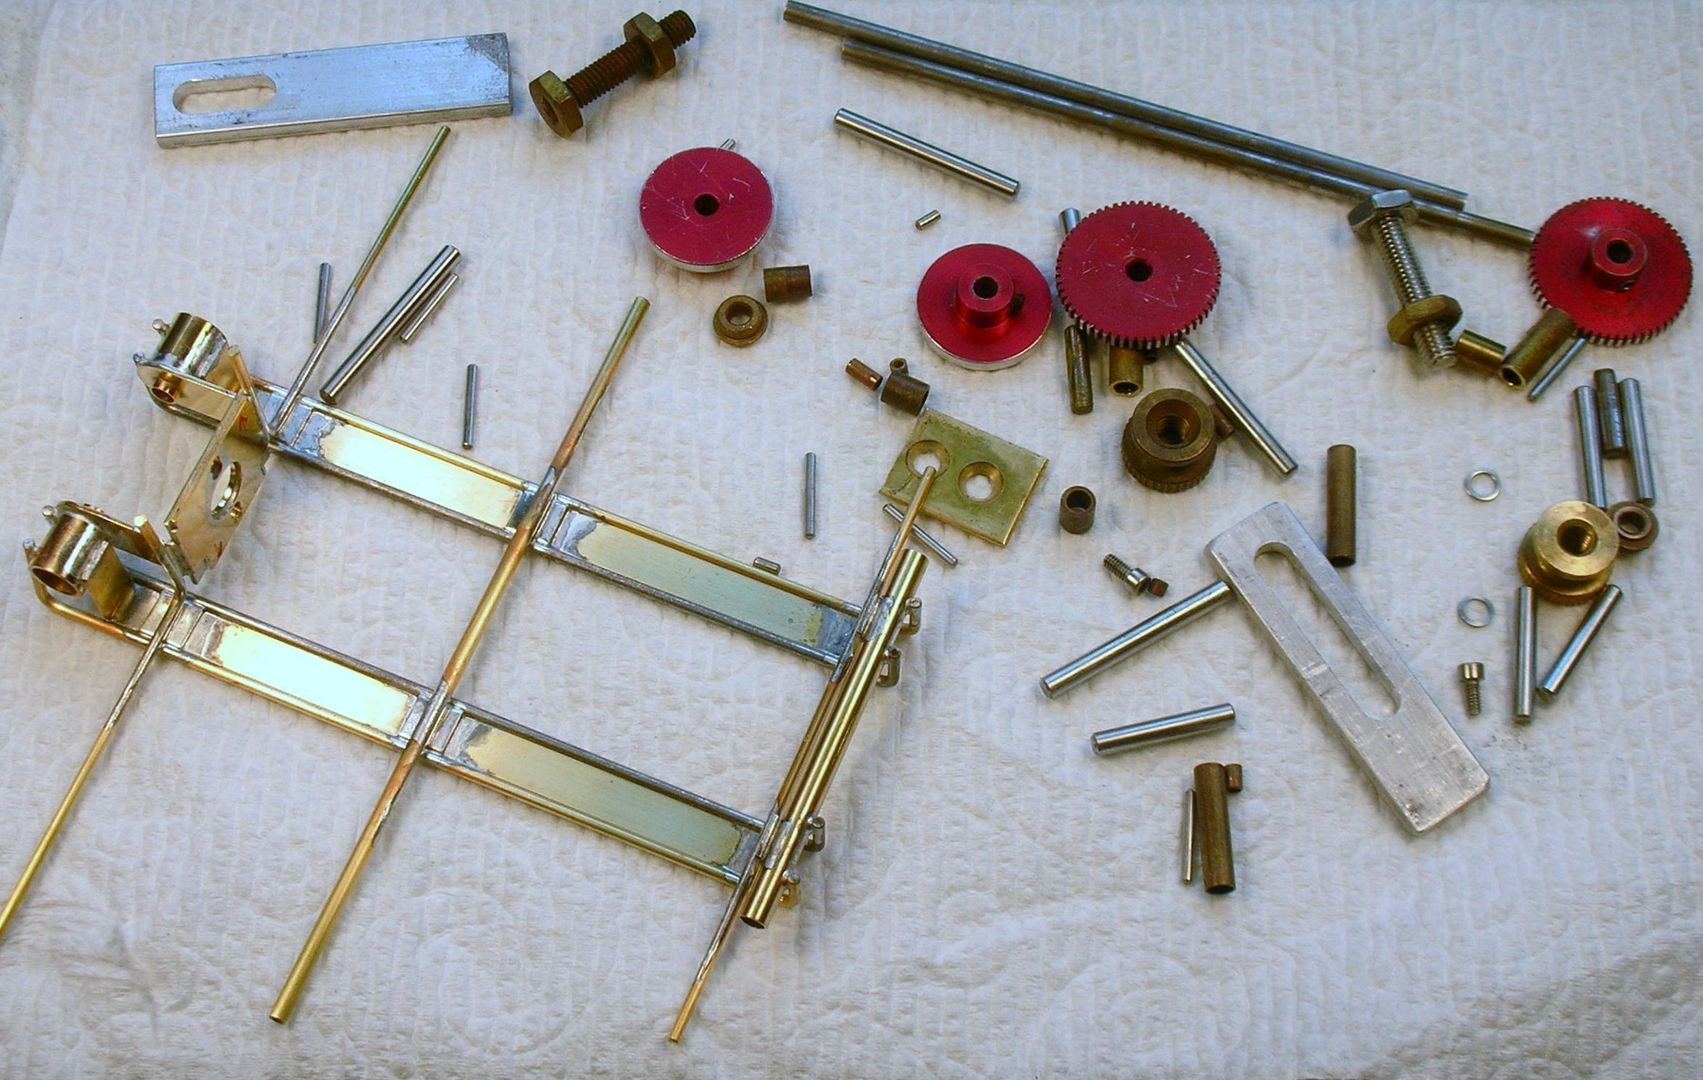
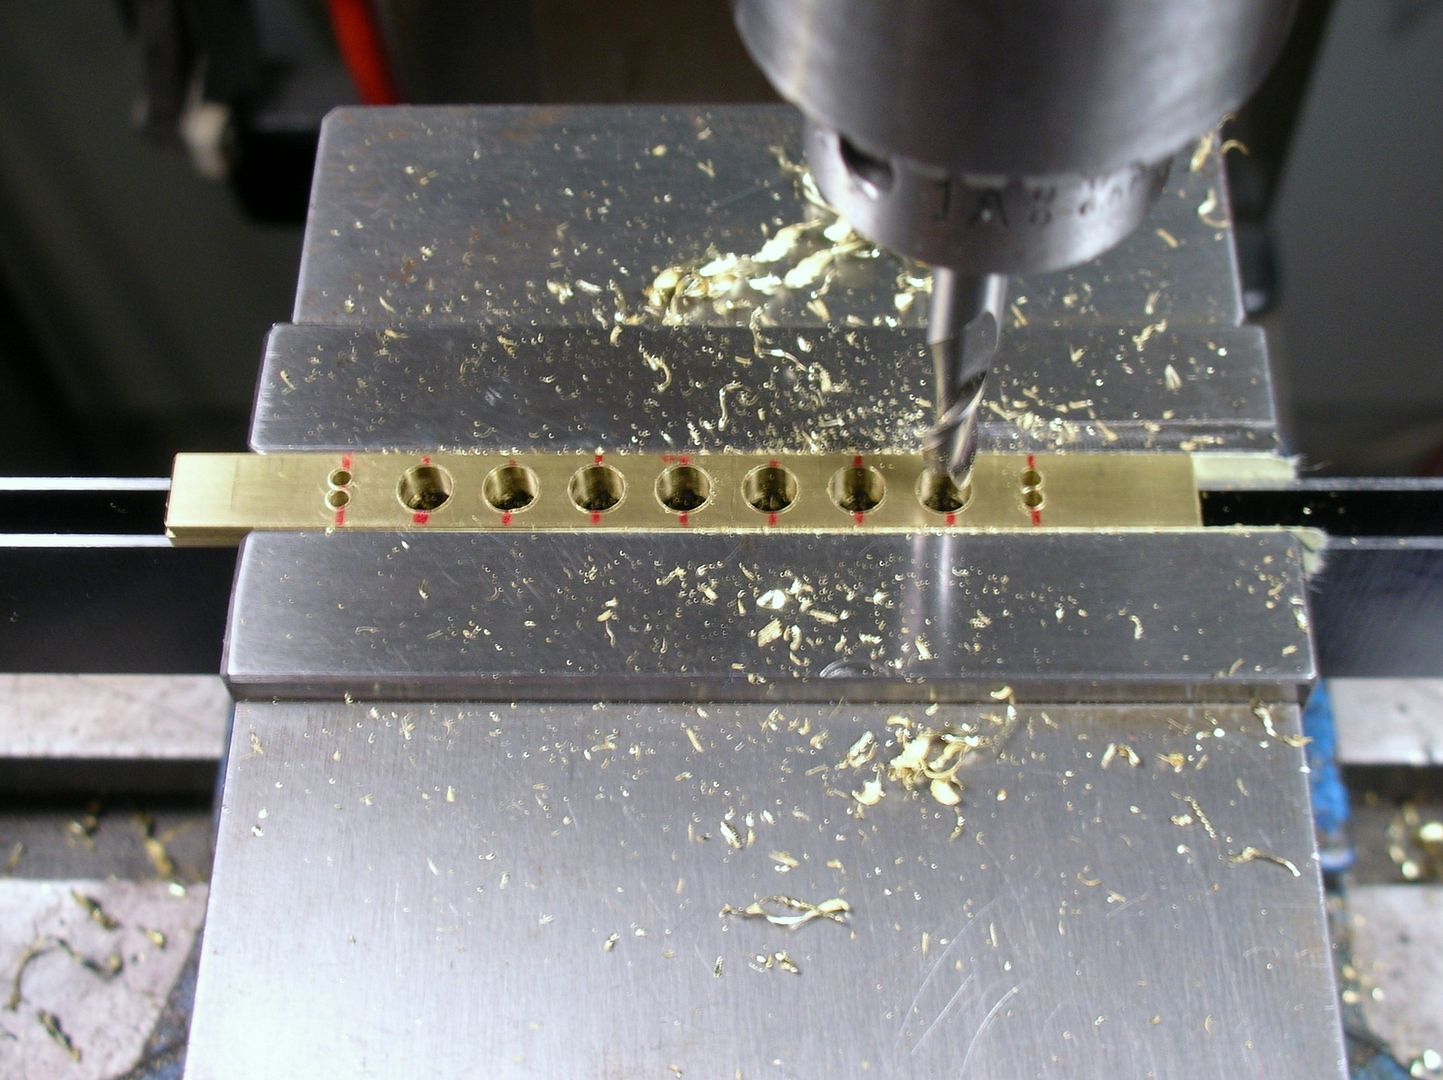
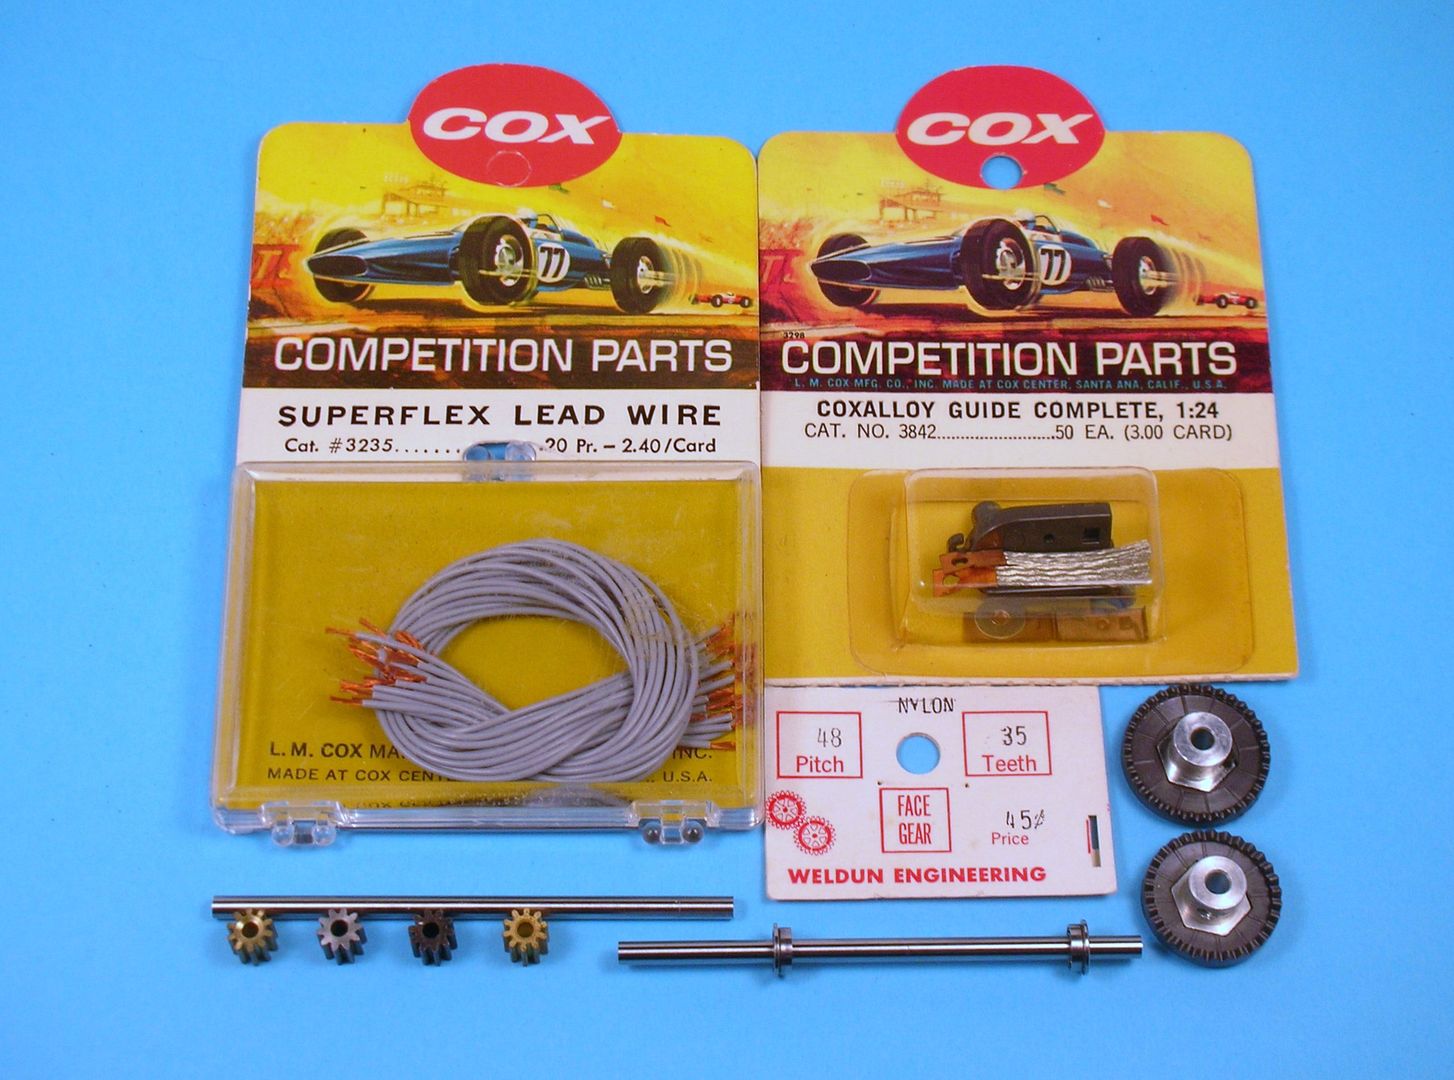
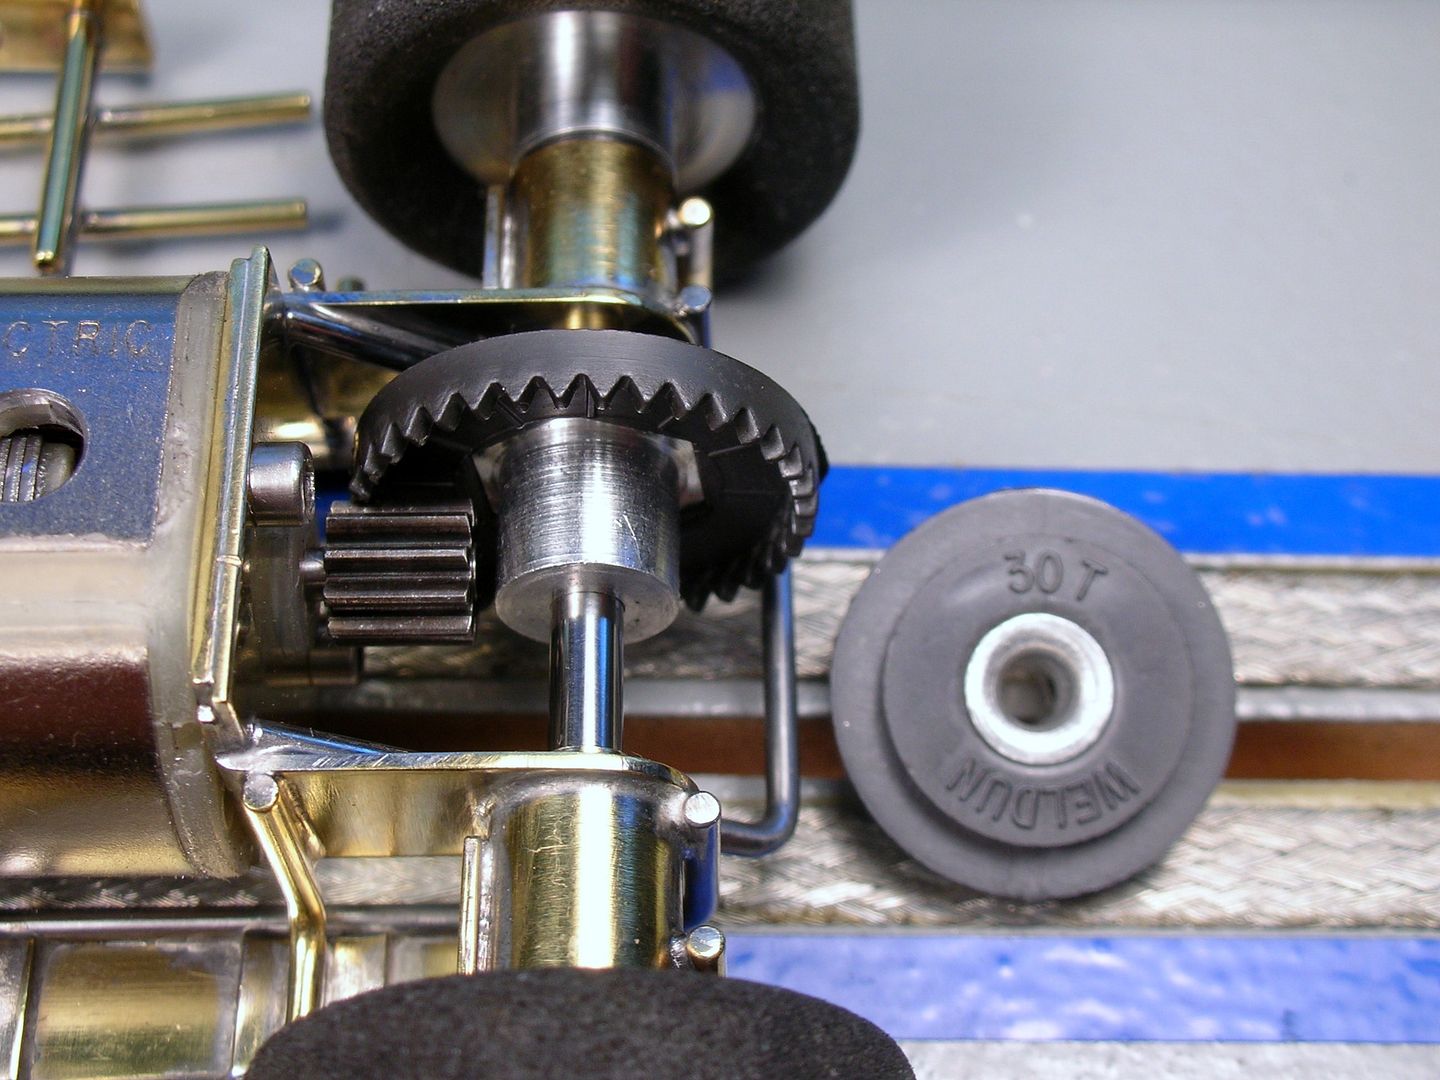
The parts used to build up the mighty GE. Cox lead wire, drill blank axles, Boca ball bearings, a 35 and 30 tooth Weldun crown gears and a selection of 10 tooth pinions with different tooth forms:
Here's a closeup of the pinions and their different shaped teeth.
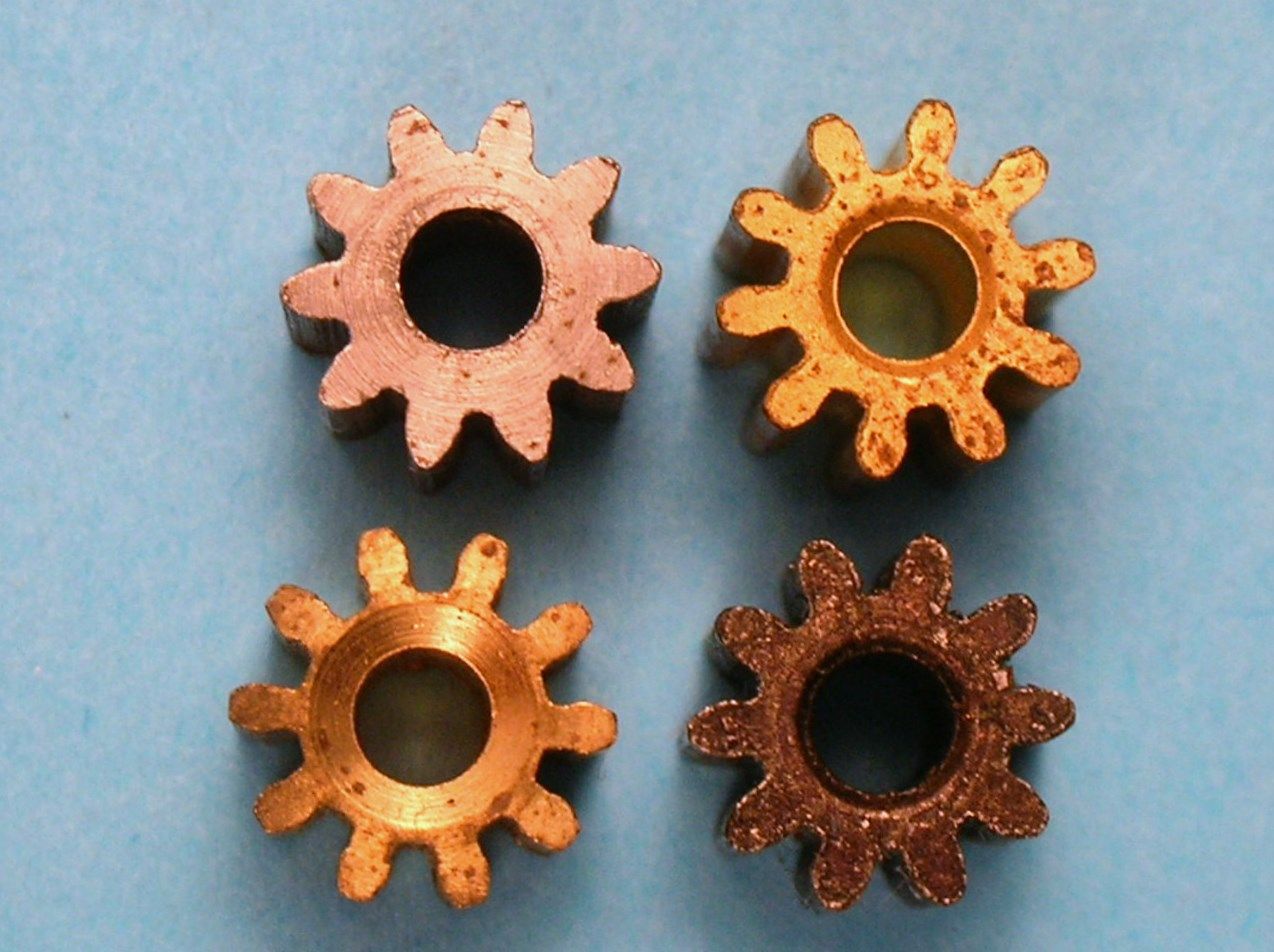
I've had problems with Weldun crown gears meshing smoothly. I tried the steel gears first to check for a smooth mesh. The pinion on the top left worked pretty well but when I tried the steel gear on the bottom right it was gear mesh heaven!
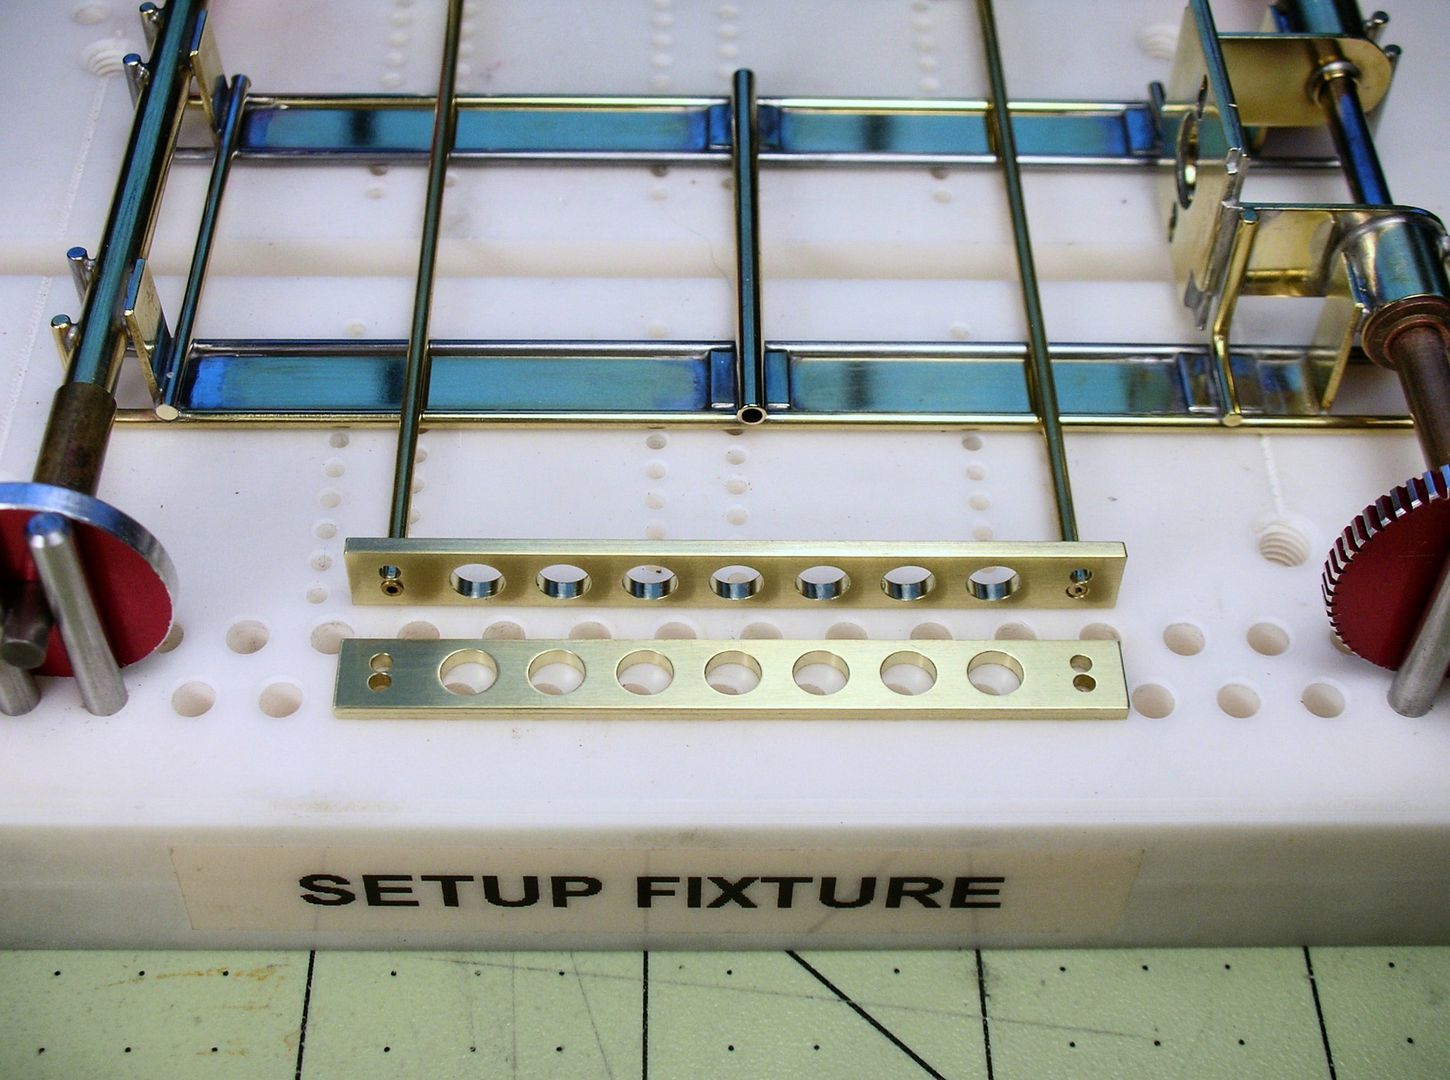
Here's my setup. I can quickly switch between 30 and 35 tooth crown gears for a 3:1 and 3.5:1 gear ration during testing:
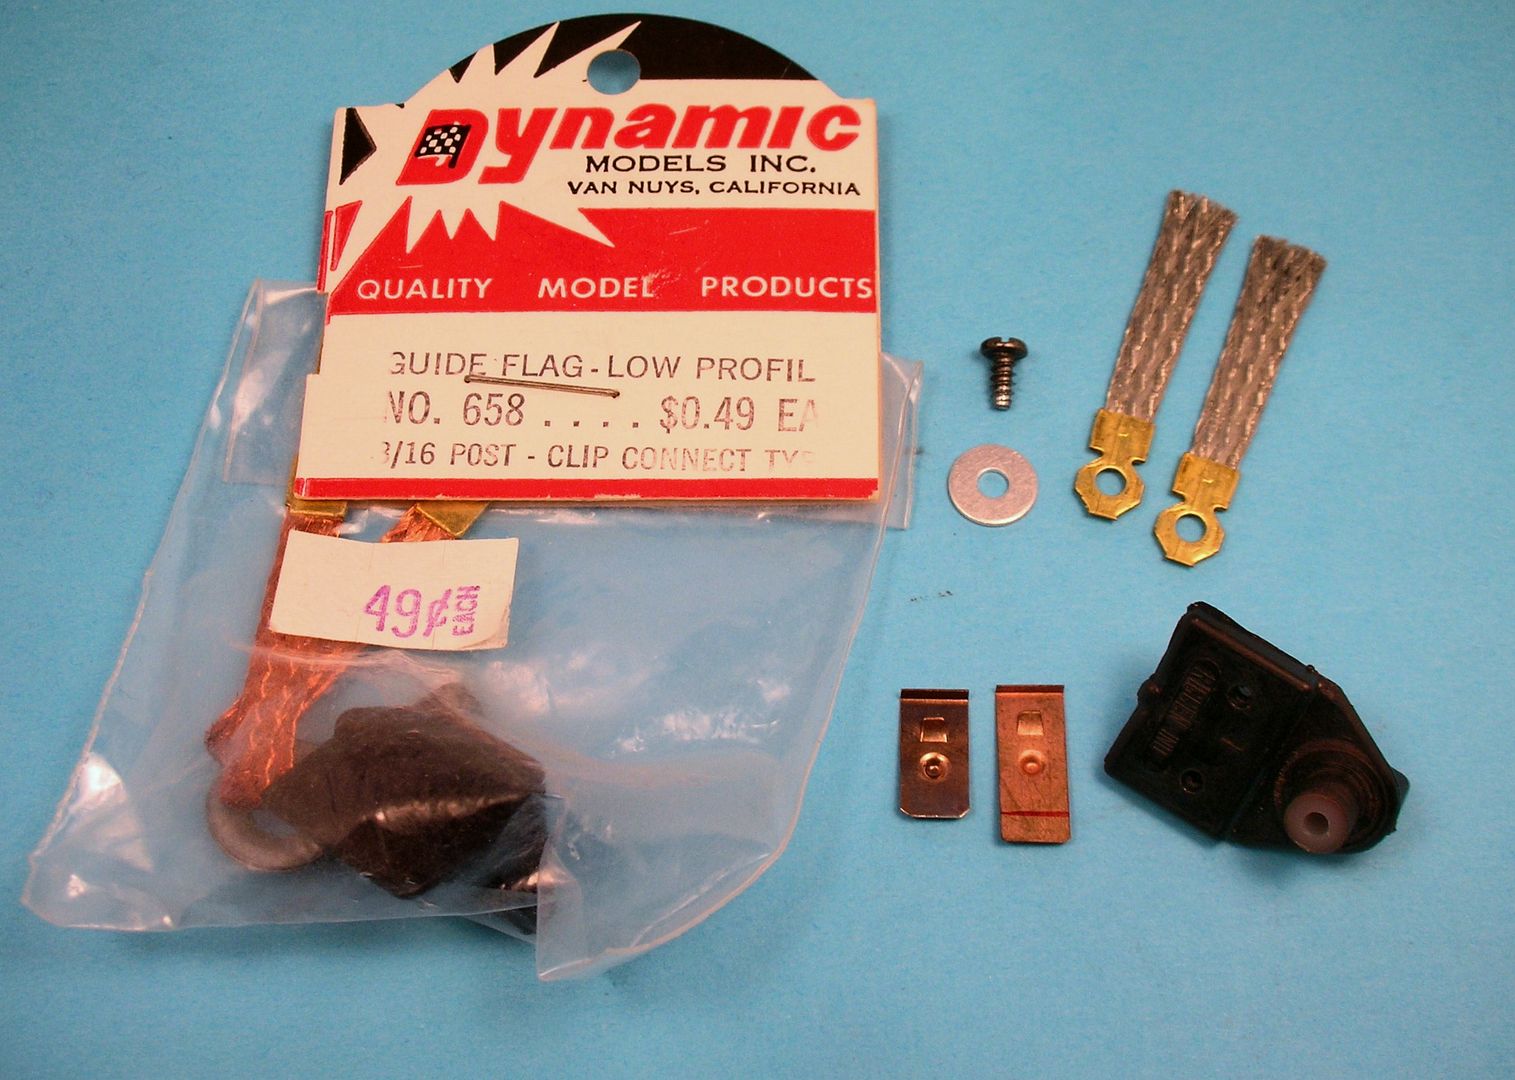
I did change my mind on the Cox guide flag. I went with a Dynamic packaged and Riggen marked Dynamic Low-Profile guide flag. I also used shortened Cox braid clips and drilled the guide post for a Cox retaining screw and washer:
Wheels and tires are next............................
- slotbaker, Tim Wilkins and C. J. Bupgoo like this
Rick Thigpen
Check out Steve Okeefe's great web site at its new home here at Slotblog:
The Independent Scratchbuilder
There's much more to come...
#47
don.siegel
-
- Subscriber
-
- 5,873 posts Joined: 17-February 06
Grand Champion Poster
- Gender:Male
- Location:Paris, France
Posted 02 November 2016 - 12:16 PM
Great pinion shot Rick - fascinating how different the profiles are.
Would definitely go with 3:1 - it's a torque monster (torquemada?). Something along those lines worked fine here, even on the short Bordo track. Unless of course your's revs a lot higher - be interesting to see in any case!
Don
#48
dc-65x
-
- Subscriber
-
- 7,018 posts Joined: 14-February 06
Grand Champion Poster
- Gender:Male
- Location:Captain Rick: The only vintage slot car nut in SW Oregon?
Posted 02 November 2016 - 12:48 PM
Hi Don,
My "dewound" motor with the holes drilled in the can seems to rev quite freely..............and run HOT. I thought I'd start with a bit lower gearing. Rodney's testing will tell the tale.
Rick Thigpen
Check out Steve Okeefe's great web site at its new home here at Slotblog:
The Independent Scratchbuilder
There's much more to come...
#49
dc-65x
-
- Subscriber
-
- 7,018 posts Joined: 14-February 06
Grand Champion Poster
- Gender:Male
- Location:Captain Rick: The only vintage slot car nut in SW Oregon?
Posted 02 November 2016 - 07:44 PM
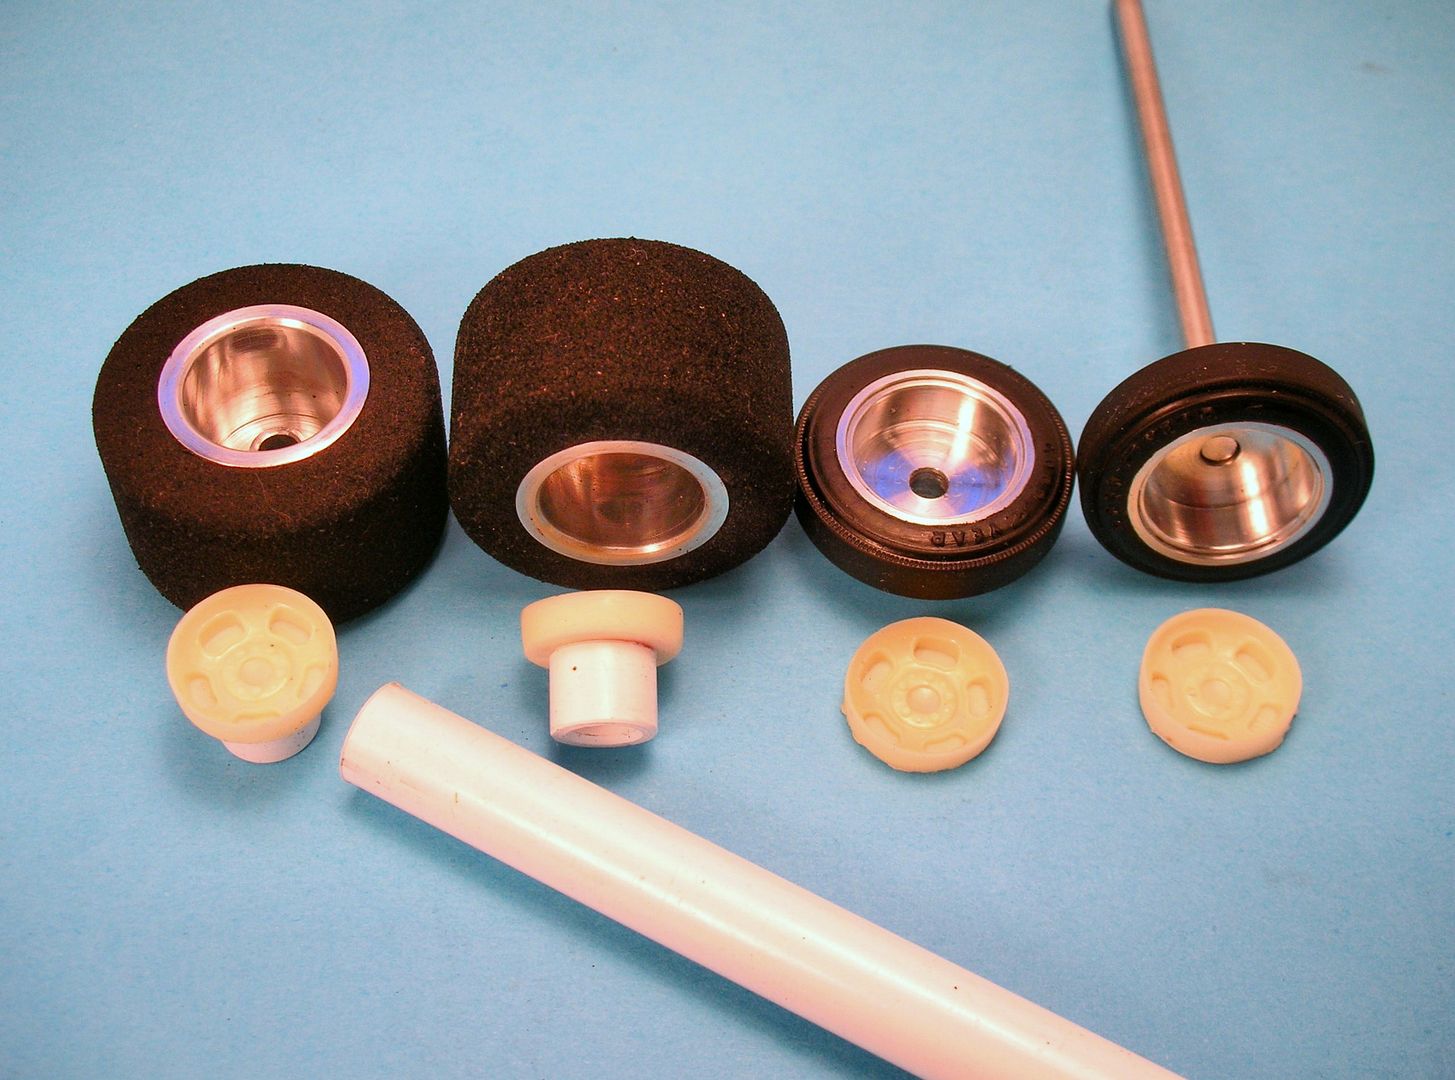
Wheels, tires and wheel inserts for this project:
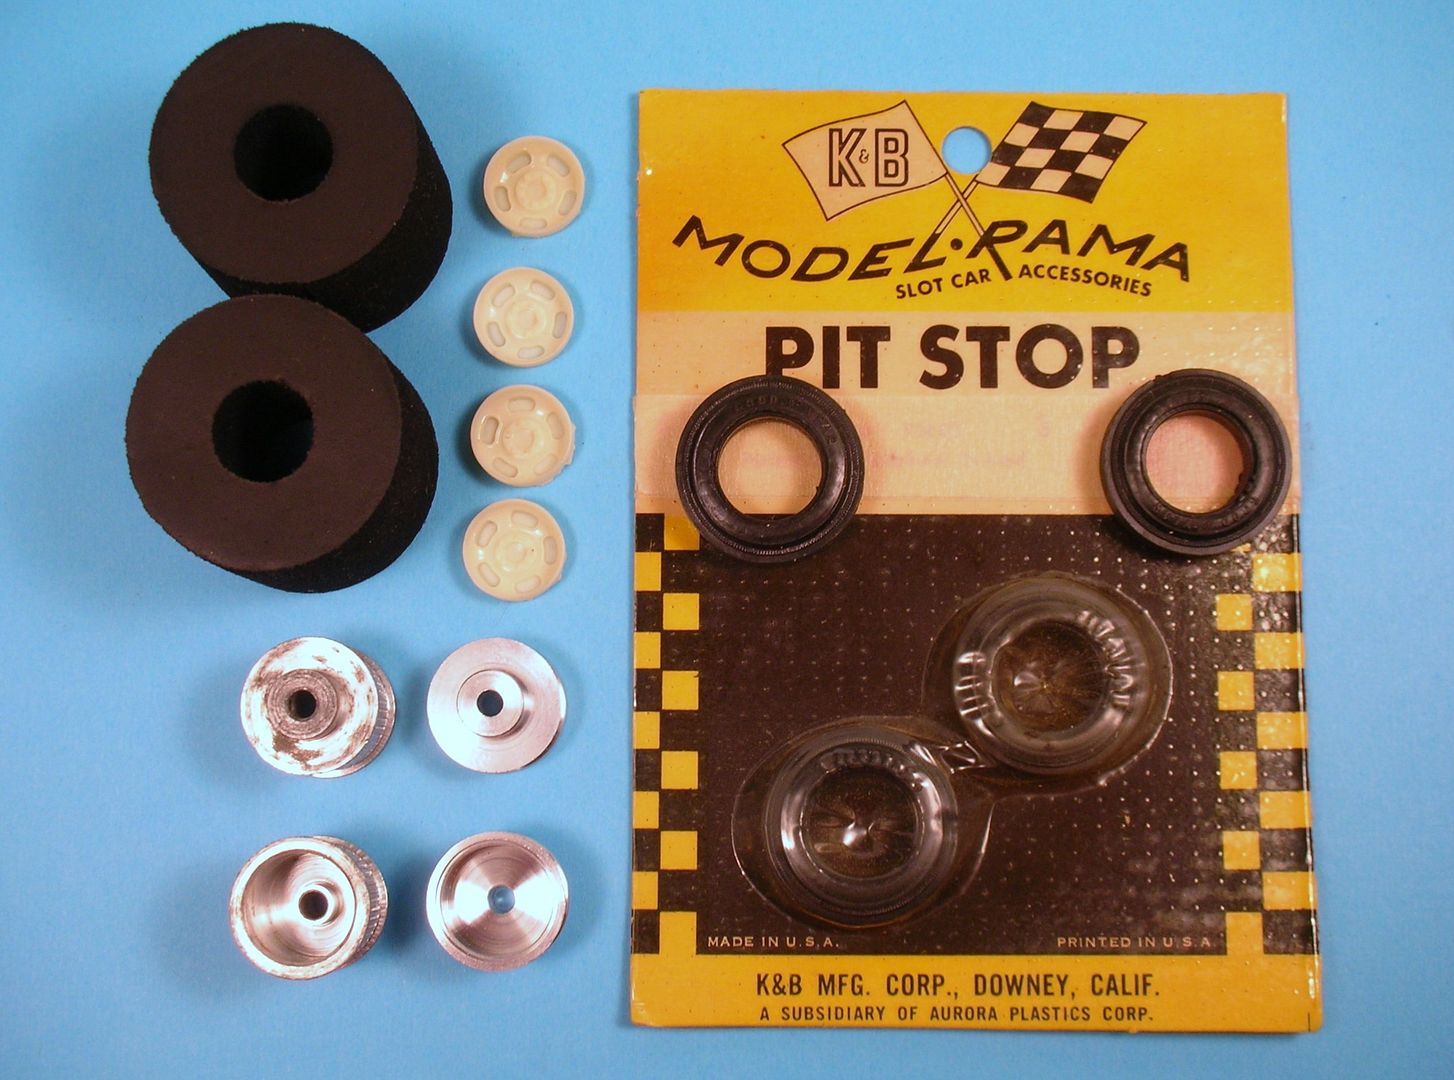
I'm using these vintage Weldun's for rear wheels:
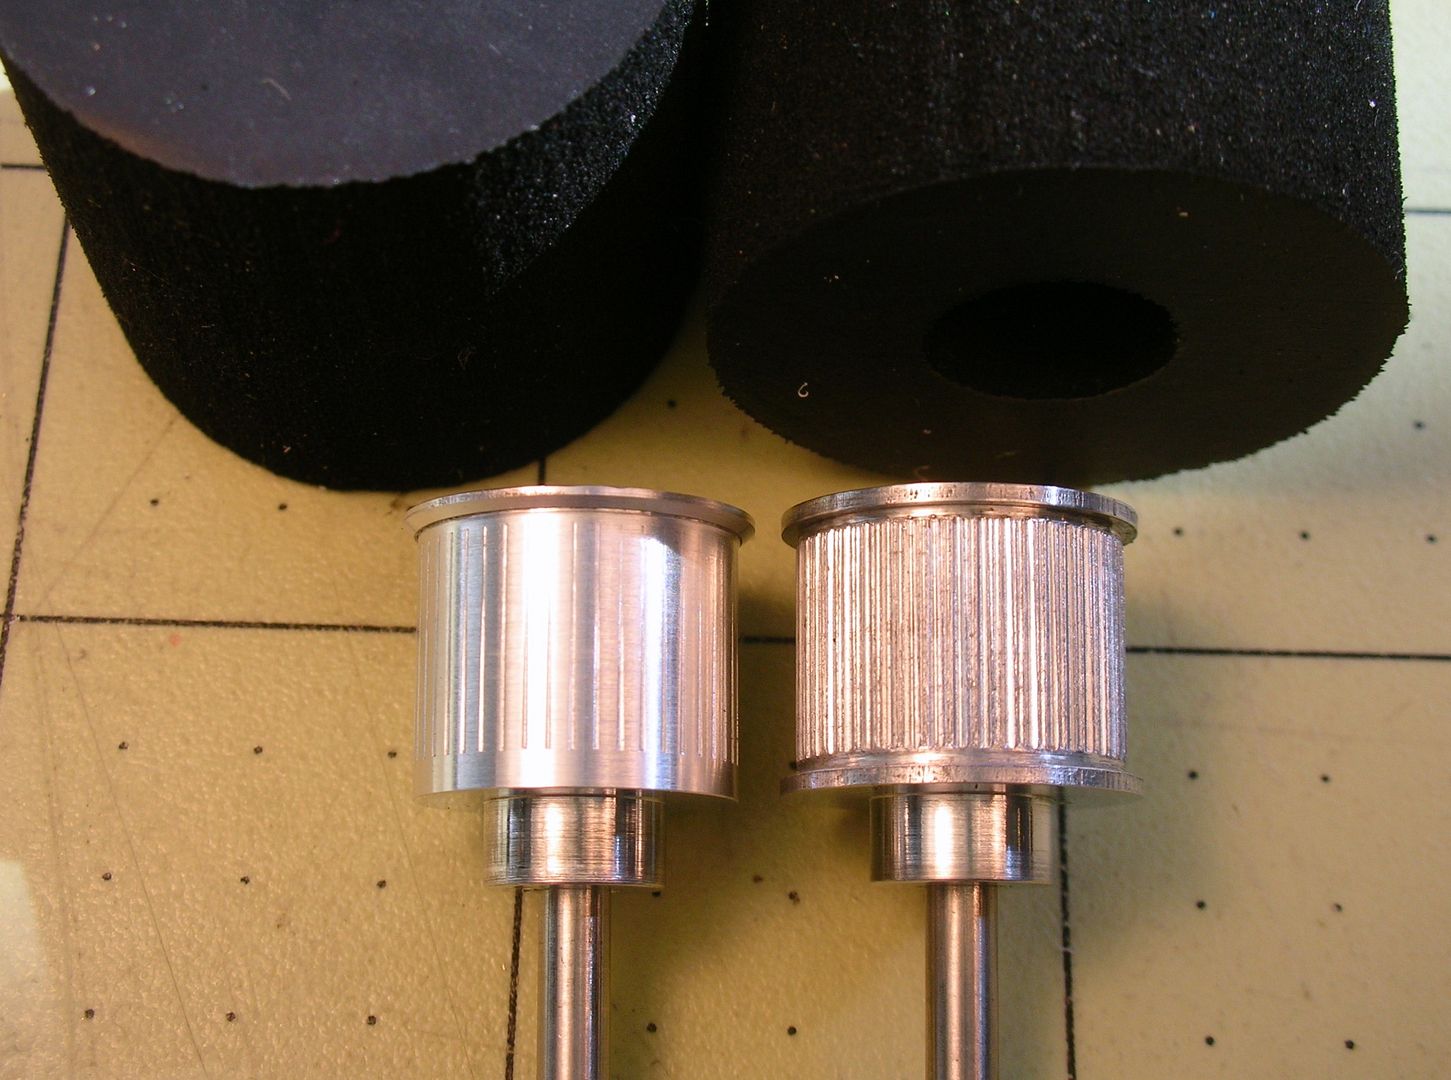
Below on the right is the stock wheel. On the left the modified wheel. The rear flange is removed as is most of the knurling and the front flange is thinned and chamfered:
The tires are mounted and trued front and rear. The rear wheel inserts needed a spacer made from styrene tubing to space them out "Korrectly":
Track testing time...................
- slotbaker, Samiam, Tim Wilkins and 1 other like this
Rick Thigpen
Check out Steve Okeefe's great web site at its new home here at Slotblog:
The Independent Scratchbuilder
There's much more to come...
#50
dc-65x
-
- Subscriber
-
- 7,018 posts Joined: 14-February 06
Grand Champion Poster
- Gender:Male
- Location:Captain Rick: The only vintage slot car nut in SW Oregon?
Posted 07 November 2016 - 06:09 PM
It runs! Seems pretty fast too
It's got great brakes too. I don't have my track heavily glued and the handling is tail out, power oversteer. Perhaps with more glue it would tend to roll but not here. I hope to have Rodney test it on a commercial track.
Now the hard part, at least for me........the body.
- Jairus, Slot_Grasshopper and Tim Wilkins like this
Rick Thigpen
Check out Steve Okeefe's great web site at its new home here at Slotblog:
The Independent Scratchbuilder
There's much more to come...


