

Dennis,
I laid the pans alongside the center section to check for width, and I'm 0.033" over. I know I can sand them down to fit, but how much extra should I take off? How much side to side movement should there be? Or is this a matter of the type of track I'm going to be running on? I always thought the smoother the track, the less movement required. And most tracks today ARE smooth, nothing like the cobbled up old American Oranges I ran on back in the 70s-80s.
Thank you again for sharing your expertise.

F1 chassis build
Started by
Mike Patterson
, Mar 31 2009 08:38 PM
106 replies to this topic
#26

Mike Patterson
-
- Subscriber
-

- 2,577 posts Joined: 14-October 07
Village Luddite
- Gender:Male
- Location:Zanesville, OH
Posted 15 April 2009 - 01:45 PM
I am not a doctor, but I played one as a child with the girl next door.
#27
gascarnut
-

- Full Member
-
- 3,938 posts Joined: 16-February 06
Posting Leader
- Gender:Male
- Location:Irvine, CA
Posted 15 April 2009 - 02:31 PM
Side to side, .020" or so is fine.
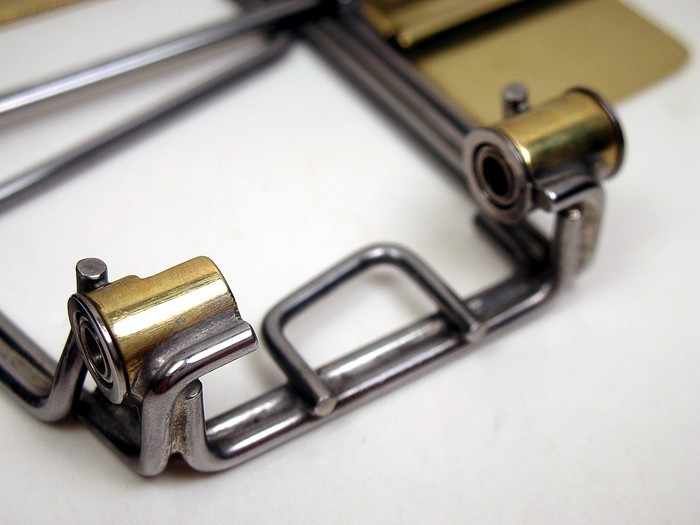
Fore and aft the movement on my frames is determined by how closely the wire "saddles" fit over the cross braces that hold the side pans together.
Vertically, I usually put a piece of .015" shim stock under the side pans between the cross brace attaching points while I am soldering the "saddles" in place. The rear of the pan will lift more than that once this is done, which is fine. If you leave too much lift, then the front end of the pan can dip below the nosepiece when the rear lifts up. If it gets too much, put a stop on them like on Noose's car in the pictures above.
#28
Mike Patterson
-
- Subscriber
-
- 2,577 posts Joined: 14-October 07
Village Luddite
- Gender:Male
- Location:Zanesville, OH
Posted 17 April 2009 - 09:22 PM
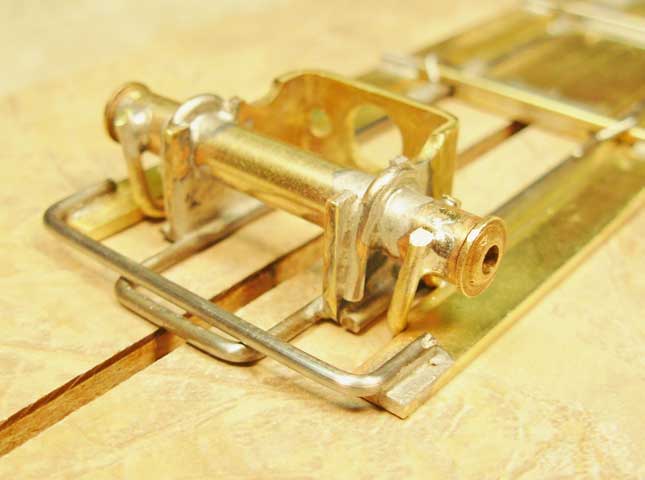
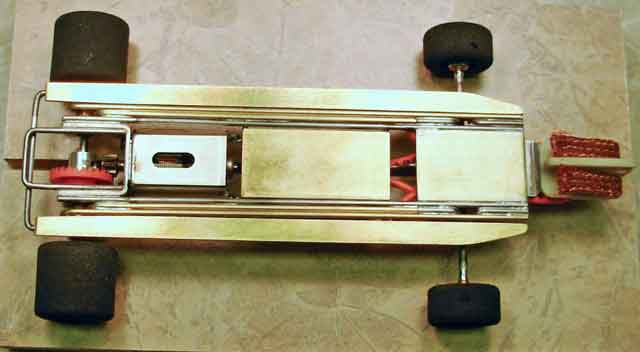
Well, I finally got my Samson copy F1 chassis 95% done. Due to my less than accurate construction techniques, my center section was slightly wedge shaped: 1.133" wide at the front, 1.158" wide in the rear. I debated whether or not to unsolder the brass main rails and start over, but I decided to grind the pans to fit. Bad decision. I should have redid the main rails. It's HARD to grind a shallow angle on 1/4" brass on a bench sander. Warm too.
I still have to cut the rear axle tube, and set the front axle at the correct height. And I might try to clean up my solder blobs. Here we are:
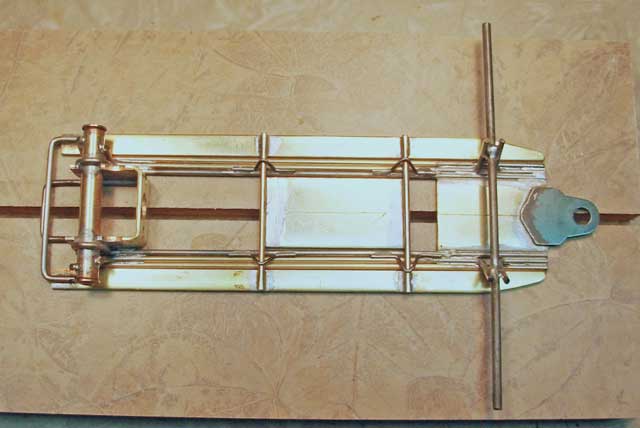

Dennis, I used the wire upstop method like you use, and the chassis seems really tight, hardly any movement whatsoever. Is this correct, or should I loosen it up some?
BTW, this has been THE hardest chassis I've ever attempted!
I still have to cut the rear axle tube, and set the front axle at the correct height. And I might try to clean up my solder blobs. Here we are:
Dennis, I used the wire upstop method like you use, and the chassis seems really tight, hardly any movement whatsoever. Is this correct, or should I loosen it up some?
BTW, this has been THE hardest chassis I've ever attempted!
I am not a doctor, but I played one as a child with the girl next door.
#29
One_Track_Mind
-

- Subscriber
-
- 2,966 posts Joined: 16-February 06
Posting Leader
- Gender:Male
- Location:Cleveland, OH
Posted 18 April 2009 - 03:44 AM
Hi Mike,
I would say you got it Right!
Nice job!...won't be long now before your running this one around the track.
I would say you got it Right!
Nice job!...won't be long now before your running this one around the track.
Slots-4-Ever
Brian McPherson
REM Raceway
"We didn't realize we were making memories, we just knew we were having FUN!"
#30
Tigwldr
-

- Full Member
-
- 217 posts Joined: 06-February 07
On The Lead Lap
- Gender:Male
- Location:G-Vegas, SC
Posted 18 April 2009 - 06:15 AM
Nice job....I think yours turned out a little nicer than mine did. I haven't been able to get pics of it yet but hopefully this weekend I can. I did the upstops also, I had to put a small bend in the wire so I would have the travel I wanted.
Johnny Hyatt - Pit Crew for My Son
Slow Poke Racing

Slow Poke Racing
#31
Mike Steube
-

- Full Member
-
- 875 posts Joined: 28-November 07
Race Leader
Posted 18 April 2009 - 09:33 AM
Nice building going on here. This chassis should be a winner. 
#32
Mike Patterson
-
- Subscriber
-
- 2,577 posts Joined: 14-October 07
Village Luddite
- Gender:Male
- Location:Zanesville, OH
Posted 18 April 2009 - 10:38 AM
I have found my binding problem. I need to remove the left pan and do a little more grinding at the rear. No rest for the weary  !
!
!
I am not a doctor, but I played one as a child with the girl next door.
#33
gascarnut
-
- Full Member
-
- 3,938 posts Joined: 16-February 06
Posting Leader
- Gender:Male
- Location:Irvine, CA
Posted 18 April 2009 - 11:03 AM
Mike,
Nice job!! Well done, that looks very good.
I have had the same problem on the first few I built too, don't worry! The later ones got better, as I concentrated more on measuring before soldering.
I don't even try to use a belt sander, I file the pans by hand. It takes a bit longer, but it is more accurate.
Glad you found the tight spot, the pans need to rattle quite freely. Take a look at the back where the outer brass rail bends up and out to support the axle tube - you might need to file a little groove in the pans to clear that rail.
Nice job!! Well done, that looks very good.
It's HARD to grind a shallow angle on 1/4" brass on a bench sander. Warm too.
I have had the same problem on the first few I built too, don't worry! The later ones got better, as I concentrated more on measuring before soldering.
I don't even try to use a belt sander, I file the pans by hand. It takes a bit longer, but it is more accurate.
Glad you found the tight spot, the pans need to rattle quite freely. Take a look at the back where the outer brass rail bends up and out to support the axle tube - you might need to file a little groove in the pans to clear that rail.
#34
Mike Patterson
-
- Subscriber
-
- 2,577 posts Joined: 14-October 07
Village Luddite
- Gender:Male
- Location:Zanesville, OH
Posted 18 April 2009 - 08:48 PM
I have had the same problem on the first few I built too, don't worry! The later ones got better, as I concentrated more on measuring before soldering.
Dennis, you have NO idea how good that makes me feel to hear you say that! I agree, I have to pay more attention to measurements and alignments.
Take a look at the back where the outer brass rail bends up and out to support the axle tube - you might need to file a little groove in the pans to clear that rail.
That's exactly the area where work needs to be done. I never thought about the angled axle bracing screwing things up. Something else I learned today.
To be honest, I'm sorely tempted to just start over, and try to correct the mistakes I made with this one. But then, I look at this one as a challenge: Can I make a silk purse out of a sow's ear?

And Mr. Mike Steube, thank you for the compliment, I really appreciate it.
I am not a doctor, but I played one as a child with the girl next door.
#35
Mike Patterson
-
- Subscriber
-
- 2,577 posts Joined: 14-October 07
Village Luddite
- Gender:Male
- Location:Zanesville, OH
Posted 19 April 2009 - 08:53 PM
I took my chassis apart today (which turned out not to be the PITA I figured it would), did some grinding and filing, and put it back together. SUCCESS! NOW I have some movement !
Dennis, due to the length of the rear axle tube (I made mine 1.5" long), have you, or anyone that you know of, also put bearings on the inside of the tubes, for better axle support? Or is this pretty much a non-issue with these low power motors?
!Dennis, due to the length of the rear axle tube (I made mine 1.5" long), have you, or anyone that you know of, also put bearings on the inside of the tubes, for better axle support? Or is this pretty much a non-issue with these low power motors?
I am not a doctor, but I played one as a child with the girl next door.
#36
gascarnut
-
- Full Member
-
- 3,938 posts Joined: 16-February 06
Posting Leader
- Gender:Male
- Location:Irvine, CA
Posted 20 April 2009 - 07:30 AM
Mike,
It's a non-issue with the low power motors and the pink gears. I would only use double bearings if they were ball bearings anyway, I would be too worried about extra friction if I was using bushings.
Don't be too hasty about building another one until you have run this one. Sometimes the first one is a charm.....
#37
GTPJoe
-

- Full Member
-
- 448 posts Joined: 26-July 07
On The Lead Lap
- Gender:Male
- Location:Manch-Vegas NH
Posted 20 April 2009 - 07:34 AM
HI Mike!
First, great chassis. Looks much better than my first attempt. I think this scratchbuilding thing is gonna grow on ya!!
Second, with a drill blank rear axle no need for inside bushings. The small amount of torque these motors have would not cause that much flex. BUT...it sure would be cool to do inner ones too. LOL!!
Did you ever see the pics of PdL's 3 bearing AW car??? That's right THREE!!
See ya!
Attached Images
GTP Joe Connolly
In theory there is no difference between theory and practice.
In practice there is.
#38
Mike Patterson
-
- Subscriber
-
- 2,577 posts Joined: 14-October 07
Village Luddite
- Gender:Male
- Location:Zanesville, OH
Posted 20 April 2009 - 09:54 AM
It's a non-issue with the low power motors and the pink gears. I would only use double bearings if they were ball bearings anyway, I would be too worried about extra friction if I was using bushings.
Dennis, I would only use ball bearings. The bushings shown in my chassis are strictly for construction purposes.
Did you ever see the pics of PdL's 3 bearing AW car??? That's right THREE!!
Joe, I saw pictures of that chassis BITD. And IIRC, PdL said the additional bearing wasn't worth the added hassle!
Another question: How do you bend your guide tongue? Before or after soldering? I usually bend mine after it's soldered on. I clamp the tongue in a vise, grasp the chassis with a suitably large pair of pliers, and bend. This is also a good test of how well the tongue is soldered
.
I am not a doctor, but I played one as a child with the girl next door.
#39
gascarnut
-
- Full Member
-
- 3,938 posts Joined: 16-February 06
Posting Leader
- Gender:Male
- Location:Irvine, CA
Posted 20 April 2009 - 10:53 AM
Another question: How do you bend your guide tongue? Before or after soldering?
Ooh, good question - this leads to the revelation of more tricks and secrets!

I always cut the nosepieces of my frames from K&S stock that is as wide as the LENGTH of the nosepiece I want. Meaning that for a 3/4" wide by 1" long nosepiece I will cut a 3/4" piece off a 1" wide strip, not a 1" long piece off a 3/4" wide strip. Now when you go to solder the nosepiece into the frame, orient it so the slightly rounded edges caused by the shearing of the strip are underneath, scroos the front and the rear of the nosepiece. Now when you solder the guide tongue to the nosepiece, if you apply pressure to the back of the guide tongue, pushing it down hard onto the brass, the front will lift up just slightly, as the brass is not entirely flat.
Take a close look at a strip of K&S brass and you will see what I'm talking about.
Otherwise, the best way to do this is to space the front of the guide tongue up about .010 while soldering it.
#40
Mike Patterson
-
- Subscriber
-
- 2,577 posts Joined: 14-October 07
Village Luddite
- Gender:Male
- Location:Zanesville, OH
Posted 20 April 2009 - 08:34 PM
Gee, Dennis, I never intended to pry into your setup secrets. All you had to say was "I usually space mine up about 0.010" when I solder it", and let me figure out hos to do it . But thank you for sharing some of your "Tricks".
Mike is racing F1s and CanAms at Tom Thumb this Saturday, and I'm gonna try to have this puppy done!
. But thank you for sharing some of your "Tricks".Mike is racing F1s and CanAms at Tom Thumb this Saturday, and I'm gonna try to have this puppy done!
I am not a doctor, but I played one as a child with the girl next door.
#41
gascarnut
-
- Full Member
-
- 3,938 posts Joined: 16-February 06
Posting Leader
- Gender:Male
- Location:Irvine, CA
Posted 21 April 2009 - 07:18 AM
Mike,
My comment was a compliment for the quality of the question. The best questions are always those that lead to more answer than you were expecting.
My comment was a compliment for the quality of the question. The best questions are always those that lead to more answer than you were expecting.
#42
Mike Patterson
-
- Subscriber
-
- 2,577 posts Joined: 14-October 07
Village Luddite
- Gender:Male
- Location:Zanesville, OH
Posted 22 April 2009 - 03:15 PM
Well, here it is, the moment you've all been waiting for, the latest in a short line of Team BOZO homemade chassis:
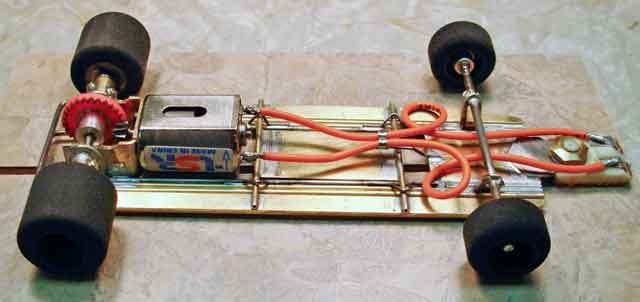
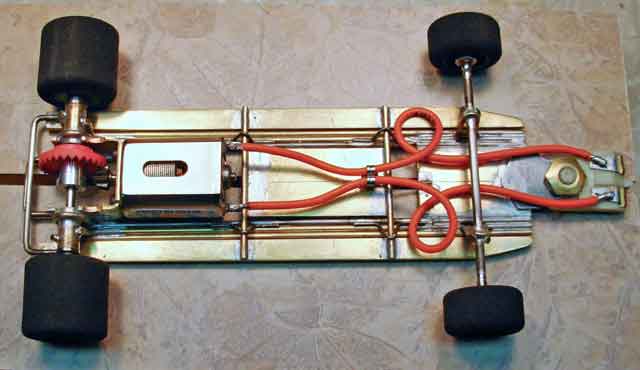
The chassis weighs 108.7 grams as shown. Judging by the picture of Jay Kisling's car at the R4, it will probably need a layer of lead .
Thank you again, Dennis, for all your help (and ideas).
Now I get to bug Noose about painting F1 bodies !
The chassis weighs 108.7 grams as shown. Judging by the picture of Jay Kisling's car at the R4, it will probably need a layer of lead
.Thank you again, Dennis, for all your help (and ideas).
Now I get to bug Noose about painting F1 bodies
!
I am not a doctor, but I played one as a child with the girl next door.
#43
tonyp
-

- Member at Peace
-
- 15,325 posts Joined: 12-February 07
Grand Champion Poster
- Gender:Male
- Location:Sanford, FL, land of lizards and big roaches
Posted 22 April 2009 - 03:17 PM
Mike looks great, I am sure it will jet.
Anthony 'Tonyp' Przybylowicz
5/28/50-12/20/21
Requiescat in Pace
#44
Noose
-

- IRRA National Director
-
- 23,320 posts Joined: 08-November 06
Grand Champion Poster
- Gender:Male
- Location:Denville, NJ
Posted 22 April 2009 - 03:19 PM
Now I get to bug Noose about painting F1 bodies
Vell foist you gets a brush and some paints.
Joe "Noose" Neumeister
Sometimes known as a serial despoiler of the clear purity of virgin Lexan bodies. Lexan is my canvas!
Noose Custom Painting - Since 1967
Chairman - IRRA® Body Committee - Roving IRRA® Tech Dude - "EVIL BUCKS Painter"
"Team Evil Bucks" Racer - 2016 Caribbean Retro Overall Champion
The only thing bad about Retro is admitting that you remember doing it originally.
#45
gascarnut
-
- Full Member
-
- 3,938 posts Joined: 16-February 06
Posting Leader
- Gender:Male
- Location:Irvine, CA
Posted 22 April 2009 - 04:01 PM
Very nicely done, Sir!
It's a very flattering compliment, thank you!
I especially like the neat way you have reinforced the axle tube mount at the rear, and the axle mounts at the front. I may just use that idea myself next time. Much easier than the wire wrapping I do now.
It's a very flattering compliment, thank you!
I especially like the neat way you have reinforced the axle tube mount at the rear, and the axle mounts at the front. I may just use that idea myself next time. Much easier than the wire wrapping I do now.
#46
One_Track_Mind
-
- Subscriber
-
- 2,966 posts Joined: 16-February 06
Posting Leader
- Gender:Male
- Location:Cleveland, OH
Posted 22 April 2009 - 04:59 PM
Hi Mike,
I was expecting to see the Samson Classic signature on the bottom!!
Good job!
I was expecting to see the Samson Classic signature on the bottom!!
Good job!
Slots-4-Ever
Brian McPherson
REM Raceway
"We didn't realize we were making memories, we just knew we were having FUN!"
#47
The Bugman
-

- Member at Peace
-
- 2,989 posts Joined: 22-May 07
a dearly-missed departed member
- Gender:Male
- Location:Harbor City, CA
Posted 22 April 2009 - 05:09 PM
onehelluva fine job mr patterson,,very impressive,i have a Samson F1 car,and its so sweet to drive,,im positive you'll be amazed how well they work,,(im taking building notes/ pics. from you too,,,lol)
KUDOS
KUDOS
Oscar Morales
8/16/49-9/18/13
Requiescat in Pace
8/16/49-9/18/13
Requiescat in Pace
#48
slotcarone
-

- Full Member
-
- 3,997 posts Joined: 23-January 07
Posting Leader
- Gender:Male
- Location:Dutchess County, NY
Posted 22 April 2009 - 05:47 PM
Beautiful build Mike!!!! Very Retro Retro in design!!!
Mike Katz
Scratchbuilts forever!!
#49
Mike Patterson
-
- Subscriber
-
- 2,577 posts Joined: 14-October 07
Village Luddite
- Gender:Male
- Location:Zanesville, OH
Posted 23 April 2009 - 08:49 PM
Guys, I appreciate the compliments, but all I did was copy someone else's design. And pretty blatantly too, I might add. I wish I could have added some originality, but if it ain't broke, why fix it? Kudos to Mr. Samson, who graciously shared some of his knowledge of what makes these little boogers work.
Noose, I gots sum paints and a 2" brush. I did whole body with one stroke ! You'll be proud!
Thanks again to all of you who tuned in. This has been fun.
Noose, I gots sum paints and a 2" brush. I did whole body with one stroke
! You'll be proud!Thanks again to all of you who tuned in. This has been fun.
I am not a doctor, but I played one as a child with the girl next door.
#50
Richie
-

- Full Member
-
- 827 posts Joined: 02-October 07
Race Leader
- Gender:Male
Posted 25 April 2009 - 10:52 AM
Mike,
GREAT looking chassis!!! You've inspired me to attempt one of these cars for my F1. I finished the basic frame and side pans, finishing the center weight tonight... Hopefully I can finally get some good quality pics up in the chassis gallery tomorrow! Very good work again! I have to sand the side pans as well... stnd. 1/4" wide pans put me at 1.655" wide, so lots of hand filing tonight or tomorrow to bring it to width rules!!! Thanks again!!
GREAT looking chassis!!! You've inspired me to attempt one of these cars for my F1. I finished the basic frame and side pans, finishing the center weight tonight... Hopefully I can finally get some good quality pics up in the chassis gallery tomorrow! Very good work again! I have to sand the side pans as well... stnd. 1/4" wide pans put me at 1.655" wide, so lots of hand filing tonight or tomorrow to bring it to width rules!!! Thanks again!!
Obsessed is the word the lazy use to describe the dedicated.
- Richie Austin


