Jump to content


Photo

Total Performance - first Cobra race car


  • Please log in to reply
50 replies to this topic

#1 dc-65x

dc-65x

    Grand Champion Poster

  • Subscriber
  • PipPipPipPipPipPipPipPip
  • 6,975 posts
  • Joined: 14-February 06
  • Gender:Male
  • Location:Captain Rick: The only vintage slot car nut in SW Oregon?

Posted 16 February 2014 - 07:25 PM

This is my first car built for the Total Performance theme.

TotalPerformancePost-6.jpg

Below is a link explaining this theme:

Total Performance Era


I'm building the first Cobra race car. It's a "slabside" 289 ci:


CobraPictures-3470x353.jpg


Here's an excerpt from Dave Friedman's "COBRA The Shelby American Original Archives 1962 - 1965":


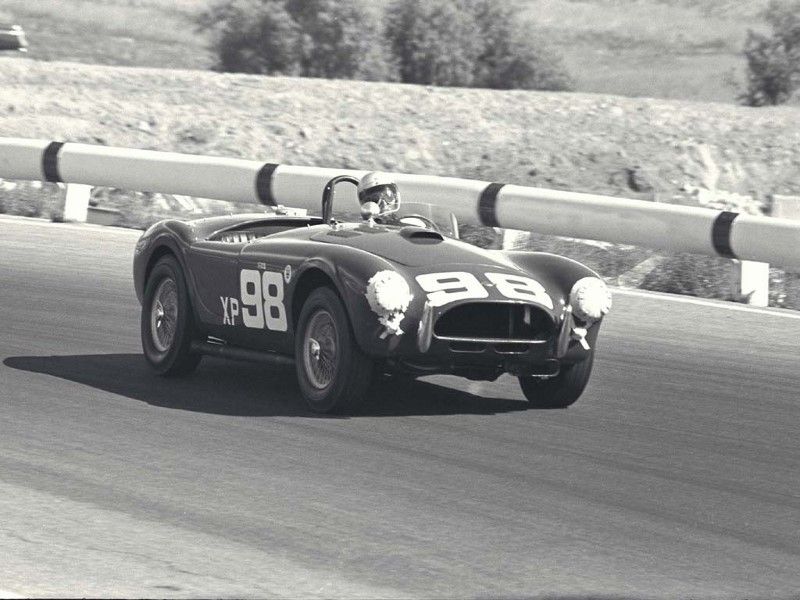
Our first race car made its debut at Riverside in October 1963 with Bill Krause driving. This race was a three-hour endurance that was run as a prelude to the famous Los Angeles Time Grand Prix. This race was also the debut of the Corvette Z06, and the Chevrolet guys came loaded for bear with drivers like Dave MacDonald, Bob Bondurant, Jerry Grand and Doug Hooper."


"The race was reasonably close at the beginning with Dave MacDonald's Corvette and Krause's Cobra Swapping position for the lead in the early laps. Soon, however, the Cobra Pulled away to a half-lap lead, only to have a wheel hub break and rob Shelby American of a victory in its premiere race."


After this first race it was total Cobra dominance:
 

CobraPicturespost-1.jpg


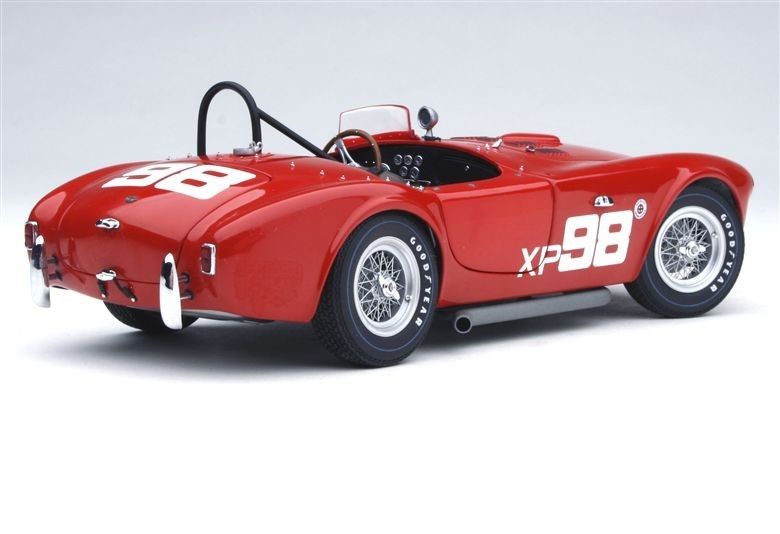
Here are some color pictures of the die cast model version:


CobraPictures-4617x386.jpg


I love this car! Slabside fenders, no flares, wire wheels and the little racing windscreen:
 

CobraPictures-9780x534.jpg


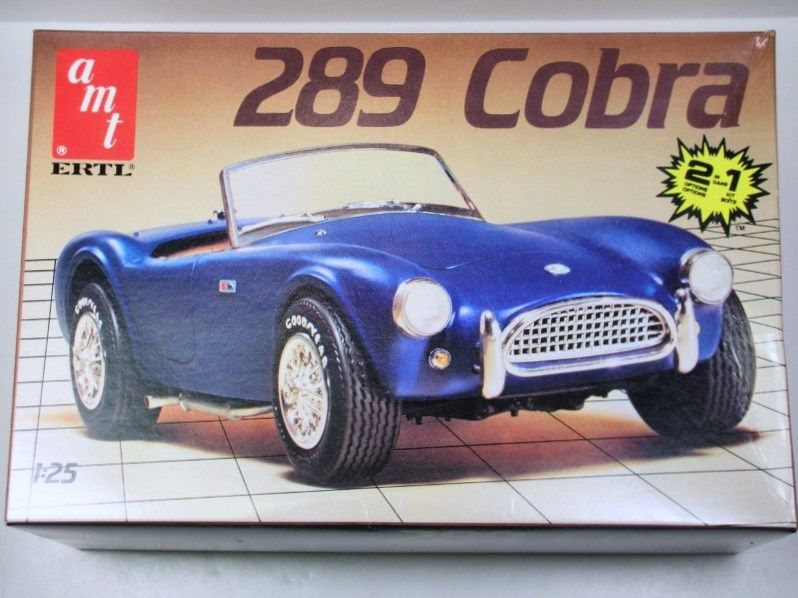
For my slot car version I found this vintage AMT model kit on eBay Buy It Now for $16:
 

CobraBuild-5.jpg


This car is SMALL with a super short nose (guide lead), 3 5/8" wheelbase and a width of only 2 7/16". :shok: At least it's pretty light at 20g including the body mount posts and brass screw inserts.


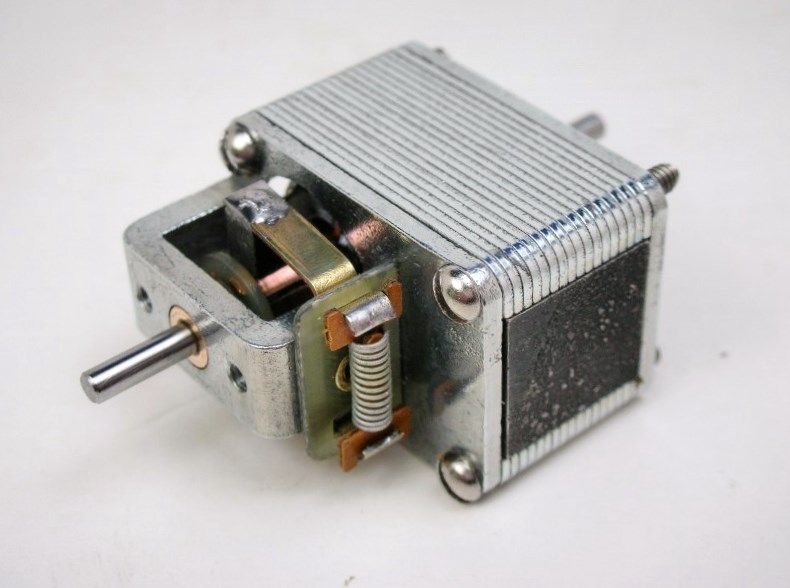
At first I wanted to do a RAM 850 or a Kemtron X503 but those motors were just too tall for the body. I ended up with one of my favorite vintage motors, the Pittman DC-65X or 6 volt.:


CobraBuild-4.jpg


For the chassis design I had in mind I needed to drill and tap 2-56 holes in both motor end-plates. The end-plates came off for the procedure:


CobraBuild-6.jpg


In hindsight, which is 20-20, I could have CAREFULLY drilled and tapped the holes with the motor together. Especially since the metal end-plates are not magnetic, I could have kept the drill chips out of the motor.


The motor's aren't complicated but sometimes it take some finessing to get them re-assembled so the arm spins freely. Perseverance prevailed and here's the drilled, tapped, buffed but otherwise stock motor:
 

CobraBuild-9.jpg


CobraBuild-8.jpg


I made up some Russkit 22 style motor mount plates.......it's going to be and inline. :D


chassis-30.jpg


Starting with the rear of the chassis I'm using big honk'n Speedway 3/8" ball bearings and K&B bearing housings for the rear axle:
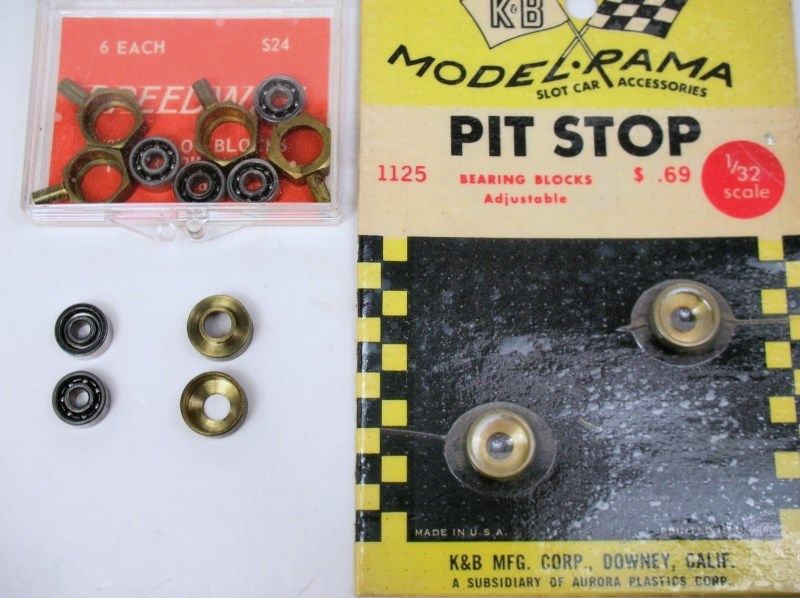
 

CobraBuild-10.jpg


1/2" X 1/32" brass strip was drilled for the housings..........
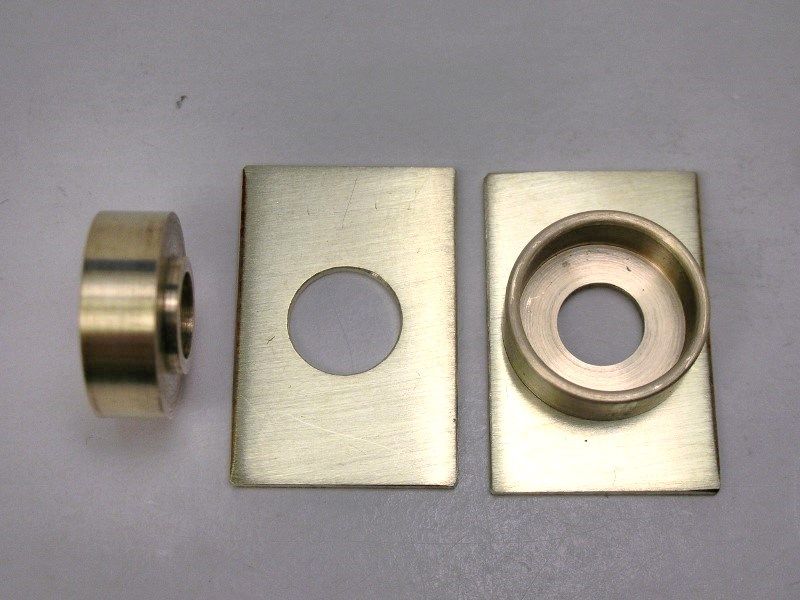
 

chassis-27.jpg


......and soldered to "pin tube" frame rails:
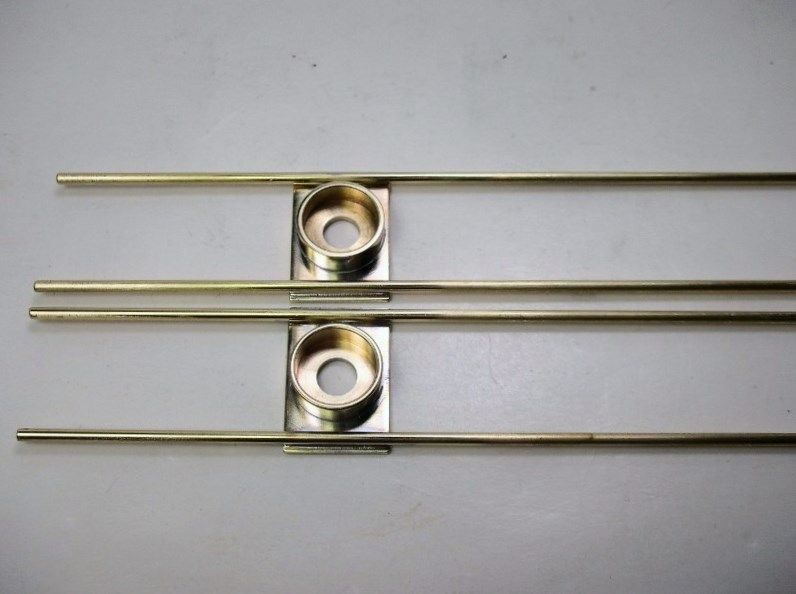
 

chassis-31.jpg


Next up, all this goes into my Rick's jig............


  • endbelldrive and Gator Bob like this

Rick Thigpen
Check out Steve Okeefe's great web site at its new home here at Slotblog:
The Independent Scratchbuilder
There's much more to come...


#2 slotbaker

slotbaker

    Dan Gurney Fan

  • Subscriber
  • PipPipPipPipPipPipPip
  • 2,694 posts
  • Joined: 16-February 06
  • Gender:Male
  • Location:Sydney, Australia.

Posted 16 February 2014 - 09:02 PM

Very cool, as per usual.

:popcorm1:


As a kid I read an article in one of the magazines of the day showing how to build a DC65 powered Cobra (sidewinder), but could never had the $s to by a motor.

Wish I could find that article now.... I've now got a motor for it.


Steve King


#3 dc-65x

dc-65x

    Grand Champion Poster

  • Subscriber
  • PipPipPipPipPipPipPipPip
  • 6,975 posts
  • Joined: 14-February 06
  • Gender:Male
  • Location:Captain Rick: The only vintage slot car nut in SW Oregon?

Posted 16 February 2014 - 09:40 PM

Thanks Steve.


I know of an R&C magazine article by Bob Braverman where he builds a 1/32 Cobra with a DC-65 sidewinder. Could that be the one???


Rick Thigpen
Check out Steve Okeefe's great web site at its new home here at Slotblog:
The Independent Scratchbuilder
There's much more to come...


#4 Gator Bob

Gator Bob

    Grand Champion Poster

  • Banned
  • PipPipPipPipPipPipPipPip
  • 13,391 posts
  • Joined: 12-April 11
  • Gender:Not Telling
  • Location:.

Posted 16 February 2014 - 09:57 PM

A Lenz 289 would be a cool motor too.


Posted Image
                            Bob Israelite

#5 slotbaker

slotbaker

    Dan Gurney Fan

  • Subscriber
  • PipPipPipPipPipPipPip
  • 2,694 posts
  • Joined: 16-February 06
  • Gender:Male
  • Location:Sydney, Australia.

Posted 16 February 2014 - 11:01 PM

Rick, That's possible, but I thought it was 24th... Twas a long time ago.
:)


Steve King


#6 Gator Bob

Gator Bob

    Grand Champion Poster

  • Banned
  • PipPipPipPipPipPipPipPip
  • 13,391 posts
  • Joined: 12-April 11
  • Gender:Not Telling
  • Location:.

Posted 16 February 2014 - 11:17 PM

Rick,

As usual you are raising (resetting) the bar in quality and perfection of one off builds. This one with your trade name for power. :good:


Posted Image
                            Bob Israelite

#7 SlotStox#53

SlotStox#53

    Posting Leader

  • Full Member
  • PipPipPipPipPipPipPip
  • 4,084 posts
  • Joined: 13-March 13
  • Gender:Male
  • Location:TX

Posted 16 February 2014 - 11:57 PM

This one is gonna be fun! :D Inline namesake motor....... :dance3:  Along with all the right vintage parts... Awesome.


Really obvious question regarding removing the endplates Rick, seeing as they're not magnetic you don't have to worry about having to zap the magnet to bring it back up? You only have to do that if you remove the armature I take it ...


#8 dc-65x

dc-65x

    Grand Champion Poster

  • Subscriber
  • PipPipPipPipPipPipPipPip
  • 6,975 posts
  • Joined: 14-February 06
  • Gender:Male
  • Location:Captain Rick: The only vintage slot car nut in SW Oregon?

Posted 17 February 2014 - 04:42 PM

I ended up taking the armature out but I left the laminations as arranged by the factory and the magnet installed.......hoping for an easier motor re-assembly. Even with the arm removed and reinstalled the motor still had a gauss reading in the high 200's when reassembled. I did a re-zap and the gauss reading jumped to the high 300's.


Back at my Rick's Jig, the chassis starts to take shape with the main rails, front and rear axles. The motor is covered in tape to keep the acid flux nasties off and the rear axle is aligned to the armature shaft with my custom alignment gizmo:


chassis-3.jpg


Here's the basic chassis before putting the "buff" to it:


chassis-6.jpg


Like some builders in the period magazines I tried to make the chassis like a full size race car's tube space frame:


chassis-5.jpg


Hopefully, it didn't end up looking like this instead :shok: :laugh2:


chassis-32.jpg


Here it is blinged out:


chassis-7.jpg


Front body mount:


chassis-11.jpg


Rear body mount - axle brace:


chassis-10.jpg


Drop arm hinge tubes:


chassis-8.jpg


Next up is the drop arm.........


  • endbelldrive, slotbaker and Jocke P like this

Rick Thigpen
Check out Steve Okeefe's great web site at its new home here at Slotblog:
The Independent Scratchbuilder
There's much more to come...


#9 SlotStox#53

SlotStox#53

    Posting Leader

  • Full Member
  • PipPipPipPipPipPipPip
  • 4,084 posts
  • Joined: 13-March 13
  • Gender:Male
  • Location:TX

Posted 17 February 2014 - 06:34 PM

Rezap to bring it up to full power... gotcha Rick :good: Thanks.. Loving the chassis !


#10 dc-65x

dc-65x

    Grand Champion Poster

  • Subscriber
  • PipPipPipPipPipPipPipPip
  • 6,975 posts
  • Joined: 14-February 06
  • Gender:Male
  • Location:Captain Rick: The only vintage slot car nut in SW Oregon?

Posted 18 February 2014 - 06:17 PM

My first inline DC-65X was built as a lightweight and it is pretty fast. It was fast enough and light enough to wheelie out of the slot exiting the bank at full tilt boogie on the Blue King. The resounding BAM into the dead man wall brought a hush over the raceway. :o


PittmanDC-65HSC-076.jpg


PittmanDC-65HSC-081.jpg


Note the drop arm of just 2 pieces of pin tube? The car was rebuilt with 1/8" thickness of lead on the drop arm:


PittmanDC-65HSC-087.jpg


So, for the new build I went heavyweight with 4 rails, lots of solder and 1/16" brass plate. The 3/32" pivot tube was tapped 1-64 for machine screw that secure it to the chassis:


chassis-13.jpg


The guide holder is a machined down Dynamic #315 "double groove bearing":


chassis-14.jpg


The drop arm installed:


chassis-15.jpg


The guide lead is only 7/16" and that was pushing the guide flag as far as possible but still keeping it "not visible in front of the body when viewed from the top":


chassis-17.jpg


Next the Cobra needed some big honk'n side pipes. While I was at it I decided I could add some extra weight down low with 1/8" brass rod with 5/32" aluminum slip on "pipes:"


chassis-19.jpg


5/32" tube to mount the side pipes down low:


chassis-20.jpg


The pipes on the chassis:


chassis-21.jpg


Time to assemble the "roller"........


  • endbelldrive, slotbaker and Jocke P like this

Rick Thigpen
Check out Steve Okeefe's great web site at its new home here at Slotblog:
The Independent Scratchbuilder
There's much more to come...


#11 SlotStox#53

SlotStox#53

    Posting Leader

  • Full Member
  • PipPipPipPipPipPipPip
  • 4,084 posts
  • Joined: 13-March 13
  • Gender:Male
  • Location:TX

Posted 18 February 2014 - 06:32 PM

Honking side pipes and a hefty drop arm, that should keep the Pittman motor from taco'ing itself like your lightweight racer did..

Chassis is coming along great Rick :D

#12 dc-65x

dc-65x

    Grand Champion Poster

  • Subscriber
  • PipPipPipPipPipPipPipPip
  • 6,975 posts
  • Joined: 14-February 06
  • Gender:Male
  • Location:Captain Rick: The only vintage slot car nut in SW Oregon?

Posted 19 February 2014 - 07:12 PM

Putting the all the pieces together: The loose tires are urethane K&B repops from Pauls Slot Car Shop of Canada:


CobraBuild-7.jpg


For wheel inserts I used some Monogram wheels from their Ferrari 275P model kit, Dynamic knock-offs and 5-40 set screws to attach the them together:


CobraRoller-.jpg


The Monogram wheels were turned down to 1/2" and drilled and tapped 5-40:


CobraBuild-.jpg


All the bits assembled together. The front wheels were modified to be "free wheeling":


CobraRoller-1.jpg


The guide is a Classic and the lead wires are Cox superflex controller fuse wires:


chassis-26.jpg


The finished roller:


CobraRoller-7.jpg


CobraRoller-6.jpg


CobraRoller-9.jpg


My Tamiya paint just showed up from Tower Hobbie............no more excuses not to paint the body.  :o  WAIT, here's one. It's too cold to paint. It will be sunny and warmer this weekend. I better wait. :laugh2:


  • endbelldrive, slotbaker and Jocke P like this

Rick Thigpen
Check out Steve Okeefe's great web site at its new home here at Slotblog:
The Independent Scratchbuilder
There's much more to come...


#13 slotbaker

slotbaker

    Dan Gurney Fan

  • Subscriber
  • PipPipPipPipPipPipPip
  • 2,694 posts
  • Joined: 16-February 06
  • Gender:Male
  • Location:Sydney, Australia.

Posted 20 February 2014 - 05:42 AM

WOW....

:wub:


Steve King


#14 dc-65x

dc-65x

    Grand Champion Poster

  • Subscriber
  • PipPipPipPipPipPipPipPip
  • 6,975 posts
  • Joined: 14-February 06
  • Gender:Male
  • Location:Captain Rick: The only vintage slot car nut in SW Oregon?

Posted 20 February 2014 - 07:19 PM

Thanks Steve :)


To mount the body I used some 1/4" X 1/4" styrene, unknown vintage 4-40 brass body mount gizmos, Revell 4-40 brass screws and some itty bitty 4-40 set screws to use as stops for the Revell screws. The screws bottom out on the little setscrews so the body can "rattle fit" the chassis:


chassis-18.jpg


All of the above is screwed to the chassis and a bead of JB Weld metal filled epoxy is lathered onto the top of the plastic pieces. The body is set on the chassis and when the epoxy cures a fillet of epoxy was applied to reinforce the mounts. It's a bit ugly but will look fine when it's all painted:


CobraBody-.jpg


It's also really strong :D


Time for a test drive :dance3:


cobrabody2.jpg


cobrabody3.jpg


  • slotbaker likes this

Rick Thigpen
Check out Steve Okeefe's great web site at its new home here at Slotblog:
The Independent Scratchbuilder
There's much more to come...


#15 Alchemist

Alchemist

    Posting Leader

  • Full Member
  • PipPipPipPipPipPipPip
  • 2,696 posts
  • Joined: 11-November 09
  • Gender:Male
  • Location:Far, far away

Posted 20 February 2014 - 09:04 PM

Hi Rick!


Hope all is well!  What a gorgeous piece of work - as usual!


Knowing you have to travel far to get to your local track - LOL -  How did the test drive go please?


Ernie


Ernie Layacan

#16 dc-65x

dc-65x

    Grand Champion Poster

  • Subscriber
  • PipPipPipPipPipPipPipPip
  • 6,975 posts
  • Joined: 14-February 06
  • Gender:Male
  • Location:Captain Rick: The only vintage slot car nut in SW Oregon?

Posted 20 February 2014 - 10:30 PM

Hi Ernie,


When I first put it on the track, "it looked pretty canine to me" :o


The motor sounded great on the power supply and the rear axle would spin forever like it was a perpetual motion machine. The bevel gears had a bit of back lash so they weren't set up too tightly but the car ran like a dog. :dash2:


I lifted the rear wheels of the track, gave the car full power and it just sounded terrible. Low RPM's and lots of gear noise. I double checked the gear free play and it was OK. As I was pondering this terrible noise, all of a sudden picked up a bit of speed. Hmmmmmmmmmm........I thought, "it's a Pittman and it probably won't blow up if I keep it wide open a bit longer". Then another increase in speed and decrease in gear noise. :wacko2:


I kept this up until the car sounded like it should. Now the car had the speed of my other inline 65X and the gears sounded fine. I've used lapping compound to smooth out gears before but never a "full RPM, no lube, free wheeling blast". :laugh2:


Anyway, the car now has good speed and it even handles great. The handling was a pleasant surprise since the car is so short and skinny. I'm really happy! :dance3:


  • endbelldrive and slotbaker like this

Rick Thigpen
Check out Steve Okeefe's great web site at its new home here at Slotblog:
The Independent Scratchbuilder
There's much more to come...


#17 Jairus

Jairus

    Body Painter Extraordinaire

  • Subscriber
  • PipPipPipPipPipPipPipPip
  • 10,174 posts
  • Joined: 16-February 06
  • Gender:Male
  • Location:Salem, OR

Posted 21 February 2014 - 01:39 AM

Takes time to wear them in. Or... work them in.
Either way, the car looks great.
Good luck painting that beasty.

I've got two hard body cars here that I'm painting soon as I can find the time.


Jairus H Watson - Artist
Need something painted, soldered, carved, or killed? - jairuswtsn@aol.com

www.slotcarsmag.com

www.jairuswatson.net
http://www.ratholecustoms.com
Check out some of the cool stuff on my Fotki!


#18 dc-65x

dc-65x

    Grand Champion Poster

  • Subscriber
  • PipPipPipPipPipPipPipPip
  • 6,975 posts
  • Joined: 14-February 06
  • Gender:Male
  • Location:Captain Rick: The only vintage slot car nut in SW Oregon?

Posted 21 February 2014 - 11:35 AM


Good luck painting that beasty.


Thanks Jairus, I'll need it. :o I'm going rattle can on this one.......we'll see.


Rick Thigpen
Check out Steve Okeefe's great web site at its new home here at Slotblog:
The Independent Scratchbuilder
There's much more to come...


#19 Mark H

Mark H

    Race Leader

  • Full Member
  • PipPipPipPipPip
  • 591 posts
  • Joined: 02-September 09
  • Gender:Male
  • Location:SoCal

Posted 22 February 2014 - 12:16 PM

that looks great! i must say that looks like a real 1:1 car sitting there even unfinished.


Mark Haas

#20 dc-65x

dc-65x

    Grand Champion Poster

  • Subscriber
  • PipPipPipPipPipPipPipPip
  • 6,975 posts
  • Joined: 14-February 06
  • Gender:Male
  • Location:Captain Rick: The only vintage slot car nut in SW Oregon?

Posted 23 February 2014 - 05:18 PM

Thanks Mark!


Good luck painting that beasty.


I got it primed and painted a beautiful Tamiya Bright Mica Red but............I ran out of luck Jairus. Just when I thought I'd nailed it I see a run in the left rear fender. :dash2: You can just see it in this picture about half way up. :o


cobrabody1.jpg


I don't know about sanding it out and polishing. I fear I'll just make it worse. :wacko2:  Maybe I should just slap a decal on it. :laugh2:


I really struggle with these "hardbody" builds. Give me a vac body like this one any day. :dance3:


Lotus19Special179.jpg


Rick Thigpen
Check out Steve Okeefe's great web site at its new home here at Slotblog:
The Independent Scratchbuilder
There's much more to come...


#21 Jairus

Jairus

    Body Painter Extraordinaire

  • Subscriber
  • PipPipPipPipPipPipPipPip
  • 10,174 posts
  • Joined: 16-February 06
  • Gender:Male
  • Location:Salem, OR

Posted 23 February 2014 - 05:23 PM

If it's still wet,  you can sometimes take a flat brush and pull the sag out. 
Wet sanding is always an option later. But wait till MUCH later!
Then hit the thing with a clear coat after the decals are applied.


Or... as you suggest. Put a decal on the sag. That works too.


Jairus H Watson - Artist
Need something painted, soldered, carved, or killed? - jairuswtsn@aol.com

www.slotcarsmag.com

www.jairuswatson.net
http://www.ratholecustoms.com
Check out some of the cool stuff on my Fotki!


#22 dc-65x

dc-65x

    Grand Champion Poster

  • Subscriber
  • PipPipPipPipPipPipPipPip
  • 6,975 posts
  • Joined: 14-February 06
  • Gender:Male
  • Location:Captain Rick: The only vintage slot car nut in SW Oregon?

Posted 23 February 2014 - 05:44 PM

Hi Jairus,


Clear coat after sanding, hmmmmm......


The decals are Pattos that will be coated with Testors Clear Laquer before being applied.


What clear coat would you recommend over the paint and decals?


Rick Thigpen
Check out Steve Okeefe's great web site at its new home here at Slotblog:
The Independent Scratchbuilder
There's much more to come...


#23 Jairus

Jairus

    Body Painter Extraordinaire

  • Subscriber
  • PipPipPipPipPipPipPipPip
  • 10,174 posts
  • Joined: 16-February 06
  • Gender:Male
  • Location:Salem, OR

Posted 23 February 2014 - 09:25 PM

There are many options.
I gave you my phone number a while back. 
Still willing to talk.

J


Jairus H Watson - Artist
Need something painted, soldered, carved, or killed? - jairuswtsn@aol.com

www.slotcarsmag.com

www.jairuswatson.net
http://www.ratholecustoms.com
Check out some of the cool stuff on my Fotki!


#24 dc-65x

dc-65x

    Grand Champion Poster

  • Subscriber
  • PipPipPipPipPipPipPipPip
  • 6,975 posts
  • Joined: 14-February 06
  • Gender:Male
  • Location:Captain Rick: The only vintage slot car nut in SW Oregon?

Posted 23 February 2014 - 09:37 PM

Thanks for your offer of help. I thought it would be nice to share your expertise with not only me but our fellow Slotblogers.


Rick Thigpen
Check out Steve Okeefe's great web site at its new home here at Slotblog:
The Independent Scratchbuilder
There's much more to come...


#25 Jairus

Jairus

    Body Painter Extraordinaire

  • Subscriber
  • PipPipPipPipPipPipPipPip
  • 10,174 posts
  • Joined: 16-February 06
  • Gender:Male
  • Location:Salem, OR

Posted 23 February 2014 - 10:08 PM

Okay:

#1 There is a polishing kit that contains cloth backed sanding squares from 600 to 10,000 grit plus a bottle of polishing compound that makes Maguiar's look like tooth paste.

The original in the hobby was called "Millennium 2000". That is off the market unfortunately. 
Today the best that can be had is this.
 

#2 You could lightly wet sand the fender and take down the sag with 600 to 1000 grit. Then after the decals are applied, lightly spray a coat of Testors Glosscote rattle can.
Not too much or the decals will react and lift.

30 minutes later spray another light coat.

30 minutes later spray a medium coat and don't worry too much about the orange peel effect.
30 minutes later shoot a heavier coat and let it sit over night.
Next day I hog on the last of the paint in a couple coats about an hour apart. Then let it sit a week or more to cure.
If you get a drip or sag.... go to #1.
If it works... you are in like Flynn!

That's what I do.

#3 Involves buying industrial clear-coat that requires a hardener mixed in.  Any unused paint has to be tossed. The total cost of the paint (quarts usually) could match the cost of the total project, but... it works really well and all plastic has to be totally sealed to prevent reaction.


Jairus H Watson - Artist
Need something painted, soldered, carved, or killed? - jairuswtsn@aol.com

www.slotcarsmag.com

www.jairuswatson.net
http://www.ratholecustoms.com
Check out some of the cool stuff on my Fotki!


Electric Dreams Online Shop