Jump to content


Photo

New Kurtis proxy car built by Pablo


  • Please log in to reply
74 replies to this topic

#1 Pablo

Pablo

    Builder

  • Administrator
  • PipPipPipPipPipPipPipPip
  • 18,437 posts
  • Joined: 20-February 06
  • Gender:Male
  • Location:Cleveland, Tennessee

Posted 08 October 2014 - 02:30 PM

No, there isn't a new Kurtis car proxy round coming up (yet, anyway) so don't get too excited.


Jaak (I like to tease and call him Jaaaaaak  :)) from France has been asking nicely for help to improve his game from the start. 

His finishes were not great, but he has a good attitude and wants to learn. Some people have worked on his car a little bit here and there to improve it, like Manta Ray in Chicago. It needs more than that, so I volunteered to receive his car before it returns home to fully critique it and offer my suggestions on improvements.


I did a complete post-race teardown and found some things that keep it from reaching its potential. I think I opened Jaak's mind, especially being sensitive to weight up high and chassis flex. 


I decided the best way to back up some of the things I taught him was not changing his chassis, but starting over from scratch. So even though the series is over at present, he will see my work up close in person when I send it to him. My plan is to build a chassis even better than my own #12 Dean Van Lines car, and show Jaaaaaak here everything step by step. I didn't want to cannibalize parts from Jaak's chassis, so some new parts are on order.


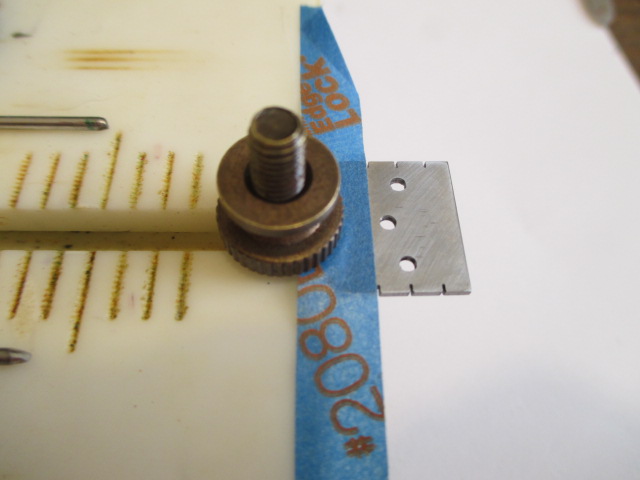
Let's build a race car, Jaak. For now, I can begin prepping some parts. Your flag was the wrong type (cut down), so I swapped it even-steven for a brand new (standard thickness) flag. I ran it through the Cahoza threader a little at a time, cleaning the cut thread pieces as I went, ending up all the way to the hilt.


IMG_2218.JPG


Then I faced the nut and the flag.


IMG_2221.JPG


Trimmed the post a little (not too much, Pablo !!! :dash2:) then re-cut the first couple threads with the facing tool.


IMG_2223.JPG


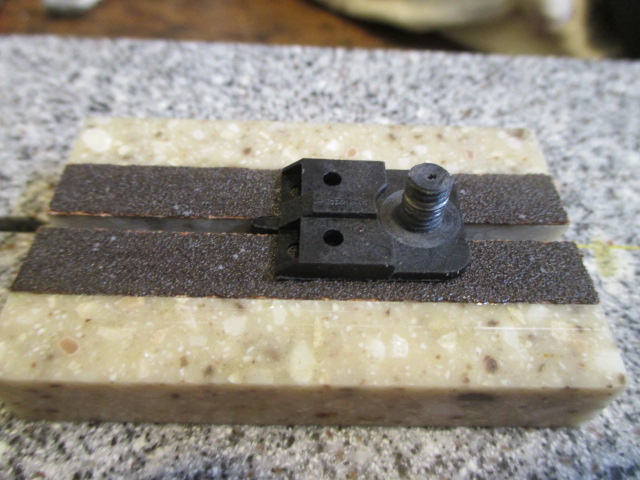
Sanded the braid decks flat


IMG_2227.JPG


IMG_2224.JPG


Flag is done. Two 10 thou steel spacers - one will go under the tongue, the other will be over it. That way if you need another spacer during a lane change, no need to go to the pits to get a spacer - it's right there ready to go. John Clow taught me that.  :D


IMG_2225.JPG


Onward! :dance3:


  • Jaak and James Fetherolf like this

Paul Wolcott


#2 Gator Bob

Gator Bob

    Grand Champion Poster

  • Banned
  • PipPipPipPipPipPipPipPip
  • 13,391 posts
  • Joined: 12-April 11
  • Gender:Not Telling
  • Location:.

Posted 08 October 2014 - 02:36 PM

True 'guidance' for Jaak. :good:


Posted Image
                            Bob Israelite

#3 Jaak

Jaak

    Jaak Beentjes - JaakWorks

  • Full Member
  • PipPipPipPipPip
  • 797 posts
  • Joined: 07-November 07
  • Gender:Male
  • Location:France, Boëge... 20KM from Geneva (I am Dutch)

Posted 08 October 2014 - 05:15 PM

Thanks, Pablo. Much appreciated. Looking forward to the lessons. :good:


Jaak Beentjes


Sig1_zps24552ee9.jpg
THINGIEPHILE REBEL EXTRAORDINAIRE
JaakWorks Website


#4 Pablo

Pablo

    Builder

  • Administrator
  • PipPipPipPipPipPipPipPip
  • 18,437 posts
  • Joined: 20-February 06
  • Gender:Male
  • Location:Cleveland, Tennessee

Posted 10 October 2014 - 01:58 AM

Backing up for a moment, this is how we "pin" a guide flag, a la cheater Wells:

IMG_2250.JPG

IMG_2284.JPG


.047 piano wire piece goes down below the deck and partially into the blade.

If somebody shears off a flag post in a crashfest race, it won't be this one :aggressive:  :laugh2: 


  • Jaak likes this

Paul Wolcott


#5 Jaak

Jaak

    Jaak Beentjes - JaakWorks

  • Full Member
  • PipPipPipPipPip
  • 797 posts
  • Joined: 07-November 07
  • Gender:Male
  • Location:France, Boëge... 20KM from Geneva (I am Dutch)

Posted 10 October 2014 - 02:01 AM

Never realized there could be so much improvement on just the guide!

Thanks for sharing Pablo :victory:


Jaak Beentjes


Sig1_zps24552ee9.jpg
THINGIEPHILE REBEL EXTRAORDINAIRE
JaakWorks Website


#6 Pablo

Pablo

    Builder

  • Administrator
  • PipPipPipPipPipPipPipPip
  • 18,437 posts
  • Joined: 20-February 06
  • Gender:Male
  • Location:Cleveland, Tennessee

Posted 10 October 2014 - 08:20 AM

The goal is to spend as much time as possible perfecting each and every single part before it becomes part of the racecar.

The DNF I suffered in Florida was a rare event for me.  Don't bank on seeing that happen very often, Bunky :bomb: :crazy:  


Paul Wolcott


#7 CoastalAngler1

CoastalAngler1

    Outlaw Racer

  • Full Member
  • PipPipPipPipPipPip
  • 1,299 posts
  • Joined: 03-May 14
  • Gender:Not Telling
  • Location:Quit Wishin Go Fishin

Posted 11 October 2014 - 11:38 AM

:king:


"Flag was the wrong type (cut down), so I swapped it even-steven for a brand new (standard thickness) flag."


How do you choose the flag? What kind are good?  


Charlie McCullough

Charlie's Speed Shop

Kelly Racing Wanna Be


#8 Gator Bob

Gator Bob

    Grand Champion Poster

  • Banned
  • PipPipPipPipPipPipPipPip
  • 13,391 posts
  • Joined: 12-April 11
  • Gender:Not Telling
  • Location:.

Posted 11 October 2014 - 01:09 PM

Me!? Only use a cut-down where you 'have to,' like on flush(ish) braid tracks with stamped steel cars.


Posted Image
                            Bob Israelite

#9 Bill from NH

Bill from NH

    Age scrubs away speed!

  • Full Member
  • PipPipPipPipPipPipPipPip
  • 14,700 posts
  • Joined: 02-August 07
  • Gender:Male
  • Location:New Boston, NH

Posted 11 October 2014 - 02:23 PM

Use a cut-down flag on any chassis that doesn't have to have a minimum front clearance and the front wheels don't have to touch. Stamped steel and others.


:)  


Bill Fernald
 
I intend to live forever!  So far, so good.  :laugh2:  :laugh2: 

#10 Pablo

Pablo

    Builder

  • Administrator
  • PipPipPipPipPipPipPipPip
  • 18,437 posts
  • Joined: 20-February 06
  • Gender:Male
  • Location:Cleveland, Tennessee

Posted 11 October 2014 - 08:58 PM

"Flag was the wrong type (cut down), so I swapped it even-steven for a brand new (standard thickness) flag."


How do you choose the flag? What kind are good?  

Simple answer, Charlie, this is a proxy race car, the flag is mandated by the rules.

Jaak's car arrived here with the wrong flag - a Parma "The Blade" 70223 (cut down type) - technically it was illegal - the rules for this series call for a Parma "The Blade" 70222 standard thickness flag (non-cut down).  At some point in time between Chicago, Germany, and Florida his flag was changed to a cut down because the front of the chassis was way too high.  It's a very minor issue and obviously Jaak wasn't trying to gain any performance by it.


My favorite flag is the Parma Blade, both cut down and non-cut down. NOT the white ones-those are for rental cars.  The reason they call them "cut down" is stupid in my opinion and I'm not even going to explain it.  When somebody says "cut-down" they mean .032 deck thickness.  When they say "non-cut down" they mean .063 deck thickness.  :) End of story


  • Jaak and James Fetherolf like this

Paul Wolcott


#11 Bill from NH

Bill from NH

    Age scrubs away speed!

  • Full Member
  • PipPipPipPipPipPipPipPip
  • 14,700 posts
  • Joined: 02-August 07
  • Gender:Male
  • Location:New Boston, NH

Posted 11 October 2014 - 10:08 PM

Just to add, the deck thicknesses mentioned by Pablo in the post above, is only the area around the guide post where the guide tongue fits, not the complete top of the guide.  Just how they make cut-down guides, I don't actually know. But I'd think they use a specially made steel cutter or grinding stone.


I like the maroon & white nylon versions of the Parma Blade. I boil both before use. Black ones are stronger & don't seem to need the boiling.


Bill Fernald
 
I intend to live forever!  So far, so good.  :laugh2:  :laugh2: 

#12 Pablo

Pablo

    Builder

  • Administrator
  • PipPipPipPipPipPipPipPip
  • 18,437 posts
  • Joined: 20-February 06
  • Gender:Male
  • Location:Cleveland, Tennessee

Posted 11 October 2014 - 10:26 PM

The only reason I boil anything is to eat it, or dye it a different color :laugh2:  You keep boiling yours, I'll keep pinning mine :laugh2:


  • Jaak likes this

Paul Wolcott


#13 Bill from NH

Bill from NH

    Age scrubs away speed!

  • Full Member
  • PipPipPipPipPipPipPipPip
  • 14,700 posts
  • Joined: 02-August 07
  • Gender:Male
  • Location:New Boston, NH

Posted 11 October 2014 - 10:35 PM

If you ever had a guide break in an area other than the post, you'd boil & pin them. :sarcastic_hand:


Bill Fernald
 
I intend to live forever!  So far, so good.  :laugh2:  :laugh2: 

#14 Pablo

Pablo

    Builder

  • Administrator
  • PipPipPipPipPipPipPipPip
  • 18,437 posts
  • Joined: 20-February 06
  • Gender:Male
  • Location:Cleveland, Tennessee

Posted 12 October 2014 - 02:44 AM

Jaak, your new Kurtis car is going to use body clips. On a skinny car like this, it just makes sense. There is a trick to using them, you will figure it out soon enough. A body clip man can remove and replace a body before a pin tube guy even blinks. If you set them up using my method, they will never fail.


Stock JK 2" body clip:

IMG_2288.JPG


Modified clip.  The front bend is relaxed about 35 degrees and both ends are sharpened a little:

IMG_2287.JPG


Nothing in the Kurtis rules prohibits us from trimming excess fat, so I removed some plastic from Dave Crevie's masterpiece driver assembly.  I'm sure he approves - I carved away a huge amount of the worst race car weight there is - high up, and useless. The driver figure needs to go on a diet. 

IMG_2302.JPG


After his diet:

IMG_2321.JPG


Now she looks like this:

IMG_2315.JPG


And your race car just dropped a bunch of high up weight.


  • Jaak likes this

Paul Wolcott


#15 Pablo

Pablo

    Builder

  • Administrator
  • PipPipPipPipPipPipPipPip
  • 18,437 posts
  • Joined: 20-February 06
  • Gender:Male
  • Location:Cleveland, Tennessee

Posted 12 October 2014 - 06:06 PM

Jaaaaak, are you out there ? :)

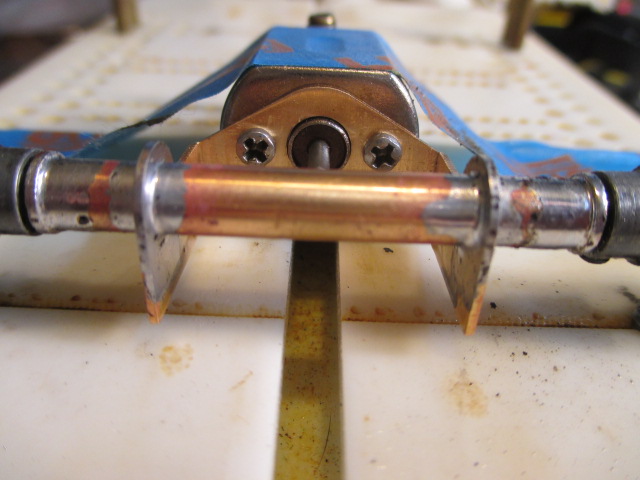
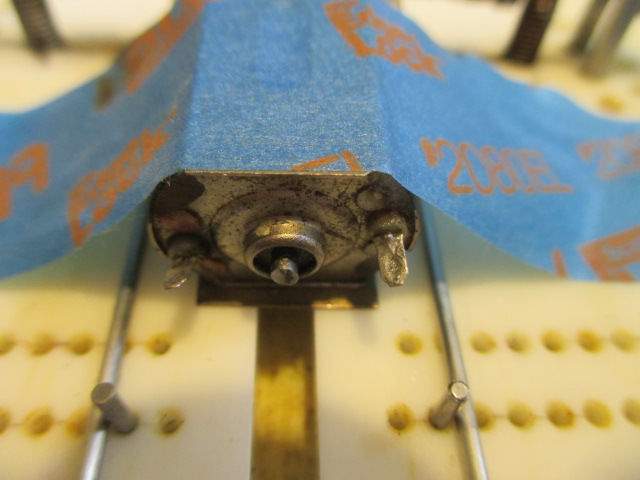
JK motor brackets are always close to being perfect, so it didn't take much work to get it there.  I tweaked it a little and now it's (almost) perfectly flat, straight, and true with 90 degree angle bends.  The tool I use to check stuff is an X-ACTO Precision Edge Square.  Jaak, I said "almost perfect" because Greg Wells taught me this:  "nothing is perfectly straight, but rather there are varying degrees of straightness".  Did I say that right, Greg ?  :crazy:  I also faced the bracket front surface as flat and true as possible using my 10" Disc Sander then I layed a (wet) sheet of 400 grit wet/dry automotive sandpaper on a flat surface and sanded all surfaces including the 3 sided bottom edge.  Unfortunately, the bottom is going to be a mile up in the air anyway so it was fun, but wasted effort  :laugh2:  I took care to ensure the motor face was true because if it's not, when you tighten your motor screws some things are going to become distorted - not good, Bunky. It could bind up your arm shaft or stress your motor box and you'd never know why the car just plain sucks no matter what you do.  Once the bracket has been perfected, it is aligned in every way before tacking the 1.594" axle tube and oilites home.  There will be enough room for two Slick 7 .022 thick spacers on each side - that way the needle oiler can get in there.

IMG_2349.JPG


Last time I built a Kurtis car, I used the only tool I had available that was perfect size OD for jig wheels - a pair of .900" vintage wheels - set the axle then got 'em out of there and cleaned 'em up real quick.  Not a kosher way to do business - but sometimes in the heat of the battle ya just gotta use what works

IMG_2327.JPG


This time I tried a different approach, screwing studs into the threaded holes on the Rick's jig and making the bottom of the axle exactly .3875" up off the jig surface. This will give me .050 clearance using 1.000" OD rear wheels (I hope).  Jaak, you don't want to know how much time it took me to make sure and triple check this was all correct before I plugged in the Ungar :)

IMG_2330.JPG

IMG_2339.JPG


(don't worry, Jaak, that's not your new Falcon 2 motor :laugh2: )


  • Jaak likes this

Paul Wolcott


#16 Pablo

Pablo

    Builder

  • Administrator
  • PipPipPipPipPipPipPipPip
  • 18,437 posts
  • Joined: 20-February 06
  • Gender:Male
  • Location:Cleveland, Tennessee

Posted 12 October 2014 - 10:28 PM

At this point, Sir Jaak, I'm pretty sure everything is where I want it, so I slathered the joints in acid one by one and and let the Ungar iron do it's thing:

IMG_2352.JPG


By the way, there is a 16 thou brass piece under the front edge of the Falcon jig motor.....When Noose inspects your car, you best be on your best behavior :)


  • Jaak likes this

Paul Wolcott


#17 Jaak

Jaak

    Jaak Beentjes - JaakWorks

  • Full Member
  • PipPipPipPipPip
  • 797 posts
  • Joined: 07-November 07
  • Gender:Male
  • Location:France, Boëge... 20KM from Geneva (I am Dutch)

Posted 13 October 2014 - 08:33 AM

Heya Pablo, I was busy racing this weekend.

Thanks for trimming the weight of the driver Maestro Pablo he looks a lot better, yes it's a he. :hi: 

Also an interesting way to assure clearance is proper, not something I can do on my Jig though (Retro Pro)


Following with great interest  :good: 


Jaak Beentjes


Sig1_zps24552ee9.jpg
THINGIEPHILE REBEL EXTRAORDINAIRE
JaakWorks Website


#18 Pablo

Pablo

    Builder

  • Administrator
  • PipPipPipPipPipPipPipPip
  • 18,437 posts
  • Joined: 20-February 06
  • Gender:Male
  • Location:Cleveland, Tennessee

Posted 13 October 2014 - 03:02 PM

Cool, Jaak. 

I didn't put the brass piece under the motor to make the car clear - everything should clear .050 with it sitting right on the deck.

It was just an extra precaution to guarantee the front edge would not end up even a hair below the level of the chassis.


I don't understand why you can't get the clearance you want with your jig. Let's address that issue when you have time.


Front axle in place, the center is .45 above the deck, same as the rear.  Guide lead is about .245, same as my first car. 

Front .063 chunk is 1" by 0.6" and backagra was narrowed to 1.36" so as not to interfere with the movement of the body.

Rails are going to be single .063 wire.  The rear 90 degree bend goes right up above the rear axle tube, flush with the bracket sides, to strengthen it.

IMG_2356.JPG


  • Jaak likes this

Paul Wolcott


#19 Bill from NH

Bill from NH

    Age scrubs away speed!

  • Full Member
  • PipPipPipPipPipPipPipPip
  • 14,700 posts
  • Joined: 02-August 07
  • Gender:Male
  • Location:New Boston, NH

Posted 13 October 2014 - 04:27 PM

I don't understand why you can't get the clearance you want with your jig. Let's address that issue when you have time.


I think here, Jaak is referring to the four (2 front, 2 rear) axle leveling screws in an RGEO jig. I believe he has SCD & Backtrack chassis jigs, neither of which have those screws.They may be an item unique to later RGEO jigs only. I may be old school, but I like jig wheels better. :)


  • Jaak likes this
Bill Fernald
 
I intend to live forever!  So far, so good.  :laugh2:  :laugh2: 

#20 Pablo

Pablo

    Builder

  • Administrator
  • PipPipPipPipPipPipPipPip
  • 18,437 posts
  • Joined: 20-February 06
  • Gender:Male
  • Location:Cleveland, Tennessee

Posted 13 October 2014 - 04:59 PM

Oh, now I understand, thanks Bill. Jig wheels would be a thousand times easier that this method, believe me.

But I don't own any .900 OD jig wheels in both 1/8 and 3/32 :laugh2:

And I don't plan on making a lot of Kurtis cars, either :o


  • Jaak likes this

Paul Wolcott


#21 Pablo

Pablo

    Builder

  • Administrator
  • PipPipPipPipPipPipPipPip
  • 18,437 posts
  • Joined: 20-February 06
  • Gender:Male
  • Location:Cleveland, Tennessee

Posted 14 October 2014 - 12:35 AM

Rails 101:  Tack solder first, then double check for perfection before finalizing the joints:

Rail uprights flush to bracket and axle tubes ? check.

IMG_2367.JPG

Left rear rail flat on deck and snug against the alignment pin ? check.

IMG_2376.JPG

Right rear on deck and snug ? check.

IMG_2378.JPG

Both rails flat on deck up front ? check.

IMG_2383.JPG

Front axle adjustment screws in perfect alignment ? check.

IMG_2392.JPG

Front brass chunk centered, flat, straight, flatter side down, and positioned perfectly ? check.

IMG_2396.JPG

Jig motor perfectly centered, straight, and flat on deck ? check.

IMG_2402.JPG


My cars "get beaten" regularly in races all over the world by great builders who don't sweat small details like I do, Jaak. Precision is just my personal choice, nothing more.  After you watch the Steube video, you'll understand.  Nobody can judge or predict which concepts and techniques will work for you.  I look forward to seeing you win a proxy round soon, Jaak.  Besting some of the world's most competitive slot car builders in a proxy event is something just a few people on this planet have ever done.  But when it happens, well, let's just say, you will know when you get there. :)


  • Jaak likes this

Paul Wolcott


#22 Jaak

Jaak

    Jaak Beentjes - JaakWorks

  • Full Member
  • PipPipPipPipPip
  • 797 posts
  • Joined: 07-November 07
  • Gender:Male
  • Location:France, Boëge... 20KM from Geneva (I am Dutch)

Posted 14 October 2014 - 12:56 PM

It is not if but when  :sun_bespectacled: 

Bill was completely correct in his explanation. I have a SCD 1/32 and a Retro Pro chassis Jig and recently acquired a Honey Comb jewelers Jig.


Totally forgot about the DVD will shoot Keith a mail again and ask him to send it to you.

I am with you on the precision Pablo, only thing different it takes more effort to reach precision but that is a matter of time and practice.

Thank you for doing the effort to photograph each step of your checks and the accompanied explanations, this helps a lot.
It may seem as totally obvious but many things do in hindsight.

You know what they say "Hindsight has clear vision"


Jaak Beentjes


Sig1_zps24552ee9.jpg
THINGIEPHILE REBEL EXTRAORDINAIRE
JaakWorks Website


#23 Pablo

Pablo

    Builder

  • Administrator
  • PipPipPipPipPipPipPipPip
  • 18,437 posts
  • Joined: 20-February 06
  • Gender:Male
  • Location:Cleveland, Tennessee

Posted 15 October 2014 - 01:04 PM

As it turns out, a Chicagoland .040 brackagra can slip completely underneath the bracket face with a couple thou to spare.

So, I soldered on a piece of 1/8 brass angle a hair narrower than the inside of the bracket, about 1/16 in back of the front edge.

I'll solder the angle up against the inside face, connecting brackagra to bracket. This way the brackagra is able to sit at ground zero.

I'll also solder pieces of angle from brackagra up the bracket sides.

IMG_2409.JPG


Brackagra is secured to rails and bracket, and everything is braced for heavy battle.  Joints here are merely tacked, rough and ugly until I can get it out of the jig and re-solder everything that needs it.  Jersey John says you can never overbrace :D although I'm well aware my rear ends are way overbuilt :aggressive: Jaak, I'm showing you this ugly bracket work because Idon't want anything flexing in my motor box area.  I'm also willing to spend extra effort to ensure nothing ever breaks.  Even if it did, redundancy in the design will allow the car to continue instead of failing. 


The wire pieces with goofy bends are .063 which connect the rails to the bracket, brace the bracket sides and axle tube.

It's bigger wire than it needs to be, but by being same size as the rails it creates a perfect nest for a pair of .047 braces that do triple duty by securing brackagra, rails, bracket, and axle tubes.  Simple "L" braces strengthen the insides of the tubes, bracket sides, and top of the bracket face.  I know it looks sloppy right now, but that will soon change  :D

IMG_2450.JPG


  • Jaak likes this

Paul Wolcott


#24 Pablo

Pablo

    Builder

  • Administrator
  • PipPipPipPipPipPipPipPip
  • 18,437 posts
  • Joined: 20-February 06
  • Gender:Male
  • Location:Cleveland, Tennessee

Posted 15 October 2014 - 09:22 PM

Chicagoland .040 steel tongue, shortened to .74".  Hole filed out just a little for free rotation of the flag post.  All surfaces (including edges) wet sanded.  Flat, true, square, tinned, and centerlines scribed on both sides for perfect alignment.

IMG_2458.JPG

IMG_2477.JPG


  • Jaak likes this

Paul Wolcott


#25 Jaak

Jaak

    Jaak Beentjes - JaakWorks

  • Full Member
  • PipPipPipPipPip
  • 797 posts
  • Joined: 07-November 07
  • Gender:Male
  • Location:France, Boëge... 20KM from Geneva (I am Dutch)

Posted 16 October 2014 - 03:06 AM

Heya Pablo,


Thank you for the next installment, is the Bracket face the side where the motor is attached? and what is a Backagra?

Nice amount of bracing you got going there at the back, I like the idea of scribing the centerlines.
Will do this from now on, I did mine by eyes only. (as everything else on the car)

I am losing you on what you mean here:

As it turns out, a Chicagoland .040 brackagra can slip completely underneath the bracket face with a couple thou to spare.

So, I soldered on a piece of 1/8 brass angle a hair narrower than the inside of the bracket, about 1/16 in back of the front edge.

I'll solder the angle up against the inside face, connecting brackagra to bracket. This way the brackagra is able to sit at ground zero.

I'll also solder pieces of angle from brackagra up the bracket sides.

Jaak


Jaak Beentjes


Sig1_zps24552ee9.jpg
THINGIEPHILE REBEL EXTRAORDINAIRE
JaakWorks Website


Electric Dreams Online Shop